Sabrina is a Lifestyle, Parenting and Product Review Blogger. A Writer, Photographer, Reviewer, Home Cook, Crafter & Nature Enthusiast. You will find a bit of all those categories here on Severn Wishes Blog, Welcome to Sabrina's Lifestyle Blogging & Honest Reviews.
Welcome to Sweet Treats Week on Severn Wishes. This half term I wanted to share my top 5 baking treats with you all, hopefully you’ve got some time this week to make them with me! Check out my Instagram for more food pictures and recipe ideas too!
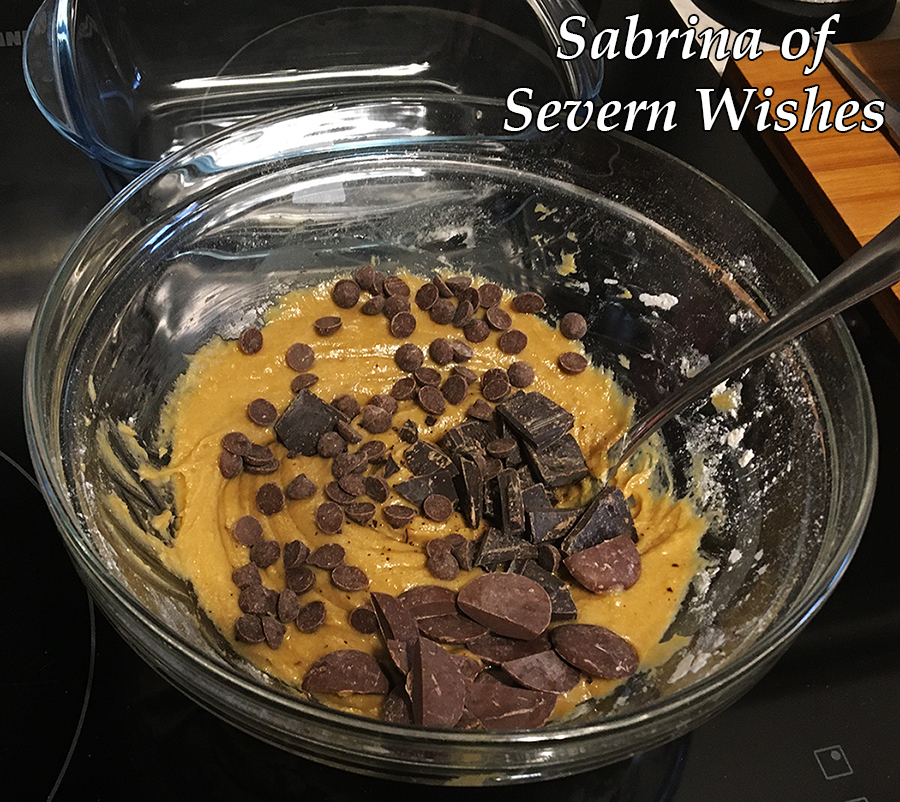
Day 3 is Sabrina’s No Bake Needed Rocky Road
Definitely one that the kids can get involved in, and this tray bake requires zero baking! You just need an adult to do some melting and chopping! This recipe will make 24 delicious squares of Rocky Road and you can do a custom set of ingredients to suit your family too!
Start by gathering all of your favourite things and a giant bowl to mix them! You’ll need chocolate for melting which will be the glue to hold all of the other ingredients together! You also need a deep tray to squash it all down into before you refrigerate it too!
The best thing about Rocky Road is that it’s totally customisable to your family and you can’t really get it wrong! Plus it’s fun for everyone! There’s only one danger with Rocky Road! Just don’t go eating all the singular ingredients while you’re making it!
I love to put things in mine you don’t usually find in a supermarket style tray bake, sometimes you find Nuts and I don’t put any of those in, some also contain fruit, which is a personal preference to whether or not you add this in. I will outline all the measurements below, and you can make your selection of your favourites.
Step 6.
What You Will Need
A Large Mixing Bowl – the bigger the better! A Wooden Spoon or Two A Saucepan (to do the melting part) A Spatula A Sharp Knife Tea Towel and Rolling Pin (Or something to smash the biscuits with) Baking Parchment to line your tray A Large Tray that will still fit in your Fridge minimum of 1.5 inches deep
Ingredients
Mini Marshmallows 50g to 60g Maltesers or Honeycomb Shards 50g to 60g White Chocolate Chips 30g to 40g Biscuits 150-200 grams (You can use a mixture of biscuits like I do, Digestive, Shortbread and Ginger are my faves, Ginger give a nice taste!) ☆ Milk Chocolate (for the melting) 250 grams Dark Chocolate (for the melting) 120 grams Butter (for the melting) 140 grams Golden Syrup (for the melting) 4 tablespoons
Additional Ingredients to Personalise your version of Rocky Road
Your “Special Ingredient” can be anything, between January and April I tend to use Mini Eggs or other Easter related Mini Chocolate Eggs etc. I just cut some of them up for going inside the bake. Other things that go well and add colour are Smarties, Aero Bubbles anything that sort of size etc.
Use around 70g to 100g of your chosen ingredient and remember to save around 30g of it for the topping!
You can also add any of the following things that all go brilliantly with this type of non-bake recipe – Cherries / Cranberries / Nuts / Raisins etc…
You will need 50 grams of your chosen one/s and make sure you then increase the depth of your tray by half an inch / 2 cm if you decide to include more than one of these ingredients. You could also choose to remove say, the white chocolate from my main list, and add in Raisins instead, just keep the ratio the same…
The customization is all down to you and your family! Go crazy! Have fun!
Method
1. Measure out and then Crush the Biscuits into mixed bite size pieces and add them to a large bowl.
2. Next, gather all your additional ingredients as outlined above, measured correctly and add these to your large bowl. The aim is to then mix all these dry ingredients together so they are evenly distributed.
3. Melt the Milk and Dark Choc with the Syrup and Butter until Smooth. Set 150ml of this melted chocolate mixture to one side in a jug to cool a little (you need this for the top of the mixture).
4. Add your melted mixture from the saucepan to your large bowl, coating all of the dry ingredients, keep mixing it quickly but carefully. You need to cover all of them in a light chocolate covering before it cools down too much.
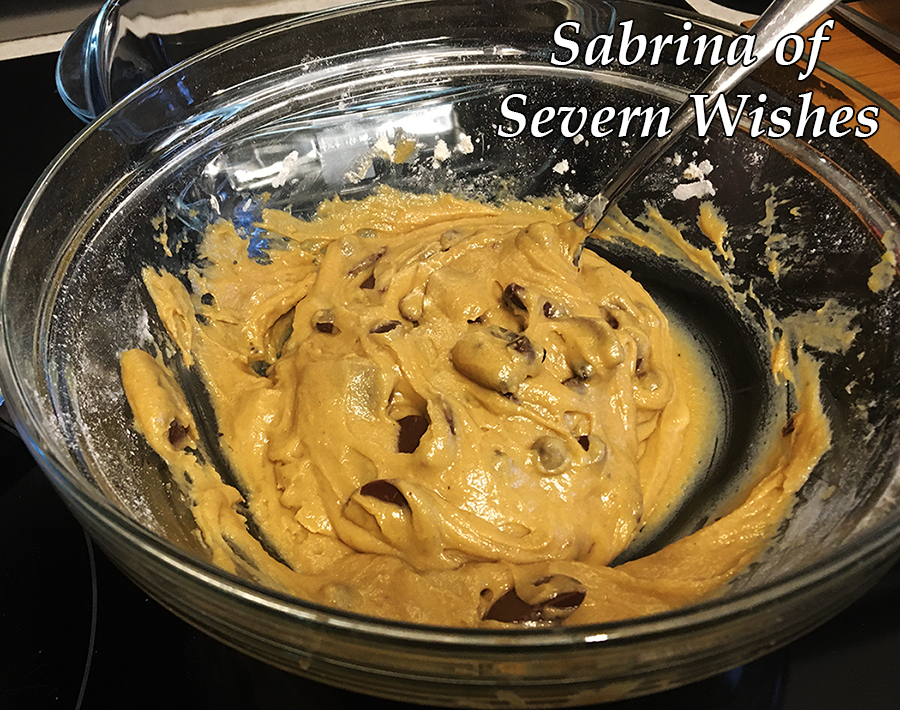
Step 5.
5. Transfer from the bowl to the tray making sure the parchment is already lined inside it and smooth the rocky road out as flat as possible, push it down gently using a wooden spoon. Then pour the remaining melted chocolate (from the jug) over the mixture and smooth that all over the top with a spoon or a spatula, you need to try and coat most of the mix if not all of it, TOP TIP don’t forget to coat up to the corners!
6. Finally add your chosen Chocolate Decorations like Mini Eggs. Push them down a little so that they stick to the melted chocolate. Score the pieces of size you want to cut once it’s solid, using a knife (adult part only). Then put the whole tray in the fridge to set for a couple of hours.
7. To serve it, gently remove the paper from the baking tray, lay flat and cut the Rocky Road where you scored into it earlier, do this using a knife that has been run under hot water (another adult only part). Remember to put the pieces into a seal-able tin or tub afterwards to make sure it stays fresh. Once set and cut you just store it at room temperature, for the best results eat it within 3 days.
Step 2.
Thanks very much for joining me for this recipe on Sweet Treats Week! I do hope to see you here again tomorrow! See my social media for some videos while I am baking these as well! Including versions and what I use to make my bakes dairy free too!
If you make any of my recipes be sure to tag me on social media, leave me a comment here on my blog. Any questions about a recipe please don’t hesitate to ask them! If you recreate this recipe somewhere else please credit me for it and name me and my blog, or even better link back to this original post too! Thanks everyone!
Welcome to Sweet Treats Week on Severn Wishes. This half term I wanted to share my top 5 baking treats with you all, hopefully you’ve got some time this week to make them with me! Check out my Instagram for more food pictures and recipe ideas too!
Finished Cookie Dough, Yummy!
Day 2 is Sabrina’s Warm and Gooey Cookie Dough Recipe.
This fantastically easy recipe is great if you want a hot desert ready in under an hour. It’s egg free too! I make mine with a dairy free butter and use dairy free chocolates. But you don’t have to if you prefer the real thing. This warm desert is best served about thirty minutes after it’s finished baking, cooled off a little bit but while it’s still warm and gooey. Great on its own or you can pair it with a nice vanilla or coconut ice cream for example.
What You Will Need
A Glass Dish measuring approximately 12cm x 17cm / 5″ x 7″ and preferably with a lid for easy storage after its cooled down! A Large Mixing Bowl A Wooden Spoon A Sieve
Ingredients
150g Plain Flour 115g Butter (Dairy Free Spread) 110g Light Brown Sugar Water (Per Tablespoon – See Method) 1 Tablespoon of Vanilla Chocolate Chips or Chunks (As many as you like but a nice ratio between dough and chocolate) I used around 60g of dairy free chocolate chips.
Additional Information: This sized portion will make 4 portions when transferred into pudding bowls. This is a rich desert and you can divide it up into 8 portions if you want to have it accompanied with something else such as ice cream. Keep any leftovers inside the glass dish with the lid on at room temperature, eat it within 48 hours. If you want it warm and extra gooey then microwave a portion for 20 seconds in the microwave.
Dairy Free Cookie Dough with Various Dairy Free Chocolates
Cookie Dough Variations
Add Chunks of Chocolate Brownies. If you have already made brownie earlier in the week you could put small lumps of your softest brownie into the cookie dough along with some chocolate chips. Just ensure they are submerged in the dough so as not to overcook near the top!
Method Steps
1. First you will need to soften the butter a little, add the measured out spread into the large mixing bowl, melt it at 10 second intervals in the microwave and stir after each one. Once softened you add your measured out sugar. Mix until smooth and combined.
2. Sieve your measured flour into the bowl now, make sure once it’s all in you carefully mix it. Then when smooth you add your Vanilla and Chocolate Chips.
3. You now need to add some water to the mixture, add it a tablespoon at a time until you achieve a Cookie Dough consistency. It usually takes between 4 and 8 tablespoons to achieve the dough like substance. Once you’re happy transfer it to your preferred baking dish.
Step 3. Ready to Bake!
4. Now it’s time to bake! Preheat your oven to 180’c and cook in the centre of your oven until the cookie dough top goes golden and slightly brown. The best way to test the dough is right for you is to carefully touch the top, beware it will be hot, so leave it a minute outside of the oven and push down on the top. I like mine to be like a Cookie on the top, and then soft and gooey underneath! Mine took around 24 minutes!
5. As I described above, leave the glass dish out of the oven for around 30 minutes after the bake is complete. Serve the dough after this, it won’t be too hot that way, it should just be warm and gooey!
Thanks very much for joining me on my blog for this recipe! Thank you very much for joining me for Sweet Treats Week! I do hope to see you here again tomorrow!
If you make any of my recipes be sure to tag me on social media, leave me a comment here on my blog. Any questions about a recipe please don’t hesitate to ask them! If you recreate this recipe somewhere else please credit me for it and name me and my blog, or even better link back to this original post too! Thanks everyone!
Welcome to Sweet Treats Week on Severn Wishes. This half term I wanted to share my top 5 baking treats with you all, hopefully you’ve got some time this week to make them with me! Check out my Instagram for more food pictures and recipe ideas too!
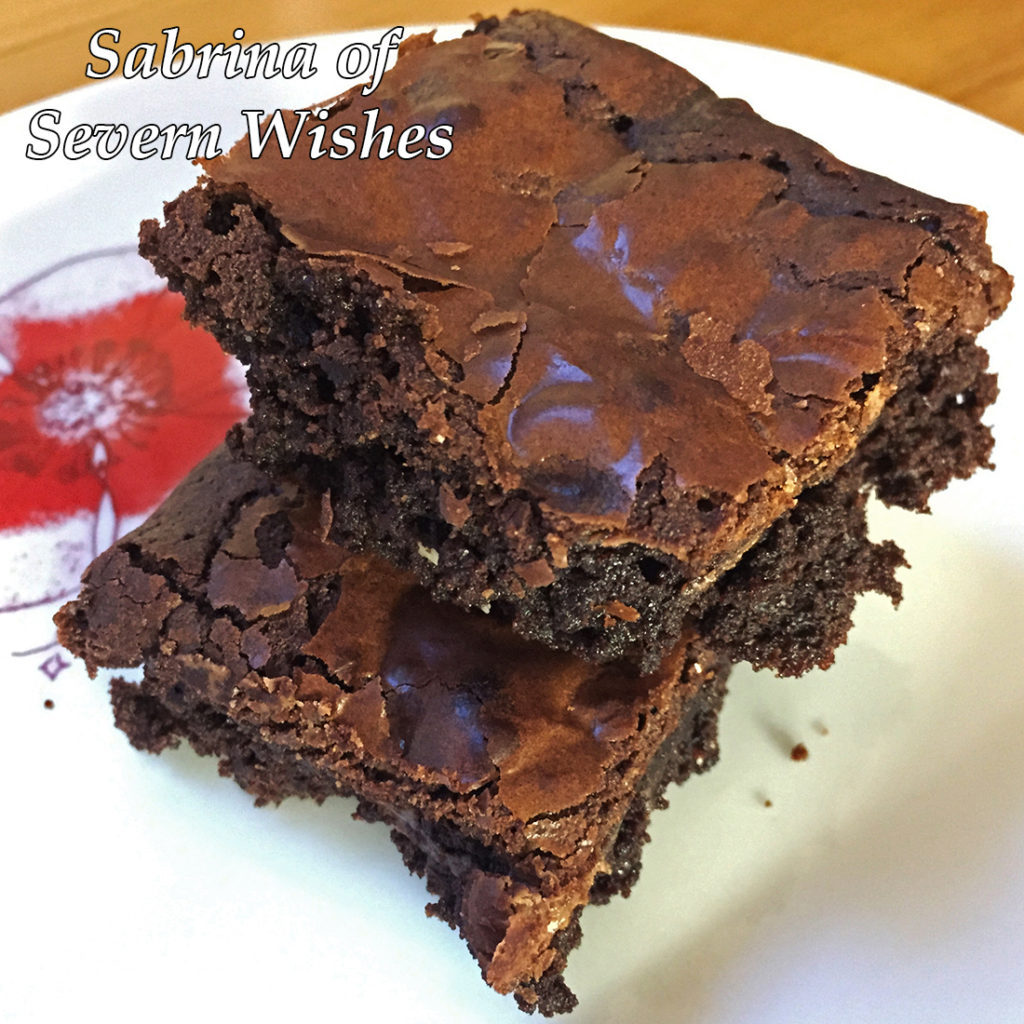
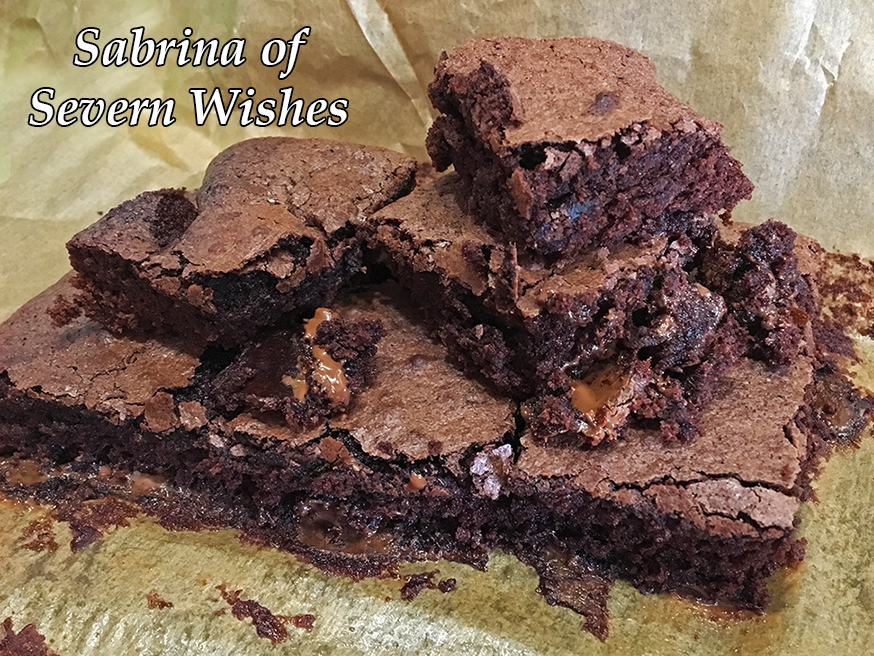
Sabrina’s Chocolate Brownies
Day 1 is Sabrina’s Extra Special Chocolate Brownies
Brownies can be tricky, but if you follow my recipe one step at a time you should be able to recreate my incredible triple chocolate brownies! Since needing to go dairy free I’ve even made these brownies free from dairy by substituting the butter for a dairy free spread and then I swapped the triple chocolate chips for only dairy free chocolates, and they still taste incredible! So do whichever version you would prefer, the difference in butter doesn’t change the end result.
My recipe will make around 20 brownies once you cut them after they have cooled. They are quite rich which is nice because they will last longer! They will last around 3 days in a sealed container, the best way to keep them is to store them at room temperature. TOP TIP Reheat a square or two for between 10 and 20 seconds in the microwave and serve them with ice cream! Yum!
Sabrina’s Triple Chocolate Style Brownies (A.)
What You Will Need
A Glass Dish or Baking Tray measuring approx 26cm x 20cm (8 x 10″) Baking Paper or Parchment A Saucepan A Large Mixing Bowl A Wooden Spoon A Metal Spoon A Whisk – Manual or Mechanical A Sieve A Knife A Cooling Rack Something To Store Them Inside After They Are Cooled
Step 5. Once Smooth Add Your Chocolates To The Mix!
Ingredients
3 Free Range Eggs (Fresh is best for baking) 175g Plain Chocolate (for melting) (You can use dairy free chocolate too) 175g Butter (or Dairy Free Spread) 200g Caster Sugar 75g Plain Flour 50g Cocoa Powder
Additional Flavours or Additional Chocolates… There Are Endless Possibilities! What Would You Do? Here are my favourites…
BrownieVariations
A. Triple Chocolate Brownies require 75g of White Chocolate Chips and 75g of Milk Chocolate Chips (or use different varieties of dairy free chocolates). Add these at Step 5. B. Chocolate Orange Brownies require 100g of Chocolate that is Orange Flavoured, dairy free choc orange bars from Asda are fab or a few broken segments of a Terry’s Chocolate Orange are best! Put these pieces in the mixture at Step 5 instead of chocolate chips. C. Mint Chocolate Brownies require 75g of Chocolate that is Mint flavoured, with such a strong flavour of chocolate it can be used as part of the melted part at the start of the bake. For a more Minty flavour later on you could add some Aero Mint Chocolate Balls when the brownie is almost cooked! Push them into the top of the brownie before the top is solid leaving just a little sticking out so they don’t melt and or burn!
Sabrina’s Chocolate Orange Brownies (B.)
Method Steps
1. First you need to place your butter and plain chocolate into a saucepan. Break the chocolate into small bits so it melts faster. Only melt on a low heat slowly. Keep stirring the melting mixture frequently until it is smooth with no lumps left. TOP TIP I only have my hob one setting 1 or 2 for melting, you don’t want to burn the mixture! I don’t like melting chocolate in a microwave, it’s too easily burnt!
2. Set the melted chocolate mixture to one side and allow it to cool. You can now preheat your oven to 180’c, 160’c for a Fan Assisted or 350F or Gas Mark 4. Cut a piece of baking parchment for your tray and push it inside.
3. In a large bowl break the 3 Eggs, make sure no shell falls in. Using a wooden spoon mix them up, add the Caster Sugar gradually while stirring. You then need to Whisk them both up together until they are combined and smooth with a light and creamy colour.
4. Using a Large Metal Spoon, you now fold in the cooled melted chocolate and butter mixture, one spoonful at a time. Keep stirring it through the creamy mixture, keep going one spoon at a time until all of the smooth thick liquids are combined into one large one. It should be a lot and not lumpy. TOP TIP If the chocolate mixture is still hot it instantly cooks the eggs and you end up with a curdled concoction! Make sure its cool, lukewarm is best, and stick to my one spoon at a time method!
5. Finally you need to Sieve the Cocoa Powder and the Plain Flour into your liquid, again you do this gradually, shaking a little into the bowl and mixing it through until it disappears. Repeat until all the dry ingredients are in the bowl and the mixture should now be a thick pour-able liquid. Add your chocolate chips or buttons or other bits now! Mix them in thoroughly.
6. Pour the mixture entirely into your tray with the parchment inside it. The mixture should sit just over half way inside giving it a little room to rise up slightly. Add any toppings like chocolate chips now, or part way through if they are not bake stable. Shake the tray from side to side before pushing it into the oven, so the bake is level.
7. Bake it with the correct setting for your oven, you’re looking for an even bake with the slightly crisp topping, it should change colour, it should be soft but cooked in the centre. On average this bake takes between 20 and 30 minutes, depending upon tray used and oven type. Just keep an eye on it, take it out and stick a knife into it. When the knife comes out almost clean, pull the tray out. Leave it on top of your oven for ten minutes, try the knife again. Remember if you hit a melted chocolate chip you may think it’s not cooked when it is! For this reason don’t be tempted to over cook it! They should be soft with the additional chocolates melted inside when you cut it!
Remember to wobble the tray so the mixture goes flat!
Thank you very much for joining me for Sweet Treats Week! I hope to see you again tomorrow!
If you make any of my recipes be sure to tag me on social media, leave me a comment here on my blog. Any questions don’t hesitate to ask them! If you recreate this recipe somewhere else please credit me for it and name me and my blog or even better link back to this original post! Thanks everyone!
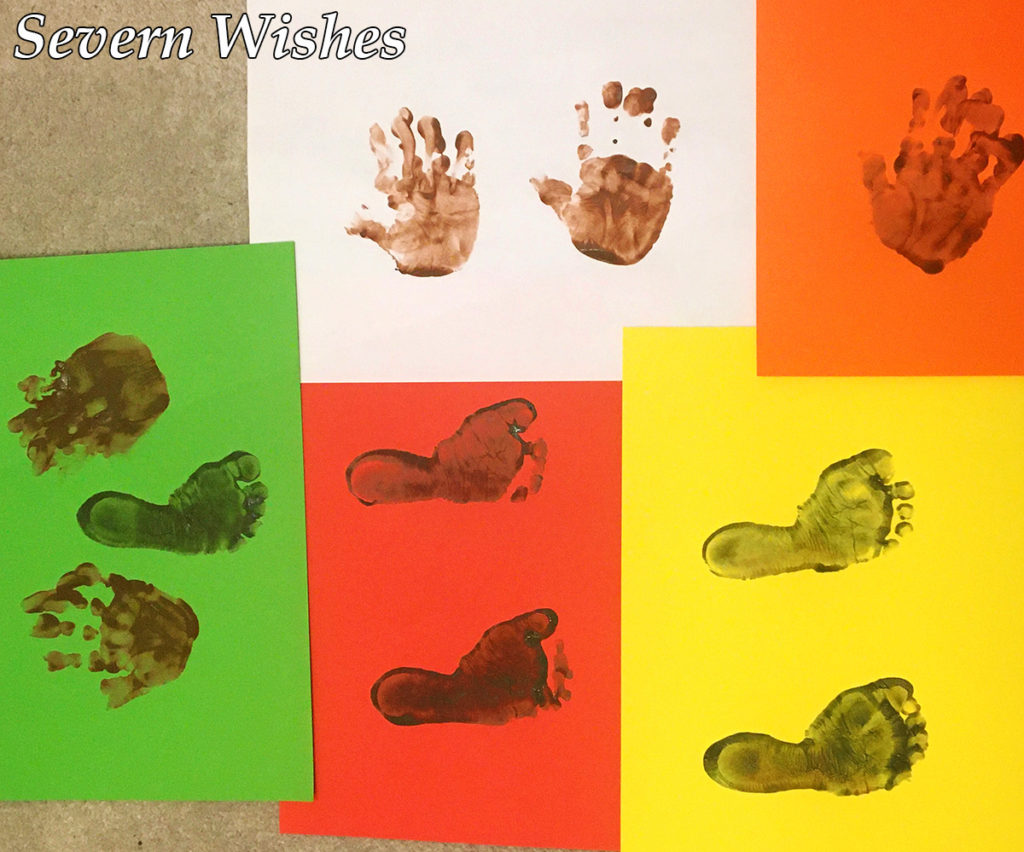
Hello everyone, today I’ve gone all arts and crafts on you!Most children break up from school today and I’m sure a lot of you are trying to come up with ways you can entertain everyone without it being Christmas movie after Christmas movie. Hands up if I’m right!
So what about some crafting! You can choose whichever one of these that you already have the necessary items for!Pick one or do them all over the festive season! They make great tree decorations or cards, and perfect gifts for family members too!
Top Tip: Pop your little ones name and the year in the corner of the decoration if you’re keeping it, make one every year and compare the sizes!
It’s amazing what you can make out of a few bits of card, a pack of mixed pens and some washable paints! Why not give one of these awesome craft ideas a go with your little ones this Festive Season!
I always love the idea of doing cards! You can combine any of the below ideas and then simply cut out your finished design and stick it on to a piece of card.
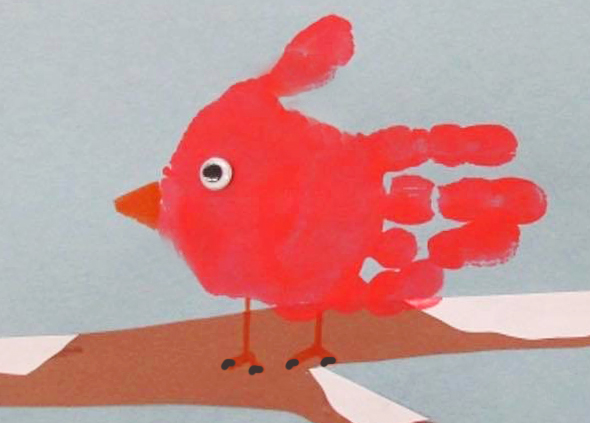
Reindeer Foot Print Penguin Foot Print Snowman Foot Print Christmas Tree Foot Print Reindeer Hand Print Robin Hand Print
What Will You Need:
A Sensible but Fun Adult 😉 with Baby Wipes at the ready! Coloured Paper and Card Pack of Mixed Coloured Pens, Glitter Pens are also cool too Double Sided Tape or Pritt Stick or Glue
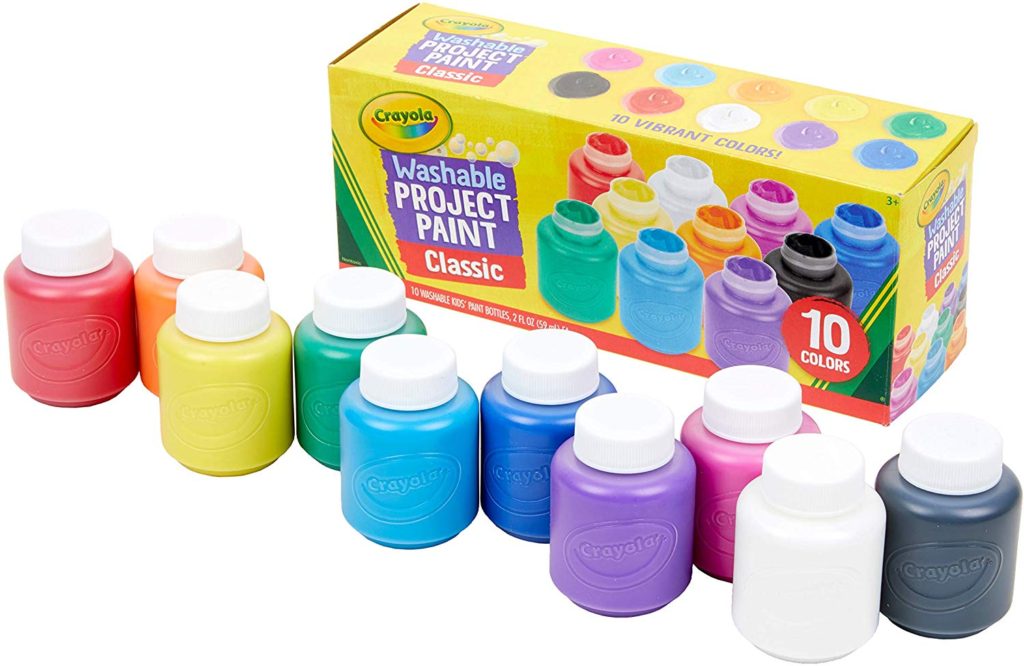
Washable Paints in mixed colours – I like the Crayola ones A few different sized paint brushes or a sponge for skin application. Scissors (one reason you need an adult) Stickers if you want to add those or some googly eyes for your print animals
You may need a ruler, a hole punch and string or ribbon if you plan on making anything into a hanging decoration.
Use Washable Paints and some Card to make your very own Tree Decorations or Christmas Cards. It’s easy to do Hand Print Robins, Wreath or Reindeer! Or Footprint Trees, Snowmen, or Penguins!
How To Make It…
Paint your child’s Hand or Foot and carefully press it down on to your chosen card or paper. Let it dry overnight somewhere warm. Flatten the design for the next few hours once it’s dry. Next you need to decide which Christmas theme to go for! Paint, Draw or Stick on your favourite bits to make your design real! Get an adult to do any cutting parts that are needed to make it into a decoration or card.
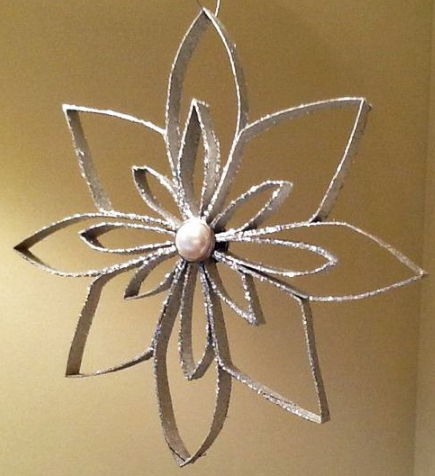
Toilet Roll Snowflakes are great to do too! You need two toilet rolls per snowflake, glue, scissors, paint and glitter! Tip One: Paint the Toilet Roll and Glitter it up first and then let it dry before cutting, at least overnight! Tip Two: Cut all the pieces the same width and arrange it before gluing! Tip Three: Tie some Ribbon or String to the top and hang in your home!
Thank you for visiting Severn Wishes today, I hope you enjoyed this Arts and Crafts post. Hopefully I will to see you here again soon. Have a great Festive Season!
In my article I’m going to be talking about the different issues and infections I have had during my current journey, in order to raise awareness for other mothers who, like me, may have been unaware of the seriousness of them. And I will also be touching upon the isolation too, it’s such a stupid thing in modern times for it not to be accepted by everyone. It is however the most rewarding thing that I have ever chosen to do. At the end of the day breasts are part of a woman’s body in order to nurse children. I will discuss lots of things in these 4000+ words! So grab a cup of tea and a biscuit and brace yourself for honesty and facts…
Breastfeeding is Incredible but it is also Hard Work
Breastfeeding my son has been one of the most rewarding yet hardest things I have ever done in my life. It was a choice I made while I was pregnant and I wanted to persevere and give it my absolute best, with the aim of feeding him for at least six months if it was possible. But then when we hit that milestone and after that other milestones too, I just kept saying “I will now stop when baby no longer wants it”. Now we are at 15 months and still going, yay for us! The bond we have is amazing.
Don’t get me wrong, it certainly was not the easy way of feeding my baby and I think that women who do breastfeed give up a lot, and this should definitely be recognised a bit more. Let me start at the beginning and explain how and why I chose to carry on, in the face of pain, problems and less than four hours sleep for many a night. And why I’m still breastfeeding… right now in fact! While I type some of this story!
It had been an uphill battle to establish the breastfeeding and the routines to begin with. We were plagued with problems from the outset but because I was determined I continued on. Our son developed jaundice a day after birth which required a lengthy stay in hospital in an UV incubator and I breastfed or pumped every ninety minutes for the first two weeks of his life. Tough was an understatement, because my milk was still only just coming in when we realised our son had some problems. So I ended up with sore and cracked nipples from the constant feeding one way or another. The lack of sleep and the worry caused me to get rundown too. I remember filling myself with food and drinking litres of water at the beginning, it really did help get me through. And I have to thank the midwife team and breastfeeding coordinators at my local hospital too for their support and kindness.
When we eventually went home, to stay, our son was cluster feeding, we encouraged this to get him to gain some weight. It was incredibly hard, with sleep time being few and sitting down time a plenty, yet I wouldn’t change the bond it allowed for us to grow. So many hours were spent just gazing at one another; sleepy feeding at all hours and burping sessions too! We were doing so well, our little boy was slowly gaining weight and we had turned a corner. Family were also supportive and I carried my pregnancy pillow with me everywhere I went… Then one day as we started to feed I got pains, and these increased over the course of the day, and it turned out to be an infection that I knew nothing about. Let me tell you about Ductal Thrush.
Lots of doctors misdiagnose this ailment as Mastitis when in fact it’s Ductal Thrush. And if you get a misdiagnosis like I did with this, then you can actually make your infection so much worse! Let me explain a bit more about my run-ins with the dreaded Ductal Thrush and then I will show you a list of the symptoms and give you some facts!
Ductal Thrush
My son was only seven weeks old when I got some bizarre pains as he latched on to feed. Previously my breasts had been engorged and that was painful, my nipples had been sore and cracked and they had also been painful, but this was different. It felt as though my son was drawing my milk out through the nipple, and as usual you can feel that gentle pull, except this time it was as though my nipple was being shredded from the inside out by glass shards. Yes… glass shards. It’s the best way I have of describing it, and it’s incredibly painful. At times during my experience with Ductal Thrush I would even say it hurt me more than the contractions of labour.
Now I’m pretty good with pain, I had my son naturally on just a little gas and air, and even my midwife took that off me almost ninety minutes before he was born to get me to focus more… so when I was tearing up and gritting my teeth through baby latching I knew something was not right. My son and I had such a bond already, but he was feeding frequently, usually fourteen to fifteen times in every twenty four hours. The pain of Ductal Thrush lasts for around a minute or two into the feed, and then different pains occur after baby has fed and you have your milk let down. That pain is a dull ache felt right in the depths of the breast tissue, mine was so deep it radiated around my back under my armpit.
I managed to get in at my GP quickly, the next day in fact. But I had hardly any sleep because of the pain during and between feeds that I was exhausted when I got there. The doctor took a look and listened to my symptoms before telling me that it was Mastitis. Having read about this condition and also having been given leaflets on it in hospital because it’s quite common in new breastfeeding mum’s, I just didn’t think he was correct. I went home with a box of antibiotics, and despite my reservations I took them for four days. The GP said that after forty eight hours I should begin to feel better and that the pain would get better. In fact by the fourth day the pain had almost doubled and I was crying my way through every single feeds. I was biting down on one of the baby teething rings we had bought for him just to get through the initial latch, and if he let go and had to start all over again I would literally be sobbing it was terrible.
After this night of debilitating pain I decided to call the breastfeeding coordinator number that I had been given, and they gave me some advice. They also sent a member of the breastfeeding team to my house to check me over when I described what a time I was experiencing. They checked to make sure baby was latching properly, and once I had told them about the pain they instantly knew it was Ductal Thrush and not Mastitis. I remember exactly how the conversation went, and how exhausted I felt. She also looked inside my son’s mouth because you can often see the thrush in baby’s throats and on their tongue. I wasn’t aware of this until I was told, but it’s white and often sticks to babies tongue and gums, and it was evident towards the back of my little ones mouth.
“You need to go back to your GP with this new information, and you need to stop taking those antibiotics because that type is feeding the infection not helping to get rid of if”.
I was devastated, it was now worse because of the misdiagnosis and my son was suffering too, I had to phone the GP up and ask to see them again. When I told him what the breastfeeding team had said he needed to look it up on his computer and find out what he needed to prescribe me instead. Not only did we require tablets but we also needed a nipple cream for me and a gel for my son for his mouth. They weren’t an everyday antibiotic, and my local pharmacy required a minimum of twenty four hours in order to get them in. So I waited, my husband picked up the prescription for me the following afternoon, and it was three days for them to enter my system and begin working.
During all of this time I continued feeding through the excruciating pain, and my poor son kept looking up at me wondering why I was so upset, his mind must have been so confused at the time, since I had always enjoyed our feeds and bonding since getting over the initial first pains and soreness that comes with new mothers feeding. Now he saw it as something that was upsetting me so I tried to not show him how hurt I was feeling and tried to smile down at him for reassurance.
But I was now in pain for minutes at every single feed, and this continued for a further week before it finally began to improve. It was tedious, I had to apply this fungal cream after each feed but remove some of it if it hadn’t been absorbed into the skin when he next wanted to feed. I also had to rub the gel onto his gums after each feed was over. I also had Lanolin for my nipples which were so sore from all the contact. But the antibiotics were finally starting to work, and I had a two week dosage of tablets which I thought was fine. It wasn’t. Due to it being so bad and embedded so far into my breast tissues I had to return to the GP and get a further repeat prescription of it. In total I was medicated for a whole six weeks, and it was a concern with my son being so young and the medication passing on to him.
For me Ductal Thrush at times was more painful than giving birth, and any mother who has had a severe case of it like I did will no doubt back me up. I’m not exaggerating with the pulling your milk through shards of glass description, or the burning sensation that radiates through your entire chest and into your tissue and muscles well into your back. I look back now and it’s a bit of a blur, I wonder how I even got through those weeks, but I did. I remember having to bite down on that teether at our three o’clock feed to stop my crying waking up the neighbours.
The GP even sent me to the hospital during my second dose of antibiotics to have an ultrasound scan on my breast tissues, to make sure nothing else was going on, luckily there was not and I was able to return to feeding my son. Although this was not before I was asked if I wanted to stop feeding him. When the thrush reoccurred without the tablets, well it never really left thinking back on it now, it was just starting to improve when I ran out of medication that first time and therefore it flared up again. But I recall telling every member of the health department that I came across, “No, I have worked too hard to establish feeding I want to continue”. I knew that I could beat this and carry on, not just for my son but for my sake as well.
As a sufferer of Endometriosis, I’m currently at Stage Four, so it was more beneficial to me to continue breastfeeding as long as was possible. When I explained the benefits most people could see why I wanted to maintain the feeds. But it was important to me because of how much I had already been through to even get to this stage of breastfeeding. For those few weeks that were debilitating and exhausting it felt never ending, but then we turned a corner, I woke one morning and the pain was there but bearable. I didn’t see the Ductal Thrush again, and if I never do again it would be all too soon. It affected the supply in my right breast, so much so that the left side became dominant and grew to almost double the size. I live with the constant lopsided reminder of how infection can really change your body. But I am a stronger breastfeeding mother because of what I have been through.
So many mothers are misdiagnosed with Ductal Thrush and it can have implications as well as creating painful feeding. Please speak to your local breastfeeding team if you are at all concerned that your GP might not be fully understanding to your needs. Get them to check inside your baby’s mouth because this is also an indication of where thrush lies. As a mother who has chosen to breastfeed you should be made aware of what Ductal Thrush and Mastitis are, so that you can make an informed decision if you should contract either of them.
Let us now go through the differences between the two of them. Ductal Thrush occurs when an infection grows among the breast tissues and is usually spread and passed from mother to baby and back again. Thrush can be an infection that occurs on several different parts of the body. Evidence of it in the breast can sometimes be seen on and around the nipple, or within baby’s mouth. Baby needs to be treated at the same time as the mother and it usually affects both of the breasts, but usually one side more than the other. Mastitis occurs in the breast when the ducts of tissue become blocked, it is usually associated with engorgement or when your baby is not feeding effectively and draining every part of the breast. Mastitis is accompanied with red, swollen and hot skin, then pain and redness that expands. Both of these conditions are serious, Mastitis more so due to the nature of the infection.
As explained on the NHS website, here are some more facts about Mastitis as a condition.
Mastitis only usually affects one breast and women feel unwell. Symptoms develop quickly and can include a red, swollen and painful area of the breast. Usually there is a lump or hard area to the breast tissue that doesn’t go after feeding baby. There can be burning pains associated with feeding your baby or occurring continuously. Discharge from the nipple is common including white or blood streaked. Flu-like symptoms are the normal experience for people with this infection, aches and pains, fatigue, going hot and cold, running a temperature and a having a fever.
Mastitis in breastfeeding women is known as Milk Stasis, it is caused by a build-up of milk that has not been drained properly. This occurs when the baby hasn’t got a good enough latch, there is an abundance of milk and baby isn’t feeding effectively or when the baby is feeding infrequently or misses a feed. It is an infection most common in the first twelve weeks of breastfeeding; however it can occur at any time for breastfeeding mothers who have a change in their usual routine for example. Mastitis occurs when the build-up of breast milk that has become blocked becomes infected with bacteria. If the bacteria are not treated quickly then the milk can turn into pus in the form of a breast abscess which may then need to be surgically drained.
Luckily Mastitis is easily treatable with antibiotics and rest. As with any infection you need to rest and hydrate, as well as eat healthily and take the tablets you are prescribed. Pain medicine such as Paracetamol and Ibuprofen can be taken on the advice of your Doctor. Avoid tight fitting clothes and no bra if you think you may have Mastitis and while you are recovering. You must continue to breastfeed so as to remove any milk from the breast and avoid any further infections.
Is it important to remember that Mastitis can be a serious infection, and if you believe you may have it you need to see a Doctor as soon as possible. When infections spread it is more difficult to treat them and undiagnosed infections can lead to problems like Abscess’ or even Sepsis (Blood Poisoning). If in doubt see your GP and don’t be embarrassed about seeking help for something like this.
My Experience with Mastitis
I think I was in denial when I had Mastitis. I kept thinking, just one more painful feed and then it will be better, but this went on for weeks until I finally walked a mile and a half to the doctors on a really hot day because I could literally take it no more. I had a sore nipple after my son had accidentally bitten me with a fresh tooth he was cutting, and as he breast fed the sore kept reopening as a wound and became rather painful. This is what I attributed my pains to, and it wasn’t until I woke with an adjacent lump and red patch on my skin that I thought it was something more.
As I sat down to be examined with the doctor a chaperone was there too, and she was watching my son who was getting flustered at the sight of somebody other than him touching my breast, ha! Within seconds of looking at me he concluded it was Mastitis and told me I needed to start antibiotics immediately, I was told off for not coming in sooner. He told me to go to the pharmacy across the road and then go home and rest. He advised me to up my fluid intake, take paracetamol and stay warm. He even told me that if the redness spread any further across my chest to phone 111 and get admitted for IV antibiotics. It was quite scary…
My son was so flustered I had to breastfeed him in the Doctor’s surgery
waiting room before I left the premises. That’s one thing people don’t realise
about Mastitis, you actually have to keep on feeding despite the pain. Allowing
the Breast to become engorged again would be dangerous and could further spread
the infection.
So once my son was done I managed to get him back into his pushchair and I
did what the Doctor said, I got my tablets, then I grabbed myself some Pepsi
Max and Chilled Water from the convenience store next to the pharmacy too, it
was so hot that day. Walking home afterwards I was getting more and more
exhausted.
Once home I didn’t get the chance to rest, I took my medication then I fed
my son both food and my milk. By the time I was sitting down to breastfeed I
realised how hungry I was, but upon reading the antibiotic packet I saw it read
no food for two hours after a tablet. So I then had to wait even longer to have
my lunch.
By the time my husband got home from work in the evening I was sat on the
sofa huddled in blankets watching my son play with his toys on his mat. I was
so exhausted I just did dinner in the oven that night. One of the symptoms is
fatigue because your body is fighting an infection. Another is the flu like
symptoms that hit you like a train. For a moment you feel fine and then boom
you’ve got shivering shakes and feel really cold. It was 28 degrees Celsius
outside and 24 inside my house, yet I was sat with a heavy cardigan on and a
blanket wrapped around me. I had these particular symptoms on and off for just
over forty eight hours, and they were not pleasant.
I was on my antibiotics course for two weeks, one tablet four times a day.
Luckily by the time I came to the end of the course I had noticed an
improvement and my pain was now subsiding. I did however still had the open
sore on my nipple which took another three weeks to heal completely. My son
couldn’t help opening it every time he had an aggressive “I’m really hungry”
feed.
The reason I got Mastitis was because I was away from my son for a few hours. Despite expressing some milk while away that day I still ended up engorged and in a lot of pain. Although I had encouraged him to feed more from my breast in the days that followed I could see my raised ducts weren’t going back down. If I ran my finger over my skin while he fed I could feel them, they were like tiny raised finger like shapes. A week or so later the pain and discomfort began getting a lot worse. One side of my breast was bright red and due to my encouraging more feeds to try and empty the breast, it had become sore and my skin was splitting where my nipple met my areolas. I gritted my teeth at the start of every feed.
My son prefers one side to the other… I hear most babies do! I recall the
doctor asking me if he fed on the other side and I said he did do, but my right
could never keep up with the supply and demand that the Left could. He
commented that I was rather lopsided, and I asked him to tell me something I
didn’t already know!
So the weeks past and luckily my Mastitis completely rectified itself and I didn’t need any further treatment. I’m one of the lucky ones, and I also have fairly small breasts as far as sizes go! I could imagine that someone with larger breasts where more infection could spread would be having a more difficult time of it! It didn’t reoccur at all although I have been careful not to have a spaced out feed since then, and my son has gone everywhere with me.
It took me a whole month to feel normal again, it was awful feeling so weak for a few days, but then the fatigue took a few days to recover from as well. I was grateful that I knew a bit about Mastitis due to my misdiagnosis when I had Ductal Thrush, so at least I was clued up on what to look out for. But some women are never told about these conditions and I think it’s important that they are discussed and recognised by the wider community.
Isolation
Finally, I want to talk about the Isolation that Breastfeeding brings.
Breast is best, and it sure is! You get to bond with your baby, get extra cuddles and even burn more calories and get your pre-baby body back more quickly! But breastfeeding can also be very isolating especially if you can’t express or find it difficult to get your baby to take milk from a breast and a bottle… this was us. We had always hoped to do combination feeding, but our son didn’t like multiple bottle types. That said, I have never had an issue with feeding him by my breast, wherever I was and whenever he needed me to, I did it. So far that has been sat on the floor in Primark and even whilst walking around Tesco supermarket doing the grocery shopping.
I knew of mother friends who went back to a date night routine when their child was twelve weeks old, they went back to work at nine months, they went on a family holiday around the little ones first birthday. Most of these friends bottle fed their children for whatever reason. But you could end up like me, putting your little ones needs ahead of your own, you could be breastfeeding them for a particular reason. Our main reason is allergies, specifically food ones. It was imperative that I kept feeding him when my son was diagnosed with a potential milk allergy, and now we know it is a serious one I was glad that I stuck with feeding and didn’t put him at risk by trying all sorts of random formula. We are now waiting to see a consultant about his allergies, so for now I am sticking with breastfeeding him and maintaining a free from diet for me. It makes things difficult but I am used to it now, and I know he is safe.
It’s been hard not to be the social butterfly that I once was, but I have enjoyed the time with my son, I wouldn’t trade it for anything. Especially the teaching and learning for both of us, the bonding and the love. Teaching him has been an absolute joy so far and I hope that it continues.
Unless other mother friends have breastfed and know what it’s like to have a cluster feeding baby who feeds every two hours and for fourteen or fifteen times a day, then they don’t know what it’s like to painfully turn down social invitations because you’re so exhausted you can just about feed and clothe yourself and the baby. It does get better, and routines are the key. Now I can plan my day so that I can get in a short walk and maybe a grocery shop between breast feeds and even do things around the house without baby getting too grumpy by not being permanently attached to my chest! I know it’s been a good day if I have showered, have done my home chores and gotten a walk in all before four o’clock in the afternoon. At that time every day we cuddle up on the sofa so he can feed, with a packet of free from biscuits for me, and we watch our favourite quiz shows together until it’s time for me to cook dinner. It’s a great life to live, although it can sometimes be a little lonely in terms of adult interaction, though I have to say being at home with my son all day is one of the best decisions I ever made. I know it cannot be like this forever and I will make the most of the time I have with him before things change.
I am a proud mother bear to be still feeding my child now at fifteen months of age. I’m also quite glad looking back, all the hurdles we have beaten and all the issues we have overcome. And yes I have to maintain a dairy free diet for the entire time that I continue breastfeeding, but you know what, it’s what is best for my son, so I will do it.
I guess what you can say here is that breastfeeding is only isolating if you let it become such. During those first few months everyone is learning and discovering and it’s both wonderful and scary and also amazing. This little life looks to you for everything and that is a massive deal, but you also cannot lose sight of who you were before you were mother of the baby. I think for a few months that was what happened to me. I stopped being Sabrina and started being mum, mum for every occasion. When in reality what was really happening was that I was isolating myself even more. I got out of that rut by joining a baby class and having an afternoon out with other parents and their children every week. The isolation started to become less and less and I soon felt more like myself again.
Recently my son has been teething, in fact for the last month he has cut tooth after tooth and is ahead of the game in terms of a teething diagram! This is a good thing in some ways, but it has also meant that he has fed more. Partly out of comfort and partly out of the fact he is having an overall growth spurt. I am back to having between four and six hours sleep in every twenty four hours, I am up at least twice a night and it is quite exhausting some days. But the feelings I have when I am the one who can soothe his pain and calm him down, is very reassuring to me, that bond is irreplaceable. So for now I make do with the lack of sleep, because of all the positives our continued feeding provides us.
So, if you’re breastfeeding and feel a little bit alone here is my advice. Join a club or a group, get out for some fresh air, invite family or friends around and do something together even if it’s free! Just remember that you’re not just a boob on legs, although some days you think that that is all your little one sees! You are a person, a parent and a mother who is doing this amazing thing for their child, but you need to look after yourself too, body and soul.
Don’t let breastfeeding close you off, allow it to open doors to so much more, more friends and more life experiences.
Thanks for reading this lengthy article, if you got to the end in one sitting then I give you a pat on the back. I will be talking about more aspects of parenting very soon. until then, see you later.
What makes my recipe different to others? My “Special” Curry is Free From for my family! The great thing about my recipe is that you can put any meat with it or even vegan alternatives such as Quorn with it. Whatever protein you fancy really! Even fish if you’re that way inclined! The combined flavours work well with everything, but I prefer Chicken and… Potato! Yes… you’ll see!
I use my nifty little food processor (Russel Hobbs Mini Chopper) to save chopping time but if you don’t have a processor then just chop the vegetables as small as possible with a knife and watch those fingers!
The Free From Bit! This curry recipe is DF, NF and GF and it serves 4-6 people. So many curries in the supermarkets contain dairy and nuts. Even local take away restaurants cannot guarantee things being free from certain ingredients. Our family has a wide range of allergies so I’ve learnt to cook my recipes alternatively and figure out what works without it including an allergen. This has been my best recipe to date! You can follow this and it be great for you and your family as well! Plus it’s 3 of your 5 a day!
What can you serve with it? You can serve this curry with a nice Rice, Basmati is a good choice or Pilau, and you can easily get GF rice these days, I recommend Tilda or Tesco’s own brand rice for their flavour! Naan Bread is delicious but obviously it’s not DF or GF so do be careful there! Poppadoms and Chutneys are a great accompaniment but again some of these will not be GF and some even contain Nuts! If you don’t have any allergies then you can have any of these (or all of them) with the curry! If you choose all of the above you will serve at least 6 people…
Sabrina’s Special Free From Curry Prep Time: Up To 60 Minutes Cooking Time: 90 Minutes Serves: 6 People (8 if you include side dishes)
Ingredients
500g – 600g of your chosen Protein into bite size pieces for frying
400g Tomatoes – use a tin of Plum Tomatoes for the Sauce, pop them into a food processor until smooth and a sauce like consistency, use plum will taste sweeter
1 Large Onion Diced Finely for the Sauce, you can pop this in the food processor before you prepare the tomatoes until shredded very fine
1 Large Onion Chop into bite size pieces ready for frying
2 Peppers – Chopped into short slices (Red or Yellow) ready for frying
4 Tablespoons of Tomato Puree for the Sauce
The Sauce needs to be made of the following spices and seasonings; 4 Tablespoons of Garam Masala 1 Tablespoon of Cumin 3 Tablespoons of Coriander Leaf 1 Tablespoon of Garlic 1 Tablespoon of Paprika 2 Tablespoons of Chilli Powder (Mild) (Use Hot if you can handle it) 30ml of warm water Salt and Pepper to your taste.
Oil for Frying
400g – 500g Potatoes – Cut into bite size chunks and washed
Method
Prepare all of the ingredients as stated above, diced and chopped.
You need to have a large saucepan and a frying pan warming with a little oil in each. First begin by adding the chopped onion and peppers to the frying pan. Add the tiny diced onion and some garlic to the large saucepan.
Fry off all the ingredients, once the saucepan with the diced onion is nicely caramelised, you can add the sauce ingredients from the list above and mix well. Leave the Onion and Peppers inside the Frying Pan to caramelise and then add the chicken.
Put your plum tomatoes in a food processor and then once blended add them to your saucepan. Next you’ll need to continue frying off the protein and vegetables in the frying pan until thoroughly cooked.
Add anything additional you require for the sauce, that includes the tomato puree and seasonings. Taste it before you add your meat and vegetables so you can tell if it needs more chilli or more salt and pepper.
Simmer your sauce on a low heat, adding the contents of the frying pan which should now be nicely cooked and combined in flavour. You need to continue to simmer this for at least an hour for the flavours to coat everything and for the sauce to thicken up.
Now is the perfect time to add the Potatoes! They will cook inside the sauce and do not need boiling before hand. Use fresh or tinned whatever you have at hand. Leave it to simmer for a while…
Taste test at one hour to ensure the potato are cooked and the chicken is tender, stir occasionally during this hour of cooking time to ensure it’s not getting stuck to the bottom or sides. It should gradually thicken. If you don’t think there is enough sauce when you add all the contents and mix it then add 10ml of water at a time and mix in until the sauce covers everything.
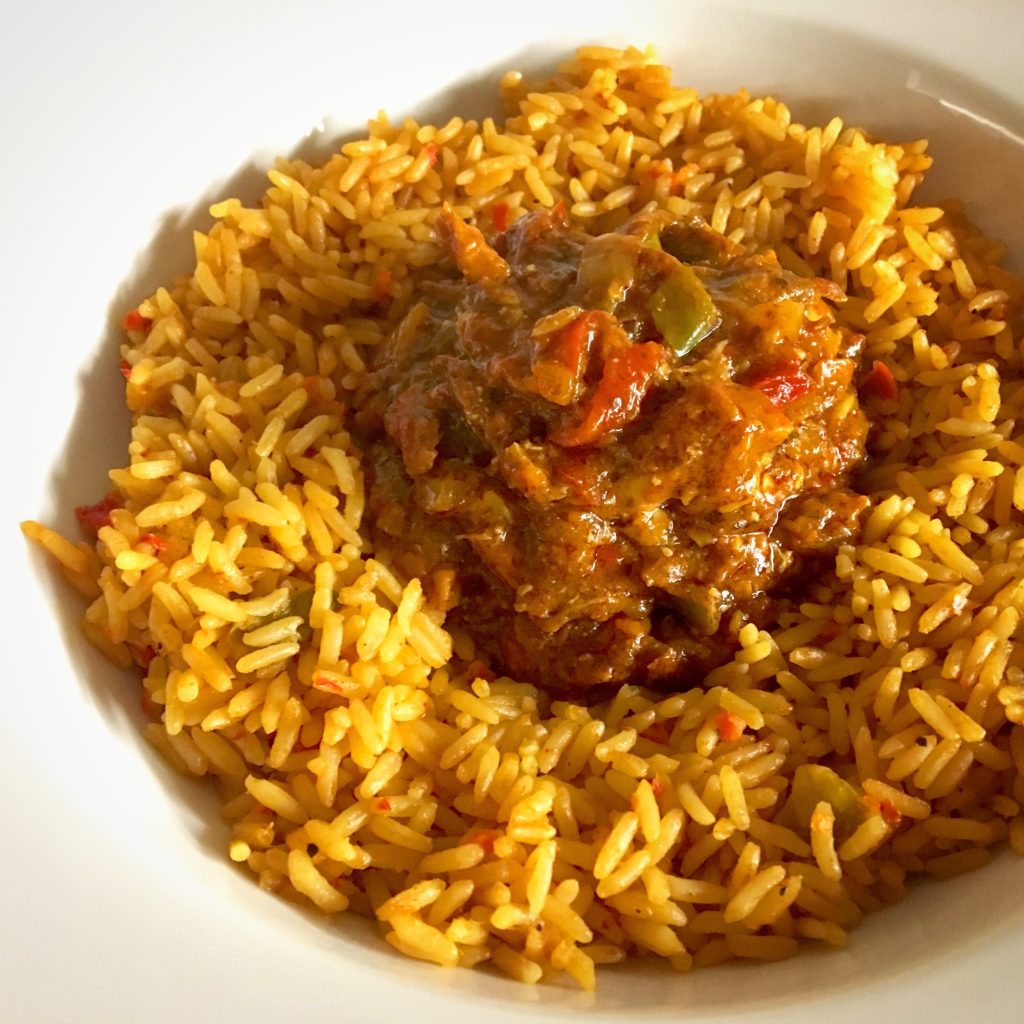
Serve immediately with Rice and any of the other sides I suggested.
Here is my curry when I served it with Pilau Rice and No Potato in this one either… you don’t have to add them it’s optional.
Thank you reading this post today, I really hope you like the look of my recipe, if you give it a go yourself then please tag me on social media to let me know and show me the end result too!
These are my Six Tips for New Parents – but they are the things that everyone forgets to mention!
So despite being post birth and genuinely exhausted, most mum’s will admit to that feeling of pride that comes with the arrival of a child. Be it your first or fifth baby, they are all special and all little miracles. Just look what you have achieved!
However there are things people forget to mention to you and I thought I would share some of my tips in this blog post for getting passed these… we will call them the six newborn phases!
When you become a mum you look at your bundle of joy and you feel incredible, that rush of emotions and pride… you just grew and birthed (in whichever way you did) a small human being. Go you! Own it!
But, while trapped in a chair under said small human, (in fear of waking them up if you were to even clear your throat!), you can’t help but wonder why your amazing body didn’t also develop the ability of telekinesis while it was doing this awe shattering feat! How amazing and useful would that be?! So here are my six phases… I guarantee you’ll laugh before the end of this article…
✩✩✩
Phase 1. The “I Can’t Put The Baby Down Because We Are Bonding Or Cluster Feeding” Phase.
Always keep the essentials close by, as in within an arms stretch! This goes for the TV remote, your phone, at least one snack, your phone charger or a charging device, iPad or a book, and definitely a glass of water. If you have a little one who won’t sleep very much then life saving materials can be what get you through those afternoons, as you cradle your small bundle who is finally napping but you dare not put them down. Instead you settle in to an afternoon of Netflix binge watching and you have a whole packet of biscuits with your name on.
Personally I had a lunch bag size cool bag next to where I sat with my son. Inside it were snacks, a reusable bottle of water and piece of fruit. I kept a table to one side of me with the remotes and my phone on, and a box of tissues. On the other side within a stretch away was the cool bag, my iPad and a portable USB charger. Life savers for me on several afternoons!
✩✩✩
Phase 2. The “Where’s The Flipping Muslin Cloth” Phase.
Buy Extra Cloths! So cloths for a newborn are a given, but have you considered you may need to wipe all sorts of things off your baby and multiple times in one day. I couldn’t believe how many cloths I went through a day at first. The tip for this is to keep a folded clean pile of muslin’s somewhere in every main room of your home. Also buy similar colours of cloth so that you can just throw them all in the wash together. Because Muslin cloths are thin they don’t take a lot to wash and also dry, but you won’t want to wait a few hours when you’re down to your last one and baby is due for a feed…
✩✩✩
Phase 3. The “What Time Is It? Oh My Days, I Forgot To Stop For Lunch, Again” Phase.
Nobody tells you how fast the time goes. This isn’t a lie, time actually goes faster and you will forget what time of day it is and then realise you haven’t had a drink for hours! Make sure you always get nourished every time you journey into the kitchen, keep snacks and fruit handy, things you can eat one handed, and keep a reusable water bottle by your favourite seat. Keeping hydrated is most important especially if you’re breastfeeding and recovering from birth too. If baby is having something to drink then you should be too!
✩✩✩
Phase 4. The “I’m Too Tired To Cook, Let’s Open Up The Fast Food App” Phase.
Every parent will admit to ordering fast food in those first few weeks with a newborn baby. But if you can organise yourselves in the weeks running up to their arrival, you’ll feel better for it, both stomach and bank balance!
The answer is this, Bulk Cook your favourite Foods! Keep some of those previous takeaway Tupperware tubs, check how many you can stack in a drawer in your freezer. Then bulk cook a few of your favourite dishes using fresh ingredients. Then you can freeze them in tubs and in portions. Throw in Veg too if you like, at least then you’re getting healthy food inside you. Chicken Curry with added Veg or Spaghetti Bolognese made with a few Veg to bulk it out are both easy to reheat.
✩✩✩
Phase 5. “I Managed To Put The Baby Down, Shall I Pop On That New Series On Netflix Or Go To Sleep?”
It’s really tough when Social Media blows up with the latest Netflix series, and you’re surviving on maybe 4 hours of sleep and only scrolling on your phone in order to stay awake during the 5am feed… But there will come a day when things get easier, your baby won’t need feeding every two hours forever. And then you’ll sleep a little more… (does 6 hours or less sound good to you?). Plus you’ll get used to the lack of sleep and gradually be able to do more, like managing to watch half an episode of something… once a week… then forget what happened and watch it again… and so it goes on…
✩✩✩
Phase 6. “We haven’t had any us time for a long time…”
This phase is a serious one and more to do with you as parents, it’s brand new, it’s exhilarating and exhausting but remember you have become two different people. You are still you, and what time you spend together is still important. You might not get a date night in weeks, if not months after baby is born. But if you have the support of family and you trust them, then there will come a time where you can leave your baby with that person and get back to being you “both” again. People don’t tell you how hard it is, not being able to go out just the pair of you, you won’t get to watch television or a film without interruption or pausing it every now and then. This is the new normal and it’s okay to find it a difficult transition. Especially if you’re used to going out for a meal once a week or pop off to the cinema at an hours notice… My tip to get through this phase is this, plan, plan and plan some more. Make timetables and plan ahead with a calendar and try your best to stick to it. Change the usual cinema outings to a Netflix movie and a meal at home, with a big bag of popcorn and sweets from the supermarket as a great and cheaper alternative to the cinema treats…
✩✩✩
Thank you for visiting Severn Wishes today, I hope that I see you here again soon for more parenting posts.
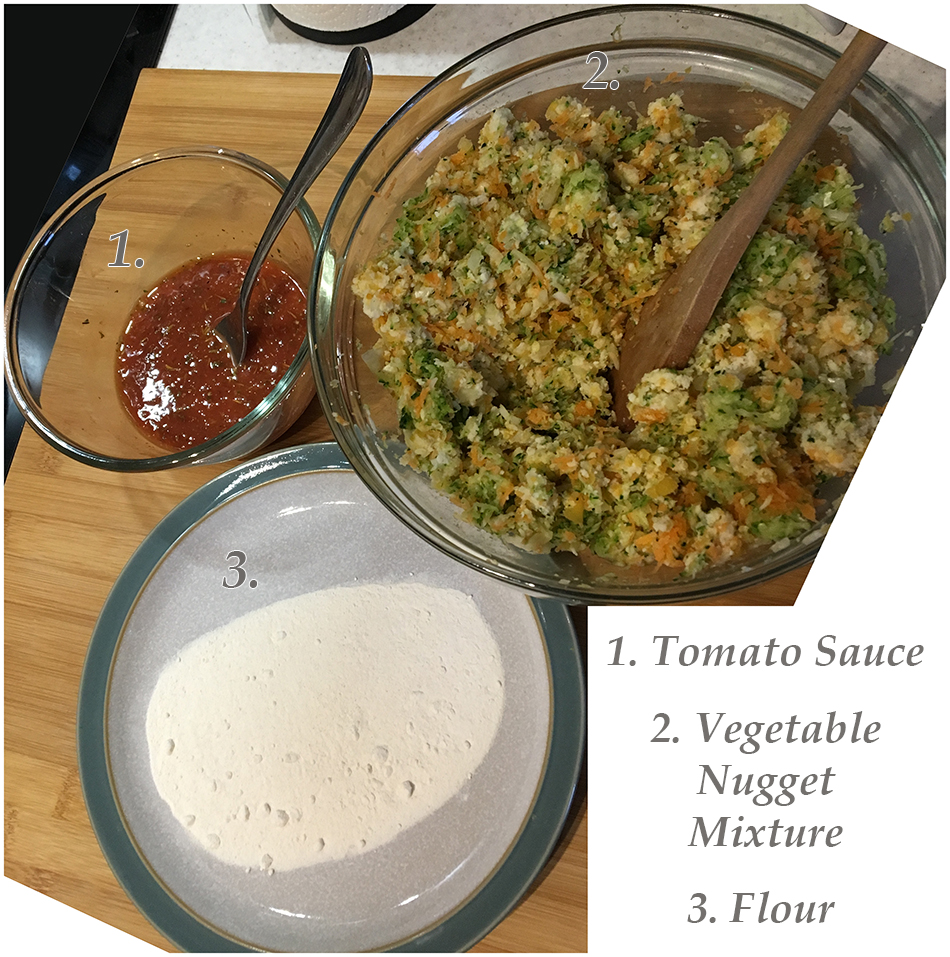
How To Make Delicious Dairy Free Vegetable Nuggets For All The Family To Enjoy!
Today I will be showing you how to make tasty, nutritious and dairy free vegetable nuggets that contain four different vegetables. They are great fun for your children to eat as finger food and your older children can dip them in the sauce if they choose. This recipe is ideal for weaning and beyond.
Veggie Nugget (broken so you can see the soft inside)
✩✩✩
Ingredients for Sabrina’s Veggie Nuggets
3 Tablespoons of Tomato Ketchup 1 Tablespoon of Reduced Salt Soy Sauce 1 Tablespoon of Mixed Herbs 1 Large Egg (Beaten) 160 grams of Breadcrumbs (approx) roughly 4 slices of bread – I always use the 2 end bits if I have them! 6 Medium Carrots – Grated and Squeezed 2 Courgettes – Grated and Squeezed 100 grams of Swede Cooked First, then Diced Finely using a Chopper 1 Large White Onion Diced Finely 50 grams of Dairy Free Alternative to Italian Style Hard Cheese Plain Flour (6 tablespoons approx) spread this onto a small plate ready for rolling…
✩✩✩
Method
To make the sauce combine tomato ketchup and soy sauce together. Double the amount if you are preparing these nuggets for people to dip into the sauce straight after cooking them. Use half of the sauce for the vegetables mixture and leave half for the dip.
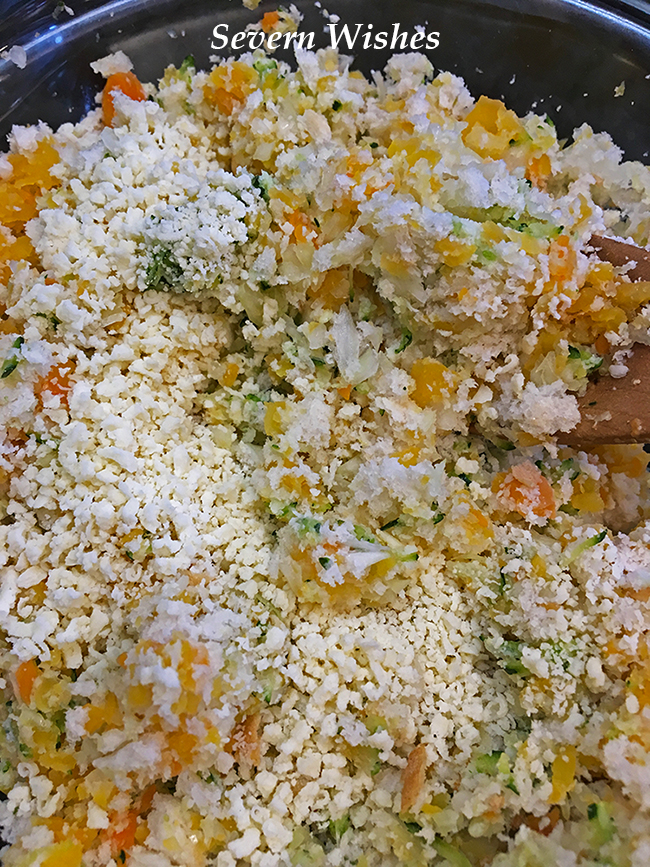
Once you have prepared all of the vegetable ingredients as directed above, you will need to ensure the mixture of vegetables isn’t too wet. Take a handful of the grated and chopped veg and place it between a few paper towels, a muslin cloth or a clean tea towel. Squeeze and press it in the cloth to squeeze out as much liquid as possible. Do this with all of the grated veg.
Get a large mixing bowl and crack the egg into it. Add the herbs and stir until combined. Next add some of the tomato dip. Next add the squeezed vegetables, then lastly add the hard cheese (or alternative) and the breadcrumbs, stir it all thoroughly. You don’t want lots of the same type of veg in each ball, try and mix it so you get a variant of all the ingredients. (I do my breadcrumbs in a small food mixer).
Place the flour onto a small plate ready to roll your nuggets in.
To make a nugget take a small handful of the combined mixture and roll between your palms. Top Tip! Do this with wet hands so it doesn’t stick to you! Roll them out into oval shapes, and then once happy you can roll each one in flour to coat it.
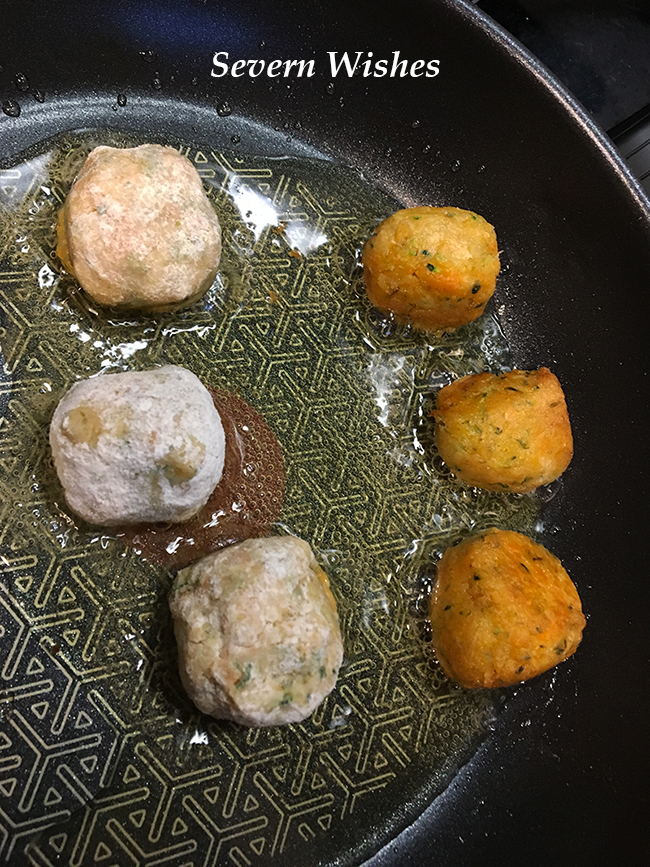
Have a large frying pan ready on your cooker with some oil getting hot. You should place the nuggets down gently so as not to break them or splash the oil. Fry each one until lightly browned all over. Top Tip! Use a pair of tongs to adjust them while frying to make sure you do all of the sides. Keep topping up the oil after every few nuggets.
Once they are cooked set the nuggets to one side on a piece of kitchen roll so as to drain any excess oil from them and let them cool a little, and then serve them while they’re still warm in a large bowl with the remainder of the tomato dip. They are great for a children’s party or a finger food family night in.
Squeezing the Veg so as to remove as much moisture as possible.
Veggie Nugget Mixture Ready For Mixing and Rolling
Vegetable Nuggets are ideal for children who are weaning at around 10 months and older, when they are learning to hold and bite into foods. They are great for getting your children to eat vegetables. The tomato dip provides a fun element for older children. The leftovers can be frozen, defrost over night and re-fry them to give them a crunchy outside again. My Recipe made me approximately 24 Nuggets.
Once you have rolled your nuggets between your palms you can get ready to fry them… My Top Tip is to have some done so you can fry one set while you make the next set…
FryingTips
When frying the Nuggets take care and turn them frequently so that they cook evenly on all sides. You also need to maintain the oil so that they sit in a few millimetres at all times to avoid sticking to the pan.
Finished Veggie Nuggets
These Nuggets are great, and rather tasty too, that is providing you like the Veg I have chosen. You can substitute the Courgette for Mushrooms if you prefer those! And you can also do these without being dairy free by using a regular cheese like Parmesan if you wish.
✩✩✩
Thank you for visiting, I hope you have enjoyed reading about this recipe, if you decide to give it a go then please leave me a comment with how it went afterwards… Check out my other recipes on the category list!
Our Weaning journey began delicately due to our son having suspected allergies. He is exclusively breastfed and he cluster fed for the first 5 months of his life. He was born slightly premature at 37 + 5 and after having bad jaundice at birth, it took him many weeks to recover. We spent so much time in hospital at the start that our first month with him went by in a blur. Problems with allergies began at around 12 weeks, so it was a steep learning curve in the next 10 to 12 weeks that followed.
Then, when it came to Baby A reaching the 6 month milestone he was still in size 3-6 month clothing and breast feeding up to 14 times in 24 hours. We hoped that Weaning would satisfy him more so and because we could introduce cooled boiled water with his meals, it would take a bit of pressure off me. This did work, but he had such an appetite that he continued regular breastfeeding including a minimum of two feeds a night, plus day times and extra weaning snacks. We had ourselves one hungry baby!
I recall the health visitor questioning how much I was feeding him at our 6 month visit… she couldn’t believe how much I was saying he ate, I’m almost sure she thought I was lying. I had read in a parenting book that you cannot over feed a baby, because they will simply refuse to eat it. Our son wanted more and more food as the days went by, so I used motherly instincts and I watched my baby for cues. So I continued on with my busy breastfeeding schedule plus I began our weaning journey in a rather swift fashion.
We Tried A Range Of 4 Month Plus Puree, These Are A Few Of Them Little One Loved.
Baby A enjoyed many things that we tried first off, including individual vegetables such as Carrot, Potato, Parsnip, Sweet Potato, Apple and Strawberry. There were only 2 things he spat out which were Prune and Peas. And I don’t blame him for either! Ha!
After doing some reading and noticing how keen Baby A was with eating and being fed, we decided to do 6 weeks of Purées to start with. We maintained that he was to ingest nothing dairy of course, I checked packaging meticulously or I made my own. This worked well, starting with a few mouthfuls twice a day for the first week, followed by doubling the amount in subsequent weeks. By the time we got to week 6 Baby A was eating 70g of fruit purée for breakfast and 70g of vegetable purée in the early evening. He also tried Melty Puffs around this time too.
Prices of Purée vary, but they usually cost anything from 40p all the way up to £1.50. They also range in size so look out for that. We made the most of any offers that were on in supermarkets and also used any store credit points and vouchers we had picked up to get our initial 6 week stash of purée. Boots vouchers can go a long way if you sign up to the Clubcard and baby club before hand. Keep a look out on social media for offers too.
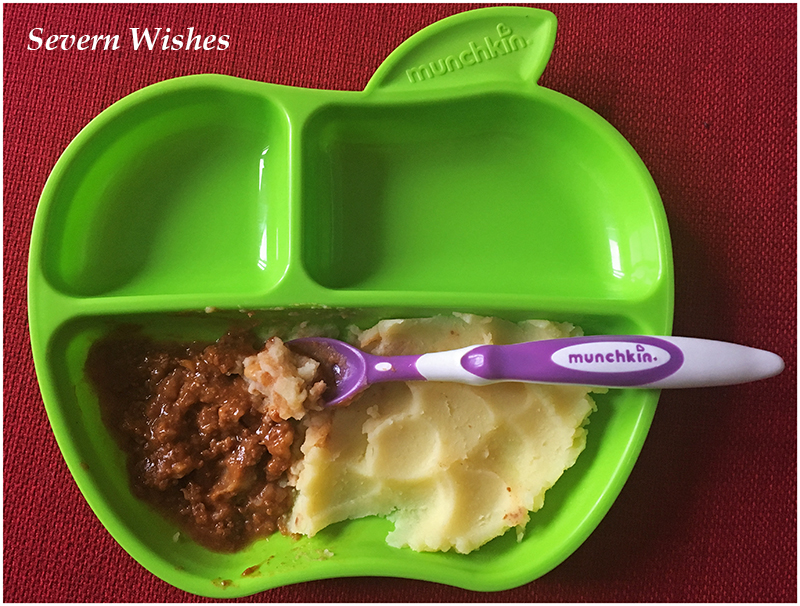
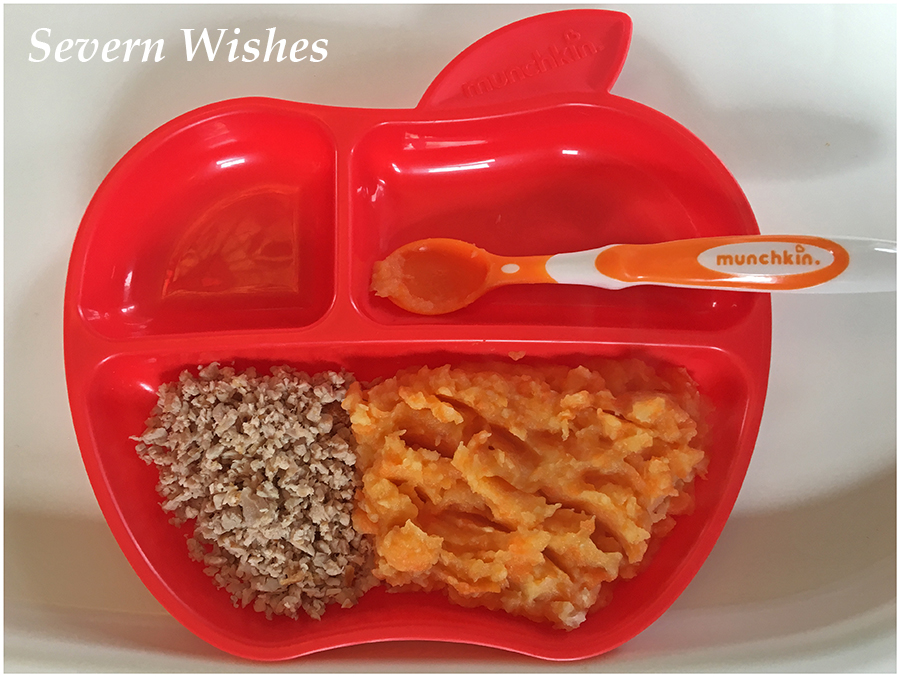
Minced Beef and Onions with Mashed Potato (7M)
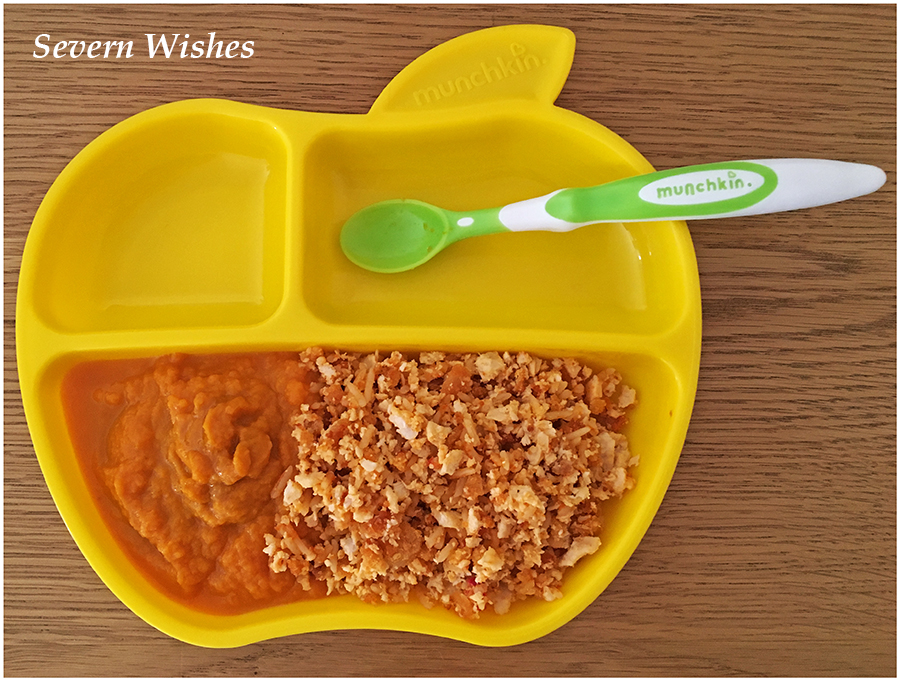
He was enjoying the food we were giving him and he was obviously hungry. We were approaching his 8 month mark when we began moving to thicker purées and food with more textures. I was bulk cooking mashed vegetables at this point and freezing them in small pots (roughly 80g each). Some combinations included Potato and Carrot, Carrot and Swede, Carrot and Parsnip and Parsnip and Sweet Potato.
At 8 months Baby A was eating between 70g and 100g for breakfast, between 100g and 130g for his lunch and between 130g and 150g of food in the evening. This was on top of 12 breast feeds still most days, and we had began to try him on some more snacks. The melty puff kind that melted on his tongue were a real hit! Luckily they came in many flavours.
We also gave him fruit such as Raspberries, Strawberries and Melon as an evening pudding if he was feeling particularly hungry.
Minced Pork and Onions with Carrot and Potato Mash (8M)
Baby A ate most things from Day Dot but turned his nose up at the taste of Cucumber and also highly disliked the taste of Peppers. Some foods took a couple of times before he decided that he liked them, usually very strong tasting food groups. He was unsure about things like Tomato, Scrambled Eggs and Pasta, but we persevered and he eats them now. The trick is to leave a food for 2-3 weeks then try it with them again.
One thing I loved about Weaning was the way he learned and every day you saw him remember. Within two weeks he understood that cutlery went into his mouth, he began to chew even when food was super soft, and he was also cutting several teeth while we were trying most new foods. He did so well with all these milestone changes and I’m very proud of him.
Mashed Carrot and Swede with a Small Chicken Steak and some Rice (9M)
One thing I would recommend to mum’s who want to cook healthy meals for their little ones is to invest in a good strong vegetable mash utensil and a mini food processor. Mine is called the Russel Hobbs Mini Food Processor 22220 Mini Chopper and I cannot rate it high enough! It was used every day for 3 months and I still use it to dice up chewy meat because it saves me so much time. I still use it for my now one year old boy.
Russel Hobbs Mini Chopper In Use
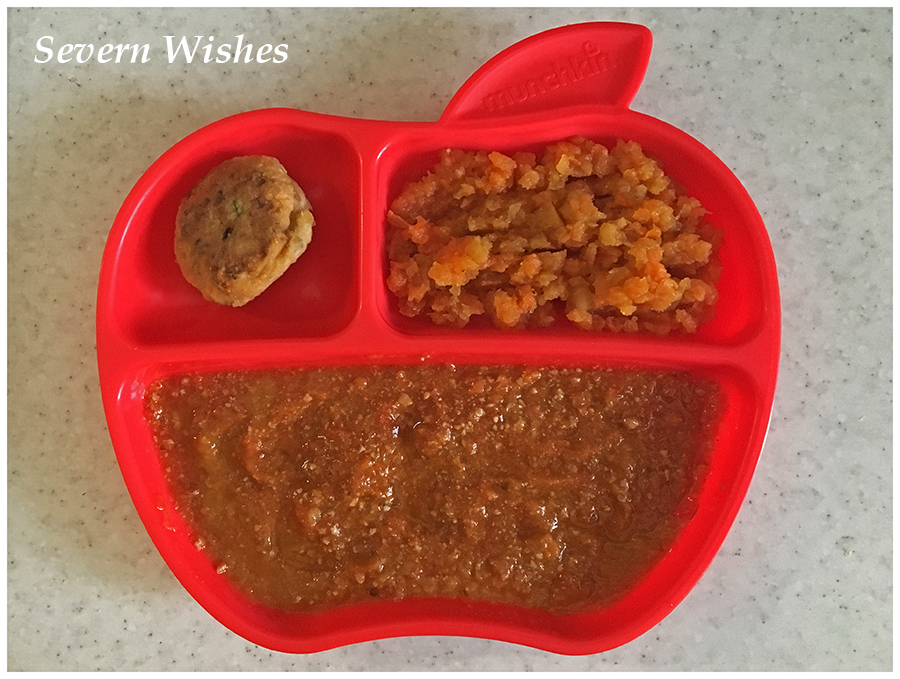
At nine months Baby A began eating some more of the food I prepared for us adults. This includes the meat and sauce of bolognese but we gave him mashed vegetables and not much pasta. He ate my cottage pie (all of it), we had chicken steaks that I had diced in a blender with soft vegetables and rice, sausages were diced and served with mash and veg, and he even ate flaky white fish with rice and veg too!
I also used a weaning book that my mother had bought for me that had some great ideas inside for weaning recipes and snacks. I altered most of them to suit the various allergies in my family of course. Homemade Veggie Nuggets were by far my favourite thing to make, I bulked cooked them which was time consuming but then they’re frozen for convenience.
Minced Beef and Onions, Carrot and Swede Mashed with a Homemade Veggie Nugget
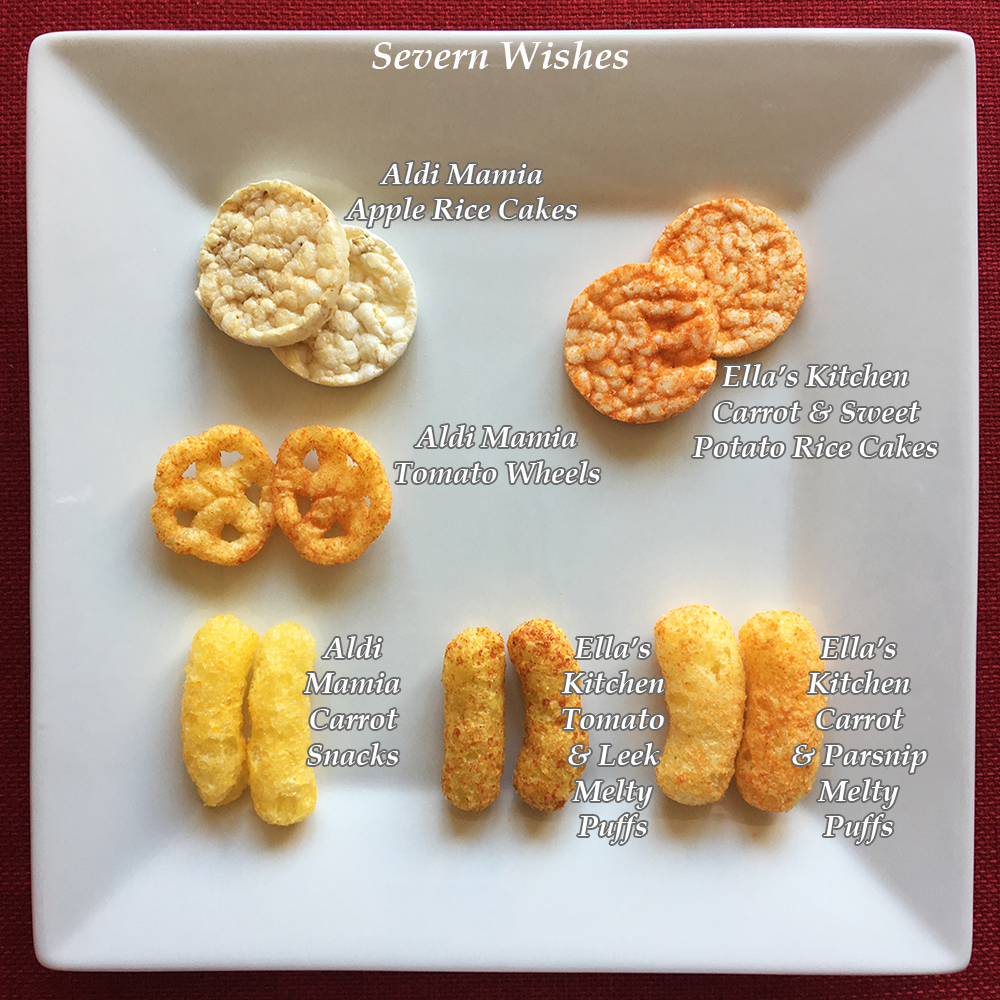
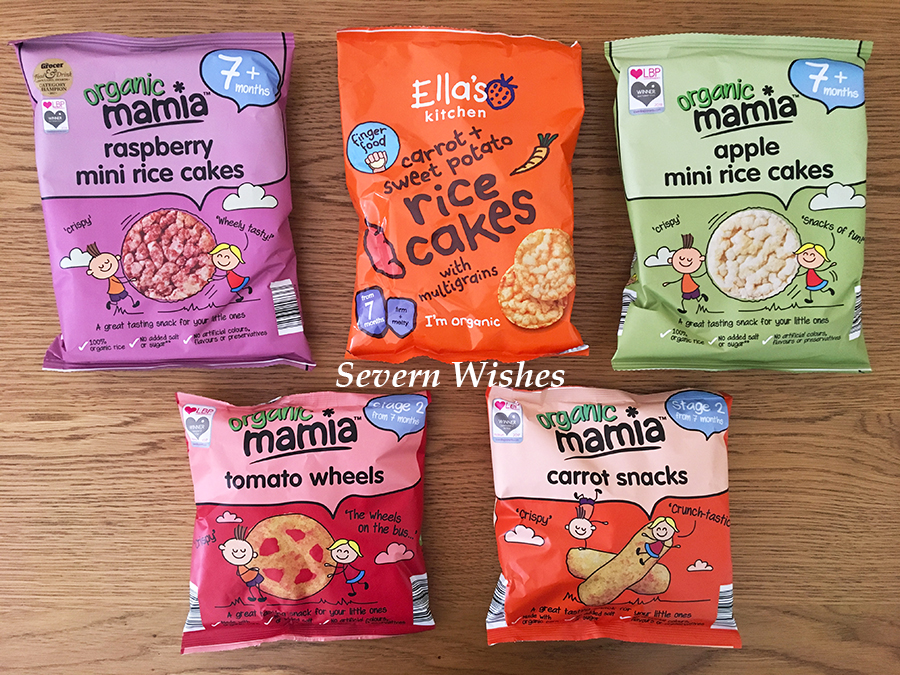
By the time he reached 10 months of age Baby A had 8 teeth and was eating 80% of what we were. He still loves his baby related snacks too! These include Vegetable Puffs, Rice Cakes and Flavoured Shaped Corn Snacks. A lot of these are Organic too.
Some Of The Baby And Toddler Snacks We Buy Regularly.
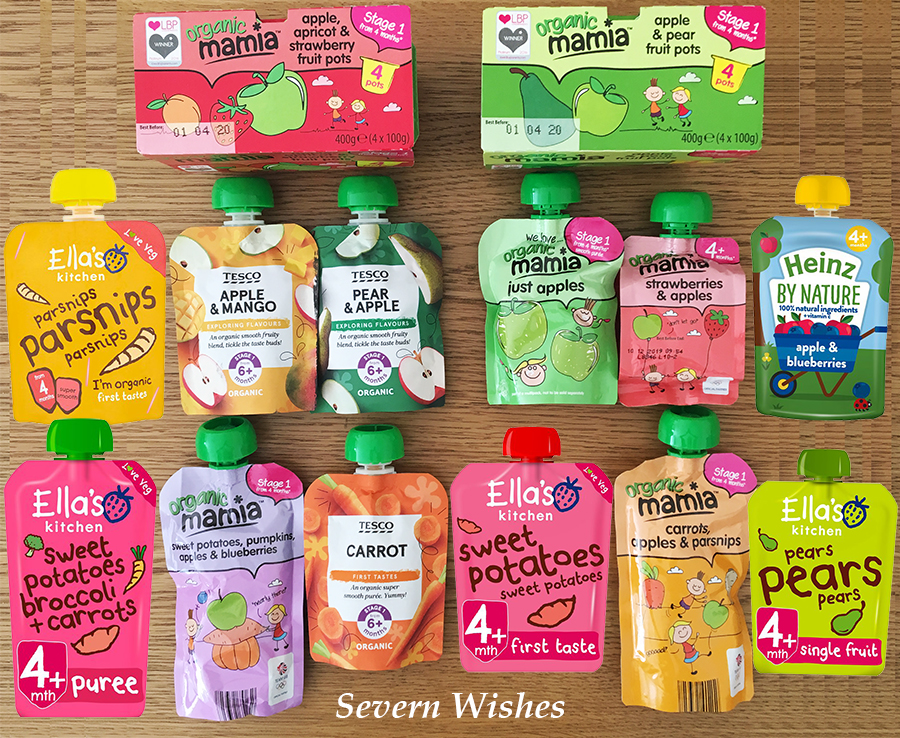
A Few Of The Pouches We Tried And Tested From 7 Months Plus
These snacks are very affordable from places like Aldi who have their Mamia range. If you sign up to Ella’s Kitchen on their website they will send you a pack and a voucher to try bits from their range which are purchasable at most large supermarkets and Boots stores.
Our little one loves to feed himself firm snacks but has been more than happy for us to feed him things that require a spoon such as fruit purée, cottage pie, mashed vegetables and the like. It’s so important to get your little one to eat their fruit and veg, and it doesn’t matter if you have to create a mashed version in order for them to eat it. Try different combinations and see what your baby likes. Keep a food diary to keep track!
Some of the 7 month snacks are little one loves.
Sabrina’s Weaning Tips For Parents
My top 4 tips for any parents about to wean a baby would be these…
1. Take it slowly and calmly. Your Baby will be intrigued but it can also be a stressful experience for all of you. All healthy Baby’s generally have a good gag reflex and don’t confuse this for choking, stay calm if they cough or spit things out and take all foods – even the purées – at a slow pace!
2. Start with Veg! You don’t want your little one to have too many sweet flavours in those first weeks, this is because when it comes to the savory kind they are less likely to want it. Start with Veg Purée or Mash and go from there…
3. If you plan on doing Baby Lead Weaning, then you must let your little one use their hands. Be prepared for mess! Get a good highchair, get a mat for the floor and keep plenty of baby wipes at hand too!
4. Keep a Food Diary! This is a useful tip for all new parents. It’s a great way to keep track of what baby has eaten, if your little one was to have a rash or reaction to anything they had eaten you can go back and check the diary before trying the substance again. Those first couple of months are critical in preparing baby for stronger tastes and good food habits, so start them early on the main products that your household enjoys together and move forward from there.
– ✩ – ✩ –
All Parents Should Definitely Sign Up To…
1. Ella’s Kitchen via the Website You get a free pack in the post with tips, a board with stickers, ideas for foods and even some vouchers for baby snacks.
2. Boots Parenting Club Using your Boots Advantage Card on the Boots App or Website you can add the addition of the Parenting Club which gives you bonus deals, free products and vouchers every month. For example we got a free bottle, a free weaning book and some promotions on nappies and baby food. Check the app each month for new promotions and deals. You also get extra points on your card when purchasing certain products in store and online too.
Ella’s Kitchen Have A Great Website and Their Melty Puffs Are A Real Hit!
✩ Russel Hobbs Mini Chopper Review ✩
I would highly recommend this chopper to any parents who want to make a lot of their own food for their baby. Not only is it simple to use, easy to clean and maintain, but it allows you to make just enough food for a large portion that can be good for a day, or if you’re bulk cooking into baby sized pots it made 6 pots of food no problem. The best thing about this mini processor is it’s size, it takes up very little room in my cupboard and is portable enough to take away for a weekend to a relatives house without being a burden.
Design 5/5 Features 5/5 Value for Money 5/5
RRP £16.00
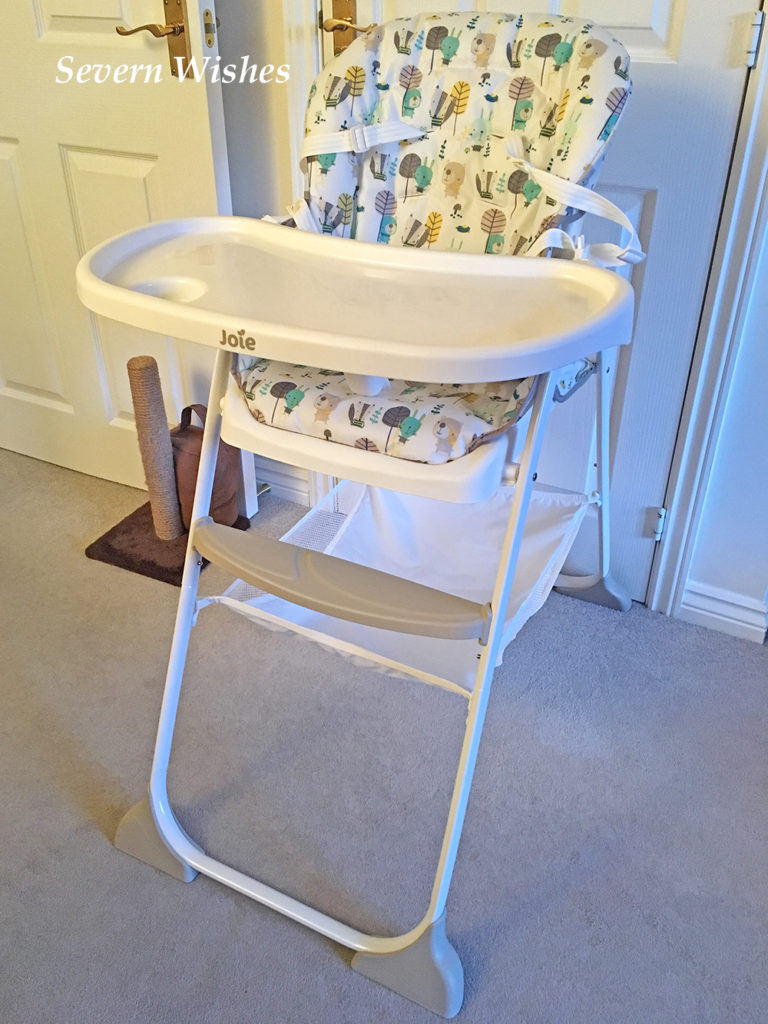
✩Joie High Chair Review✩
We highly recommend the Joie High Chair because it is affordable and also has some great features. These include the large sturdy tray, the beautiful animal design on the seat itself and the large fabric basket underneath which is great for storing extra bits and pieces close by for when you need them, such as bibs, wipes and toys. We only have one suggestion, that the straps could either be entirely removable for cleaning purposes or that they be a different colour than white, because they really show up every bit of food dirt.
Design 5/5 Features 4/5 Value for Money 5/5
RRP £55.00
✩Munchkin Products Review✩
We have been really impressed by the Munchkin Apple Bowls and Plates, as well as their range of Spoons too. We picked most of them up at various baby events in Supermarkets and on Amazon UK. They are affordable and well made. They are designed for different stages of Weaning and further interactions with food, ranging from 4 months right up until Toddler ages. Our son found the spoons easy to eat off and the divider apple plates are a great idea when trying different foods at meal times. Or for separating the meal and the dessert when you get to that stage.
Designs 5/5 Features 5/5 Value for Money 5/5
Thank you for reading this post today, I hope you have found it interesting. If you try any of the products that I have recommended then please let me know in the comments below if your little one liked it.
If you have any questions about any of the products I have mentioned then feel free to also comment and ask me anything, I will do my best to answer you honestly.
A wonderful sensory related toy that will be fun for your little one for years to come.
As part of being an Argos Tester I often get sent items for reviewing purposes. This recent campaign has been surrounding Fisher-Price toys and learning. It has been a great opportunity for me to introduce my son to various new things and build that level of curiosity within play time and learning.
Learning about Shapes, Numbers, Letters, Words, Songs, Music all by encouraging the ability to push and press buttons to gain a response.
The Fisher-Price Game and Learn Controller is one of the items that can easily grab a child’s attention. With a variety of buttons to press, a toy that is ergonomically designed and easy for small hands to hold too. Paired with its bright colours, lights and sounds, it was already a winner and we had only pressed three things when it came out of its box.
You can see the various buttons in shape, size and colour, all attracting the child to the toy.
This game pad has a range of sensory aspects such as letters, shapes, lights, sounds, music, numbers, words and songs, plus various things to push and pull on its surface.
The centre of the pad lights up and has different coloured lights that shine out from where the happy and smiling face is. All of the buttons are brightly coloured & inviting.
At the top there is a clicker disc and a switch to toggle for more fine-motor playing.
It has two settings, one that focuses more on numbers and the other on sounds and music. It has so many novelty noises too that you would find within actual games such as “dun dun dun” and “splash”. Other noises include an Engine from a Racing Car, a few Sci-Fi sounds and fun game jingles.
The controller also has positive reinforcements such as “Well Done” and “Brilliant” as well as Game sentences like “Power Up” and “You Win”.
This toy is one that will grow with my child because it has two different levels for them to go through. It is designed for children ages 6 months to 36 months.
The buttons are perfect for small hands and the bright colours, shapes and letters encourage learning.
It certainly has reference to real life items too, such as gaming controllers for consoles and remote controls. Our son has recently become very intrigued by our phones, remotes and other devices that require you to press buttons on their surface.
We are very happy with how entertaining the game controller is & our son presses it with ease all on his own. The sounds and music are all very catchy, and the toy has been used daily since I received it to review. Our son picks it up out of a bunch of toys available, so it’s been a real hit in our house.
Toy Details Ages 6 months + Requires 3 x AAA Batteries (Included) Toy Size Height 20.3cm Width 16.5cm Depth 6.9cm
Would I recommend this product?
Yes I would. I give it 5 ✩‘s
Manufacturing Quality 5/5 Overall Design 5/5 Toy Features 5/5 Entertainment Value 5/5 Development Value 5/5
Overall the Fisher-Price Controller has great entertainment value while getting your child to learn at the same time. Our son really enjoys every aspect of it, be it the pressing or clicking of buttons, listening to the sounds or jingles, and even just holding the toy by himself. It allows independent play by encouraging the child to do things for themselves, both in imagination and physical
This is a great new price currently at just £7.98 at Argos. (Price correct as of publish date for this post).
If you want to learn more about this toy you can visit the link to it for the Argos website here
Thank you for reading this review today, for more of my opinions on some of the latest children’s toys then click the appropriate categories on my main page. Please come back again soon.
✩ Sabrina ✩
By continuing to use the site, you agree to the use of cookies. more information
The cookie settings on this website are set to "allow cookies" to give you the best browsing experience possible. If you continue to use this website without changing your cookie settings or you click "Accept" below then you are consenting to this.