Endo & Me ~ Endometriosis Awareness March 2020

In coordination with Endometriosis Awareness month this March 2020 I am going to be telling my diagnosis story. I know I have talked about my Endo in many of my posts, but this is the real true and honest story of mine. I will also be sharing statistics, symptoms and other information, as well as giving links to the websites you might find useful to find more out about Endometriosis if you wish to.

Not only is this going to be emotional post, it is raw, and it could also be disturbing for others. I am choosing to share some pictures post surgery too. I will therefore by putting a Trigger Warning on this post, because I am showing pictures but also talking about things that may upset others.

Please don’t let this put you off reading it, I think people need to see what effect this horrible condition can have upon the body. The female body already endures so much, so to have to deal with this condition too, it is exhausting. I should know.

There was light at the end of the tunnel for me, so this post does end on a positive, but I do believe more people need to realise the repercussions of having this debilitating and incurable condition.

Please continue reading now as I tell my story of pain, loss and eventual diagnosis.

Endo and Me

I have a love hate relationship with my body. Sometimes I love that I have a fast metabolism, it keeps me slim and I’m generally quite fit and strong despite my thin frame and small bones… however the Endo side of me causes unimaginable pain at times. It’s a chronic and incurable illness that doesn’t just affect your period like so many ignorant and uneducated people might believe. It is so much more than that because a number of things that happen to you can have a real negative affect on your life as well as your body. Let’s start at the beginning for me. I first had issues with my body when I was around fifteen years of age. I began getting unusual pain that I had to take medication for. All you could get at that age was paracetamol and ibuprofen tablets which were 200mg a piece and trust me; they barely touched the sides of my pain. As I got older I began having more symptoms, I didn’t know back then they were to do with Endometriosis. Except that whenever I sat in front of a doctor they tried to tell me it was anything and everything but that, it was never even mentioned. When I was seventeen I lost weight suddenly and quickly, I was tested for Thyroid issues and even Cancer! All tests came back negative and I tried to just deal with my awful periods and pains. Doctors were reluctant to explore further, so I let it go. At 19 I was fed up with the ridiculously heavy flow I had every month and the fact that I had no regular cycle, it was so exhausting and an anxious time. So after some persuasion on my part, I went on to a contraceptive pill. Regulating my cycle was a bonus of the tablets, and for the first time in my life I could be social with confidence. By knowing when things would be occurring allowed me to be at home with my hot water bottle and tablets when I needed to be.

When I was 25 I came off all medication in the hope of starting a family. Little did I know that all the pill had done for years was masking other symptoms of my Endo. When I had been off it for just six months I had such pain that it began affecting my everyday life. I cancelled social time with friends and family, I ended up avoiding things that I usually enjoyed because I was worried about being unwell in front of people. This caused me to suffer with anxiety, and that never went away, it just got worse as years went by… and so did my pain.

When I failed to conceive for years I went to my doctor and had various tests, blood tests for Thyroid, Hormones and Vitamin Deficiency amongst them. Then when everything came back with no issues and my pains were so bad that they affected me daily, I began seeking more answers. Endometriosis or Polycystic Ovary Syndrome was just two conditions that female members of my blood line suffer with. I must have told this to over a dozen doctors over the years. There are correlations between female genes that are often ignored. It wasn’t until I finally conceived after three years of trying, and then I tragically miscarried, that I ended up in Accident and Emergency every four weeks when I got my period, and I began getting sussed on this…

When I lost my baby I blamed myself and it made me depressed. I was so unwell physically I just didn’t know to what extent just yet.

So to help my state of mind I kept a diary, what I ate, what I did daily, what my pains were and where, I kept track of my cycle down to the hour and tried to make sense of it all. I looked for answers online and anything that told me what it could possibly be. Going in and out of hospital with no answers was exhausting, and it was wasting so much time too.

One afternoon I had written out all of my symptoms and matched them to the condition Endometriosis. All I wanted was someone to take me seriously and try and attempt to diagnose me. Instead I was in hospital nine times over the course of eighteen months. I had one MRI, seven ultrasounds, I went on a drip three times due to dehydration, I was given antibiotics twice, I had examinations with five internal swabs checking for infections… Nothing came back with anything concrete. On an ultrasound they told me that I had had a cyst that had burst. That time I ended up almost passing out in the bathroom at home from the pains, I was vomiting and couldn’t keep anything down. A&E was the only option when I had so much blood loss and was so sick from pain that I became dehydrated and needed a drip.

When I was admitted during the period that came after I lost my first child it was clear that I was incredibly ill and needed help. I had doctors who wanted to take me to surgery to check my appendix and my bowel, but I kept telling them it was Gynaecological. After I had a complete meltdown and shouting because I was kept nil by mouth for three whole days while two doctors argued over what to do with me, a lovely doctor who was a cancer specialist offered to do a basic laparoscopy on me that evening, to simply look inside me and take some pictures, so I could be passed on to whichever department I needed to be. This was the turning point for me; it was the start of my actual diagnosis. Over thirteen years since my first unexplained pains had begun…

It was severe. I was diagnosed with Stage 4 Endometriosis, with a mass the size of a Tennis Ball attaching my Left Ovary, Bladder, Bowel and Womb to each other. My organs were all pulled off to the left side of my body, which was contributing to other symptoms that I was having, including bloating, bowel pain and problems, pain when I had a full bladder and pain during intercourse. The pictures that were taken inside my body showed extensive Endometriosis, like a mesh of tissue, thick cobwebs and various sized pockets of blood. At this time I had been ill for a long time, and I had lost weight, I was a size 6 and I didn’t feel like me anymore. The pain was all I knew some days. Having a diagnosis was like a light bulb had been turned on in my darkened room…

I was lucky because there was an Endo Gynaecologist Specialist at my local hospital. After speaking with him he agreed to operate, to try and save my left ovary. I wanted to be a mother so badly and he understood this. We also agreed to check for reasons why I couldn’t carry a baby thus far, four years of trying and a miscarriage was an indication things weren’t right. And he wanted to find out if it was all down to this Endo and the position of my organs. He would also do the dye test on my Fallopian tubes while I was under to see if they were clear of Endo too.

So I was popped onto his waiting list for surgery twelve weeks later. Every day was hard during that time, it was a blur of medication and hot water bottles and I had to give up work and go off sick after trying and failing to do my shifts and ending up just collapsing. After dealing with the chronic pains during that time, having hardly any sleep because I couldn’t get comfortable and my constant anxiety and nausea… I finally went in for my surgery…

The day afterwards I felt like a new woman, this man and his team had literally given me my life back. It was bad, but they had fixed me for now… I had had the Endo mass and tissue removed, then my organs gently coaxed back into place, my tubes flushed, my bowel that was damaged had a resection, and my left ovary was carefully saved. I could feel that constant pressure was gone; there was no more dull pain in that area. In fact recovering from the surgical incisions wasn’t anywhere near as bad as the pain I had lived with every day for years. I stopped taking pain medications three days after I got home from my surgery, because I felt like I could deal with the pains I was getting, which were less than ten per cent than what I was used to. How mad is that?

The worst thing about the surgery for me was the gas, it fills every part of your body as it absorbs and fills the spaces between your organs, it can be very painful until it’s gone. I had to drink so much peppermint tea to help with the bloating! Below is my abdomen after surgery, you can see I’m swollen and bruised and you can see the three incision sites.

Days After Surgery…

The worse thing about having Endo is that it has stolen friendships away from me, and it put strains on other relationships too. People don’t understand how you can look so “well” on the outside but feel incredibly ill on the inside. Pain is something your body gets used to but it is the fatigue that most people struggle to deal with. Sometimes I would visit family and I would be talking one minute and falling asleep the next. Even after my surgery, although I didn’t have the same pain levels as before, I was still keeping up with the feelings of being tired, and my periods were exactly the same.

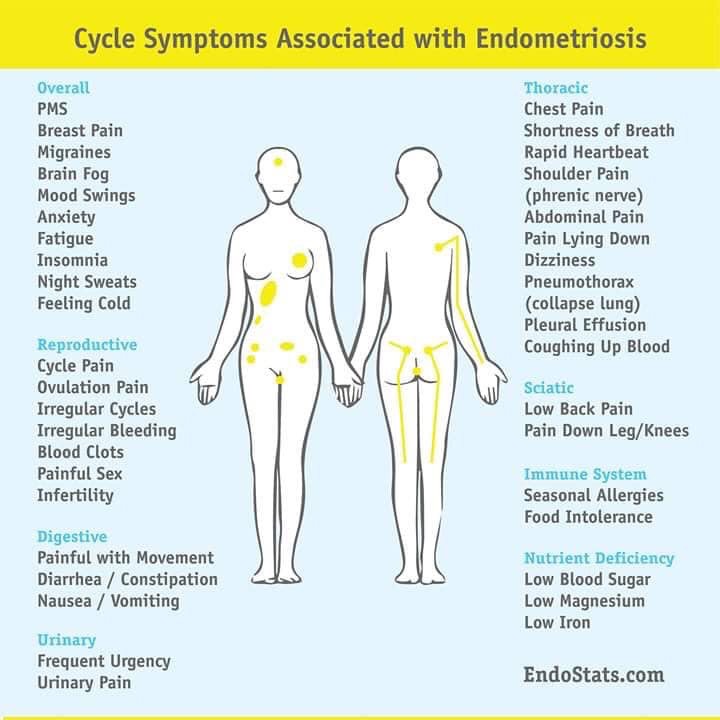
Did you know that Endometriosis also causes a whole range of other issues? I had over half of these when I eventually got diagnosed. Most women get told they have painful periods and IBS. Most of us only have these things because we have Endo. Here is a great diagram that was shared on the social media Endo pages earlier this month outlining most of what women like me have to deal with, sometimes these are daily symptoms, some are infrequent but they still occur, often brought on by hormone changes and cycles.

I experience a great deal of these symptoms. Some are daily and some are infrequent.

Endo Warrior is a term I use often to describe myself, because some days it feels like a battle just to get through the day. I am extremely lucky because I got the time to recover from my surgery, both body and soul searching too. Then when I was ready I had to do IVF in order to have my son. He is my entire world and I would be lost without him. I look back at all that I’ve been through and I am proud that I never gave up, despite everything.

If you want something in life and you have to work harder to get it then it makes it all the more worthwhile. I overcame a needle phobia and dealt with my Endo pain during my IVF treatment. But I would do all of it again if I had to. Being a mother is one of the most incredible and rewarding things I have ever done.

I realise some women have too bad a diagnosis and never get the chance to be mothers because of this condition, and that makes me sad. I class myself as one of the lucky ones.

To anyone out there who is suffering, make your voice heard. I once said to a friend that “Living a life in pain is like letting pain decide your life for you” and I got to a point where I just couldn’t live like that anymore. If your pain is ruling your life, then perhaps it is time to do something about it. Find a Doctor willing to listen and willing to take you seriously. Keep a diary, show that to a specialist if you’re lucky enough to get referred quickly.

Endometriosis has cost me so much in my life already, and because there is no cure I deal with those uncertainties for my future every single day. I still class myself as one of the lucky ones, I still have all my organs at the moment, and I was able to carry and have my son. I love being a mum. I try not to let my pain get in the way of that. As my son gets older I will be able to explain why mummy cannot bend and play today, and I will come up with other things for us to do together on those, my bad days. But I know it won’t stop me from being the mother he deserves. Of that I will make sure.

Website Links To Endometriosis Information

Endometriosis UK
Endometriosis NHS

Thank you for visiting Severn Wishes today. If you would like to leave a comment please do so, I hope that my words help even just one person to stand up for themselves, to explain to a doctor that you want answers, that you deserve to live a life without pain. Stay strong.

✩ Sabrina ✩

Argos Tester Review of the BaByliss 2993KSU Keratin Shine Volume Hot Air Styler

Everything that is supplied in the box.

Being an Argos Tester I often get sent items for the purpose of a review. This month I was offered an item under the category of Personal Care ~ Hair Products. This post has been written about a product that I have been supplied in order to review it and test it.

Fitted with the 38mm thermal brush.

I chose to review the BaByliss 2993KSU Keratin Shine Volume Hot Air Styler. This amazing Dryer Styler has two heat settings and a cool setting, as well as being made from Keratin infused ceramic. It’s lightweight and easy to use. The BaByliss 2993KSU has two sized thermal brushes, one 50mm and one 38mm. They have also included a styling nozzle and the cord is a handy 2m in length.

This styler is designed to dry your hair while creating volume and a smooth finish. I have fine long hair so I wasn’t sure how well this was going to work for me. It dried my hair in a matter of seconds even on the lowest heat setting. Using the different sized roller attachments you can create different levels of volume. I needed to use products to stop my hair from going frizzy, because of how fast it did dry.

This device can only be used on damp hair and not wet hair, due to it being electric of course. Always use a heat defense spray on your hair as well before using dryers. Overall I found this device is a good time saver, it did make my hair straighter and smoother, and I used products before and after using it to tame any frizzy sections. I’m not sure how much volume it would create on fine hair, people with thicker hair types might find that aspect more beneficial. It did put a kink to the ends of my hair. I have used it several times but I also want to experiment more with it over time and see if I can work out how to create more volume.

I enjoyed testing this product and always wanted to test something like this which combined a styler with a way to dry your hair. I found that all I needed was some products to tame the frizzy flyway’s from my fine hair. I would use this product if I needed a smooth style after washing my hair, for both quickness and convenience, I feel like I would use this over a dryer and separate straightener.

Easy to Use Settings

Product Name:
BaByliss 2993KSU Keratin Shine Volume Hot Air Styler
Product Information:

1000W Power
Two Heat Settings and A Cool Setting
Two Buttons for Easy Interchangeable Attachments
Keratin Infused Ceramic Finish
Frizz Controlling Ionic System – Smooths Hair and Enhances Shine
Lightweight and Easy to Use

Interchangeable Attachments for Drying, Shaping and Adding Volume.
Two sizes of Thermal Brushes 50mm and 38mm.
Styling nozzle
Swivel Cord is a handy 2 metres


Argos Website – Click here for the link to the product on sale at Argos.


Manufacturing Quality 5/5
Overall Design 4/5
Unique Features 5/5
Performance of Product 4/5
Ease of Use 5/5

As you can see in my image above I chose to style one side of my hair in order to show the products potential. It did give me some volume towards the roots and curled at the ends of my hair, however I find that because my hair is thin it becomes frizzy the more I use it. It also dried so fast even on the lowest setting, it took three brushes and was dry. If I needed to dry and style quickly I would use this device. Otherwise I would usually let my hair dry naturally, like the left side of my image, it is naturally curly.

✩ My Argos Tester Review ✩

My favourite feature of the BaByliss Keratin Shine are the styling heads, they brushed through my hair gently and smoothed it out in seconds. Although I have fine hair and knew it wouldn’t take a lot to dry, I was impressed with how soft my hair became. I wasn’t able to get a great deal of volume from using it but I think that’s down to my hair type.

Thank you for visiting Severn Wishes today, I hope you have enjoyed this review. If you have any other questions about the product then please leave me a comment or click on the links above to visit the Argos website.

✩ Sabrina ✩

Sweet Treats Week – Day 3 – Sabrina’s Rocky Road

Welcome to Sweet Treats Week on Severn Wishes. This half term I wanted to share my top 5 baking treats with you all, hopefully you’ve got some time this week to make them with me! Check out my Instagram for more food pictures and recipe ideas too!

Day 3 is Sabrina’s No Bake Needed Rocky Road

Definitely one that the kids can get involved in, and this tray bake requires zero baking! You just need an adult to do some melting and chopping! This recipe will make 24 delicious squares of Rocky Road and you can do a custom set of ingredients to suit your family too!

Start by gathering all of your favourite things and a giant bowl to mix them! You’ll need chocolate for melting which will be the glue to hold all of the other ingredients together! You also need a deep tray to squash it all down into before you refrigerate it too!

The best thing about Rocky Road is that it’s totally customisable to your family and you can’t really get it wrong! Plus it’s fun for everyone! There’s only one danger with Rocky Road! Just don’t go eating all the singular ingredients while you’re making it!

I love to put things in mine you don’t usually find in a supermarket style tray bake, sometimes you find Nuts and I don’t put any of those in, some also contain fruit, which is a personal preference to whether or not you add this in. I will outline all the measurements below, and you can make your selection of your favourites.

Step 6.

What You Will Need

A Large Mixing Bowl – the bigger the better!
A Wooden Spoon or Two
A Saucepan (to do the melting part)
A Spatula
A Sharp Knife
Tea Towel and Rolling Pin (Or something to smash the biscuits with)
Baking Parchment to line your tray
A Large Tray that will still fit in your Fridge minimum of 1.5 inches deep

Ingredients

Mini Marshmallows 50g to 60g
Maltesers or Honeycomb Shards 50g to 60g
White Chocolate Chips 30g to 40g
Biscuits 150-200 grams (You can use a mixture of biscuits like I do, Digestive, Shortbread and Ginger are my faves, Ginger give a nice taste!)

Milk Chocolate (for the melting) 250 grams
Dark Chocolate (for the melting) 120 grams
Butter (for the melting) 140 grams
Golden Syrup (for the melting) 4 tablespoons

Additional Ingredients to Personalise your version of Rocky Road

Your “Special Ingredient” can be anything, between January and April I tend to use Mini Eggs or other Easter related Mini Chocolate Eggs etc. I just cut some of them up for going inside the bake. Other things that go well and add colour are Smarties, Aero Bubbles anything that sort of size etc.

Use around 70g to 100g of your chosen ingredient and remember to save around 30g of it for the topping!

You can also add any of the following things that all go brilliantly with this type of non-bake recipe – Cherries / Cranberries / Nuts / Raisins etc…

You will need 50 grams of your chosen one/s and make sure you then increase the depth of your tray by half an inch / 2 cm if you decide to include more than one of these ingredients. You could also choose to remove say, the white chocolate from my main list, and add in Raisins instead, just keep the ratio the same…

The customization is all down to you and your family! Go crazy! Have fun!

Method

1. Measure out and then Crush the Biscuits into mixed bite size pieces and add them to a large bowl.

2. Next, gather all your additional ingredients as outlined above, measured correctly and add these to your large bowl. The aim is to then mix all these dry ingredients together so they are evenly distributed.

3. Melt the Milk and Dark Choc with the Syrup and Butter until Smooth. Set 150ml of this melted chocolate mixture to one side in a jug to cool a little (you need this for the top of the mixture).

4. Add your melted mixture from the saucepan to your large bowl, coating all of the dry ingredients, keep mixing it quickly but carefully. You need to cover all of them in a light chocolate covering before it cools down too much.

Step 5.

5. Transfer from the bowl to the tray making sure the parchment is already lined inside it and smooth the rocky road out as flat as possible, push it down gently using a wooden spoon. Then pour the remaining melted chocolate (from the jug) over the mixture and smooth that all over the top with a spoon or a spatula, you need to try and coat most of the mix if not all of it, TOP TIP don’t forget to coat up to the corners!

6. Finally add your chosen Chocolate Decorations like Mini Eggs. Push them down a little so that they stick to the melted chocolate. Score the pieces of size you want to cut once it’s solid, using a knife (adult part only). Then put the whole tray in the fridge to set for a couple of hours.

7. To serve it, gently remove the paper from the baking tray, lay flat and cut the Rocky Road where you scored into it earlier, do this using a knife that has been run under hot water (another adult only part). Remember to put the pieces into a seal-able tin or tub afterwards to make sure it stays fresh. Once set and cut you just store it at room temperature, for the best results eat it within 3 days.

Step 2.

Thanks very much for joining me for this recipe on Sweet Treats Week!
I do hope to see you here again tomorrow! See my social media for some videos while I am baking these as well! Including versions and what I use to make my bakes dairy free too!

If you make any of my recipes be sure to tag me on social media, leave me a comment here on my blog. Any questions about a recipe please don’t hesitate to ask them! If you recreate this recipe somewhere else please credit me for it and name me and my blog, or even better link back to this original post too! Thanks everyone!

 Sabrina 

Sweet Treats Week – Day 2 – Sabrina’s Warm and Gooey Cookie Dough

Welcome to Sweet Treats Week on Severn Wishes. This half term I wanted to share my top 5 baking treats with you all, hopefully you’ve got some time this week to make them with me! Check out my Instagram for more food pictures and recipe ideas too!

Finished Cookie Dough, Yummy!

Day 2 is Sabrina’s Warm and Gooey Cookie Dough Recipe.

This fantastically easy recipe is great if you want a hot desert ready in under an hour. It’s egg free too! I make mine with a dairy free butter and use dairy free chocolates. But you don’t have to if you prefer the real thing. This warm desert is best served about thirty minutes after it’s finished baking, cooled off a little bit but while it’s still warm and gooey. Great on its own or you can pair it with a nice vanilla or coconut ice cream for example.

What You Will Need

A Glass Dish measuring approximately 12cm x 17cm / 5″ x 7″ and preferably with a lid for easy storage after its cooled down!
A Large Mixing Bowl
A Wooden Spoon
A Sieve

Ingredients

150g Plain Flour
115g Butter (Dairy Free Spread)
110g Light Brown Sugar
Water (Per Tablespoon – See Method)
1 Tablespoon of Vanilla
Chocolate Chips or Chunks (As many as you like but a nice ratio between dough and chocolate) I used around 60g of dairy free chocolate chips.

Additional Information: This sized portion will make 4 portions when transferred into pudding bowls. This is a rich desert and you can divide it up into 8 portions if you want to have it accompanied with something else such as ice cream. Keep any leftovers inside the glass dish with the lid on at room temperature, eat it within 48 hours. If you want it warm and extra gooey then microwave a portion for 20 seconds in the microwave.

Dairy Free Cookie Dough with Various Dairy Free Chocolates

Cookie Dough Variations

Add Chunks of Chocolate Brownies. If you have already made brownie earlier in the week you could put small lumps of your softest brownie into the cookie dough along with some chocolate chips. Just ensure they are submerged in the dough so as not to overcook near the top!

Method Steps

1. First you will need to soften the butter a little, add the measured out spread into the large mixing bowl, melt it at 10 second intervals in the microwave and stir after each one. Once softened you add your measured out sugar. Mix until smooth and combined.

2. Sieve your measured flour into the bowl now, make sure once it’s all in you carefully mix it. Then when smooth you add your Vanilla and Chocolate Chips.

3. You now need to add some water to the mixture, add it a tablespoon at a time until you achieve a Cookie Dough consistency. It usually takes between 4 and 8 tablespoons to achieve the dough like substance. Once you’re happy transfer it to your preferred baking dish.

Step 3. Ready to Bake!

4. Now it’s time to bake! Preheat your oven to 180’c and cook in the centre of your oven until the cookie dough top goes golden and slightly brown. The best way to test the dough is right for you is to carefully touch the top, beware it will be hot, so leave it a minute outside of the oven and push down on the top. I like mine to be like a Cookie on the top, and then soft and gooey underneath! Mine took around 24 minutes!

5. As I described above, leave the glass dish out of the oven for around 30 minutes after the bake is complete. Serve the dough after this, it won’t be too hot that way, it should just be warm and gooey!

Thanks very much for joining me on my blog for this recipe! Thank you very much for joining me for Sweet Treats Week! I do hope to see you here again tomorrow!

If you make any of my recipes be sure to tag me on social media, leave me a comment here on my blog. Any questions about a recipe please don’t hesitate to ask them! If you recreate this recipe somewhere else please credit me for it and name me and my blog, or even better link back to this original post too! Thanks everyone!

 Sabrina 

February 2020 Treatbox Reveal

Hello Treatbox Fans!
It’s time for the February 2020 Treatbox Reveal and Review!

Greeted by baby pink paper and a sticker that reads “Awesome People’s Club” the February treatbox smells nice as I open it up…

The first thing I notice is the scarf, wow it’s beautiful! It has instantly become my favourite item inside this month’s box. I look forward to wearing it.

White Scarf with Triangular Pattern Details
“Dream Big” Long Cosmetics Bag / Pencil Case
“Don’t Worry if Today Feels a Little Grey” Treatbox Card
Self Care Print A5
Korean Beauty Mask – Purifying Pink Clay Sheet Mask
Whitworth’s Shots – Berry and White Chocolate – Healthy Snack
Pink Heart Bath Bomb

A Sticker – I think! Will Update! “Beautiful Inside and Out”

My Honest Opinion

Here we are everyone, it’s February! I was looking forward to this box, as it could have literally been anything and the themes aren’t a thing anymore. Knowing it would be self care and making time for yourself is always good, but it’s also different for every person.


I’m very pleased with most of its contents. I especially like the scarf, the case and the shots. The quotes and the quality in these three items are right up my street. The card is also nice and has a good quote to remind us all that grey days do eventually pass. The bath bomb is a nice touch but I honestly don’t have much time to relax in the bath these days! HA!

We do have yet another Korean Beauty, which I would like to see something else inside the next box, perhaps still beauty but not a mask, maybe a lip balm, a stick on tattoo or even something like jewellery perhaps… the final item I think might be a sticker of some sort, but without the useful calendar and explanation page I can’t tell you what it is! I shall find out from Zoe and update my blog accordingly!

Finally the quote on the A5 print this month hit home to me, we often find ourselves so busy to do self care, I know I do. Some days I do feel I am just giving what is left, and I want the people directly in my life to have the best parts of me.

Overall I have really liked the February box, there have been some nice items and a good improvement on the products inside too.

Are you thinking of ordering a TreatBox for yourself or for a gift for someone?

Then you can find Treatbox subscriptions and build your own box at their 
website

Check out my previous Treatbox unboxing posts in this unique category of mine called ‘Treatbox’ it is specifically for these box reviews and reveals – Severn Wishes Treatbox.

Don’t forget you can follow my social media such as Instagram for more Treatbox photos and updates throughout the month including me using items! @SevernSabrina

Thank you for visiting Severn Wishes, have a great February!

✩ Sabrina ✩

All The Free’s From Chocolate Cake Recipe

It’s time for another Free From recipe!

As most of you regular Severn Wishes readers will know, my son was born with a number of allergies. I love to cook and baking is something that I am gradually getting better at. I wanted to make up a recipe that was easy and that I could use with what I usually find in my baking cupboard. But not only that, it had to taste like proper chocolate cake. There’s nothing worse than it not resembling what you know and love!

This moist and soft chocolate cake recipe is egg free and dairy free. You could even change the flour to make it gluten free too if you like. I made it normally first, and then with gluten free baking flour when my sister (she’s coeliac) visited us, and both times it still baked as a soft sponge. Delicious! A great treat if you’re doing Veganuary this year! Why not make this Vegan delight at the end of the month? Give you a treat to look forward to!

This cake serves 10 people, you only want a small slice as it’s rich!
Time to Prepare, Make and Bake is… 1 Hour 30 Minutes
Preheat your Oven to a Temperature of 180’c or 360’F
You will need baking parchment to line your 8″ Tin
You shall need a Jug for the Sauce, one Large Bowl and one Small
You will also need a Sieve, a Spoon and a Whisk
And finally a Cooling Rack

Ingredients

For the Cake:

175g Flour – I used plain or a mixture of Plain and Raising, or use GF
200g Caster Sugar
50g Cocoa Powder
1 Teaspoon Baking Soda
1 Teaspoon of Vanilla Extract – You could use Mint Flavouring instead
240ml Tepid Water
120ml Vegetable Oil

For the Sauce to pour on top:

4 to 6 Tablespoons of Tepid Water
2 Tablespoons of Golden Syrup or Maple Syrup
2 Tablespoons of Cocoa Powder
130g of Icing Sugar

Sabrina’s Free From Chocolate Cake

Method – Making the Cake

Step 1. Sift the Flour, Cocoa Powder, Caster Sugar and Baking Soda together in a large bowl. Make sure you mix them together thoroughly to combine.

Step 2. In a small bowl mix oil, water and vanilla together and stir until mixed.

Step 3. Gradually stir your wet mix bowl into the dry ingredients. Once you have combined them use a whisk or hand processor in order to make the mixture smooth. Mix until all the liquid is combined with the dry mixture.

Step 4. Pour your smooth mixture into the lined cake tin and shake gently from side to side to make it even inside.

Step 5. Bake in the Centre of your Preheated Oven, between 26 and 32 minutes depending upon oven type. Keep an eye on your cake so that it doesn’t over bake, use a knife of skewer in the centre, when it comes out clean it’s baked.

Step 6. Once cooked gently transfer the cake to a rack so that it can cool. You don’t want to pour on your sauce until it is cooled. Make sure the cake is completely cool before serving, you don’t want your sauce running off!

Method – Making the Sauce

Step 1. Sift the cocoa powder and icing sugar together in a bowl. Mix with a spoon until combined and a brown colour over all.

Step 2. Pour the syrup of your choice and the water into the bowl, make sure you stir it immediately and keep stirring until the ingredients resemble a smooth consistency. Start with 4 Tablespoons of water, if it’s not resembling a sauce that is pour-able then you can add more, one spoonful at a time until it’s how you want it to be. It can vary on the size of the spoon you use for example. TIP: Always better to start with less water and add it gradually, if it’s too wet to start with then you’re going to be measuring out more sugar which is a consistency much more difficult to get right.

Step 3. Cover this sauce until your cake is cooled and ready to serve, cut your cake slices, plate them up and then pour the sauce on to each piece. It’s easy to make more sauce if you need it and only takes a matter of minutes!


Thank you for coming to Severn Wishes today to read this recipe blog post. I hope you have enjoyed it. Can you please leave me a comment on this post if you try the recipe, and let me know what you think!

Have a great week!

Sabrina

January 2020 Treatbox Reveal

Hello There! Happy New Year!

Welcome to the January 2020 Treatbox Reveal and Review.

So inside the Treatbox the sticker reads “Warning, Opening this Package will result in Happiness” and there are also two pieces of paper.

The first one reads “Happy New Year” and tells us that Zoe is making some changes to these monthly boxes, to make them about Positivity and “Looking After Yourself”.
She has chosen to remove the leaflet about the products and that also means that we no longer get the Calendar Print. Zoe says if we have her Treatbox Newsletter then we could download one. But I didn’t notice that available on my email and it’s now 10th January so is there much point? I don’t have a printer, so I wouldn’t be able to use the calendar unless I used it digitally. I liked having the calendar to write on so I will miss this aspect of the box… it used to go on my fridge…


The second paper says “January” and outlines that this box will be about Positivity and ways we can introduce more of that into our daily lives. The card tells about ways in which we could do that at home. In short, Start the day on a Positive, Focus on what is Good and finally Set Short Term Goals. These are all good points, I almost wish the back of the card had a positive quote or a pretty picture on the back of it too though!

This box has a dark navy tissue paper wrapping up all this month’s treats inside. Inside the January box you shall find…

Organised Chaos Mini Notepad
A “Keep Going” Treatbox Pin

Vitamasques Evening Goggle Eye Mask – Repair and Relax
Sweet Tooth Pack of 2 Air Fresheners – Apple and Very Berry
Sweet Tooth “Pretty Little Thing” Speech Bubble Ring Dish
Willow & Rose “Smile” White Keyring Leather Charm

My Honest Opinion

So I get that Zoe wants to revamp the boxes and that’s great, although it is a shame the calendar is no longer included. I love the positivity that she wants to spread. However if this is going to be a face or eye mask every time then I can’t see me keeping up my subscription. We also have yet another ring dish, those who are regular subscribers will probably have about seven of these now. I gave two away recently I had never used. You don’t need a lot of these things, otherwise they just clutter your home unnecessarily. The air fresheners are also not my cup of tea, they are the sort of thing you get for free when you have your car cleaned! I believe that is the poor item this month.


I will end on a positive however, the pin is fantastic! It’s just what I needed to hear at the moment, the “Keep Going” quote resonated with me this month and I like its rainbow design as well. The keyring charm thing is also nice and of good quality, and reads “Smile”. It will make a nice bag charm, I may put it on my changing backpack to remind me to smile even if I’m changing a nappy ha! ha! The notepad is useful but I can guarantee I have enough note books and pads now to last me around ten years, and I regularly make lists!


A mixed bunch for this newly designed monthly box, so I will see what the next two are like. My birthday is in March so I will subscribe until then as a gift to myself, then I think I will reevaluate.

Are you thinking of ordering a TreatBox for yourself or for a gift for someone?
Then you can find Treatbox subscriptions and build your own box at their 
website

Check out my previous Treatbox unboxing posts in this unique category of mine called ‘Treatbox’ it is specifically for these box reviews and reveals – Severn Wishes Treatbox.

Don’t forget you can follow my social media such as Instagram for more Treatbox photos and updates throughout the month including me using items! @SevernSabrina

Thank you for visiting Severn Wishes, have a great January!

✩ Sabrina ✩

Fun Crafts With Children This Christmas

Hello everyone, today I’ve gone all arts and crafts on you! Most children break up from school today and I’m sure a lot of you are trying to come up with ways you can entertain everyone without it being Christmas movie after Christmas movie. Hands up if I’m right!

So what about some crafting! You can choose whichever one of these that you already have the necessary items for!
Pick one or do them all over the festive season! They make great tree decorations or cards, and perfect gifts for family members too!

Top Tip: Pop your little ones name and the year in the corner of the decoration if you’re keeping it, make one every year and compare the sizes!

It’s amazing what you can make out of a few bits of card, a pack of mixed pens and some washable paints! Why not give one of these awesome craft ideas a go with your little ones this Festive Season!

I always love the idea of doing cards! You can combine any of the below ideas and then simply cut out your finished design and stick it on to a piece of card.

Reindeer Foot Print
Penguin Foot Print
Snowman Foot Print
Christmas Tree Foot Print


Reindeer Hand Print
Robin Hand Print

What Will You Need:

A Sensible but Fun Adult 😉 with Baby Wipes at the ready!
Coloured Paper and Card
Pack of Mixed Coloured Pens, Glitter Pens are also cool too
Double Sided Tape or Pritt Stick or Glue

Washable Paints in mixed colours – I like the Crayola ones
A few different sized paint brushes or a sponge for skin application.

Scissors (one reason you need an adult)
Stickers if you want to add those or some googly eyes for your print animals

You may need a ruler, a hole punch and string or ribbon if you plan on making anything into a hanging decoration.

Use Washable Paints and some Card to make your very own Tree Decorations or Christmas Cards. It’s easy to do Hand Print Robins, Wreath or Reindeer! Or Footprint Trees, Snowmen, or Penguins!

How To Make It…

Paint your child’s Hand or Foot and carefully press it down on to your chosen card or paper.
Let it dry overnight somewhere warm.
Flatten the design for the next few hours once it’s dry.

Next you need to decide which Christmas theme to go for!
Paint, Draw or Stick on your favourite bits to make your design real!
Get an adult to do any cutting parts that are needed to make it into a decoration or card.

Toilet Roll Snowflakes are great to do too!
You need two toilet rolls per snowflake, glue, scissors, paint and glitter!
Tip One: Paint the Toilet Roll and Glitter it up first and then let it dry before cutting, at least overnight!
Tip Two: Cut all the pieces the same width and arrange it before gluing!
Tip Three: Tie some Ribbon or String to the top and hang in your home!

Thank you for visiting Severn Wishes today, I hope you enjoyed this Arts and Crafts post. Hopefully I will to see you here again soon. Have a great Festive Season!

✩ Sabrina ✩

Reindeer Child Foot Print

Argos Tester Review of the PDP Gaming LVL50 Wired Gaming Headset An Official Licensed Product for PS4

Being an Argos Tester I often get sent items for the purpose of a review. This recent Autumn campaign has been about Gaming Accessories, predominantly headsets.

On this occasion I chose the PDP Gaming LVL50 Wired Stereo Gaming Headset which is an Official Licensed Product for PS4
.

PDP Gaming or Performance Designed Products Ltd have designed an official licensed headset for PlayStation, specifically the PS4. This compatibility is designed to enhance the gaming experience by giving the best possible quality of sound.

This headset type can also be bought to be compatible with Xbox or PC but you need to choose the correct one from their stock available. See the Argos website for more details or pop in store and take a look.
Search for “LVL50 Official Licensed Headset” to see all of the available products.

Product Information: Gaming Headset LVL50 Official Licensed PlayStation Product that works with controllers that have a 3.5mm headset jack.
Product Name:
PDPGaming Headset LVL50 Licensed Product for PS4
Colours Available: Black/Grey with Blue
Price:
RRP £39.99

Headset Main Features:
Compatible with PlayStation 4 Dualshock 4 wireless controller.
Lightweight with padding along the head bar and ear cushions.
Cushion is made of soft, breathable and durable material.
This headset has high definition 50mm drivers.
There is a microphone attached to the left ear cup.
The microphone has a flip up mute capability.
There is an adjustable volume dial on the right ear cup.
All features are adjustable without needing to remove the headset.

Overall Scores 

Manufacturing Quality 5/5
Overall Design 5/5
Unique Features 5/5
Compatibility 5/5
Comfort 5/5
Sound Quality 5/5
Connectivity 5/5

I rate this headset 5 stars. My reasons are due to it’s features that rival some of the other types of headset on the market. Some other headsets also have microphones and mute capabilities, but the design on the wired LVL50 is both simple and effective. There is no need to remove it from your head in order to find the button because there isn’t one, you just push the mic up into an upright position to activate the flip-up mute. This bi-directional design is both effective and quick to administer while gaming.

Another great feature is the volume which is on the opposite side to the mic and features a turn able volume dial for Min to Max sound. The sound itself is incredibly clear through the ear cushions that feature nylon mesh fabric that is both soft and breathable. The clarity of both talking, music and sound effects through the headset is excellent.


The entire headset is comfortable to wear because it is so lightweight and even the headband has a cushion for comfort. The attached 3.5mm headset jack with cord is long enough to reach the controller and give enough slack for even those gamers who might have a lot of movements to make during their intense gaming sessions.


Finally I will end by saying that overall this headset is excellent for anyone who enjoys their PlayStation products and I would encourage them to purchase a licensed product such as this one, which is designed to coincide with their console and provide the best possible addition to their gaming experience. The quality of the sound is clear and precise, it’s one of the best headsets that I have had the pleasure of testing, I would highly recommend this headset to all who use PlayStation 4 products.

✩ Argos Website Link ✩
PDP Gaming Headset Link

✩ My Argos Tester Review✩

This headset has some great features like the mute capability with a flip up microphone, and the adjustable volume dial on the opposite ear cup. Talk about comfortable, this headset has cushions on the ears and the headband for hours of gaming comfort. I was very impressed with the clarity of the sound, the music, sound effects and talking through the headset and mic is clear and precise. It is one of the best quality headsets I have had the pleasure of using. I would recommend it for all PlayStation users.


Thank you for visiting Severn Wishes today, I hope you have enjoyed this review. If you have any other questions about the product then please leave me a comment or click on the links above.

✩ Sabrina ✩

November 2019 Treatbox Reveal

Hello readers! This is the November 2019 Treatbox Reveal
with me, Sabrina of Severn Wishes Blog.

Happy Treatbox Day!
My apologies for the delay in bringing you this November Treatbox reveal. I hope that you can forgive its lateness.

It has a pretty lilac tissue paper this month… Top Tip! Open the paper carefully and re-use it to wrap something for someone at Christmas this year! Recycle your Treatbox Tissue Paper!

Don’t forget you can follow my social media for more Treatbox photos and updates throughout the month including me using items!

Here are the contents of the November box.
This month there are 5 physical items in total, 10 Cards, along with 1 A5 Print and of course the usual Calendar Print.

November Calendar Print
A5 Print “Time To Relax”

Mindfulness Prompt Cards – 10 Cards
Sign Decoration “home”
Clipper Hot Chocolate Fairtrade Instant Drink 28g
Candy Kittens Bag of Sweets! Tropical Mango – Vegan 54g
Rose Gold Dust Sheet Mask – Moisturising Face Mask 20ml
Pink Sparkle Tealights – 12

My Opinion on the November 2019 Box

The items I like most in this month’s box are ‘home’ sign, the mindfulness prompt cards, the sweets and the mask.

I will be gifting away the hot chocolate because it’s not dairy free sadly, but I know of someone who will love it so it’s going in as a Christmas Stocking filler!
Ooo!

I am most looking forward to eating the sweets, hanging up my ‘home’ sign on the wall. And I will try using the mindfulness cards too for the coming weeks.

This is a positive card that I do intend to take inspiration from, this is a lovely idea to incorporate at the end of your day instead of a diary entry.
Candy Kitten Sweets are Vegan! And So Yum!
More of the mindfulness cards…
I actually achieved this card this month, two large bags of unwanted clothes and bric-a-brac have gone to a charity shop.
These candles smell nice…
Not much relaxing happening for me at the moment, so the mask is going in my drawer for a time when I have an hour or two free in order to pamper myself!

Are you thinking of ordering a TreatBox for yourself or for a gift for someone?
Then you can find Treatbox subscriptions and build your own box at their 
website

Check out my previous Treatbox unboxing posts in this unique category of mine called ‘Treatbox’ it is specifically for these box reviews and reveals – Severn Wishes Treatbox.

Thank you for visiting Severn Wishes, I hope you enjoyed this Review. See you again soon.

✩ Sabrina ✩