Product Review of the Maybelline Skin Perfector 4 in 1 Matte Makeup

Hello and Welcome to my Product Review today!

This Spring I became part of the UK Maybelline Team of Bloggers who Review products that are brand new out in the country. Maybelline New York is one of the leading brands worldwide for make up. I have been reviewing a few items, and today it’s the turn of the Vegan Instant Skin Perfector 4 in 1 Whipped Matte Makeup to go up on my blog.


To see my other Maybelline Reviews after you’ve read this one, please click the Maybelline Category on the homepage of my blog.

I have been sent this sample for free for the purpose of providing a written review and photography across my social media platforms. I am always honest in my critique and review a product solely upon my own personal experience of using it.

You can see Video content of my Reviews on my Facebook or Instagram

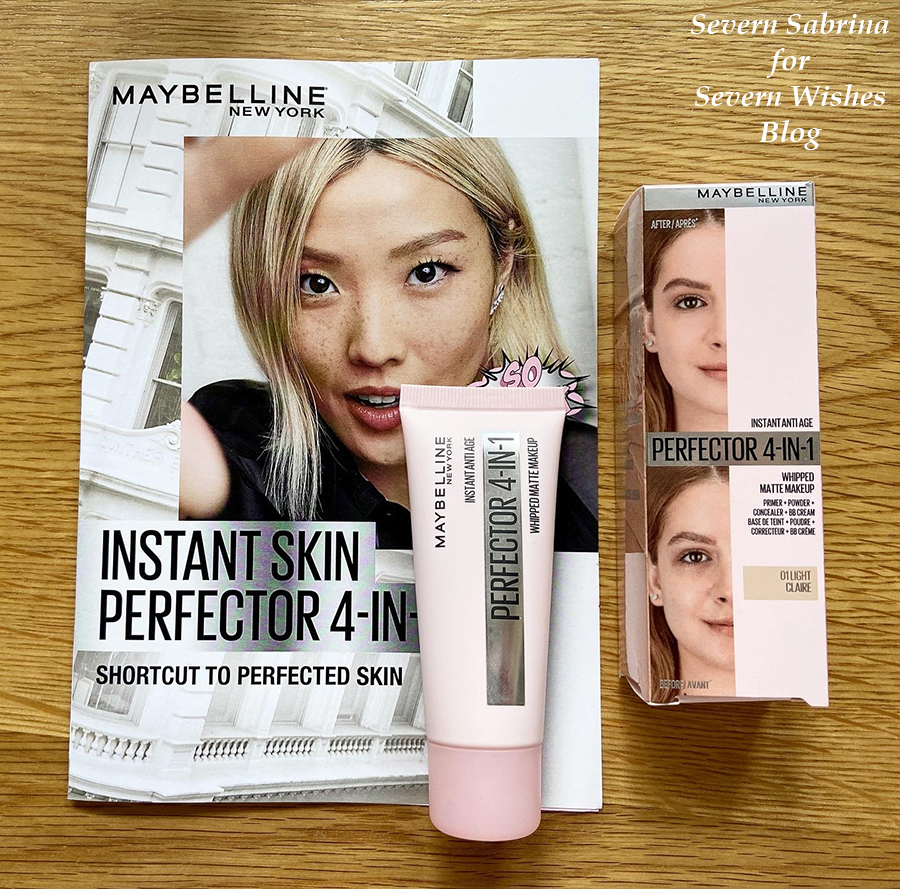
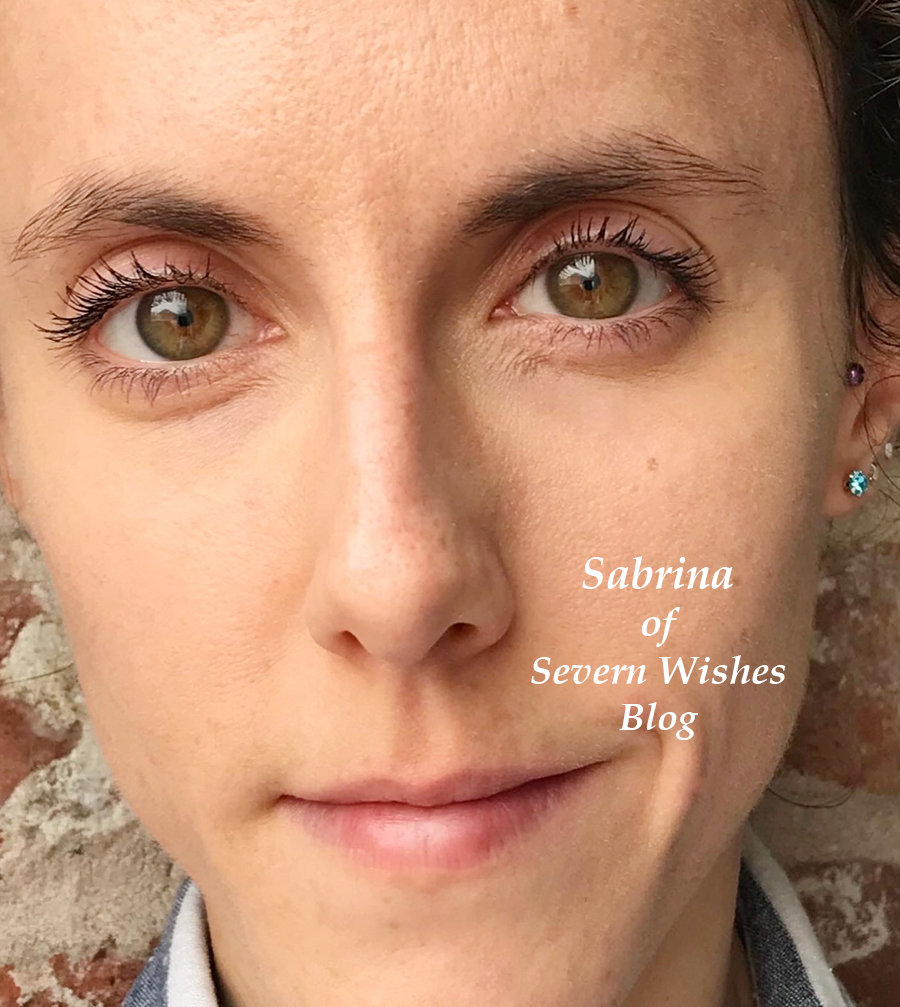
I was pleasantly surprised with this makeup because a little of it on your finger or brush goes a long way. It was so soft and easy to apply to my skin with a great match! Light was the colour I was matched with online, and it blended in well and minimised the look of redness, blemishes and even my dark circles somewhat too.

I highly recommended this product if (like me) you don’t have much time in your morning routine for applying makeup, As a single mum I need something that I can apply fast but without compromising on its effectiveness. With having a 4 in 1 application this cream saves me lots of time in a morning, and since the initial review I have frequently used it and applied it after my daily SPF moisturiser. I feel like there is barely anything on my skin, and I found my skin felt breathable compared to some makeup which can feel physically heavy set in the pores of the face. The Vegan formula is also something I can really get behind and I’m always trying to go Vegan friendly when it comes to makeup.


The 4 in 1 Matte Makeup was also easy to remove, I use a Garnier Face Wash and then a Garnier Micellar Water to remove any makeup that I apply.


I would recommend for people to at least try this makeup for themselves and see if they get as good a match, it has true to skin shades and self adjusts to fit your unique tone. I have sensitive skin, and I had no reaction to this makeup.
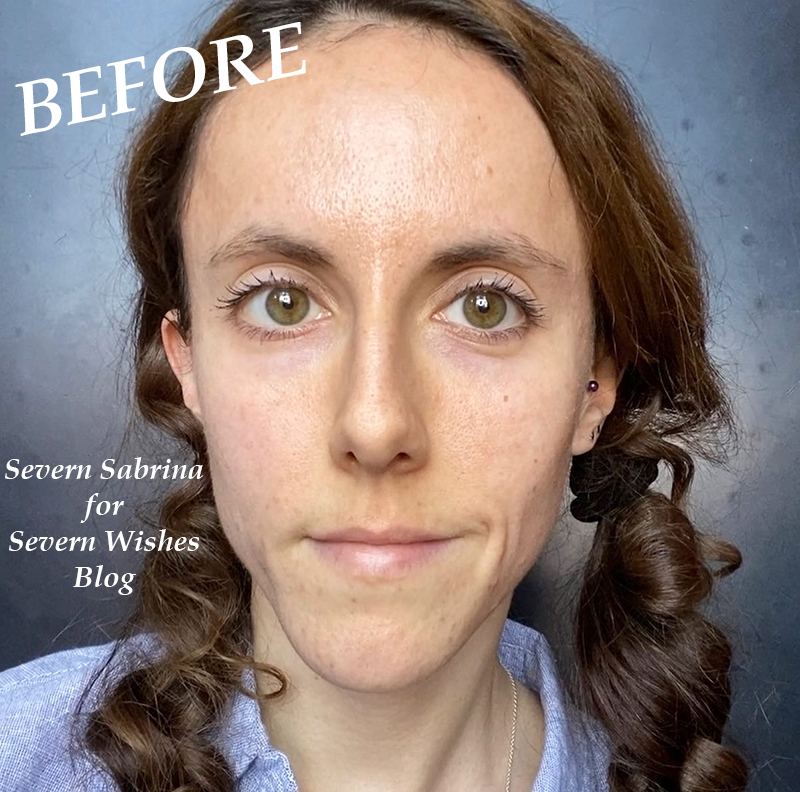
BEFORE
&
AFTER

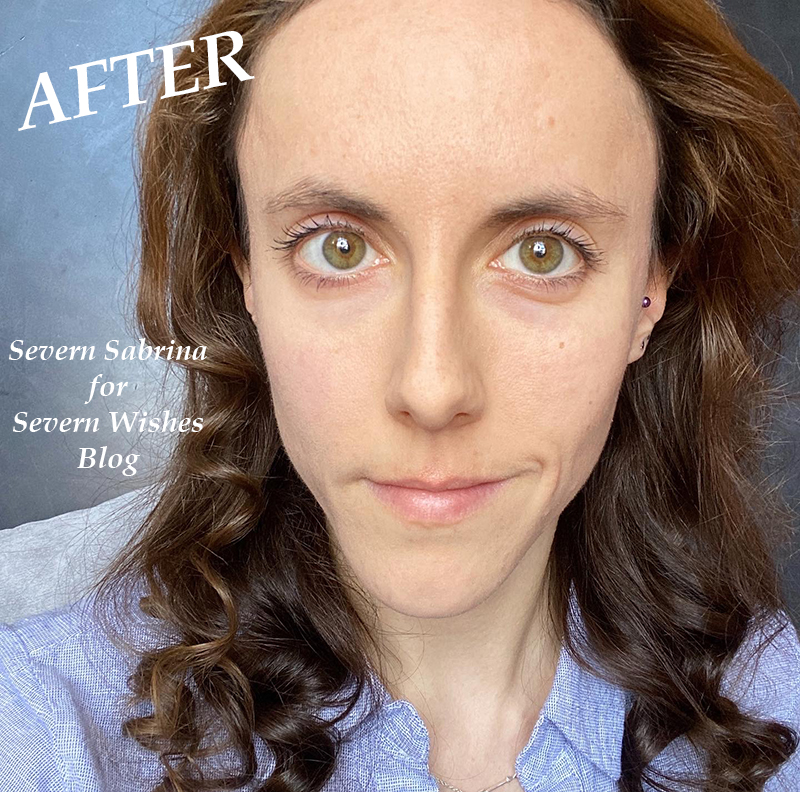
As you can see in my images, before I had quite a lot of redness in my skin, and afterwards that redness is reduced and so are my pores.

Overall Appearance in Use 4✩
Overall Product Quality 5✩
Skin-True Match 5✩
Staying Power 4✩

Now that I have used this product for a few weeks I will say it is excellent, easy and fast to apply, saving me lots of time, and a great match to my skin, no reactions and a good staying power. It did go a little cakey one time when I was outside a lot of the day and I think that may have been the wind drying out my skin. Other than that one occasion its been a fantastic product. I would recommend people still applying their usual SPF face cream about 15 minutes prior to putting on this matte makeup. SPF is so important and the extra moisture will undoubtedly increase the makeups staying power.

About the Skin Perfector Matte Makeup

Vegan

Whipped Matte Makeup
Available in 6 Self-Adjusting and Skin-True Colours
Contains a 4 in 1 formula of Primer, Pigment, BB Cream and Powder
4 Benefits in 1 of Blurring, Concealing, Evening the Skin Tone & Mattifying the Finished Look

Wishing all who have read this review a happy and healthy remainder of April!

Thank you for visiting Severn Wishes Blog today, I hope to see you again soon!

✩ Sabrina ✩

Earth Day 2022 April 22nd Why Not Do Something Good


Earth. Our Home Planet.

Here are some interesting Earth facts to celebrate Earth Day!

Earth is the third planet from our sun.

It is the only known planet in our system to be known to harbour life.

Earth is made up of 71% Oceans and we still haven’t fully explored all of them.

Earths main 3 elements found on Earth are Oxygen, Iron and Silicone.

Earth has a powerful magnetic field.

Planet Earth is billions of years old – Wow! Get your head around that!

Making little changes can make a BIG difference to our world.

Here are some things you can do on Earth day and also from now on too, to make little changes in your life that can affect the planet in a positive way

Give up single use plastics such as cling film and find somewhere to recycle those plastics – do not add them to your normal refuse or they end up in landfill.

Do a Beach Clean Up – if you visit the Beach or are able to – take a plastic bag with you.

Plant a Tree on your land or find an arboretum that allows you to plant one on their land in memory of a loved one.

Go Meat and Dairy Free for at least one day a week to reduce your carbon footprint.

Make a Bug Hotel for your Garden, hang it somewhere appropriate and check it regularly.

Only use Recyclable or Reusable Bags at the Supermarket.

Shop Locally when you can do to support local business.

Walk somewhere and walk regularly, fresh air is great for your mental health.

Use your car less when possible, could you carpool or walk?

Go on a Nature Scavenger Hunt with your Family and look for endangered species.

Pick up Litter around where you live, it doesn’t matter how much you collect, every bit helps.

Do lots of Recycling at Home and be mindful of doing what you can to reduce your waste.

Feed the Birds today or buy a bird feeder for your Garden to help regularly.

Make a Bee corner or Bee friendly flower pot in your Garden or on your windowsill.

Thank you for reading this blog post today, I hope that I have inspired you to do something for our Planet this Earth Day! Have a wonderful day!

✩ Sabrina ✩

Sabrina’s Easter Craft Ideas 2022

Happy Easter! I hope you’re having a wonderful long weekend!

If you’ve already been out and about and are now looking for something to do within your home to keep the children entertained, then why not check out all my craft pieces below, show your children and they might want to give them a go! They are all really easy and just need a few minutes of your time as the adult to deal with some scissor cutting and poking holes, and then they can begin! You won’t need any fancy craft equipment for any of these either, just gather the following items on my list below and you’re good to go!

If you were wondering what it cost me to make all of the craft items I have done in recent posts it was about £15. That includes all of the double sided tape, various packs of white and coloured card, good quality colouring pens, craft balls and pipe cleaners among other things. But I have lots of them left over from these purchases too for use in future craft projects. I actually have more crafty items in the works and I’m still using up the same items and haven’t needed to buy any additional ones.

Sabrina’s TOP TIP: Making up a Craft box is a great idea, it will keep everything neat and tidy. Throw in left over pieces of card, toilet rolls and crafting left overs. I recommend a Really Useful Box or a similar one which has a tight fitting lid. These are also really strong and stackable for easy storing away.

✩✩✩ What Will We Need for all these Projects ✩✩✩

Toilet Rolls
Cereal Box Cards
Pens to Decorate
Scissors
A Pen or Pencil
A Ruler
Pipe Cleaners
Fluffy Craft Balls
Coloured Card
Googly Eyes
Double Sided Tape
Pritt Stick or PVA used sparingly

✩✩✩

How to Make Sabrina’s Fluffy Craft Easter Animals

These cute and fluffy animals were made using cereal box card, double sided tape and a bag of craft balls! In all it cost me about £2! And we have a ton of balls left over which we can use as flower middles and things like that – I use them in other projects too. This one is easy for little children, you do the templates and then add the glue on and then they can go to town with all the sticking!

Step 1. Draw on a cereal box, inside on the flat side piece, whatever shape you like, a Rabbit, a Chick, an Easter Egg, whatever you like or your children want.
Step 2. Cut out your templates, make them as big or as small as you like.
Step 3. Use PVA or Pritt Stick or Doubled Sided Tape to coat your template with glue.
Step 4. Provide a clean and flat surface for your little ones to sit and stick the fluffy craft balls to their card template.
Step 5. Add googly eyes or card beaks or any other items you want to finish them off.
Step 6. Let them dry overnight, place a piece of kitchen roll or newspaper on a flat surface, add the template, add another layer of tissue or newspaper, and then place a heavy book on top overnight to flatten them down and help the balls to stick.
Step 7. Next day you can display them around your home.

✩✩✩

How to Make Sabrina’s Toilet Roll Flowers

My easy toilet roll flowers are so simple to do! They only take about ten minutes to make once your toilet roll is decorated and dry. You could make a load of these, if you have a kitchen roll tube you may even get 3 flowers worth of petals from one tube! I would like to try and make a Rainbow of these!

Step 1. Let the Children decorate their toilet rolls and let them dry.
Step 2. An adult then cuts the toilet rolls into equal width pieces to make the petals.
Step 3. An adult also then uses the pointy end of their open scissors to poke holes that are 1cm up from the end and through both sides of each petal. (See my photo).
Step 4. The petals can now be opened out and gently threaded on to a pipe cleaner through the holes made with the scissors. Push them on until they hit the middle of the pipe and keep adding round.
Step 5. Curve the Pipe Cleaner round as you go, after each petal, and then after the final one is added you push the ends of the pipe back through the final petal holes to neaten it up. Line it up spaced between the petals while it is flat on a table and then push a fluffy craft ball into the middle.
Step 6. Hang your flowers up around your home on ribbon or string for a nice decoration.

Step 3 – 1 cm in from the petal end
Step 3 – making holes through the petals
Step 4.
Step 4 to 5.
Step 5.
Step 6.

✩✩✩

Step 2 – Cut the Decorated Roll into 5 Pieces

How to Make Sabrina’s Toilet Roll Easter Bunny

My cute toilet roll bunny’s are great for the Easter break! And they should stand up all by themselves! They are a little trickier than the flowers, but lots of fun still! They all start with a decorated toilet roll anyway so make sure you just save them up and get little ones to colour them in.

Step 1. Children decorate toilet rolls and let them dry.
Step 2. An adult cuts the toilet rolls into 5 pieces, a base, two ears, a middle and a head. (See Photo).
Step 3. An adult uses the pointy end of scissors to poke holes in the pieces, each one is specific. So…
Base is one hole, central on one side. Middle piece is two holes, one top one bottom just push the card flat together and the scissor end straight through. The Head piece needs one hole in the base at the centre, and off centre at the top it needs two holes. Each ear needs two holes, both on the same side at either end before the point. (See My Photo).
Step 4. Using a Pipe Cleaner push it on to the base and bend the end, attach the fluffy tail.
Step 5. Add the Middle to the pipe cleaner, push it down until it is flush and flat against the base.
Step 6. Take the Head piece, thread it on through the single hole, make it flush on the Middle piece of roll and then push another fluffy ball down the pipe cleaner until it sits in the middle of the roll.
Step 7. Push the pipe cleaner up through one of the holes in the top, and curve the pipe cleaner round, make sure the bunny parts are all flush and together for the body.
Step 8. Add each ear by pushing the pipe cleaner up through one side with the holes on, in through the bottom hole and out of the top hole, bend the pipe cleaner round and then through the top hole of the final ear and down through the bottom hole.
Step 9. The final step is to push the rest of the pipe cleaner down through the second hole on the bunny head, if you have more than 1cm of pipe left cut it off, then push the last 1cm into the fluffy ball within the roll bunny head, this neatens it up and gets the pointy end of the pipe cleaner hidden away.
Step 10. Adjust your bunny feet base and middle parts so that the bunny is aligned and he should stand up all by himself!

Step 3 – use my guide to make the necessary holes
Step 4 – Base and Tail
Step 7 and Step 8 – Threading the Ears

My bunny making video tutorial can be found on my Facebook page if you get stuck which is right here

✩✩✩

How to Make Sabrina’s Circle Petal Flower Card

This one is nice and easy and once all the cutting out is done, children can stick them down however they like to design their own flowers.

Step 1. Fold a Piece of Card in half for your card base.
Step 2. Draw around a circular object many many times on some different pieces of coloured card.
Step 3. Cut out these circles carefully and assemble flat.
Step 4. Every circle needs to be folded in half.
Step 5. Assemble your Flower by arranging the petals with one side sticking up to make it 3D.
Step 6. Cut out a small circle in a bright colour for the centre of each flower.
Step 7. Once happy with the design either pritt stick or double sided tape each petal down to the card.
Step 8. Make leaves or stems from card, or use pens to decorate your card.

✩✩

Thank you for reading this (long) Craft related blog post today, I always showing you my latest “Sabrina’s How To Make’s”! And if you have any questions for me about how to do something you’ve seen on my blog then please comment below on this post and I will happily answer them for you. I hope that you have seen something you would like to try and make yourself!

If you do make any of my craft items please tag me on social media using the hashtag #SabrinasHowToMake I really look forward to seeing them!

✩ Sabrina 

Check out my previous How to Make Craft posts for these beautiful 3D paper flowers!

Product Review of Maybelline Colossal Curl Bounce Mascara

Wearing two coats of the Curl Bounce Mascara

I recently became a part of the UK Maybelline Team of Bloggers who Review products that are brand new out in the country. Maybelline New York is one of the leading brands worldwide for make up. Today I am lucky enough to be bringing you a brand new review, and it features the Colossal Curl Bounce Very Black Mascara.

Overall Appearance 5✩
Product Quality 5✩
Curl Effect 5✩
Staying Power 4✩

Having now used this Mascara over several weeks I can say that it has great staying power and a lightweight feel. The curl effect the wand has is great and I think the very black colour is striking. It has a great overall appearance and the quality of the mascara is excellent due to it being wax free and waterproof. It had minimal clumps upon application and it coated my lashes with little effort. One coat was sufficient but if I wanted an all day long look I would apply two coats. I am impressed with this new mascara and would rate if 5 stars overall, my favourite aspect is the ease of which it curled my lashes and the fact that it doesn’t weigh my lashes down so it feels more comfortable to wear than some others I have tried.

See my images below for my natural lashes compared to one application of curl bounce.

Natural Lashes
One coat of Curl Bounce Mascara

Wishing all who read this review a happy and healthy remainder of April!

✩ Sabrina ✩

Sabrina’s How To Make Paper Flowers for all Occasions

Hello and Welcome! If you’re a regular visitor to Severn Wishes Blog then you’ll know that I love to do lots of Art and Craft! If you’re new here then hi, and after this blog post please check out the remainder of my fun Crafts in the section here.

Paper Flowers are a wonderful alternative to buying fresh ones, the beauty of these homemade gifts is that they won’t wilt and have to one day be thrown away, these can be treasured by the loved one receiving them, forever! Give a single flower or make a bouquet it’s up to you!

What Do I Need?

A Ruler (30cm)
A Pen or Pencil
Pipe Cleaners various Colours
Thin Coloured Card or Thick Coloured Paper
Pens for Decorating the Petals (optional)
Fluffy Craft Balls (Flower Centres)
Scissors

My Step by Step Visual Guide is really easy to follow, but I also uploaded videos to my social media if you would prefer to follow that! Carry on reading for my step by step and photographic guide.


SABRINA’S STEP BY STEP GUIDE

1. Cut Squares from your chosen Coloured Card. For example I made my Orange Flower with a 7cm, a 8cm and a 10cm Square. Three Squares is an ideal amount of layers but you can do just two or even more layers if you wish. Assemble these squares on a flat surface ready for the individual folding process. (See my images below for additional guidance).

2. Fold each square you have in half to form a rectangle, do this by folding the bottom line up to the top line and line up the crease and push flat. Repeat for every piece you have.

3. Next, you fold each rectangle back into a square shape by folding it from the left to right and flatten and crease down flat once again.

4. Finally you will have all your layers into folded squares, and these now need to be made into Triangles. But to do this correctly for the next steps you must not rotate them at all during the folding process. Make sure that you fold the bottom right corner of your squares up to the top left, flatten and crease.

5. Next you need to draw a petal shape on every flattened triangle, make sure not to rotate it from when you folded it when you draw on it, otherwise it won’t cut intact during step 6.

6. Now you need to carefully cut out your shapes, gently follow the line and then discard these cut offs for the recycling because you don’t need them.

7. Time for the moment of truth, open out the flowers gently and slowly so as not to tear them. Lay them out flat and make sure they are an entire piece.

8. With the crease lines facing at each compass point you need to mark the petals that are in the South East corner of each flower. (See my images below if you are uncertain).

9. Carefully cut these petals away from the flower, be sure to only follow the crease lines of the folds when you cut and don’t be tempted to cut it too low in the centre, just enough for the spare petal to gently come free. You don’t need these now and these spare pieces can all be recycled at the end of your crafting session.

10. Next step is to mark the petal on the right of the one you just cut away, on each of your flower layers, and then stick a piece of double sided tape or a blob of glue on to that mark.

11. Doing each layer one at a time now, gently place the flower into your hand, and with the other hand carefully fold the petal on the left side over the petal on the right side. The creases and folds we made at the start should allow you to do this easily, if not gently fold the creases again and try again, the flower should (with some gentle persuasion) create a 3D flower with the shape similar to a cone. Push down on the glued part and make sure that you have aligned the petals and that it is stuck down. Repeat this for all flowers and layers that you want to make.

12. Carefully lay out each of the Flower layers now that they are 3D. You now need to decorate them if you want to with lines or dots before we assemble them. If making them with small children you may want them to decorate at Step 10, before you make them 3D.

13. During this step you want to use the end of the Pipe Cleaner you have chosen to gently pierce through the middle of the Flower layers, take one at a time, and force the pin end of the Pipe Cleaner directly through the centre where the creases and folds meet. Once all of the layers are pierced you can now arrange them in order of size.

14. Assemble your finished Paper Flower by sliding the layers on to the Pipe Cleaner, you do want to leave about a 4mm bit of the pipe cleaner poking out so that you can push on a coloured fluffy craft ball (if you have one) and this neatens the whole look of the flower plus it covers the pointed end of the pipe cleaner.

15. Adjust the Petals by rotating the layers slowly on the pipe cleaner stem until you are satisfied with the flowers final look. I hope you are happy with your flower! You can play around and add other things too if you like! Be creative and I cannot wait to see yours! Tag me! #SabrinasHowToMake

✩✩

Thank you for reading this Craft related blog post today, I always love doing my “Sabrina’s How To Make’s”! And if you have any questions for me then please comment below on this post and I will happily answer them for you. If you make some flowers please tag me on social media using the hashtag #SabrinasHowToMake and I really look forward to seeing them!

✩ Sabrina 

April 2022 Treatbox UK Reveal and Review

Hello! It’s Treatbox Day! And it’s time for the April 2022 Treatbox Reveal and Review.

View my Unboxing Video over on my Facebook or my Instagram.


Hello April!

It’s been quite a nice start to the month, some sunshine with occasional snow showers – the usual weird mix for Spring! But the Blossom is out and that is my favourite!
I was very much looking forward to Revealing this box due to the success of March 2022, I was not disappointed! Let’s unbox this one now!

What’s Inside the April 2022 box from Treatbox UK?

April Calendar Print
Light Blue Ribbed Cloud Design Socks
Gardners Cookies (Egg & Dairy Free) Iced Biscuit “Behind the Cloud. the Sun still shines”
Treatbox Original Sticky Notes – Cloud Design “You Got This”
Treatbox Original Shopping List Notepad – Dusky Pink Cloud Design
Treatbox & The Make Arcade Collab – Umbrella Glitter Shower Make Your Own Craft Kit
Treatbox Original Positive Affirmation Card “Stay Close to People Who Feel Like Sunshine”
Treatbox Original Keyring (Cloud Design) “Never Forget How Amazing You Are”
Treatbox Original Self Care Daily Checklist (2 + Months Worth)
Timeless Aromas Heart Shape Wax Melts in Candy Cloud Scent

My Honest Opinion on this month’s Contents.

There were several really nice and unique Treatbox original items in this April box, which I will most definitely be using! The shopping list comes in particularly handy for someone like myself, and the sticky notes are again a great piece of stationery that can be used all around the home. It was also nice to have an array of different items, an edible one, a wearable one, a make-able thing and plenty of positive affirming ones too.

I love the socks! I love socks in general but I love the quality of these socks that we receive from Treatbox, they wash and wear really well. Love the clouds design!
Again the keyring and the small card are positive reinforcement because I am sure we could all do with some with everything that is going on for us all both personally and on a global scale.

Love the idea of the self care checklist, though I’m not sure if I will get to tick off a square every single day – though I will certainly try! Self Care is not Selfish yet as a single parent some days I do struggle to find that balance. But I am trying to do better for myself.

Overall a lovely box, some really useful items, I look forward to a cup of tea with my biscuit and I will sit down and attempt the Craft Kit before the end of the month! And I promise I will put the finished piece on my social media for you all to see it! (Hides face in hands) Sewing is not my forte folks but I am very craft orientated so I shall give it my best shot!

The April 2022 Treatbox was filled with a positive and self care importance vibe, and with the calming clouds design I definitely feel as though it’s starting April off in the right way.
Now let’s hope it stays that way!


Thank you so much for joining me for this April 2022 Treatbox UK Unboxing, Reveal and Review. I really hope that you have enjoyed reading this blog post. I will be uploading various photography during the month from the products featured this month so don’t forget to follow all my socials and keep in touch for all the latest from Severn Wishes Blog!

Have a wonderful April!

✩ Sabrina ✩