How I Helped My Child Fall in Love with Numbers

I am a huge believer in passing on knowledge to people when it might be useful to them, and for many years I had considered being a teacher. However my life took a different direction once I went off to university. It didn’t stop me from coming up with things that others may find handy though, it was just one of many reasons I decided to start my blog all those years ago.

After I became a parent I found I was coming up with lots of hacks and tips for my son that other parents might also find useful. This particular blog post today is all about NUMBERS! My son learnt his numbers 1 to 10 very quickly thanks to my tips and tricks, by the time he started preschool at 3 he could count to 31. He is now 4 and thanks to my encouragement he can count to a whopping 500!

The fab thing about my tips is that you may already have some of these items laying around in your home that you can use, and if not you can make your own cards like I have also done. Check out online second hand and local shops if you don’t have anything, as well as asking friends who may have slightly older children if they could have a clear out for you. Let me tell you about how I introduced and taught my son about numbers.

Child Clocks or Numbered Blocks

Your baby may already have toys with numbers on, things for age 6 month plus normally have various things on them, you may find a mix of nature and numerical combinations or well known characters with basic shapes and or numbers too. Toys and playmats also sometimes have numbers, those talking toys certainly will, but teaching your little one how to recognise a number visually is important.

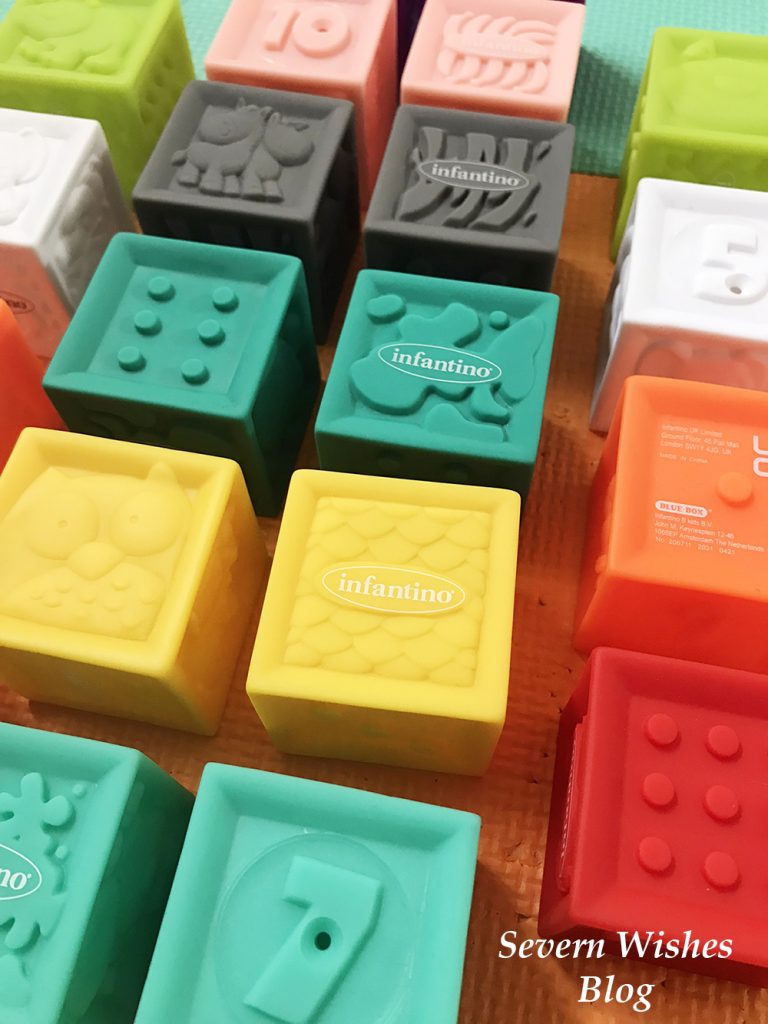
You can easily get wooden toys that contain clocks on them or boards with numbers that can be removed and set out in a numerical order. These toys are great for learning the starter numbers (1-10) but also for starting with basic mathematics too. I bought my son a board of numbers and he has a wooden clock as well gifted by a relative. The blocks in my image above were bought online and are of the brand Infantino, these BPA free plastic cubes have an array of animals and numerical variations on them such as dots and actual written numbers. They were some of the first numbers my son saw as a baby.

My son would like to count things around him, so say I gave him 4 smiley faces for his tea I would ask how many I had given him, soon he started counting everything. 2 swings at the park, 7 birds on the fence, 5 sheep in the field. And so on, and lots of praise and encouragement when they get something right is also essential. Make learning a fun thing to do and participate in.

You can also begin time telling by showing them a phone or a watch and asking them to find the time. If they have a child’s clock they can match that time. A children’s clock may just have turn-able clock hands or some have the digits that are also removeable too. For example it might be 10.30am so you ask them what that would look like on their clock and see if they select the numbers appropriately. Making it fun means that it is more likely to sink in to their mind. If they have breakfast at 7.30am every day, you could ask them what the time is on the kitchen clock if you have a steady routine, or if bedtime is 7pm too.


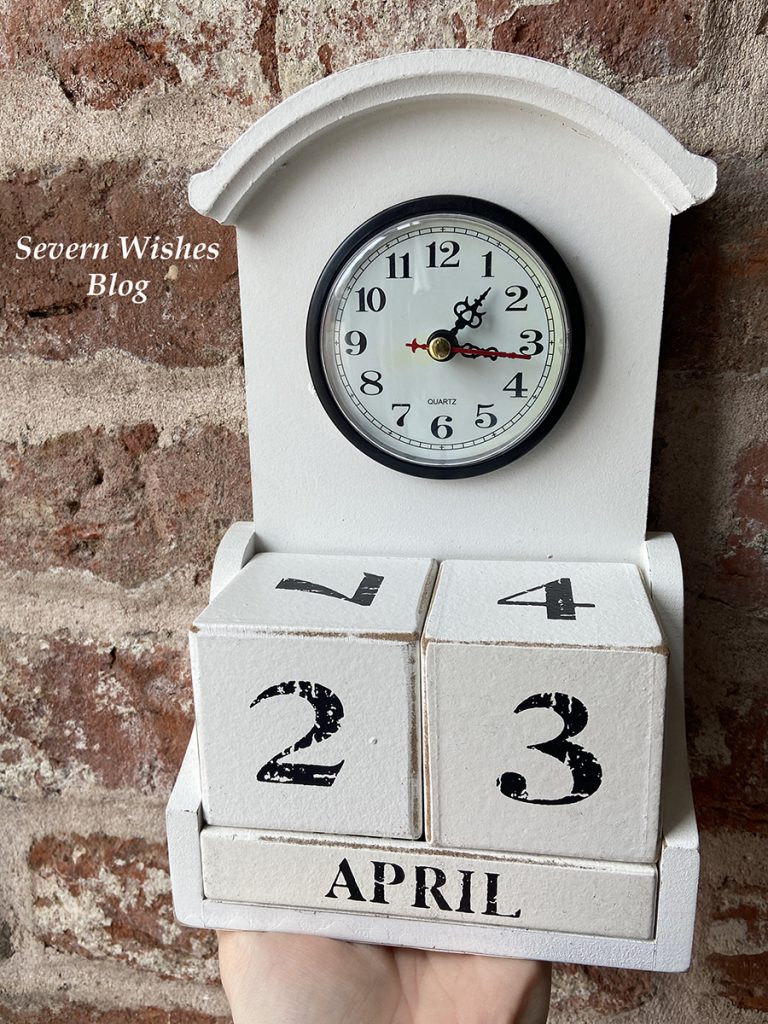
The Home Calendar Block

My calendar block is also a clock! Many of us will have a Calendar block at home, these blocks rotate daily and allow children to understand the passing of days into months. When my son was two I introduced him to my block set, and every single morning before breakfast we would rotate the blocks. I started by giving him one and me the other, I would say something like “Today is the 17th so we need a 1 and a 7, I have the 7, can you find me a 1 please?” And his interest developed from there. Soon I could ask him to find any of the numbers from One to Thirty One and he could place them on the block correctly. For the past two years we have done this every day and he has learnt to count up to 31 just by doing the calendar. My son also asked me why the months were different numbers, why it didn’t go up to Thirty Two and such, it sparked an interest which lead to me making his flashcards up to 50 numbers.

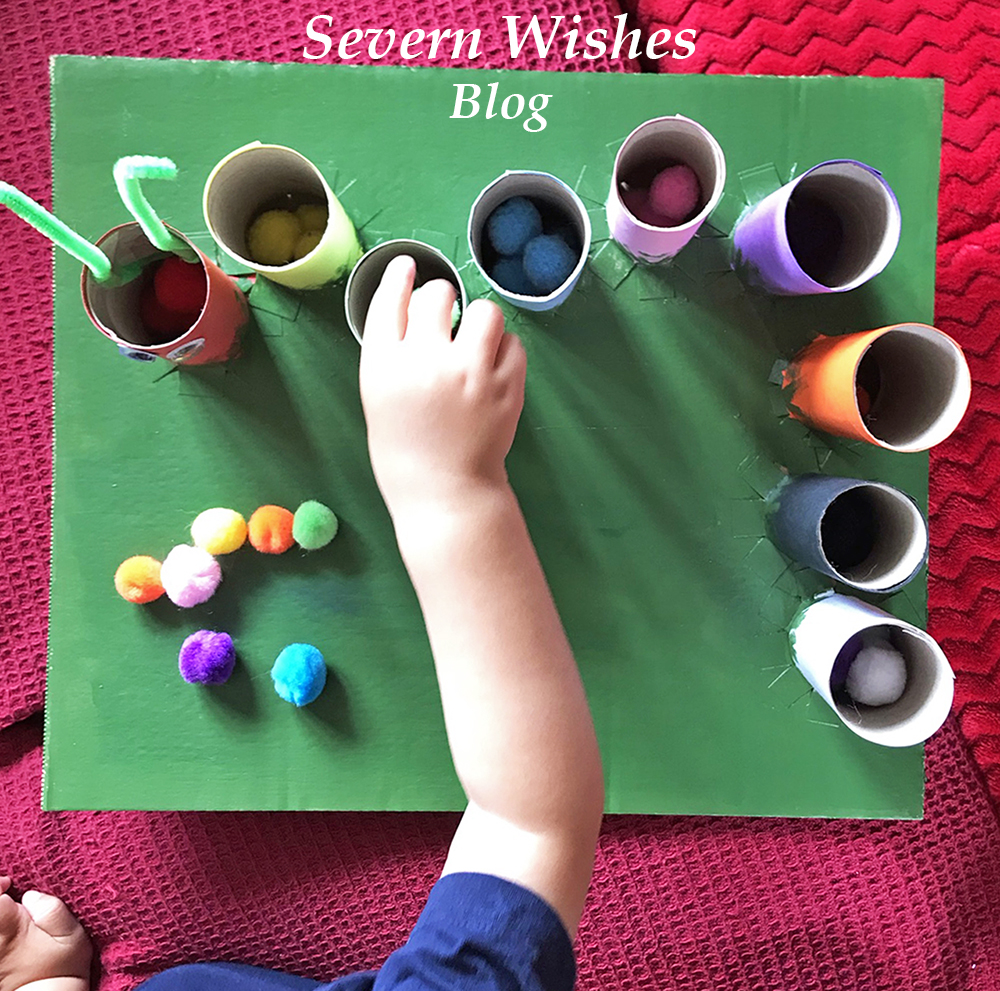
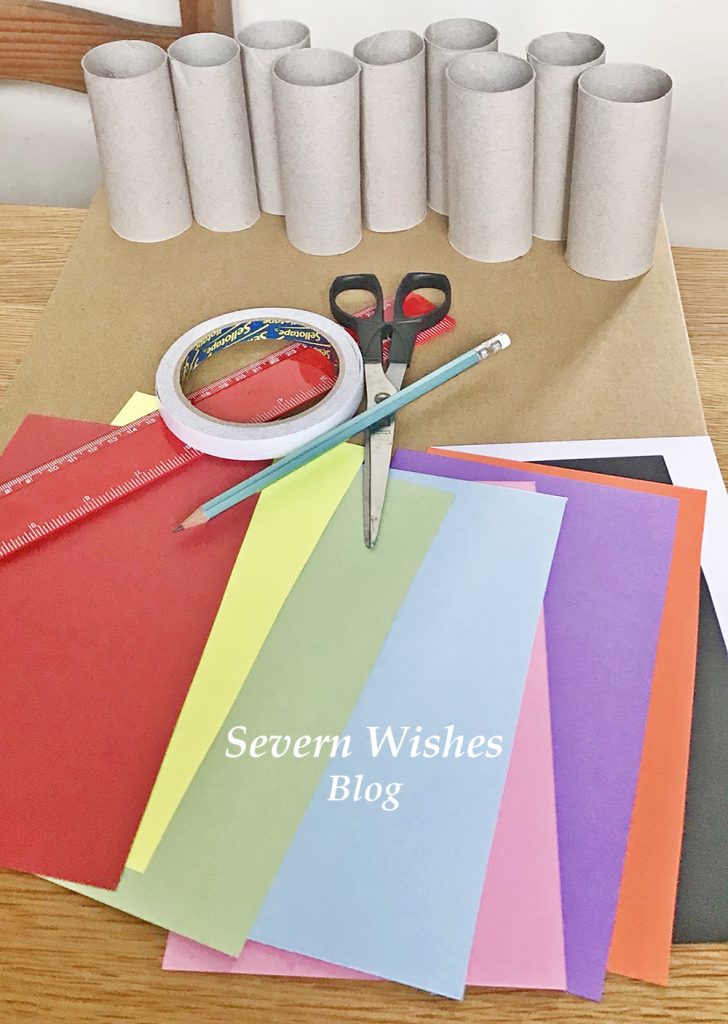
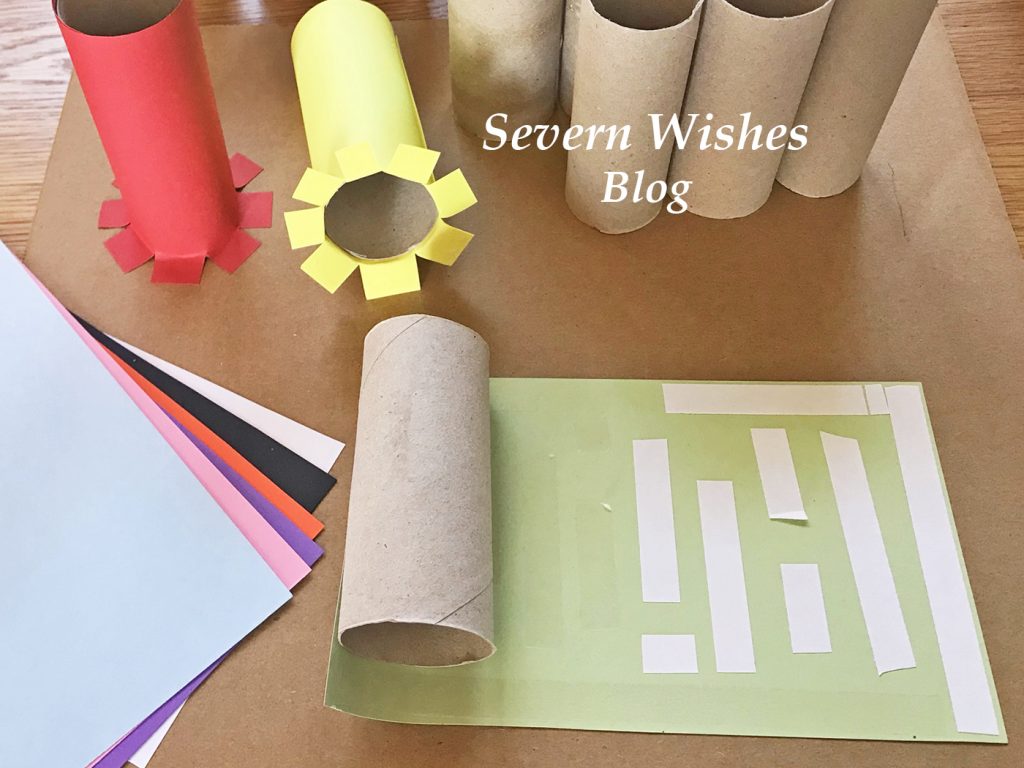
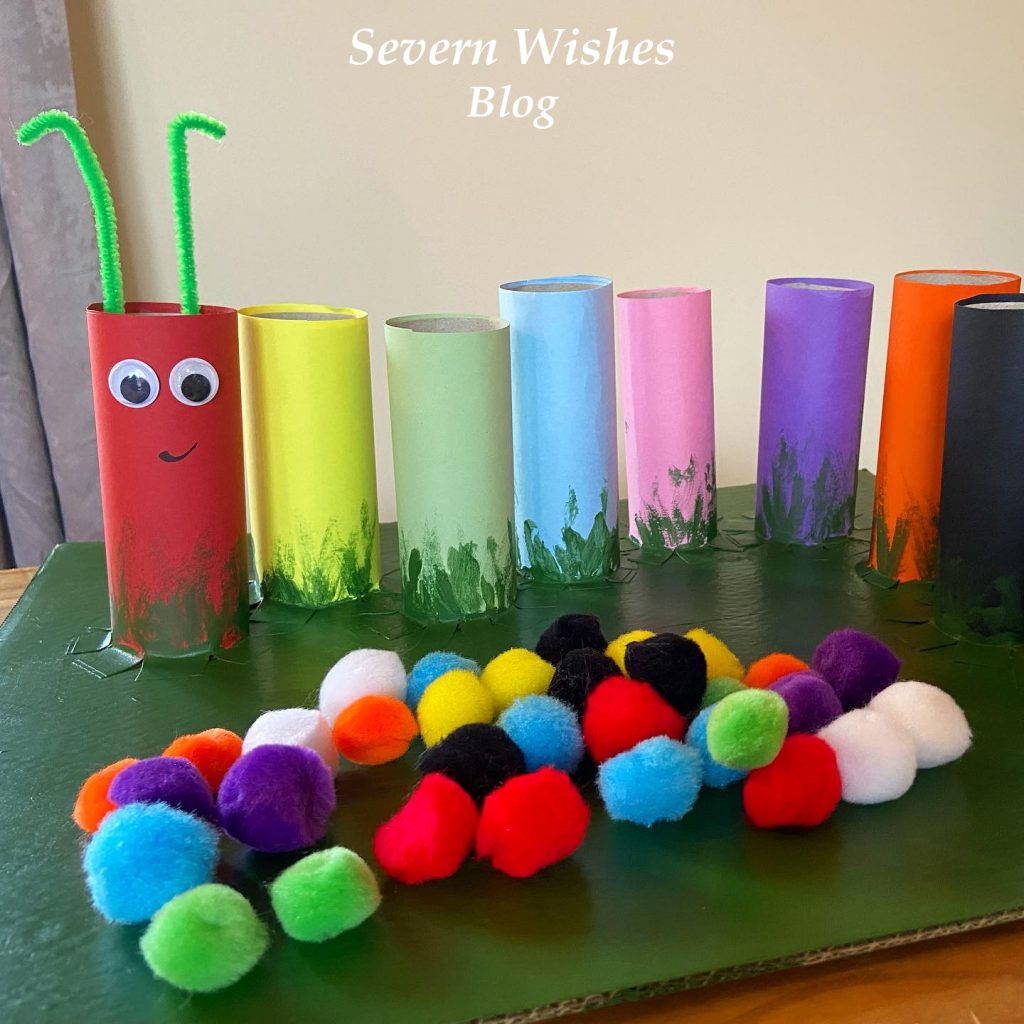
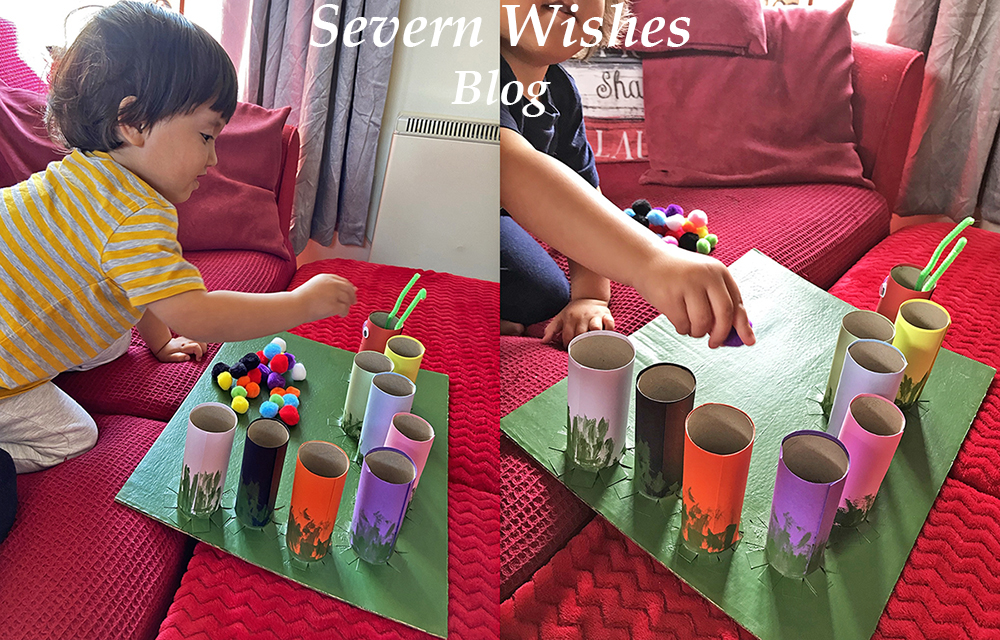
Flashcards – Bought or Homemade

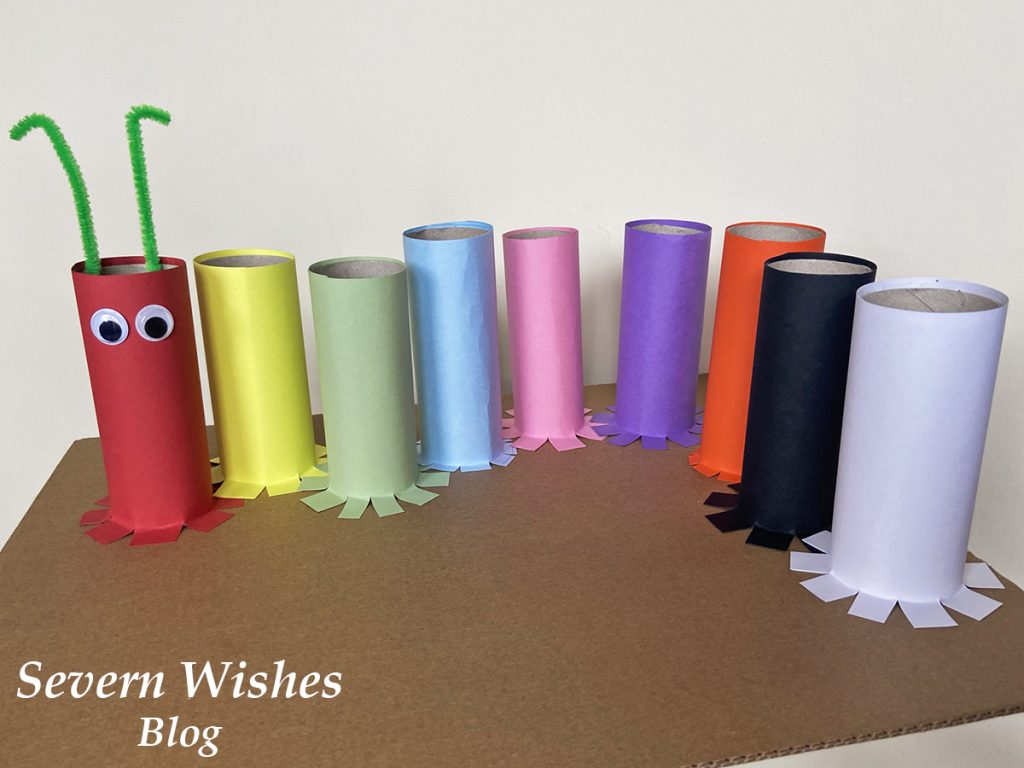
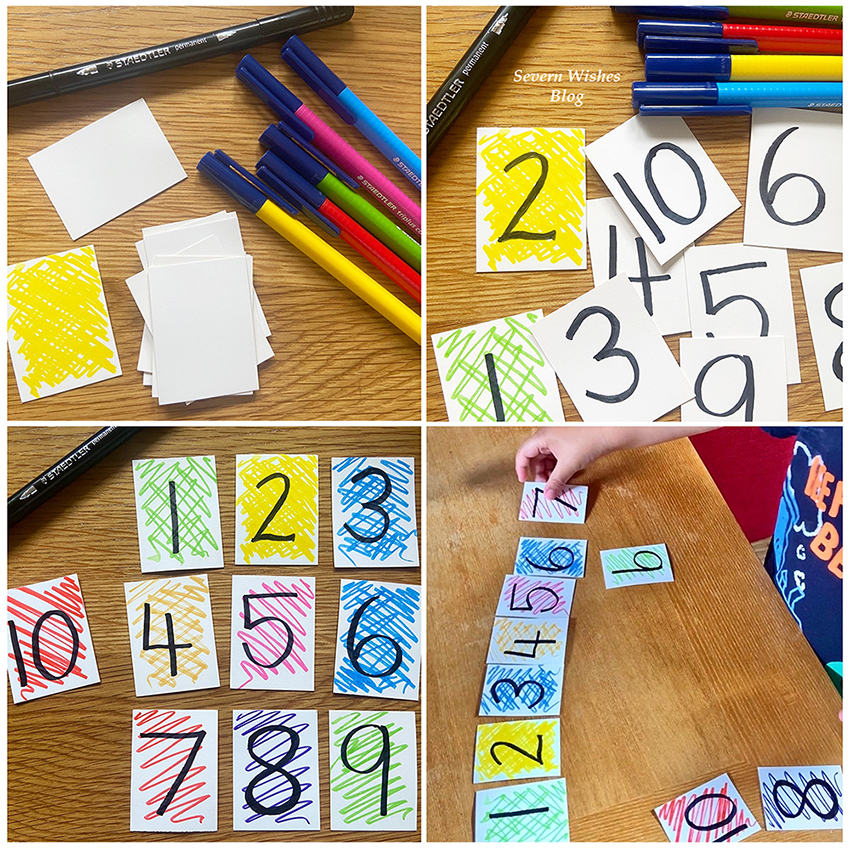
Flashcards are great, you can buy them from most online toy retailers, or if are creative and have pens, like me you could make them. My son has 50 of these homemade numbers now, and thanks to some games he can count up to 500. He does number work at school, and even got an award recently for how good he was with counting numbers. Making it colourful and fun is inviting the child to participate. Always encourage but never force your child to learn, do it on their own terms when you are at home. Plus if it is fun they will be more likely to want to repeat the exercise. My son is currently doing writing practice for his letters and numbers and coming on great thanks to wipeable board books which I highly recommend because they are reusable.

Originally I only made ten numbers but my son was soon asking for more, and the more he enjoyed counting them and laying them out in their order, the more I wanted to continue making and encouraging that growth in learning.

When my son turned 3 I also made a set of flashcards that had the number and the written word such as One and 1 on them, this was so my son learnt the word associated with the number in preparation for reading and writing them.

Other Fun Number Related Activities

Playing Dominoes is another fun learning activity which requires the counting of numbers, and games like Yahtzee, Playing Cards or Rummikub are also fun to start with children of a going to school age.

However you keep using numbers in your child’s life, know this, you are helping them learn through play.

✩✩✩

Thank you for reading this parenting related blog post today. I have tons of parenting tips and hacks across my blog and social media. I even do a Monday Mum Hack on Instagram.

Search #SevernSabrina and #SabrinasMondayMumHacks

Hope to see you here again soon.

✩ Sabrina ✩

How to Dress your Home for a Beautiful yet simple Autumnal look with Décor on a Budget


I love everything about a crisp Autumn day, the colours of nature in the trees, the warm sunshine and the cooler air. Wrapping up in warm clothing and taking a walk in the countryside cannot be beaten at this time of year. But how can you bring that beauty of Autumn into your home in simple yet beautiful ways and on a strict budget! Well here is how I do it!

Throw – Dunelm

My Items I bought on a Budget for Autumn Décor over the last few years

Glitter Pumpkins – Poundstretcher – £1
Plastic Light Up Pumpkin – B&M – £4
Artificial Autumn Leaves – The Works – £1 a bag (50 leaves per bag)
Wreaths, Craft Items and Wooden Pieces – The Works / eBay – 50p – £5
Autumn Fleece Throws – Asda £6 / Tesco £6 / Dunelm £7+
Artificial Pumpkins / Pine Cones / Acorns – eBay – £4-£12 depending upon how many pieces you want and which country you decide to order them from (China prices are cheaper but you’ll wait around 3 weeks for the delivery).
Autumn Cushions – Autumn Designed Cushions or Cushion Covers – Amazon / eBay / Dunelm £3 – £9

(Some of the items in my pictures I have purchased from years 2020, 2021 and 2022 and only similar items may now be available from their respective sellers).

Glitter Pumpkins – Poundstretcher
My delightful Cat in a Scarf Cushion from Next from 6 years ago.

I love nothing more than to cuddle up on my sofa with my cushions and fleece throws, getting cosy as the cold nights draw in. I have a whole box filled with throws, I have some for every season. It’s the turn of my Autumn throws like the one above, it’s navy and orange design emanating the colours of autumn.

Autumn Basket

I used an old wicker basket that I had laying around to create an Autumnal display. Inside I placed artificial leaves, pumpkins and acorns, with some pine cones. Take some leaves and gently slot them in around the outside, so that no matter what angle you look across at it you will see an autumnal theme.
You can use any spare Basket or even a Box you have laying around, paint it if you wanted to! And any size works too, the smaller your item the less things you’ll need to fill it up.

Autumn Basket from above
Light-Up Battery Pumpkin Clear – B&M (2021)

Autumn Wreath

An autumn wreath is simple to make from some of the items you’ve already bought for decorations like the pine cones and artificial leaves. You can also go on a nature walk, gather items off the floor (do not remove them from hedges or trees) and dry them out on a towel over the course of the next week. My wreaths are from The Works and eBay. You can buy them as Metal, Rattan or Wicker, but I try to buy plant based ones where they are sustainably grown and made when possible.
To make a wreath take your circle base and then using a glue gun attach a selection of artificial leaves as a base layer for your other items like pine cones and artificial pumpkins. Leave it to dry for at least a day before hanging it up, or lay it flat as a centre piece of a table for example. You could stand a vase in the centre of it to continue the theme.
I used some Wooden items as decorations for my indoor only wreath as well, which I picked up from The Works over the past two years. The Owls are a particular favourite of mine.
I am proud with how both of my wreaths have turned out. See my images below.

Homemade Wreath I made 2021

My outdoor wreath is a metal ring that I have glued a selection of items including the artificial leaves and pumpkins, small pine cones and artificial acorns.

Homemade Wreath I made 2022

Thank you for reading this Lifestyle blog post today, I hope you have enjoyed looking at my Autumn décor and I do hope I have inspired you to decorate your own home – even if it is on a strict budget like mine has been over the last few years!

Your children may also enjoy making some Autumn Craft pictures with dried autumn leaves that can be painted and printed, or simply glue a nature picture together in autumn glory and all the colours you can find. It’s so easy to do a nice printed picture using dried shapes from nature and you can even display it in your home after as part of the seasons décor.


✩ Sabrina ✩

Autumn Craft Printing for Children

World Bee Day 2022 on May 20th

Happy World Bee Day!

Here is a Photo montage of Bee’s that I have taken this past year…
as a Nature Photographer I am constantly making images.

AWESOME FACTS ABOUT BEES

Bees are insects that have 6 legs and 5 eyes.

Bees have been around for approximately 30 million years.

Here in the United Kingdom we house around 270 species of Bees.

Worldwide there are more than 20,000 species of Bees.

Honey made from Bees was found inside the tombs of Egyptian Pharaoh’s and it would still be edible today.

Honey Bees communicate with one another through dancing moves!

Bees can fly up to 20 MPH!

Male Bees are called Drones.

Female Bees are called Worker Bees.

The Queen Bee can lay up to 2000 eggs a day and a hive will only have one Queen.

A Honey Bee will only make 1 Tablespoon of honey in their lifetime.

Some species of Bee are solitary and live alone except for reproduction moments, these often live underground too!

On average a Bee will fly 32,000 miles in their lifetime and visit more than 1 million flowers!

Honey Bees live in Bee Hives where they work together to make Honey.

If a Bee loses its stinger it will die – so make sure not to hit them and let them just fly around you and fly off again – once they realise you’re not a flower you won’t interest them anyway!

SABRINA’S HOW TO MAKE A 3D BEE!

I thought what better way to immortalise the Bee than to make your very own 3D craft version of one! I came up with this last year but sadly I missed the deadline for World Bee Day 2021, so I have saved it all for today! World Bee Day 2022! They are fairly easy to make and I will now tell you exactly what you need before we begin the how to method!

One Sheet of A4 Thin Yellow Card or Thick Paper
One Scissors
One Piece of Cereal Box Card
Pens – black and brown
A Permanent Pen – Black with a Fine End (for the Wings)
Double Sided Sticky Tape
A Piece of Thin Plastic (mine was off some toy packaging) (for the Wings)
Two Circular Objects to Draw Around – 1 for the Small Bee Head and 1 for the Body Circles

Step 1. Cut All of Your Circles Out – You need 1 head, 1 main body out of box card and four out of the yellow card. The yellow and the body have to be the same size, but the head needs to be 1/4 of the size. Put some double sided sticky tape on the cereal box card circle because this will be your base to work the rest up on. Put the other yellow circles down on a flat surface ready for their details.

Step 2. Draw some sections on the 4 yellow circles that will become the Bee body, you will need to have 3 sections that are lined horizontally and similar in size to each of the other matching circles (See image below). Colour these in Brown. The best thing to do is to have them on top of one another, mark the section the same and attempt to line them up with the opposite side. With the small Circle that is yellow (the Bee head), you need to draw two large Oval Eyes in Black, and then do some vertical lined streaks in brown so it looks like fur. Leave the top section of it Yellow, we will be sticking it to the body shortly.

Step 3. Stick the Head to the Body using double sided tape with only 1/4 of it attached to the Card and the rest sticking out. Now place the Bee in front of you, with the head facing you (facing South). You want to now take one of the striped yellow body sections, choose the one that is least lined up. Put some double sided tape on the back of it and stick it down on to the main card body, covering the edge of the head, with the stripes going horizontally across the Bee body. Place this beneath something heavy for a few minutes so as to stick it all into place while we do steps 4 and 5.

Step 4. Take your Plastic now and Scissors and permanent pen. You want to draw out two identical wings, Bee wings tend to have some ridged ends but you can just do ovals with a pointed end if you’re not confident (See Images below). Look at my Bee montage at the start of this blog post for wing inspiration! Once you are happy with the drawing cut them out, and make sure they’re the same size by overlapping them and trimming any overhanging edges.

Step 5. Draw some lines down the wings with the permanent thin pen, try to match the Bee wings (again take inspiration from my pictures at the start but be creative too this is your own Bee!) and match each other, make the same marks on both wings by having them side by side as you create the lines. Place them off to one side to fully dry. (If you use normal pen on plastic it will likely rub off).

Step 6. Now it comes to the tricky part, you need to take your Bee body parts and fold them in half, all three of them with the coloured lines on the inside of the half fold. Make sure that the centre is through the middle of the horizontal lined sections. Do this for all three and also make sure they are folded the same across the sections so when stacked together they are the same (or close as you can).

Step 7. Once you have folded them and they do match best they can, you need to take two of them to start with, and place some double sided tape strips on the one side of each one, so that is one taped only the left underside and one taped only on the right on the yellow underside of each of them. Take a look at my photograph below for clarification on the folds and the tape.

Step 8. Take your folded Bee body circles and place one on either side of the main Bee body with the head. Line them up with the circle that is already on it, the one you put the tape on the left underside goes on the left, and the right taped side on the right. When you push the body middles together they should be flush and straight in the centre and aligned with the head. Make sure the stripes line up and are horizontal to the head that is facing south, and the crease line for your folds should be straight up from that facing north. If this is accurate you can now remove the double sided tape, stick one side down at a time, to the main body. Then do the opposite side (see Step 7 and 8 images) and this leaves you with the other half of each circle standing up on end. The final circle you still have will go in between them causing the body parts to stand up 3D.

Step 9. Attaching the final circle on to the body is just about lining it up. First you need to put some double sided tape on to the pieces that are already attached to the Bee body that you stuck down in Step 8. (See image Steps 9 and 10 to clarify this next step). With the double sided tape now in place but not removed the tabs yet, you first line up the circles, look at it and think do the edges match and is it horizontal across the body? If the answer is yes then remove the tape tabs and stick that final circle on to the top of the Bee in between the other pieces.

Step 10. Press and hold the Bee body firmly now, gently run your fingers down each of the sides to press the circles fully together and ensuring the tape grips flush. Once they look like they are fully stuck with no gaps anywhere you can now make sure your wings are dry from earlier.

Step 11. Take your plastic wings from before, line them up with where you want them to go on the Bee body (they are usually attached to the middle section of a bee’s body). Then take two thin strips of double sided tape and match those up on either side, stick down the tape. (See Step 10 and 12 image for wing tape placement).

Step 12. Attach the wings now and make sure you press them down on to the tape for at least a minute to ensure the plastic gets a really good grip. Hold the Bee upside down and make sure they don’t come loose, if they do then press again.

Step 13. Tidy up any lines on the Bee and trim any edges with scissors that aren’t in line to neaten her up. Then you have your Queen Bee! You could hang her up somewhere or make her a little hive…

HAPPY WORLD BEE DAY!
You now have a friendly Bee to live in your home and remind you of their importance, coolness and cuteness.

WHAT CAN YOU DO TO HELP THE BEES?

Make a wildflower pot, planter or corner of your garden and attract bees and help them with their pollinating. You can get wild flower seeds free with some things such as “30 Days Wild) and Brands often give them away with food products too.

Don’t pull out all of your weeds, leave a few because bees need them especially because weeds are usually the first flowers of the new season.

If a Bee comes into your house leave it alone, open some windows and let it find its way out, do not attack it or attempt to catch it because it may sting in fear and then it will sadly die. Most Bee’s will head straight back out a door or window when they smell the fresh air.

Visit a local Apiary and But Local Honey products when possible.

WOULD YOU LIKE TO MAKE A CRAFTY BEE HIVE?

What You Will Need


Tiny Craft Wooden Bees (Found in The Works craft shop)
A Narrow Sided Box or a Lid from Something (Rectangle is best)
Disposable Dehumidifier Pot Lids – doesn’t matter what colour as you will Paint them
Brown Paint and a Paintbrush

Step 1. Paint your box and the humidifier pot lids you have collected, they should be brown or a mixture of brown and black and yellow.
Step 2. Leave them to dry somewhere flat overnight at least.
Step 3. Place something to resemble honey and nectar between the lids, maybe tissue paper?
Step 4. Stick the Two (or more) lids together to form mini hive type structures.
Step 5. Stick the lids into the box and stick your Bee’s around. Done!


Thank you for taking the time to read this blog post today, I hope you have enjoyed it. If you make any Bee’s please share your pictures with me on social media, use the hashtag #SevernSabrina and #SabrinasHowToMake or tag me on them using @Severn_Sabrina or @SevernWishes Blog.

Have a wonderful World Bee Day 2022!


✩ Sabrina ✩

Sabrina’s Easter Craft Ideas 2022

Happy Easter! I hope you’re having a wonderful long weekend!

If you’ve already been out and about and are now looking for something to do within your home to keep the children entertained, then why not check out all my craft pieces below, show your children and they might want to give them a go! They are all really easy and just need a few minutes of your time as the adult to deal with some scissor cutting and poking holes, and then they can begin! You won’t need any fancy craft equipment for any of these either, just gather the following items on my list below and you’re good to go!

If you were wondering what it cost me to make all of the craft items I have done in recent posts it was about £15. That includes all of the double sided tape, various packs of white and coloured card, good quality colouring pens, craft balls and pipe cleaners among other things. But I have lots of them left over from these purchases too for use in future craft projects. I actually have more crafty items in the works and I’m still using up the same items and haven’t needed to buy any additional ones.

Sabrina’s TOP TIP: Making up a Craft box is a great idea, it will keep everything neat and tidy. Throw in left over pieces of card, toilet rolls and crafting left overs. I recommend a Really Useful Box or a similar one which has a tight fitting lid. These are also really strong and stackable for easy storing away.

✩✩✩ What Will We Need for all these Projects ✩✩✩

Toilet Rolls
Cereal Box Cards
Pens to Decorate
Scissors
A Pen or Pencil
A Ruler
Pipe Cleaners
Fluffy Craft Balls
Coloured Card
Googly Eyes
Double Sided Tape
Pritt Stick or PVA used sparingly

✩✩✩

How to Make Sabrina’s Fluffy Craft Easter Animals

These cute and fluffy animals were made using cereal box card, double sided tape and a bag of craft balls! In all it cost me about £2! And we have a ton of balls left over which we can use as flower middles and things like that – I use them in other projects too. This one is easy for little children, you do the templates and then add the glue on and then they can go to town with all the sticking!

Step 1. Draw on a cereal box, inside on the flat side piece, whatever shape you like, a Rabbit, a Chick, an Easter Egg, whatever you like or your children want.
Step 2. Cut out your templates, make them as big or as small as you like.
Step 3. Use PVA or Pritt Stick or Doubled Sided Tape to coat your template with glue.
Step 4. Provide a clean and flat surface for your little ones to sit and stick the fluffy craft balls to their card template.
Step 5. Add googly eyes or card beaks or any other items you want to finish them off.
Step 6. Let them dry overnight, place a piece of kitchen roll or newspaper on a flat surface, add the template, add another layer of tissue or newspaper, and then place a heavy book on top overnight to flatten them down and help the balls to stick.
Step 7. Next day you can display them around your home.

✩✩✩

How to Make Sabrina’s Toilet Roll Flowers

My easy toilet roll flowers are so simple to do! They only take about ten minutes to make once your toilet roll is decorated and dry. You could make a load of these, if you have a kitchen roll tube you may even get 3 flowers worth of petals from one tube! I would like to try and make a Rainbow of these!

Step 1. Let the Children decorate their toilet rolls and let them dry.
Step 2. An adult then cuts the toilet rolls into equal width pieces to make the petals.
Step 3. An adult also then uses the pointy end of their open scissors to poke holes that are 1cm up from the end and through both sides of each petal. (See my photo).
Step 4. The petals can now be opened out and gently threaded on to a pipe cleaner through the holes made with the scissors. Push them on until they hit the middle of the pipe and keep adding round.
Step 5. Curve the Pipe Cleaner round as you go, after each petal, and then after the final one is added you push the ends of the pipe back through the final petal holes to neaten it up. Line it up spaced between the petals while it is flat on a table and then push a fluffy craft ball into the middle.
Step 6. Hang your flowers up around your home on ribbon or string for a nice decoration.

Step 3 – 1 cm in from the petal end
Step 3 – making holes through the petals
Step 4.
Step 4 to 5.
Step 5.
Step 6.

✩✩✩

Step 2 – Cut the Decorated Roll into 5 Pieces

How to Make Sabrina’s Toilet Roll Easter Bunny

My cute toilet roll bunny’s are great for the Easter break! And they should stand up all by themselves! They are a little trickier than the flowers, but lots of fun still! They all start with a decorated toilet roll anyway so make sure you just save them up and get little ones to colour them in.

Step 1. Children decorate toilet rolls and let them dry.
Step 2. An adult cuts the toilet rolls into 5 pieces, a base, two ears, a middle and a head. (See Photo).
Step 3. An adult uses the pointy end of scissors to poke holes in the pieces, each one is specific. So…
Base is one hole, central on one side. Middle piece is two holes, one top one bottom just push the card flat together and the scissor end straight through. The Head piece needs one hole in the base at the centre, and off centre at the top it needs two holes. Each ear needs two holes, both on the same side at either end before the point. (See My Photo).
Step 4. Using a Pipe Cleaner push it on to the base and bend the end, attach the fluffy tail.
Step 5. Add the Middle to the pipe cleaner, push it down until it is flush and flat against the base.
Step 6. Take the Head piece, thread it on through the single hole, make it flush on the Middle piece of roll and then push another fluffy ball down the pipe cleaner until it sits in the middle of the roll.
Step 7. Push the pipe cleaner up through one of the holes in the top, and curve the pipe cleaner round, make sure the bunny parts are all flush and together for the body.
Step 8. Add each ear by pushing the pipe cleaner up through one side with the holes on, in through the bottom hole and out of the top hole, bend the pipe cleaner round and then through the top hole of the final ear and down through the bottom hole.
Step 9. The final step is to push the rest of the pipe cleaner down through the second hole on the bunny head, if you have more than 1cm of pipe left cut it off, then push the last 1cm into the fluffy ball within the roll bunny head, this neatens it up and gets the pointy end of the pipe cleaner hidden away.
Step 10. Adjust your bunny feet base and middle parts so that the bunny is aligned and he should stand up all by himself!

Step 3 – use my guide to make the necessary holes
Step 4 – Base and Tail
Step 7 and Step 8 – Threading the Ears

My bunny making video tutorial can be found on my Facebook page if you get stuck which is right here

✩✩✩

How to Make Sabrina’s Circle Petal Flower Card

This one is nice and easy and once all the cutting out is done, children can stick them down however they like to design their own flowers.

Step 1. Fold a Piece of Card in half for your card base.
Step 2. Draw around a circular object many many times on some different pieces of coloured card.
Step 3. Cut out these circles carefully and assemble flat.
Step 4. Every circle needs to be folded in half.
Step 5. Assemble your Flower by arranging the petals with one side sticking up to make it 3D.
Step 6. Cut out a small circle in a bright colour for the centre of each flower.
Step 7. Once happy with the design either pritt stick or double sided tape each petal down to the card.
Step 8. Make leaves or stems from card, or use pens to decorate your card.

✩✩

Thank you for reading this (long) Craft related blog post today, I always showing you my latest “Sabrina’s How To Make’s”! And if you have any questions for me about how to do something you’ve seen on my blog then please comment below on this post and I will happily answer them for you. I hope that you have seen something you would like to try and make yourself!

If you do make any of my craft items please tag me on social media using the hashtag #SabrinasHowToMake I really look forward to seeing them!

✩ Sabrina 

Check out my previous How to Make Craft posts for these beautiful 3D paper flowers!

Sabrina’s How To Make Paper Flowers for all Occasions

Hello and Welcome! If you’re a regular visitor to Severn Wishes Blog then you’ll know that I love to do lots of Art and Craft! If you’re new here then hi, and after this blog post please check out the remainder of my fun Crafts in the section here.

Paper Flowers are a wonderful alternative to buying fresh ones, the beauty of these homemade gifts is that they won’t wilt and have to one day be thrown away, these can be treasured by the loved one receiving them, forever! Give a single flower or make a bouquet it’s up to you!

What Do I Need?

A Ruler (30cm)
A Pen or Pencil
Pipe Cleaners various Colours
Thin Coloured Card or Thick Coloured Paper
Pens for Decorating the Petals (optional)
Fluffy Craft Balls (Flower Centres)
Scissors

My Step by Step Visual Guide is really easy to follow, but I also uploaded videos to my social media if you would prefer to follow that! Carry on reading for my step by step and photographic guide.


SABRINA’S STEP BY STEP GUIDE

1. Cut Squares from your chosen Coloured Card. For example I made my Orange Flower with a 7cm, a 8cm and a 10cm Square. Three Squares is an ideal amount of layers but you can do just two or even more layers if you wish. Assemble these squares on a flat surface ready for the individual folding process. (See my images below for additional guidance).

2. Fold each square you have in half to form a rectangle, do this by folding the bottom line up to the top line and line up the crease and push flat. Repeat for every piece you have.

3. Next, you fold each rectangle back into a square shape by folding it from the left to right and flatten and crease down flat once again.

4. Finally you will have all your layers into folded squares, and these now need to be made into Triangles. But to do this correctly for the next steps you must not rotate them at all during the folding process. Make sure that you fold the bottom right corner of your squares up to the top left, flatten and crease.

5. Next you need to draw a petal shape on every flattened triangle, make sure not to rotate it from when you folded it when you draw on it, otherwise it won’t cut intact during step 6.

6. Now you need to carefully cut out your shapes, gently follow the line and then discard these cut offs for the recycling because you don’t need them.

7. Time for the moment of truth, open out the flowers gently and slowly so as not to tear them. Lay them out flat and make sure they are an entire piece.

8. With the crease lines facing at each compass point you need to mark the petals that are in the South East corner of each flower. (See my images below if you are uncertain).

9. Carefully cut these petals away from the flower, be sure to only follow the crease lines of the folds when you cut and don’t be tempted to cut it too low in the centre, just enough for the spare petal to gently come free. You don’t need these now and these spare pieces can all be recycled at the end of your crafting session.

10. Next step is to mark the petal on the right of the one you just cut away, on each of your flower layers, and then stick a piece of double sided tape or a blob of glue on to that mark.

11. Doing each layer one at a time now, gently place the flower into your hand, and with the other hand carefully fold the petal on the left side over the petal on the right side. The creases and folds we made at the start should allow you to do this easily, if not gently fold the creases again and try again, the flower should (with some gentle persuasion) create a 3D flower with the shape similar to a cone. Push down on the glued part and make sure that you have aligned the petals and that it is stuck down. Repeat this for all flowers and layers that you want to make.

12. Carefully lay out each of the Flower layers now that they are 3D. You now need to decorate them if you want to with lines or dots before we assemble them. If making them with small children you may want them to decorate at Step 10, before you make them 3D.

13. During this step you want to use the end of the Pipe Cleaner you have chosen to gently pierce through the middle of the Flower layers, take one at a time, and force the pin end of the Pipe Cleaner directly through the centre where the creases and folds meet. Once all of the layers are pierced you can now arrange them in order of size.

14. Assemble your finished Paper Flower by sliding the layers on to the Pipe Cleaner, you do want to leave about a 4mm bit of the pipe cleaner poking out so that you can push on a coloured fluffy craft ball (if you have one) and this neatens the whole look of the flower plus it covers the pointed end of the pipe cleaner.

15. Adjust the Petals by rotating the layers slowly on the pipe cleaner stem until you are satisfied with the flowers final look. I hope you are happy with your flower! You can play around and add other things too if you like! Be creative and I cannot wait to see yours! Tag me! #SabrinasHowToMake

✩✩

Thank you for reading this Craft related blog post today, I always love doing my “Sabrina’s How To Make’s”! And if you have any questions for me then please comment below on this post and I will happily answer them for you. If you make some flowers please tag me on social media using the hashtag #SabrinasHowToMake and I really look forward to seeing them!

✩ Sabrina 

April 2022 Treatbox UK Reveal and Review

Hello! It’s Treatbox Day! And it’s time for the April 2022 Treatbox Reveal and Review.

View my Unboxing Video over on my Facebook or my Instagram.


Hello April!

It’s been quite a nice start to the month, some sunshine with occasional snow showers – the usual weird mix for Spring! But the Blossom is out and that is my favourite!
I was very much looking forward to Revealing this box due to the success of March 2022, I was not disappointed! Let’s unbox this one now!

What’s Inside the April 2022 box from Treatbox UK?

April Calendar Print
Light Blue Ribbed Cloud Design Socks
Gardners Cookies (Egg & Dairy Free) Iced Biscuit “Behind the Cloud. the Sun still shines”
Treatbox Original Sticky Notes – Cloud Design “You Got This”
Treatbox Original Shopping List Notepad – Dusky Pink Cloud Design
Treatbox & The Make Arcade Collab – Umbrella Glitter Shower Make Your Own Craft Kit
Treatbox Original Positive Affirmation Card “Stay Close to People Who Feel Like Sunshine”
Treatbox Original Keyring (Cloud Design) “Never Forget How Amazing You Are”
Treatbox Original Self Care Daily Checklist (2 + Months Worth)
Timeless Aromas Heart Shape Wax Melts in Candy Cloud Scent

My Honest Opinion on this month’s Contents.

There were several really nice and unique Treatbox original items in this April box, which I will most definitely be using! The shopping list comes in particularly handy for someone like myself, and the sticky notes are again a great piece of stationery that can be used all around the home. It was also nice to have an array of different items, an edible one, a wearable one, a make-able thing and plenty of positive affirming ones too.

I love the socks! I love socks in general but I love the quality of these socks that we receive from Treatbox, they wash and wear really well. Love the clouds design!
Again the keyring and the small card are positive reinforcement because I am sure we could all do with some with everything that is going on for us all both personally and on a global scale.

Love the idea of the self care checklist, though I’m not sure if I will get to tick off a square every single day – though I will certainly try! Self Care is not Selfish yet as a single parent some days I do struggle to find that balance. But I am trying to do better for myself.

Overall a lovely box, some really useful items, I look forward to a cup of tea with my biscuit and I will sit down and attempt the Craft Kit before the end of the month! And I promise I will put the finished piece on my social media for you all to see it! (Hides face in hands) Sewing is not my forte folks but I am very craft orientated so I shall give it my best shot!

The April 2022 Treatbox was filled with a positive and self care importance vibe, and with the calming clouds design I definitely feel as though it’s starting April off in the right way.
Now let’s hope it stays that way!


Thank you so much for joining me for this April 2022 Treatbox UK Unboxing, Reveal and Review. I really hope that you have enjoyed reading this blog post. I will be uploading various photography during the month from the products featured this month so don’t forget to follow all my socials and keep in touch for all the latest from Severn Wishes Blog!

Have a wonderful April!

✩ Sabrina ✩

Talking About All the Different Ways that We Use a Tuff Tray at Home

Hello Severn Wishes Blog Fans! Today I am bringing you a Lifestyle / Parenting / Hacks / Product Review article I have written all about something I have now owned for well over a year!
And that item is… The TUFF TRAY!

These fantastic trays are usually found in a school setting, especially with younger children like those in a preschool or nursery setting, but due to their versatility they have been becoming more and more popular with mums who are able to do a lot with their children at home.

As soon as I heard about them I knew it would be a great investment for the future. I ordered mine in black but they do come in a variety of colours. I preferred the black due to it not getting stained or if we made any scuff marks with toys they wouldn’t be showing up as easily. Overall I’m really happy with the quality of the tray for what I paid for it. So far it has withstood a toddler doing all sorts on it and in it!
I chose to purchase without the stand so it was then just suitable for laying down on the floor.

Be it Sensory, Messy Play or just toys on a flat surface, the Tuff Tray is ideal for lots of reasons when you have little ones growing up. Here are just some of the many ways that we have used our tray this past year or so! Both in visual form and I made a little list too!

  • 1. Ideal for Craft to keep the craft pieces and mess contained in the tray borders.
  • 2. Great for when you want to do some Messy Play and use paint so it doesn’t get on the floor.
  • 3. Doing some experimenting with foods in toddlerhood? Keep those rice crispies, rice grains and other food stuffs within easy clean up-able reach. You can wipe clean anything off it.
  • 4. Using Glitter today? This tray is ideal to wipe clean after your picture making as the bits will all be contained within the tray walls. Sit your children outside of it and let the mess be inside (mostly).
  • 5. Potty Training? Stick the Potty in the centre of the tray on the floor, and it will be easy to clean spillages off the plastic rather than off your floor!
  • 6. Building Lego or Duplo or Blocks? It can be annoying for little ones if pieces are rolling away or falling over all the while! But on the tuff tray they won’t get far at all! It also means it is a flat surface for the building to become easier on little hands.
  • 7. Doing a Jigsaw? Be it an adult one or a children’s one? Do it on your Tuff Tray and you’ll be able to move it at a moments notice off the floor and then continue it later.
  • 8. Want to do some baking with the kids but you want to do it at their level? It is much safer to do it on the floor where nobody is balancing and this tray doubles as a big flat surface, just clean it with sterilising spray and let it air dry before you start any food preparation.
  • 9. Sensory Play can involve all sorts of things like craft or food stuffs, having it all contained within the Tuff Tray makes life easier for you and if you planned to do it for a few sessions over a week you could even leave it on the tray and just move the whole tray instead of packing everything up.
  • 10. Play-Doh can get messy and easily sticks to hard surfaces like tables or floors, but by using a Tuff Tray base for all of the items they are contained within its sides. If you choose to get a stand with your tray you can even have the tray at a suitable height for your little ones. Or you can do what I do and maintain it on a flat floor, whichever is easier for you.
  • 11. A Tuff Tray can be used outside for a water table or a sand table due to its sides being all the way around with no holes within its surface.
  • 12. Design a World – Use your Tuff Tray and things like chalks or washable paint to create a world, a map or a world for your children to put their toys in to and play. I have drawn a road on mine for my sons toy cars before now and also used elements like sand made of ground cereal to make a beach.


So overall the Tuff Tray doubles up as another useful hard surface within your home and is ideal for playing, learning and food preparing. Young children can safely sit within its boundary or outside of it leaning in in order to play. There are no sharp edges on the Tray and the hard plastic is coated so its easy to wipe clean after every use.
I purchased the standard (medium) size but it is also available in small or extra large depending on the supplier you’re purchasing it from. They are also available in many colours.
Prices range from £11 to £70 and all Tray prices do depend upon the colour, and the size and whether you wish to buy a stand with your Tuff Tray purchase.
They can be used inside or outside but I would recommend you keep them out of direct sunlight and harsh weather conditions and keep them inside a garage or shed when not in use in order to maintain the sturdiness of the plastic.

What do we use our Tuff Tray for the most?

Craft and Messy Play and Sensory Play mainly.

Thank you for reading this blog post today, I hope I have inspired you and if I have then I would love to hear what you and your family use your Tuff Tray for!

Enjoy the rest of your February!

✩ Sabrina ✩

Sabrina’s How to Make an Autumn Wreath

Welcome to one of my latest Craft Project posts that I am very proud of.
I have been wanting to make a wreath for about four years now,
and I never got around to it until this Autumn. Oops!

Autumn Wreaths like this can be placed indoors flat or indoors hung up.
If you have a nice sheltered porch over your doorway you could even hang it outside!
I chose to make an indoor wreath using false leaves, dried pine cones, acorns and wooden craft pieces.

Here are all the things I have used to make my two wreath rings.
It’s a good idea to decide on your design before you start gluing anything, I place mine around the outside.

How to Make

Step 1. Prepare your design before you glue anything down.

Step 2. Glue the first layer of items down using a glue gun and wait for that to dry and the glue to harden before you add the next layer. Use a blob of glue per item, just enough to stick it down because you don’t want lots of excess glue on the wreath.

Step 3. Repeat the second layer with the glue and take care when pressing down the items when it is hot. Layer by overlapping the leaves until all the white on the front is gone. Once you’ve done the leaves let the wreath dry a few minutes and the glue harden.

Step 4. Keep adding to your design and let the layers dry in between, it only takes a few minutes to dry each time. You can put as many layers on as you would like to, and then add the three dimensional items last.

Step 5. When the design is fully dry then you are able to either lay it out or hang it up in your home. If you are hanging it up on a window you may want to repeat the design on the other side so that you can see leaves on both sides.

Take Care when Pushing the Items on the the Hot Glue

TOP TIPS! Make sure you only use a little glue, it’s hot and a little goes a long way!

TOP TIPS! Layer the leaves up until you cannot see any more of the white,
overlap them slightly so as to create depth to the wreath ring.

Make sure to decide on where you want to put the items before hand so that you don’t make a mistake when gluing.

What You Need

Wreath Base – Wicker or Rattan or Wood Sticks
Glue Gun and Glue Sticks
Decorations or Naturally Sourced Dried Out Items (like Pinecones) or Both!

Where I Bought From

I did a Nature Foraging Walk with my son.
I got the wooden pieces like owls and leaves and the artificial leaves from The Works in their craft part of the store.
I got the Rattan Wreaths from eBay.
I got the Glue Gun and Sticks from Amazon.

✩✩

Thank you for reading this crafty and make blog post today, if you have any questions for me then please comment below this post and I will happily answer them for you. If you like my wreath please let me know!

✩ Sabrina 

How I Made a Fun Craft Caterpillar to Teach my Child about Colours

My Fun Craft Caterpillar is an easy to make craft project, that can help you to teach your toddler about colours and counting. You can make it any size you like and with only a few simple and non expensive items. Ideal for children aged two plus with good fine motor skills.

Designed for Age Group – 2 Years Plus (Supervised)
Parent Difficulty to Make – 3/5
Time it takes to Make – 4 – 6 Hours
Cost to Make – £10
Reasons to Make – Learning about Colours and Counting
. Helps Develop Fine Motor Skills.

When my son began having issues with delayed speech I came up with several things to aid him in his communication. One of which was a Caterpillar friend that I made into several different items. Today I’m going to be showing you how I made my Fun Craft Colours Caterpillar! He is cute and great for helping little ones learn about colours, counting out and developing fine motor skills.

TOP TIP I wanted to help my son develop his fine motor skills as well as improve him saying different colours, picking up the Pom Poms and getting them to drop inside the correct tube does take some skills for little ones, so don’t worry if they have to learn how to do it. My son got the hang of it really quickly and was soon getting faster at doing it. One Tip is to show your little one what you want them to do, and then let them figure it out on their own a bit too. Always supervise but encourage and praise when they succeed.

What You Will Need

Toilet Roll Tubes – You can use toilet rolls and kitchen rolls and just trim them so they are a similar height. Order your card and Pom Poms and work out how many rolls you will need, you require one roll per colour.

A Thick Cardboard Base – Do you have a sturdy box after going shopping or have had something delivered? You need a piece of strong thick cardboard either a Square or a Rectangle for your Base that the Caterpillar will stand on.

Coloured Card – You need to try and match the coloured card with the Pom Poms you are ordering. If you want to do a simple Caterpillar just go for a pack with Red, Yellow, Green and Blue mix, sometimes you get an Orange or a Pink in those packs. I bought two packs to ensure I got black, white, purple, pink and orange for my more complex Caterpillar.

Coloured Pom Poms – A toilet roll tube is a certain width across, so make sure you only order Pom Poms that are less than this. My tubes are 4cm wide so I purchased a bag of mixed coloured 2cm Pom Poms. This means they are easy enough to tip back out after every use. Also ensure you get non toxic child friendly craft items from reputable companies.

Double Sided Tape – You need this tape for cleanly applying your Card to your Rolls, this is the most time consuming of the craft build but it’s easier and less messy than waiting for lots of paint to dry. (See my How To below).

Paint for the Base – I chose to just paint my base Green, as if the Caterpillar were on a leaf or some grass. You can be as creative as you like! You only need to paint the base, once you have fixed on all your tubes (see my How To below for more clarity).

Stationery and Craft Extras – You may want to stick on googly eyes and feelers, or draw them on, it’s totally up to you, your Caterpillar, your choice! 🙂 You will also need a Pencil and a pair of Scissors.

Where I Got My Craft Items

Coloured Card Packs – Hobbycraft Online
Pom Poms – Hobbycraft Online
Goggly Eyes and Pipe Cleaners – Craft Bundle from The Works
Double Sided Tape – Tesco Store
Green Paint and Brush – The Works

How To Make Colour Caterpillar – Sabrina’s Step by Step Guide

Step 1. Assemble all of your items as described above and ensure you have enough of what you need. Place a tube, a piece of coloured card and your desired amount of Pom Poms (I used 4 per colour) into individual piles. See what you have and how many tubes with the right colours and Pom Pom matches.

Step 2. Arrange the plain tubes on your base, and see how you would like them arranged. You need a one centimetre gap between each roll where it will be attached to the base. Bearing this in mind, arrange your tubes and mark with a pencil on the base where you would like them to go.

Step 3. Satisfied that you have all the pieces you need you can begin the card craft. Start by marking the pieces of coloured card for your tubes. For example mine were 15cm high, so I marked the card at 16cm with a pencil leaving the gap of one additional centimetre. Then cut all the card pieces to size ready for wrapping around the tube.
TOP TIP ensure you leave enough card to wrap all the way around a tube with the extra at the bottom. You need at least a one centimetre section of card at the bottom of every tube for attaching it to the base.

SABRINA’S TOP TIPS: Don’t throw away pieces of card that you have left over from this make, I have plenty of Craft and Art ideas on my blog that you could use these bits for 🙂

Step 5. Cut strips of double sided tape, align them along the top and edges of the coloured card and down the centre, ensure there is enough at the edges. At what will be the base of the tube stack the pieces vertically, using a small gap between them, this will be cut in Step 7 to ensure an easy attachment to the cardboard base. Make sure you put tape on all of the coloured card pieces. TOP TIP Make sure to do this Step and on to Steps 6 to 7 at the same time and don’t leave the craft part way finished, otherwise the double sided tape will dry out before you can affix it to the base.

Step 6. Time to roll the card on to the tubes. Remove all of the double sided tape strips. Line up the top section of the cardboard with the edge of the tube, on a flat surface like a table, gently roll the tube along the card. The tape will stick well to the thin tube, using your thumb and first fingers you can smooth out the card as it sticks. Try keeping it in line at the top. Once you come to the end of the coloured card make sure the final line of it is secure to its tube, smooth with your fingers and hold the edge in place for a minute per tube making sure that its firmly stuck in place. Repeat this per tube, laying them down on their sides once you are finished.

Step 7. You now need to be cutting the base of each tube so that they can be attached to the base. Take the first coloured tube you want to attach to the base (I did a Rainbow so mine was Red) and using sharp scissors cut a one centimetre slice up into the card at the tube base. Rotate the tube around cutting vertical slices as you go. Then once cut all the way around, gently peel back the slices and make a base for your tube. Affix it into place on your cardboard base because they should already have the double sided tape attached. Press down firmly and hold for one minute. Repeat this action with all of the coloured tubes until they are all attached to the base. (See images above and below).

TOP TIP Painting the base last ensures the tubes stay in place after the double sided tape has helped stick them down on the base. It also neatens up any edges that may have tape sticking out or tubes that weren’t quite level.

Step 8. With all your coloured tubes attached to the base you can now consider adding anything else to your caterpillar, and also paint the base with whatever paint you choose. I added googly eyes and some pipe cleaners as my Caterpillar feelers.

Step 9. Leave your Caterpillar to dry overnight before showing it to your little one. Ensure that you only play with it supervised either by you or another adult. The Pom Poms should be stored inside something that little ones can’t get into unless you are doing the toy together. Most children wouldn’t eat them at this age but better safe than sorry. I recommend a small plastic box like the really useful ones with the clip over lid handles.

TOP TIP Your Caterpillar friend can now be used to teach colours and numbers! Ask your child to count how many body parts the Caterpillar has, how many Pom Poms fit in each tube, can they separate the colours correctly and add them to the correct tube? This craft project can be used for play and learning and will keep your child occupied for hours.


Have you enjoyed this Craft Project? I would love to know what you think!
Please leave me comments on the blog section below or on social media.
Please tag me if you make a Caterpillar of your own!
Use the hashtag #SabrinasCraftCreations

Thank you for reading this blog post today, I hope I see you again soon!

Best Wishes for a happy week ahead!

✩ Sabrina ✩

Sabrina’s How To Make Your Own Unique Gift Tags This Festive Season

I have always had some creative flare, but one thing I had never done before was to make my own Christmas Present Tags! I came up with lots of ideas while spending time at home.

I took the plunge this November and ordered the things I would need to design them. I already had two awesome sets of Staedtler Pens in both fine line and bold. I also had various sequins. But I needed the tags and the string. I tried my best to use natural string and cardboard that was made from recycled materials.

What you could do if you can’t get any of these brown tags, is to cut up some old Christmas Cards and make them into similar shapes like these, add things like sequins in order to sparkle them up.

String Christmas Lights

The easiest of all my tag designs to make, you will need both thicker pens and fine pens of the same colour. The trick is to create the light shape with the finer pen and then colour it in with the same thicker style pen after. Make sure you leave the small crescent shape on one side of each light bulb so it looks three dimensional.

Begin by drawing the lines and bulb attachments with one pen, dark colours work best for this part. Then choose the pen colours you want for your bulbs. Ensure you don’t put the same shades next to one another and alternate colours like Red and Green for a Christmas look.

The size of your bulbs will depend on how many you want to do across your tag. If it’s just lights and no writing then you can fill up the space. If you plan to write “Merry Christmas” for example then perhaps do the lights top and bottom of the tag and leave the middle area blank.

Check out my images for some inspiration. Give it a go on a piece of plain paper and decide which way to do your bulbs, before doing them on to a tag.

Snow Scene with Tree

If you aren’t very good at drawing then you can still achieve something like this tag, just take your time and follow my instructions.
Check out my videos on my Facebook Page too!

You need a brown pen, the finer the tip the better, and you want to start by drawing the outline of your tree. Fill in the branches afterwards, getting smaller to the ends. Next to add a 3D aspect to your tree draw circles for holes and darken undersides of larger branches and the trunk to add shadows. Use a silver, white or light blue mixture of pens now to create the snow. You could do a snow scene or just do the tree. Be creative and have fun! Look at mine below for some inspiration.

The Christmas Tree

I quite like the abstract or deconstructed Christmas Tree type of tags. Mainly because when I try to draw symmetrical and lifelike trees they never look quite right. If you’re good at drawing trees however, then putting one in the centre of a tag would look really great!


Use a nice dark green pen for your tree. Add either stick on crafty bits and pieces or draw on some festive decorations, or do a bit of both! PVA glue is best because it will dry clear! If you want to do a more 3D tag then glue dots or adhesive squares also work well too.

Me on the other hand, I prefer to do the continuous line and have a sequin star on the top, kind of a tree!

Christmas Sparkle

If you have various diamanté, sequins or sparkles you want to use on your tags then you need to come up with designs that suit them. Check out my tags below for some ideas. Hanging decorations or bauble type designs work best for rounded craft items.
Think about when items hang on a tree, what they look like. Window decorations like a line of hanging stars or snowflakes are also very nice.

Sequins can be used on their own or accompanying pen lines.
Use your imagination and design your thoughts on a piece of plain paper first using a pencil, once happy with it, you can then transfer the ideas to a tag.

You can purchase the brown tags in most craft shops, online at places like The Works, Hobbycraft and Amazon. Try and pick ones that are already made from recyclable material.

I had previously bought my pens online from Amazon, Sequins from The Works and my Glue is also from The Works too. Other crafty items have been purchased by me over the years from various shops and also Tesco superamrket, they had a nice range of sequins this year too.

Other fun tags include, “Merry Christmas”, Holly, Baubles, Rudolph, Robin, Christmas Trees, Christmas Lights, Snowflakes, Snowmen, Santa Claus, Snowy Scenes, Penguins, Stars and things such as “Ho! Ho! Ho!” and “Let It Snow”.

Thank you for reading this post today, if you do give making Christmas tags a go then I would love to see them! Tag me on social media using the hashtag #SabrinasChristmasCrafts

Have a great Christmas!

✩ Sabrina ✩

You can see my tutorial videos on my Facebook page here…