Sabrina is a Lifestyle, Parenting and Product Review Blogger. A Writer, Photographer, Reviewer, Home Cook, Crafter & Nature Enthusiast. You will find a bit of all those categories here on Severn Wishes Blog, Welcome to Sabrina's Lifestyle Blogging & Honest Reviews.
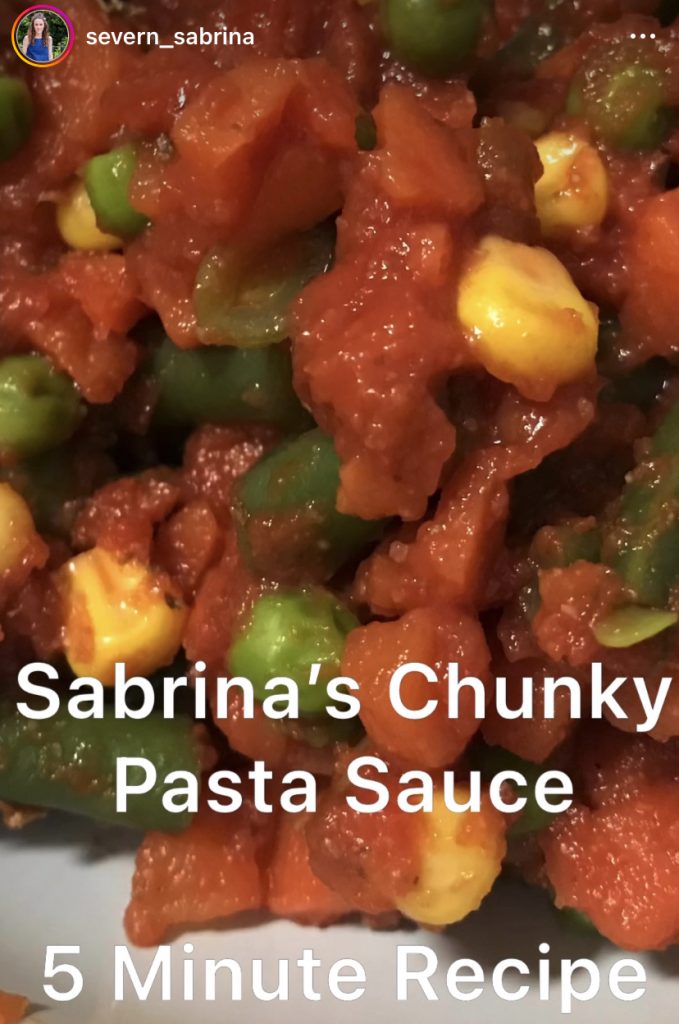
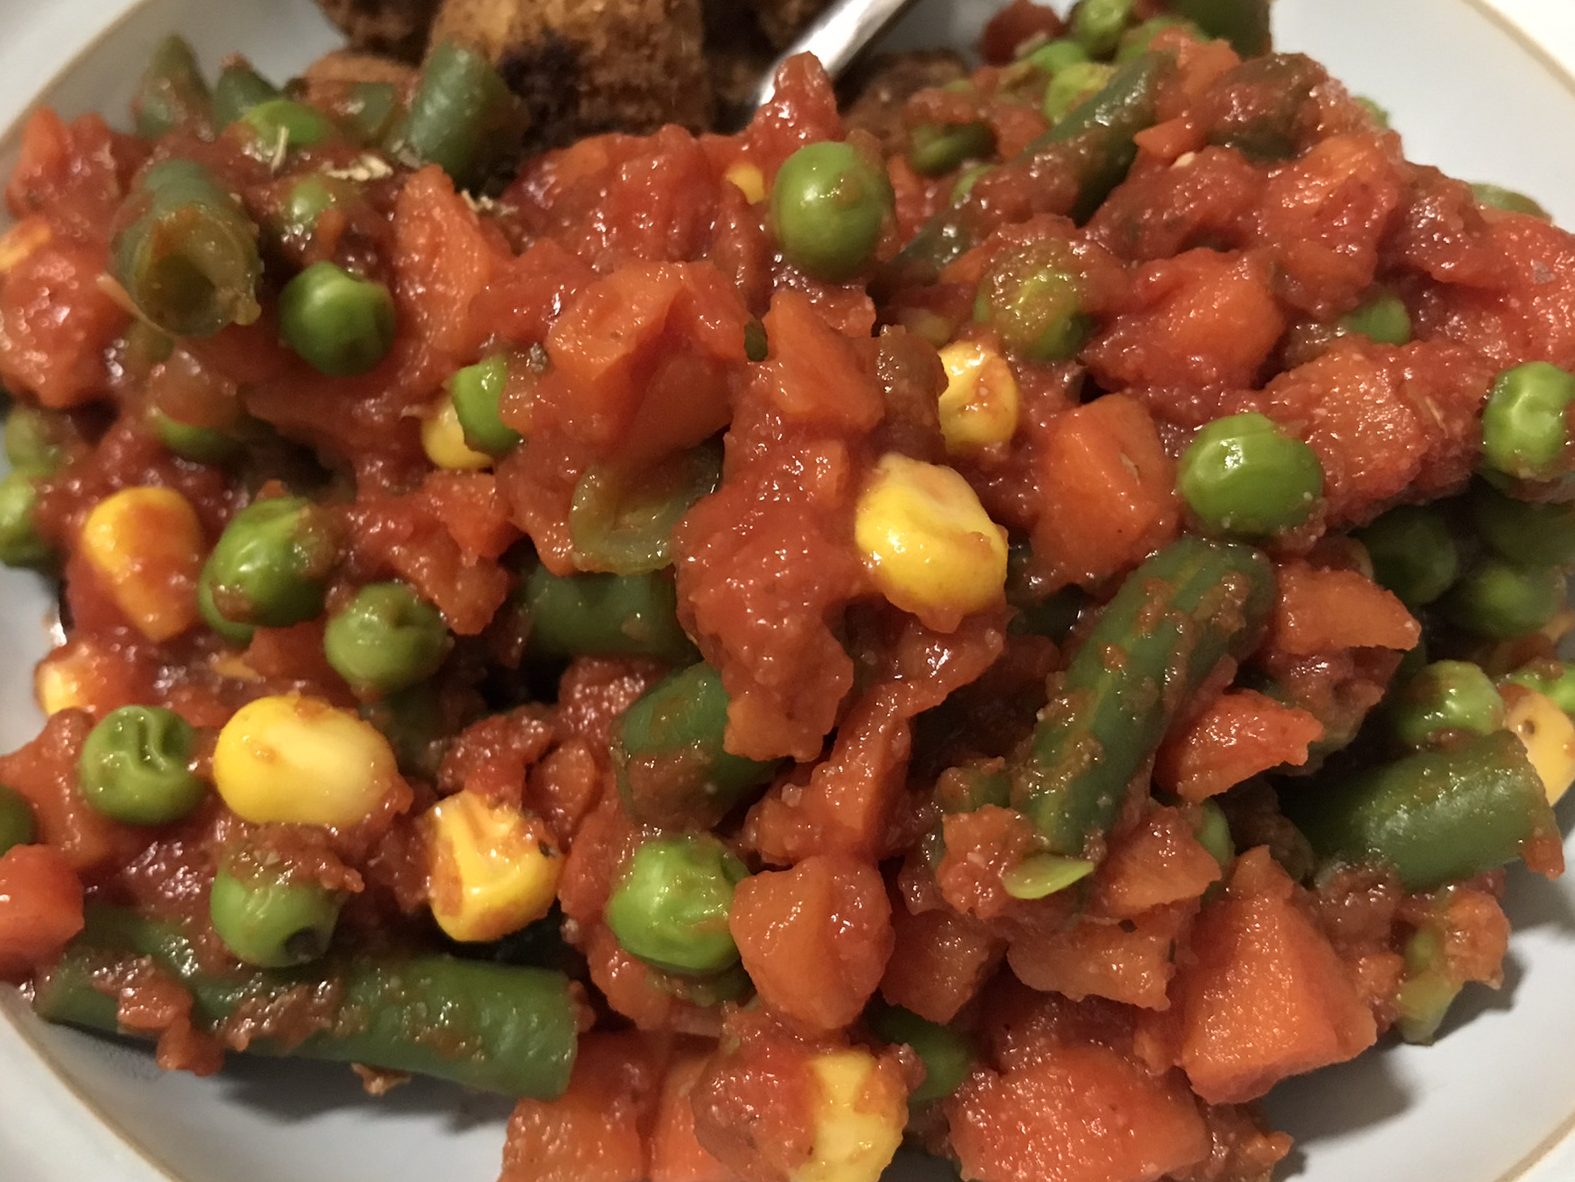
Sometimes all we want is a quick evening meal after a long day, so we decide on a fast cooking protein and/or carbohydrate like pasta but we then need a sauce. Only we open up the cupboards and find no jars in sight! Well fear not if this is you every once in a while! Because with my 5 minute sauce you’ll be serving up your food in no time!
Pop your pasta or rice or whatever else on to boil in the background. Then search your fridge and cupboard for any of the following items;
Tomato Puree Salsa (Mild or Hot) Chopped Tomatoes Salt and Pepper Italian Herbs or Herbs you like or Garlic too Vegetables – Frozen or Fridge in rough chunks Onion – Diced (Optional)
Step 1. If you have any onion fry this off in a saucepan until soft.
Step 2. Add 200ml of water to the saucepan now and add a small cup of chunky vegetables per person, easy if it’s out of your freezer but in case it isn’t… Any veg will do like peas or carrots! Just make sure if it’s fresh it’s washed (and carrots peeled) and then cut into small chunks. Add more water now just enough to cover the vegetables and bring it to the boil.
Step 3. While your veggies cook you need to make the sauce part, take all of your chosen ingredients out and put them next to your cooker, also get a tablespoon to measure with. Open any tins that you have like chopped tomatoes and wait for the veg to soften.
Step 4. Once the Veggies are soft carefully drain the water away from your saucepan, then place it back on to the cooker and begin to add the sauce elements. Step 5. Add in 2-3 Tablespoons of Salsa, 2-3 Tablespoons of Tomato Puree. Season to your taste with herbs, pepper, garlic etc. A sprinkle of salt is all you need.
Step 6. Mix this all together and now add in your chopped tomatoes, stir well, then return the saucepan to the heat and cook for another couple of minutes until it is hot throughout.
Step 7. Serve with your chosen accompaniment like Pasta, Rice or a Meat like Chicken.
Sprinkle some (I have Dairy Free) Cheese on top too if you like! Delicious!
Thank you for reading this Recipe Blog Post today!
I hope you have a great start to your week.
If you make my chunky pasta sauce I would love to know what you thought of it!
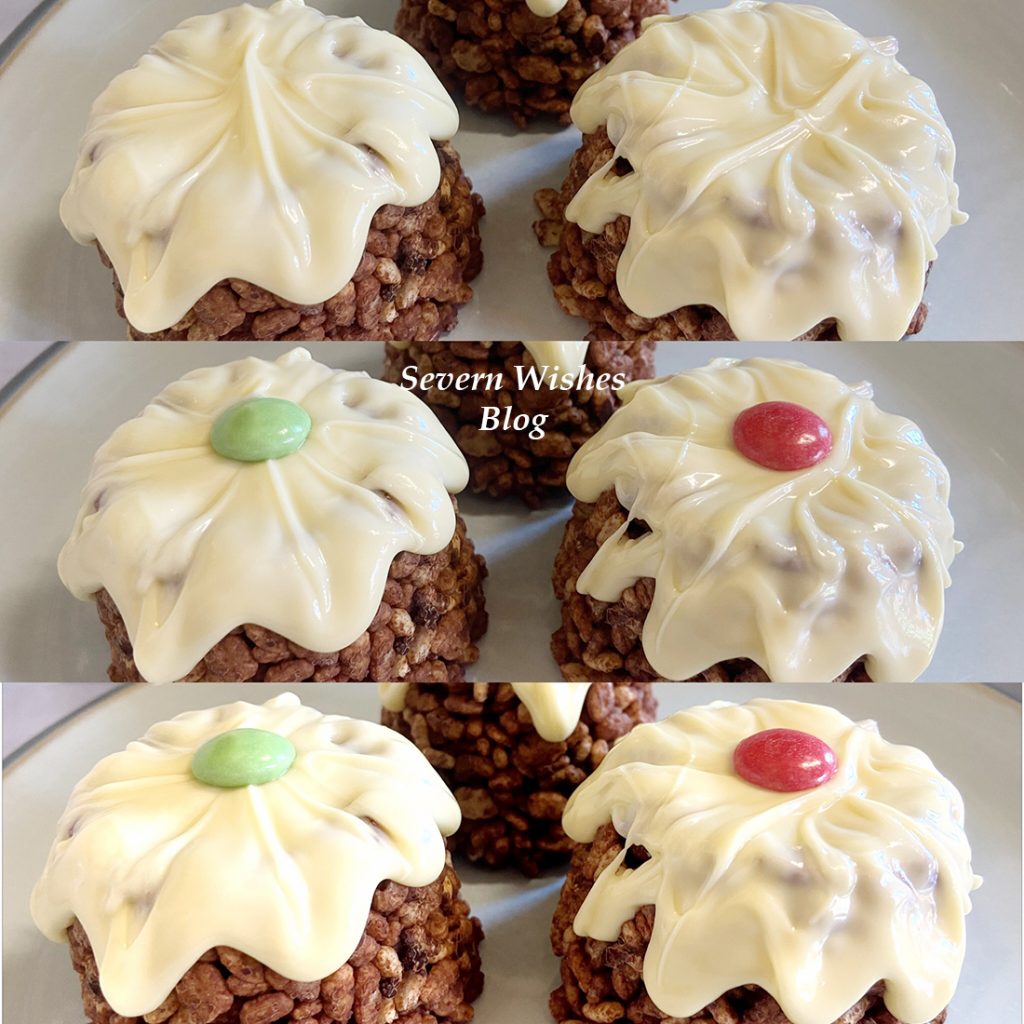
If you’re looking for a fun dessert for a Christmas Party that lots of children are attending then this might be the one for you! Look no further than these Christmas Puds! You can make them the day before and leave them to set overnight in a fridge. It will take just half an hour to make up to six Crispy Puds!
What You Will Need
Saucepan Wooden Spoon Rounded Moulds – I use an empty fruit pot that is from Tesco! They are the perfect size! Teaspoon
Crispy Cereal 300g-400g (depends on how coated in chocolate you want them to be) Milk or Plain or Free From Milk Chocolate 200g White or Free From White Chocolate (for the topping) 60-100g Decorative Item such as a Sweet or Smartie
How To Make
1. Melt the Chocolate on a low heat. 2. Once Smooth take off the heat and Stir in Crispy Cereal. 3. Push into Moulds of your Choice Firmly.
4. Refrigerate for a minimum of 4 Hours or Overnight. 5. Remove from Fridge, Turn Upside Down and Squeeze Gently to Remove from Moulds. 6. Melt the White Chocolate, Pour Over Each Pudding and Let it Drip down the Sides.
7. Using the End of a Tea Spoon Drag the White Chocolate to Form a Star Shape on Top of the Pudding .
8. Add a Sweetie or a Smartie on the Top to Decorate. 9. Pop Back in the Fridge until the Hour of Serving. 10. Keep in an Airtight Container for up to 3 days.
EASY PEASY!
Thank you for reading this blog post today, I hope that you like my recipe. If you make any of these yourself I would love to see a photo of how they turn out! Please tag me on Social Media! #SabrinasRecipes #SabrinasHowToMake
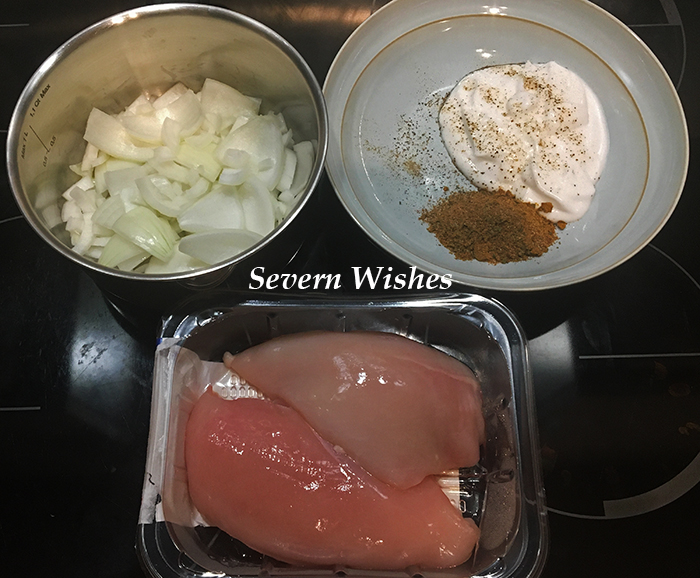
Good Day All! It’s time for a cookery related blog post today. If you follow me on social media you will have seen me share images of this one already, it’s a great alternative to a take away, and it costs a fraction of the price of one too! It’s a simple recipe, easy to make and complete in just a few minutes. Of course I am making mine dairy free because of my sons allergies, I have worked on this recipe for months. You can use alternatives and I will outline those in my recipe below if you want to alter it.
So why am I sharing this particular recipe? Well, I really miss a proper Chicken Tikka, and I thought with a little experimenting I could make a recipe I would really enjoy. Coconut is often used in curry sauce anyway, so by using coconut yoghurt as part of the base it eliminates the dairy aspect and allows me to play with the spices. This recipe I have made is great, although proper Tikka has nuts and dairy in, usually Almonds, and I can’t have either because of my son. It is also more red in colour, so I am considering adding some Paprika next time! So I will be continually trying to better this recipe and cooking in every aspect of my life, but this is the best I have so far. If I make an awesome adjustment I will edit this post! But for now my Curry is both Tasty and a little spicy too!
This is my Dairy Free Chicken Tikka Style Curry Recipe
Author: Severn Sabrina Prep Time: 20 Minutes Cook Time: 40 Minutes Total Time: 60 Minutes Serves: 2 for Curry & Rice OR 4 (if you add sides) Allergens: This Recipe is Dairy Free unless you change the Yoghurt
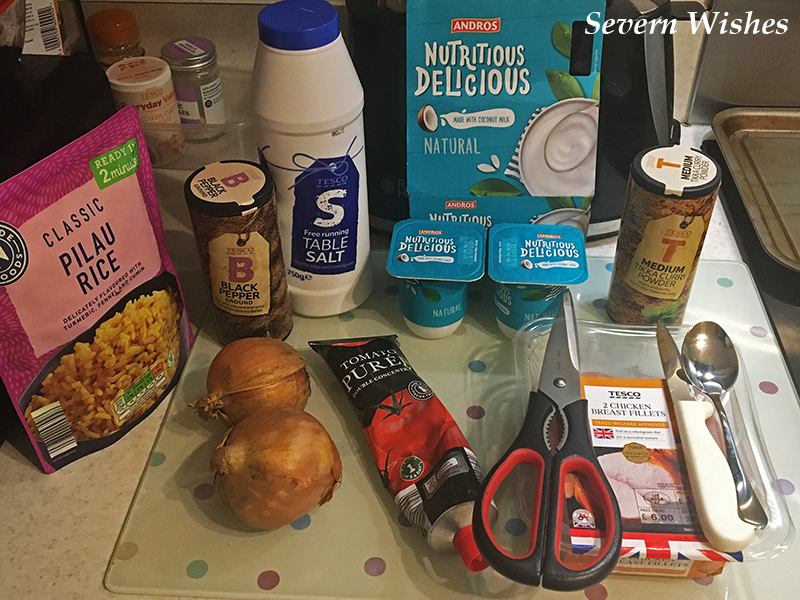
You Will Need
A Teaspoon A Wooden Spoon A Bowl for the Marinade A Medium Saucepan A Knife for Chopping A Flat Oven Tray Scissors for Cutting the Chicken
INGREDIENTS
Pilau Rice (it compliments the flavours of my sauce but you can have plain white rice if you would prefer) I sometimes just use a microwave rice packet for convenience. 300g Chicken or for a Vegetarian Alternative use Quorn Chunks White Onion – 2 Onions chopped two different ways, large chunks and diced 2 Pots of Coconut Yoghurt (average size from a usual pack of 4 pots)
Optional Extras (to increase it for the amount peopleyou’re serving) 1 Pepper diced into bite sized cubes and fried off with the onions 1/2 Tin of Chopped Tomatoes (if you prefer a more tomato based curry with less spice) Poppadoms and Chutneys Naan Bread (Shop bought usually contains Dairy) Chips
For the Marinade 1 Pot of Coconut Yoghurt 1 Teaspoon of Tikka Curry Powder (or something similar)
For the Sauce 6 Teaspoons Tomato Puree 1 Small Pots of Coconut Yoghurt (You can use regular yoghurt if not doing DF) 2 Tspn Tikka Curry Powder OR 1 Tspn of Garam Massala + 1 Tspn Cumin Salt and Pepper to taste
(If you want to make a more complex curry sauce look through my blog for my other recipes).
METHOD
1. Start by chopping your onions and frying it off in a saucepan with a little oil. You want the onions to be softened but not caramelised. Once they are cooked you can start to build the sauce up. Start by using a teaspoon to measure out the other sauce ingredients and add them into the onions. Including the spices, yoghurt and tomato puree. Stir gently to combine. Leave this on a low heat stirring it frequently. Your sauce should resemble mine in the image below.
Onions Ready to Fry, Chicken Marinade and Ready to Chop Fresh Chicken.
2. Then take your chicken, cut it bite size pieces, try and get them all roughly the same size so they cook evenly. You want to marinade the raw chicken for as long as possible before cooking it, so I would often do this as a first step and then go ahead to chopping and cooking. But it all works the same way and it will be just as soft and tender but slightly less flavoursome than if you marinaded it for a few hours! So if you’re planning to do this recipe and have some time on your hands, marinade the chicken in the fridge for a couple of hours before putting it in the oven. (With a toddler in tow I often just get a short window to cook!) When you do get to this stage you should lay the chicken pieces out evenly on a tray and oven them for around 20 minutes at 180’c. They should look baked and coated, cooked through and still tender. See my images below as a guide.
3. For the next step you want to remove the cooked chicken pieces from the oven tray gently, and set them down in the sauce, try not to lose much of their tasty marinade coating! This will add extra flavour to your sauce. Stir all of the chicken up with the sauce and then leave it on a low heat for around twenty minutes.
Mix the oven cooked chicken with the sauce you made earlier.
4. Serve the curry as soon as your rice is cooked and hot, half and half works well, you could even accompany it with some poppadoms and chutneys, a naan bread to tear and share or even do half rice and half chips while the oven is hot – if you’re that way inclined! 😉 There should be plenty of that tasty sauce for dipping things in whatever way you decide to serve it!
The Final Curry Dish Served with Pilau Rice
Thank you very much for reading this post today, if you do try my recipe let me know how you got on. If you have any questions feel free to leave a comment, I’m more than happy to answer them.
Welcome to Sweet Treats Week on Severn Wishes. This half term I wanted to share my top 5 baking treats with you all, hopefully you’ve got some time this week to make them with me! Check out my Instagram for more food pictures and recipe ideas too!
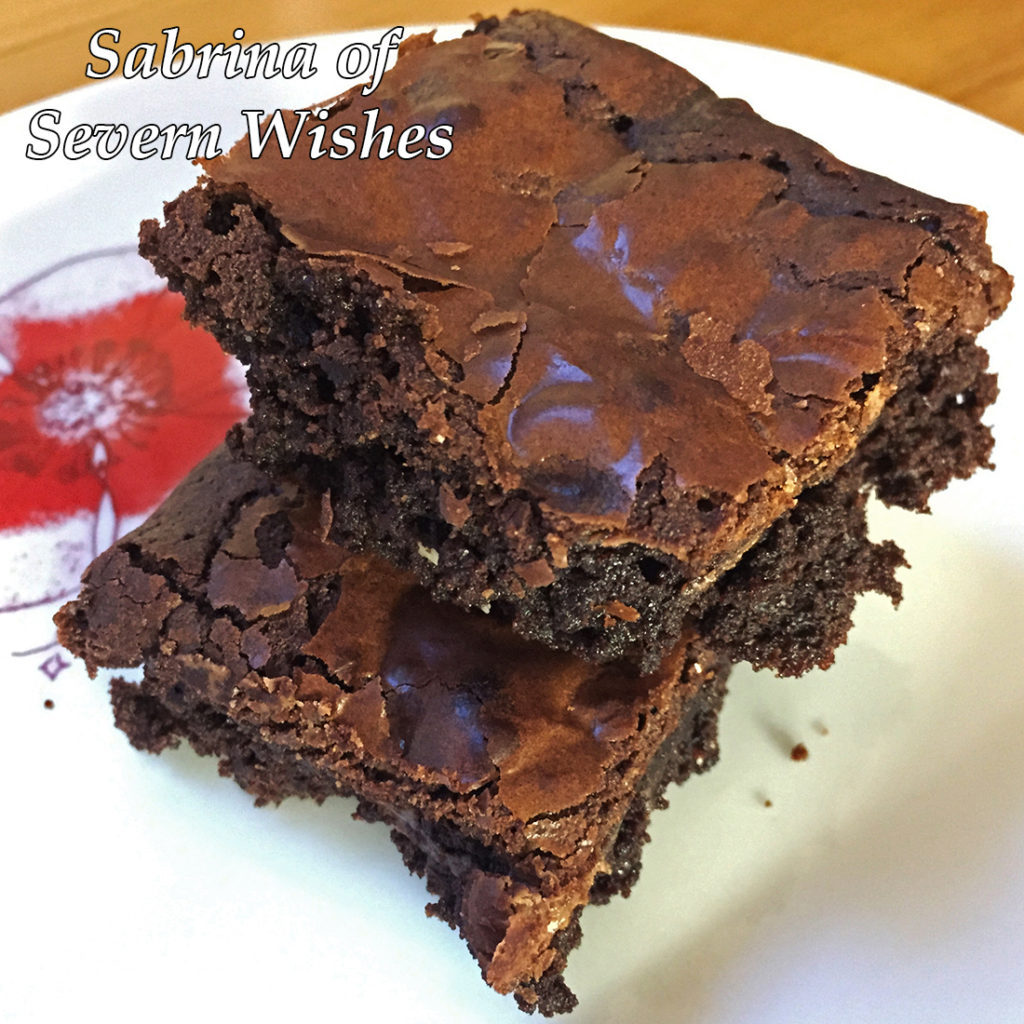
Sabrina’s Chocolate Brownies
Day 1 is Sabrina’s Extra Special Chocolate Brownies
Brownies can be tricky, but if you follow my recipe one step at a time you should be able to recreate my incredible triple chocolate brownies! Since needing to go dairy free I’ve even made these brownies free from dairy by substituting the butter for a dairy free spread and then I swapped the triple chocolate chips for only dairy free chocolates, and they still taste incredible! So do whichever version you would prefer, the difference in butter doesn’t change the end result.
My recipe will make around 20 brownies once you cut them after they have cooled. They are quite rich which is nice because they will last longer! They will last around 3 days in a sealed container, the best way to keep them is to store them at room temperature. TOP TIP Reheat a square or two for between 10 and 20 seconds in the microwave and serve them with ice cream! Yum!
Sabrina’s Triple Chocolate Style Brownies (A.)
What You Will Need
A Glass Dish or Baking Tray measuring approx 26cm x 20cm (8 x 10″) Baking Paper or Parchment A Saucepan A Large Mixing Bowl A Wooden Spoon A Metal Spoon A Whisk – Manual or Mechanical A Sieve A Knife A Cooling Rack Something To Store Them Inside After They Are Cooled
Step 5. Once Smooth Add Your Chocolates To The Mix!
Ingredients
3 Free Range Eggs (Fresh is best for baking) 175g Plain Chocolate (for melting) (You can use dairy free chocolate too) 175g Butter (or Dairy Free Spread) 200g Caster Sugar 75g Plain Flour 50g Cocoa Powder
Additional Flavours or Additional Chocolates… There Are Endless Possibilities! What Would You Do? Here are my favourites…
BrownieVariations
A. Triple Chocolate Brownies require 75g of White Chocolate Chips and 75g of Milk Chocolate Chips (or use different varieties of dairy free chocolates). Add these at Step 5. B. Chocolate Orange Brownies require 100g of Chocolate that is Orange Flavoured, dairy free choc orange bars from Asda are fab or a few broken segments of a Terry’s Chocolate Orange are best! Put these pieces in the mixture at Step 5 instead of chocolate chips. C. Mint Chocolate Brownies require 75g of Chocolate that is Mint flavoured, with such a strong flavour of chocolate it can be used as part of the melted part at the start of the bake. For a more Minty flavour later on you could add some Aero Mint Chocolate Balls when the brownie is almost cooked! Push them into the top of the brownie before the top is solid leaving just a little sticking out so they don’t melt and or burn!
Sabrina’s Chocolate Orange Brownies (B.)
Method Steps
1. First you need to place your butter and plain chocolate into a saucepan. Break the chocolate into small bits so it melts faster. Only melt on a low heat slowly. Keep stirring the melting mixture frequently until it is smooth with no lumps left. TOP TIP I only have my hob one setting 1 or 2 for melting, you don’t want to burn the mixture! I don’t like melting chocolate in a microwave, it’s too easily burnt!
2. Set the melted chocolate mixture to one side and allow it to cool. You can now preheat your oven to 180’c, 160’c for a Fan Assisted or 350F or Gas Mark 4. Cut a piece of baking parchment for your tray and push it inside.
3. In a large bowl break the 3 Eggs, make sure no shell falls in. Using a wooden spoon mix them up, add the Caster Sugar gradually while stirring. You then need to Whisk them both up together until they are combined and smooth with a light and creamy colour.
4. Using a Large Metal Spoon, you now fold in the cooled melted chocolate and butter mixture, one spoonful at a time. Keep stirring it through the creamy mixture, keep going one spoon at a time until all of the smooth thick liquids are combined into one large one. It should be a lot and not lumpy. TOP TIP If the chocolate mixture is still hot it instantly cooks the eggs and you end up with a curdled concoction! Make sure its cool, lukewarm is best, and stick to my one spoon at a time method!
5. Finally you need to Sieve the Cocoa Powder and the Plain Flour into your liquid, again you do this gradually, shaking a little into the bowl and mixing it through until it disappears. Repeat until all the dry ingredients are in the bowl and the mixture should now be a thick pour-able liquid. Add your chocolate chips or buttons or other bits now! Mix them in thoroughly.
6. Pour the mixture entirely into your tray with the parchment inside it. The mixture should sit just over half way inside giving it a little room to rise up slightly. Add any toppings like chocolate chips now, or part way through if they are not bake stable. Shake the tray from side to side before pushing it into the oven, so the bake is level.
7. Bake it with the correct setting for your oven, you’re looking for an even bake with the slightly crisp topping, it should change colour, it should be soft but cooked in the centre. On average this bake takes between 20 and 30 minutes, depending upon tray used and oven type. Just keep an eye on it, take it out and stick a knife into it. When the knife comes out almost clean, pull the tray out. Leave it on top of your oven for ten minutes, try the knife again. Remember if you hit a melted chocolate chip you may think it’s not cooked when it is! For this reason don’t be tempted to over cook it! They should be soft with the additional chocolates melted inside when you cut it!
Remember to wobble the tray so the mixture goes flat!
Thank you very much for joining me for Sweet Treats Week! I hope to see you again tomorrow!
If you make any of my recipes be sure to tag me on social media, leave me a comment here on my blog. Any questions don’t hesitate to ask them! If you recreate this recipe somewhere else please credit me for it and name me and my blog or even better link back to this original post! Thanks everyone!
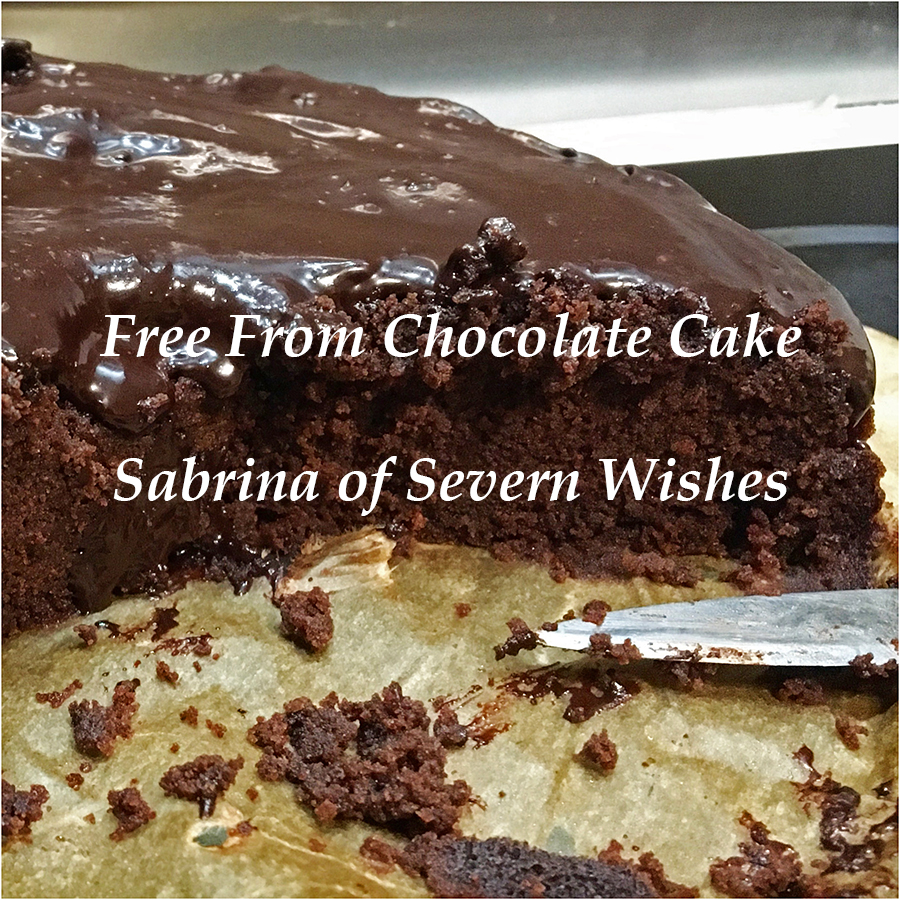
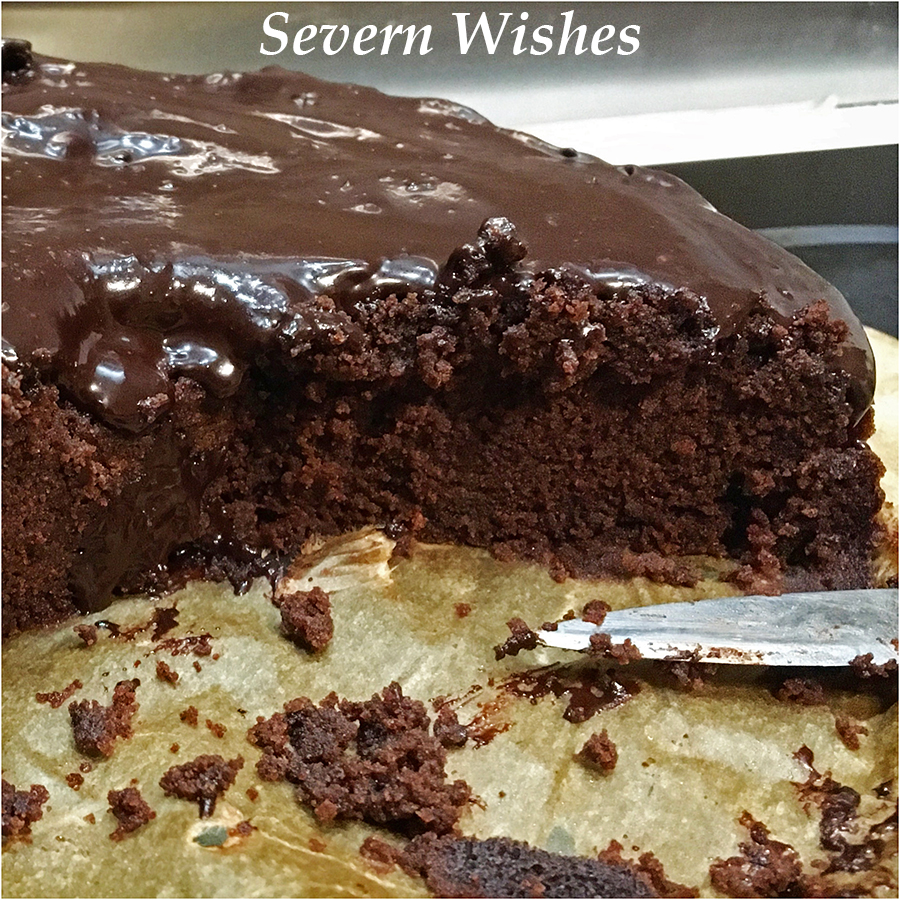
As most of you regular Severn Wishes readers will know, my son was born with a number of allergies. I love to cook and baking is something that I am gradually getting better at. I wanted to make up a recipe that was easy and that I could use with what I usually find in my baking cupboard. But not only that, it had to taste like proper chocolate cake. There’s nothing worse than it not resembling what you know and love!
This moist and soft chocolate cake recipe is egg free and dairy free. You could even change the flour to make it gluten free too if you like. I made it normally first, and then with gluten free baking flour when my sister (she’s coeliac) visited us, and both times it still baked as a soft sponge. Delicious! A great treat if you’re doing Veganuary this year! Why not make this Vegan delight at the end of the month? Give you a treat to look forward to!
This cake serves 10 people, you only want a small slice as it’s rich! Time to Prepare, Make and Bake is… 1 Hour 30 Minutes Preheat your Oven to a Temperature of 180’c or 360’F You will need baking parchment to line your 8″ Tin You shall need a Jug for the Sauce, one Large Bowl and one Small You will also need a Sieve, a Spoon and a Whisk And finally a Cooling Rack
Ingredients
For the Cake:
175g Flour – I used plain or a mixture of Plain and Raising, or use GF 200g Caster Sugar 50g Cocoa Powder 1 Teaspoon Baking Soda 1 Teaspoon of Vanilla Extract – You could use Mint Flavouring instead 240ml Tepid Water 120ml Vegetable Oil
For the Sauce to pour on top:
4 to 6 Tablespoons of Tepid Water 2 Tablespoons of Golden Syrup or Maple Syrup 2 Tablespoons of Cocoa Powder 130g of Icing Sugar
Sabrina’s Free From Chocolate Cake
Method – Making the Cake
Step 1. Sift the Flour, Cocoa Powder, Caster Sugar and Baking Soda together in a large bowl. Make sure you mix them together thoroughly to combine.
Step 2. In a small bowl mix oil, water and vanilla together and stir until mixed.
Step 3. Gradually stir your wet mix bowl into the dry ingredients. Once you have combined them use a whisk or hand processor in order to make the mixture smooth. Mix until all the liquid is combined with the dry mixture.
Step 4. Pour your smooth mixture into the lined cake tin and shake gently from side to side to make it even inside.
Step 5. Bake in the Centre of your Preheated Oven, between 26 and 32 minutes depending upon oven type. Keep an eye on your cake so that it doesn’t over bake, use a knife of skewer in the centre, when it comes out clean it’s baked.
Step 6. Once cooked gently transfer the cake to a rack so that it can cool. You don’t want to pour on your sauce until it is cooled. Make sure the cake is completely cool before serving, you don’t want your sauce running off!
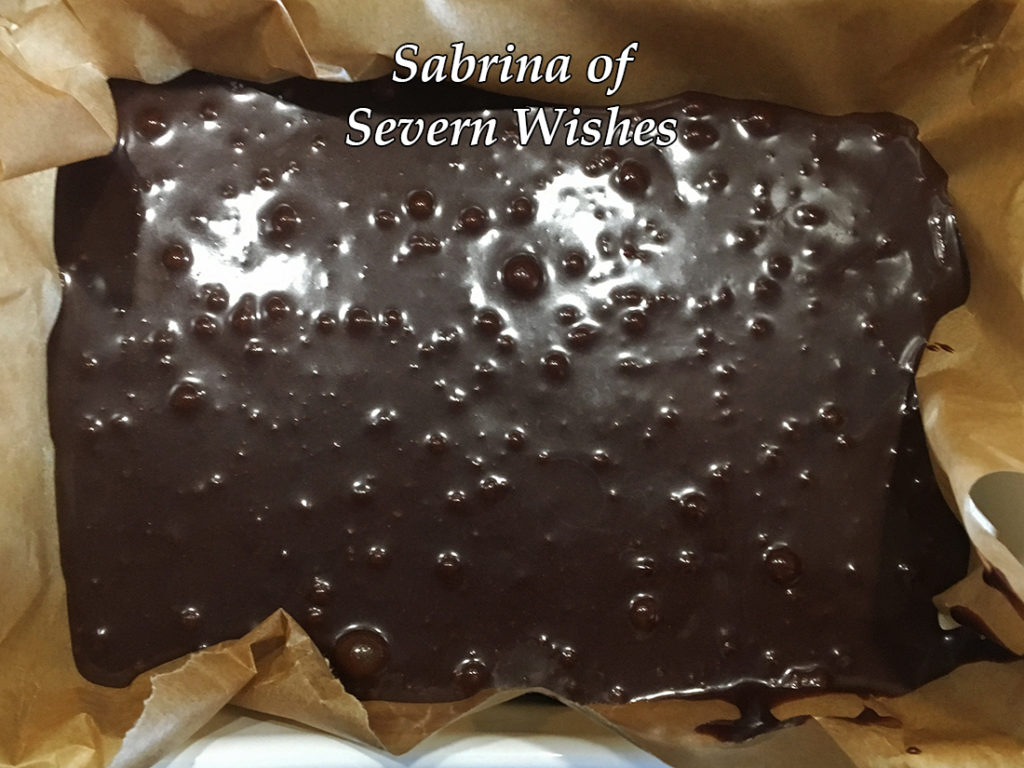
Method – Making the Sauce
Step 1. Sift the cocoa powder and icing sugar together in a bowl. Mix with a spoon until combined and a brown colour over all.
Step 2. Pour the syrup of your choice and the water into the bowl, make sure you stir it immediately and keep stirring until the ingredients resemble a smooth consistency. Start with 4 Tablespoons of water, if it’s not resembling a sauce that is pour-able then you can add more, one spoonful at a time until it’s how you want it to be. It can vary on the size of the spoon you use for example. TIP: Always better to start with less water and add it gradually, if it’s too wet to start with then you’re going to be measuring out more sugar which is a consistency much more difficult to get right.
Step 3. Cover this sauce until your cake is cooled and ready to serve, cut your cake slices, plate them up and then pour the sauce on to each piece. It’s easy to make more sauce if you need it and only takes a matter of minutes!
✩✩✩
Thank you for coming to Severn Wishes today to read this recipe blog post. I hope you have enjoyed it. Can you please leave me a comment on this post if you try the recipe, and let me know what you think!
Hello readers! It’s time for the October 2019 Treatbox Reveal with me, Sabrina of Severn Wishes Blog.
Happy Treatbox Day! It is time for some unboxing! This is my Reveal and Review of the October Treatbox.
It has a tissue paper of deep purple again this month and the sticker says “xoxo Treatbox” on it.
Don’t forget you can follow my social media for more Treatbox photos and updates throughout the month!
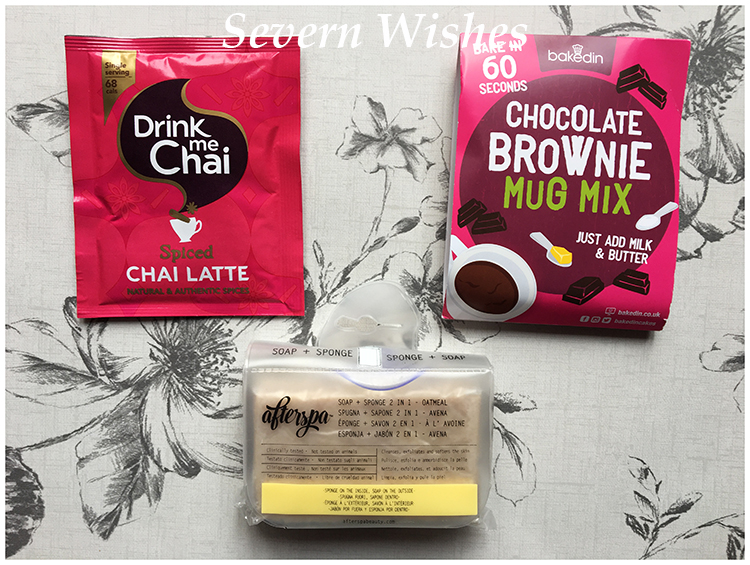
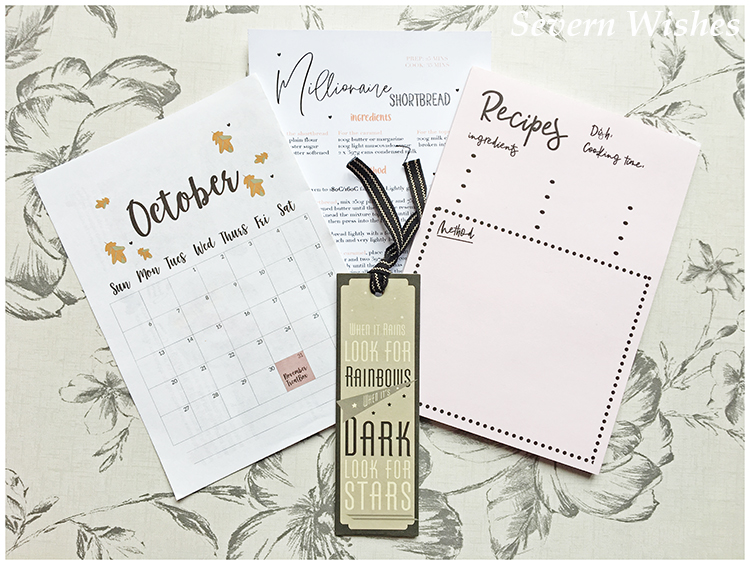
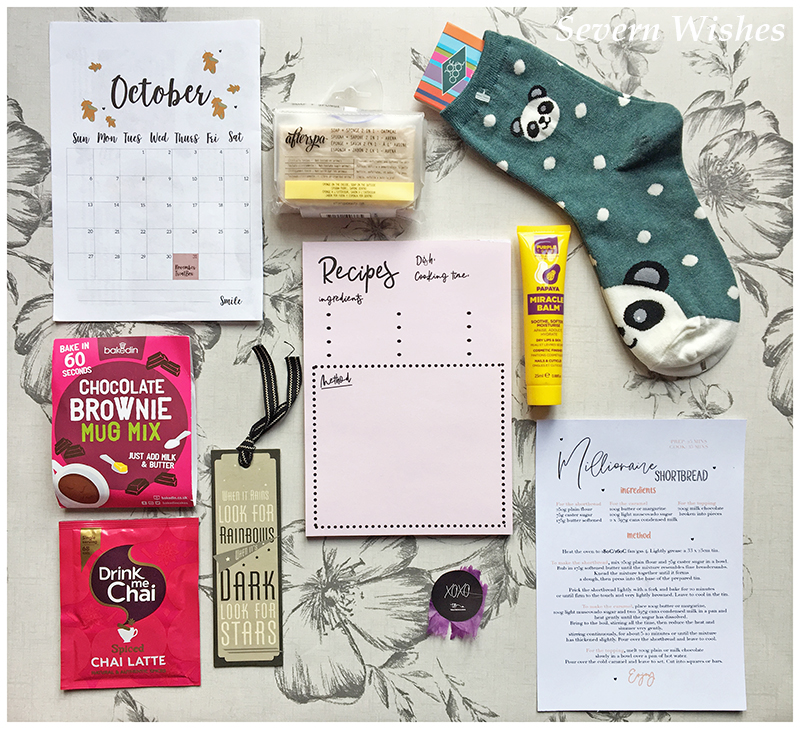
Here are the contents of the October box, this month there are 9 items in total, 7 physical, 1 Recipe Print and of course the Calendar Print.
October Calendar Print Print as a Recipe “Millionaires Shortbread” Bakedin Chocolate Brownie in a Mug Mix Joe Cool – Pair of Socks – Green Panda for me! Cute! Purple Tree Miracle Balm – Papaya Flavour for me! For Dry Lips & Skin Drink Me Chai Spiced Chai Latte Drink Sachet After Spa – Soap + Sponge 2 in 1 Oatmeal Notepad for Recipes including space for writing Method & Ingredients Bookmark – “When It Rains Look For Rainbows, When It’s Dark Look For Stars”
Here are some more
images of the contents from this October box…
Calendar Print and Bookmark
Miracle Balm and Socks
Chai Latte, Brownie in a Mug Mix and Oatmeal Soap + Sponge
Calendar Print, Recipe, Recipe Notepad and Bookmark
My Opinion on the October 2019 Box I really love some of the items in this months box, especially the Socks, Balm, Bookmark, Recipe Notepad and Brownie Mix!
I love Reading and this Bookmark has one of my favourite quotes of all time on it!
The socks are great quality and the Panda is so cute too! I am someone who nearly always has socks on her feet because they get cold so easily.
The Miracle Balm is a great handbag size and can be used on any dry skin. It smells lovely and I used it on my lips and found it very smooth.
I will definitely be using the Recipes Notepad because I’m always making up new recipes in my kitchen, and I often don’t have anywhere to write them down, so I write on post-it notes or a note on my phone. Now they can go on here! Hurrah!
Finally the Brownie in a Box is great because it has no dairy in it so I can eat it! Yay! I can add dairy free butter to it and even soya milk if I’d like, when I do enjoy it! I will pop it on my social media when I do!
The other additions to the box of a Recipe is lovely (I may have to alter it to suit our family allergies but I will give it a go at some point!) and the Soap + Sponge is rather intriguing! I will be gifting the Chai off to my Sister who loves this sort of thing!
All in all a very good box and I’m happy with the contents.
Are you thinking of ordering a TreatBox for yourself or for a gift for someone? Then you can find Treatbox subscriptions and build your own box at their website
Check out my previous Treatbox unboxing posts in this unique category of mine called ‘Treatbox’ it is specifically for these box reviews and reveals – Severn Wishes Treatbox.
Thank you for visiting Severn Wishes today, I hope you enjoyed the Review of this Treatbox and that I see you here again soon.
How To Make Delicious Dairy Free Vegetable Nuggets For All The Family To Enjoy!
Today I will be showing you how to make tasty, nutritious and dairy free vegetable nuggets that contain four different vegetables. They are great fun for your children to eat as finger food and your older children can dip them in the sauce if they choose. This recipe is ideal for weaning and beyond.
Veggie Nugget (broken so you can see the soft inside)
✩✩✩
Ingredients for Sabrina’s Veggie Nuggets
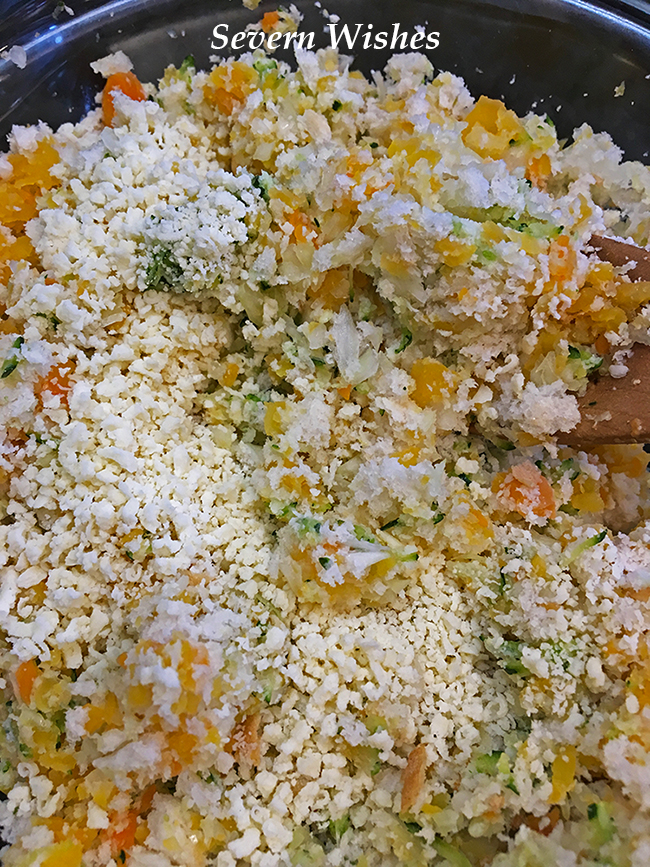
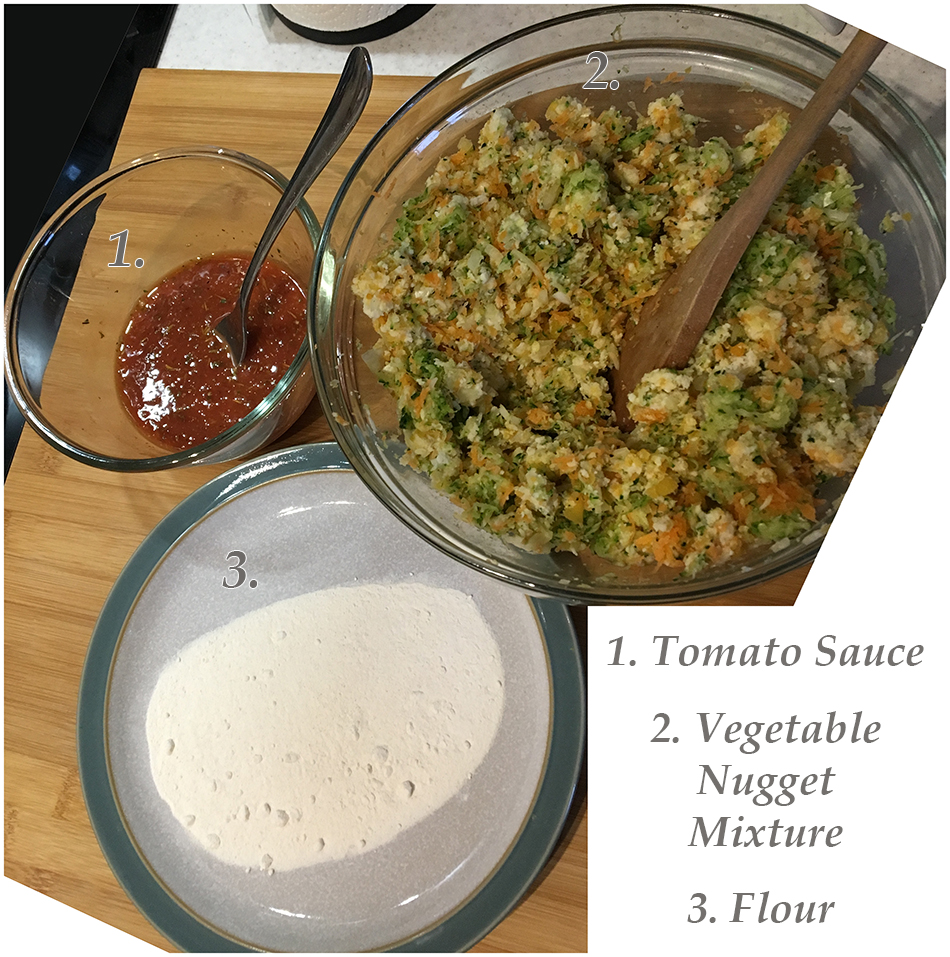
3 Tablespoons of Tomato Ketchup 1 Tablespoon of Reduced Salt Soy Sauce 1 Tablespoon of Mixed Herbs 1 Large Egg (Beaten) 160 grams of Breadcrumbs (approx) roughly 4 slices of bread – I always use the 2 end bits if I have them! 6 Medium Carrots – Grated and Squeezed 2 Courgettes – Grated and Squeezed 100 grams of Swede Cooked First, then Diced Finely using a Chopper 1 Large White Onion Diced Finely 50 grams of Dairy Free Alternative to Italian Style Hard Cheese Plain Flour (6 tablespoons approx) spread this onto a small plate ready for rolling…
✩✩✩
Method
To make the sauce combine tomato ketchup and soy sauce together. Double the amount if you are preparing these nuggets for people to dip into the sauce straight after cooking them. Use half of the sauce for the vegetables mixture and leave half for the dip.
Once you have prepared all of the vegetable ingredients as directed above, you will need to ensure the mixture of vegetables isn’t too wet. Take a handful of the grated and chopped veg and place it between a few paper towels, a muslin cloth or a clean tea towel. Squeeze and press it in the cloth to squeeze out as much liquid as possible. Do this with all of the grated veg.
Get a large mixing bowl and crack the egg into it. Add the herbs and stir until combined. Next add some of the tomato dip. Next add the squeezed vegetables, then lastly add the hard cheese (or alternative) and the breadcrumbs, stir it all thoroughly. You don’t want lots of the same type of veg in each ball, try and mix it so you get a variant of all the ingredients. (I do my breadcrumbs in a small food mixer).
Place the flour onto a small plate ready to roll your nuggets in.
To make a nugget take a small handful of the combined mixture and roll between your palms. Top Tip! Do this with wet hands so it doesn’t stick to you! Roll them out into oval shapes, and then once happy you can roll each one in flour to coat it.
Have a large frying pan ready on your cooker with some oil getting hot. You should place the nuggets down gently so as not to break them or splash the oil. Fry each one until lightly browned all over. Top Tip! Use a pair of tongs to adjust them while frying to make sure you do all of the sides. Keep topping up the oil after every few nuggets.
Once they are cooked set the nuggets to one side on a piece of kitchen roll so as to drain any excess oil from them and let them cool a little, and then serve them while they’re still warm in a large bowl with the remainder of the tomato dip. They are great for a children’s party or a finger food family night in.
Squeezing the Veg so as to remove as much moisture as possible.
Veggie Nugget Mixture Ready For Mixing and Rolling
Vegetable Nuggets are ideal for children who are weaning at around 10 months and older, when they are learning to hold and bite into foods. They are great for getting your children to eat vegetables. The tomato dip provides a fun element for older children. The leftovers can be frozen, defrost over night and re-fry them to give them a crunchy outside again. My Recipe made me approximately 24 Nuggets.
Once you have rolled your nuggets between your palms you can get ready to fry them… My Top Tip is to have some done so you can fry one set while you make the next set…
FryingTips
When frying the Nuggets take care and turn them frequently so that they cook evenly on all sides. You also need to maintain the oil so that they sit in a few millimetres at all times to avoid sticking to the pan.
Finished Veggie Nuggets
These Nuggets are great, and rather tasty too, that is providing you like the Veg I have chosen. You can substitute the Courgette for Mushrooms if you prefer those! And you can also do these without being dairy free by using a regular cheese like Parmesan if you wish.
✩✩✩
Thank you for visiting, I hope you have enjoyed reading about this recipe, if you decide to give it a go then please leave me a comment with how it went afterwards… Check out my other recipes on the category list!
✩ Sabrina ✩
By continuing to use the site, you agree to the use of cookies. more information
The cookie settings on this website are set to "allow cookies" to give you the best browsing experience possible. If you continue to use this website without changing your cookie settings or you click "Accept" below then you are consenting to this.