A Delicious Casserole Recipe the whole Family will enjoy

My Delicious Red Wine Casserole Recipe is a winner for the whole family to enjoy. And it’s got plenty of vegetables in it too, with a rich red wine gravy sauce.

You can have a tasty dinner in 3 hours, with a 30 minutes preparation time and a 2.5 hour cooking time. Easy to do and leave in the oven while you do something else! It is a very handy recipe to have when you have to help your children with homework this Autumn.

I will do my ingredients list as if you were serving 4 people. I do this meal for my son and I, and it then reheats well the next day when stored in a fridge once it has cooled from the original cooking. I do it in a Pyrex Casserole Dish with a lid, and it can then be cooked and stored easily.

Ingredients

Vegetables
4 Carrots (1 Medium Carrot per person) – finely diced is best.
2 or 3 Large White Onions (at least half a large onion per person) – finely diced or small pieces.
1 Tin of Chopped Tomatoes 400g (Make sure to add some warm water to the tin, add this in to the dish in order to create your liquid for your stock).
(Optional) Mushrooms – Small Washed Button Mushrooms are best.

Accompaniment / Side

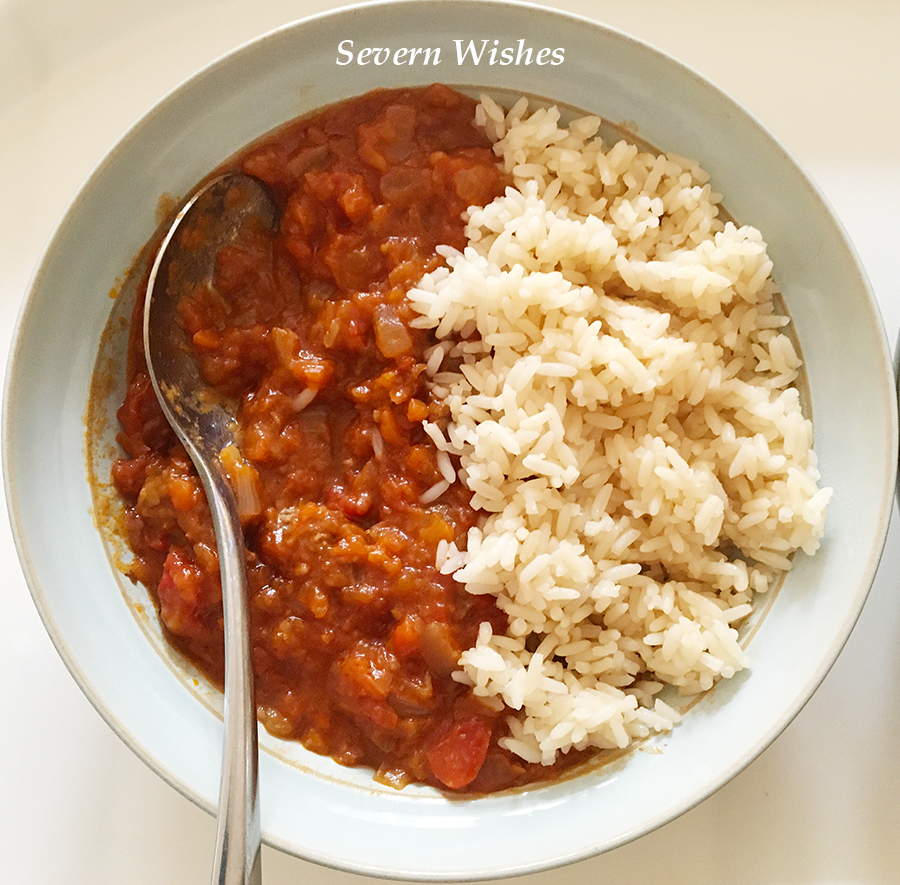
Long Grain Rice prepared per person.
1 Tin of New Potatoes 600g (serves 4 people) This can be added to the Casserole and they will cook during the time frame.
500g Mashed Potato prepared during the final half an hour of cooking.

Meat / Vegetarian Alternative

300g – 500g of Casserole Meat of your Choice – I use Beef or Chicken or Quorn – all of which go really well with the Red Wine Sauce.
Plain Flour for Coating the Meat (Contains: Wheat)

Sauce
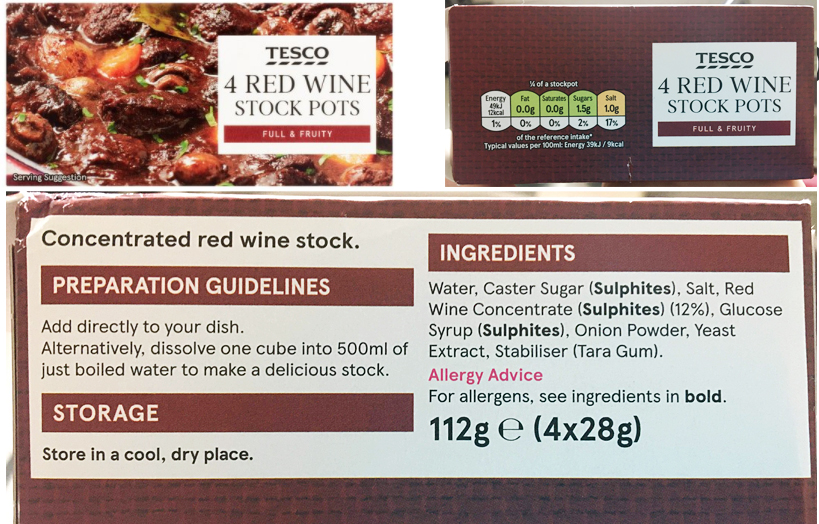
Tesco Red Wine Stock Pot – 1 for a 4 person Casserole. (Contains: Sulphites)

Tesco Stock Pot Red Wine Packaging 4 x 28g

Method

1. Start by preparing your meat, it will require 2 hours or up to 2.5 hours of cooking time. Mix your cut up raw meat with some plain flour in a bowl. You want bite size pieces and all coated in flour. Then you want to fry these off in a tiny bit of oil until sealed but not overcooked, you don’t want the meat to go dry.

2. Next you need to prepare your vegetables. Dice and Fry your Onions after you finish with the Meat/Veg Option. Dice with a knife or throw them all into a food processor to chop them up, it won’t matter to the end result, but you don’t want too big pieces. Don’t cook the Carrots, there is so need, you just want to chop and add them to the casserole dish, they will cook in the stock.

3. Speaking of Stock, that is your next thing, pop your chopped tomatoes in the dish, add water to the tin, and then add that to your dish. You need to add the stock pot, mix thoroughly.

4. Add the rest of whatever you have, vegetables, fried onions, sealed meat, mix together in the stock and then pop the lid on. Preheat your oven and cook at 160 degrees (fan oven) for 2 hours. Check and stir the casserole at that point and then pop it back in the oven for another 30 minutes. (You can do your mashed potato or rice during this half an hour if you didn’t add potatoes to the dish).

5. Be careful when you remove it from the oven as it will be very hot. Serve in bowls with your chosen accompaniment, and enjoy!

Thank you for reading this Recipe post today, I hope you will give this one a go if you can find the stock pots. I love Tesco own products and I love to shout about something if it’s an excellent product, and these most definitely are! They are affordable and allow you to make something that is both delicious and healthy. Please let me know in the comments below if you do this recipe and how it turns out! I hope you like it!

Have a wonderful day!

✩ Sabrina ✩

Sweet Treats Week – Day 5 – Sabrina’s Customisable Cookies

Welcome to Sweet Treats Week on Severn Wishes. This half term I wanted to share my top 5 baking treats with you all, hopefully you’ve got some time this week to make them with me! I cannot believe this is Day 5 already! I hope you’ve had as much fun baking these as I have!

Check out my Instagram and Facebook page for more food pictures, videos and future recipe ideas too!

Day 5 is Sabrina’s Customisable Cookies!

And the great thing with these is that you can literally add anything into them… I like mine to have chocolate chips. But you could put tiny marshmallows in them or different kinds of chocolate confectionery. Just follow my basic recipe and then add in whatever you feel like! This is a great one to get the children involved in too and perhaps they could each make two or three cookies just for them!

My recipe will make between 12 and 16 cookies with a prep time of 20 minutes and a fridge time of 3 hours. When you bake they take as little as 15 minutes and only a five minute cool time, so before you know it you could have cookies to enjoy as a mid afternoon snack today!

What You Will Need

A Flat Oven Tray or two
Baking Paper or Parchment
A Large Mixing Bowl for the main mixture
Small Mixing Bowls if your children are doing their own
A Wooden Spoon
A Tablespoon or Ice Cream Scoop
A Sieve
A Cooling Rack
Something To Store The Cookies In After They Are Cooled

Ingredients to make the Cookies

100g Light Brown Sugar
75g Caster Sugar
100g Butter / Dairy Free Spread (Melted)
1 Teaspoon of Salt
1 Egg
1 Teaspoon Vanilla Essence
1 Teaspoon Baking Powder
220g Plain Flour

Additional Ingredients

100g of Chocolate Chips

You can use other colourful confectionery like Smarties, M&Ms, Chocolate Chips of different sorts or even chop up your favourite chocolate bars and use those. (Get an adult to do this chopping up). You can use as much or as little as you want.

Step 1. Mixing Sugar and Butter and Salt

Method Steps

1. In a Large Bowl start by mixing the melted butter with the sugar and salt. You should have a thick brown liquid when it’s mixed enough.

2. Next you need to add the egg and once again mix thoroughly.

3. Make sure you sieve the flour and baking powder into the mixture and stir gently to combine as you do so. Once it’s all mixed in you can add your chocolate chips. If you’re doing different cookies you can now transfer some of the mix into smaller bowls and add the various confectionery. If your mixture is looking dry add one tablespoon of water at a time until it becomes more like cookie dough.

4. Place cling film over each bowl you have and let them cool in the refrigerator for up to 3 hours. TOP TIP While you wait you could play a game!

5. Then coming up to the end of the 3rd hour you can preheat your oven to 180’c and place some baking parchment onto a flat tray ready for your cookies.

6. In order to make your cookies the same size either use a tablespoon or an ice cream scoop to get a measurement out of the bowl. You want to make heaped almost ball shape but press them lightly to the baking paper. TOP TIP Leave at least 4 cm between each cookie! You may need 2 trays!

7. Bake the cookies but stay close by and keep an eye on them! I always have to rotate my tray half way! They will take between 12 and 15 minutes in a fan assisted oven, and you need to let them cool on a rack before you tuck in!

Step 6. Ready to Bake

TOP COOKIE TIPS

Don’t over handle your cookie dough!
Mix in your chosen confectionery into the dough but don’t over mix it.
When laying the cookies on the tray leave them heaped, they will flatten on their own.
Bake your cookies straight from the fridge for best results.
Keep an eye on them so they don’t over bake, it’s a fine line!

Cookies Freshly Baked and Cooling Down on the Rack

Thank you for joining me for Sweet Treats Week! I do hope you have enjoyed it and if you do make any of my bakes then please let me know how they turn out!

If you make any of my recipes be sure to tag me on social media, leave me a comment here on my blog. Any questions about a recipe please don’t hesitate to ask them! If you recreate this recipe somewhere else please credit me for it and name me and my blog, or even better link back to this original post too! Thanks everyone!

 Sabrina 

Sabrina’s Dairy Free Vegetable Nuggets

How To Make Delicious Dairy Free Vegetable Nuggets For All The Family To Enjoy!

Today I will be showing you how to make tasty, nutritious and dairy free vegetable nuggets that contain four different vegetables.
They are great fun for your children to eat as finger food and your older children can dip them in the sauce if they choose.
This recipe is ideal for weaning and beyond.

Veggie Nugget (broken so you can see the soft inside)


Ingredients for Sabrina’s Veggie Nuggets

3 Tablespoons of Tomato Ketchup
1 Tablespoon of Reduced Salt Soy Sauce
1 Tablespoon of Mixed Herbs
1 Large Egg (Beaten)
160 grams of Breadcrumbs (approx) roughly 4 slices of bread – I always use the 2 end bits if I have them!
6 Medium Carrots – Grated and Squeezed
2 Courgettes – Grated and Squeezed
100 grams of Swede Cooked First, then Diced Finely using a Chopper
1 Large White Onion Diced Finely
50 grams of Dairy Free Alternative to Italian Style Hard Cheese
Plain Flour (6 tablespoons approx) spread this onto a small plate ready for rolling…


Method

To make the sauce combine tomato ketchup and soy sauce together. Double the amount if you are preparing these nuggets for people to dip into the sauce straight after cooking them. Use half of the sauce for the vegetables mixture and leave half for the dip.

Once you have prepared all of the vegetable ingredients as directed above, you will need to ensure the mixture of vegetables isn’t too wet. Take a handful of the grated and chopped veg and place it between a few paper towels, a muslin cloth or a clean tea towel. Squeeze and press it in the cloth to squeeze out as much liquid as possible. Do this with all of the grated veg.

Get a large mixing bowl and crack the egg into it. Add the herbs and stir until combined. Next add some of the tomato dip. Next add the squeezed vegetables, then lastly add the hard cheese (or alternative) and the breadcrumbs, stir it all thoroughly. You don’t want lots of the same type of veg in each ball, try and mix it so you get a variant of all the ingredients. (I do my breadcrumbs in a small food mixer).

Place the flour onto a small plate ready to roll your nuggets in.

To make a nugget take a small handful of the combined mixture and roll between your palms. Top Tip! Do this with wet hands so it doesn’t stick to you! Roll them out into oval shapes, and then once happy you can roll each one in flour to coat it.

Have a large frying pan ready on your cooker with some oil getting hot. You should place the nuggets down gently so as not to break them or splash the oil. Fry each one until lightly browned all over. Top Tip! Use a pair of tongs to adjust them while frying to make sure you do all of the sides. Keep topping up the oil after every few nuggets.


Once they are cooked set the nuggets to one side on a piece of kitchen roll so as to drain any excess oil from them and let them cool a little, and then serve them while they’re still warm in a large bowl with the remainder of the tomato dip. They are great for a children’s party or a finger food family night in.

Squeezing the Veg so as to remove as much moisture as possible.
Veggie Nugget Mixture Ready For Mixing and Rolling

Vegetable Nuggets are ideal for children who are weaning at around 10 months and older, when they are learning to hold and bite into foods.
They are great for getting your children to eat vegetables.
The tomato dip provides a fun element for older children.
The leftovers can be frozen, defrost over night and re-fry them to give them a crunchy outside again.

My Recipe made me approximately 24 Nuggets.

Once you have rolled your nuggets between your palms you can get ready to fry them… My Top Tip is to have some done so you can fry one set while you make the next set…

Frying Tips

When frying the Nuggets take care and turn them frequently so that they cook evenly on all sides. You also need to maintain the oil so that they sit in a few millimetres at all times to avoid sticking to the pan.

Finished Veggie Nuggets

These Nuggets are great, and rather tasty too, that is providing you like the Veg I have chosen. You can substitute the Courgette for Mushrooms if you prefer those! And you can also do these without being dairy free by using a regular cheese like Parmesan if you wish.

Thank you for visiting, I hope you have enjoyed reading about this recipe, if you decide to give it a go then please leave me a comment with how it went afterwards… Check out my other recipes on the category list!

✩ Sabrina ✩