Sabrina is a Lifestyle, Parenting and Product Review Blogger. A Writer, Photographer, Reviewer, Home Cook, Crafter & Nature Enthusiast. You will find a bit of all those categories here on Severn Wishes Blog, Welcome to Sabrina's Lifestyle Blogging & Honest Reviews.
How To Make Delicious Dairy Free Vegetable Nuggets For All The Family To Enjoy!
Today I will be showing you how to make tasty, nutritious and dairy free vegetable nuggets that contain four different vegetables. They are great fun for your children to eat as finger food and your older children can dip them in the sauce if they choose. This recipe is ideal for weaning and beyond.
Veggie Nugget (broken so you can see the soft inside)
✩✩✩
Ingredients for Sabrina’s Veggie Nuggets
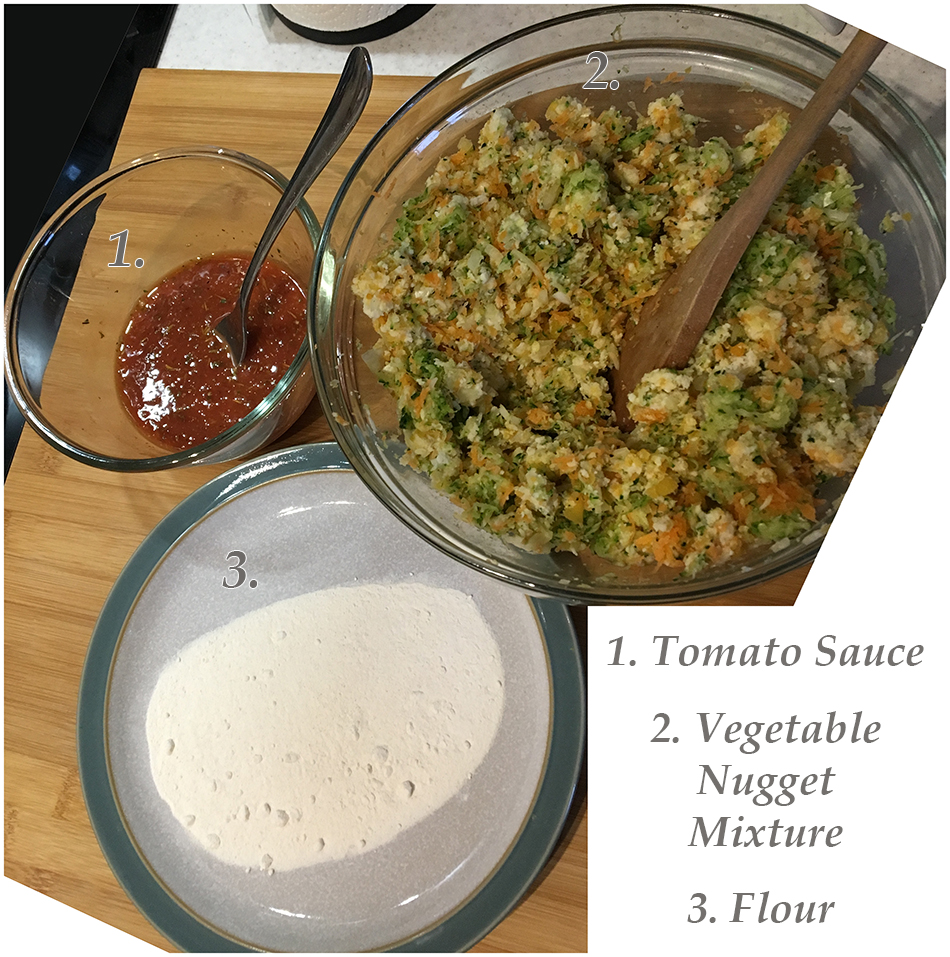
3 Tablespoons of Tomato Ketchup 1 Tablespoon of Reduced Salt Soy Sauce 1 Tablespoon of Mixed Herbs 1 Large Egg (Beaten) 160 grams of Breadcrumbs (approx) roughly 4 slices of bread – I always use the 2 end bits if I have them! 6 Medium Carrots – Grated and Squeezed 2 Courgettes – Grated and Squeezed 100 grams of Swede Cooked First, then Diced Finely using a Chopper 1 Large White Onion Diced Finely 50 grams of Dairy Free Alternative to Italian Style Hard Cheese Plain Flour (6 tablespoons approx) spread this onto a small plate ready for rolling…
✩✩✩
Method
To make the sauce combine tomato ketchup and soy sauce together. Double the amount if you are preparing these nuggets for people to dip into the sauce straight after cooking them. Use half of the sauce for the vegetables mixture and leave half for the dip.
Once you have prepared all of the vegetable ingredients as directed above, you will need to ensure the mixture of vegetables isn’t too wet. Take a handful of the grated and chopped veg and place it between a few paper towels, a muslin cloth or a clean tea towel. Squeeze and press it in the cloth to squeeze out as much liquid as possible. Do this with all of the grated veg.
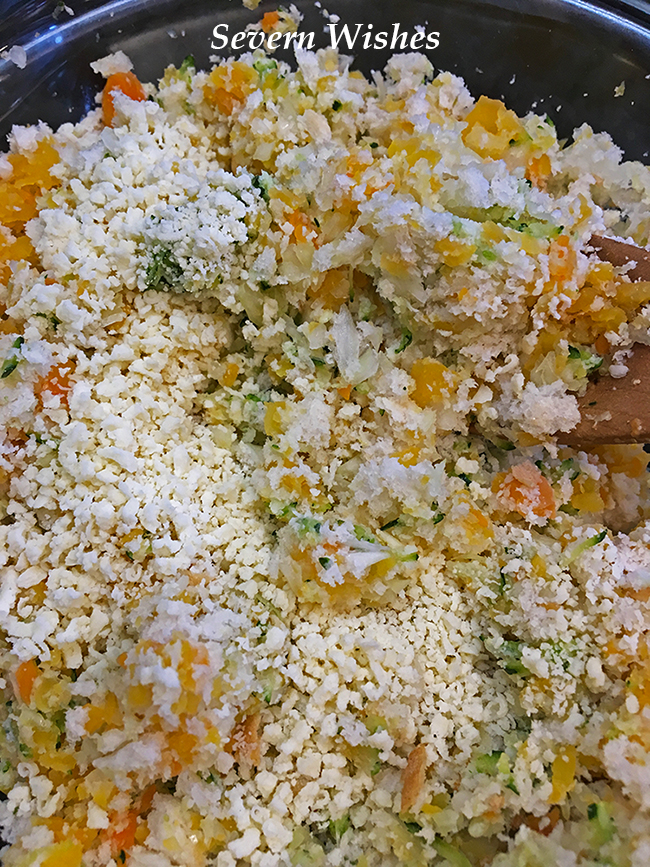
Get a large mixing bowl and crack the egg into it. Add the herbs and stir until combined. Next add some of the tomato dip. Next add the squeezed vegetables, then lastly add the hard cheese (or alternative) and the breadcrumbs, stir it all thoroughly. You don’t want lots of the same type of veg in each ball, try and mix it so you get a variant of all the ingredients. (I do my breadcrumbs in a small food mixer).
Place the flour onto a small plate ready to roll your nuggets in.
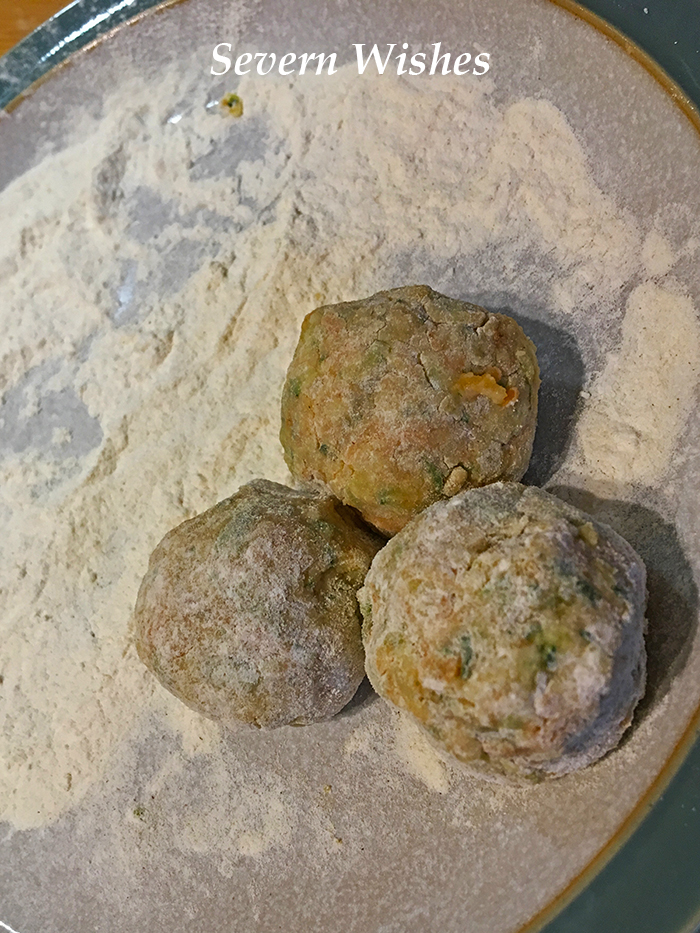
To make a nugget take a small handful of the combined mixture and roll between your palms. Top Tip! Do this with wet hands so it doesn’t stick to you! Roll them out into oval shapes, and then once happy you can roll each one in flour to coat it.
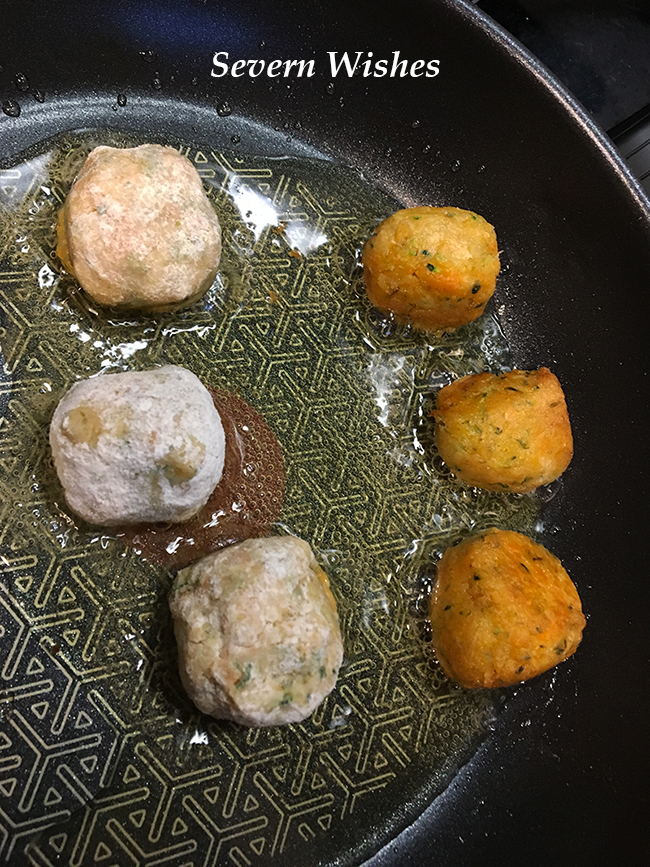
Have a large frying pan ready on your cooker with some oil getting hot. You should place the nuggets down gently so as not to break them or splash the oil. Fry each one until lightly browned all over. Top Tip! Use a pair of tongs to adjust them while frying to make sure you do all of the sides. Keep topping up the oil after every few nuggets.
Once they are cooked set the nuggets to one side on a piece of kitchen roll so as to drain any excess oil from them and let them cool a little, and then serve them while they’re still warm in a large bowl with the remainder of the tomato dip. They are great for a children’s party or a finger food family night in.
Squeezing the Veg so as to remove as much moisture as possible.
Veggie Nugget Mixture Ready For Mixing and Rolling
Vegetable Nuggets are ideal for children who are weaning at around 10 months and older, when they are learning to hold and bite into foods. They are great for getting your children to eat vegetables. The tomato dip provides a fun element for older children. The leftovers can be frozen, defrost over night and re-fry them to give them a crunchy outside again. My Recipe made me approximately 24 Nuggets.
Once you have rolled your nuggets between your palms you can get ready to fry them… My Top Tip is to have some done so you can fry one set while you make the next set…
FryingTips
When frying the Nuggets take care and turn them frequently so that they cook evenly on all sides. You also need to maintain the oil so that they sit in a few millimetres at all times to avoid sticking to the pan.
Finished Veggie Nuggets
These Nuggets are great, and rather tasty too, that is providing you like the Veg I have chosen. You can substitute the Courgette for Mushrooms if you prefer those! And you can also do these without being dairy free by using a regular cheese like Parmesan if you wish.
✩✩✩
Thank you for visiting, I hope you have enjoyed reading about this recipe, if you decide to give it a go then please leave me a comment with how it went afterwards… Check out my other recipes on the category list!
Our Weaning journey began delicately due to our son having suspected allergies. He is exclusively breastfed and he cluster fed for the first 5 months of his life. He was born slightly premature at 37 + 5 and after having bad jaundice at birth, it took him many weeks to recover. We spent so much time in hospital at the start that our first month with him went by in a blur. Problems with allergies began at around 12 weeks, so it was a steep learning curve in the next 10 to 12 weeks that followed.
Then, when it came to Baby A reaching the 6 month milestone he was still in size 3-6 month clothing and breast feeding up to 14 times in 24 hours. We hoped that Weaning would satisfy him more so and because we could introduce cooled boiled water with his meals, it would take a bit of pressure off me. This did work, but he had such an appetite that he continued regular breastfeeding including a minimum of two feeds a night, plus day times and extra weaning snacks. We had ourselves one hungry baby!
I recall the health visitor questioning how much I was feeding him at our 6 month visit… she couldn’t believe how much I was saying he ate, I’m almost sure she thought I was lying. I had read in a parenting book that you cannot over feed a baby, because they will simply refuse to eat it. Our son wanted more and more food as the days went by, so I used motherly instincts and I watched my baby for cues. So I continued on with my busy breastfeeding schedule plus I began our weaning journey in a rather swift fashion.
We Tried A Range Of 4 Month Plus Puree, These Are A Few Of Them Little One Loved.
Baby A enjoyed many things that we tried first off, including individual vegetables such as Carrot, Potato, Parsnip, Sweet Potato, Apple and Strawberry. There were only 2 things he spat out which were Prune and Peas. And I don’t blame him for either! Ha!
After doing some reading and noticing how keen Baby A was with eating and being fed, we decided to do 6 weeks of Purées to start with. We maintained that he was to ingest nothing dairy of course, I checked packaging meticulously or I made my own. This worked well, starting with a few mouthfuls twice a day for the first week, followed by doubling the amount in subsequent weeks. By the time we got to week 6 Baby A was eating 70g of fruit purée for breakfast and 70g of vegetable purée in the early evening. He also tried Melty Puffs around this time too.
Prices of Purée vary, but they usually cost anything from 40p all the way up to £1.50. They also range in size so look out for that. We made the most of any offers that were on in supermarkets and also used any store credit points and vouchers we had picked up to get our initial 6 week stash of purée. Boots vouchers can go a long way if you sign up to the Clubcard and baby club before hand. Keep a look out on social media for offers too.
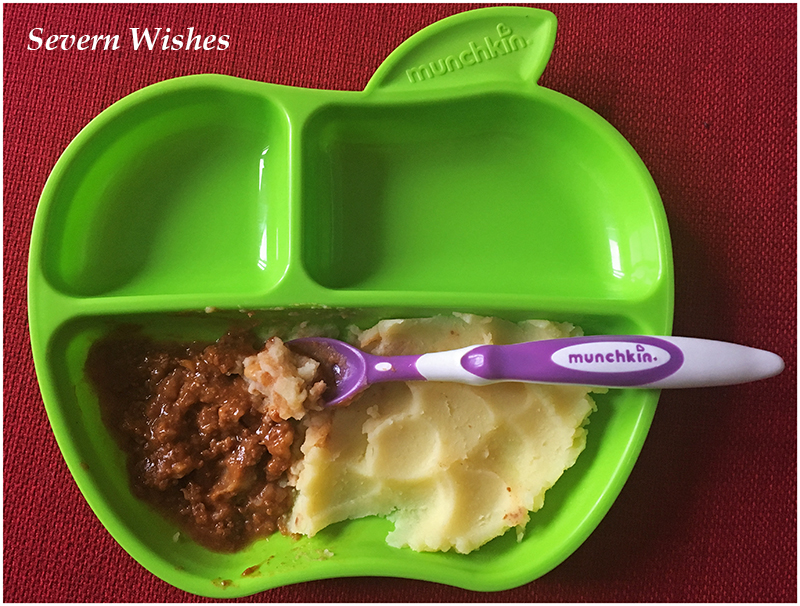
Minced Beef and Onions with Mashed Potato (7M)
He was enjoying the food we were giving him and he was obviously hungry. We were approaching his 8 month mark when we began moving to thicker purées and food with more textures. I was bulk cooking mashed vegetables at this point and freezing them in small pots (roughly 80g each). Some combinations included Potato and Carrot, Carrot and Swede, Carrot and Parsnip and Parsnip and Sweet Potato.
At 8 months Baby A was eating between 70g and 100g for breakfast, between 100g and 130g for his lunch and between 130g and 150g of food in the evening. This was on top of 12 breast feeds still most days, and we had began to try him on some more snacks. The melty puff kind that melted on his tongue were a real hit! Luckily they came in many flavours.
We also gave him fruit such as Raspberries, Strawberries and Melon as an evening pudding if he was feeling particularly hungry.
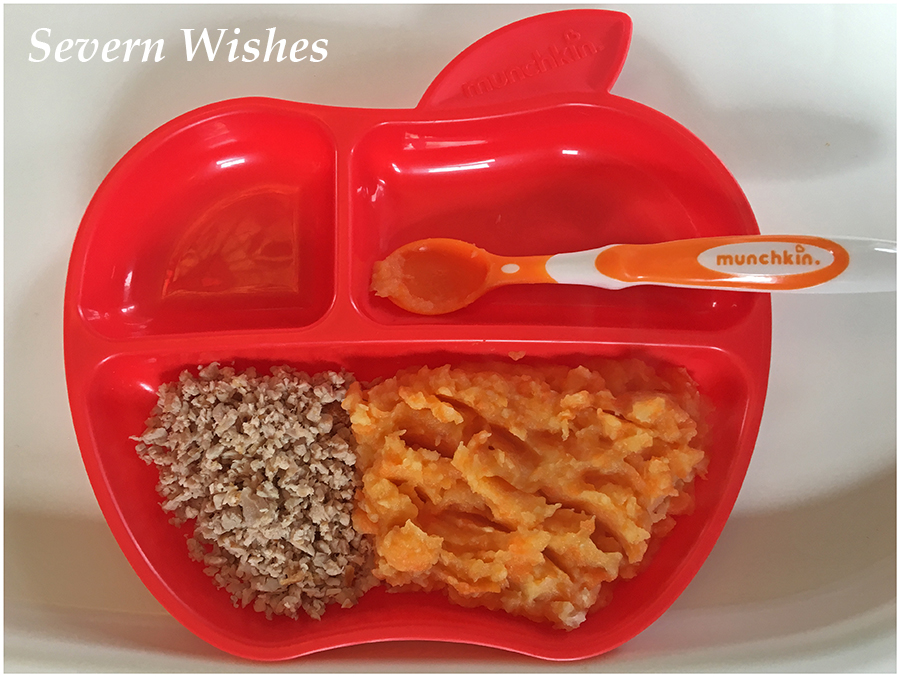
Minced Pork and Onions with Carrot and Potato Mash (8M)
Baby A ate most things from Day Dot but turned his nose up at the taste of Cucumber and also highly disliked the taste of Peppers. Some foods took a couple of times before he decided that he liked them, usually very strong tasting food groups. He was unsure about things like Tomato, Scrambled Eggs and Pasta, but we persevered and he eats them now. The trick is to leave a food for 2-3 weeks then try it with them again.
One thing I loved about Weaning was the way he learned and every day you saw him remember. Within two weeks he understood that cutlery went into his mouth, he began to chew even when food was super soft, and he was also cutting several teeth while we were trying most new foods. He did so well with all these milestone changes and I’m very proud of him.
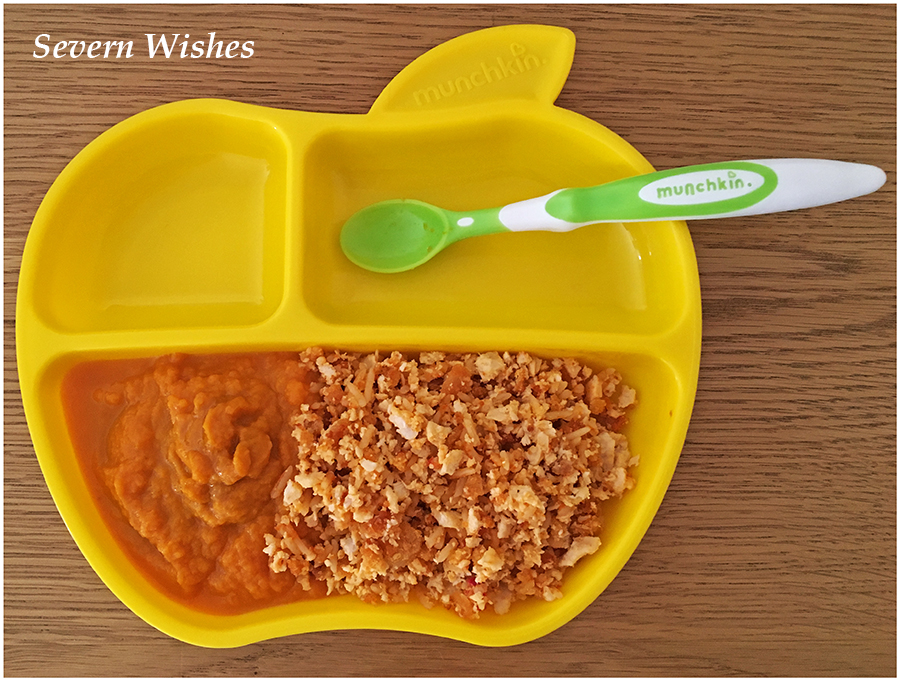
Mashed Carrot and Swede with a Small Chicken Steak and some Rice (9M)
One thing I would recommend to mum’s who want to cook healthy meals for their little ones is to invest in a good strong vegetable mash utensil and a mini food processor. Mine is called the Russel Hobbs Mini Food Processor 22220 Mini Chopper and I cannot rate it high enough! It was used every day for 3 months and I still use it to dice up chewy meat because it saves me so much time. I still use it for my now one year old boy.
Russel Hobbs Mini Chopper In Use
At nine months Baby A began eating some more of the food I prepared for us adults. This includes the meat and sauce of bolognese but we gave him mashed vegetables and not much pasta. He ate my cottage pie (all of it), we had chicken steaks that I had diced in a blender with soft vegetables and rice, sausages were diced and served with mash and veg, and he even ate flaky white fish with rice and veg too!
I also used a weaning book that my mother had bought for me that had some great ideas inside for weaning recipes and snacks. I altered most of them to suit the various allergies in my family of course. Homemade Veggie Nuggets were by far my favourite thing to make, I bulked cooked them which was time consuming but then they’re frozen for convenience.
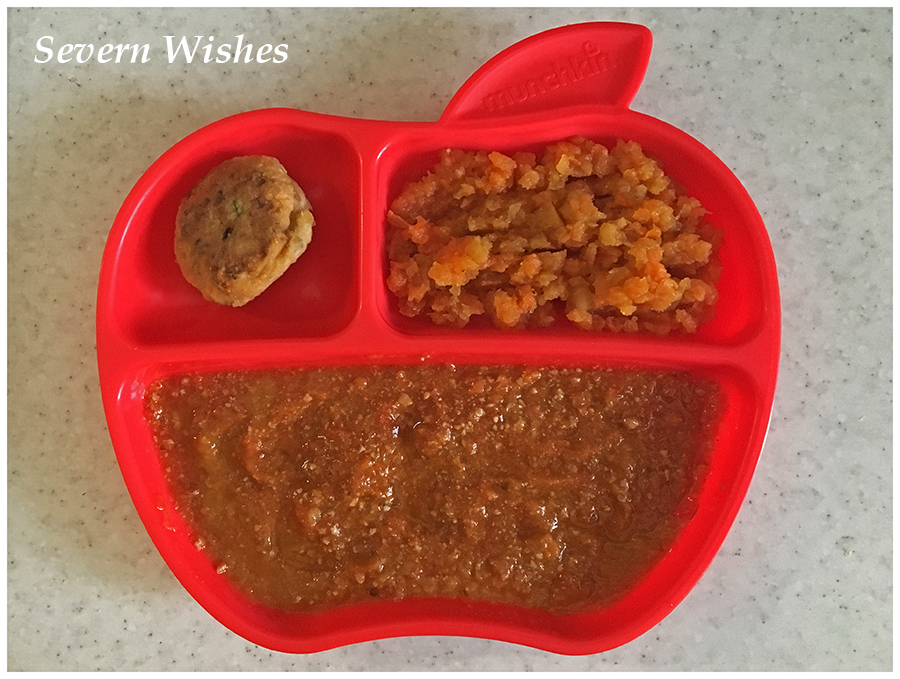
Minced Beef and Onions, Carrot and Swede Mashed with a Homemade Veggie Nugget
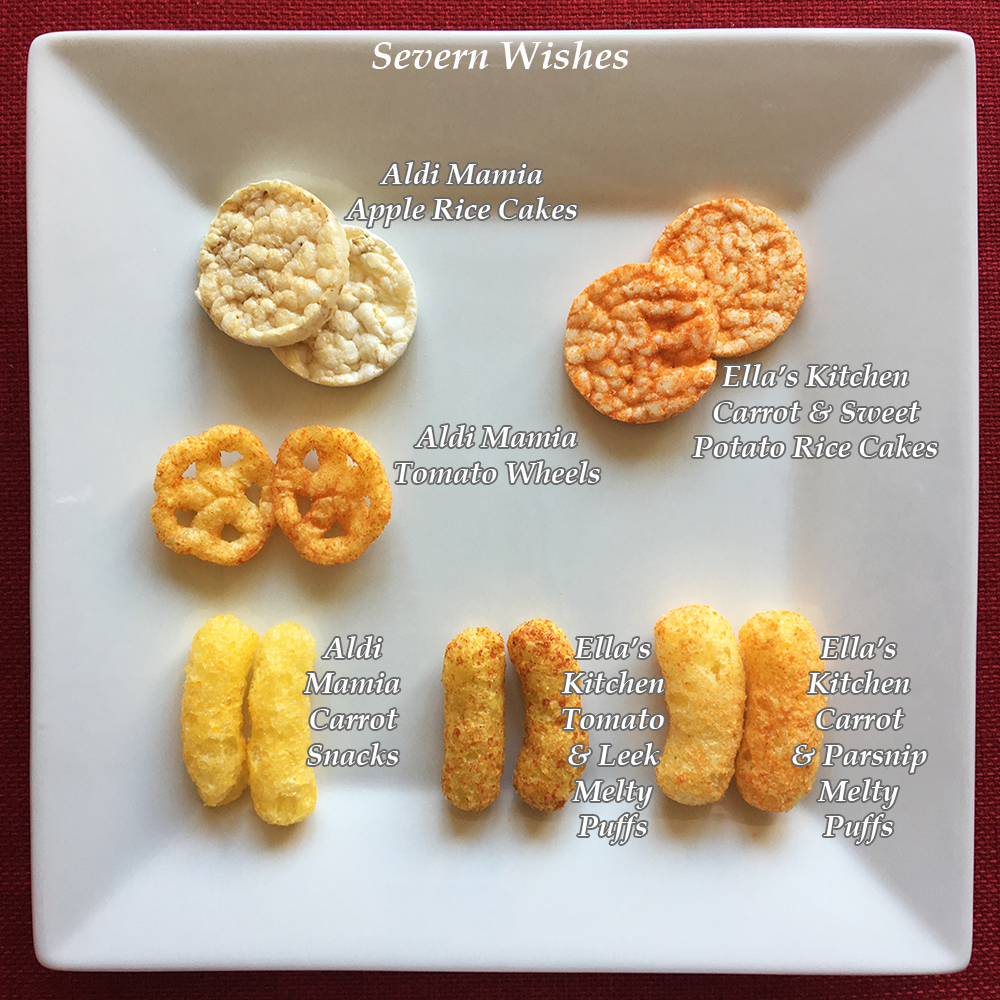
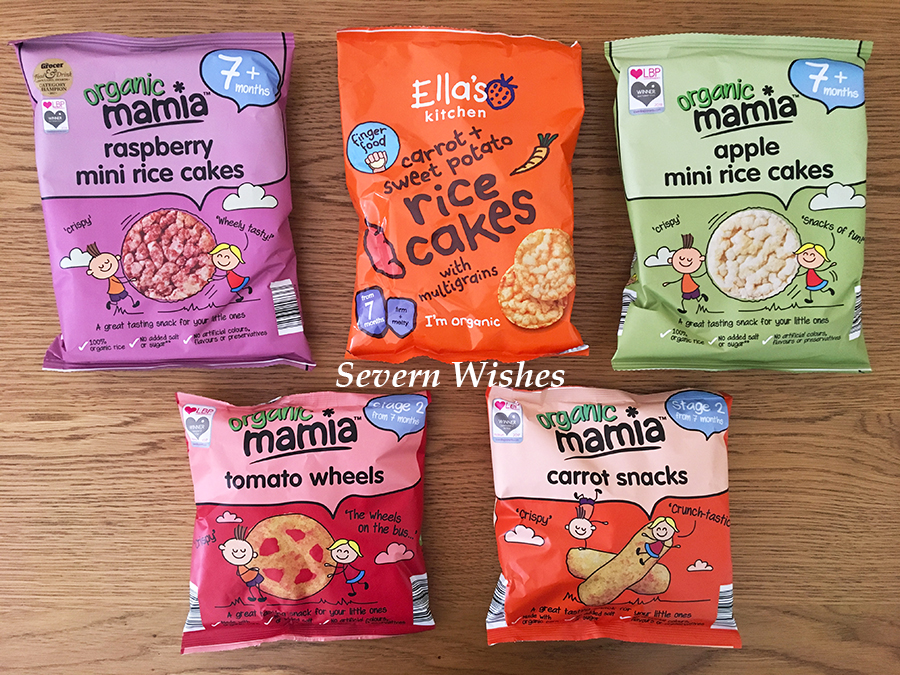
By the time he reached 10 months of age Baby A had 8 teeth and was eating 80% of what we were. He still loves his baby related snacks too! These include Vegetable Puffs, Rice Cakes and Flavoured Shaped Corn Snacks. A lot of these are Organic too.
Some Of The Baby And Toddler Snacks We Buy Regularly.
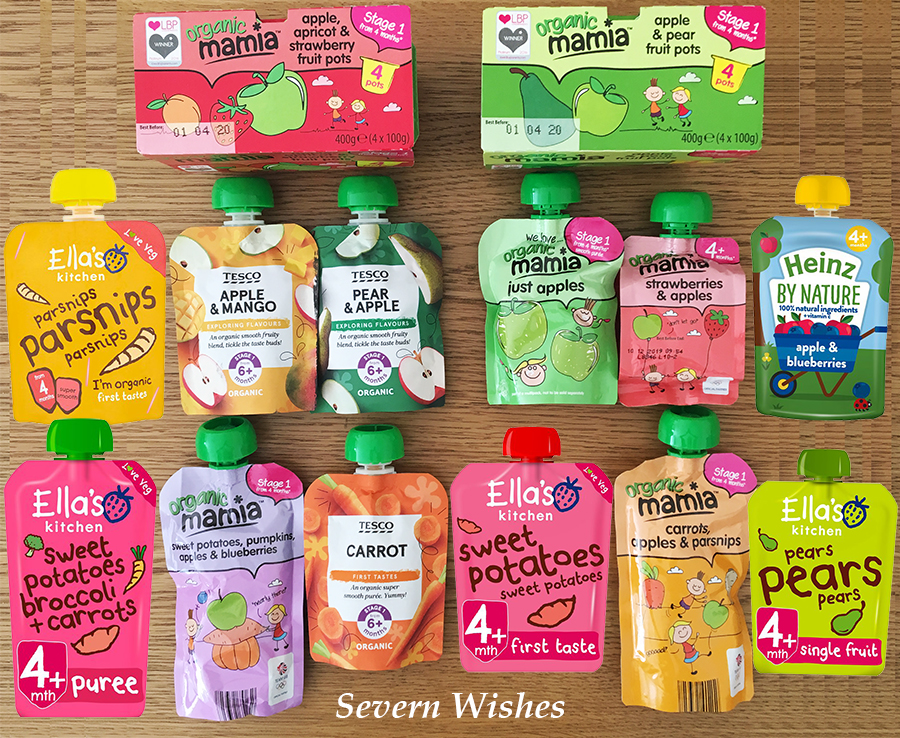
A Few Of The Pouches We Tried And Tested From 7 Months Plus
These snacks are very affordable from places like Aldi who have their Mamia range. If you sign up to Ella’s Kitchen on their website they will send you a pack and a voucher to try bits from their range which are purchasable at most large supermarkets and Boots stores.
Our little one loves to feed himself firm snacks but has been more than happy for us to feed him things that require a spoon such as fruit purée, cottage pie, mashed vegetables and the like. It’s so important to get your little one to eat their fruit and veg, and it doesn’t matter if you have to create a mashed version in order for them to eat it. Try different combinations and see what your baby likes. Keep a food diary to keep track!
Some of the 7 month snacks are little one loves.
Sabrina’s Weaning Tips For Parents
My top 4 tips for any parents about to wean a baby would be these…
1. Take it slowly and calmly. Your Baby will be intrigued but it can also be a stressful experience for all of you. All healthy Baby’s generally have a good gag reflex and don’t confuse this for choking, stay calm if they cough or spit things out and take all foods – even the purées – at a slow pace!
2. Start with Veg! You don’t want your little one to have too many sweet flavours in those first weeks, this is because when it comes to the savory kind they are less likely to want it. Start with Veg Purée or Mash and go from there…
3. If you plan on doing Baby Lead Weaning, then you must let your little one use their hands. Be prepared for mess! Get a good highchair, get a mat for the floor and keep plenty of baby wipes at hand too!
4. Keep a Food Diary! This is a useful tip for all new parents. It’s a great way to keep track of what baby has eaten, if your little one was to have a rash or reaction to anything they had eaten you can go back and check the diary before trying the substance again. Those first couple of months are critical in preparing baby for stronger tastes and good food habits, so start them early on the main products that your household enjoys together and move forward from there.
– ✩ – ✩ –
All Parents Should Definitely Sign Up To…
1. Ella’s Kitchen via the Website You get a free pack in the post with tips, a board with stickers, ideas for foods and even some vouchers for baby snacks.
2. Boots Parenting Club Using your Boots Advantage Card on the Boots App or Website you can add the addition of the Parenting Club which gives you bonus deals, free products and vouchers every month. For example we got a free bottle, a free weaning book and some promotions on nappies and baby food. Check the app each month for new promotions and deals. You also get extra points on your card when purchasing certain products in store and online too.
Ella’s Kitchen Have A Great Website and Their Melty Puffs Are A Real Hit!
✩ Russel Hobbs Mini Chopper Review ✩
I would highly recommend this chopper to any parents who want to make a lot of their own food for their baby. Not only is it simple to use, easy to clean and maintain, but it allows you to make just enough food for a large portion that can be good for a day, or if you’re bulk cooking into baby sized pots it made 6 pots of food no problem. The best thing about this mini processor is it’s size, it takes up very little room in my cupboard and is portable enough to take away for a weekend to a relatives house without being a burden.
Design 5/5 Features 5/5 Value for Money 5/5
RRP £16.00
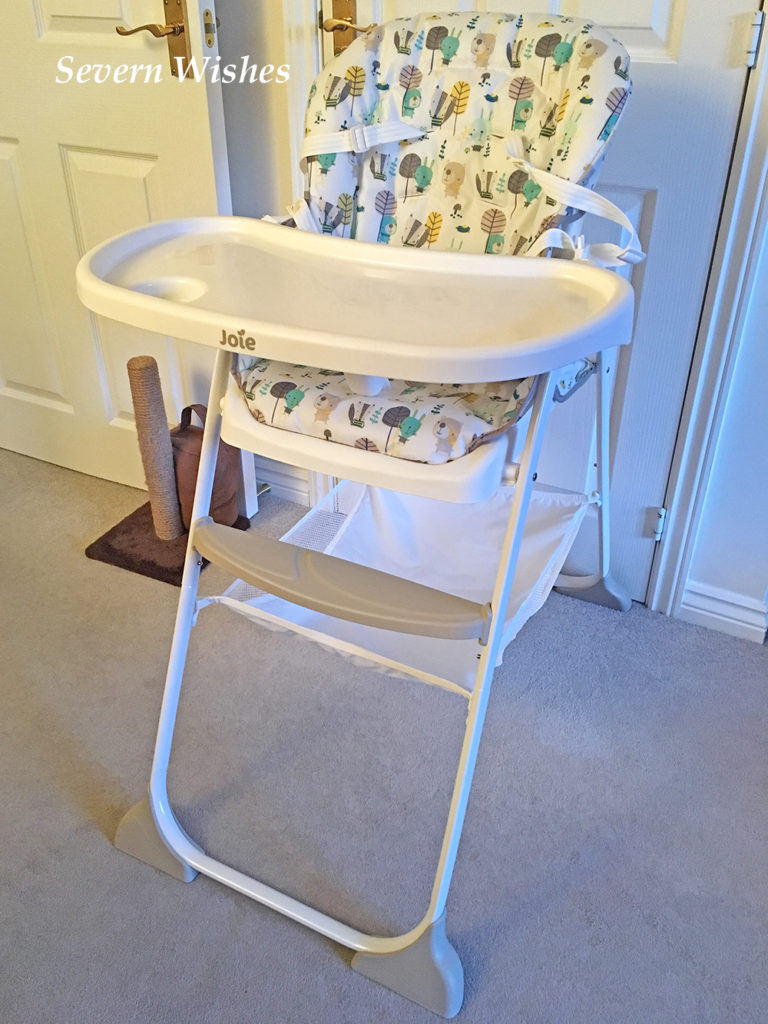
✩Joie High Chair Review✩
We highly recommend the Joie High Chair because it is affordable and also has some great features. These include the large sturdy tray, the beautiful animal design on the seat itself and the large fabric basket underneath which is great for storing extra bits and pieces close by for when you need them, such as bibs, wipes and toys. We only have one suggestion, that the straps could either be entirely removable for cleaning purposes or that they be a different colour than white, because they really show up every bit of food dirt.
Design 5/5 Features 4/5 Value for Money 5/5
RRP £55.00
✩Munchkin Products Review✩
We have been really impressed by the Munchkin Apple Bowls and Plates, as well as their range of Spoons too. We picked most of them up at various baby events in Supermarkets and on Amazon UK. They are affordable and well made. They are designed for different stages of Weaning and further interactions with food, ranging from 4 months right up until Toddler ages. Our son found the spoons easy to eat off and the divider apple plates are a great idea when trying different foods at meal times. Or for separating the meal and the dessert when you get to that stage.
Designs 5/5 Features 5/5 Value for Money 5/5
Thank you for reading this post today, I hope you have found it interesting. If you try any of the products that I have recommended then please let me know in the comments below if your little one liked it.
If you have any questions about any of the products I have mentioned then feel free to also comment and ask me anything, I will do my best to answer you honestly.
✩Sabrina✩
By continuing to use the site, you agree to the use of cookies. more information
The cookie settings on this website are set to "allow cookies" to give you the best browsing experience possible. If you continue to use this website without changing your cookie settings or you click "Accept" below then you are consenting to this.