Sabrina is a Lifestyle, Parenting and Product Review Blogger. A Writer, Photographer, Reviewer, Home Cook, Crafter & Nature Enthusiast. You will find a bit of all those categories here on Severn Wishes Blog, Welcome to Sabrina's Lifestyle Blogging & Honest Reviews.
Welcome to Severn Wishes Blog where I, Sabrina, regularly review a wide variety of things such as this Treatbox! This subscription box has been going for years and I buy one every month as a gift to myself. I review said box here on my website and showcase the products on my social media platforms too, it’s known as Sabrina’s Reveal and Review.
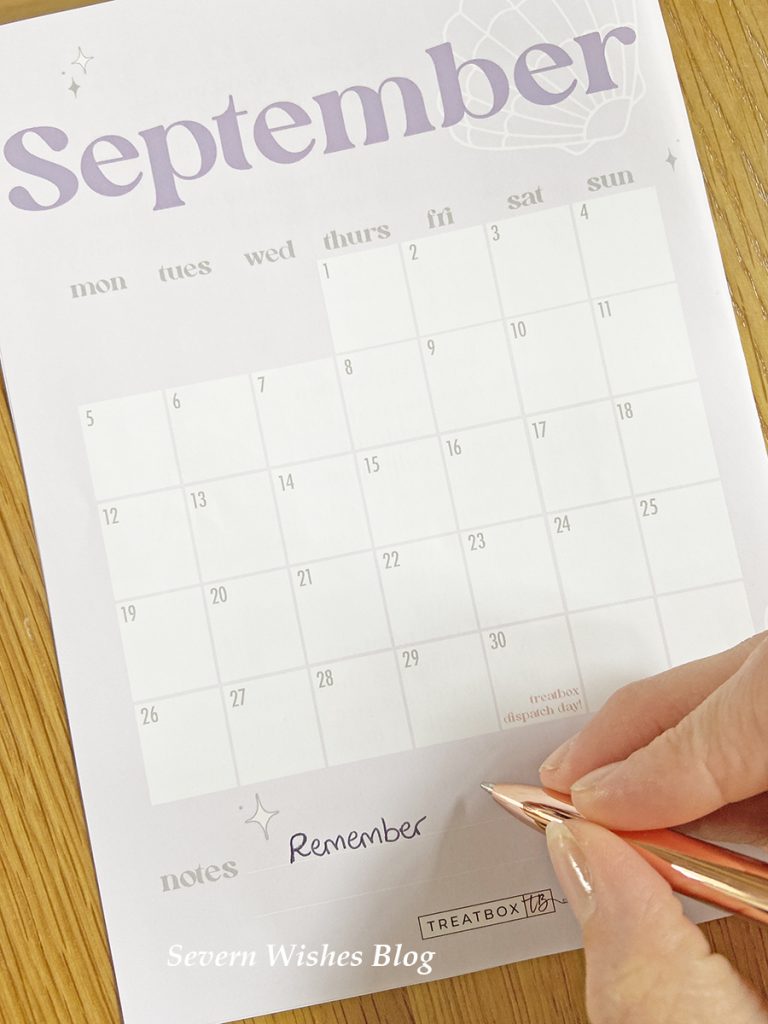
So what’s inside the September box? Well this month our Calendar Print reads “holding on to the last bit of summer” and I am so glad that they did! I’m not ready to admit that it’s over with for yet another year.
A beautiful lilac tissue paper and a white heart sticker leads me into unwrapping a box filled with pretty pieces and Treatbox UK originals.Let’s see exactly what’s inside…
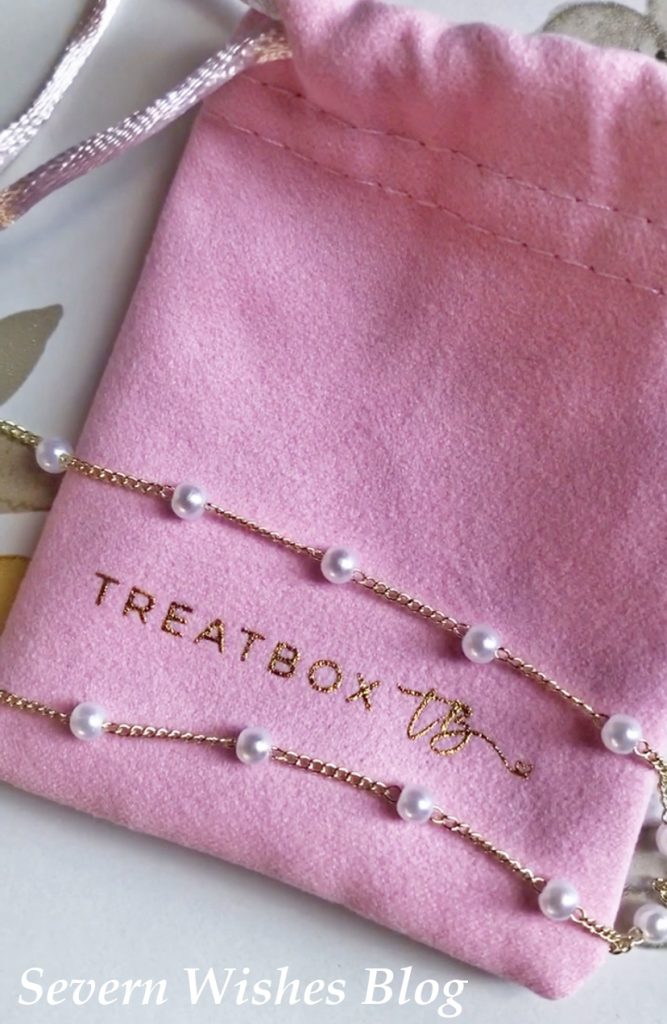
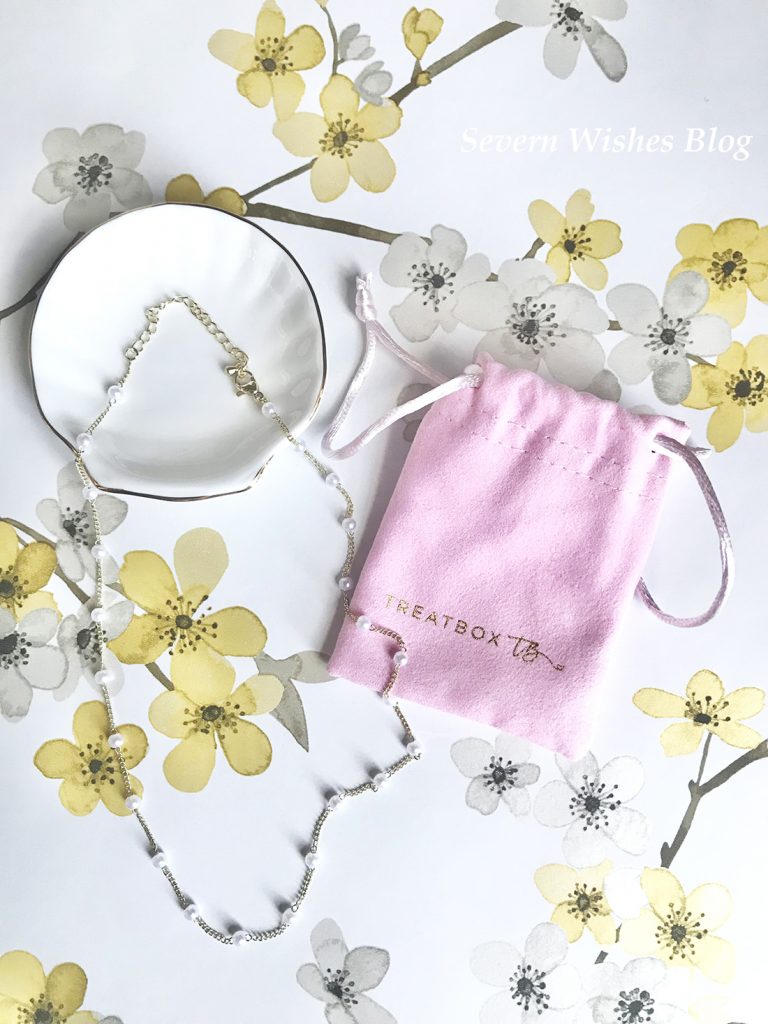
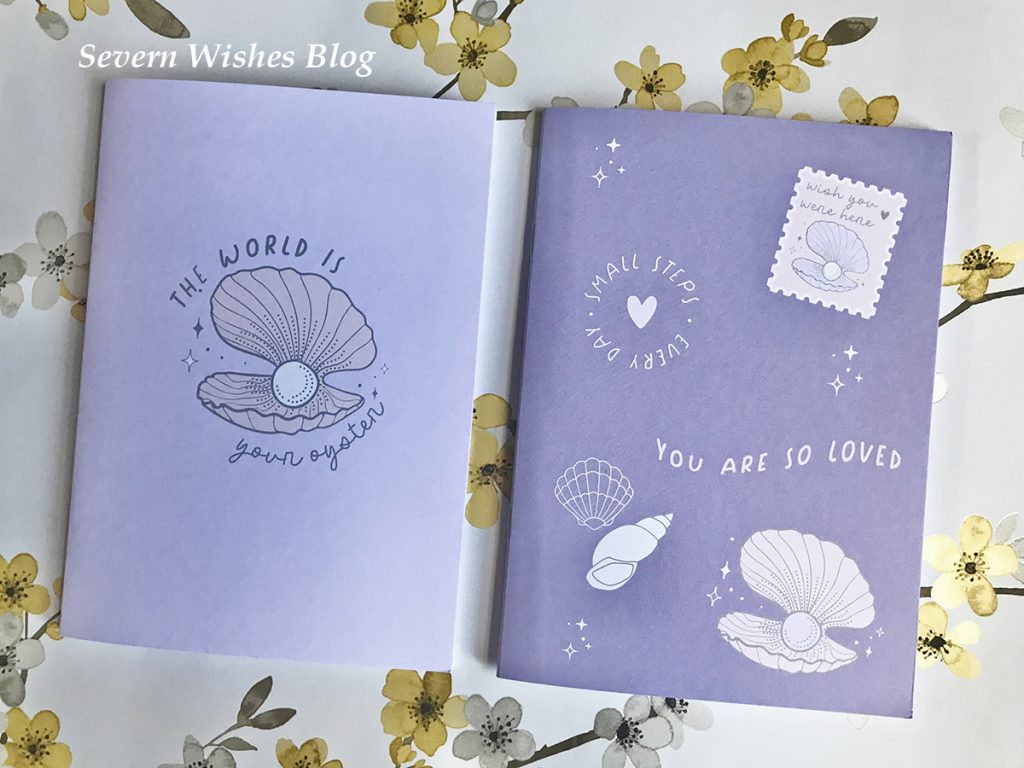
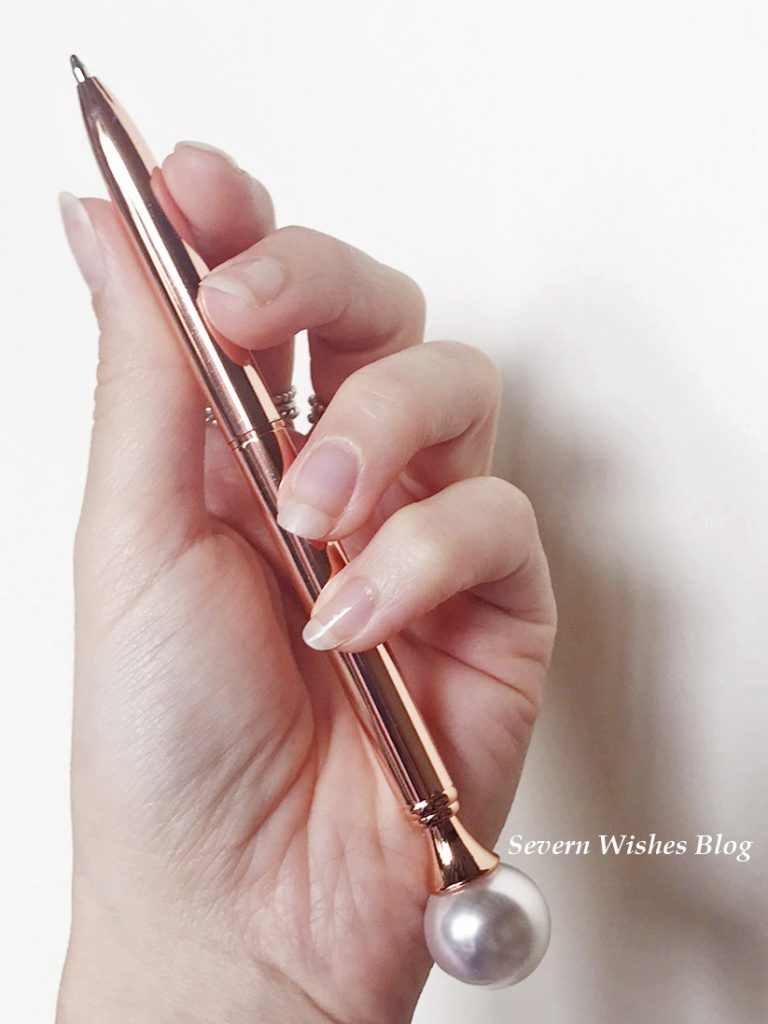
Treatbox Original Calendar Print ~ September 2022 Treatbox Original Blank Page Notebooks with Seaside Design x 2 A5 Treatbox Original Item – Pink Jewellery Bag with Pearl Beads and Gold Chain Oh K! Age Defence Hand Mask with Bakuchiol Shell Shaped Trinket Dish in White and Gold Stationery ~ Rose Gold and Pearl Topped Pen Daily Concepts Multi-Functional Mother of Pearl Soap Sponge
Here are some more of my photographs!
What Are My Thoughts?
Overall this is a very nice box filled with several items that we have not had before from previous months. The necklace in its own original Treatbox bag, the original designed notepads and the trinket dish are stand out items for me due to their quality and appearance.
The other items are also good and I look forward to trying out the hand mask this month and using the pen. I tried it out already and it’s black ink inside and writes nicely and smoothly.
I really look forward to giving the sponge a go as well! Keep a look out on my social media images for the products in use over the coming weeks.
Thank you for joining me for another Reveal and Review from me, Severn Sabrina!
Don’t forget to follow me on social media for more updates and individual product reviews too. Search #SevernSabrina or #SevernWishesBlog
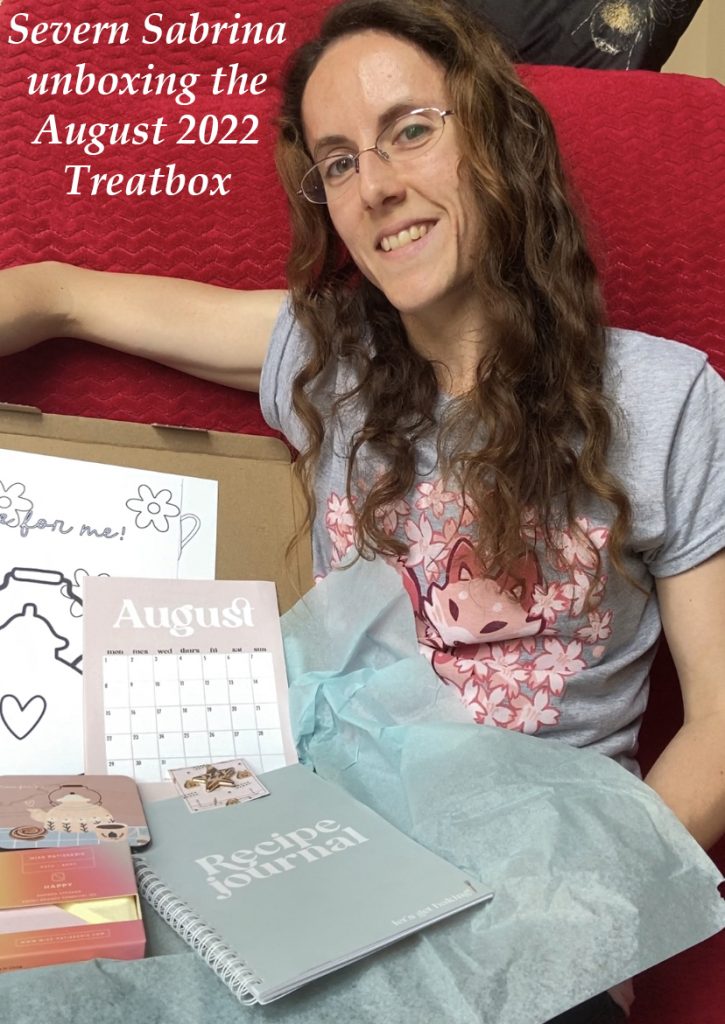
So what did the August box offer us for this month of treats?
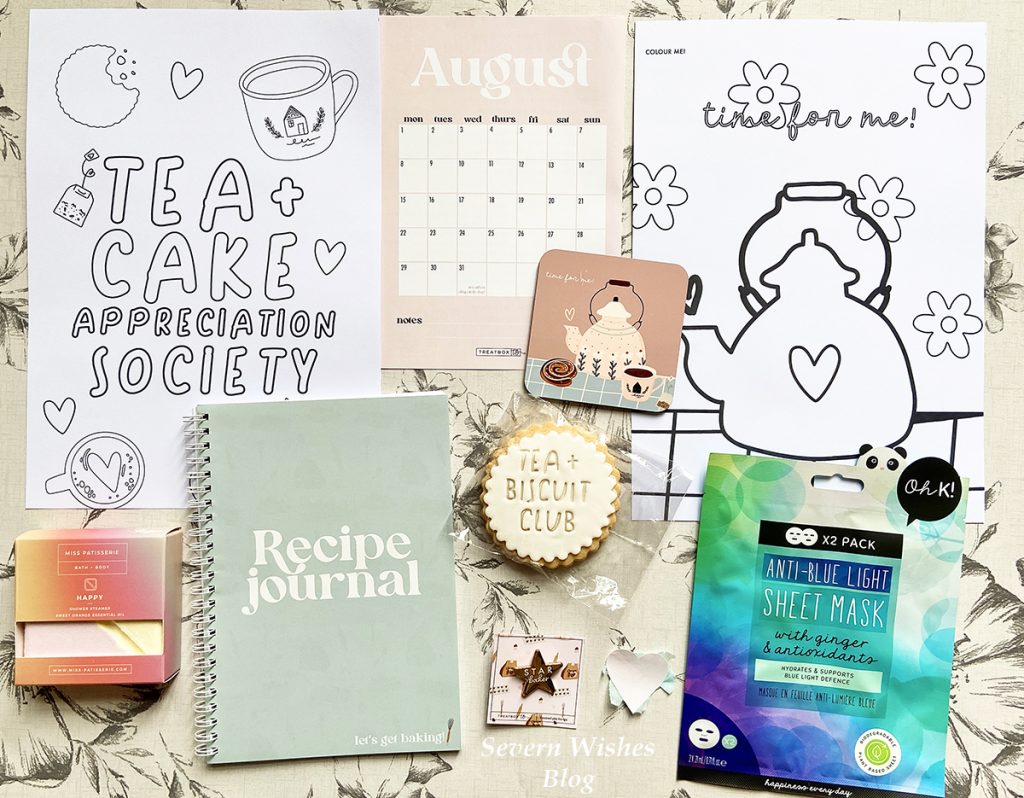
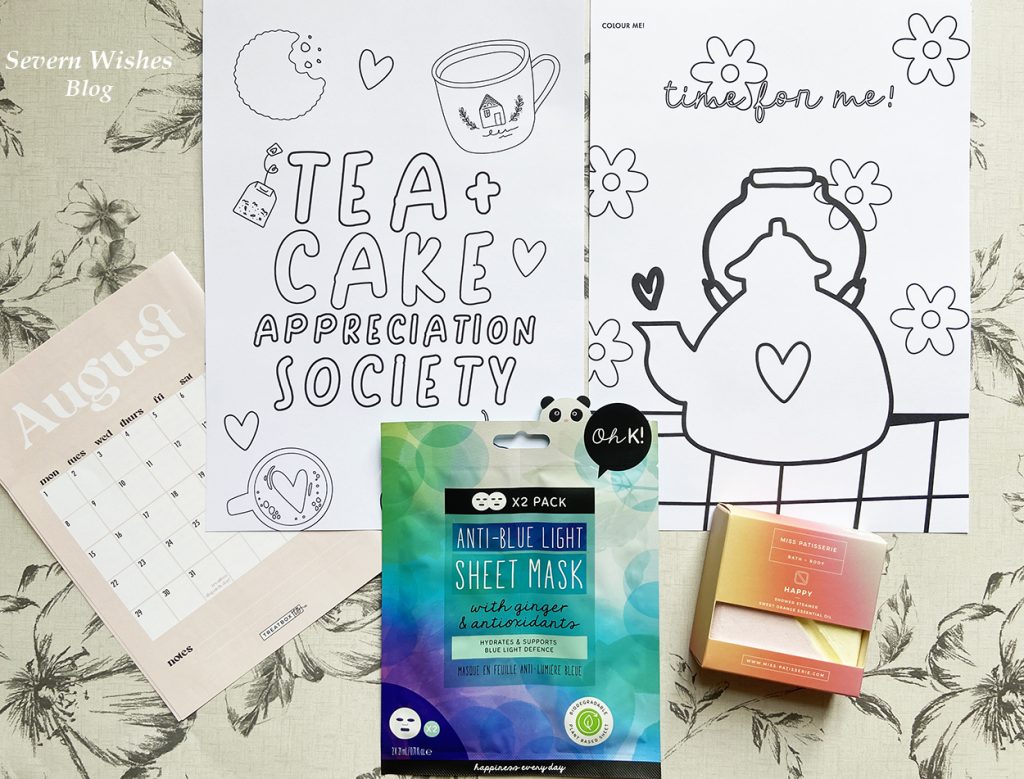
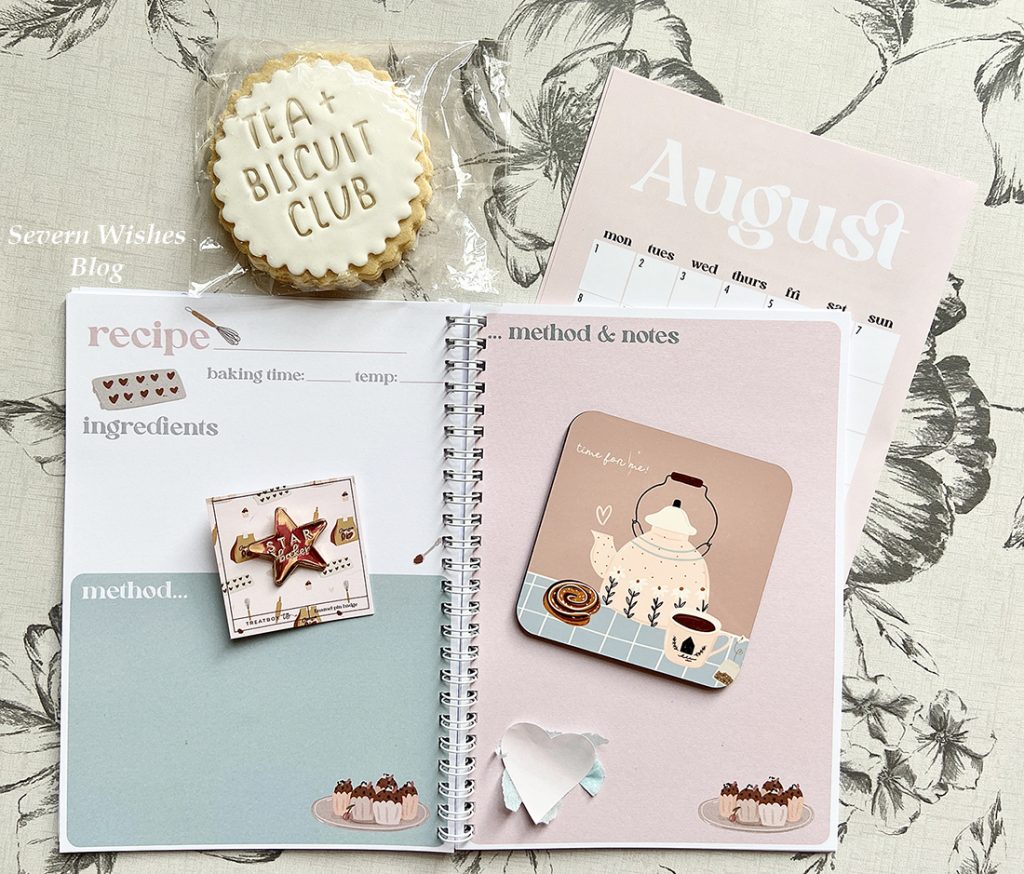
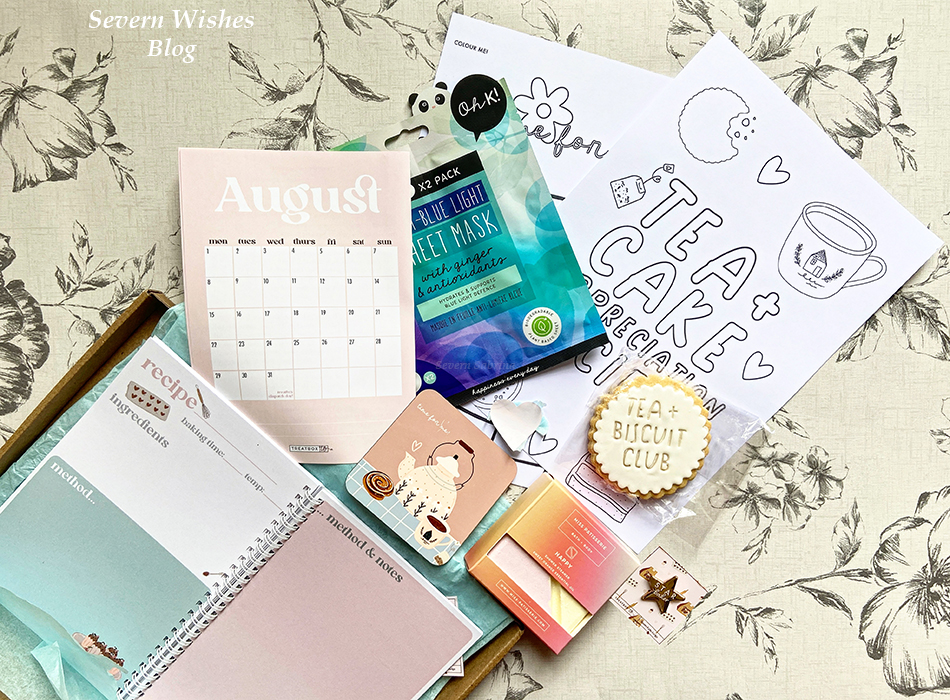
Treatbox Original Calendar Print Treatbox Original Colour Me In Pages x 2 A4 Treatbox Original Item – Bound Recipe Journal Notebook Oh K! Anti-Blue Light Sheet Masks x 2 with Ginger and Antioxidants Gardners Cookie / Biscuit – “Tea + Biscuit Club” Quote – Vegan Treatbox Original Item – Enamel Pin Badge “Star Baker” Treatbox Original Item – Drinks Coaster “Time for Me” Miss Patisserie “Happy” Essential Oils Shower Steamer Block
Here are some more photographs!
What is my Honest Opinion on the items in this August box?
We have some of the usual items in this box which include (of course) the Calendar Print and a biscuit which are regular in Treatbox and are very nice. I also see there is a Mask again this month but it’s actually two separate masks which is slightly better value as we can do two this month, or invite a friend around for a pampering session!
The Treatbox original products are unique and are really in keeping with the baking theme this month, which include the Drinks Coaster and the Recipe Journal. As someone who does a lot of cooking that is really handy! The Star Baker Pin is very fun and I have a friend that this is perfect for, I will be gifting this to her because she bakes far more and far better than I do! Ha!
The set of two colouring sheets are fun and are back this month. I always find Adult Colouring to be calming for me. Check out my social media for updates on these as I fill them in as the weeks progress…
What do we have left to talk about? Well if you watched my unboxing video on August 2nd you will know that I started having an allergic reaction to the Shower Steamer block during my recording, orange is something I became allergic to a couple of years ago and I could no longer eat or drink this without feeling poorly. When I smelt the shower block my nose instantly started to run and my eyes started to itch. Sadly I had to wrap this product up in the Treatbox plastic packaging as soon as I hit the stop button. I quickly photographed it later that day, before wrapping it again and giving it to my mother so that it was removed entirely from my house. Such a shame because I liked how the product sounded in principal! I hope my mother enjoys it!
So what are the best items this month? I really think the quality of the Treatbox UK original products are excellent and they are items that can be continually used and enjoyed and are also useful. The coaster will brighten your day, the journal is ready for whenever recipe inspiration strikes, and the rest of the items can be enjoyed over the course of the next four weeks. Keep checking my social media for individual item reviews. I will let you know how I get on with the mask!
Thank you very much for joining in for another Reveal and Review from Severn Sabrina!
Wishing you a great August month!Don’t forget to follow me on social media for more updates and individual product reviews too.
I hope this blog post finds all of you well as you’re reading this!
So we are just over half way through the year now and it’s time for the July Treatbox UK Reveal and Review.
Thank you for joining me for this unboxing! It’s time to look at the products in this months box and for me to review them for you!
If you would prefer to watch my video then head to my Facebook or Instagram.
The July box features TB OR – Treatbox Original Products only available by ordering from Treatbox UK.
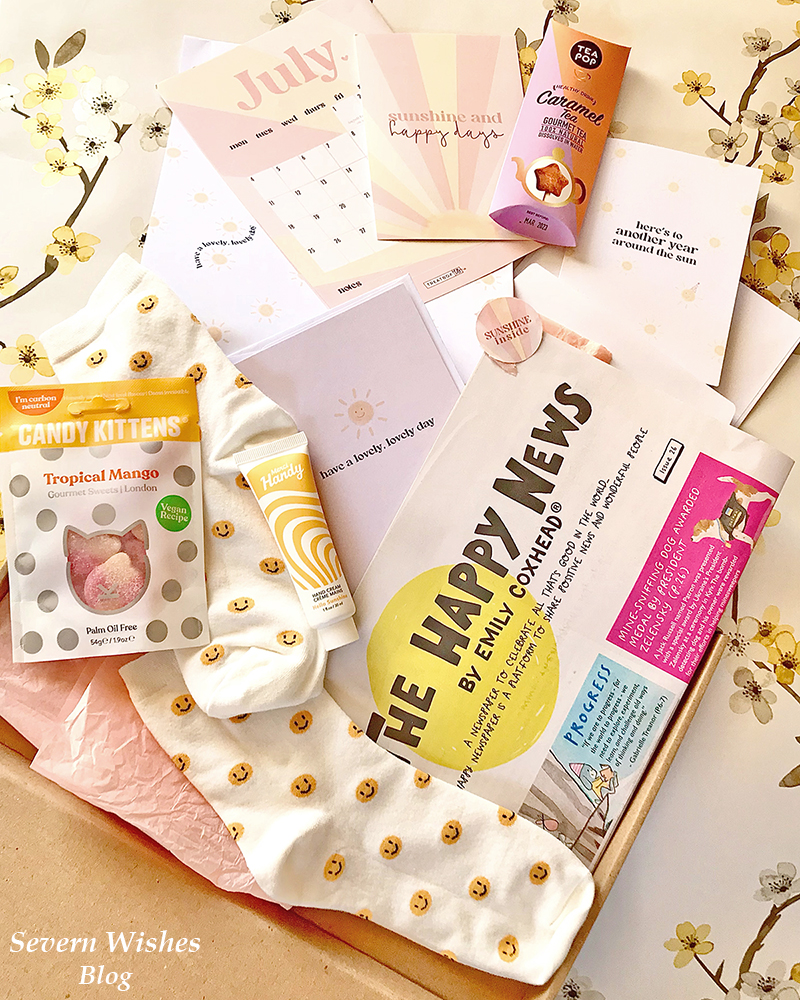
What’s Inside the July Treatbox UK?
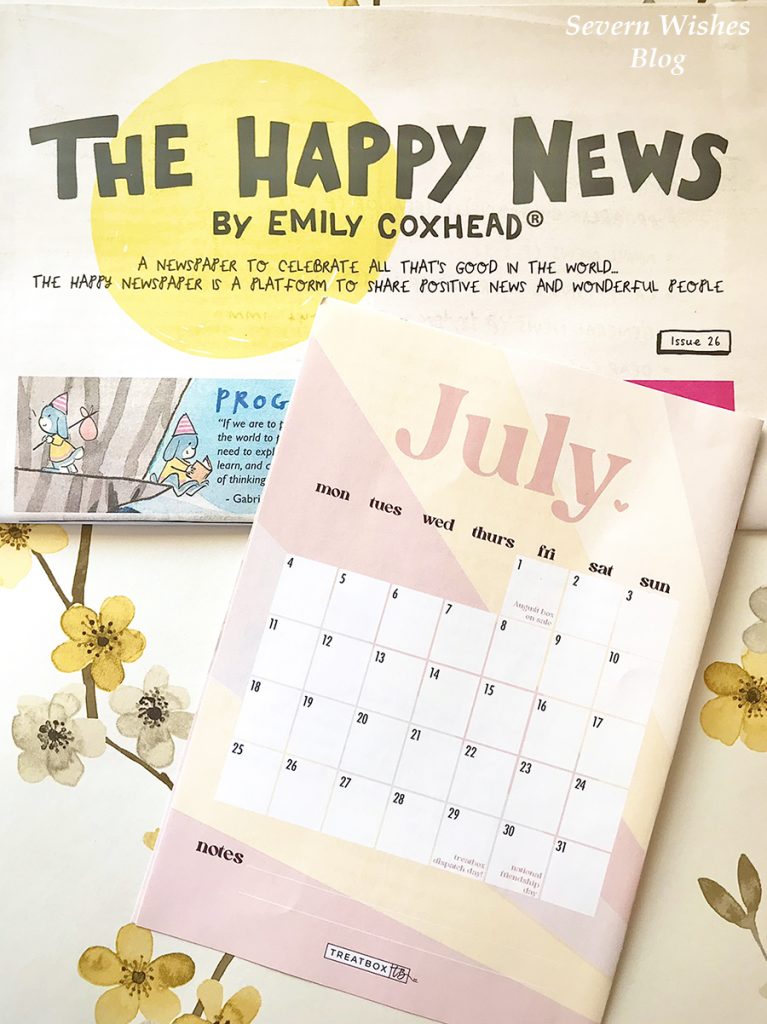
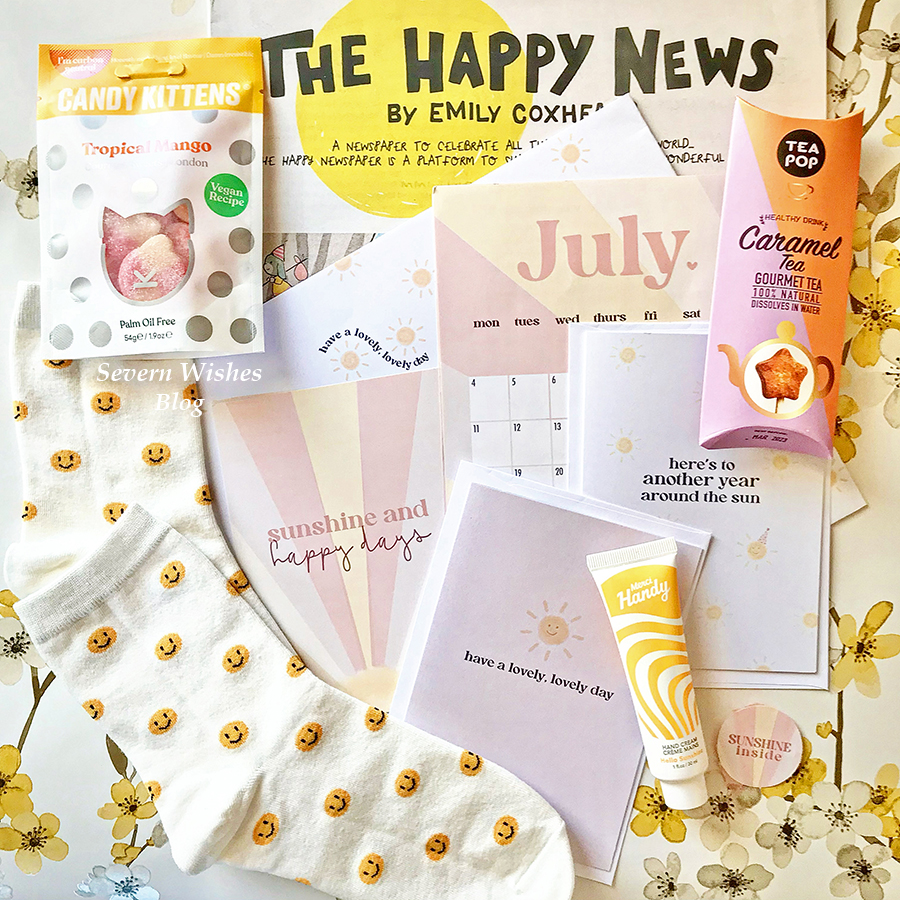
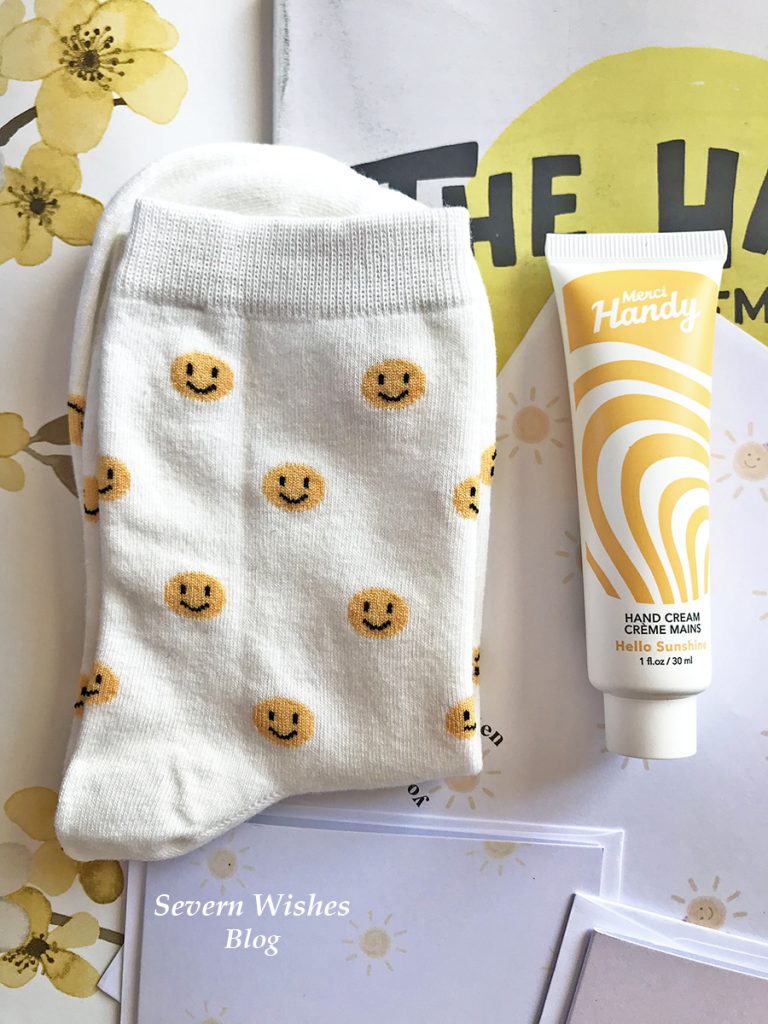
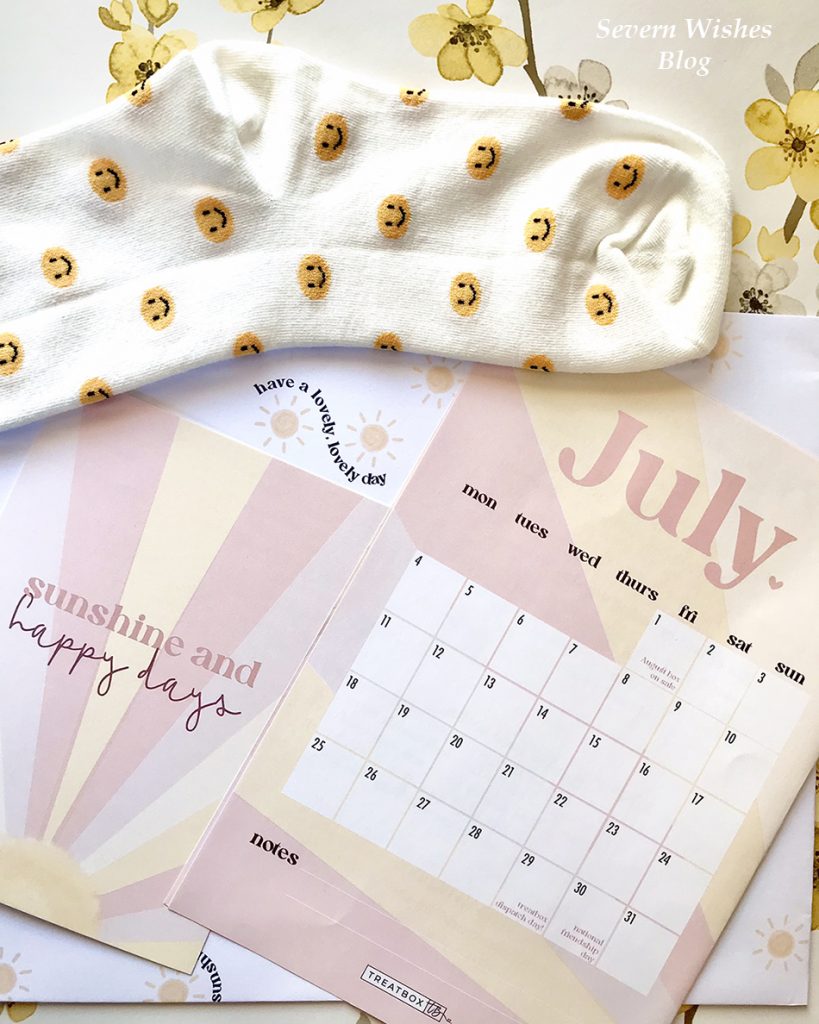
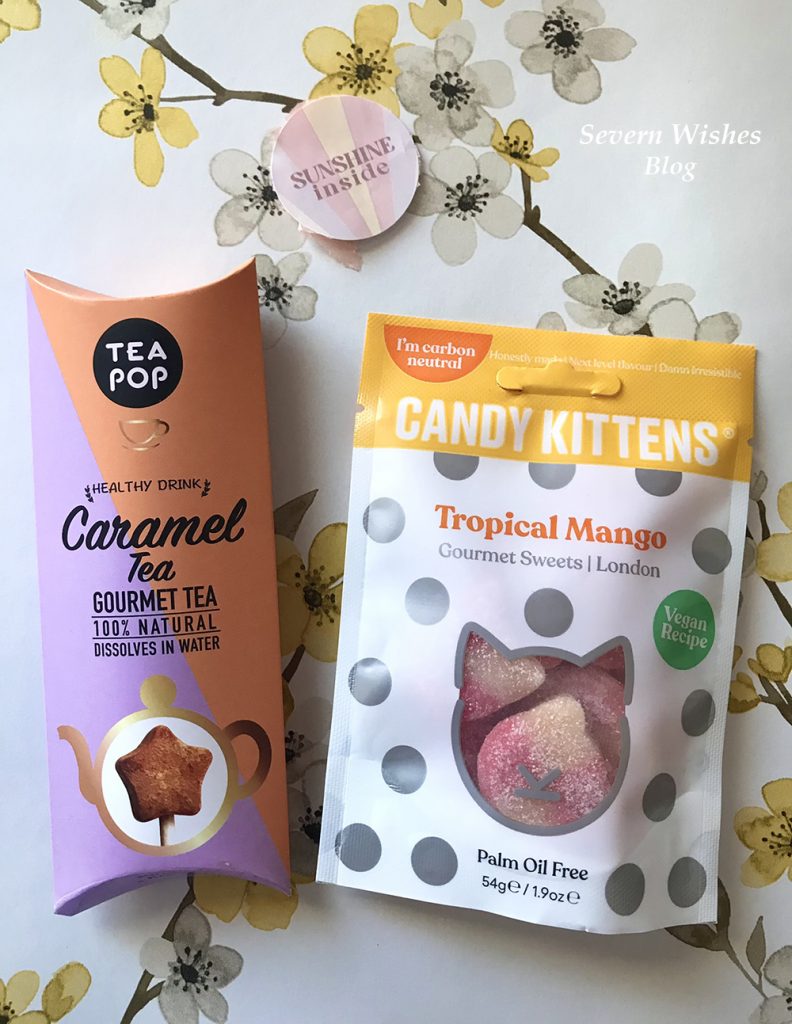
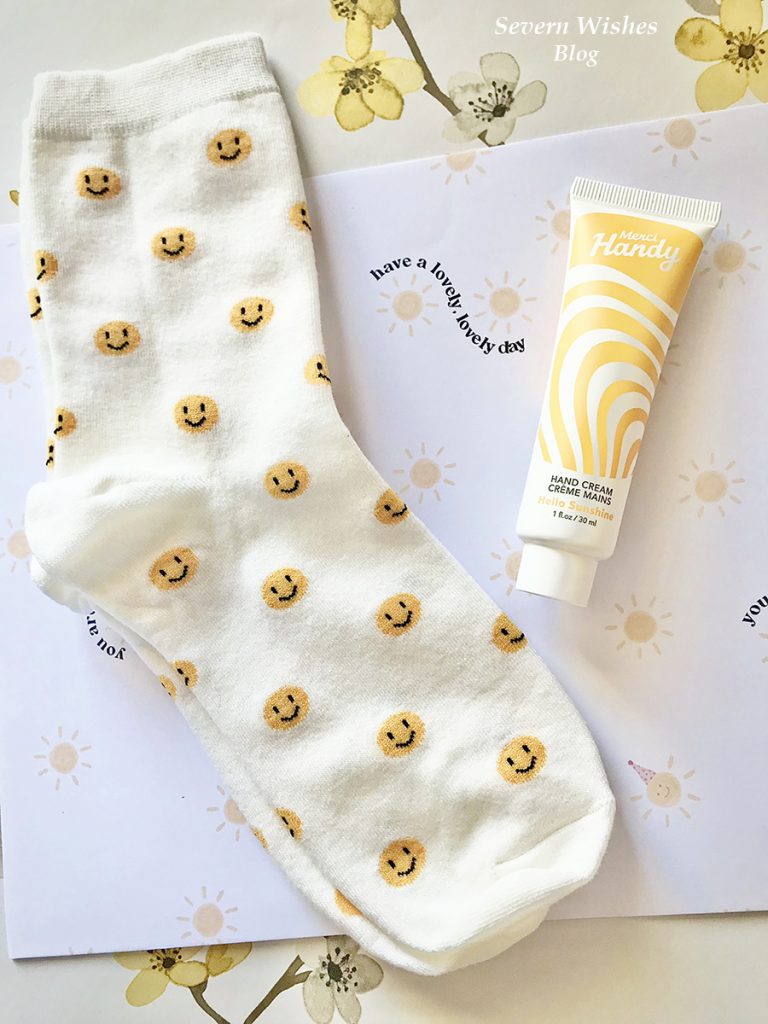
July Calendar Print TB OR A6 Print “sunshine and happy days” Smiley Face Socks TB OR Greetings Cards – 2 Cards for Passing on the Sunshine Merci Hand Cream in Hello Sunshine scent 30ml Candy Kittens – Tropical Mango flavour 54g The Happy Newspaper by Emily Coxhead issue 26 Tea Pop Gourmet Tea – Caramel flavour (in my box but may vary)
My Honest Opinion of the July box
What a box of sunshine! When I opened up the Treatbox and I saw the theme was sunshine and happy vibes it was just what I needed to boost my week. We had socks again and I was really happy about that because I love the quality of the socks! They are soft and cute as usual with smiley faces on this time! And what I also loved was the fact that we can pass on the happiness and sunshine from our July box by sending the Treatbox UK cards on to someone we care about!
The Merci hand cream smells lovely like summer flowers on a sunny day, a light cream that melts into your hands and comes in a handbag size to boot! Perfect for use all year round! It made my skin feel very soft after I used it a couple of times.
The Candy Kittens sweets are Vegan, Palm Oil Free and are now Carbon Neutral too! You get 54g to enjoy of this treat with natural fruit flavours in Tropical Mango. Yum!
We have the Happy Newspaper which I haven’t read all of yet, but hearing about happy stories and inspiring people is always a good thing. It’s important that we focus on some of the good things happening in the world even when times are hard, because if you look hard enough there is always some good news to find somewhere.
I haven’t had the Tea Pop yet because we are having a heatwave in the UK right now and I cannot stand drinking a hot drink when I’m already feeling very warm. However I did have an idea for this which was… make up the tea – I had Caramel flavour – and then pour it into an ice cube tray and freeze it! Pop these Caramel flavoured ice cubes into Pepsi Max or Water and make it a new flavour! Seeing as the heatwave is set to continue for yet another week I will make room in my freezer and do this! I will post about it on my Instagram and let you know how I get on!
Finally there are the Print, Wrapping Paper and the Cards – Treatbox Original Products – all made with the theme of sunshine! July is meant to be the happy and sunny month of the year (if we’re lucky) and so far we seem to be having just that! May the sunshine continue! I look forward to passing the cards on to people when it is appropriate to use them, and using the paper to wrap a present for someone.
Here are some more photographs now of the products I got within this box.
Thank you for joining me as I have unboxed and reviewed this July subscription box today. Treatbox UK is currently the only monthly box I am subscribed to and the reason for that is due to consistently great content and products that I hold in high regard. Providing items that are Vegan, Carbon Neutral, Sustainable and Healthy are very important to me. I get a treat but I’m also not harming the planet in the process.
I wish you a lovely month of July 2022! Please stop by again soon for another Reveal and Review!
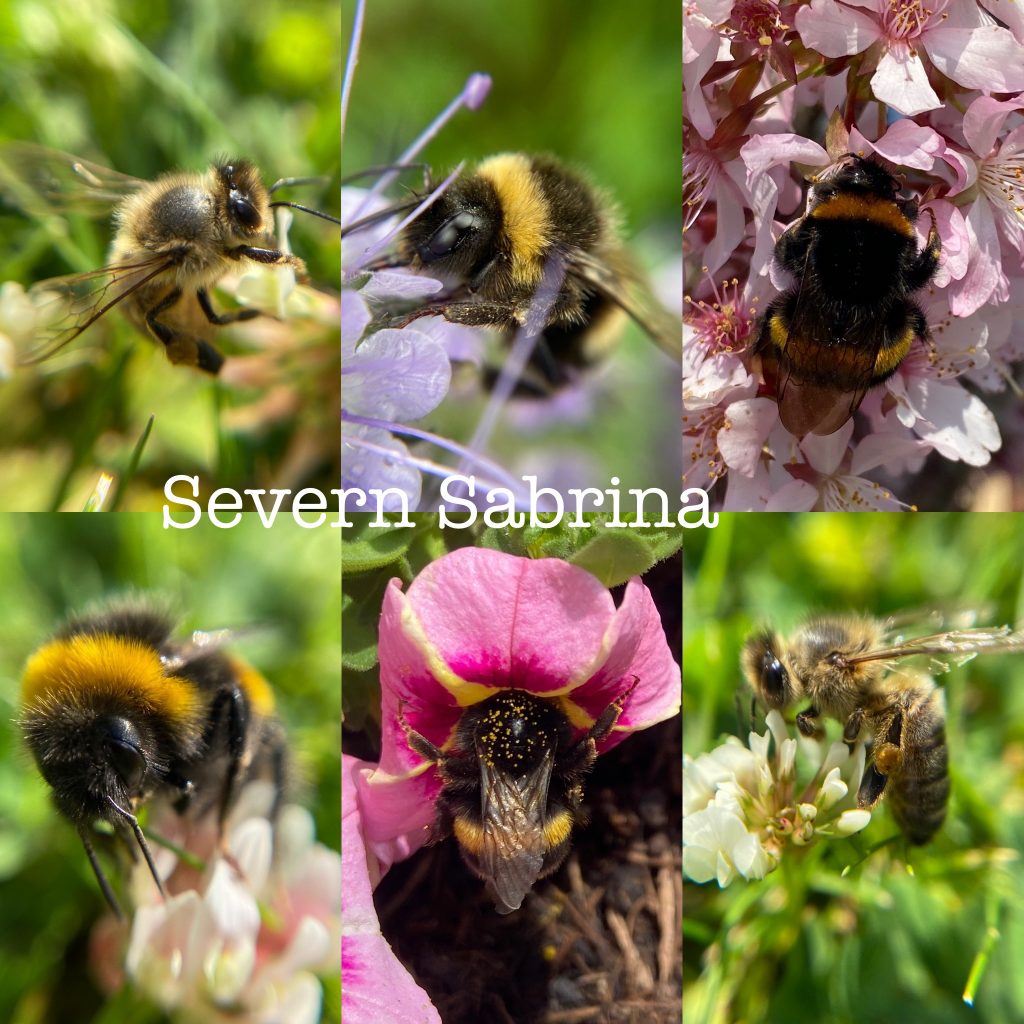
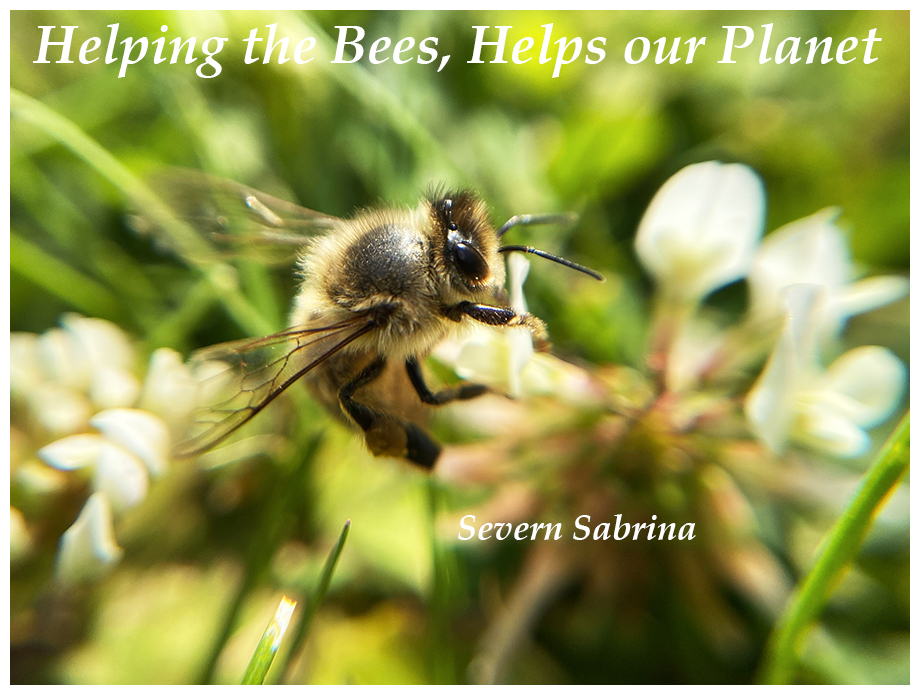
Here is a Photo montage of Bee’s that I have taken this past year… as a Nature Photographer I am constantly making images.
AWESOME FACTS ABOUT BEES
Bees are insects that have 6 legs and 5 eyes.
Bees have been around for approximately 30 million years.
Here in the United Kingdom we house around 270 species of Bees.
Worldwide there are more than 20,000 species of Bees.
Honey made from Bees was found inside the tombs of Egyptian Pharaoh’s and it would still be edible today.
Honey Bees communicate with one another through dancing moves!
Bees can fly up to 20 MPH!
Male Bees are called Drones.
Female Bees are called Worker Bees.
The Queen Bee can lay up to 2000 eggs a day and a hive will only have one Queen.
A Honey Bee will only make 1 Tablespoon of honey in their lifetime.
Some species of Bee are solitary and live alone except for reproduction moments, these often live underground too!
On average a Bee will fly 32,000 miles in their lifetime and visit more than 1 million flowers!
Honey Bees live in Bee Hives where they work together to make Honey.
If a Bee loses its stinger it will die – so make sure not to hit them and let them just fly around you and fly off again – once they realise you’re not a flower you won’t interest them anyway!
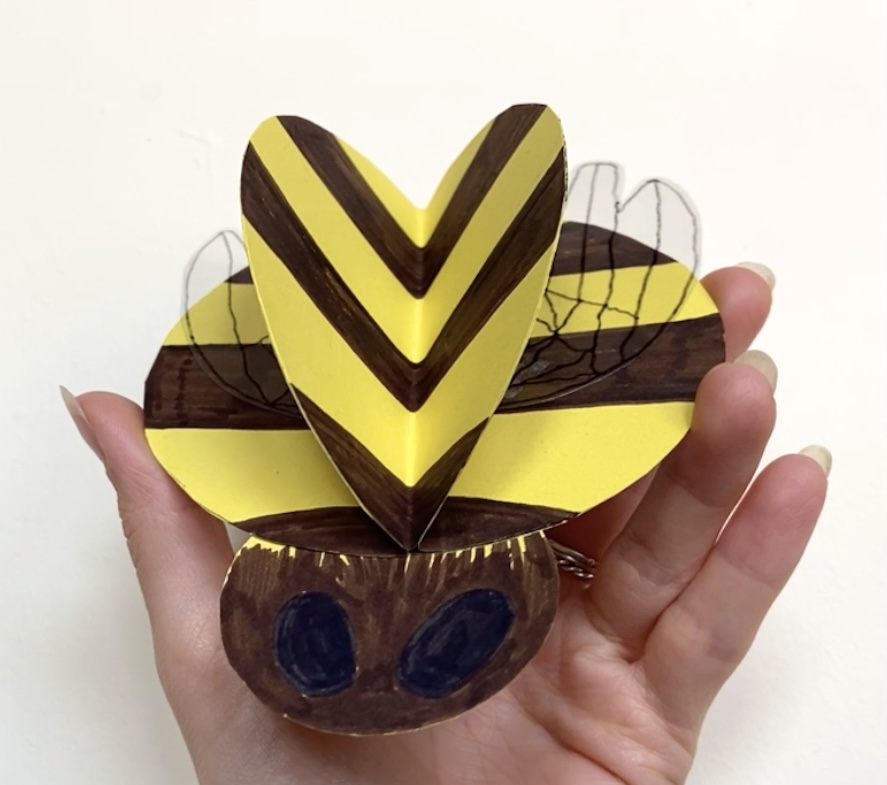
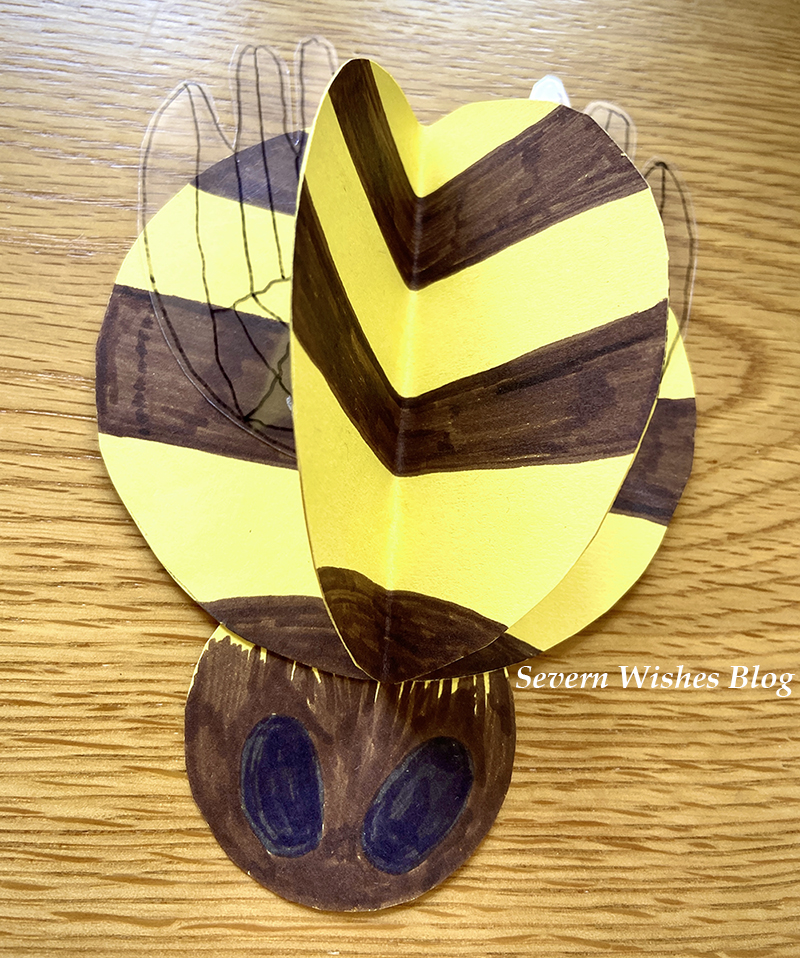
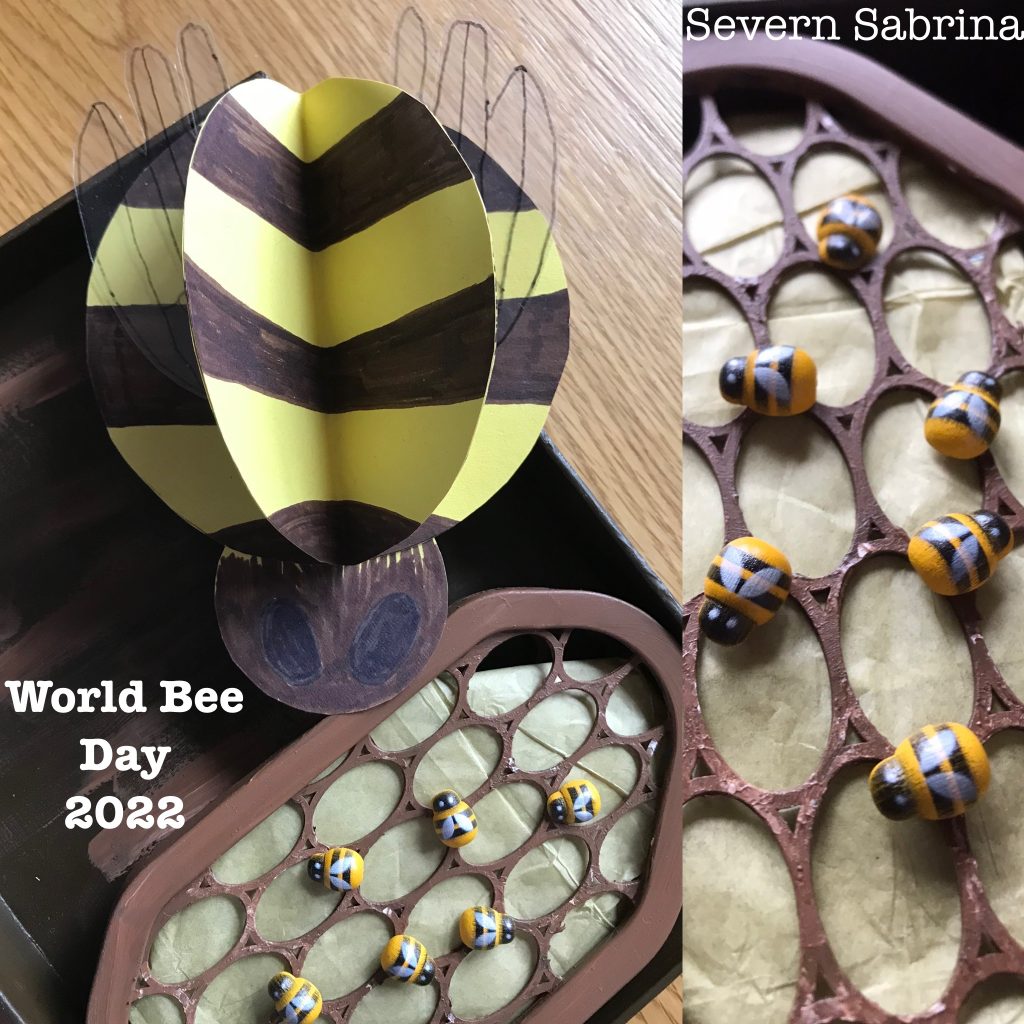
SABRINA’S HOW TO MAKE A 3D BEE!
I thought what better way to immortalise the Bee than to make your very own 3D craft version of one! I came up with this last year but sadly I missed the deadline for World Bee Day 2021, so I have saved it all for today! World Bee Day 2022! They are fairly easy to make and I will now tell you exactly what you need before we begin the how to method!
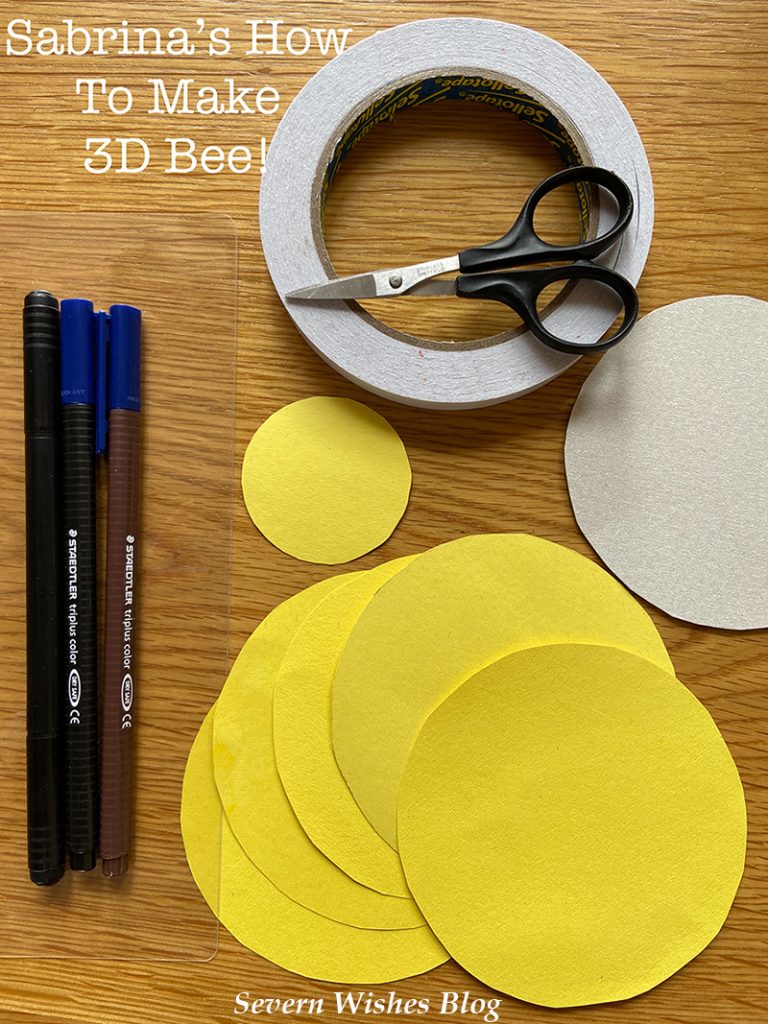
One Sheet of A4 Thin Yellow Card or Thick Paper One Scissors One Piece of Cereal Box Card Pens – black and brown A Permanent Pen – Black with a Fine End (for the Wings) Double Sided Sticky Tape A Piece of Thin Plastic (mine was off some toy packaging) (for the Wings) Two Circular Objects to Draw Around – 1 for the Small Bee Head and 1 for the Body Circles
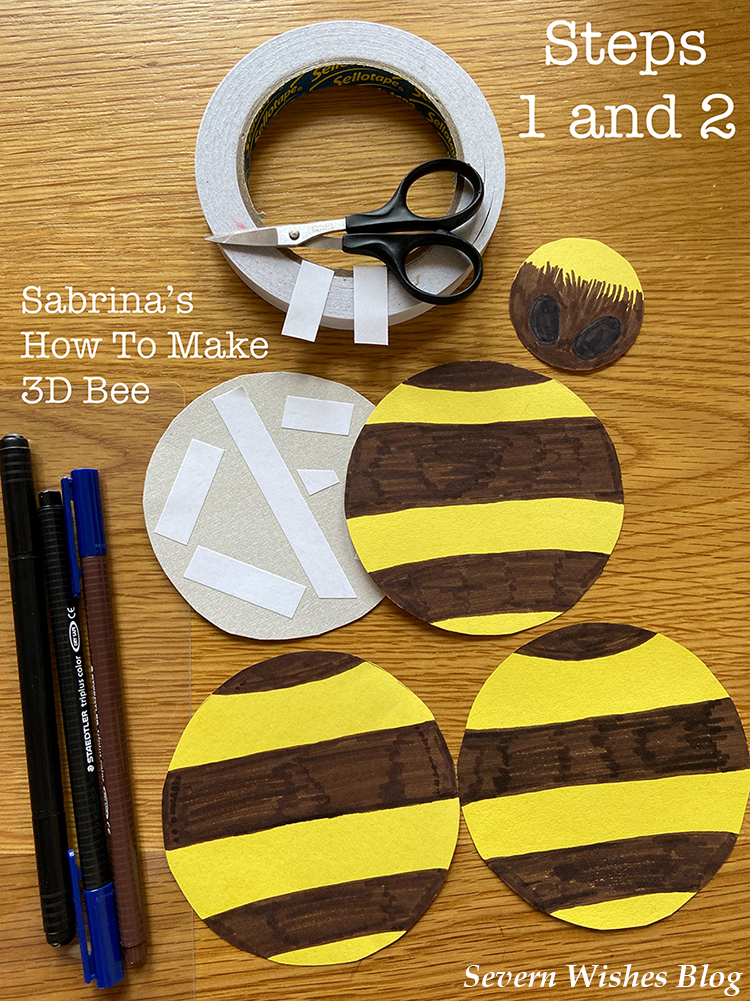
Step 1. Cut All of Your Circles Out – You need 1 head, 1 main body out of box card and four out of the yellow card. The yellow and the body have to be the same size, but the head needs to be 1/4 of the size. Put some double sided sticky tape on the cereal box card circle because this will be your base to work the rest up on. Put the other yellow circles down on a flat surface ready for their details.
Step 2. Draw some sections on the 4 yellow circles that will become the Bee body, you will need to have 3 sections that are lined horizontally and similar in size to each of the other matching circles (See image below). Colour these in Brown. The best thing to do is to have them on top of one another, mark the section the same and attempt to line them up with the opposite side. With the small Circle that is yellow (the Bee head), you need to draw two large Oval Eyes in Black, and then do some vertical lined streaks in brown so it looks like fur. Leave the top section of it Yellow, we will be sticking it to the body shortly.
Step 3. Stick the Head to the Body using double sided tape with only 1/4 of it attached to the Card and the rest sticking out. Now place the Bee in front of you, with the head facing you (facing South). You want to now take one of the striped yellow body sections, choose the one that is least lined up. Put some double sided tape on the back of it and stick it down on to the main card body, covering the edge of the head, with the stripes going horizontally across the Bee body. Place this beneath something heavy for a few minutes so as to stick it all into place while we do steps 4 and 5.
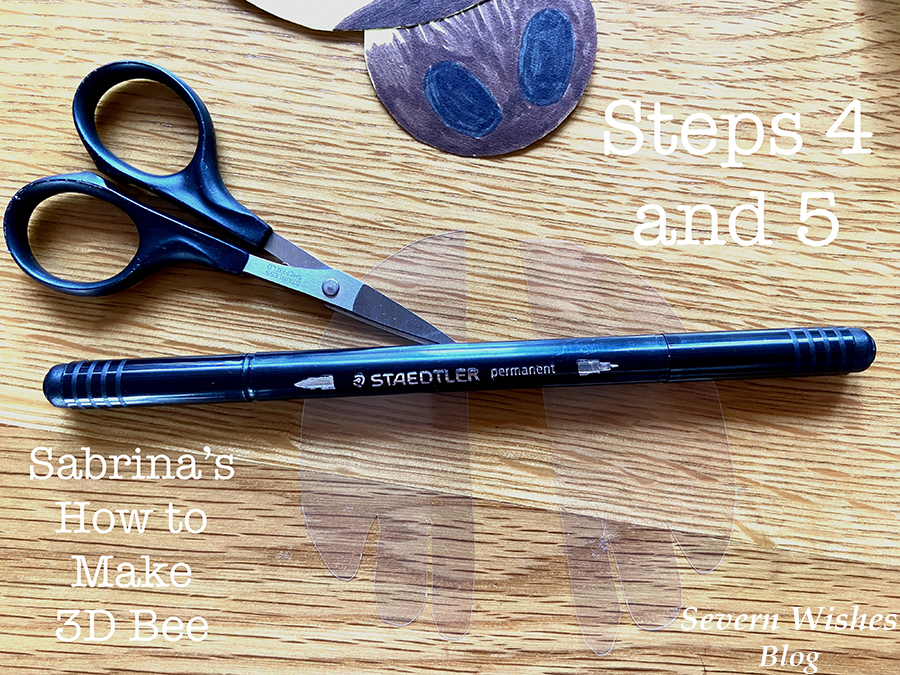
Step 4. Take your Plastic now and Scissors and permanent pen. You want to draw out two identical wings, Bee wings tend to have some ridged ends but you can just do ovals with a pointed end if you’re not confident (See Images below). Look at my Bee montage at the start of this blog post for wing inspiration! Once you are happy with the drawing cut them out, and make sure they’re the same size by overlapping them and trimming any overhanging edges.
Step 5. Draw some lines down the wings with the permanent thin pen, try to match the Bee wings (again take inspiration from my pictures at the start but be creative too this is your own Bee!) and match each other, make the same marks on both wings by having them side by side as you create the lines. Place them off to one side to fully dry. (If you use normal pen on plastic it will likely rub off).
Step 6. Now it comes to the tricky part, you need to take your Bee body parts and fold them in half, all three of them with the coloured lines on the inside of the half fold. Make sure that the centre is through the middle of the horizontal lined sections. Do this for all three and also make sure they are folded the same across the sections so when stacked together they are the same (or close as you can).
Step 7. Once you have folded them and they do match best they can, you need to take two of them to start with, and place some double sided tape strips on the one side of each one, so that is one taped only the left underside and one taped only on the right on the yellow underside of each of them. Take a look at my photograph below for clarification on the folds and the tape.
Step 8. Take your folded Bee body circles and place one on either side of the main Bee body with the head. Line them up with the circle that is already on it, the one you put the tape on the left underside goes on the left, and the right taped side on the right. When you push the body middles together they should be flush and straight in the centre and aligned with the head. Make sure the stripes line up and are horizontal to the head that is facing south, and the crease line for your folds should be straight up from that facing north. If this is accurate you can now remove the double sided tape, stick one side down at a time, to the main body. Then do the opposite side (see Step 7 and 8 images) and this leaves you with the other half of each circle standing up on end. The final circle you still have will go in between them causing the body parts to stand up 3D.
Step 9. Attaching the final circle on to the body is just about lining it up. First you need to put some double sided tape on to the pieces that are already attached to the Bee body that you stuck down in Step 8. (See image Steps 9 and 10 to clarify this next step). With the double sided tape now in place but not removed the tabs yet, you first line up the circles, look at it and think do the edges match and is it horizontal across the body? If the answer is yes then remove the tape tabs and stick that final circle on to the top of the Bee in between the other pieces.
Step 10. Press and hold the Bee body firmly now, gently run your fingers down each of the sides to press the circles fully together and ensuring the tape grips flush. Once they look like they are fully stuck with no gaps anywhere you can now make sure your wings are dry from earlier.
Step 11. Take your plastic wings from before, line them up with where you want them to go on the Bee body (they are usually attached to the middle section of a bee’s body). Then take two thin strips of double sided tape and match those up on either side, stick down the tape. (See Step 10 and 12 image for wing tape placement).
Step 12. Attach the wings now and make sure you press them down on to the tape for at least a minute to ensure the plastic gets a really good grip. Hold the Bee upside down and make sure they don’t come loose, if they do then press again.
Step 13. Tidy up any lines on the Bee and trim any edges with scissors that aren’t in line to neaten her up. Then you have your Queen Bee! You could hang her up somewhere or make her a little hive…
HAPPY WORLD BEE DAY! You now have a friendly Bee to live in your home and remind you of their importance, coolness and cuteness.
WHAT CAN YOU DO TO HELP THE BEES?
Make a wildflower pot, planter or corner of your garden and attract bees and help them with their pollinating. You can get wild flower seeds free with some things such as “30 Days Wild) and Brands often give them away with food products too.
Don’t pull out all of your weeds, leave a few because bees need them especially because weeds are usually the first flowers of the new season.
If a Bee comes into your house leave it alone, open some windows and let it find its way out, do not attack it or attempt to catch it because it may sting in fear and then it will sadly die. Most Bee’s will head straight back out a door or window when they smell the fresh air.
Visit a local Apiary and But Local Honey products when possible.
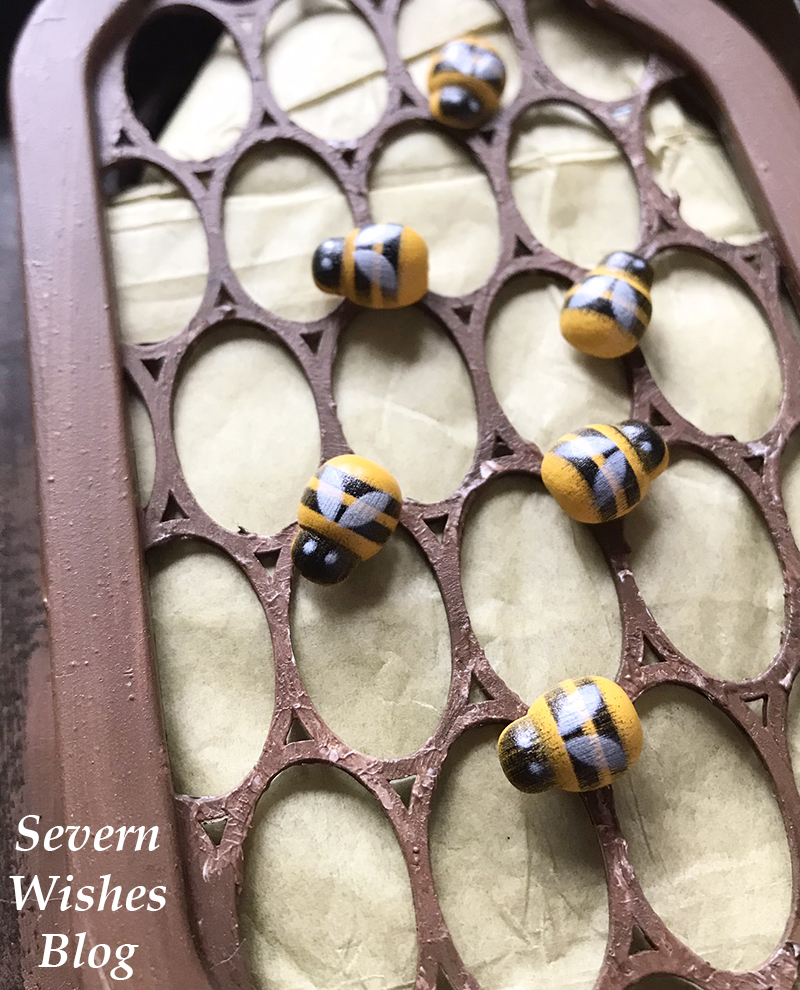
WOULD YOU LIKE TO MAKE A CRAFTY BEE HIVE? What You Will Need
Tiny Craft Wooden Bees (Found in The Works craft shop) A Narrow Sided Box or a Lid from Something (Rectangle is best) Disposable Dehumidifier Pot Lids – doesn’t matter what colour as you will Paint them Brown Paint and a Paintbrush
Step 1. Paint your box and the humidifier pot lids you have collected, they should be brown or a mixture of brown and black and yellow. Step 2. Leave them to dry somewhere flat overnight at least. Step 3. Place something to resemble honey and nectar between the lids, maybe tissue paper? Step 4. Stick the Two (or more) lids together to form mini hive type structures. Step 5. Stick the lids into the box and stick your Bee’s around. Done!
Thank you for taking the time to read this blog post today, I hope you have enjoyed it. If you make any Bee’s please share your pictures with me on social media, use the hashtag #SevernSabrina and #SabrinasHowToMake or tag me on them using @Severn_Sabrina or @SevernWishes Blog.
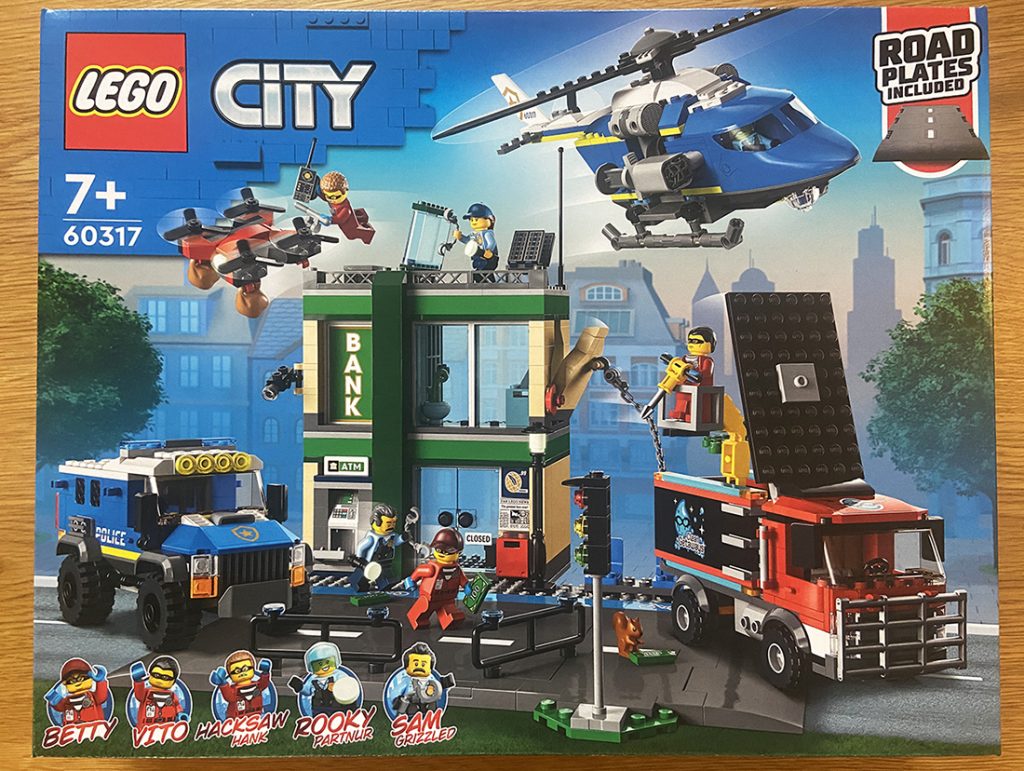
Today I am lucky enough to be showcasing a brand new LEGO City set which is out this week! I have reviewed this product during the start of January and already provided my finished article to Argos, it was supplied to me through Argos Testers. 2022 now marks my sixth year as part of the program and I am very grateful.
I am an Argos Tester, this means that I often get items sent to me for the purpose of an online review. I test products and take photographs of them before submitting my findings and thoughts to Argos. The final campaign of 2021 was LEGO! I was very excited at the thought of testing something that I love, I enjoy making LEGO at home already on a regular basis.
#ArgosTester #ArgosTesters #ArgosTestersCommunity
I have written this article about a product that I have been supplied for free, in order to test and then review it. This is my experience with said product and my honest review about the product which is listed below. I have already submitted my product review to the Argos Website, and it has been accepted when this post has been published.
My Argos Tester Review
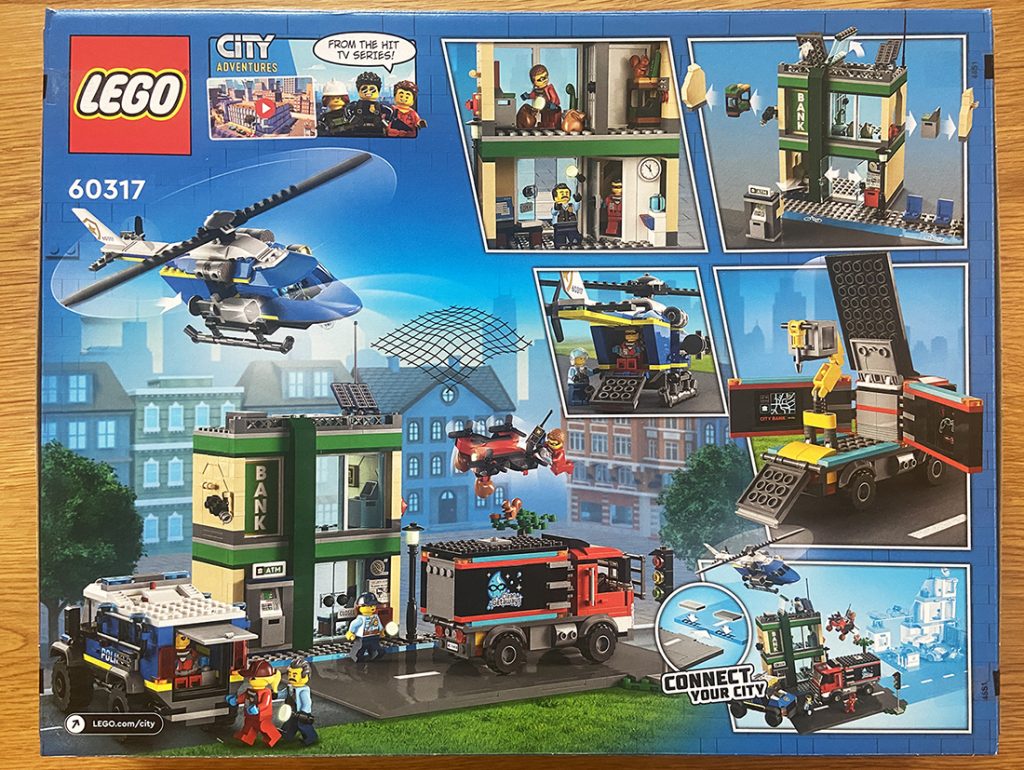
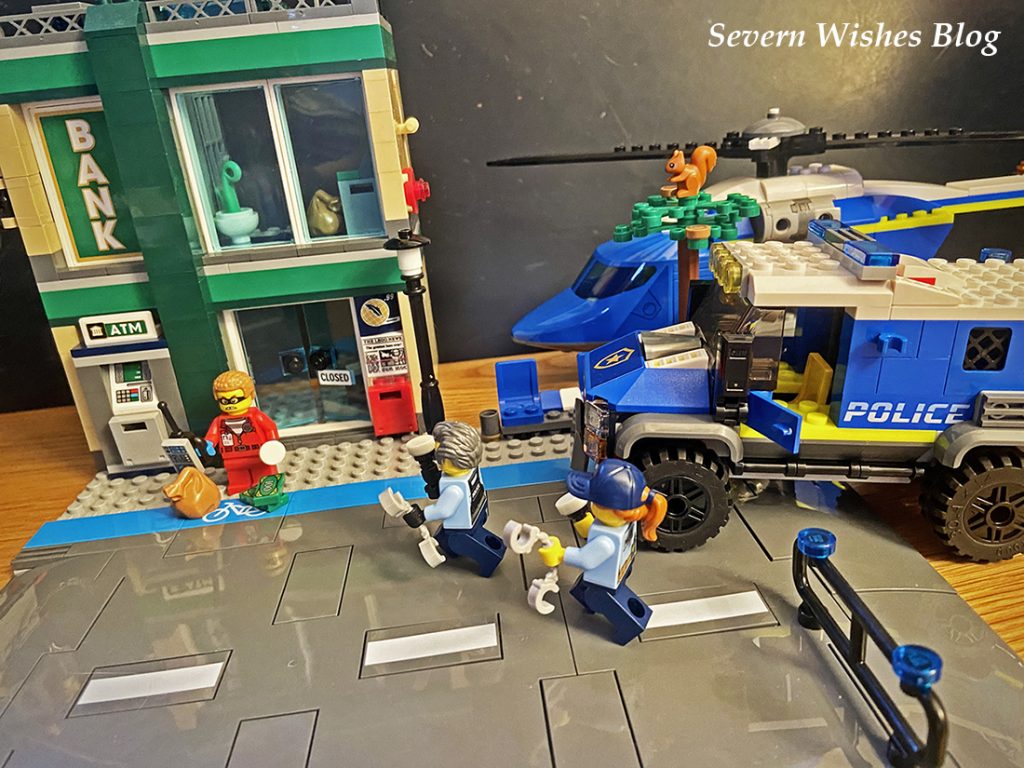
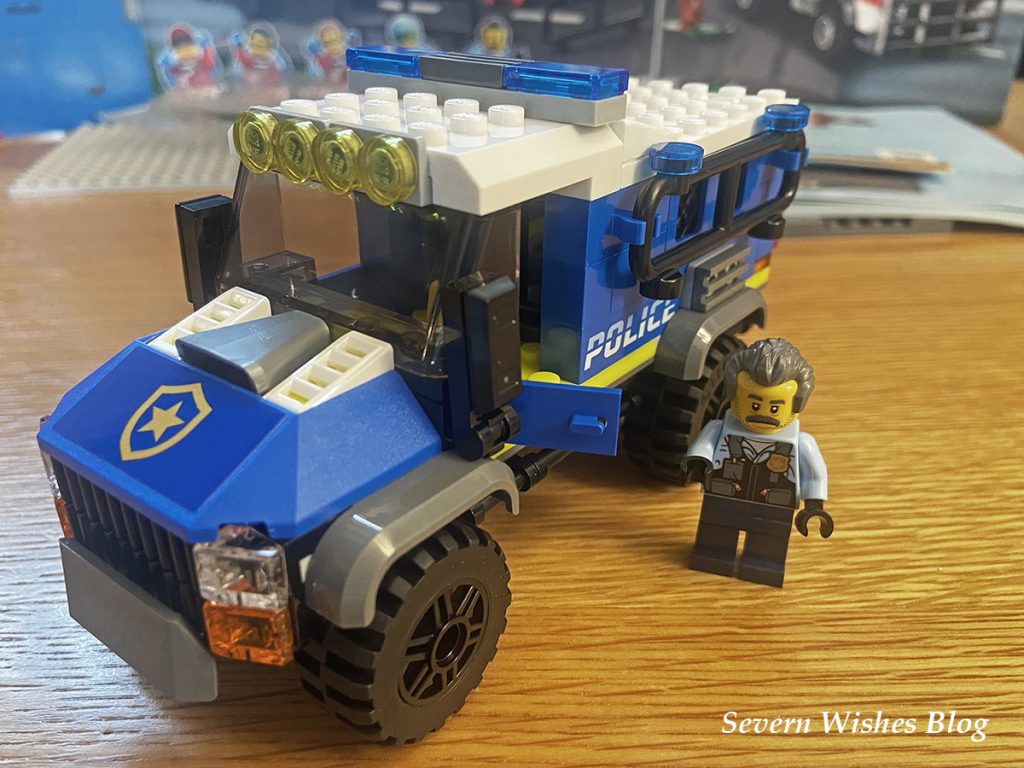
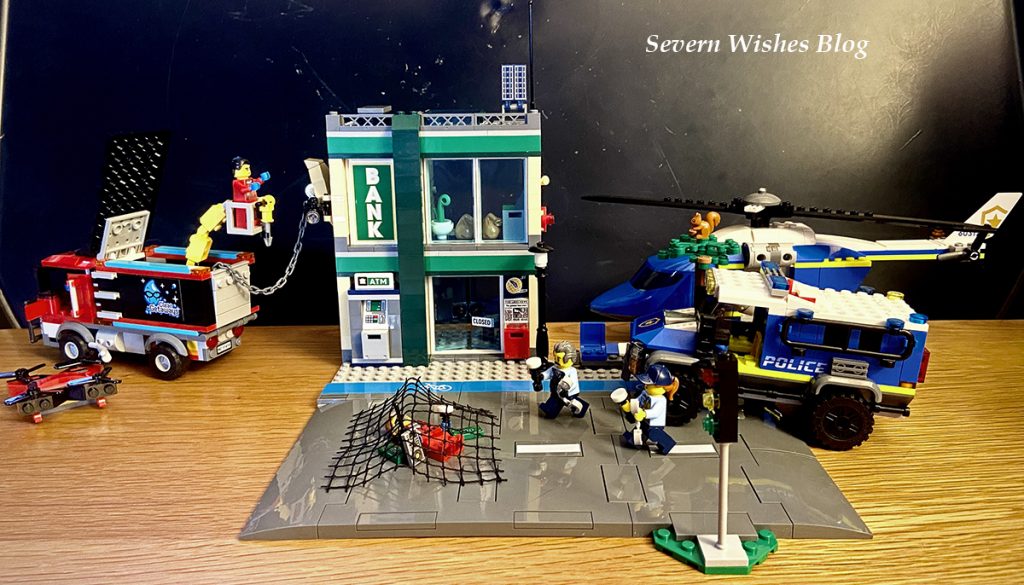
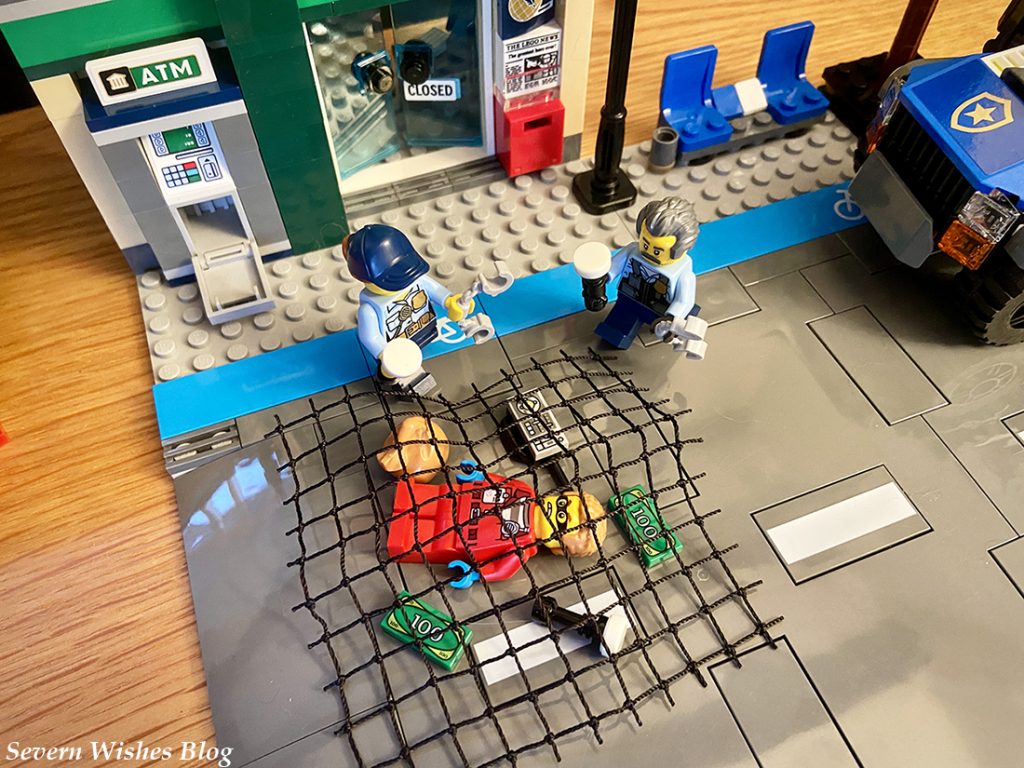
A set filled with fun & imagination, helicopter, police vehicle & the “clean getaways” Robbers / Heist assault vehicle. Not to mention a Bank full of awesome details & nifty moveable pieces. Endless possibilities for imaginative Police vs Robbers scenarios. Combine with other Lego City products, road pieces are included. Loved building this, took around 8 hours, so many amazing details & quirky unique LEGO aspects. Well designed vehicles & building with many opportunities for playing individually or with others. My favourite piece is the Helicopter that even allows you to fire a net out of the side! Wow! The details on the outfits of the characters are excellent with the Police Officers having vests with zip pockets & badges visible. Great accessories for all LEGO Mini Figures. All vehicles have wheels or rotatable blades. Everything is sturdy & the instructions are easy to follow (as always with LEGO). A wonderful set for anyone collecting the LEGO City or anyone who enjoys this type of scenario with Police catching the bad guys.Great for children aged 7 and over due to its small parts, also great set for adults who enjoy LEGO scenarios too!
Product Name: LEGO City Police Chase at the Bank Set with Trucks (Set Number 60317) Product Price: £90.00 Product Link: Argos Website LEGO City Police Chase at the Bank Product Information from Argos: 915 Pieces. 7 Years and Over. Road Pieces Included. 5 Mini Figures Included. Set builds are a Police Truck, Police Helicopter, Two Floor Bank Building, Heist Vehicle and Drone.
Thank you for reading this review, I hope you have enjoyed it. You can purchase this product or read more about it by looking online from Argos, I have left the link in the product description above.
If you have any questions about this LEGO City set then please leave me a comment below and I will do my best to answer them best I can with the knowledge I have gained from reviewing this product. Thank you.
Wow didn’t December creep up on us! Happy December one and all!
As if I am sat here writing this blog post mid December! I had every intention of doing this post earlier in the month but I have had so much on and so much to do that the days have simply blurred into one
So my apologies for a late post this month, I will try and bring you the unboxing for January 2022 within the first week of the month!
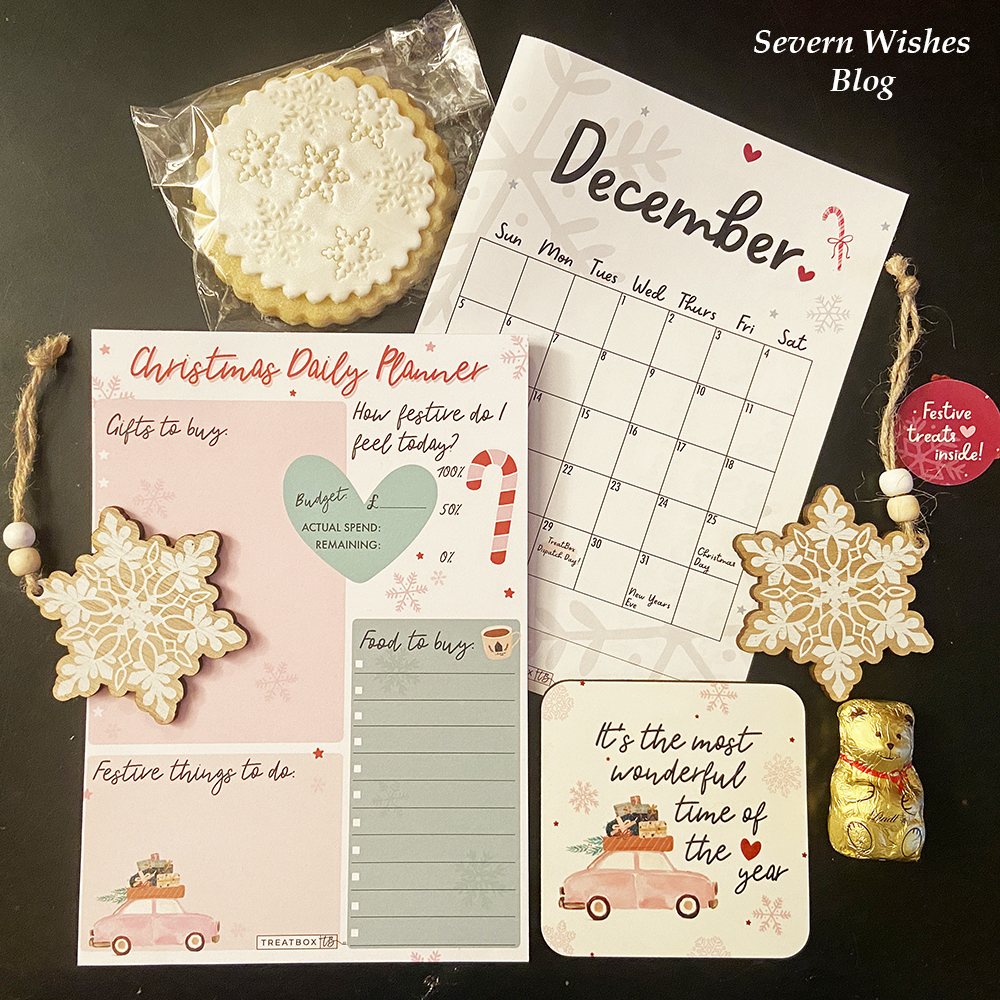
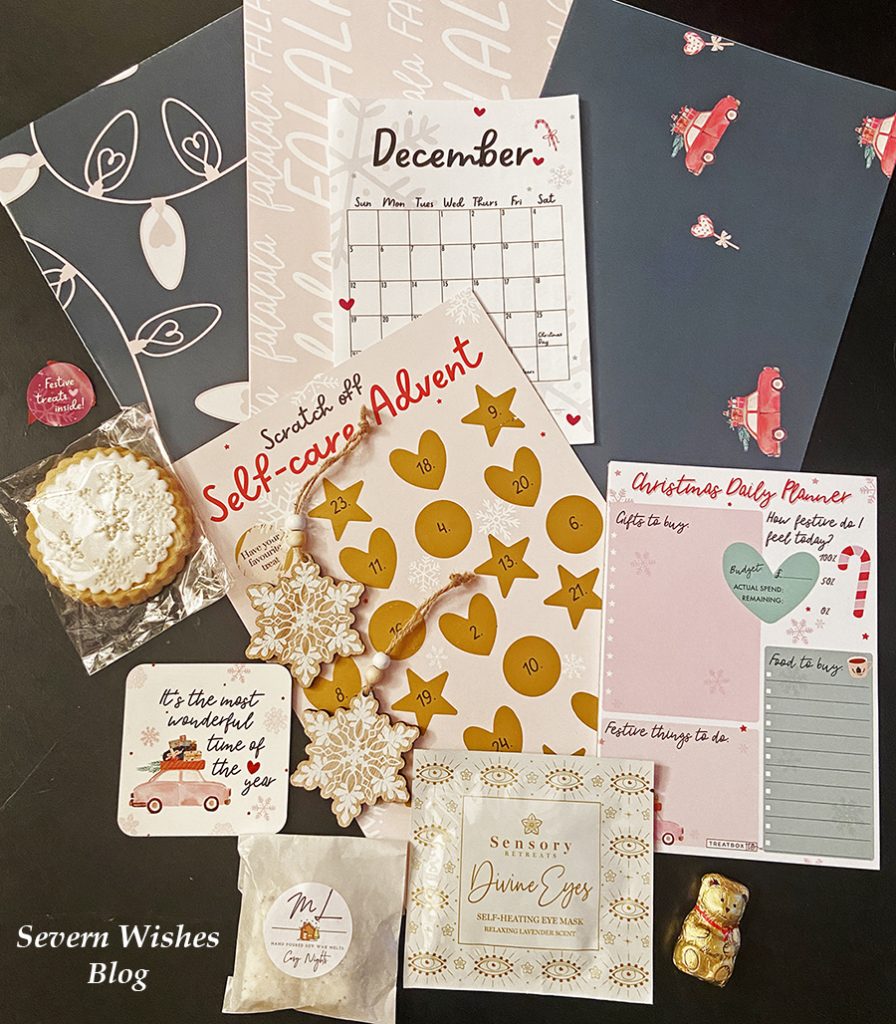
What was Inside the December 2021 Box
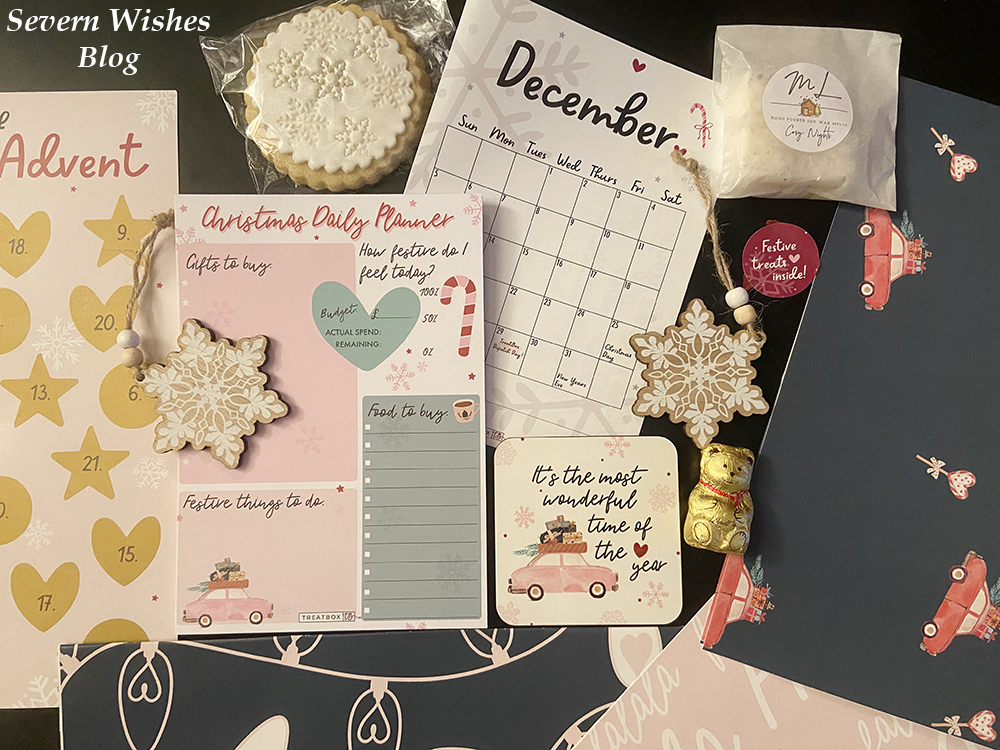
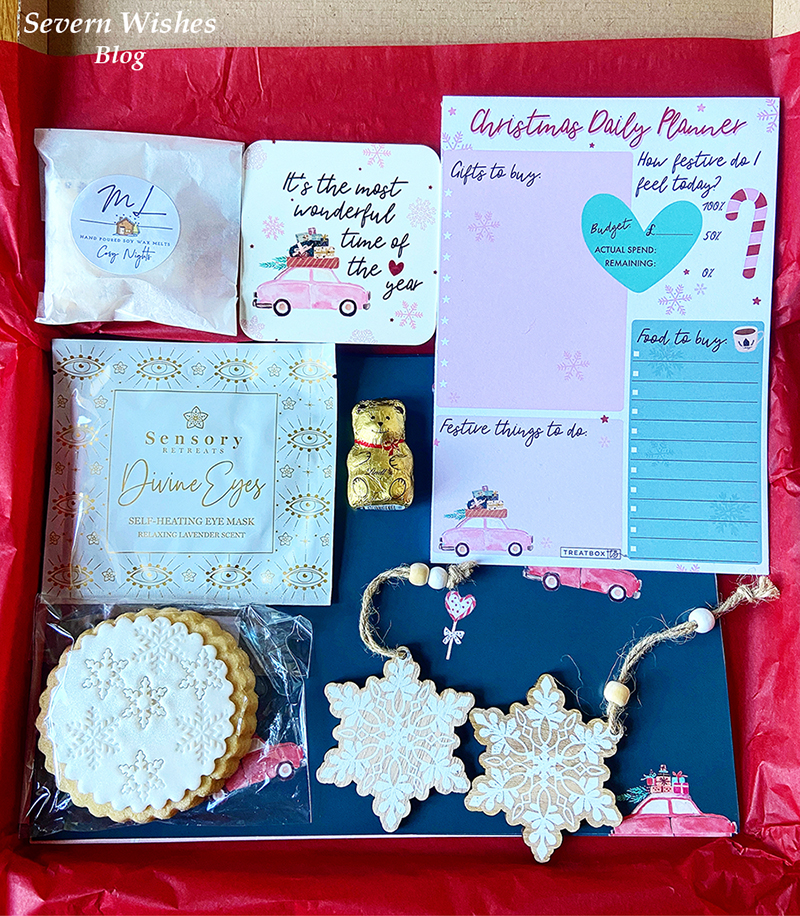
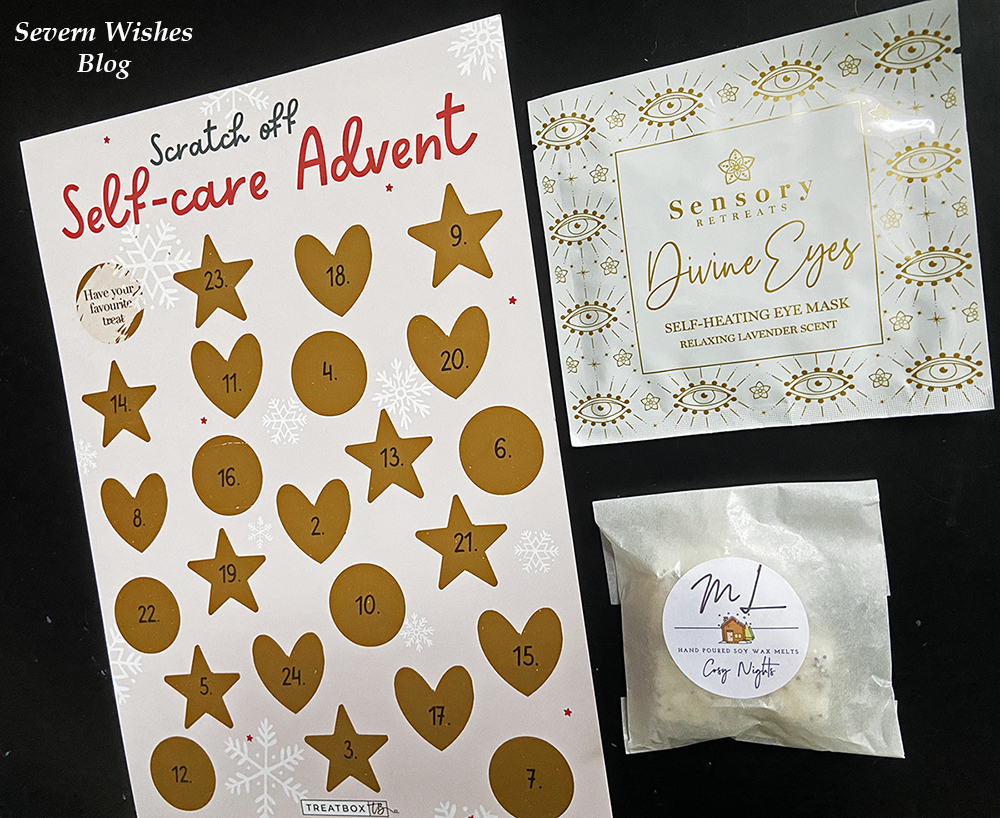
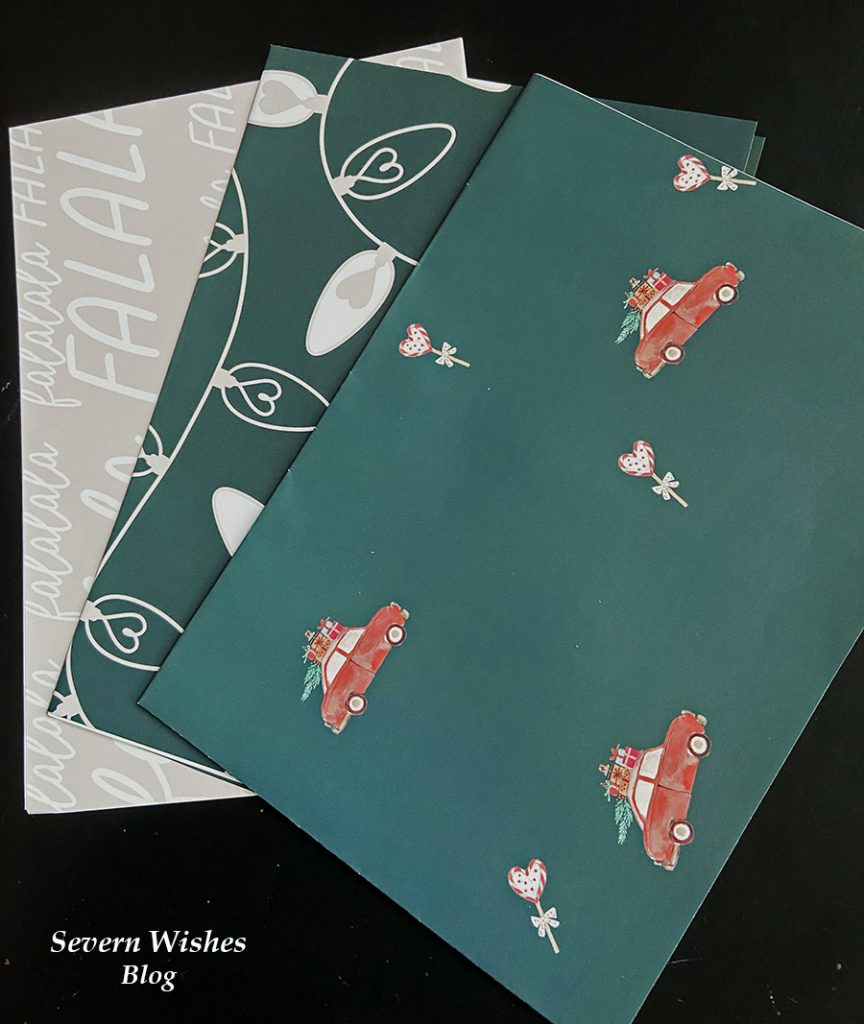
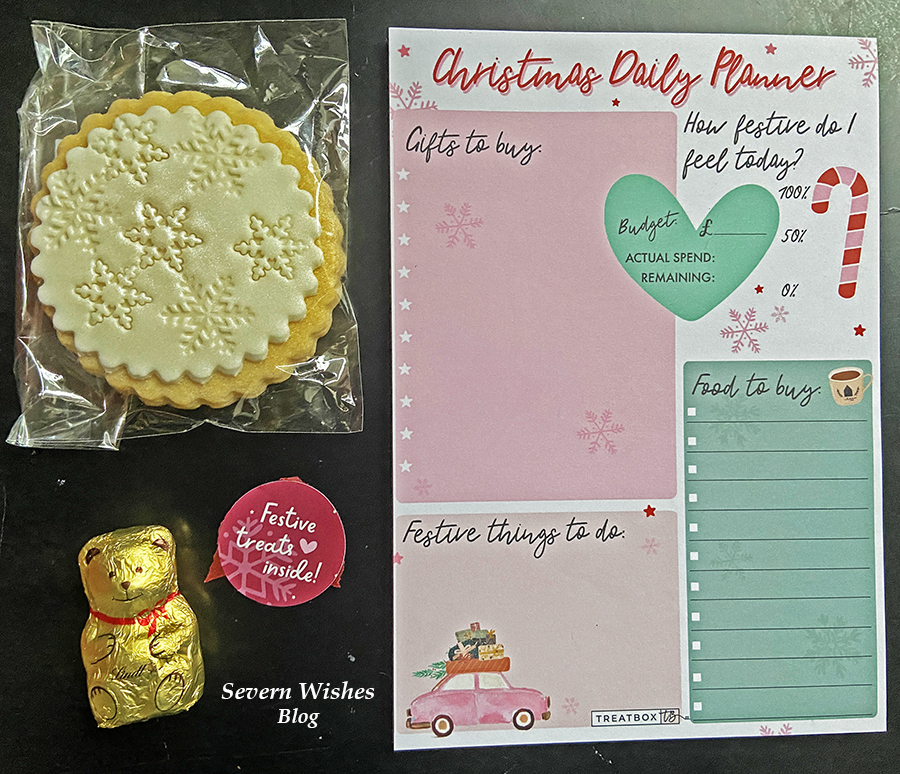
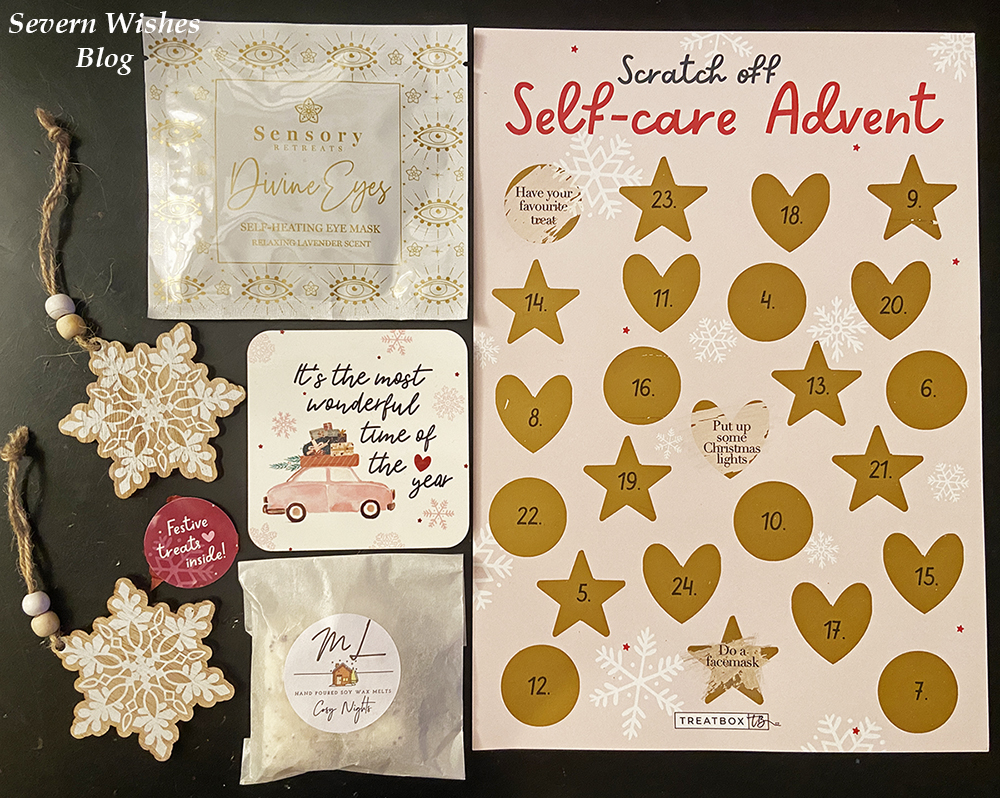
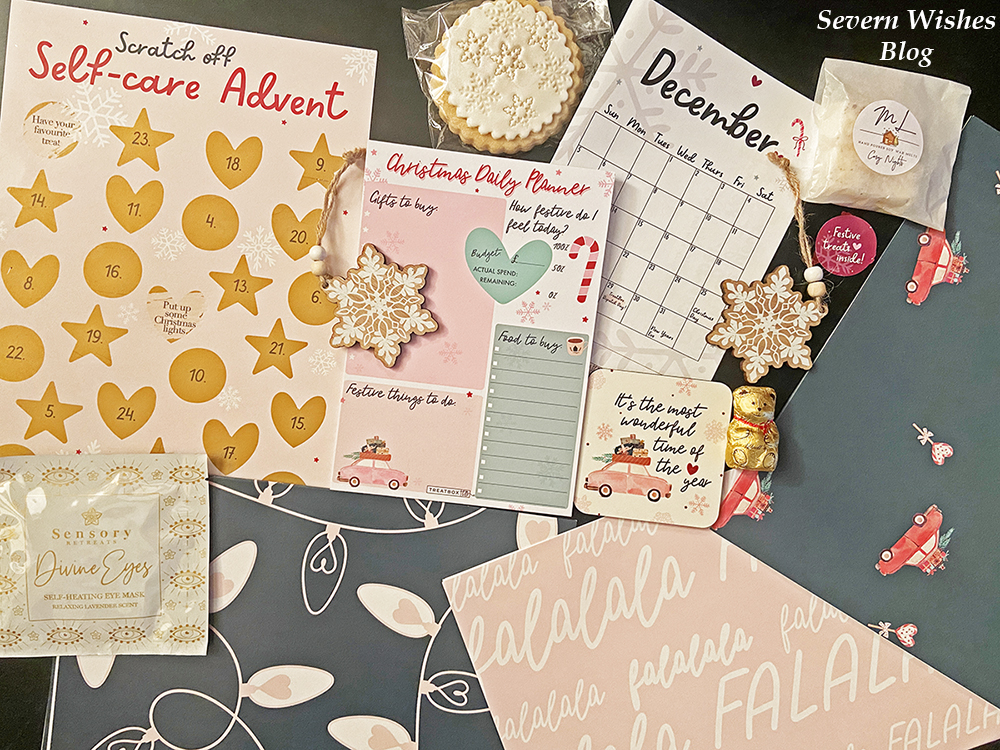
December Calendar Print Treatbox Wrapping Paper – 3 Unique Sheets Treatbox Scratch Off Self-Care Advent Card Two Wooden Snowflake Christmas Decorations Sensory Retreats Divine Eyes Eye Mask – Self Heating Treatbox Originals Christmas Daily Planner Notepad Treatbox Christmas Coaster “It’s the most wonderful time of the year” Tasty Treat of a Snowflake Biscuit Mrs L Cosy Nights Wax Melts Lindt Chocolate Teddy Bear
My Thoughts on the December Box
What a fantastic box! I really loved the contents of this month, from the wooden decorations to the organisation notepad and the fabulous TreatboxUK original wrapping paper! You can tell a lot of thought went into the preparation of this month’s box.The self care card was also pretty cool, although I kept forgetting to scratch it off and then would do two in the same day! Oops!
Overall I feel like this is a strong box, even those who don’t love this time of year would find it hard not to like the contents. Who doesn’t love a beautiful wooden snowflake or a tasty biscuit treat? I know I do! My favourite items are the decorations and the coaster. The quality of every single item in the box this month has been excellent. A great way to end the year of boxes and end TreatboxUK 2021 boxes on a high! I loved photographing this box and couldn’t decide which pictures to include in my Reveal so I chose them all! Enjoy! Have a great Christmas!
Wishing all who read this a happy and healthy end to the year. Thank you for reading this unboxing post and I hope Severn Wishes Blog has kept you entertained throughout the year.Please stick with us for 2022 because there are lots of exciting things coming up in the Spring time!
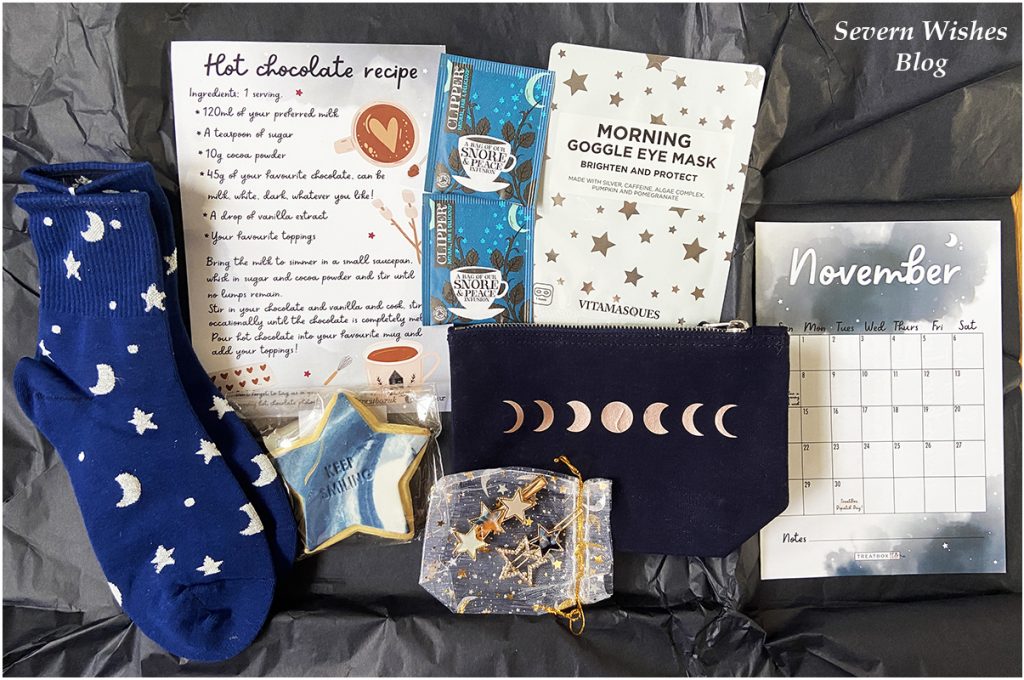
The time has quickly come around and here we are again with the start of a new month, meaning of course a new Treatbox Reveal and Review. The November Treatbox was a well thought out themed box with some new items never before seen in Treatbox! How exciting! Let’s see what was inside…
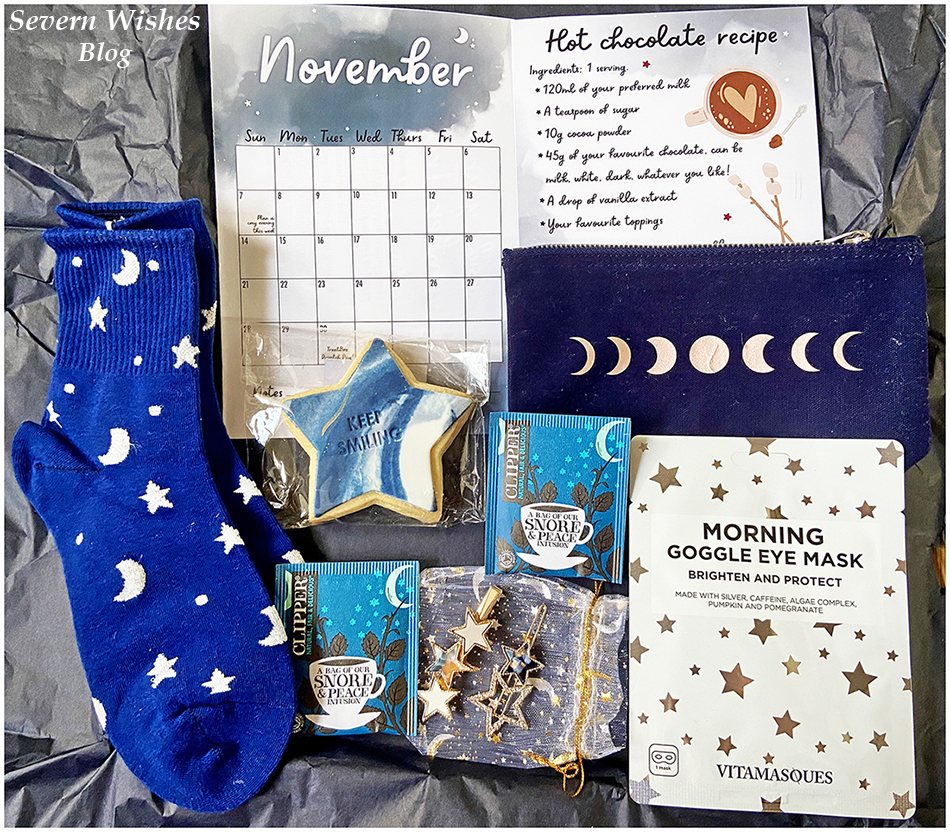
What was inside the box for November 2021?
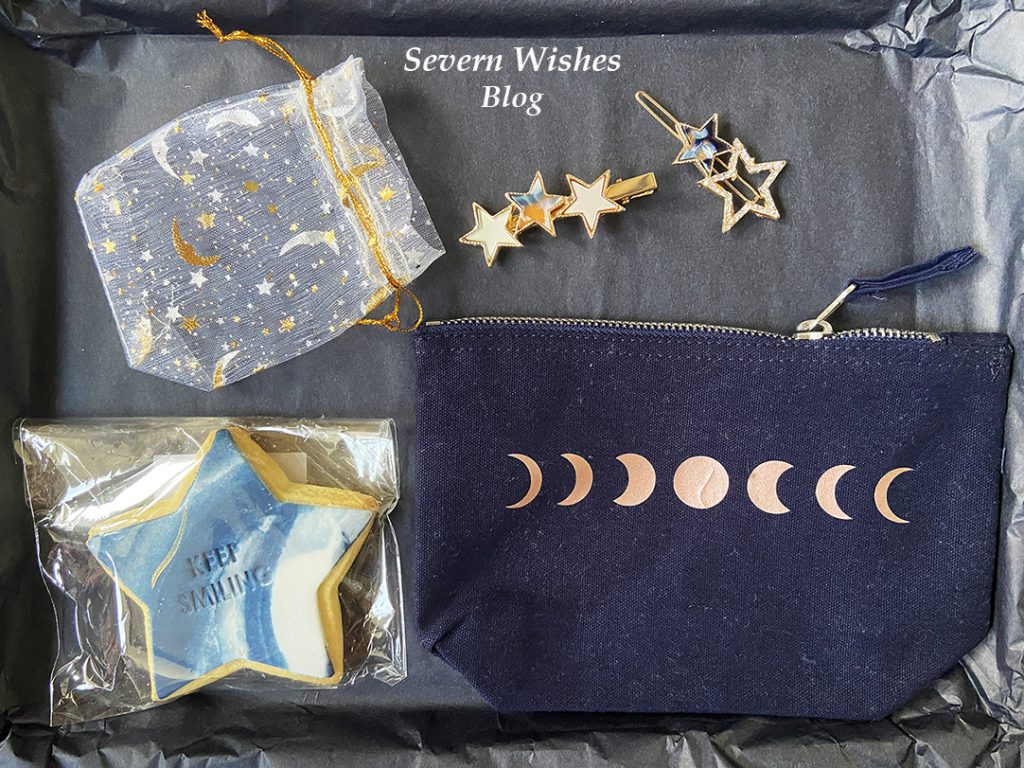
Blue Star and Moon Socks Two Star Hair Clips in an Organza Bag Treatbox Original Hot Chocolate Recipe Card Two Bags of Clipper Natural “Snore and Peace” Infusion Tea Vitamasques Morning Goggle Eye Mask to Brighten and Protect Gardner’s “Keep Smiling” Vegan Blue Iced Star Biscuit Treatbox Original Dark Blue and Moon Zip Up Pouch / Bag Treatbox UK November Calendar Print
My Opinion on the November 2021 Treatbox
I first want to say how much I loved the theme of this box, moons and stars, was really lovely!
The items were all of great quality, nice to see some Vegan friendly pieces and things we had never had before in a Treatbox! I am someone who loves to wear socks so I always enjoy getting new ones. I look forward to eating the Vegan biscuit and enjoying a cup of tea. I will also try the hot chocolate but I will make mine with dairy free milk 😉
The hair clips are very pretty and a nice treat to brighten your hair. I’m going to try the mask tonight in fact! I haven’t yet used the bag for anything but it is ideal for makeup or handbags.
Thank you for reading this Treatbox UK unboxing post, I hope you enjoyed it. I cannot quite believe that the next box will be the December / Christmas box and the last one of 2021!
Wishing all who read this a happy and healthy November!
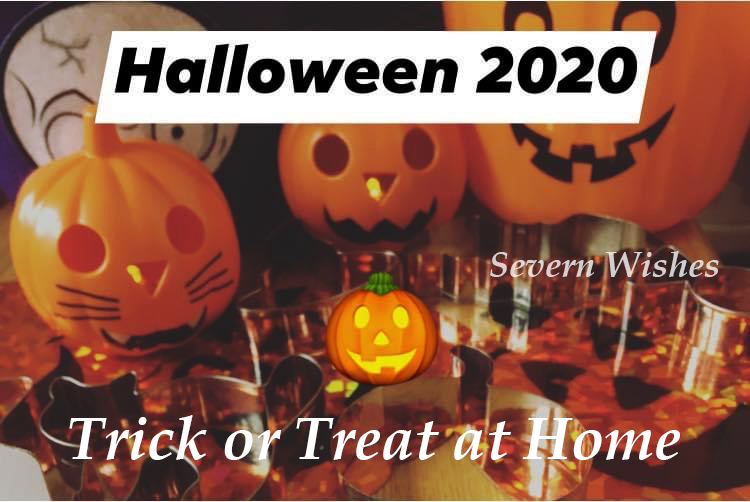
Halloween is one of those holidays where people either love it or loathe it. Whether or not you like Fancy Dress and Decorating your Home, it’s an important right of passage for your little ones to experience the fun of a Halloween.
If it’s their first Halloween then I have lots of ideas that you could achieve easily at home and make some nice memories and keepsakes to show the child when they are older.
With the pandemic still affecting us all, there are many children who would love to be trick or treating and having fun and games with their friends. It’s highly likely not to happen this Halloween 2020, however that doesn’t mean you cannot do things at home.
WHAT IS IN THIS BLOG POST… HALLOWEEN 2020
Fancy Dress Photo Shoot Fun – My Tips and Tricks
Hand and Feet Print Halloween Decorations – Fun Family Keepsakes
Halloween Games with Treats to be Found (at home) – My Lockdown Halloween Trick or Treat Ideas
Baking with Halloween Shapes – Fun Baking Tips for the Family to do together
What Else Can You Do With Halloween Baking Cutters as Stencils!
Fancy Dress Photoshoot at Home
One way in which I always like to remember a holiday event or day is to do a photo shoot. For the last two years I have dressed my son up and surrounded him with a variety of Halloween related items. I got some good photographs doing this at home that I can treasure. If you set it up correctly you won’t need to pay anyone to take photographs for you.
You Will Need
A decent camera or a phone with a decent camera A camera which has a timer if you want to do a family portrait Natural light coming through a door or window is best for colours Fancy Dress items and any props that you would like to include
My Photography Tips
Natural Light is important to get clear and sharp imagery.
Use fairy lights to add depth to your image (supervised around the child/ren of course).
Props are important and make sure you arrange them so they can be seen, if you’re going for a theme try and stick to it.
If you want things to be inside the frame then choose your layout carefully and keep looking through the camera lens as a guide.
A sofa or chair is ideal to sit a baby on or you could even use a ball pit or a rocker with a sheet over it to block out any unwanted branding or colours.
Set up your photo shoot before you get a baby ready otherwise they may get fed up rather quickly if you ignore them to move things around.
If you can get a large pumpkin or a cushion you can sit babies inside or on top, just make sure to always have their necks supported!
If you can’t pull off a Photoshoot then why not use some Free Filters on some Photo Apps. Some of them are highly detailed. We did one to show you just how cool! And if you have older children they might be more interested in that too!
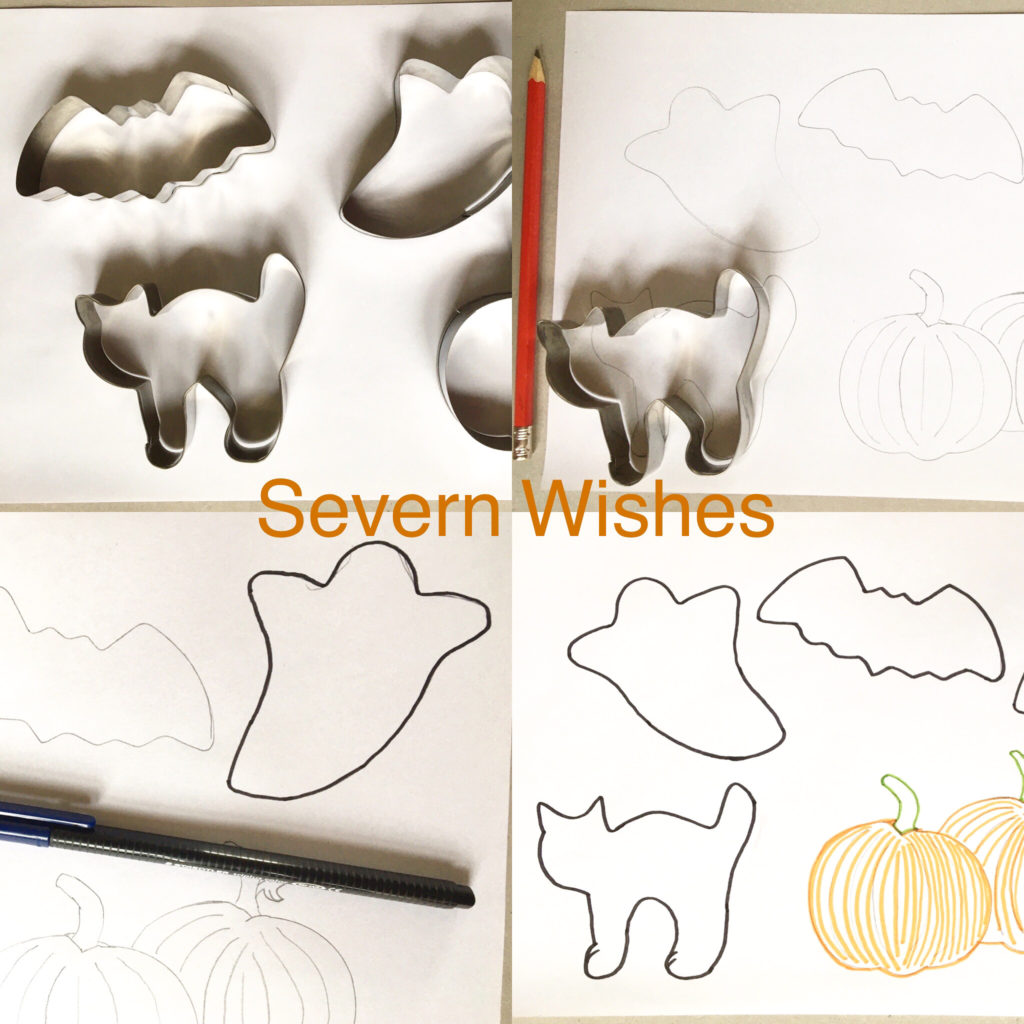
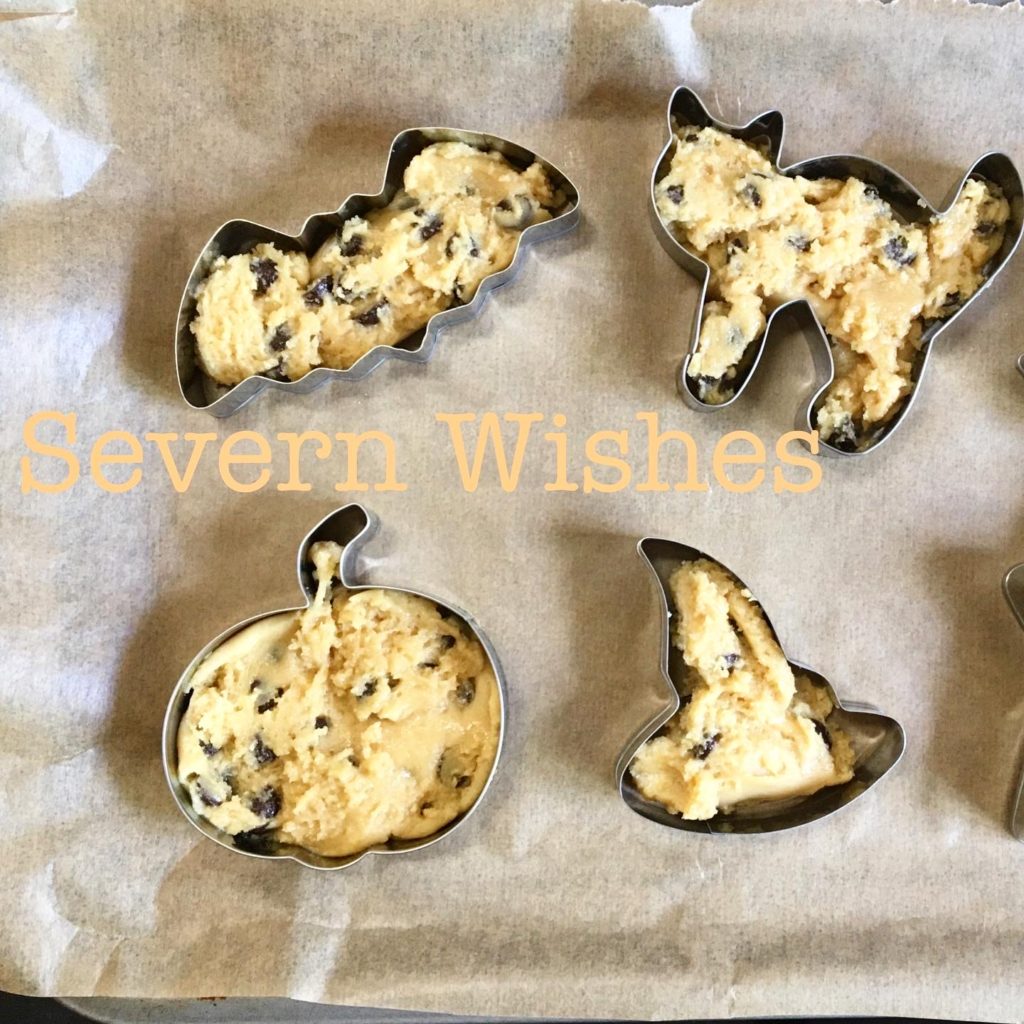
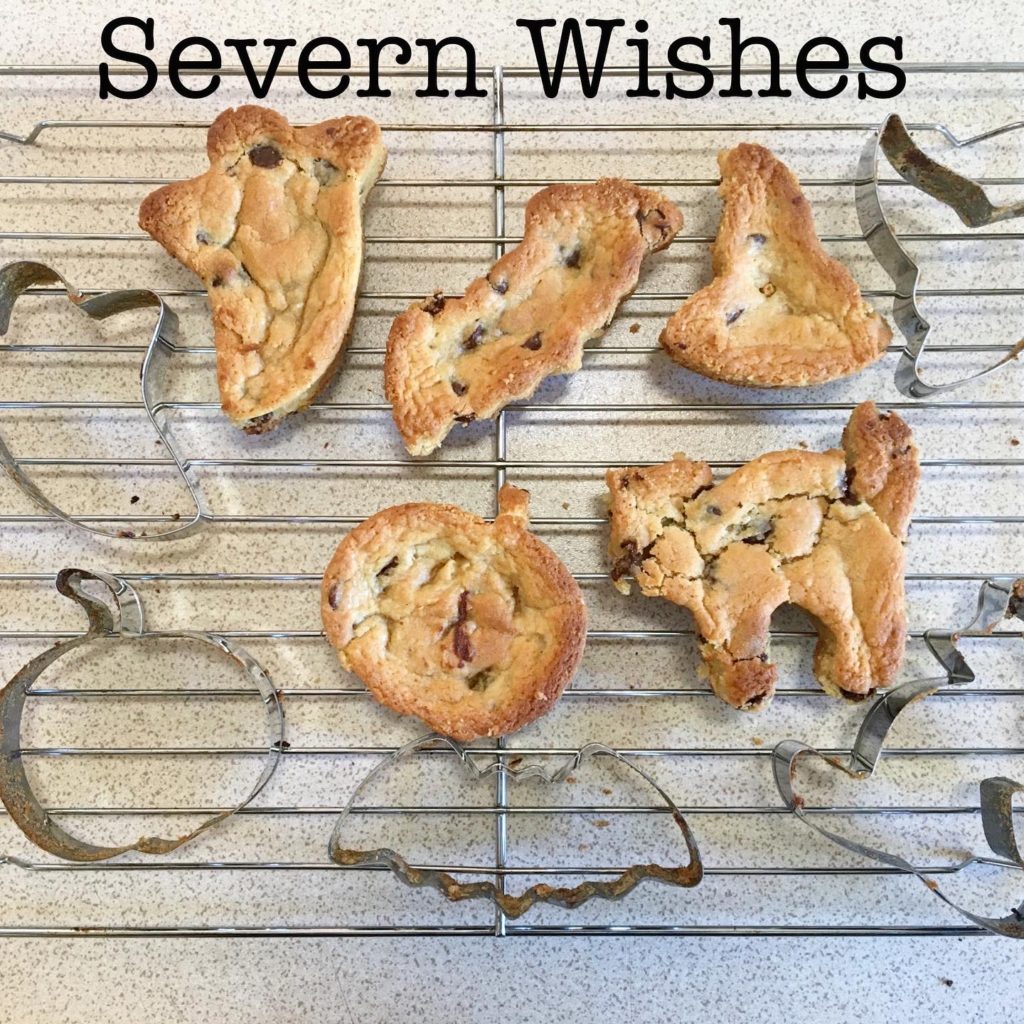
4 WAYS TO USE HALLOWEEN BAKING CUTTERS AS STENCILS
I’m not very good at drawing so using these cutters as outlines was a great idea for me! If you can draw well you won’t need to do this! Ha! Ha!
Halloween Decorations
Halloween Posters
Halloween Colouring In
Halloween Baking
I drew around the shapes and outlined them in pen, then let my child colour it in.
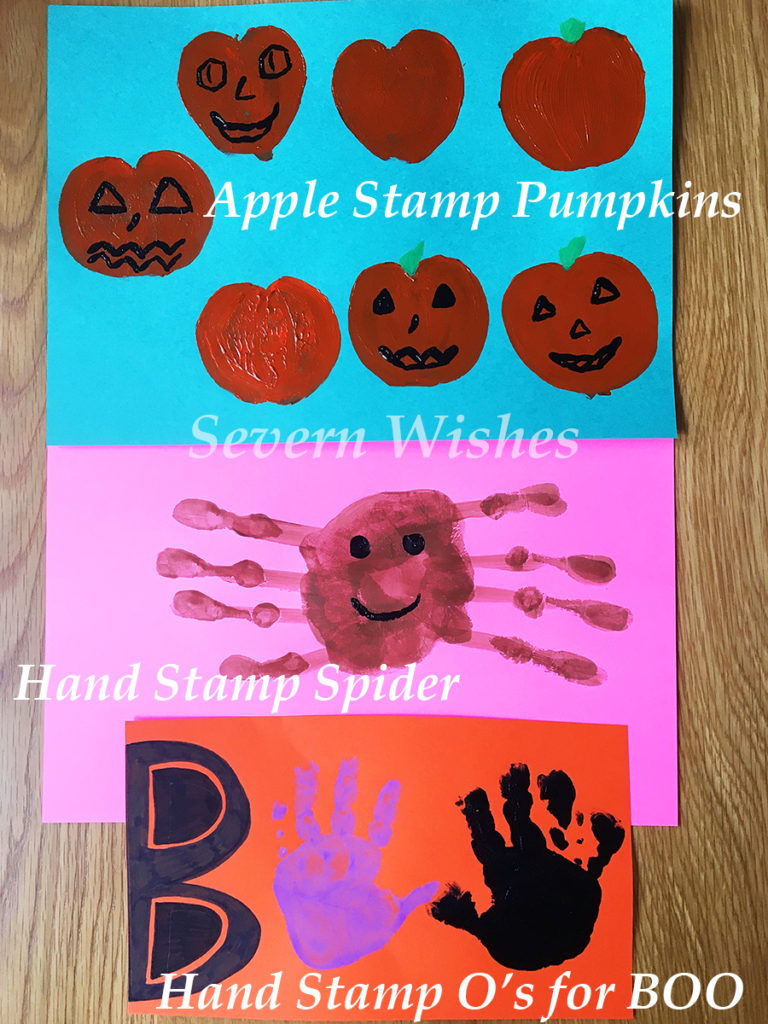
Halloween Decorations
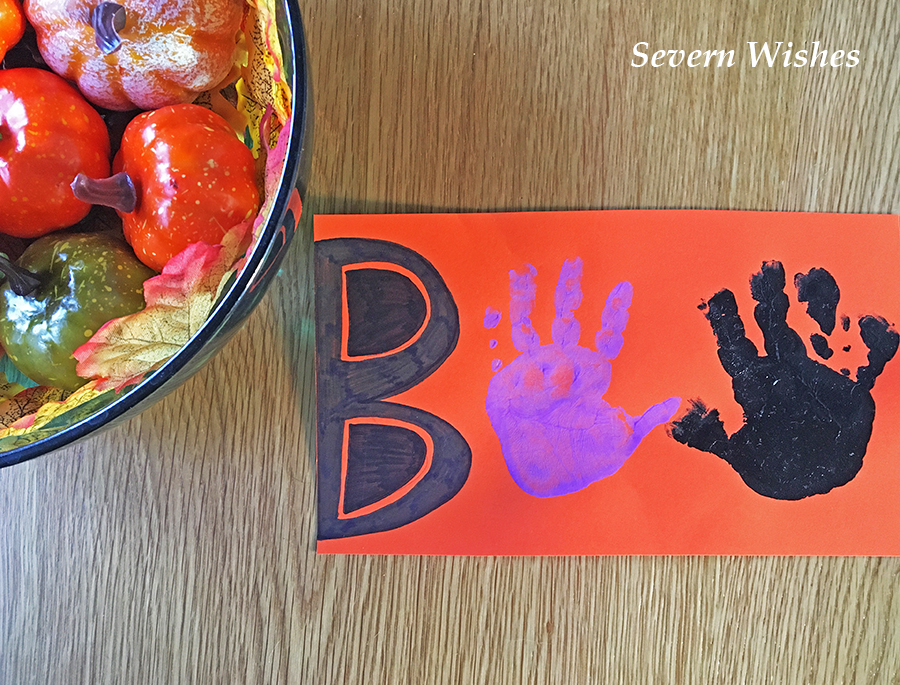
Making Halloween Decorations is easier than you think! So long as you have got some card and some paint. There are tons of ways you can make nice posters or decorations. Here is how I have made mine…
Pumpkins – Apples Halved and Dipped in Paint. Spider – Hand Prints leaving off the thumb so fingers make 8 legs. BOO – B and two hands for the O’s. Ghost – Foot Print (upside down)
I’m planning to cut out the Pumpkins once they are fully dry and hang them up against my window.
You can make a Halloween poster for your window or you can cut the items out and hang them up with string.
Trick or Treat at home won’t be the same, but it can still be fun! Check out my ideas below!
1. Make Every Room A Different Theme with a Different Sweet to Find. You can tailor them to meet the needs of your family, no choke-able sweets for little ones etc. If you don’t do Sweets you could use Numbered Fruit like Apples which result in a Toy prize if they find them all.
2. Make It A Halloween Treasure Hunt with the Treasure being Sweets! Write little clues on paper for the kids to follow. Create traps and fun obstacles for them to overcome, riddles and rhyming works well too! “Where you Sleep, Often Deep, Beneath the Covers is what you Seek!” things like that, E.G Under their bed covers is a Sweet or another Clue.
3. Use A Dice And Clues to Make a Halloween Game of your Own! Using how many rooms you have and how many children, you can send each child off to a room where they have to either complete a task or seek and find the next clue, which once put together with their siblings answers, will reveal their bounty of Treats! E.G Two Siblings, they each find a clue on paper, one reads KITC and the other HEN and when put together they go to the KITCHEN for the next clue etc.
HALLOWEEN BAKING
I have done some step by step baking videos on my Halloween cookie baking and these are available to watch on my Facebook page, I will drop you the link here Severn Wishes on Facebook.
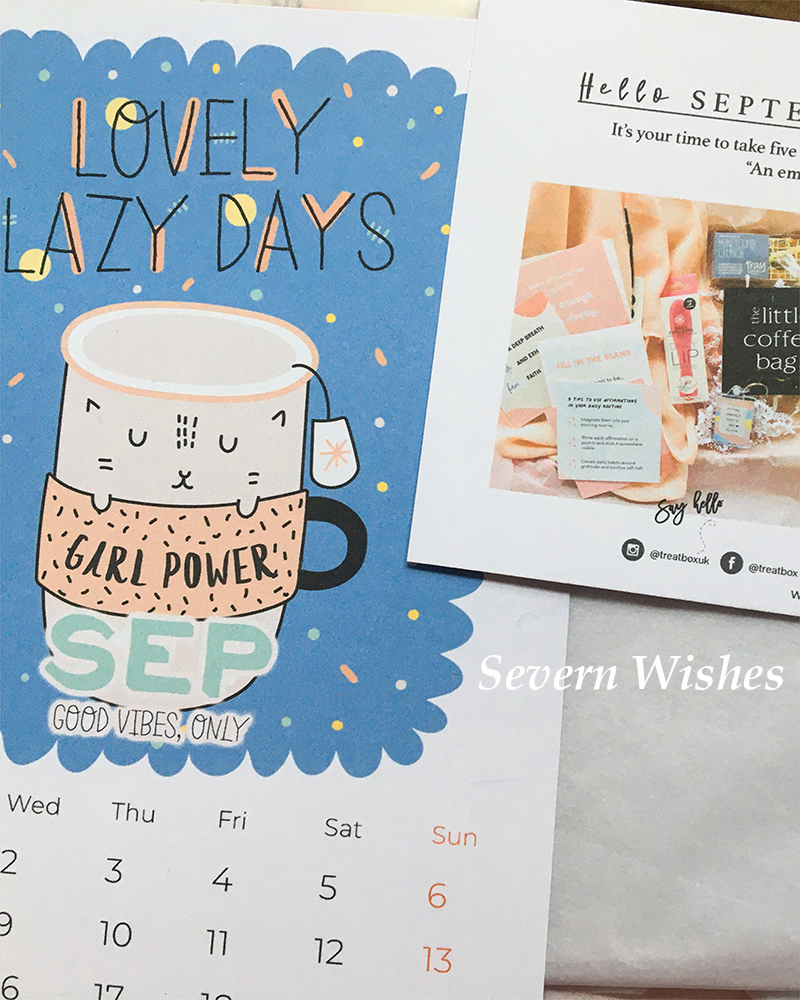
Welcome one and all to the September Treatbox Reveal and Review!
My apologies for this post being so late in the month, there was a mix up with my box so I have only justreceived it! But what a fabulous box of treats it is!
Read on to find out exactly what!With pictures too!
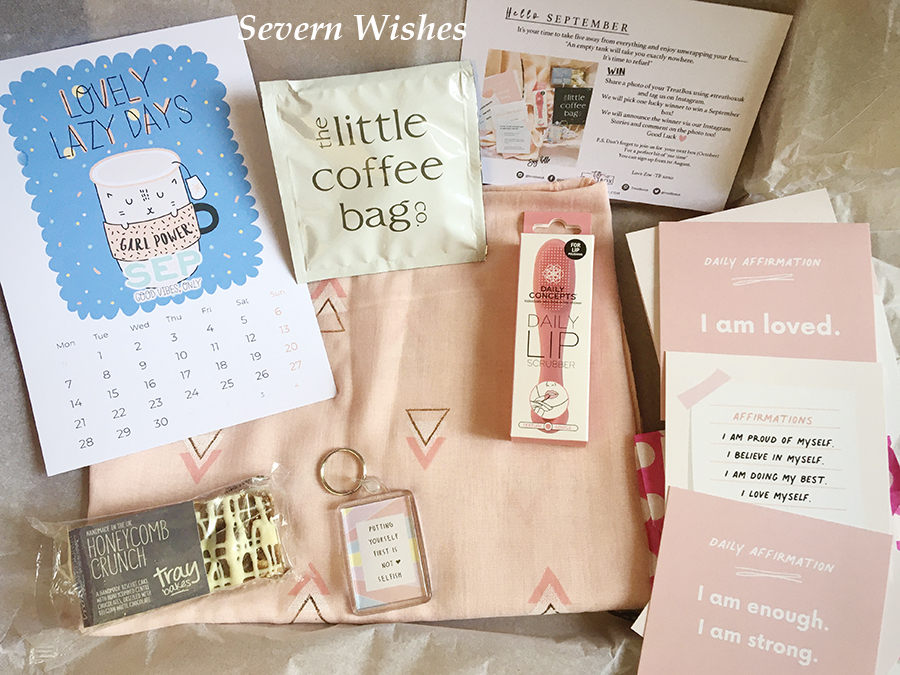
SO WHAT IS INSIDE THE SEPTEMBER BOX?
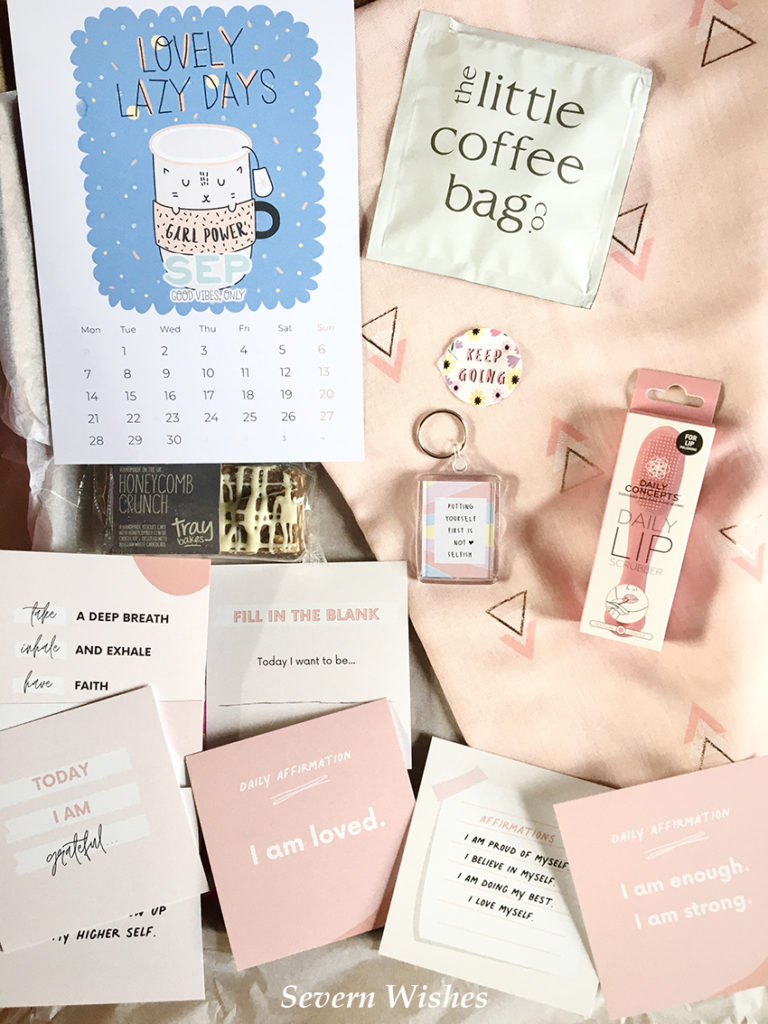
An awesome and very cute Calendar Print (Yay!)
A beautiful Scarf, blush Pink with patterns of Hearts or Chevrons (Picked at Random) (It’s so soft!)
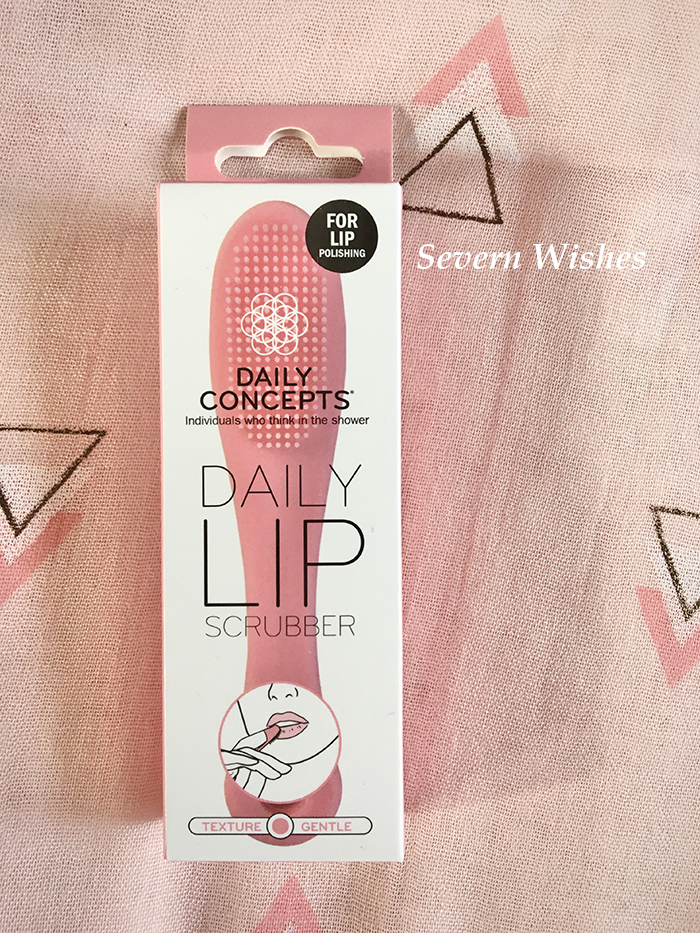
Daily Concepts Daily Lip Scrubber
Tray Bakes Honeycomb Crunch Bar (Mmm!)
the Little Coffee Bag Co. Black or White Coffee Bag
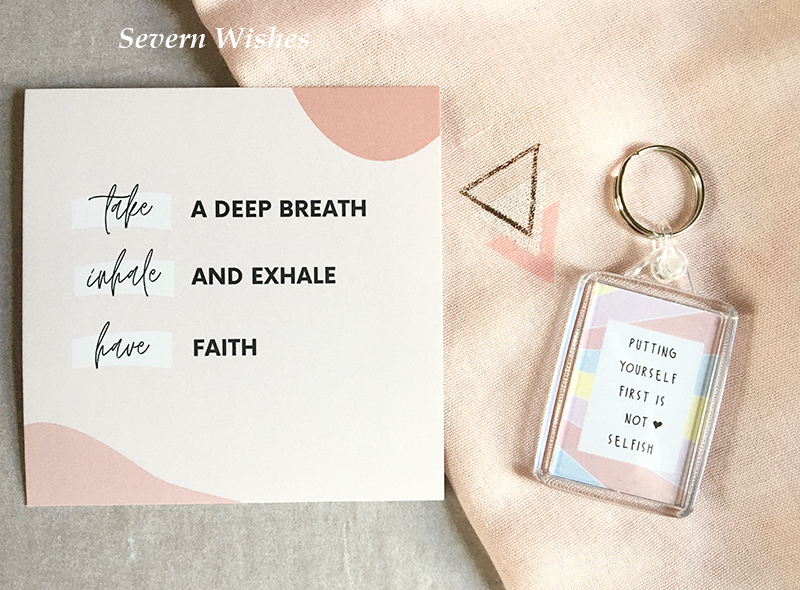
Treatbox Unique Key Ring with Inspirational Quotes
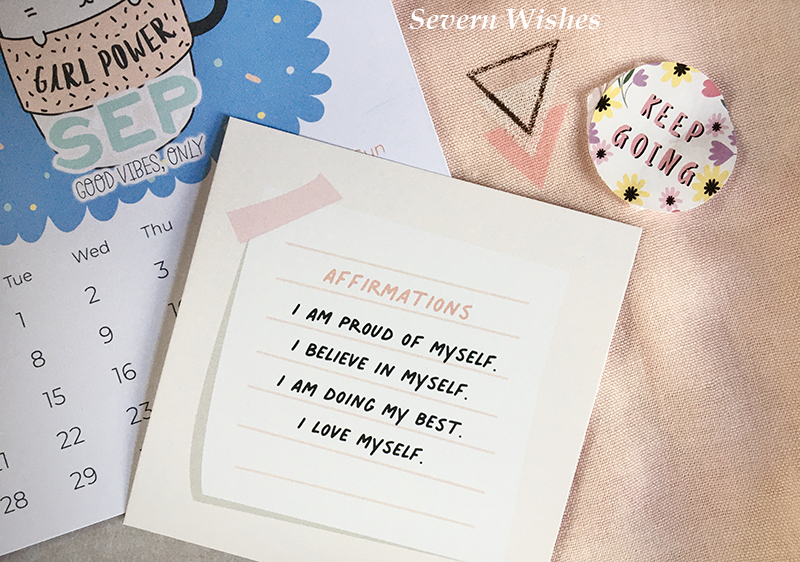
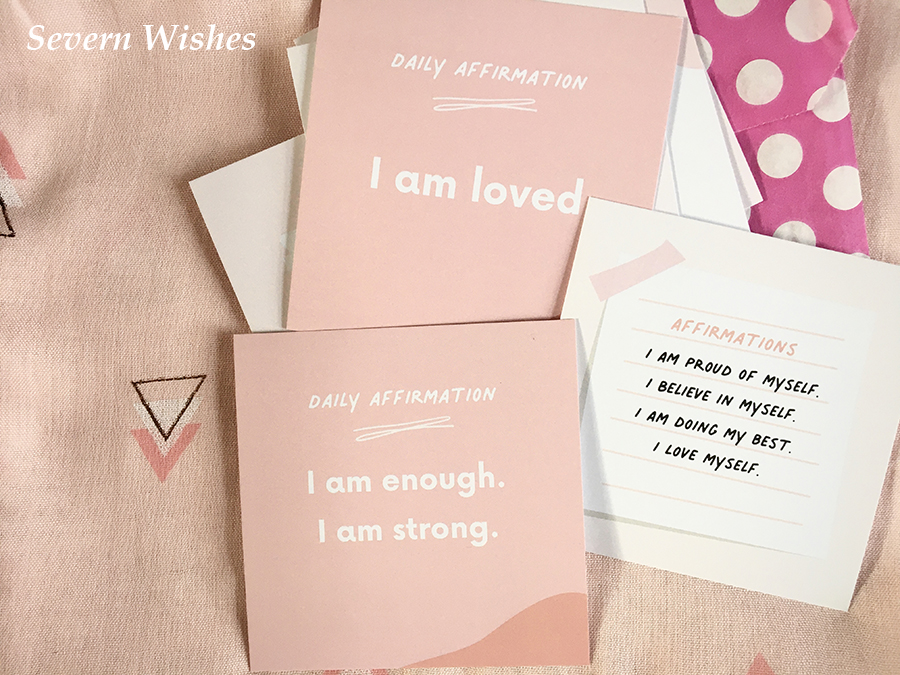
Paper Bag of Treatbox Special Daily Affirmation Cards
What Do I Love Most In This Box?
I cannot express how happy I was to see the Calendar Print! I love it too being a Cat related image! It has gone straight on to my Fridge. I do hope this will be a regular occurrence again! If so, then fab! I adore the scarf it is both pretty and soft, and the pattern is versatile enough to go with anything in my wardrobe.
The Lip Scrubber is really useful and a very handy product considering we are now entering into Autumn and Winter. A good idea to have in your bathroom in case of dry lips!
I haven’t eaten the Treat Bar yet, but it sounds delicious! And I have gifted the Coffee Bag to my Mother who adores her Coffee, I am not fond of it in all honesty. I’m sure she will enjoy it!
The Affirmation Cards are wonderful! Just when you need a pick me up they are right there. Wonderful quaint designs and they say all the right things. I have popped two of them on my fridge along with my calendar, because as someone who is currently working through a low self esteem, it’s really nice to have reminders such as, “I am enough” and “I am strong” etc.
I love the pink theme this month, to be honest the whole box is well thought out. I am also ecstatic because there isn’t a face or eye mask in sight! Hurrah! *Dances* I really hope this is a good move and a turning point, because if it is then I am happy to continue my subscription. I want (as I’m sure many of you do) a Treat to eat or drink, something to cherish or wear, something to do and enjoy and something to inspire. The calendar print I would love to see return, as I would also love to see A5 prints perhaps. I have a few of the A4 ones from the last 3 years of boxes framed around my home and I still adore them.
I am very much looking forward to my October box now, I hope it is full of inspiring things and perhaps an Autumnal theme…
If you want to read any of my reviews on previous boxes then please click the category Treatbox.
Thank you for visiting Severn Wishes today, I hope you have enjoyed the Review of this September Treatbox. I hope to see you here again soon for another one of my Reviews.
In these uncertain times it’s nice to have a box of joy arrive on my doorstep, I very much love how Treatbox does that.
✩ Sabrina ✩
Check out my previous Treatbox unboxing posts in this unique category of mine called ‘Treatbox’ it is specifically for these box reviews and reveals – Severn Wishes Treatbox.
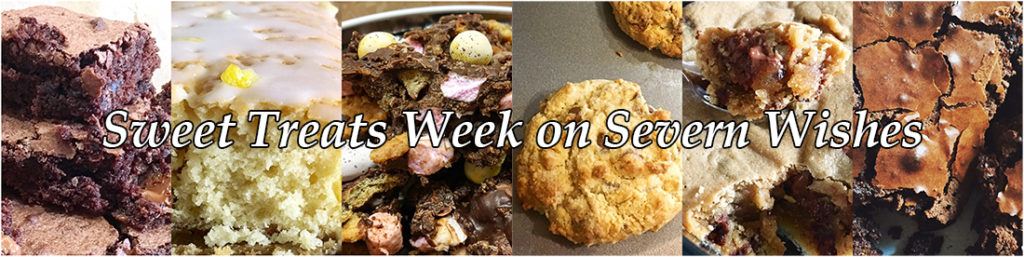
Welcome to Sweet Treats Week on Severn Wishes. This half term I wanted to share my top 5 baking treats with you all, hopefully you’ve got some time this week to make them with me! Check out my Instagram for more food pictures and recipe ideas too!
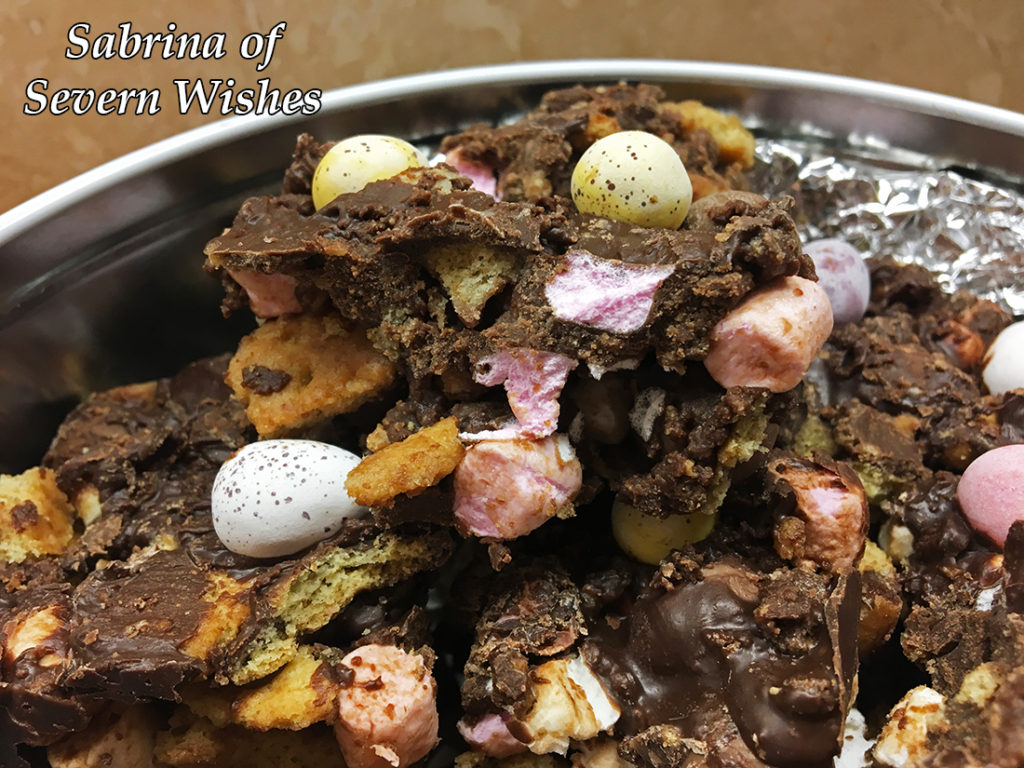
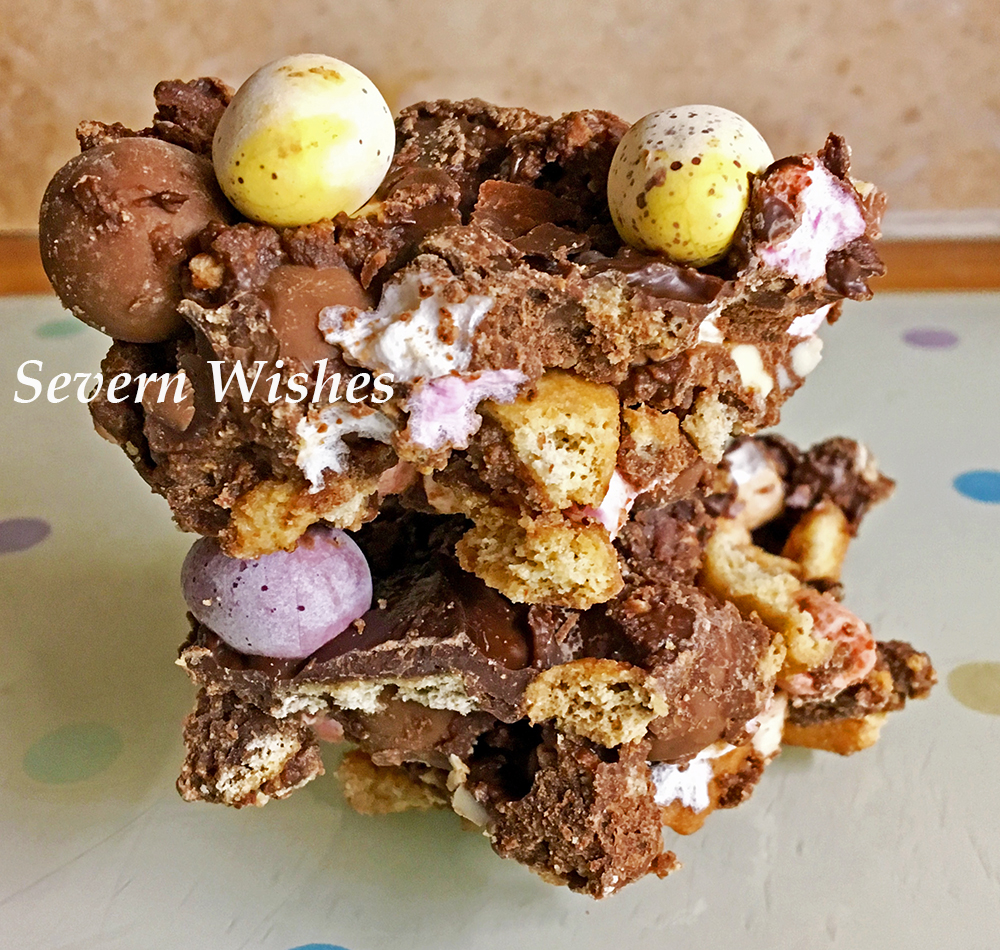
Day 3 is Sabrina’s No Bake Needed Rocky Road
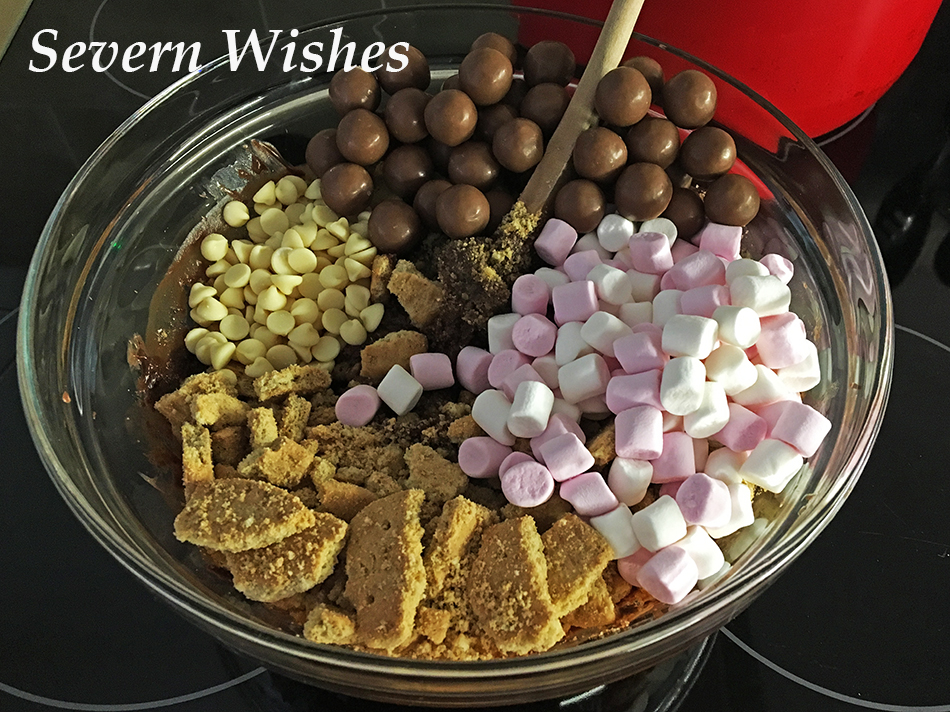
Definitely one that the kids can get involved in, and this tray bake requires zero baking! You just need an adult to do some melting and chopping! This recipe will make 24 delicious squares of Rocky Road and you can do a custom set of ingredients to suit your family too!
Start by gathering all of your favourite things and a giant bowl to mix them! You’ll need chocolate for melting which will be the glue to hold all of the other ingredients together! You also need a deep tray to squash it all down into before you refrigerate it too!
The best thing about Rocky Road is that it’s totally customisable to your family and you can’t really get it wrong! Plus it’s fun for everyone! There’s only one danger with Rocky Road! Just don’t go eating all the singular ingredients while you’re making it!
I love to put things in mine you don’t usually find in a supermarket style tray bake, sometimes you find Nuts and I don’t put any of those in, some also contain fruit, which is a personal preference to whether or not you add this in. I will outline all the measurements below, and you can make your selection of your favourites.
Step 6.
What You Will Need
A Large Mixing Bowl – the bigger the better! A Wooden Spoon or Two A Saucepan (to do the melting part) A Spatula A Sharp Knife Tea Towel and Rolling Pin (Or something to smash the biscuits with) Baking Parchment to line your tray A Large Tray that will still fit in your Fridge minimum of 1.5 inches deep
Ingredients
Mini Marshmallows 50g to 60g Maltesers or Honeycomb Shards 50g to 60g White Chocolate Chips 30g to 40g Biscuits 150-200 grams (You can use a mixture of biscuits like I do, Digestive, Shortbread and Ginger are my faves, Ginger give a nice taste!) ☆ Milk Chocolate (for the melting) 250 grams Dark Chocolate (for the melting) 120 grams Butter (for the melting) 140 grams Golden Syrup (for the melting) 4 tablespoons
Additional Ingredients to Personalise your version of Rocky Road
Your “Special Ingredient” can be anything, between January and April I tend to use Mini Eggs or other Easter related Mini Chocolate Eggs etc. I just cut some of them up for going inside the bake. Other things that go well and add colour are Smarties, Aero Bubbles anything that sort of size etc.
Use around 70g to 100g of your chosen ingredient and remember to save around 30g of it for the topping!
You can also add any of the following things that all go brilliantly with this type of non-bake recipe – Cherries / Cranberries / Nuts / Raisins etc…
You will need 50 grams of your chosen one/s and make sure you then increase the depth of your tray by half an inch / 2 cm if you decide to include more than one of these ingredients. You could also choose to remove say, the white chocolate from my main list, and add in Raisins instead, just keep the ratio the same…
The customization is all down to you and your family! Go crazy! Have fun!
Method
1. Measure out and then Crush the Biscuits into mixed bite size pieces and add them to a large bowl.
2. Next, gather all your additional ingredients as outlined above, measured correctly and add these to your large bowl. The aim is to then mix all these dry ingredients together so they are evenly distributed.
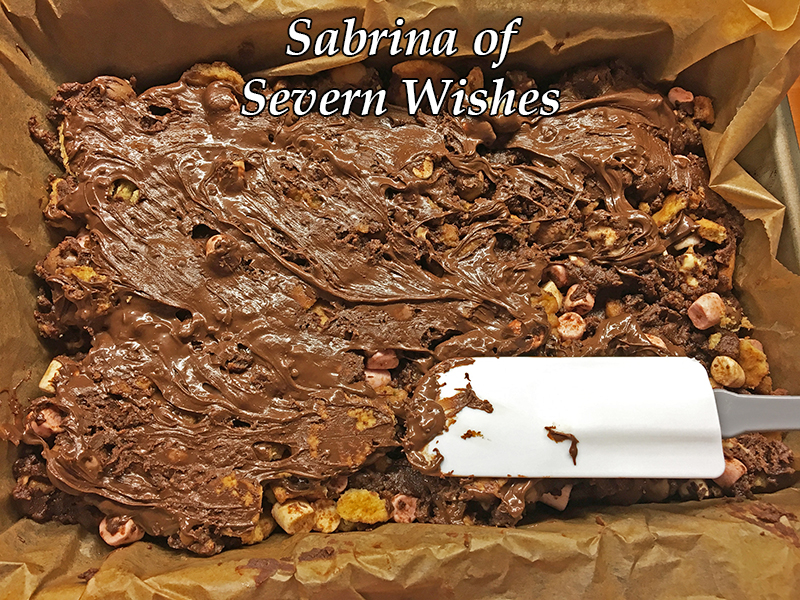
3. Melt the Milk and Dark Choc with the Syrup and Butter until Smooth. Set 150ml of this melted chocolate mixture to one side in a jug to cool a little (you need this for the top of the mixture).
4. Add your melted mixture from the saucepan to your large bowl, coating all of the dry ingredients, keep mixing it quickly but carefully. You need to cover all of them in a light chocolate covering before it cools down too much.
Step 5.
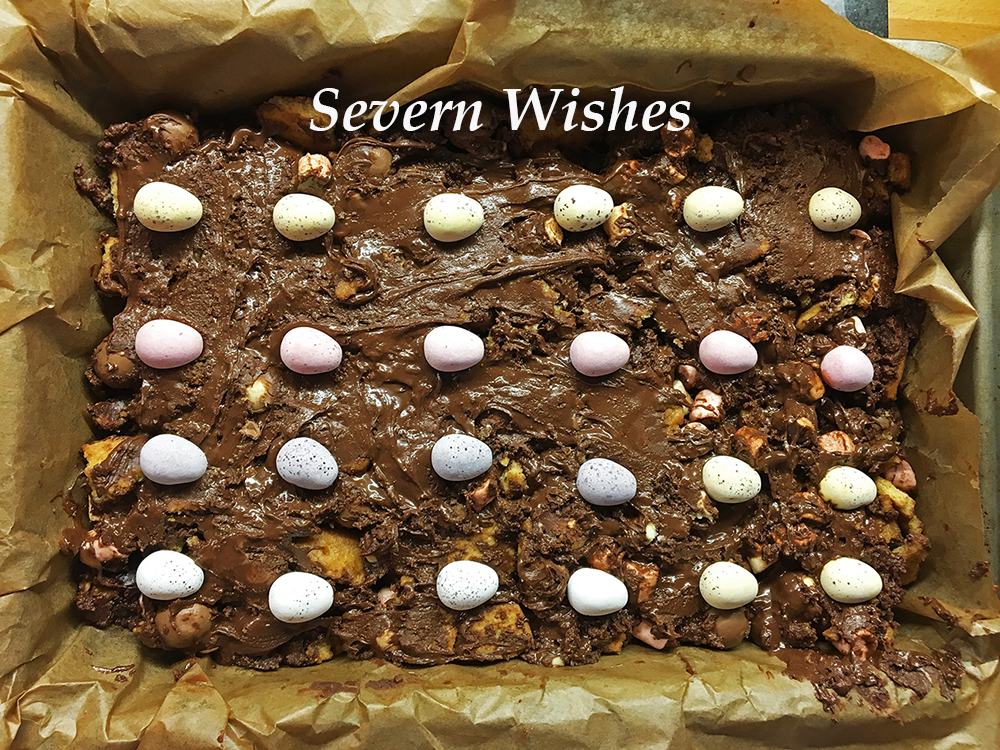
5. Transfer from the bowl to the tray making sure the parchment is already lined inside it and smooth the rocky road out as flat as possible, push it down gently using a wooden spoon. Then pour the remaining melted chocolate (from the jug) over the mixture and smooth that all over the top with a spoon or a spatula, you need to try and coat most of the mix if not all of it, TOP TIP don’t forget to coat up to the corners!
6. Finally add your chosen Chocolate Decorations like Mini Eggs. Push them down a little so that they stick to the melted chocolate. Score the pieces of size you want to cut once it’s solid, using a knife (adult part only). Then put the whole tray in the fridge to set for a couple of hours.
7. To serve it, gently remove the paper from the baking tray, lay flat and cut the Rocky Road where you scored into it earlier, do this using a knife that has been run under hot water (another adult only part). Remember to put the pieces into a seal-able tin or tub afterwards to make sure it stays fresh. Once set and cut you just store it at room temperature, for the best results eat it within 3 days.
Step 2.
Thanks very much for joining me for this recipe on Sweet Treats Week! I do hope to see you here again tomorrow! See my social media for some videos while I am baking these as well! Including versions and what I use to make my bakes dairy free too!
If you make any of my recipes be sure to tag me on social media, leave me a comment here on my blog. Any questions about a recipe please don’t hesitate to ask them! If you recreate this recipe somewhere else please credit me for it and name me and my blog, or even better link back to this original post too! Thanks everyone!
✩ Sabrina ✩
By continuing to use the site, you agree to the use of cookies. more information
The cookie settings on this website are set to "allow cookies" to give you the best browsing experience possible. If you continue to use this website without changing your cookie settings or you click "Accept" below then you are consenting to this.