Sabrina is a Lifestyle, Parenting and Product Review Blogger. A Writer, Photographer, Reviewer, Home Cook, Crafter & Nature Enthusiast. You will find a bit of all those categories here on Severn Wishes Blog, Welcome to Sabrina's Lifestyle Blogging & Honest Reviews.
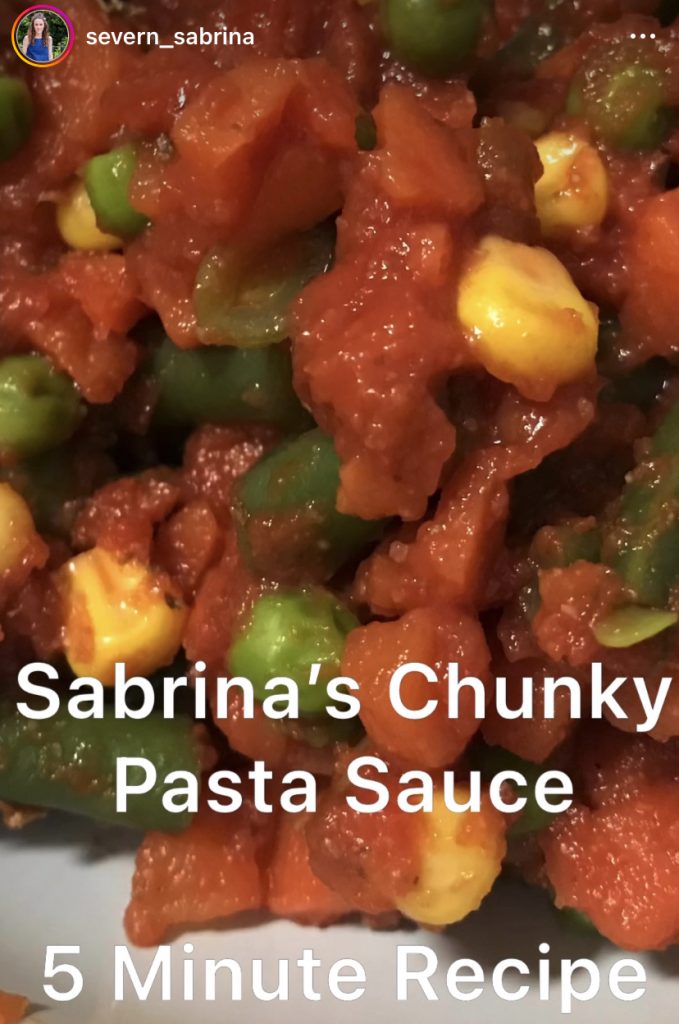
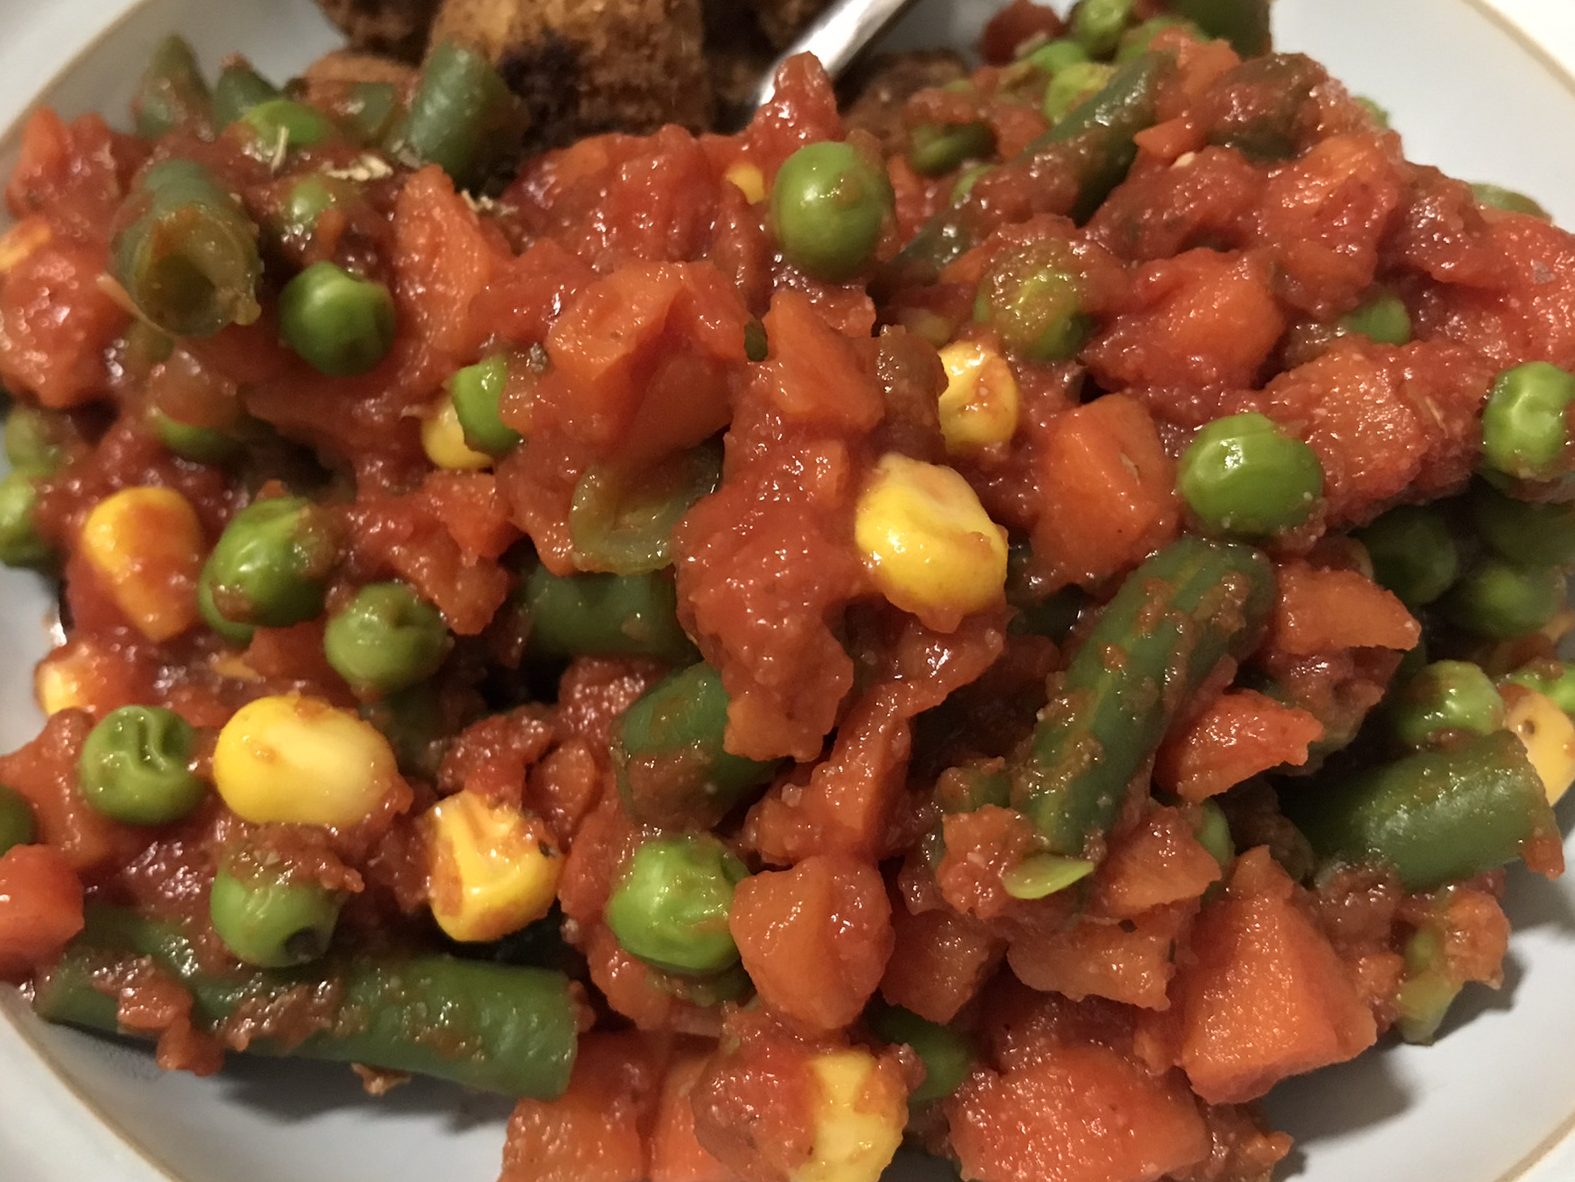
Sometimes all we want is a quick evening meal after a long day, so we decide on a fast cooking protein and/or carbohydrate like pasta but we then need a sauce. Only we open up the cupboards and find no jars in sight! Well fear not if this is you every once in a while! Because with my 5 minute sauce you’ll be serving up your food in no time!
Pop your pasta or rice or whatever else on to boil in the background. Then search your fridge and cupboard for any of the following items;
Tomato Puree Salsa (Mild or Hot) Chopped Tomatoes Salt and Pepper Italian Herbs or Herbs you like or Garlic too Vegetables – Frozen or Fridge in rough chunks Onion – Diced (Optional)
Step 1. If you have any onion fry this off in a saucepan until soft.
Step 2. Add 200ml of water to the saucepan now and add a small cup of chunky vegetables per person, easy if it’s out of your freezer but in case it isn’t… Any veg will do like peas or carrots! Just make sure if it’s fresh it’s washed (and carrots peeled) and then cut into small chunks. Add more water now just enough to cover the vegetables and bring it to the boil.
Step 3. While your veggies cook you need to make the sauce part, take all of your chosen ingredients out and put them next to your cooker, also get a tablespoon to measure with. Open any tins that you have like chopped tomatoes and wait for the veg to soften.
Step 4. Once the Veggies are soft carefully drain the water away from your saucepan, then place it back on to the cooker and begin to add the sauce elements. Step 5. Add in 2-3 Tablespoons of Salsa, 2-3 Tablespoons of Tomato Puree. Season to your taste with herbs, pepper, garlic etc. A sprinkle of salt is all you need.
Step 6. Mix this all together and now add in your chopped tomatoes, stir well, then return the saucepan to the heat and cook for another couple of minutes until it is hot throughout.
Step 7. Serve with your chosen accompaniment like Pasta, Rice or a Meat like Chicken.
Sprinkle some (I have Dairy Free) Cheese on top too if you like! Delicious!
Thank you for reading this Recipe Blog Post today!
I hope you have a great start to your week.
If you make my chunky pasta sauce I would love to know what you thought of it!
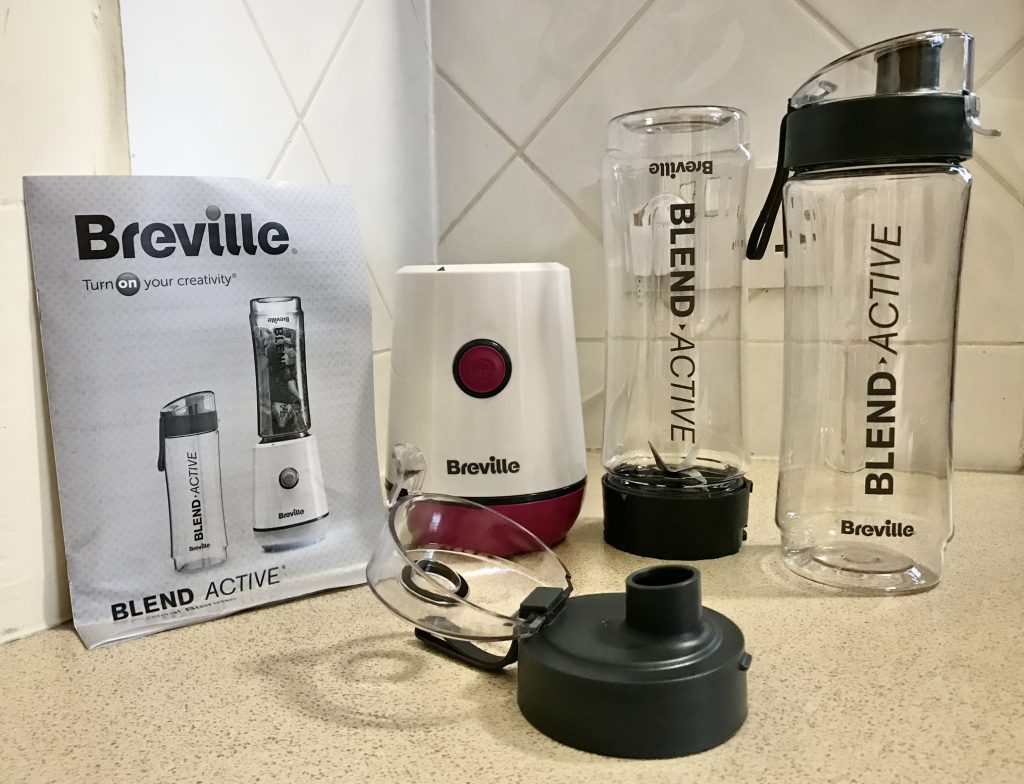
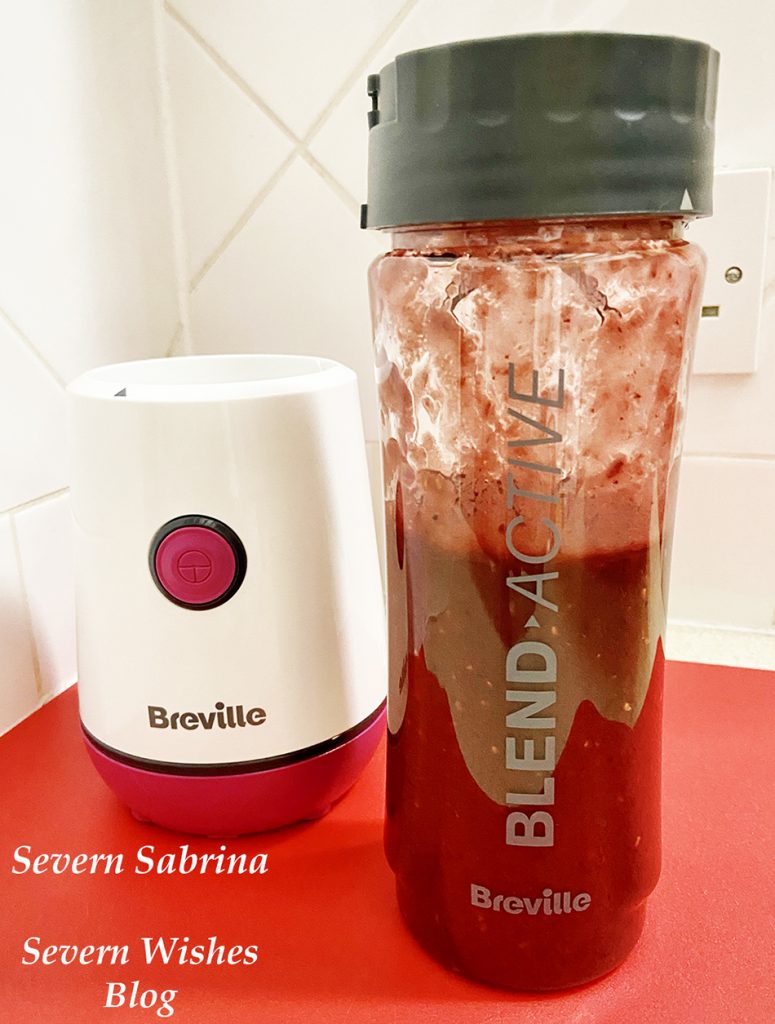
Hello! I’m Sabrina! And I am an Argos Tester, this means that I often get items sent to me for the purpose of an online review. I thoroughly test products and take photographs of them before submitting my findings and honest thoughts over to Argos. This latest campaign was to test a brand new Breville Blender and I jumped at the chance to do so, mainly because I hadn’t replaced an old blender when it broke around three years ago.
#ArgosTester #ArgosTesters #ArgosTestersCommunity
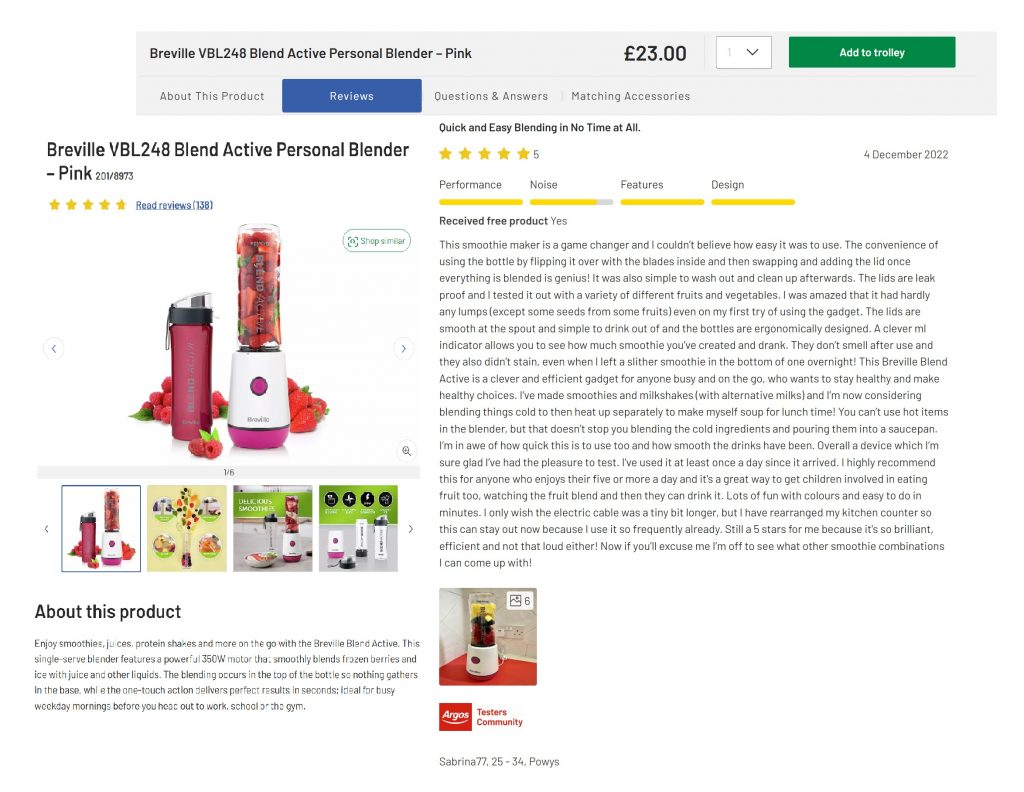
I have written this article about a product that I have been supplied for free, in order to test and then review it. This is my experience with said product and it is my honest review about the product listed below. I have already submitted my review to the Argos Website, and it has been accepted on to live public view when this blog post has been published. Please see my review on this screengrab below from the Argos website.All words and photography below this screengrab are my own.
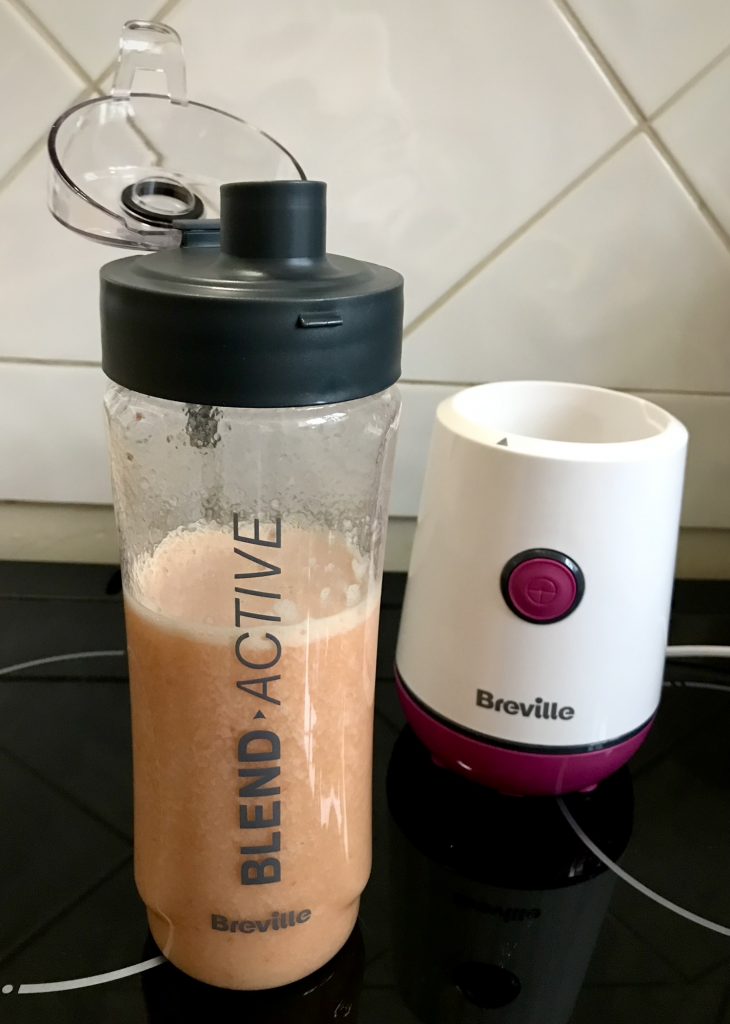
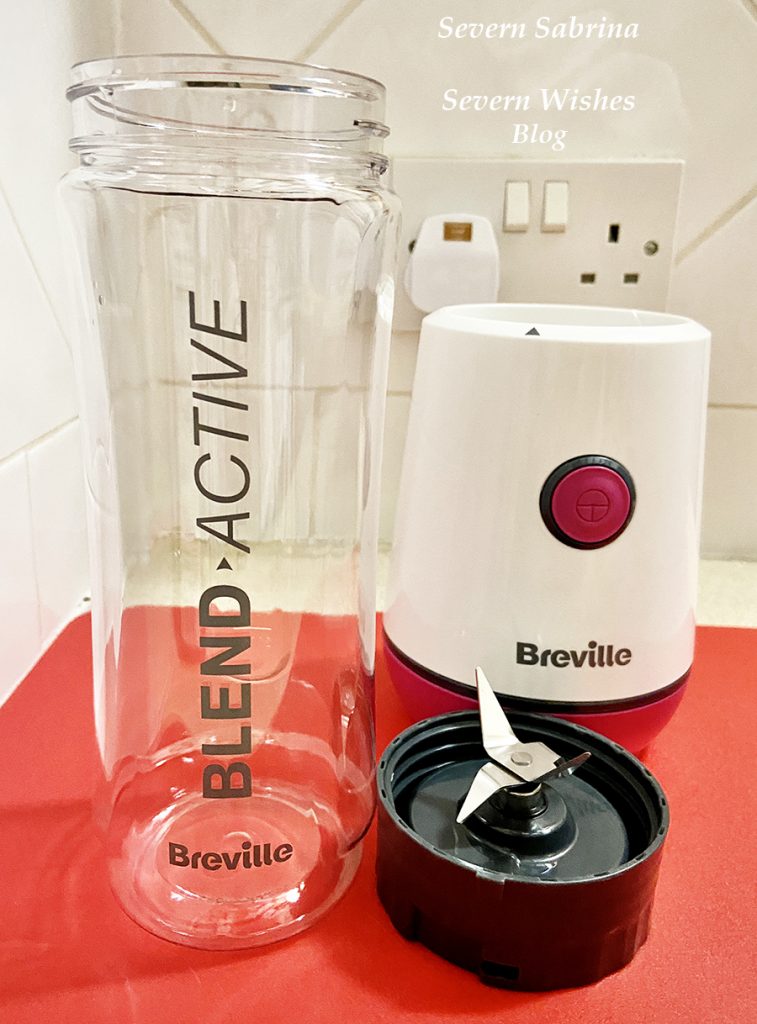
Product Name: Breville VBL248 Blend Active Personal Blender in Pink (also available in Green) Product Price: £23.00 Product Link: Argos Website
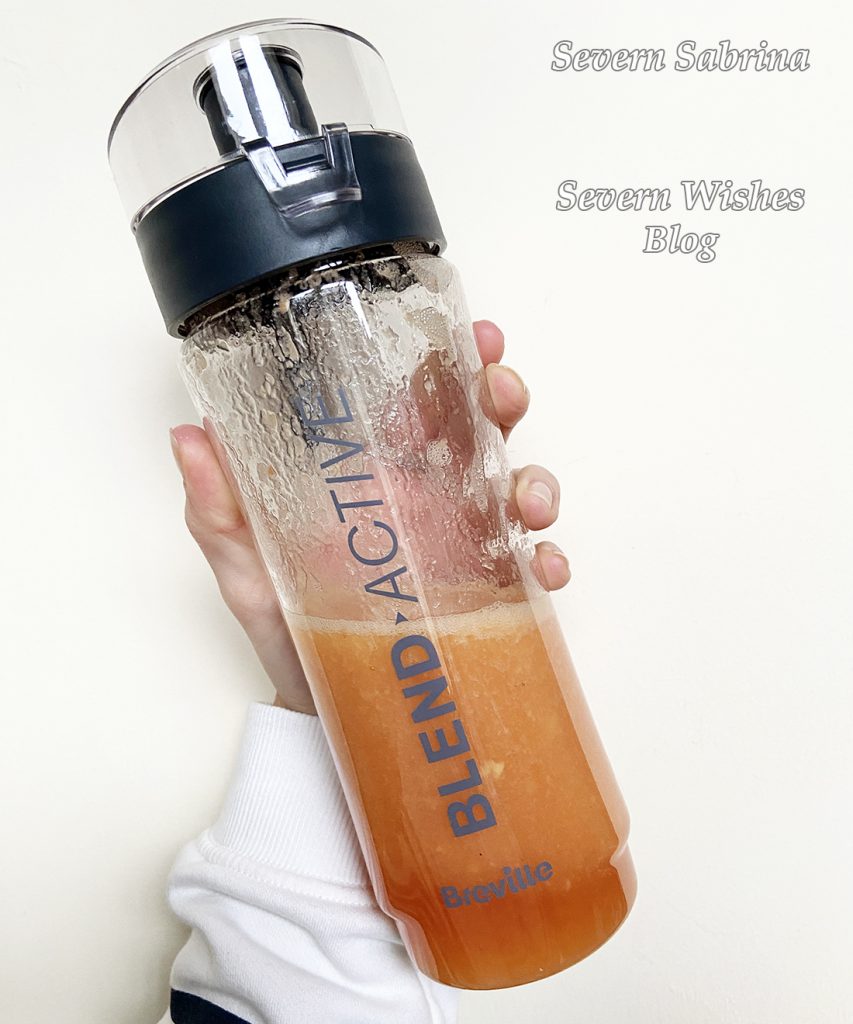
Product Information: Two 600ml Plastic Bottles BPA Free. Two Super-Seal Leak Preventing Lids with Carry Straps. 350W Blender Unit. Stainless Steel Bladed Bottle Base (Screw on Top), Blades Suitable to Crush Ice and Frozen Fruit. Only Suitable for Cold Liquids and Food Stuffs. One Touch Easy Blending. Bottles are Marked with ml for Ease of Use. Base Unit also available in Green.0.6 Litre Capacity. Base requires Mains Electricity Supply.
Description from Argos:
Enjoy smoothies, juices, protein shakes and more on the go with the Breville Blend Active. This single-serve blender features a powerful 350W motor that smoothly blends frozen berries and ice with juice and other liquids. The blending occurs in the top of the bottle so nothing gathers in the base, while the one-touch action delivers perfect results in seconds; ideal for busy weekday mornings before you head out to work, school or the gym.
Make healthy, delicious smoothies, frozen juices, protein drinks and more.
One-touch blending action delivers perfect results in seconds; a quick and easy way to your 5-a-day.
My Honest Opinion
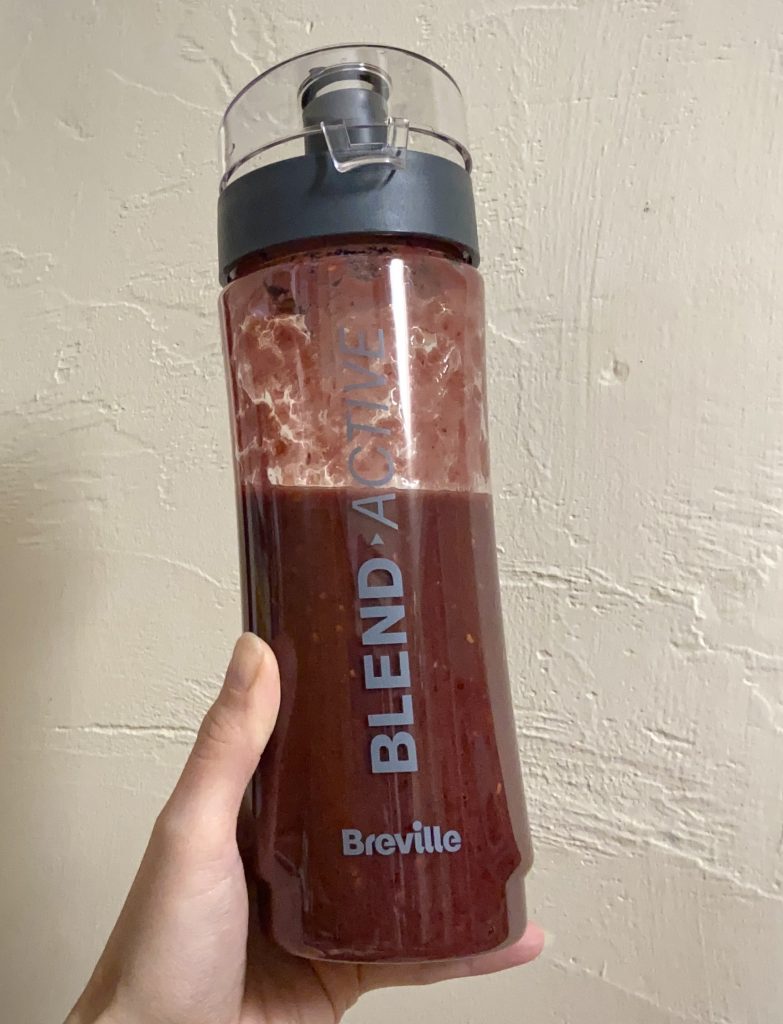
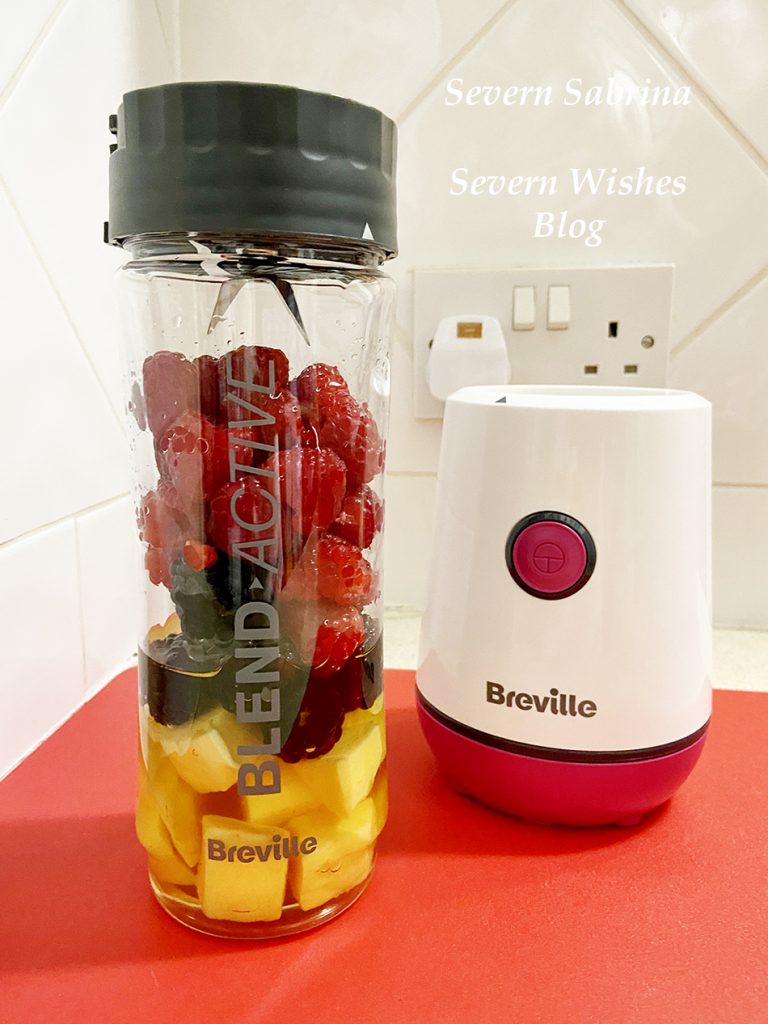
I have really enjoyed testing this gadget, and as someone who eats a lot of fruit anyway, it was nice to consume my five a day in a different way for a change. I enjoyed coming up with various smoothies and shakes over the several days of testing this product. I only had one minor issue with it and that was the electric cable from the base unit was a little short, but that’s also my bugbear due to the fact I don’t have many plugs in my kitchen as is. So I have since rearranged my counter top now so that my Blend Active can remain at easy reach. I did my first go on the top of my oven hob which wasn’t going to be practical, so I moved things around. I have used the Breville Active every day so far since I received it. It wasn’t as noisy as I thought it might be, and it was so quick to set up and easy to use too. The bottles are really nice to hold, and the ml on the sides allows for ease of preparation of the smoothie and also tells you how much you’ve created and drank respectively. You could divide one full smoothie of 600ml into three 200ml glasses and give them to your children in a morning. Or you may wish to consume the entire bottle yourself at home or on the go, the decision is totally up to you.
Due to getting a limited word count when I submit my Argos Review I always like to elaborate some more on my blog. So to answer some of the questions other people have had online; yes the device is only mains powered so you will need access to a plug in order to use it. The blending button needs to be held down in order to blend or to pulse your chosen ingredients, however it also doesn’t take very long at all to blend those items, I think the longest that I did one smoothie (with Vegetables in) was for around 45-50 seconds. Usually 30 seconds was plenty enough time for the fruit I was using to become smooth. If you don’t like fruit seeds you could strain your smoothie through a sieve, into a jug and then pour it back into your (rinsed bottle or spare second) bottle, however it is convenient to simply smoothie up and drink. Finally yes it is going to have some noise to it being a mechanical device, but I have a mini food processor half the size and that is way louder than this Breville blender, so overall the noise for me wasn’t an issue, plus if you’re only making noise for a single minute tops, it’s not going to disrupt the neighbours is it.
Overall I would like to rate the Breville Blend Active 5 stars.
Performance 5✩ Features 5✩ Noise 4✩ Design 5✩ Additional 5✩
Performance is excellent and the quality of the end result is consistently very good. Features are great such as the leak proof lids and the ml on ergonomic large bottles. Noise is very good for a loud gadget, it’s not quiet but it’s speed makes up for the noise. Design is great, a compact base unit and everything fits so well with arrow indicators to help. Additional star is for BPA Free Plastic and the Recipes in the Booklet to get you started.
Thank you for reading this review, I hope you have enjoyed it. You can purchase this product or read more about it by looking online from Argos, I have left the link in the product description above.
If you have any questions about this Personal Breville Blender then please leave me a comment below or on my social media posts and I will do my best to answer with the knowledge I have gained from reviewing this product.
Don’t forget to check out my social media to see this in action too!
We live in an age where so much is readily accessible to us, but there can be so much information out there that it can often be overwhelming, especially for first time parents. With so many websites, forums and blogs that can sometimes be opinionated and not necessarily filled with the facts. Every person knows where they would prefer to get their information from, some of us like books and others like the world wide web!
Sometimes you can have a baby that is completely different to any before it or any you have known, and you may need additional help or advice. During these times you should always turn to a Midwife, Doctor or Paediatrician if you have concerns of any kind.
There were things I wished I had known more about before I had my son, and that was despite me reading both books and websites for hours at night when I had terribly painful SPD. I found lots of the websites and apps that I have listed below extremely useful at one point or another during the last four years. So I thought a blog post might help other expectant parents to see what information is available to them.
As a parenting blogger I often get asked about my personal opinion of which apps and websites have helped me since I became a mother. So in order to achieve this post I have gone back over four years of my browsing and researching and screenshot history, to bring you an alphabetical list of all the things that I have found the most useful. I have only included websites and apps that I used more than once and found them beneficial long term.
A Aptaclub Pregnancy and Birth B Bounty App B Baby Centre Apps and Email Newsletter and Website B Baby Names App B Baby and Child (British Red Cross First Aid)
D Duo ABC E Ella’s Kitchen E Emma’s Diary F Free Prints (Photos and FP Cards)
G Get Creative (CBeebies) G Go Explore (CBeebies) K Kicks Count Website
N NHS Website O Online 4 Baby Website
P Pokémon Smile (Teaching Toddler Teeth Brushing) P PooGoesHomeToPooland (Teaching How To Use The Toilet)
S Storytime (CBeebies) S Snapfish (Photo Printing)
Y Your Baby Club Website and Social Media
Let me now elaborate on a few of these now and the reasons why I found them so useful. Some of them are of course self explanatory, but others are really handy for tips and tricks. Some offer you freebies and others offer key medical advice or milestone information.
Bounty App The app gives you information on the progress of your baby whilst in the womb, and then after the birth it gives you key advice on milestones and growth. An app that I found generally fascinating to look at every week as my pregnancy progressed. Now that my son is older he is still on the app as a 48 month old! And the app offers me developmental advice and articles to read. The articles can be read at any time of your pregnancy and usually the app updates what is relevant to you at the time you need it. There are also useful check lists on it too. I score this app a 5✩.
Baby and Child (British Red Cross First Aid) First Aid is such an important part of human life, however most people go through their entire pregnancy without knowing how to do life saving procedures on babies or young children such as, choking, allergic reactions and dealing with illness. The Baby and Child App gives advice as well as videos that people can watch at their leisure for a variety of situations. Just some of what they cover include; Asthma, Bleeding, Burns, Choking, Epileptic Seizure, Fever, Head Injury, Meningitis, Vomiting etc. This app is one that I believe every single person should have on their phone, just in case. I score this app a 5✩.
Duo ABC I found this app while researching after my son had to start Speech and Language therapy. Due to the support being so sporadic due to the pandemic I did my own research, started my own lessons with my child at home, and created my own flash cards. But this app came up on a results search, and despite it being American my son found aspects of it to be beneficial. Writing the letters on the phone screen with his finger, sounding out letters and recognising upper and lowercase letters all helped on our journey. I did just 20 minutes with him a day for 3 months, alongside my other teaching and he soon knew his alphabet and could say all but 5 of the letters properly. If anyone is struggling with their child and they seem distanced from paper methods, try this app, just ten minutes a day with you, you may just see a difference as I did. I score this app 4✩.
Ella’s Kitchen Once your little one reaches the 6 month milestone and you consider starting to wean them alongside their daily milk amount, you may want some advice. Ella’s Kitchen App provide you with advice, recipes and you can sign up for a free pack with a journey poster, stickers and some vouchers for their snacks. It was fun when my son was little, but when he developed lots of food allergies I made my own recipes up. I score this app 4✩.
Emma’s Diary Emma’s Diary is a fun app where you can create all sorts of fun things to keep throughout your pregnancy, it also offers some information and it gives away bags of goodies at certain points of your pregnancy. It’s worth signing up to this as soon as you find out you’re pregnant to take advantage of all the items on offer. I score this app 4✩.
Free Prints (Photos and FP Cards) Free Prints have two useful apps, the first one is Photo’s and you get some free prints every month just pay the postage. And the second one is Cards where you get one free card a month like a postcard, just pay postage. Upgrade to proper cards for pennies and they offer lots of other fun affordable products throughout the year. The more you order the more deals you’ll get. I score these apps 4✩.
Get Creative (CBeebies) and Go Explore (CBeebies) Apps that I don’t know what I would have done without! When I became a single parent even taking a shower was tricky. Sitting my son on the bathroom floor safely on a bean bag when he was a toddler, my phone playing CBeebies programs and videos off the app were a godsend! Now he is older he is using the various parts of the app to learn all sorts of things like shape sorting, mathematics, role play like shopping and problem solving. The Creative app allows freedom in Art and expression using some of the CBeebies favourite characters, and the Go Explore is more about learning and fun, again with the usual friendly faces. Love these apps! In moderation of course. I score these apps 5✩.
Kicks Count Website Kicks Count is something that is really important, and all pregnant women should visit the website and learn about the importance of kick counting and the work this group do. It’s worth following them on social media too. I score this 5✩.
NHS Website When you have questions in the small hours of the morning the NHS website can have useful information or point you in the direction of help if you need it. I score this 5✩.
Online 4 Baby Website An excellent website for affordable baby items such as changing mats and muslin cloths. Worth a look when they have a sale on for certain! I score this website 4✩.
Pokémon Smile (Teaching Toddler Teeth Brushing) Whether you like Pokémon or loathe it, if you have a child that refuses to brush their teeth you will try literally ANYTHING to make that time of the day and night less stressful. For us it was this app that allowed my son to turn a corner! There is an icon of the mouth that follows them while they brush and indicates where to go next so they don’t miss any teeth. I score this app 5✩.
PooGoesHomeToPooland (Teaching How To Use The Toilet) Another app that is a little annoying but if it helps your child to understand that poo goes down the toilet and not on the floor then so be it! My son watched it every day for about a month and then got bored of it, but it certainly helped him realise that I score this app 3✩.
Storytime (CBeebies) Another CBeebies app and this one is all about books and stories. The app can read to your child or they can try and read themselves. The stories are often interactive as well, lots of fun. I score this app 5✩.
Snapfish (Photo Printing) Free photo’s every month just pay the postage, a great way to keep family up to date with how little one changes and you can make an album of their first year for less than £20. I score this app 4✩.
Your Baby Club Website and Social Media As a Blogger Writer for Your Baby Club I often provide them with useful articles surrounding parenting. These first hand experiences from parents go alongside their informative articles on the websites and on their social media platforms too. I score this 5✩.
Thank you for reading this blog post today, I do hope that you have found it useful. Please pass the link to my website on to family or friends who are expecting so that you can share these excellent websites and apps with them. Hopefully they will be just as happy with them as you were today! (I hope).
Keep on visiting Severn Wishes Blog for Parenting related blogging, Product Reviews and general Lifestyle Posts! Thank you! Have a lovely day!
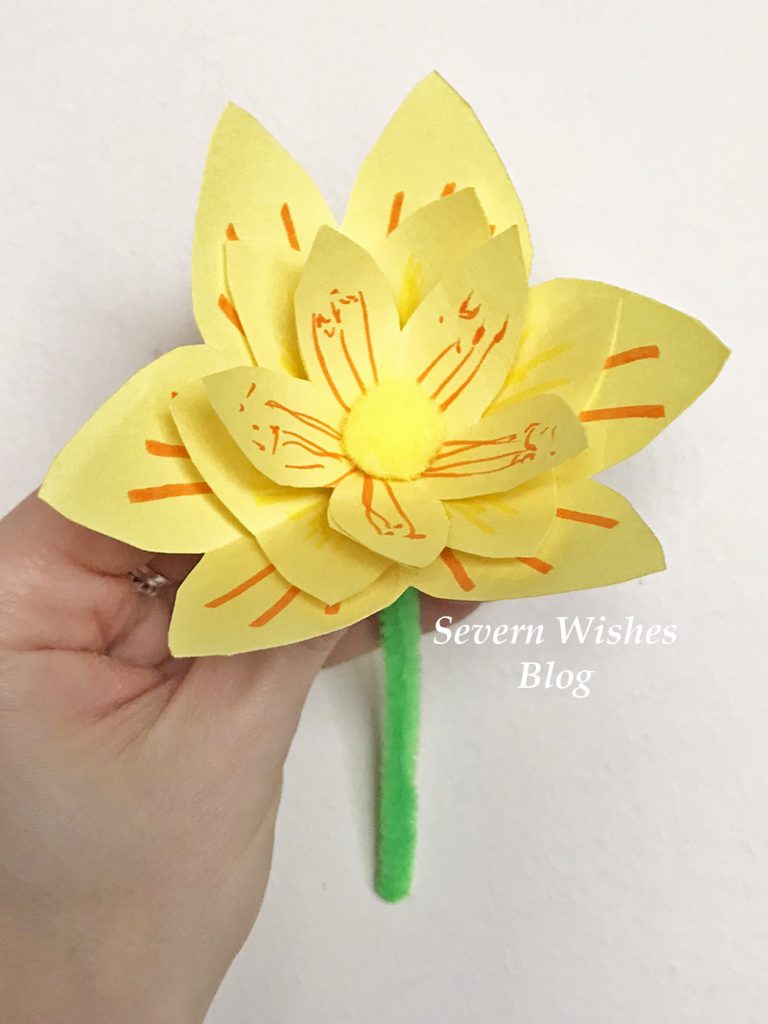
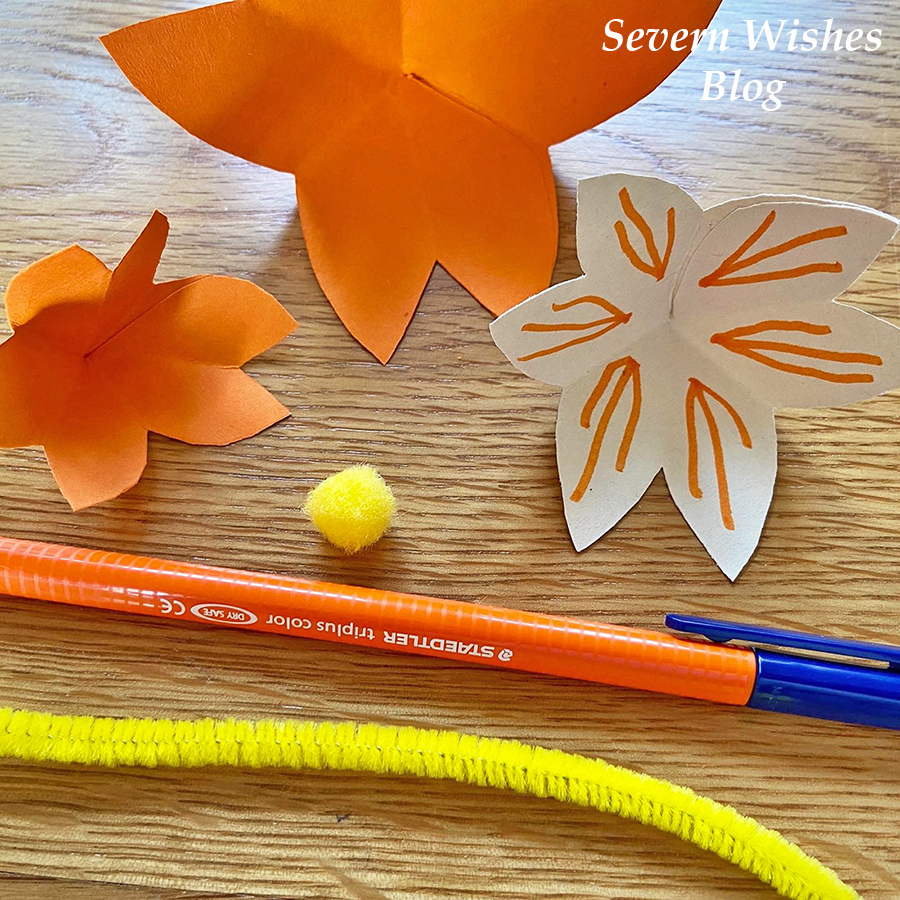
Hello and Welcome! If you’re a regular visitor to Severn Wishes Blog then you’ll know that I love to do lots of Art and Craft! If you’re new here then hi, and after this blog post please check out the remainder of my fun Crafts in the section here.
Paper Flowers are a wonderful alternative to buying fresh ones, the beauty of these homemade gifts is that they won’t wilt and have to one day be thrown away, these can be treasured by the loved one receiving them, forever! Give a single flower or make a bouquet it’s up to you!
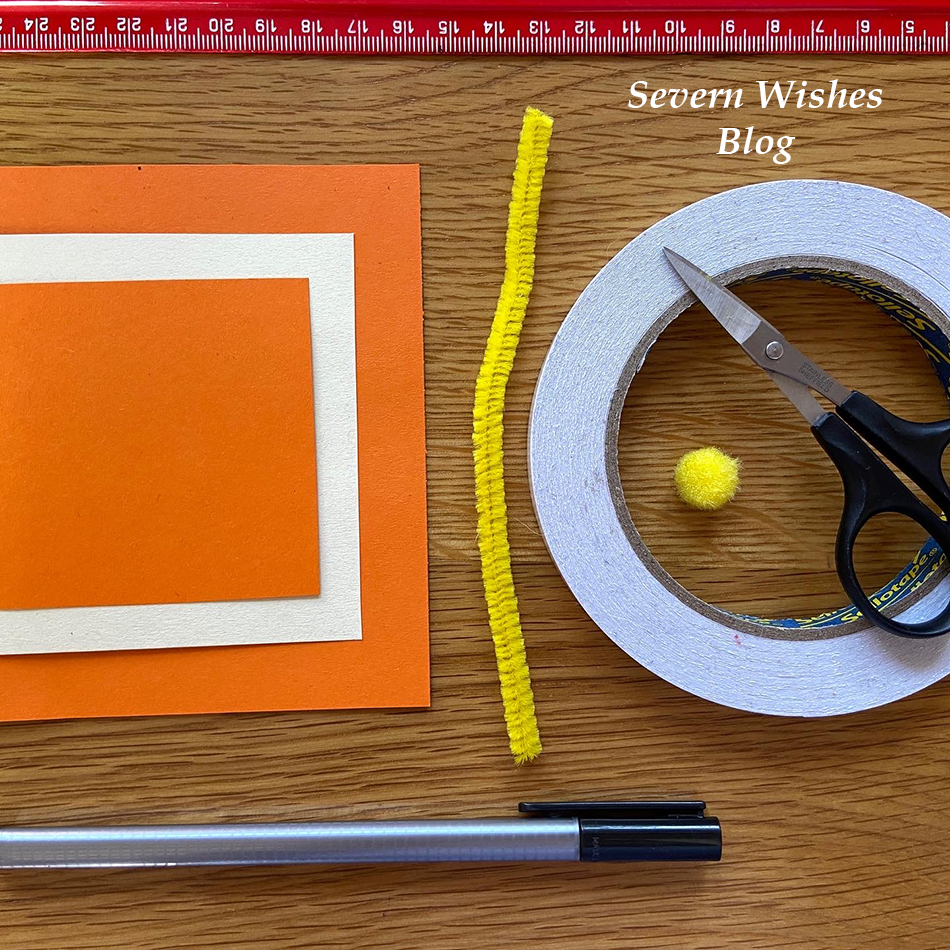
What Do I Need?
A Ruler (30cm) A Pen or Pencil Pipe Cleaners various Colours Thin Coloured Card or Thick Coloured Paper Pens for Decorating the Petals (optional) Fluffy Craft Balls (Flower Centres) Scissors
My Step by Step Visual Guide is really easy to follow, but I also uploaded videos to my social media if you would prefer to follow that! Carry on reading for my step by step and photographic guide.
SABRINA’S STEP BY STEP GUIDE
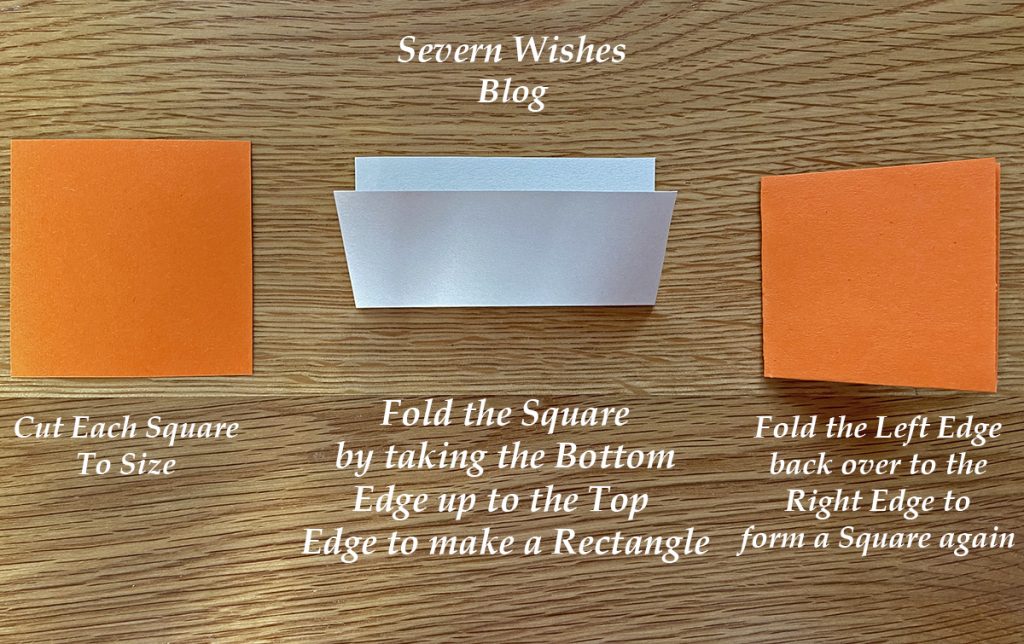
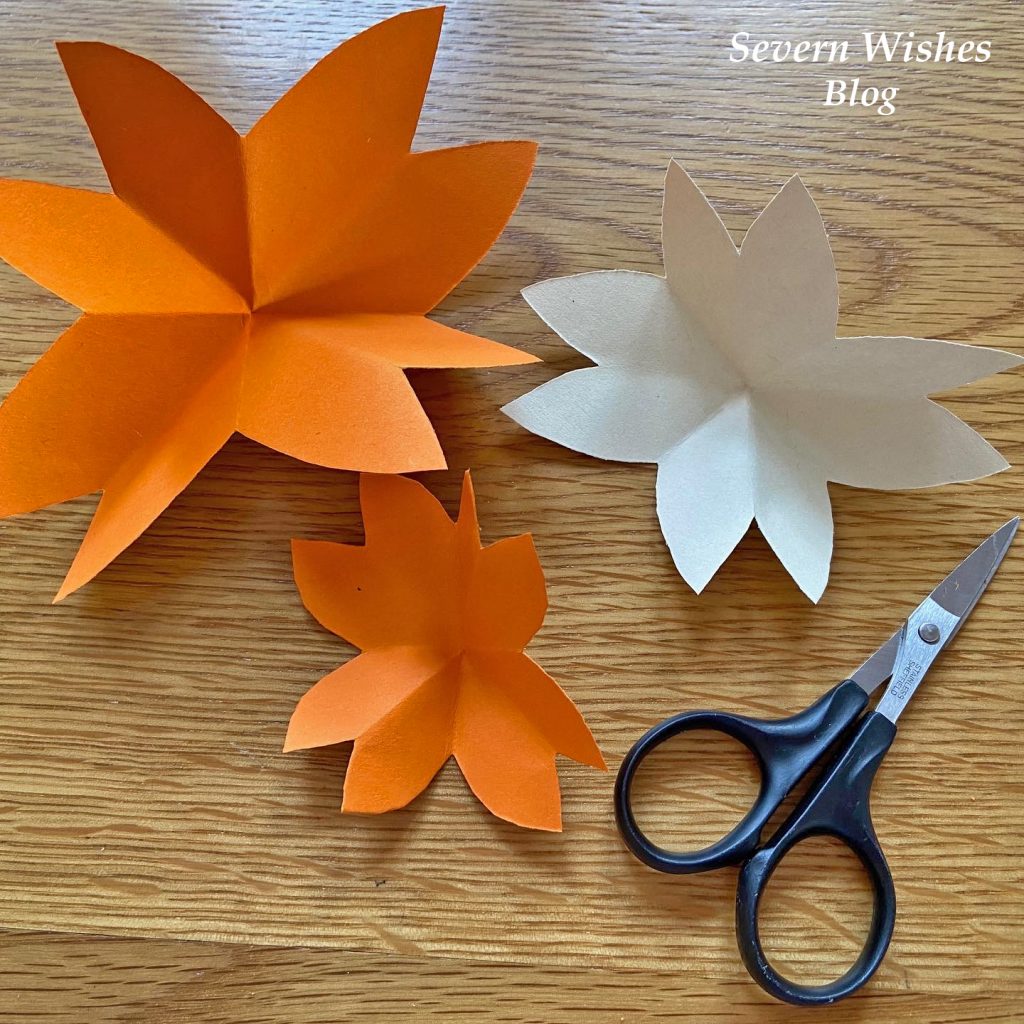
1. Cut Squares from your chosen Coloured Card. For example I made my Orange Flower with a 7cm, a 8cm and a 10cm Square. Three Squares is an ideal amount of layers but you can do just two or even more layers if you wish. Assemble these squares on a flat surface ready for the individual folding process. (See my images below for additional guidance).
2. Fold each square you have in half to form a rectangle, do this by folding the bottom line up to the top line and line up the crease and push flat. Repeat for every piece you have.
3. Next, you fold each rectangle back into a square shape by folding it from the left to right and flatten and crease down flat once again.
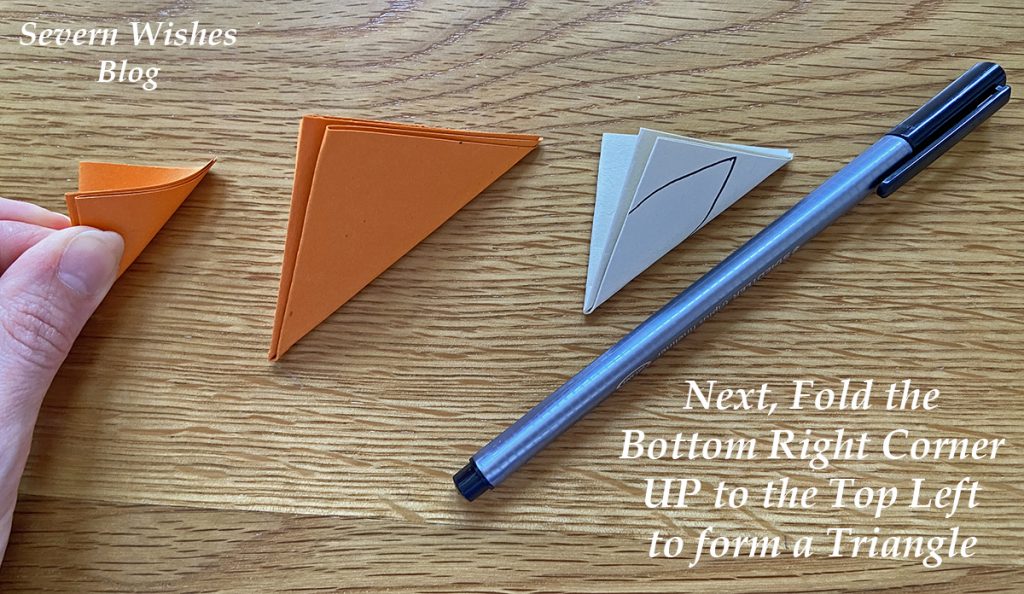
4. Finally you will have all your layers into folded squares, and these now need to be made into Triangles. But to do this correctly for the next steps you must not rotate them at all during the folding process. Make sure that you fold the bottom right corner of your squares up to the top left, flatten and crease.
5. Next you need to draw a petal shape on every flattened triangle, make sure not to rotate it from when you folded it when you draw on it, otherwise it won’t cut intact during step 6.
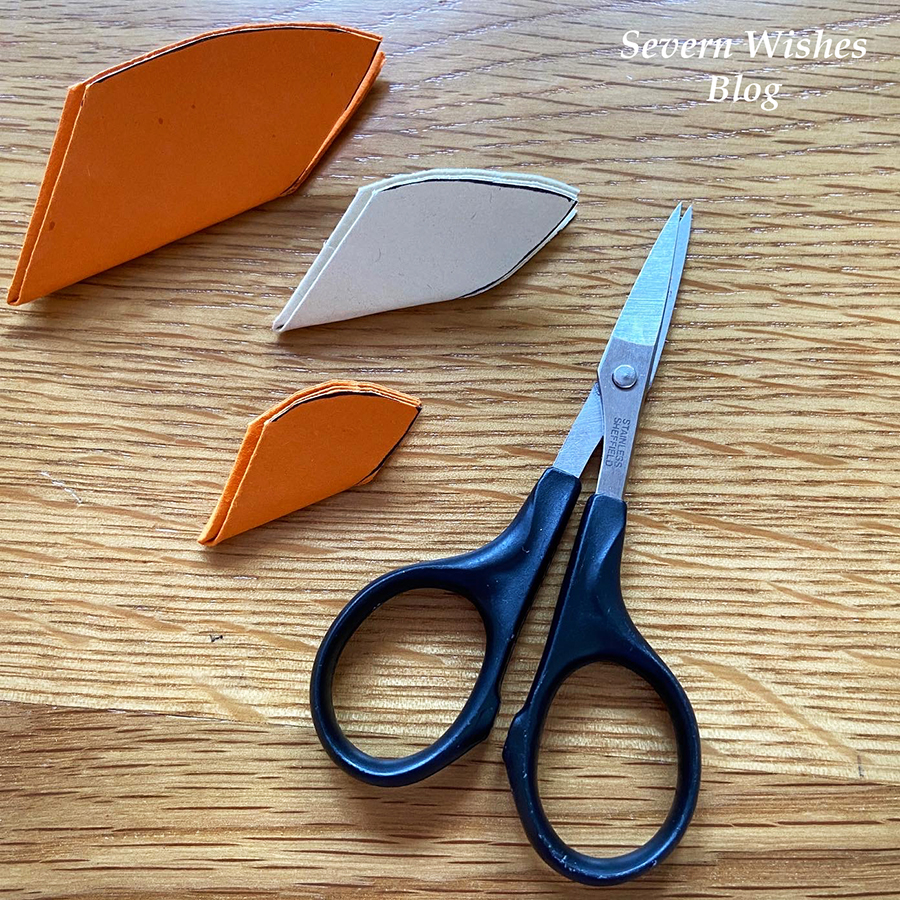
6. Now you need to carefully cut out your shapes, gently follow the line and then discard these cut offs for the recycling because you don’t need them.
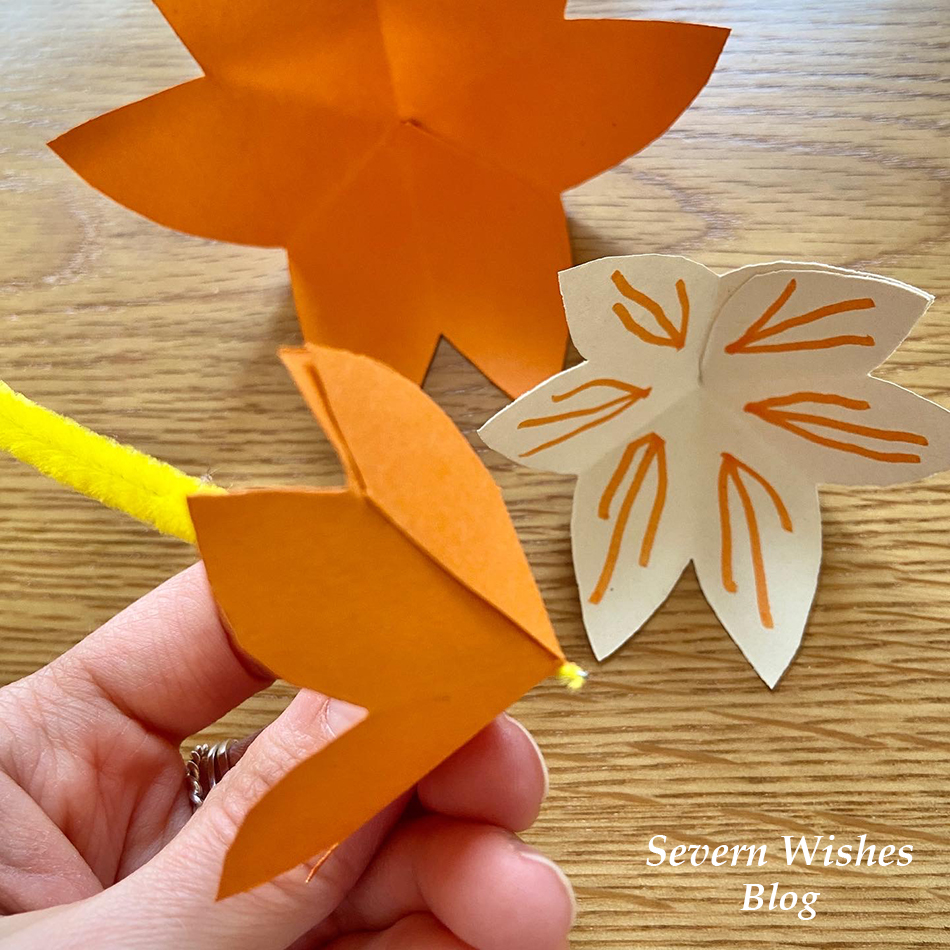
7. Time for the moment of truth, open out the flowers gently and slowly so as not to tear them. Lay them out flat and make sure they are an entire piece.
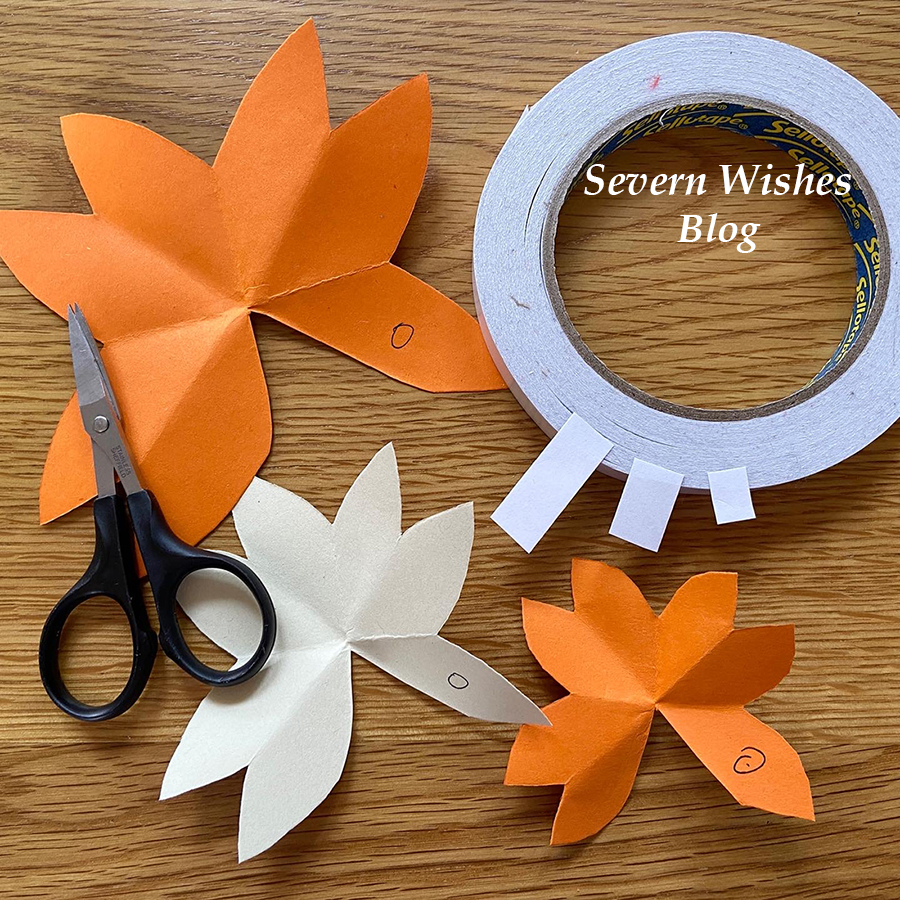
8. With the crease lines facing at each compass point you need to mark the petals that are in the South East corner of each flower. (See my images below if you are uncertain).
9. Carefully cut these petals away from the flower, be sure to only follow the crease lines of the folds when you cut and don’t be tempted to cut it too low in the centre, just enough for the spare petal to gently come free. You don’t need these now and these spare pieces can all be recycled at the end of your crafting session.
10. Next step is to mark the petal on the right of the one you just cut away, on each of your flower layers, and then stick a piece of double sided tape or a blob of glue on to that mark.
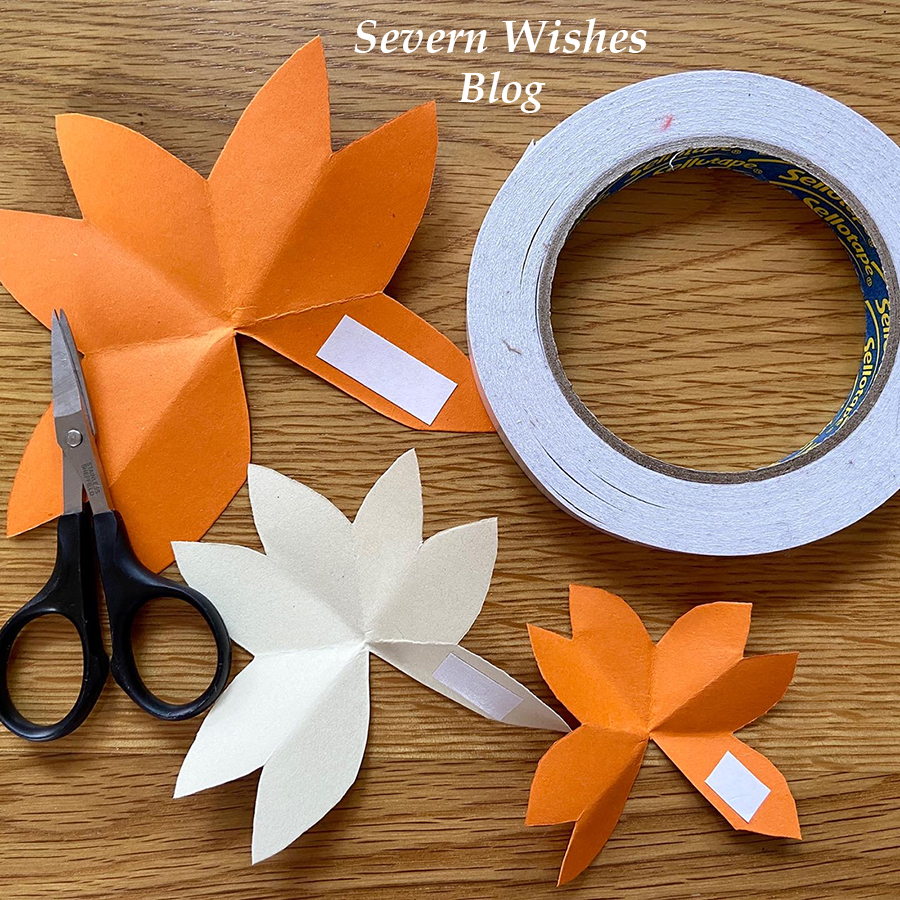
11. Doing each layer one at a time now, gently place the flower into your hand, and with the other hand carefully fold the petal on the left side over the petal on the right side. The creases and folds we made at the start should allow you to do this easily, if not gently fold the creases again and try again, the flower should (with some gentle persuasion) create a 3D flower with the shape similar to a cone. Push down on the glued part and make sure that you have aligned the petals and that it is stuck down. Repeat this for all flowers and layers that you want to make.
12. Carefully lay out each of the Flower layers now that they are 3D. You now need to decorate them if you want to with lines or dots before we assemble them. If making them with small children you may want them to decorate at Step 10, before you make them 3D.
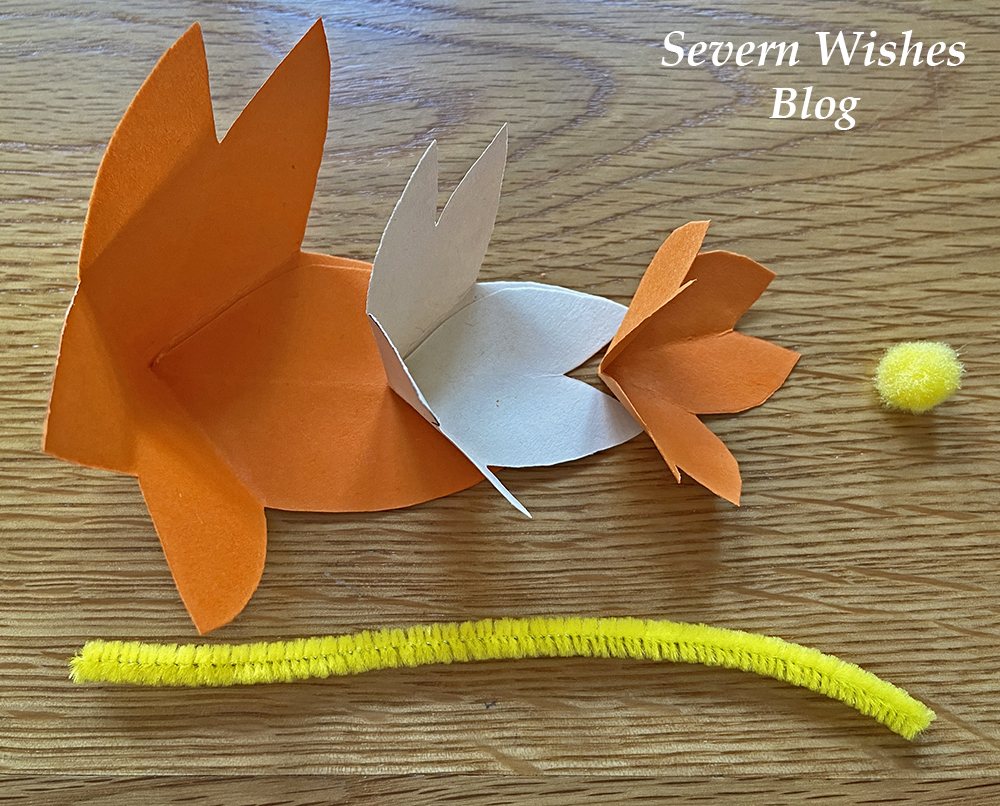
13. During this step you want to use the end of the Pipe Cleaner you have chosen to gently pierce through the middle of the Flower layers, take one at a time, and force the pin end of the Pipe Cleaner directly through the centre where the creases and folds meet. Once all of the layers are pierced you can now arrange them in order of size.
14. Assemble your finished Paper Flower by sliding the layers on to the Pipe Cleaner, you do want to leave about a 4mm bit of the pipe cleaner poking out so that you can push on a coloured fluffy craft ball (if you have one) and this neatens the whole look of the flower plus it covers the pointed end of the pipe cleaner.
15. Adjust the Petals by rotating the layers slowly on the pipe cleaner stem until you are satisfied with the flowers final look. I hope you are happy with your flower! You can play around and add other things too if you like! Be creative and I cannot wait to see yours! Tag me! #SabrinasHowToMake
✩✩✩
Thank you for reading this Craft related blog post today, I always love doing my “Sabrina’s How To Make’s”! And if you have any questions for me then please comment below on this post and I will happily answer them for you. If you make some flowers please tag me on social media using the hashtag #SabrinasHowToMake and I really look forward to seeing them!
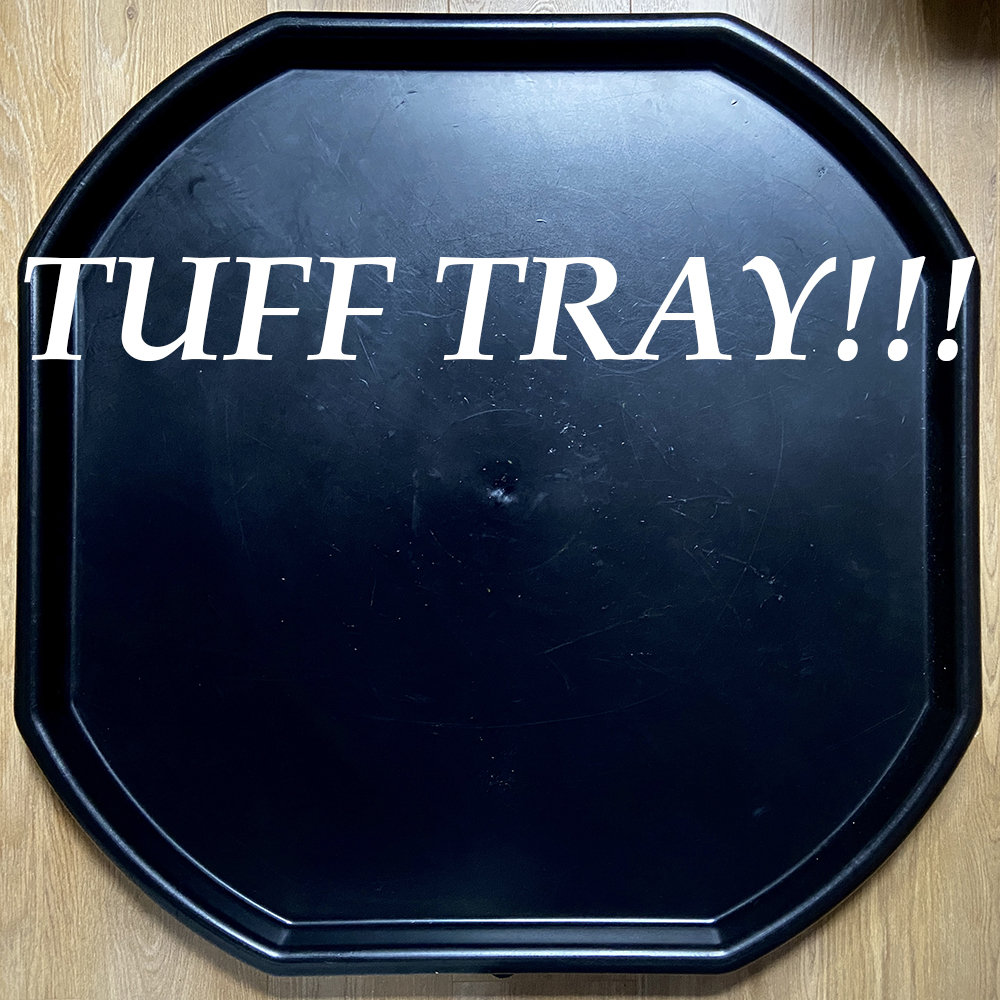
Hello Severn Wishes Blog Fans! Today I am bringing you a Lifestyle / Parenting / Hacks / Product Review article I have written all about something I have now owned for well over a year! And that item is… The TUFF TRAY!
These fantastic trays are usually found in a school setting, especially with younger children like those in a preschool or nursery setting, but due to their versatility they have been becoming more and more popular with mums who are able to do a lot with their children at home.
As soon as I heard about them I knew it would be a great investment for the future. I ordered mine in black but they do come in a variety of colours. I preferred the black due to it not getting stained or if we made any scuff marks with toys they wouldn’t be showing up as easily. Overall I’m really happy with the quality of the tray for what I paid for it. So far it has withstood a toddler doing all sorts on it and in it! I chose to purchase without the stand so it was then just suitable for laying down on the floor.
Be it Sensory, Messy Play or just toys on a flat surface, the Tuff Tray is ideal for lots of reasons when you have little ones growing up. Here are just some of the many ways that we have used our tray this past year or so! Both in visual form and I made a little list too!
1. Ideal for Craft to keep the craft pieces and mess contained in the tray borders.
2. Great for when you want to do some Messy Play and use paint so it doesn’t get on the floor.
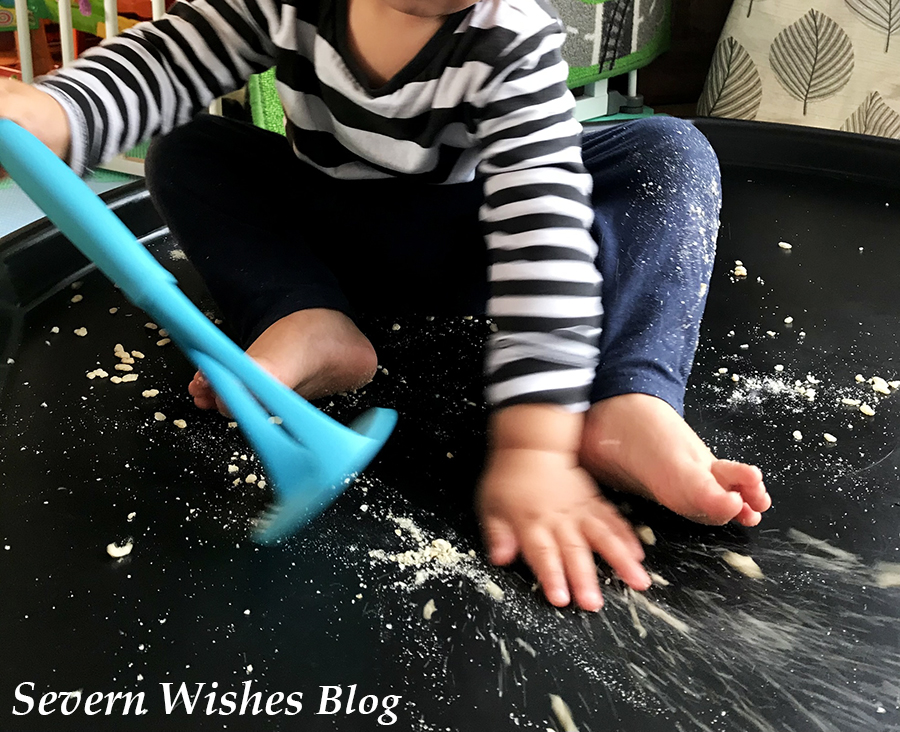
3. Doing some experimenting with foods in toddlerhood? Keep those rice crispies, rice grains and other food stuffs within easy clean up-able reach. You can wipe clean anything off it.
4. Using Glitter today? This tray is ideal to wipe clean after your picture making as the bits will all be contained within the tray walls. Sit your children outside of it and let the mess be inside (mostly).
5. Potty Training? Stick the Potty in the centre of the tray on the floor, and it will be easy to clean spillages off the plastic rather than off your floor!
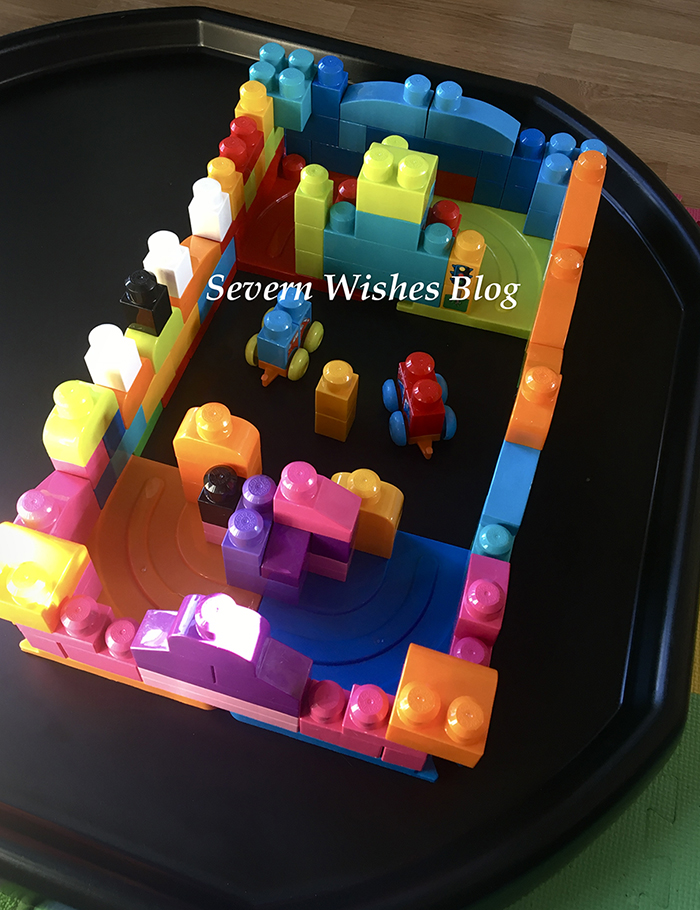
6. Building Lego or Duplo or Blocks? It can be annoying for little ones if pieces are rolling away or falling over all the while! But on the tuff tray they won’t get far at all! It also means it is a flat surface for the building to become easier on little hands.
7. Doing a Jigsaw? Be it an adult one or a children’s one? Do it on your Tuff Tray and you’ll be able to move it at a moments notice off the floor and then continue it later.
8. Want to do some baking with the kids but you want to do it at their level? It is much safer to do it on the floor where nobody is balancing and this tray doubles as a big flat surface, just clean it with sterilising spray and let it air dry before you start any food preparation.
9. Sensory Play can involve all sorts of things like craft or food stuffs, having it all contained within the Tuff Tray makes life easier for you and if you planned to do it for a few sessions over a week you could even leave it on the tray and just move the whole tray instead of packing everything up.
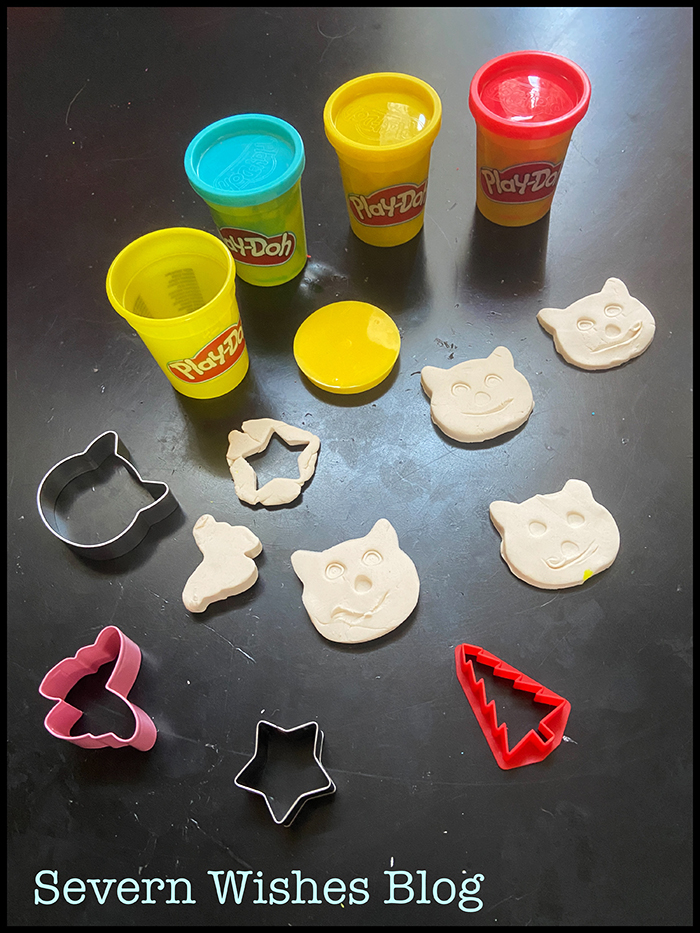
10. Play-Doh can get messy and easily sticks to hard surfaces like tables or floors, but by using a Tuff Tray base for all of the items they are contained within its sides. If you choose to get a stand with your tray you can even have the tray at a suitable height for your little ones. Or you can do what I do and maintain it on a flat floor, whichever is easier for you.
11. A Tuff Tray can be used outside for a water table or a sand table due to its sides being all the way around with no holes within its surface.
12. Design a World – Use your Tuff Tray and things like chalks or washable paint to create a world, a map or a world for your children to put their toys in to and play. I have drawn a road on mine for my sons toy cars before now and also used elements like sand made of ground cereal to make a beach.
So overall the Tuff Tray doubles up as another useful hard surface within your home and is ideal for playing, learning and food preparing. Young children can safely sit within its boundary or outside of it leaning in in order to play. There are no sharp edges on the Tray and the hard plastic is coated so its easy to wipe clean after every use. I purchased the standard (medium) size but it is also available in small or extra large depending on the supplier you’re purchasing it from. They are also available in many colours. Prices range from £11 to £70 and all Tray prices do depend upon the colour, and the size and whether you wish to buy a stand with your Tuff Tray purchase. They can be used inside or outside but I would recommend you keep them out of direct sunlight and harsh weather conditions and keep them inside a garage or shed when not in use in order to maintain the sturdiness of the plastic.
What do we use our Tuff Tray for the most?
Craft and Messy Play and Sensory Play mainly.
Thank you for reading this blog post today, I hope I have inspired you and if I have then I would love to hear what you and your family use your Tuff Tray for!
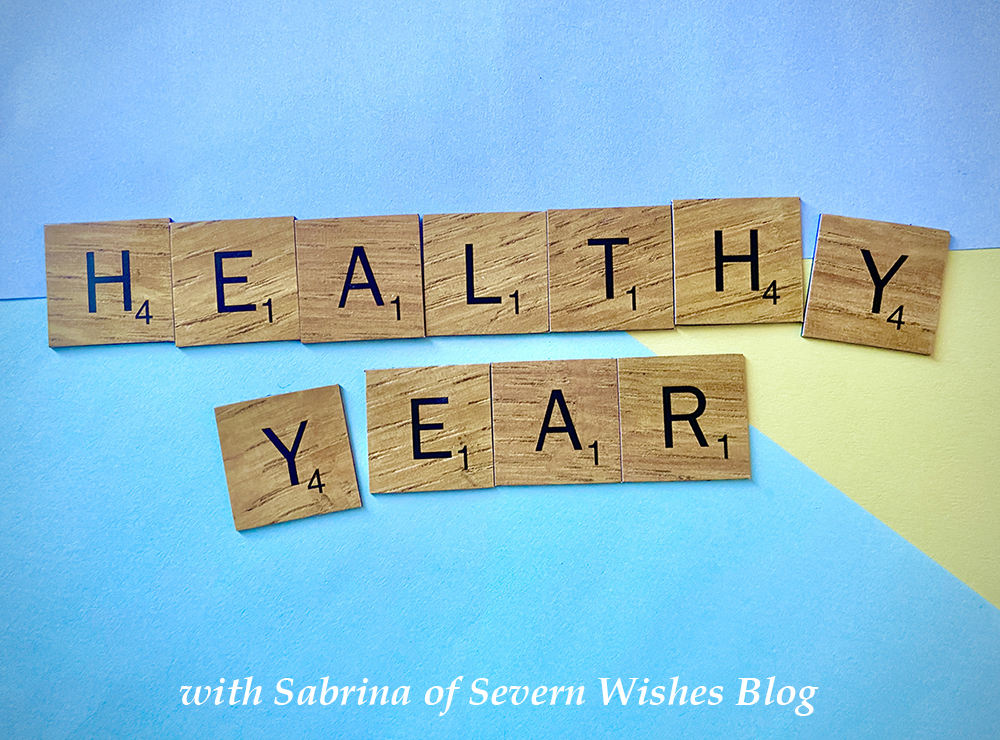
Hello everyone, I hope this latest blog piece finds you all well.
Today I am discussing the 5 healthy choices that I do all the time, that are easy enough so that anyone can get behind them! You’ll feel better if you accomplish even one of these this new year, because they are not only good for your body but also your mind, let us all have a healthy year ahead.
Drink More Water
I cannot stress enough how so many people don’t drink enough water every day. Women and Men need at least two litres of water a day to aid blood pressure and digestion and to help cell renewal in the skin. I personally aim for 2.5 litres a day and use my reusable water bottles. You will also find that by drinking more water your organs and joints will be cushioned and hydrated. Water contains minerals too, such as Calcium, Magnesium, Chloride and Sodium to name but a few. Water is essential for good kidney and bladder health and helps them by removing toxins that have built up. If these aren’t enough reasons for drinking more water then how about this, by drinking a glass of water when you first wake up it stabilises your blood pressure and kick starts your digestive system, meaning when you start your day your breakfast is ready to be harvested for all its nutrients. To top it off your brain can also respond with regular and consistent water in take, including by improving your mood and memory. So why not try and drink more water this year, once you get into the habit of it and you feel the improvements for yourself your body will ask you for more. That is why a reusable water bottle is great, I carry one everywhere I go.
2. Swap to some Dairy Free food items
You may not believe me now, but making a few swaps to things such as Dairy Free Butter (which is delicious by the way) can help with things such as cholesterol and get you to eat less salt too. You can still bake and cook with Dairy Free Butter and because it’s so tasty you wouldn’t know the difference. I would never go back now to a dairy based butter or spread. I love the Vitalite spread! Perfect in Mashed Potatoes and fab for baking too!
One reason to go dairy free is the choice you have, wow what a range! Plant based or nut based milks are healthier options for you and most alternative milks are fortified with vitamins and minerals too. You may also find that some have lower calories and are better for your body because they are hydrating. Some people (like my family) use alternatives due to allergies and medical conditions. However you can still make the change to a healthier alternative for both your body and the climate. Most people find they have more energy and are less bloated and have less digestive issues by swapping from dairy to the alternatives out there, finding one that you like might be hard because there is a massive choice. However my Doctor recommended unsweetened Soya Milk in small amounts or Oat Milk because they are both filled with Vitamins and Minerals necessary to maintain a healthy body such as Calcium.
Dairy Free Cheeses are getting better every year! When I first went Dairy Free there were two choices on the shelf in the chilled isle, now there is a whole fridge dedicated to various types and varieties of dairy free cheese, be it grated, hard, soft or even something in between them all! The only way you can know is to try it for yourself one day. I do recommend the Violife range though!
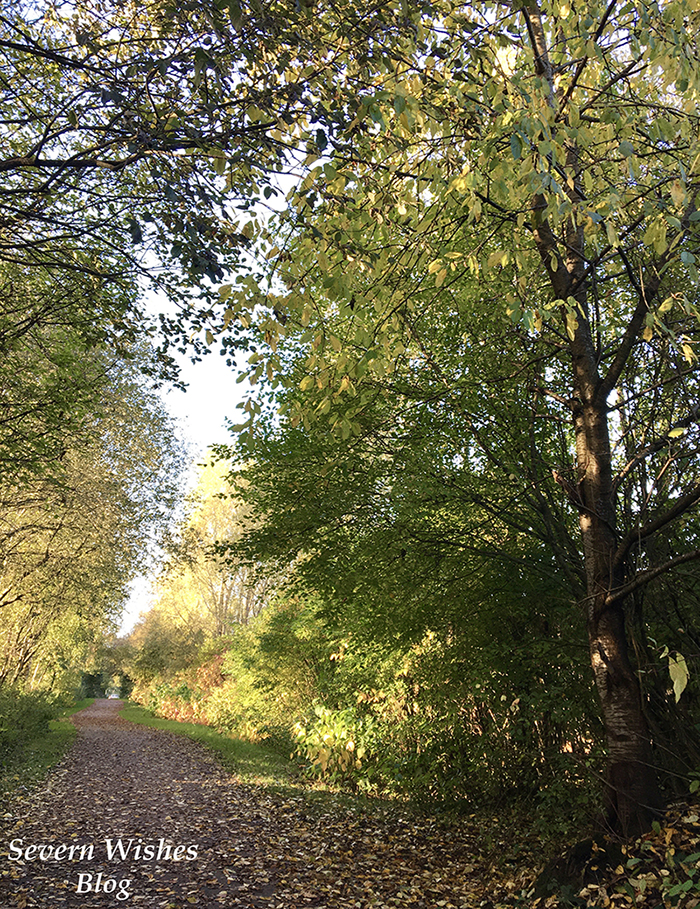
3. Taking a 15 to 30 Minute Break for Fresh Air Every Day
Fresh Air is so important and a lot of us don’t get enough of it, so if you make one new year resolution this year make sure it’s to get more of it. Even if the weather is bad, standing in your garden under an umbrella still counts. You could walk and that would be even better because it would be light exercise too!
Fresh Air is vital for blood pressure and heart rate by providing clean oxygen for your body, it also aids digestion by increasing oxygen flow through your organs. Fresh Air also improves your mood and can make your happier. Oxygen is vital for good brain health and mood so the more fresh oxygen you can get every day the more you’ll feel the benefit of it.
Breathing in fresh air can also help to reduce the risk of getting air born illnesses and infections by clearing the sinuses. People are more likely to lose weight and stay fit by going for a daily walk and getting both their heart rate up a little and by breathing in plenty of fresh air. Even if you live in the city search on local maps for parks and green spaces. You never know what you might see on your walk either, make it fun for children and play a game like eye spy or pick a letter every day and each person has to spot five things beginning with that letter.
As the weather improves into Spring this will be a much easier one to do every day.
Find Somewhere Local, Green and Full of Nature and Enjoy
4. Do Something You Love for Half an Hour a Day – For Your Mental Health
Most of us prioritise lots of things above our mental health, including housework and other chores, when we should be either resting or doing something for ourselves. Try to make a list of what needs to be done that day and what can be put off until tomorrow. It’s important to get through your every day necessities at home without feeling guilty about wanting to do something for you. And when you’re a parent you get even less time to yourself so it’s very important to take that half an hour, just to fit it in somewhere if you can. I usually have my half an hour before bed, gaming, reading, writing, catching up on a television program I have recorded…
Choose Happy and Healthy
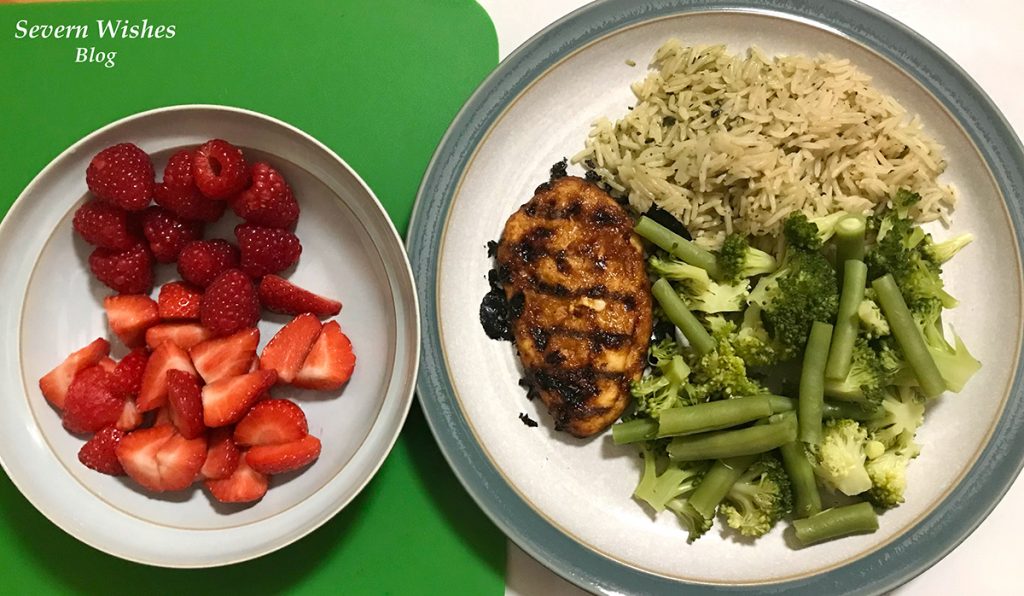
5. Eat a Rainbow of Coloured Foods Every Week
This may sound like a simple one, but I have read many studies that suggest eating a variety of fruit and vegetables over the course of a week, and not just the same four or five every day, gives our bodies the varied vitamins and minerals that it needs to stay healthy. So why not try adding a different lunch and a different evening meal to your routine this week, start to experiment more and try that piece of fruit that you always see in the supermarket but never buy! The more colour the better. Check out my recipes on my blog for some inspiration to start with!
You can get your five or more a day through fruit juice, fruit pieces that are fresh, frozen or tinned, frozen veggies or fresh ones, they all count towards your total. My photograph below shows a typical dinner for myself, and I usually get one of my five during the cooking of my evening meal, I regularly eat a whole raw Carrot while I cook!
If you find that you’re struggling to get your 5 fruit and veg a day (for whatever reason) and feel like you’re lacking something in your diet, perhaps consider taking a multivitamin to give your body a boost, even if just through the winter. Most people lack Vitamin C and D during the colder months.
Eating More Colour Is Better For Your Health
Thank you for reading this blog post today and I do hope that you enjoyed it. If you do take me up on any of my healthy suggestions do comment and let me know how you’re getting on.
Have a wonderful last few days of January! Best wishes!
Well look at that, three years have literally gone past in a blur, and I am sitting here trying to fight back my eyes welling up. My baby boy is no longer my little baby boy, and in fact he has grown up so much this year that it’s scary. Having just emailed in all of the many forms I am now sitting on my sofa writing this blog post as I prepare for him to go off to Pre-School this September.
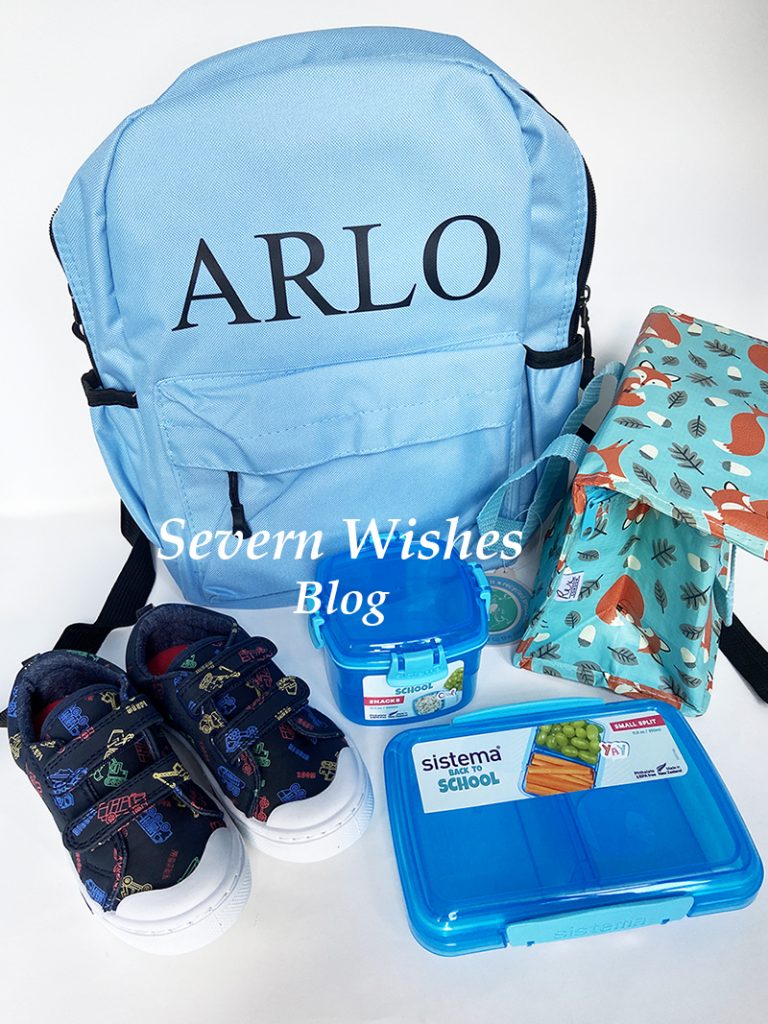
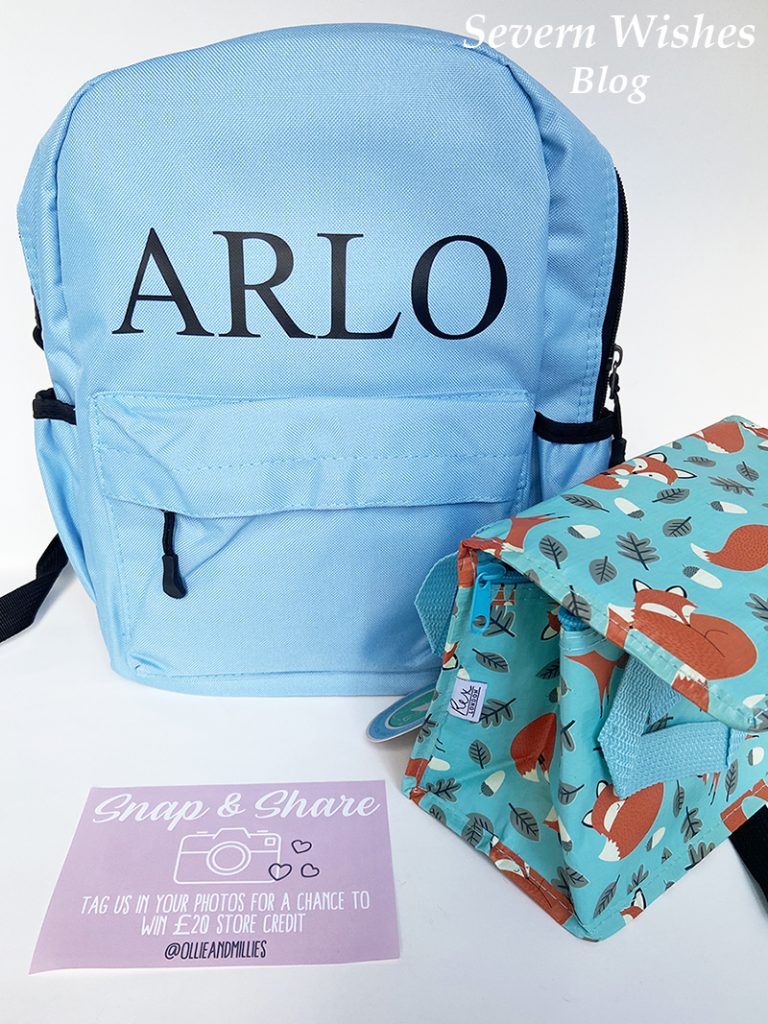
Backpack – Ollie & Millie’s Sistema Tubs – Tesco Kids Shoes – Tesco F&F Fox Cool Bag – Ollie & Millie’s
Going to school is like a right of passage and it’s a huge milestone in any child’s life. So I wanted to get my son some items to make that transition a bit easier. I had seen this gorgeous backpack on a page I follow on Facebook called Ollie & Millie’s. I had been looking at buying one for months, I looked around for a while, and then I decided to order one from them when I couldn’t find anything that looked as niceas theirs.
And because of Covid19 the School is not able to share some things any longer such as plasters, so every child must have their own in their bag. But that isn’t all, and my sons allergies also pose issues so he has to have everything he needs altogether in one bag. Luckily everything has fitted into the one I have chosen to buy from Ollie & Millie’s. Things such as a reusable water bottle (which we use already in my house but I bought my son a new one just for his school days), a (I chose personalised) backpack, snack pots, wellies for outdoor play and any medical items they require for the time frame they are at school are also included.
I’m very impressed with the backpack because of its quality in both material and its features such as strong straps and zips. There are several colours to choose from but my son loves blue so I chose blue for him, and because it’s a light sky blue colour the writing for his name really stands out. I was impressed with the time frame between ordering the product and receiving it from Ollie & Millie’s. The backpack also has versatility because I was surprised by just how much I could fit inside it, once I had gently opened it out when it arrived. Overall I rate it exceptionally highly and would recommend it to any parents who are after a good priced backpack with their child’s name on. The cool bag is also a lovely product and it is of excellent quality with a very cute fox design. Ollie & Millie’s have a wide range of products and also make personalised t-shirts and other clothing as well.
Other items that I have got to make things easier for both my son and myself are some fantastic plastic tubs from Tesco which are from the brand Sistema. The tubs are not only different sizes than what you would usually see in the supermarket, but they also have fun sections built in and have genius clips and lids too. Bonus points that I could get them in blue to match my sons bag as well!
Everything shown in my picture above is now inside the backpack, and with a handy bottle pocket on the side my sons drink is safe and secure too.
Thank you for clicking on this post, I hope you have enjoyed reading it.
Have you got any young children heading to School this term? I do hope they take it all in their stride! I will be doing a follow up post about how things went after the first few weeks too.
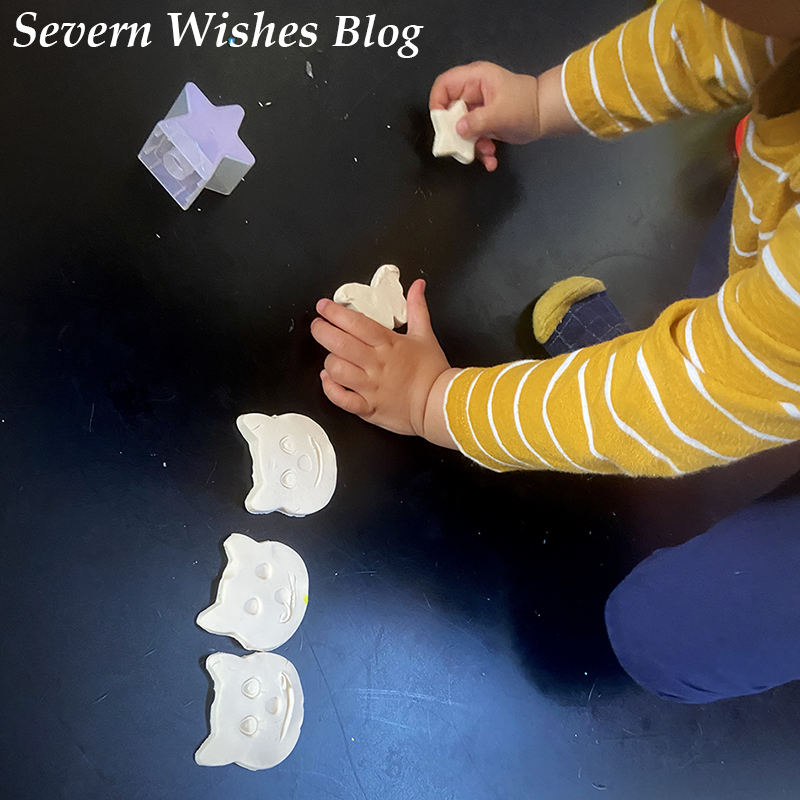
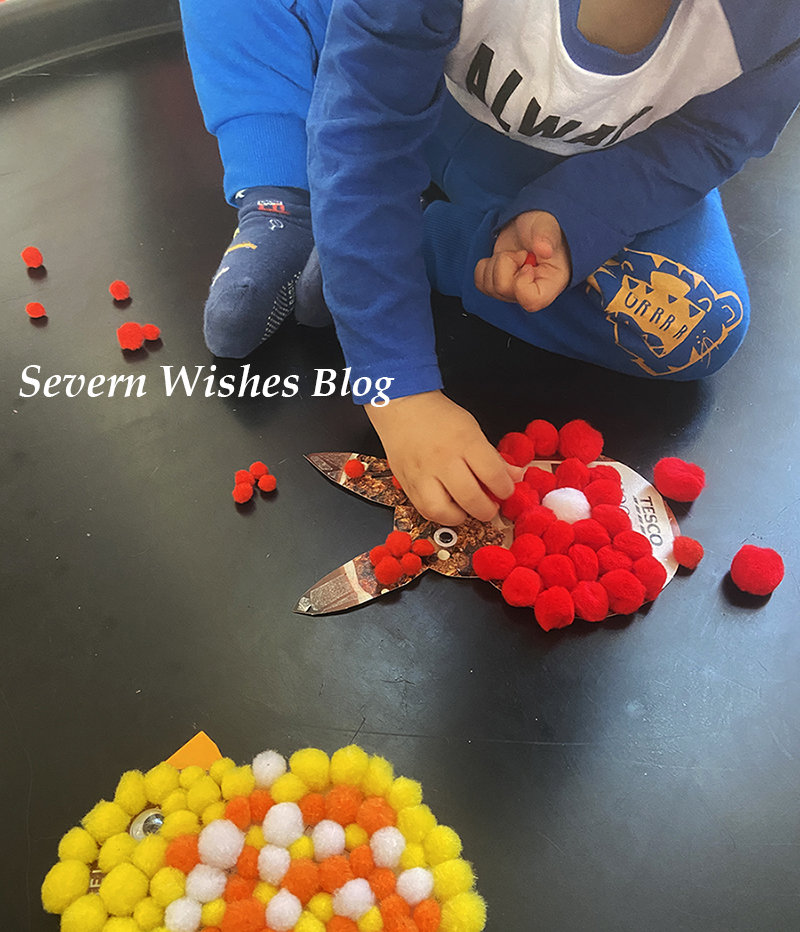
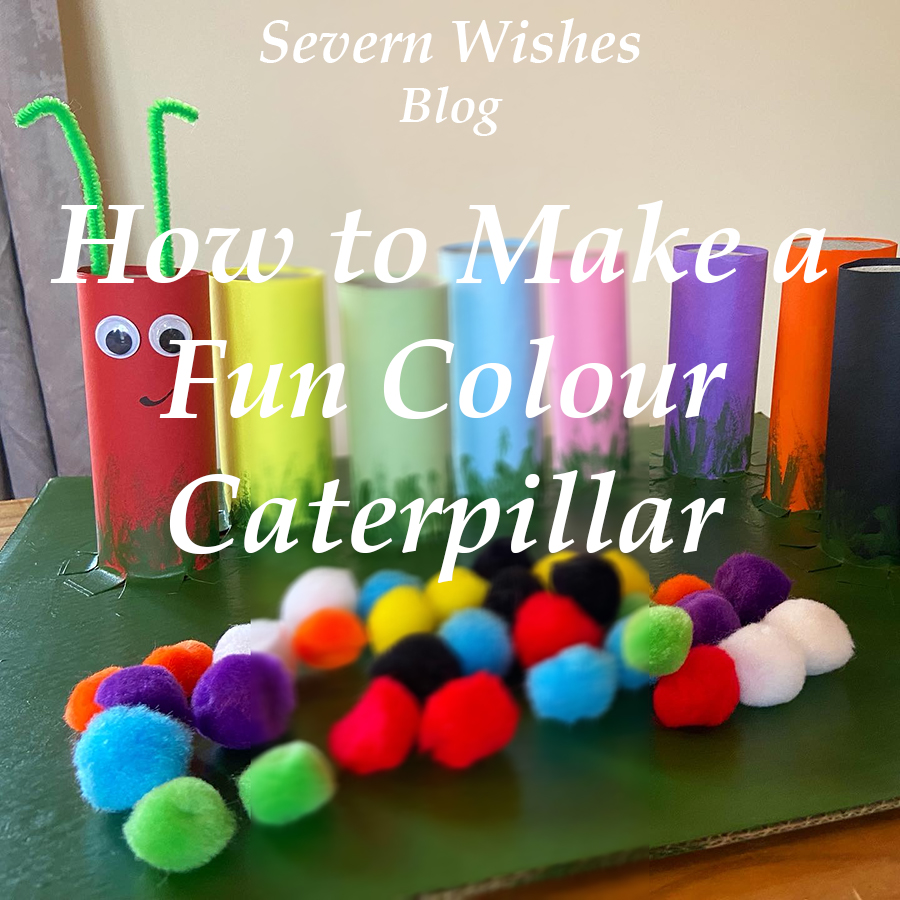
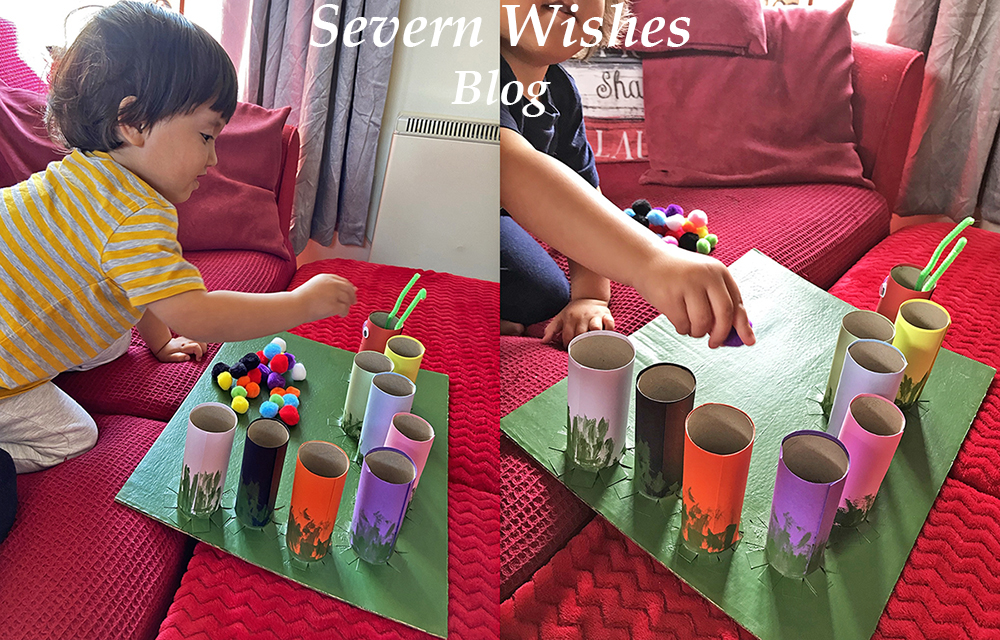
My Fun Craft Caterpillar is an easy to make craft project, that can help you to teach your toddler about colours and counting. You can make it any size you like and with only a few simple and non expensive items. Ideal for children aged two plus with good fine motor skills.
Designed for Age Group – 2 Years Plus (Supervised) Parent Difficulty to Make – 3/5 Time it takes to Make – 4 – 6 Hours Cost to Make – £10 Reasons to Make – Learning about Colours and Counting. Helps Develop Fine Motor Skills.
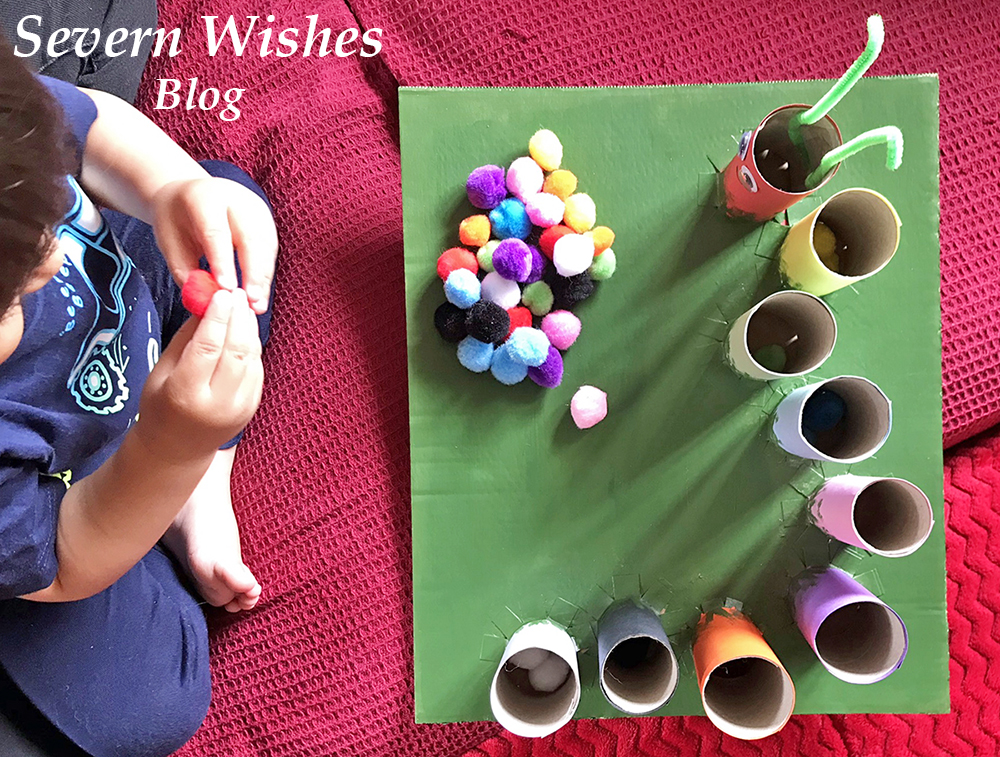
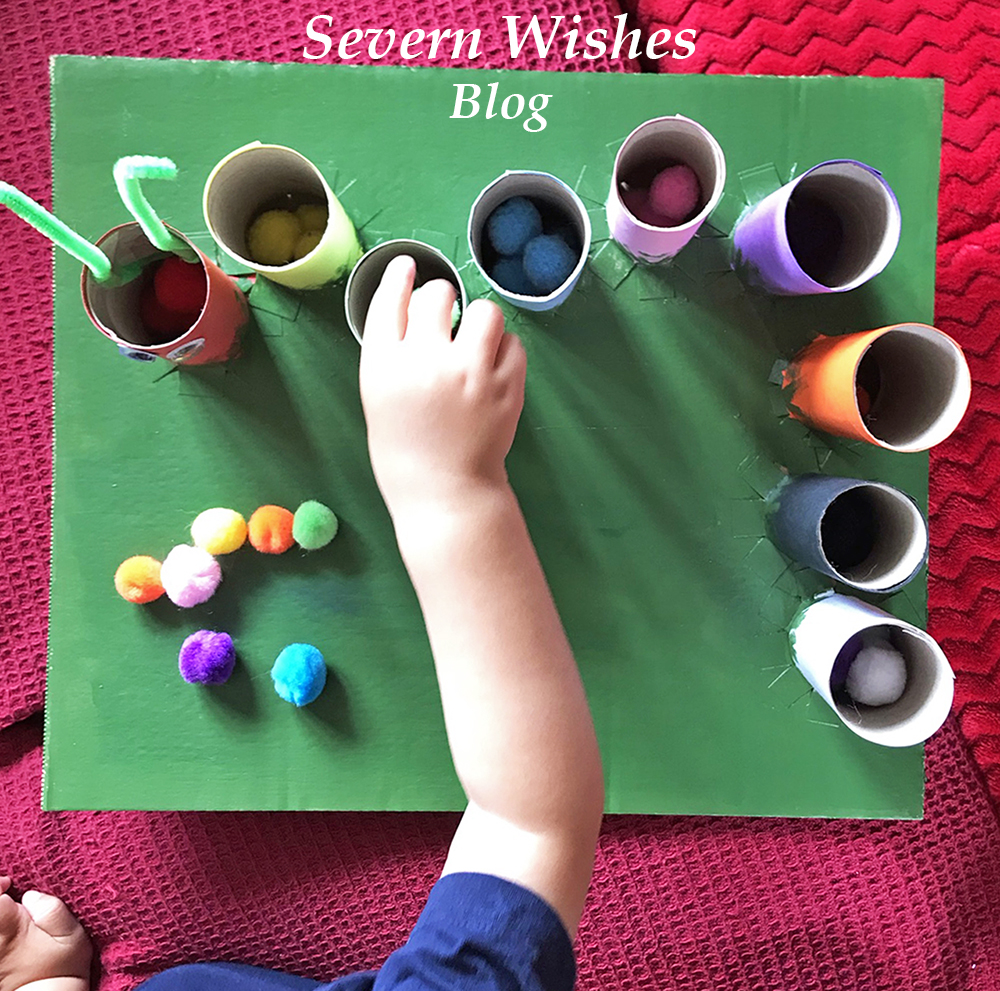
When my son began having issues with delayed speech I came up with several things to aid him in his communication. One of which was a Caterpillar friend that I made into several different items. Today I’m going to be showing you how I made my Fun Craft Colours Caterpillar!He is cute and great for helping little ones learn about colours, counting out and developing fine motor skills.
TOP TIP I wanted to help my son develop his fine motor skills as well as improve him saying different colours, picking up the Pom Poms and getting them to drop inside the correct tube does take some skills for little ones, so don’t worry if they have to learn how to do it. My son got the hang of it really quickly and was soon getting faster at doing it. One Tip is to show your little one what you want them to do, and then let them figure it out on their own a bit too. Always supervise but encourage and praise when they succeed.
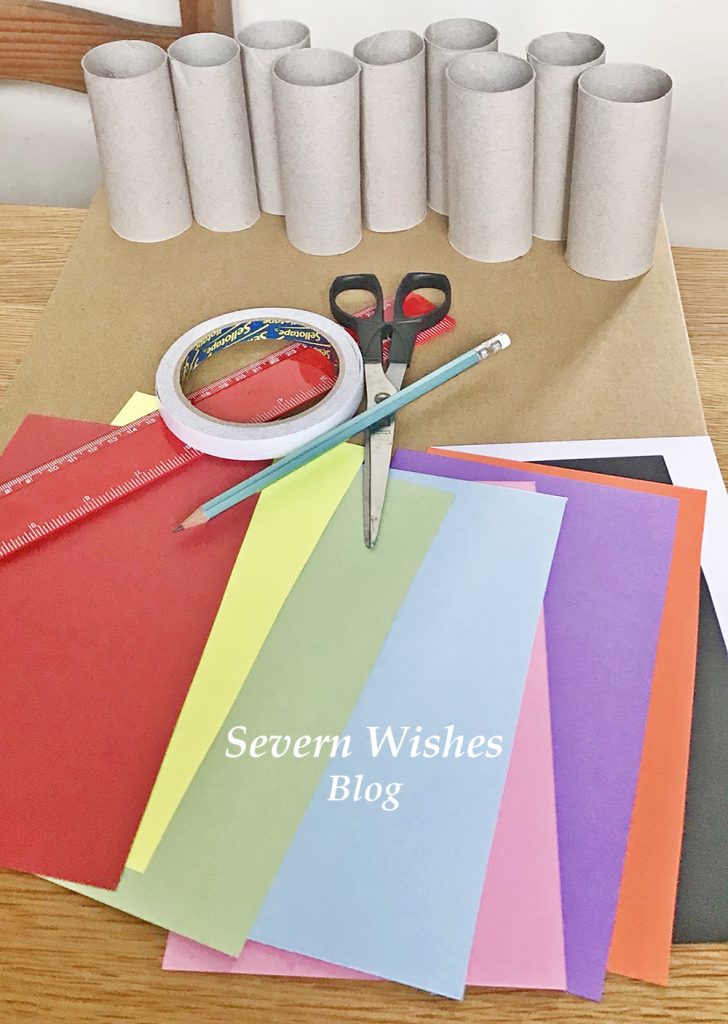
What You Will Need
Toilet Roll Tubes – You can use toilet rolls and kitchen rolls and just trim them so they are a similar height. Order your card and Pom Poms and work out how many rolls you will need, you require one roll per colour.
A Thick Cardboard Base – Do you have a sturdy box after going shopping or have had something delivered? You need a piece of strong thick cardboard either a Square or a Rectangle for your Base that the Caterpillar will stand on.
Coloured Card – You need to try and match the coloured card with the Pom Poms you are ordering. If you want to do a simple Caterpillar just go for a pack with Red, Yellow, Green and Blue mix, sometimes you get an Orange or a Pink in those packs. I bought two packs to ensure I got black, white, purple, pink and orange for my more complex Caterpillar.
Coloured Pom Poms – A toilet roll tube is a certain width across, so make sure you only order Pom Poms that are less than this. My tubes are 4cm wide so I purchased a bag of mixed coloured 2cm Pom Poms. This means they are easy enough to tip back out after every use. Also ensure you get non toxic child friendly craft items from reputable companies.
Double Sided Tape – You need this tape for cleanly applying your Card to your Rolls, this is the most time consuming of the craft build but it’s easier and less messy than waiting for lots of paint to dry. (See my How To below).
Paint for the Base – I chose to just paint my base Green, as if the Caterpillar were on a leaf or some grass. You can be as creative as you like! You only need to paint the base, once you have fixed on all your tubes (see my How To below for more clarity).
Stationery and Craft Extras – You may want to stick on googly eyes and feelers, or draw them on, it’s totally up to you, your Caterpillar, your choice! 🙂 You will also need a Pencil and a pair of Scissors.
Where I Got My Craft Items
Coloured Card Packs – Hobbycraft Online Pom Poms – Hobbycraft Online Goggly Eyes and Pipe Cleaners – Craft Bundle from The Works Double Sided Tape – Tesco Store Green Paint and Brush – The Works
How To Make Colour Caterpillar – Sabrina’s Step by Step Guide
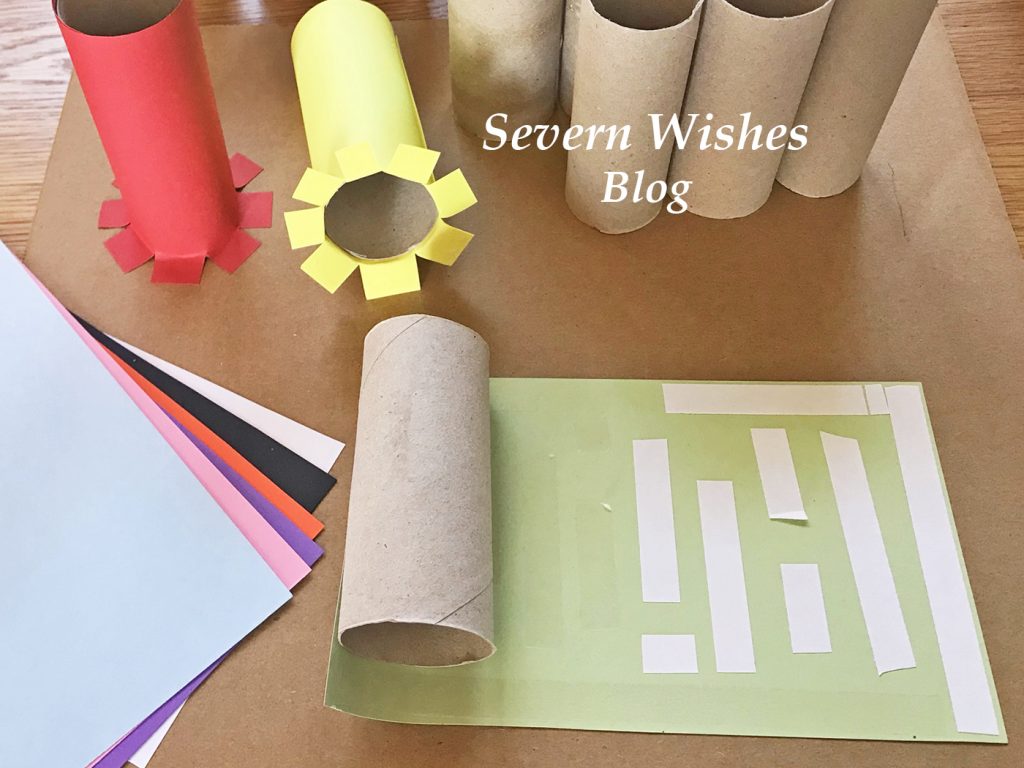
Step 1. Assemble all of your items as described above and ensure you have enough of what you need. Place a tube, a piece of coloured card and your desired amount of Pom Poms (I used 4 per colour) into individual piles. See what you have and how many tubes with the right colours and Pom Pom matches.
Step 2. Arrange the plain tubes on your base, and see how you would like them arranged. You need a one centimetre gap between each roll where it will be attached to the base. Bearing this in mind, arrange your tubes and mark with a pencil on the base where you would like them to go.
Step 3. Satisfied that you have all the pieces you need you can begin the card craft. Start by marking the pieces of coloured card for your tubes. For example mine were 15cm high, so I marked the card at 16cm with a pencil leaving the gap of one additional centimetre. Then cut all the card pieces to size ready for wrapping around the tube. TOP TIP ensure you leave enough card to wrap all the way around a tube with the extra at the bottom. You need at least a one centimetre section of card at the bottom of every tube for attaching it to the base.
SABRINA’S TOP TIPS: Don’t throw away pieces of card that you have left over from this make, I have plenty of Craft and Art ideas on my blog that you could use these bits for 🙂
Step 5. Cut strips of double sided tape, align them along the top and edges of the coloured card and down the centre, ensure there is enough at the edges. At what will be the base of the tube stack the pieces vertically, using a small gap between them, this will be cut in Step 7 to ensure an easy attachment to the cardboard base. Make sure you put tape on all of the coloured card pieces. TOP TIP Make sure to do this Step and on to Steps 6 to 7 at the same time and don’t leave the craft part way finished, otherwise the double sided tape will dry out before you can affix it to the base.
Step 6. Time to roll the card on to the tubes. Remove all of the double sided tape strips. Line up the top section of the cardboard with the edge of the tube, on a flat surface like a table, gently roll the tube along the card. The tape will stick well to the thin tube, using your thumb and first fingers you can smooth out the card as it sticks. Try keeping it in line at the top. Once you come to the end of the coloured card make sure the final line of it is secure to its tube, smooth with your fingers and hold the edge in place for a minute per tube making sure that its firmly stuck in place. Repeat this per tube, laying them down on their sides once you are finished.
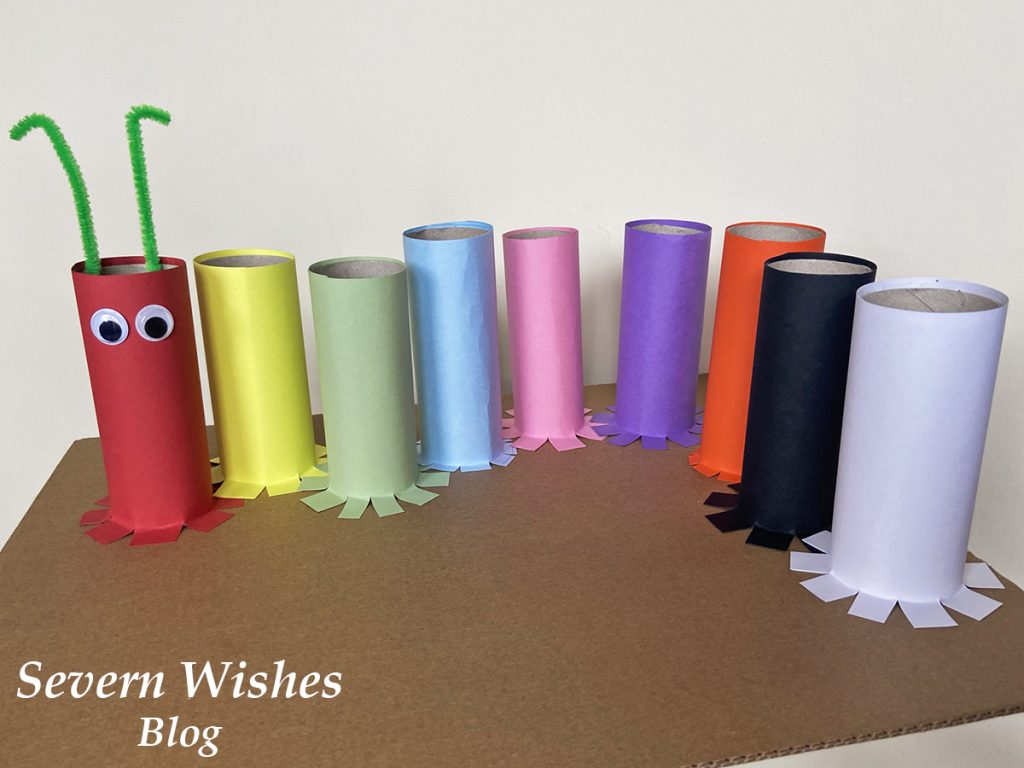
Step 7. You now need to be cutting the base of each tube so that they can be attached to the base. Take the first coloured tube you want to attach to the base (I did a Rainbow so mine was Red) and using sharp scissors cut a one centimetre slice up into the card at the tube base. Rotate the tube around cutting vertical slices as you go. Then once cut all the way around, gently peel back the slices and make a base for your tube. Affix it into place on your cardboard base because they should already have the double sided tape attached. Press down firmly and hold for one minute. Repeat this action with all of the coloured tubes until they are all attached to the base. (See images above and below).
TOP TIP Painting the base last ensures the tubes stay in place after the double sided tape has helped stick them down on the base. It also neatens up any edges that may have tape sticking out or tubes that weren’t quite level.
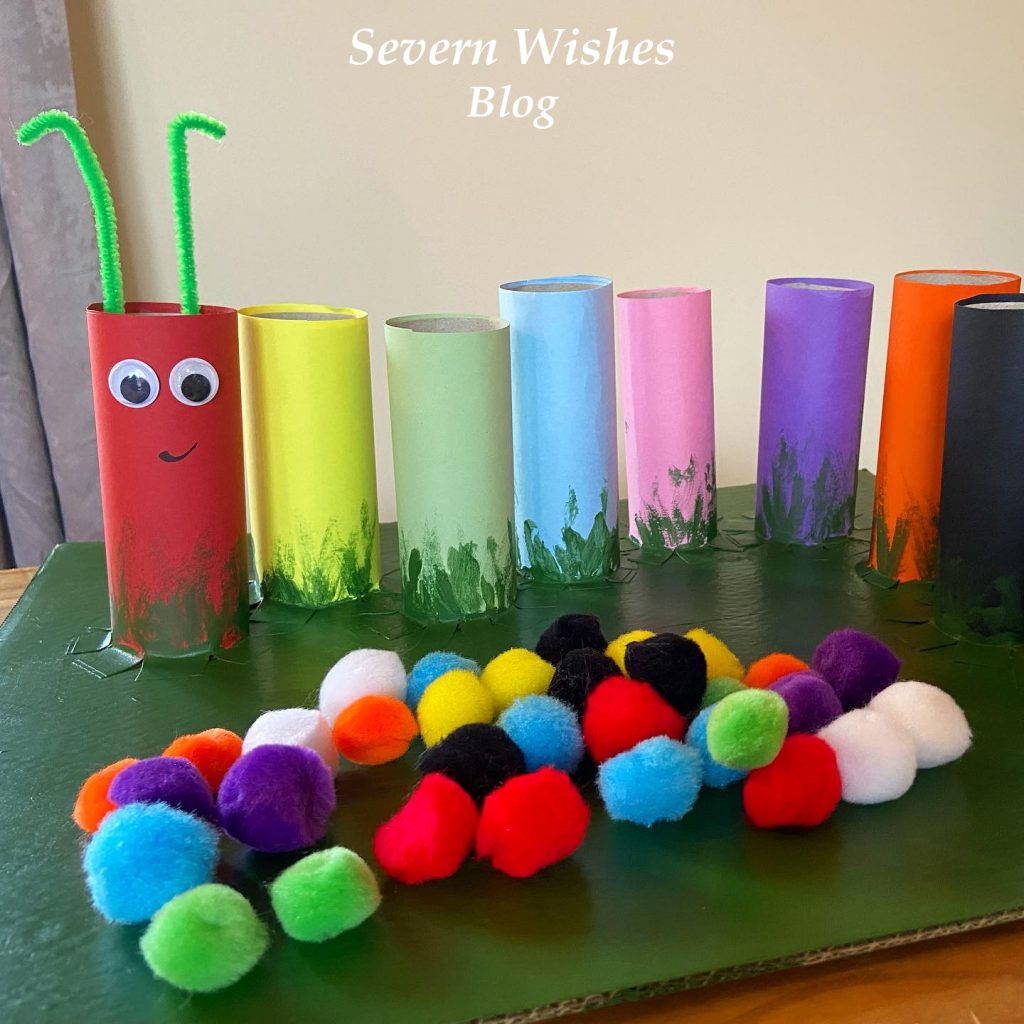
Step 8. With all your coloured tubes attached to the base you can now consider adding anything else to your caterpillar, and also paint the base with whatever paint you choose. I added googly eyes and some pipe cleaners as my Caterpillar feelers.
Step 9. Leave your Caterpillar to dry overnight before showing it to your little one. Ensure that you only play with it supervised either by you or another adult. The Pom Poms should be stored inside something that little ones can’t get into unless you are doing the toy together. Most children wouldn’t eat them at this age but better safe than sorry. I recommend a small plastic box like the really useful ones with the clip over lid handles.
TOP TIP Your Caterpillar friend can now be used to teach colours and numbers! Ask your child to count how many body parts the Caterpillar has, how many Pom Poms fit in each tube, can they separate the colours correctly and add them to the correct tube? This craft project can be used for play and learning and will keep your child occupied for hours.
Have you enjoyed this Craft Project? I would love to know what you think! Please leave me comments on the blog section below or on social media. Please tag me if you make a Caterpillar of your own! Use the hashtag #SabrinasCraftCreations
Thank you for reading this blog post today, I hope I see you again soon!
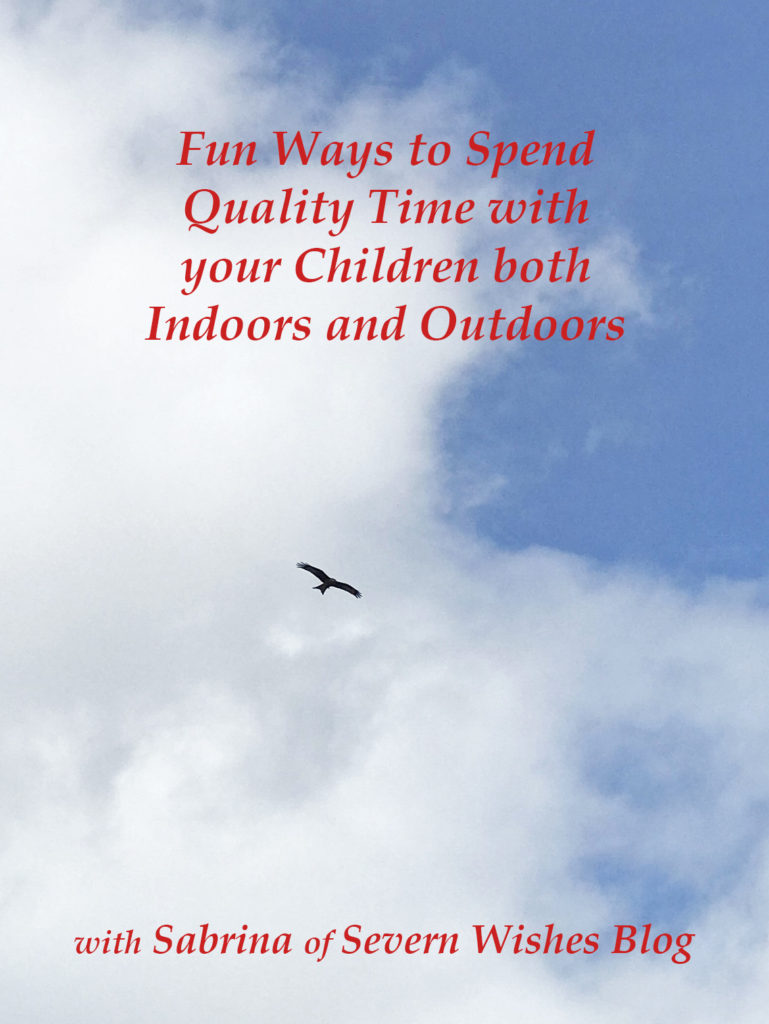
Sometimes we are all guilty of spending too much time on technology, and now that the weather is improving we should all be putting down our TV remotes and phones and getting outside! (I know that you’re thinking about doing that now, as you read this blog post on a piece of tech, but please bare with me as I have some great activities you’ll want to be inspired by I’m sure!)
So where to begin! If you’re not naturally adventurous for the great outdoors it can seem a bit overwhelming! So how about we just start small! I have come up with a range of things to suit everyone, outdoorsy types and not so much! All you need to do is choose one of these to do each day during the school break or even at the Easter weekend and voila you have some outdoor fun, nature related or outdoor activity to enjoy!
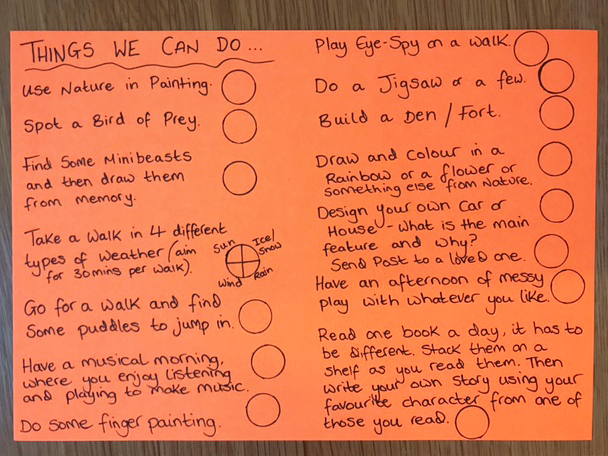
Here are my 15 “Things We Can Do” of Fun Ideas to do Indoors and Outdoors…Weather Dependent!
🥚 Use Nature in a Painting – Use sticks or leaves to paint with! 🥚Spot a Bird of Prey – Look up and see what is flying above your head! 🥚Find Some Minibeasts and Draw Them from Memory – Bugs can be colourful and interesting! 🥚Take a Walk in 4 Different Types of Weather – No matter what the weather it can be fun to take a walk!
🥚 Go For a Walk and Find Some Puddles to Jump in – Who doesn’t like jumping in a puddle! Wear wellies!
🥚 Have a Musical Morning, Listening or Playing – Music can help you relax!
🥚 Do Some Finger Painting – Draw the trunk of a tree and make the leaves with your fingers! 🥚Play Eye-Spy on a Family Walk – Eye Spy is great for a range of ages! 🥚Do a Jigsaw on a Rainy Day – Jigsaws can be a fun family activity on a rainy day or a board game!
🥚 Build a Den or Fort Together – Who doesn’t love building a den! Cushions and Throws work well!
🥚 Draw and then Colour in something you’ve seen in Nature on your Walk, a Rainbow, Tree, Flower etc
🥚 Design your own Dream Car or Dream House (for older children to imagine)
🥚 Create Post for a Loved One and Walk to a Post Box to Send it – Draw a Picture or Write a Letter
🥚 Have an Afternoon of MESS with Messy Play or Fun with Paint or Food items – Paint and Rice Crispies…
🥚 Read More! Read as a Family, decide on what your Favourite Book is and why – Books help you learn!
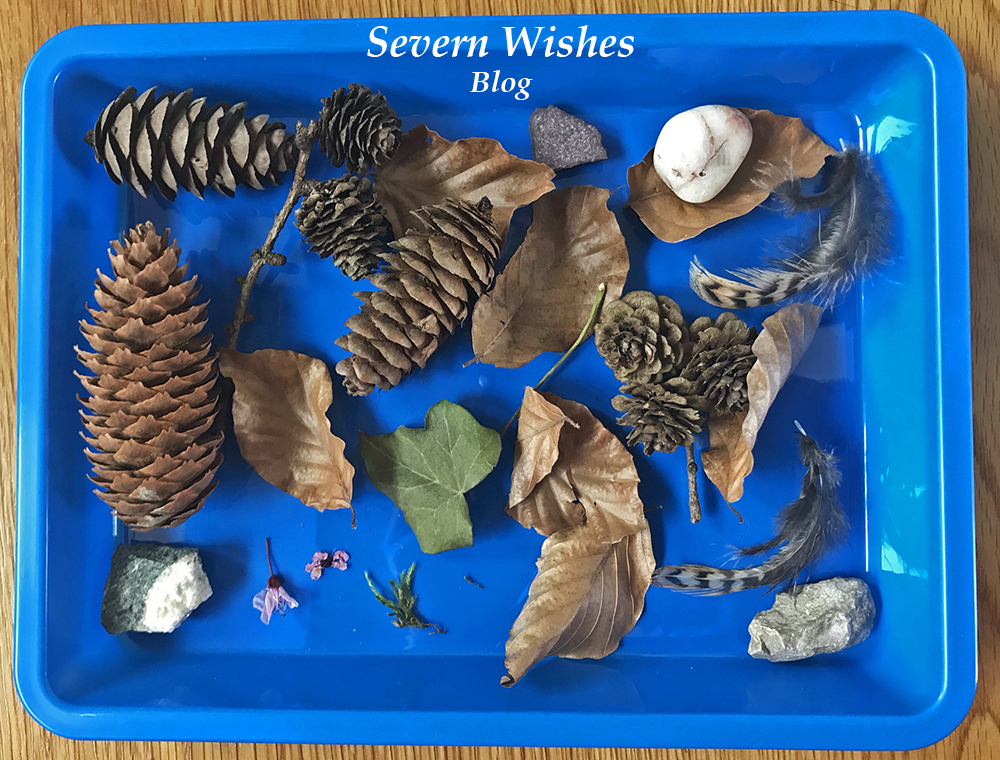
🥚 Nature Hunter Gatherers – Collect some things from in your local area to look at when you get home such as leaves and pinecones, things that have fallen from trees and bushes. Don’t deliberately destroy nature though! Fallen Leaves are great, discover what tree they come from by looking at the shape!
The image above is from when my son and I did a day of Nature Hunter Gatherers. It was a lovely warm day and we spent six hours outside having fun, games and walking. This activity is great for learning about where things come from such as pinecones and feathers. Make sure you do this on a dry day. We took a long walk through our village and picked up things that we found on the ground. Leave them somewhere cool and dry for a few days to dry out and make sure there are no creatures living in them before you handle them again!
I highly recommend getting some coloured trays like these, they were only £3 for a pack of 3 from The Works. Perfect for both Art and Craft and collecting things too!
✩✩✩
Picking Up Litter
If your children are a little older than mine you might want to pop gloves on when you go on your walk, take a plastic bag with you, and do a litter picking up hour in your local village or town. This helps the environment and the animals and birds in your area from getting injured.
🥚 Easter Ideas 🥚
You could also do Easter themed Drawings, Colouring In and Games such as an Easter Egg Hunt in your house or garden this weekend.
Check out my previous Easter blog posts for Art and Craft ideas and Baking fun… Here…
Thank you for reading this blog post today! I hope that I have inspired you to do at least one of these activities with your own family. Let me know in the comments section or on my social media if you get up to anything fun in the next few weeks!
I am fortunate to be an Argos Tester, this means that I often get items sent to me for the purpose of an online review. I test products and take photographs of them before submitting my findings and thoughts to Argos. For February I was offered Children’s Toys. I was excited at the thought of testing something that my young son would be a huge part of, and his opinions would matter during the reviewing process.
#ArgosTester #ArgosTesters #ArgosTestersCommunity
I have written this article about a product that I have been supplied for free, in order to test and then review it. This is my experience with said product and my honest review about the product which is listed below. I have already submitted my product review to the Argos Website when this post has been published.
My Honest Opinion on the Product
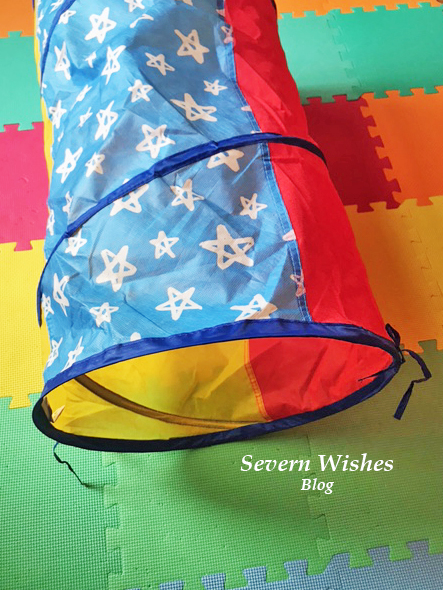
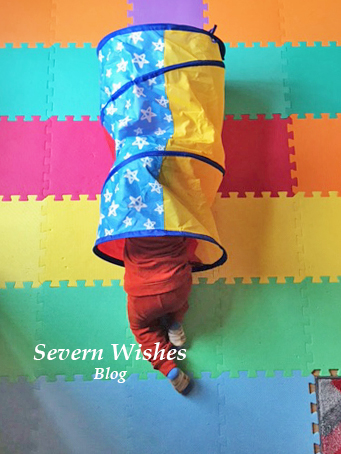
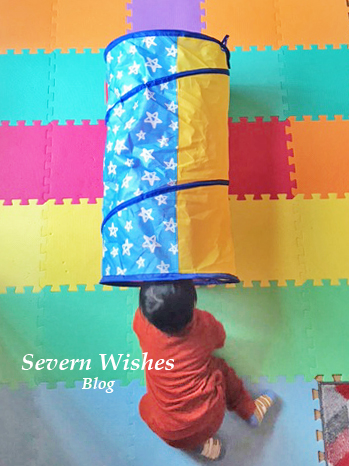
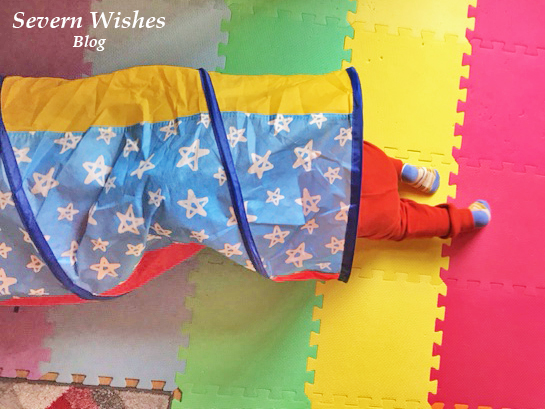
I have been rather happy with the overall look and quality of this product. The Pop Up Tunnel is something that doesn’t only entertain my toddler, but we can add learning into play and he also gets exercise indoors on poor weather days. It is bright and inviting and my son wanted to play with it immediately after I had set it up for him. I look forward to setting it up outside in the summer too on some outdoor play mats. I think it’s an excellent product for the price it is available at, and most children would have the imagination to be able to use it effectively. Because it folds away neatly it even fits into our large toy chest so it takes up no additional room. This product is ideal for any parents who may have a toddler or young child with lots of energy like mine. The best features are the ideal length (it is not too long to overtake your floor but long enough for a toddler to crawl through and have lots of fun), its bright colours and fun stars pattern, the genius tabs at either end so it can be securely fastened and put away for another day, and finally the imagination factor of it!
✩✩✩
Sabrina’s Top Tips for Using this Tunnel for Learning during Play
Once your child is used to the tunnel and is having fun with it, then there are several ways you can use it to increase learning while your child is playing. Words such as “Through” for them crawling through the tunnel is a good one, as well as “In”, “Out” and “Under”. You can also name the various Colours such as “Red”, “Yellow” and “Blue” and the “Stars” on the pattern too. See if your toddler can indicate which is which and say them back.
✩✩✩
Usage of the Product
The tunnel is made from material that is not waterproof, and is only wipe clean, so it is best used indoors and on a soft surface such as carpet, a rug or play mats. Keep food and drink away from it in my opinion. It will move around and slip easily on a wooden floor so perhaps look at where is safest in your home to set it up. Always supervise your child or children when using toys. The tunnel can be used outdoors in dry weather but I would suggest it was still set up on play mats still to avoid the material getting torn by anything sharp or pointed.
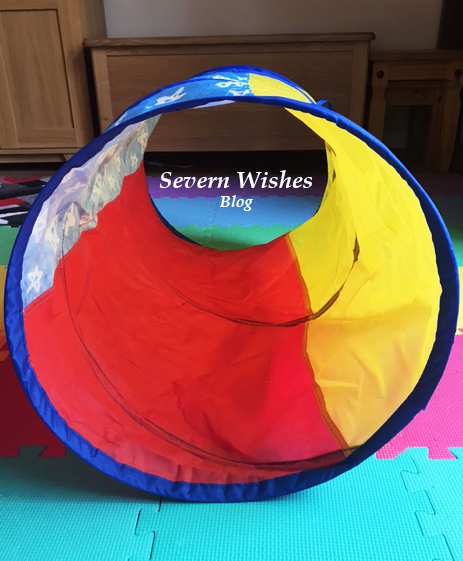
Product Name: Chad Valley Bright Stars Pop Up Play Tunnel
Product Details: A Red, Yellow and Blue Tunnel with White Stars. Ideal for children aged 2 years and over. Pop Up means it has minimal assembly required and also folds away neatly using the tabs at either end to secure and store reasonably flat. It is advisable to supervise children at all times while using this toy tunnel and to keep any sharp toys or furniture away from the material to prolong use. It can be used indoors or outdoors, but should only really be used on a flat and soft surface indoors, ideally set up on play mats or carpet. Due to the nature of the material it should be stored appropriately. Play Mats that can be set up outdoors is also a good idea when planning to use this outside because this tunnel is not waterproof.
Product Dimensions: H42cm W80cm D42cm
Product Description: Ideal for bringing children into a world of imagination. This tunnel can be anything they want it to be, and you can also use it with other items such as when children want to build a den for example. A tunnel to a secret dinosaur world, a secret passageway out into the world of spies… this can be whatever your child can dream up.
Argos Website Price: £8.00 (Correct as of 14th February 2021)
My Argos Tester Review Submission
My son was over the moon with this bright & fun tunnel he loves anything with stars on. It took no time to set up & easily packed away again, tabs either end secure it together almost flat so storage is no issue when not in use. A lovely item filled with possibilities with a bit of imagination, good for learning, teaching & great exercise on days we can’t get out of the house.
If you are interested in finding out more about this product then please click the link above in my Product Details section to go to the Argos website.
Thank you for reading this review, have a lovely day.
✩ Sabrina ✩
By continuing to use the site, you agree to the use of cookies. more information
The cookie settings on this website are set to "allow cookies" to give you the best browsing experience possible. If you continue to use this website without changing your cookie settings or you click "Accept" below then you are consenting to this.