My Day Trip to Warner Brothers Studios for the Harry Potter Tour at Leavesden Studios, at Watford Near London.
Welcome to my Travel and Lifestyle post outlining my experiences at the Harry Potter Studio Tour, with some of my photography. As well as an insight into my childhood growing up with this amazing literature adventure.
I went with my husband on the August 2017 Bank Holiday Weekend, and I paid £101.85 for the privilege of two “The Complete Adult Tour” Packages including the Paperback Souvenir Guide and Digital Guide to go around the studio with. That includes the £3.95 I paid to have all of my tickets posted to me. I spent £49.80 on souvenirs afterwards, but we will get to those at the end…

My Visit to the Harry Potter Studio Tour and My Personal Reasons for Going
It was an experience that I had been waiting for for a considerable time. The chance to go to Leavesden Studios near London, was on my bucket list. And not just for the one reason that’s obvious. Everyone who grew up reading the Potter franchise, either for themselves or with their own children, knows that these books hold a part of your soul that you gave away while becoming completely engrossed in the world of Hogwarts and Harry. J.K Rowling managed to do what very few authors can, and this was to create a world that so many people (both young and old) fell in love with. Although it was a frightening place to reside at times during the books, people longed to go there, and we all had our own visions of what it would be like…

For me though, it’s way more than that. The reason is that I had hoped to one day work at the studio. I remember applying to audition for the original Harry Potter film, but on my returned letter it stated that I was 6 months too old to audition, and that other older roles had already been filled. My dream was shattered. I had applied to audition for any part and was offering to be an extra as well, I was happy to travel as my parents knew how much it meant to me, and had supported me if I was chosen.
Sadly I was never lucky enough to be an extra, though I tried countless times and for the majority of the films whenever they opened up a casting. So I gave up on that dream for a time, and I stuck to my reading and writing with occasional stage work too as a teen. Still, I longed to be a part of that world…
Those days of being on stage are also sadly behind me now because of health reasons. And when I went to University aged 19 I had the choice of going down the drama route or to follow my other creative passion, which is photography. And I chose the latter. I still write though and I hope to one day have something published.
I think if anyone ever made my books into films I would love to be like Peter Jackson, who appeared in numerous scenes as an extra throughout his time directing The Lord of the Rings franchise. That would be completing two of my dreams in one go, I still live in hope of all of it…

So for the past two years I’ve tried my utmost to get to the Harry Potter Studio Tour, between work commitments and poor health, every time I’ve had to postpone or rearrange… but this August Bank Holiday I was determined to go. I had to book it two months in advance due to the summer holidays but it was something to look forward to.

What made it more real was the tickets arriving in the post, they were unique and creative and I felt like I was holding a part of the experience already. I thought it felt like an age away, but it was soon here and upon us. My husband offering to drive us down so I agreed and became my usual organised freak self, I did my maps and my travel times and planned out our day.
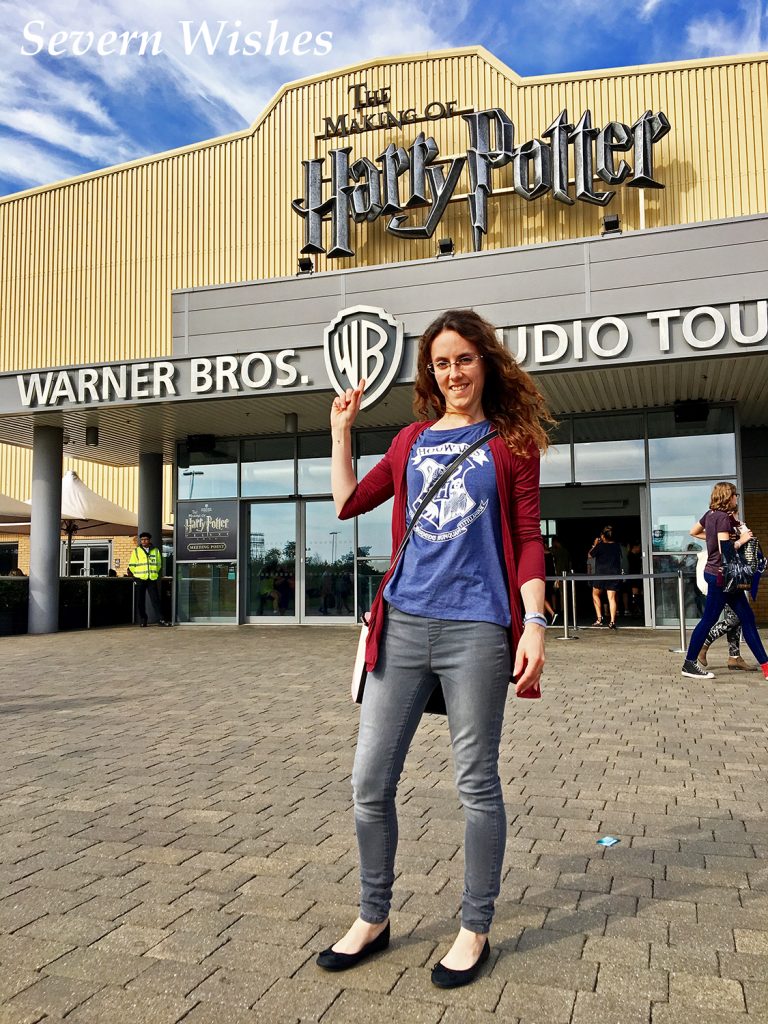
When you pull up to the studio’s you’ll notice that only advanced bookings are allowed and that security check your tickets on arrival. From there you park up in front of what looks like a mixture between an air craft hanger and a business distribution headquarters. The only give away are statues out front and several rather large Harry Potter film related posters…
The whole studio is neatly laid out and the main atrium is large and welcoming. The actors and characters portraits are all looking down on you from the high walls above. The Weasley Car (one of the many used) is suspended in the air above one corner, and you have a feeling of awe before you’ve even gone past the foyer.
I couldn’t help but wonder how people with no knowledge of the books would ever feel at home here. But as I said to my husband, (who has seen the films but read zero words on any of the books pages), to take the studio as it is, for its magnificence and marvel at the creativity, the hard work and the talent that has gone into making every single aspect of it.

Having purchased tickets that included a paperback guide and a digital guide, we decided to headphone it up and get into the queue. We would pick up our book guides at the gift shop at the end of our tour (as suggested by a staff member) so we didn’t have to carry them around.
So as we queued up initially to start the tour I was amazed by just how many people there were. There had to easily be 200 people going in to each tour slot. Plus there were always things to read, see or listen to, even while you waited. Quotes from J.K.Rowling and the famous “Cupboard Under the Stairs” can be admired as you queue for the beginning of you tour.

Once inside the introduction area you are met with many television screens on the walls placed vertically and acting as cinema posters, showcasing the Harry Potter film franchise in every language they were released in. It was fascinating to see how the posters looked, advertising the various movies in their country, some were rather different than ours.
Next our tour guide gave us a brief introduction into the do and don’t of the studio. Of course it contained the usual rules of, “Please don’t pass any barriers” and “Don’t reach over and touch the costumes” things like that. Common sense but essential reminders for those who might get a little carried away with the magic. There was also a no food and drink policy and only one main rule encouraging you to take as many photographs as possible and to share them. No problem for me, I thought, and by the end of my tour I was suitably satisfied with the 1,200 images I had taken.
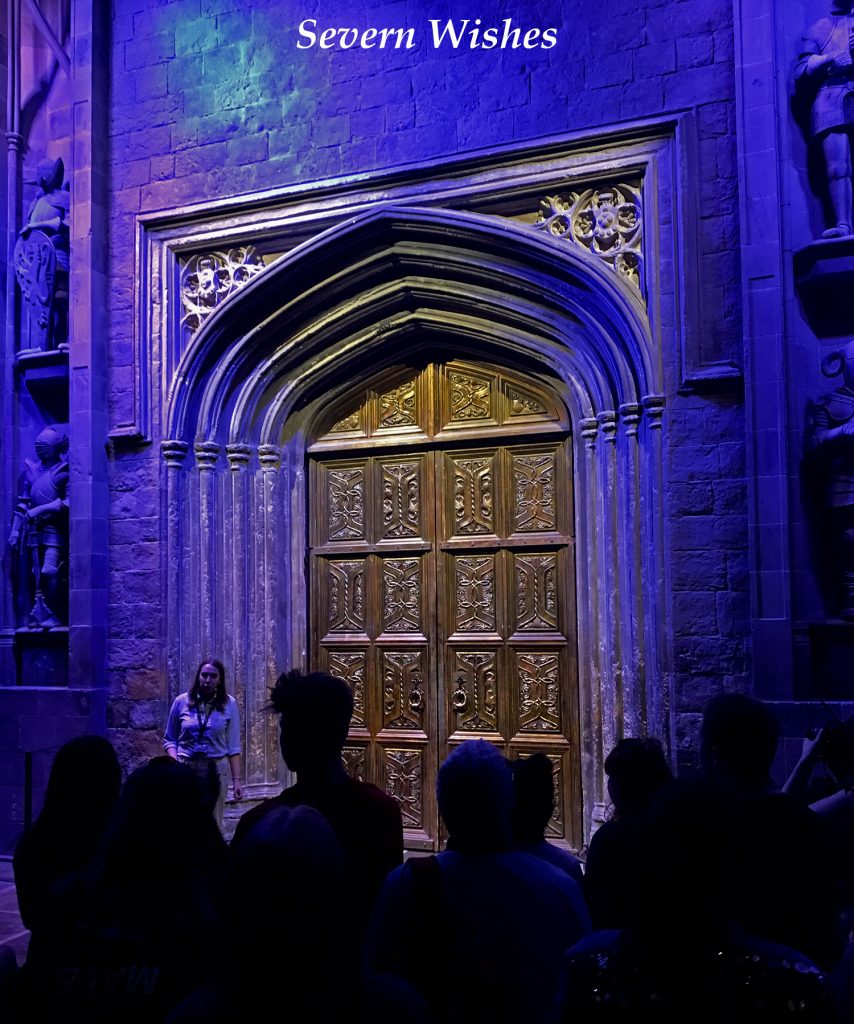
So the next part I don’t want to spoil for those of you who have yet to visit, all I will tell you is that it begins with a door…
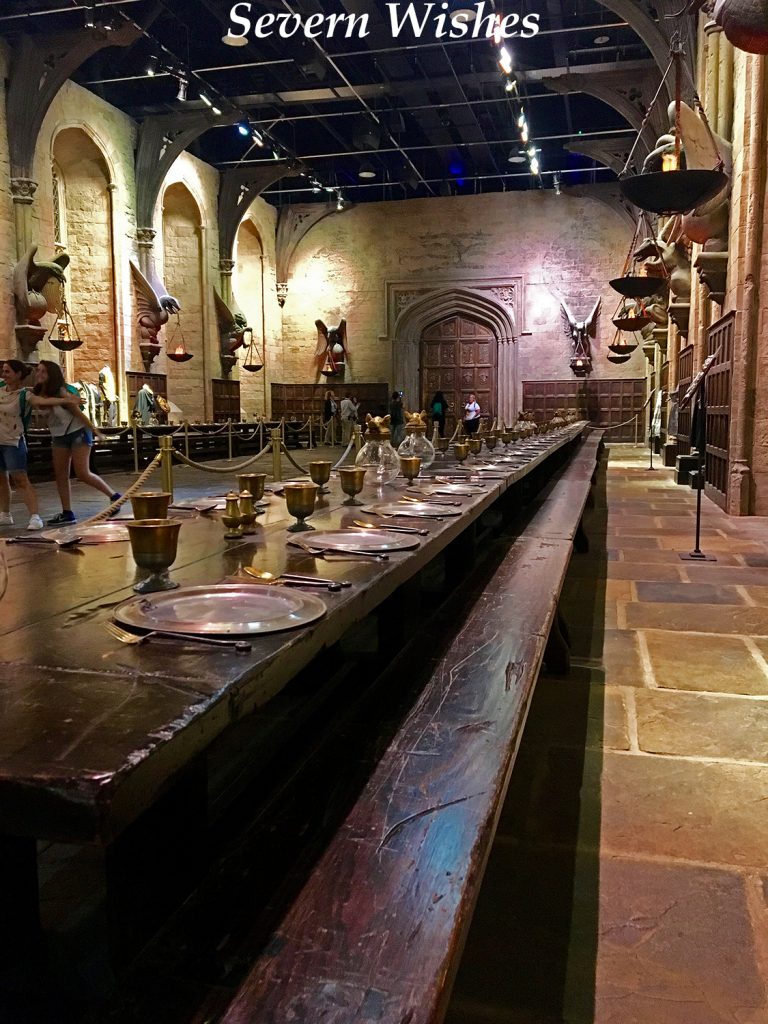
As you enter the start of your Harry Potter studios tour you are welcomed with a familiar sight, and one that I had imagined in my mind since I was eleven years old, when I first read The Philosophers Stone, that room is of course The Great Hall. Obviously missing the incredible magic sky in the ceiling, but this room is so iconic to the movies and an essential part of the Hogwarts Castle. If you think back to how many incredible things happen in this Great Hall, then you will understand why I got goosebumps as I walked through it.

Set around the room are two of the amazing long tables and benches, that had once been filled with the actors as they were being filmed. Now they stand in testament to all those hours of rolling film, still set out as though students would soon be filing in for dinner. Fake flames flicker up the walls from the metal burners along the sides, and the original flagstone floor remains underfoot. Some of the actors costumes are situated further down in the hall, and I was in awe of their details. Even the alter with the Owl that Sir Richard Harris (the original and wonderful Dumbledore) stood at in the first two films, along with his costume, and that of several of the other teachers too, remain in excellent condition for all to see. The details were incredible!

As you finish The Great Hall you notice some doors off to the left, these lead you on to the rest of your tour. I took one last look back at The Great Hall as I went through the doors into the rest of the studio… I hope this image shows you the scale of this incredible room.
 I won’t go into every little detail of this next enormous section, but I will however give you a list of some of the rooms and the things you will encounter here.
Hair and Makeup and Especially Wigs
Wands and their Wizards
The Gryffindor Common Room
The Gryffindor Tower and Beds
More Costumes – Mostly Gryffindor and/or Teachers
Dumbledore’s Office
The Pendulum Clock
Potions Class
Paintings and Stairs
The Leaky Cauldron
Hagrid’s Hut
Musical Instruments
Various Significant Furniture
Quidditch Brooms and Trophies
Broomstick Lessons and Photo Experience
The Burrow – Weasley Household
Ministry of Magic Chimneys
Various Props
Cars and Vehicles
Significant Tables and Doors
Statues
Animatronics
Here are a few images but I won’t spoil it all for you…
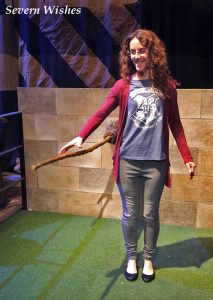 Here I am doing my first Broom Lesson… “UP!”

 I remembered these costumes so vividly…

 Potions Lesson anyone? I was a huge fan of Alan Rickman, I don’t think anyone could have played Severus Snape as well as he did. I was very sad when he passed away recently, so to be so close to one of the costumes that he actually wore, I felt like he was there in spirit…
Once safely through these wondrous parts which took us over an hour because there is so much to see (and with crowds too), you find yourself at the Ministry of Magic section and the entrance to The Forbidden Forest.
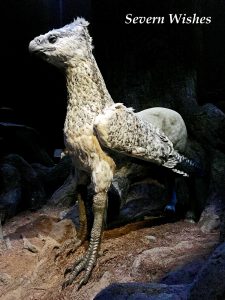
Having deliberately waited for the Forest to be included in the tour I was rather glad I had. I absolutely loved The Prisoner of Azkaban, it is my favourite of the books and although I felt the film missed a few vital back story parts, it was extremely well done by the directors. Buckbeak the Hypogriff was also a vital part of the storylines so to stand so close to his animatronic version was a great experience. I even took a selfie!
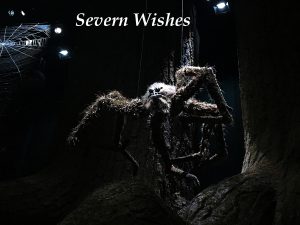
The other side of the forest leads us into the territory of rather large spiders including the one and only Aragog and her Spider minions. You can see a Patronus and other forest related things too. After this you will pass through into a break area with a small shop and some toilets…

After the small pit stop area you walk out into the long room and are greeted by the smell of smoke and the bright colours of the Hogwarts Express. The real life and full sized train, it was amazing to see, and all the more amazing to get on it and stand where actors had once stood.
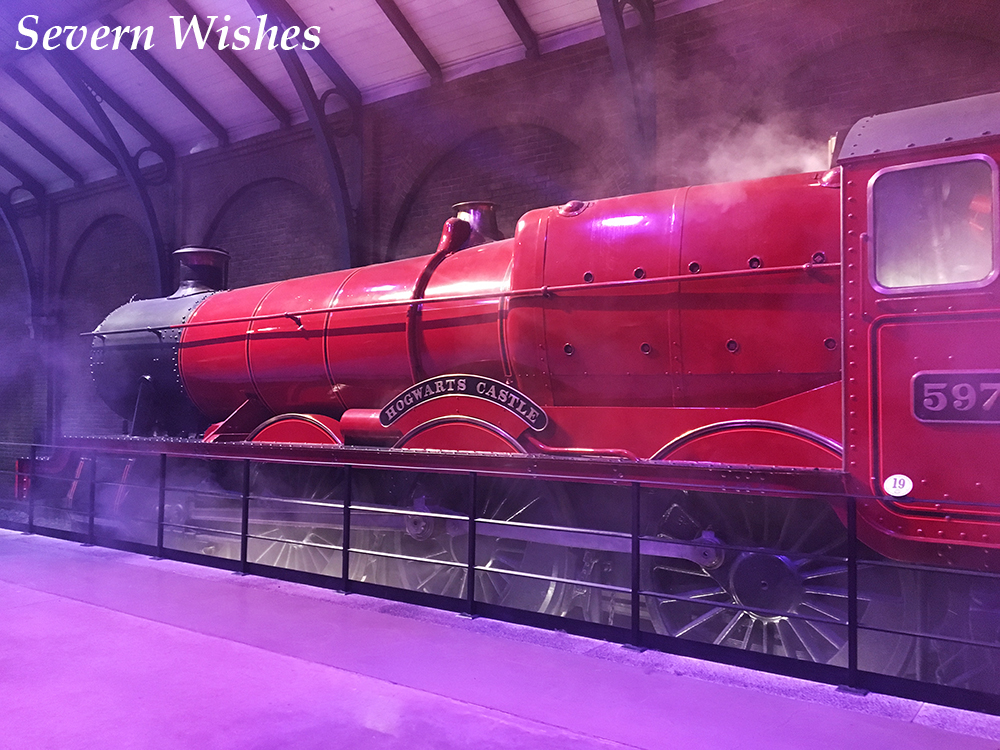 Obviously so much of the inside of it is partitioned off so as to preserve the original carriage seating and other features, but they allow you to walk on and look inside the various sections. Most are still laid out with luggage and examples off the confectionery trolley such as the illusive chocolate frogs.


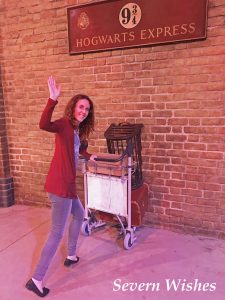
There are a few photographic opportunities here as well as a small shop too. And for those who have never visited King’s Cross Station in Central London, the chance to be one of those lucky wizards pushing their trolley through the wall at 9 & 3/4s…
Once you’re through and finished with the Hogwarts Express the Cafe Area awaits. Butterbeer and food can be found here, along with a vast seating area for you to rest before the next part of the tour.
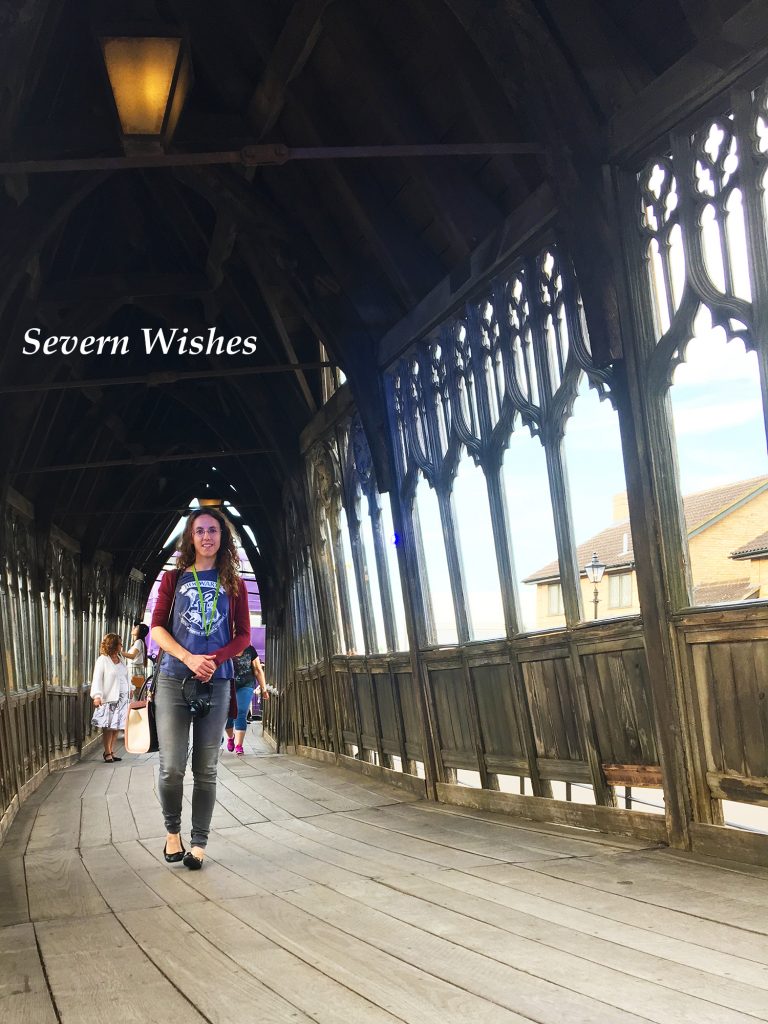
Into the Backlot now and you will see some rather familiar sites! The Hogwarts Bridge, famous in the film The Prisoner of Azkaban, where Remus Lupin and Harry share a beautiful moment as he reflects on the past… This is one of my favourite parts of the films and the books, and I loved walking along here…
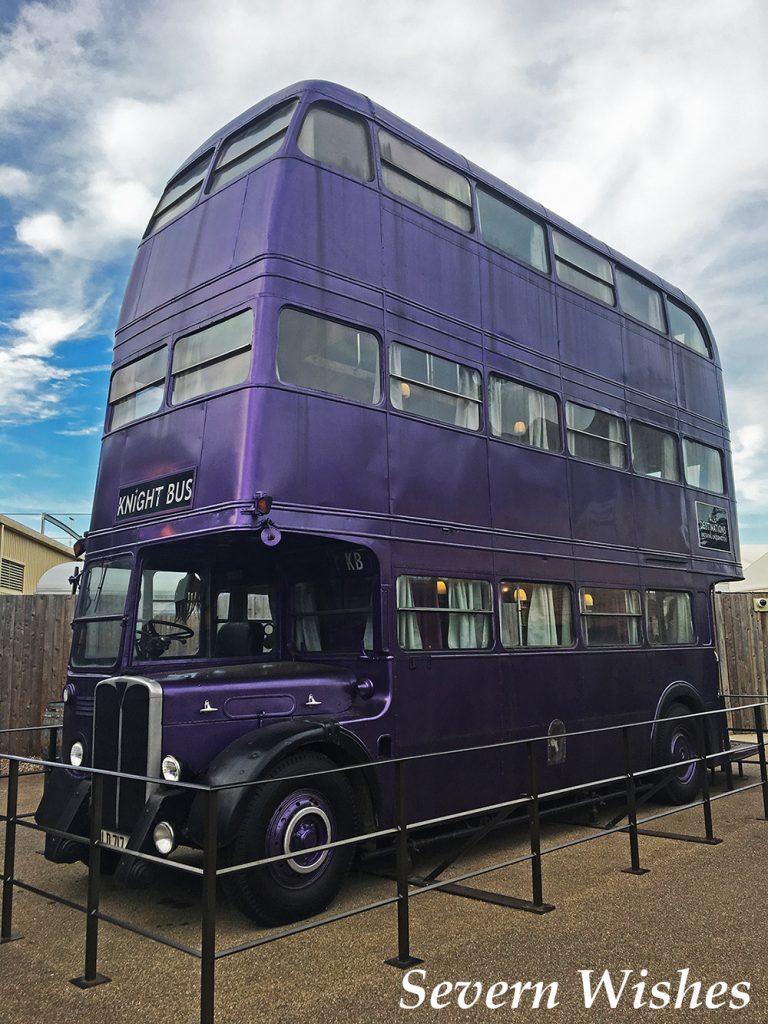
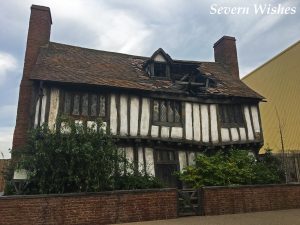
 The Knight Bus! And the houses… 4 Privet Drive and The Potter’s Cottage at Godric’s Hollow are all here in this outside space… To walk and to stand where these incredibly talented people had stood, was inspiring. Here are some of my images…
 The attention to detail in every area of the tour is astounding.

The Chess Pieces from the Chamber of Secrets lead you inside and on to the next parts of the tour…

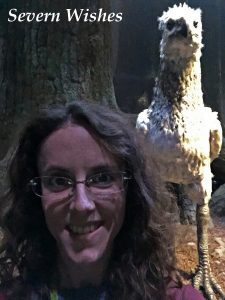
Following on from this you go into the Creature Effects Department. This was an area that fascinated me, not just because of the animatronics and the puppets, but the almost life sized body doubles of some of the cast who perish at times in the movies. Here is a fun fact, they were designed this way so that when actor Robbie Coltrane was carrying them, they looked the correct size.

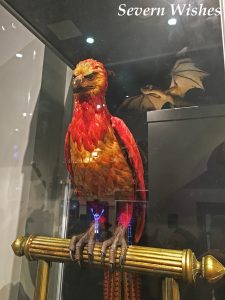
Fawkes the Phoenix was my favourite in this section, as well as a Hedwig model Owl and a few other pieces like another Buckbeak and a Dragon head.


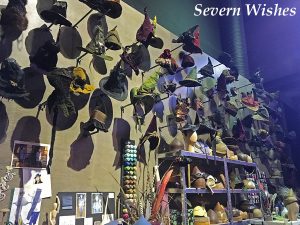
As you walk through you notice all the small things that would have taken days for someone to painstakingly create. Three dimensional models, a hundred or more hats, wands and costume pieces.
One of the final parts of the tour is the one and only Diagon Alley. And although I was excited to see this part, I somehow expected it to be larger! I’m not sure why! I will include a photograph of me with my husband below, see what you think, did you expect the area with the shop fronts to be bigger? I know I did!


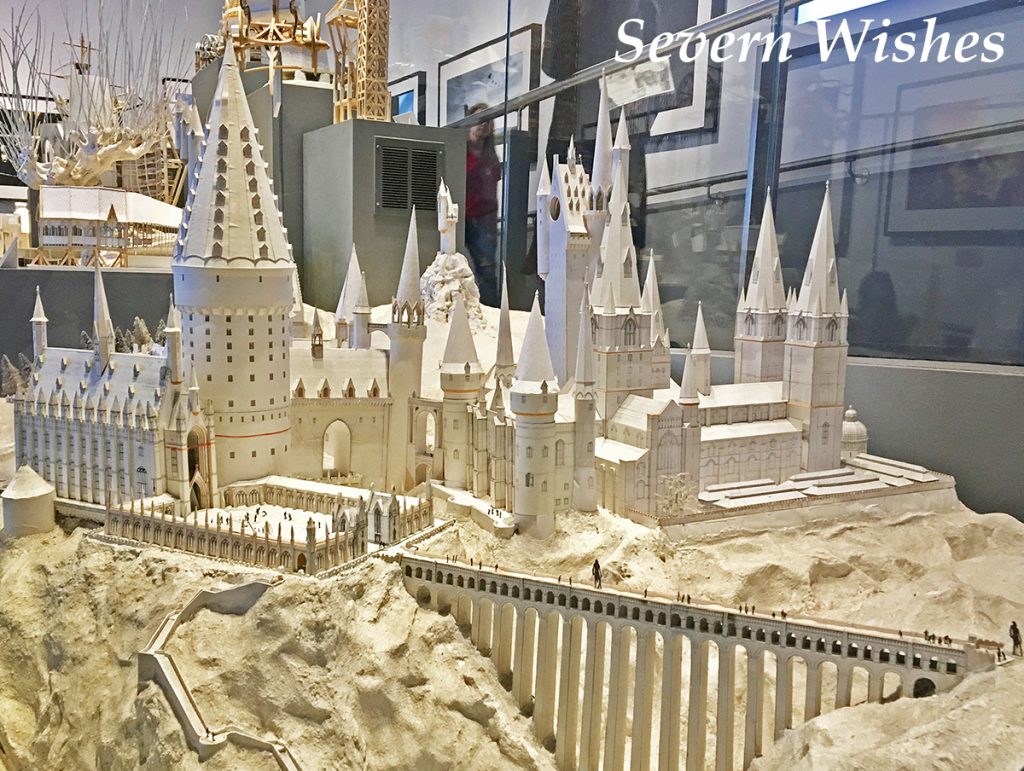
One of the most incredible rooms on the tour is the final one… The Model Room! I was in awe of the details of the castle as we walked in. The lighting is quite dim however so it was difficult to get a good photograph, I hope you can see the details.
This was an amazing way to end the tour, and I could have spent hours looking at all the tiny details of this model. But I also wanted to get myself into the gift shop!
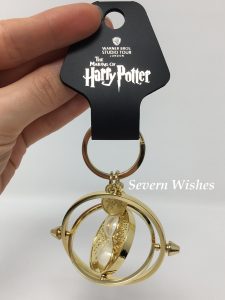
 Finally you enter the gift shop at the end of your tour. It was packed with all sorts of Harry Potter wonders! Clothing, Books, Keyrings and Cuddly Toys! But I must say, the majority of the prices are very steep. It’s disheartening when you pay so much for the tour itself, to find a mere key ring is £7! I will outline the items I bought and the prices that I paid for them. There were many items I would have liked to buy but I couldn’t justify the amount they were asking for them.
 Hogwarts Crest Keyring £6.95
Hogwarts Crest Pin £6.95
Time Turner Keyring £8.95
Buckbeak Keyring £4.95
Hedwig Pin £6.00
5 Pins Set £9.95
Overall I thoroughly enjoyed my afternoon at the Warner Brothers Harry Potter Studio Tour, and I can understand now what all the hype was about. Being there, where actors that I am greatly fond of, have worked for many years, is such an experience. There was only one part of the tour that I was expecting to see and did not… The Sorting Hat? I had wondered if I had missed it but then I was sure I didn’t. So if there isn’t one, perhaps it could be suspended in glass and you stand beneath it, it could sort you into a house… just an idea for the future WB!
Now for some questions that I have been asked and my honest answers to them.
Would I go again?
Probably not this year, or next year, but if there was something newly added or they extended it and included things in an easier to see way (I thought some parts were over filled and cramped). I’m sure they have plenty of things they could build or rebuild or dig out of storage to make the place larger.
What was my favourite part/s?
I loved seeing the train, the animatronics (Buckbeak) and the costumes. But my favourite part was walking along the bridge from the third film. The details in so many aspects of the tour were amazing.
Was it good value for money?
When you consider how many people worked on the film, and I’m talking artists, sculptors, carpenters and the like. Those are the people the tour celebrates, and I think that is so important, as these professions don’t always get the credit that is deserved. Overall I think you pay your money to see all the amazing things that made the franchise of films what they were, and without all of these elements it would not have been such a success. For this, I don’t mind paying what I have paid. Though I wouldn’t go again in a hurry.
Have I ever done a Harry Potter Sorting Hat Quiz?
Yes I have done, one as a teenager and two as an adult. Each time I have been either a full Gryffindor or part Gryffindor and part Hufflepuff.
What souvenir did I buy for myself at the WB HP Tour?
I purchased three things for myself, one was a pin, and the other two were key rings. I bought a few little bits for my family members. See the images below for a more detailed look at them.
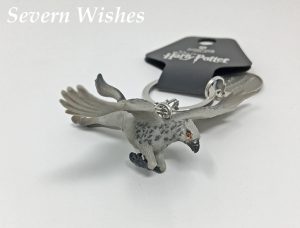
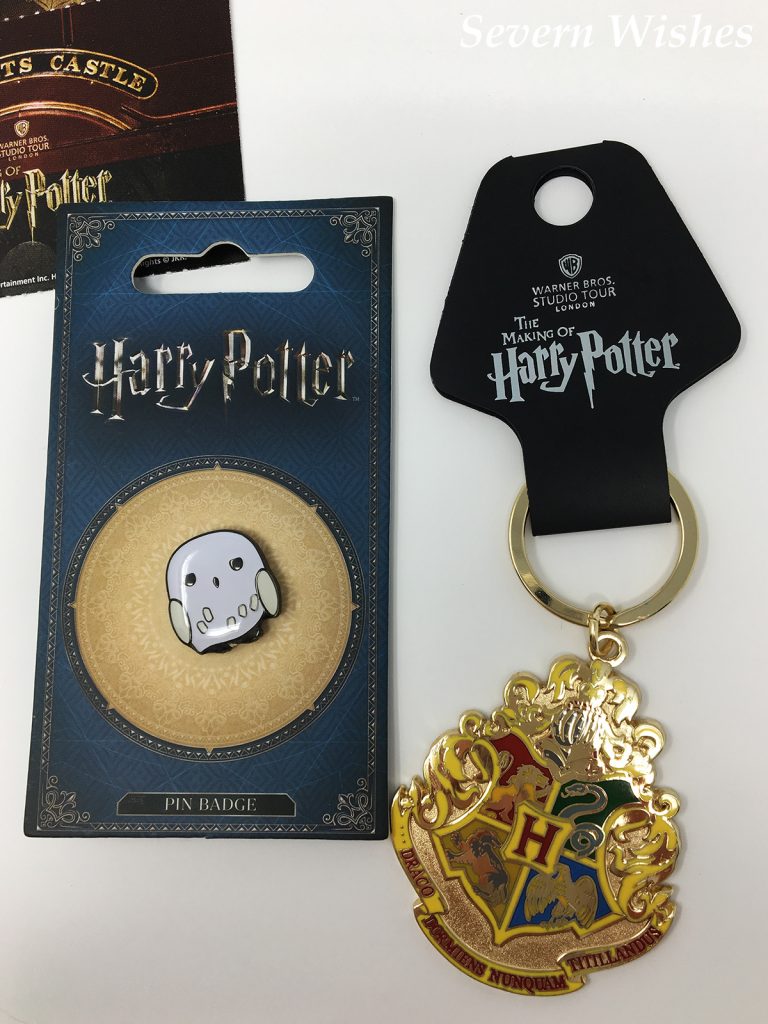 How cute is the tiny Hedwig Pin?! 😀
I hope you have enjoyed reading about my Harry Potter lifestyle, my experience on the tour and looking at my photographs too.
If you have any questions and you think I can answer them please leave me them in the comments section below.
I will include a link to the website below too, for anyone who wants to look at maybe booking a tour slot, they have unique visits this time of year too.
Until next time Wizards and Muggles, I’m Sabrina, and you’ve been reading this on Severn Wishes Blog.
✩ Sabrina ✩
Harry Potter Studio Tour Website


 Hello and Welcome to the October Treatbox Reveal with Sabrina of Severn Wishes.


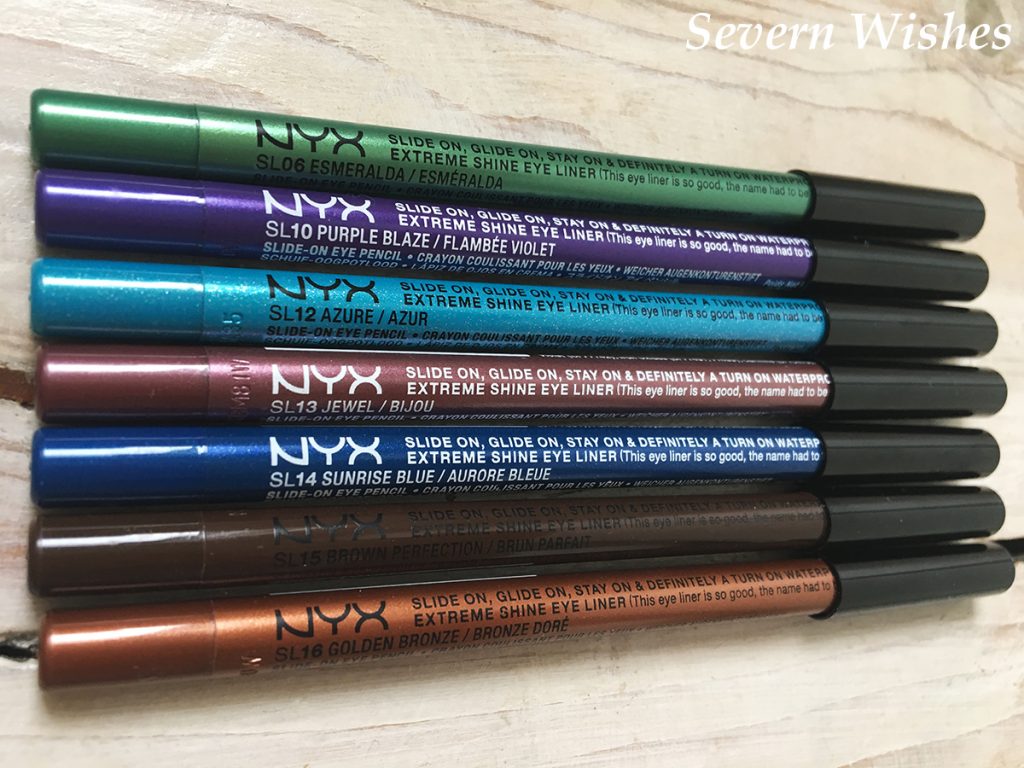 Here are the numbers and the names of the seven eyeliners I have bought.
 The new colours are perfect for creating looks that stand out, especially with the blue shades.
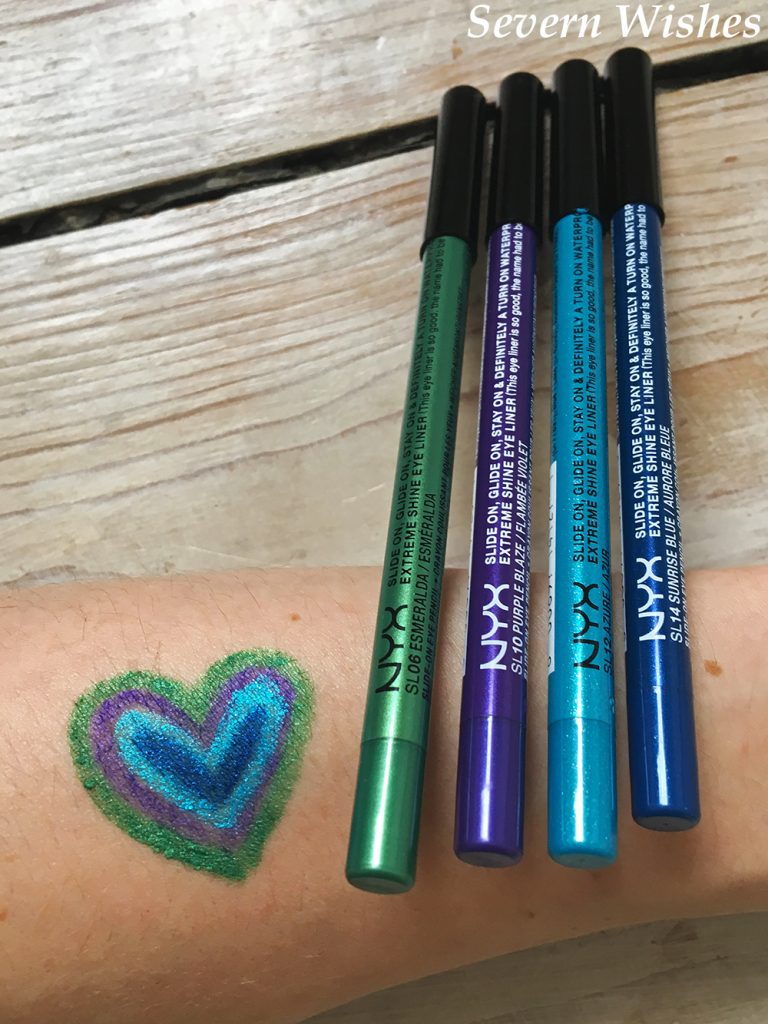 Playing around with some of the colours… I drew a heart on my arm, can I get an aw?
 You can tell on my fairly pale skin just how much these colours stand out, and they compliment one another well too.
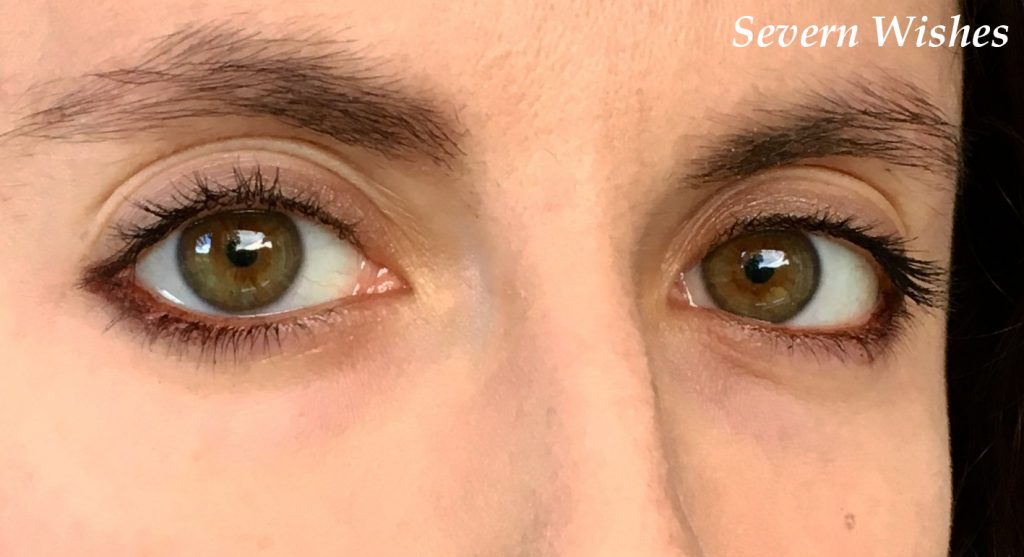 Above; Subtle Natural Makeup Look; while using SL15 and SL16.
 Above; My take on a Mermaid Look while using SL10, SL12 and SL14.
 These are now my “go-to” eye liners and I haven’t used any other brand since getting them. If you see me with my makeup done online, look for the tags to see if I used the NYX ones!
 These eyeliners are so easy to apply, I absolutely adore using them. I sometimes blend them on my eye lids using my Spectrum Brushes too…
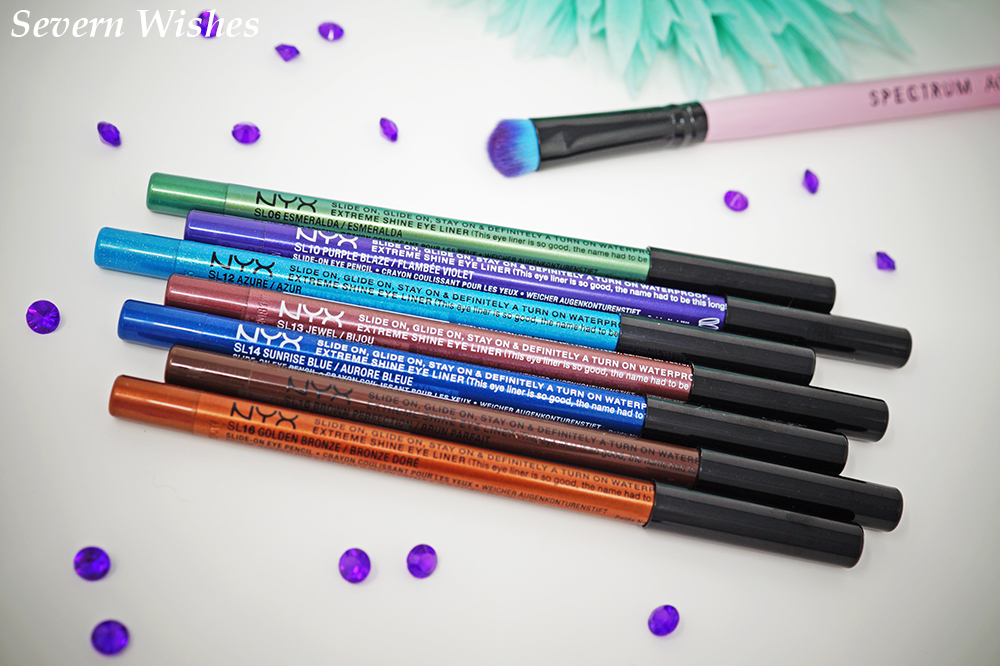


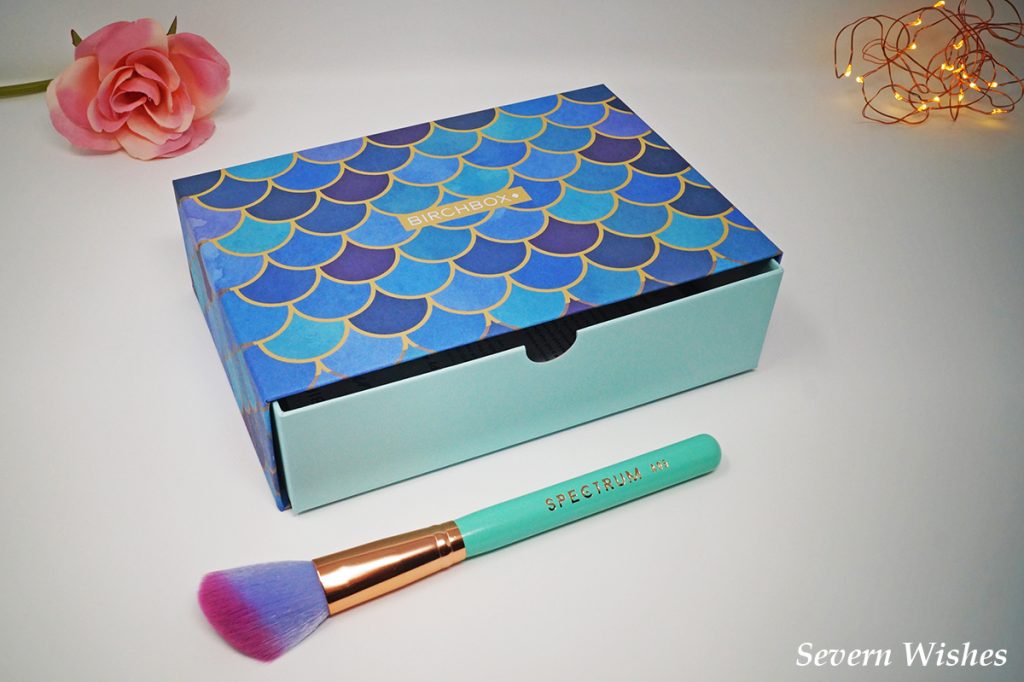 Now it’s time for the Reveal! Let’s open my Mermaid themed box!

 Nails Inc is a good brand that I have tried and tested before. I was happy that I was receiving something that was well known. The makeup bag reminds me of Summer with the shades of its stripes. They are two free gifts that I will certainly enjoy.
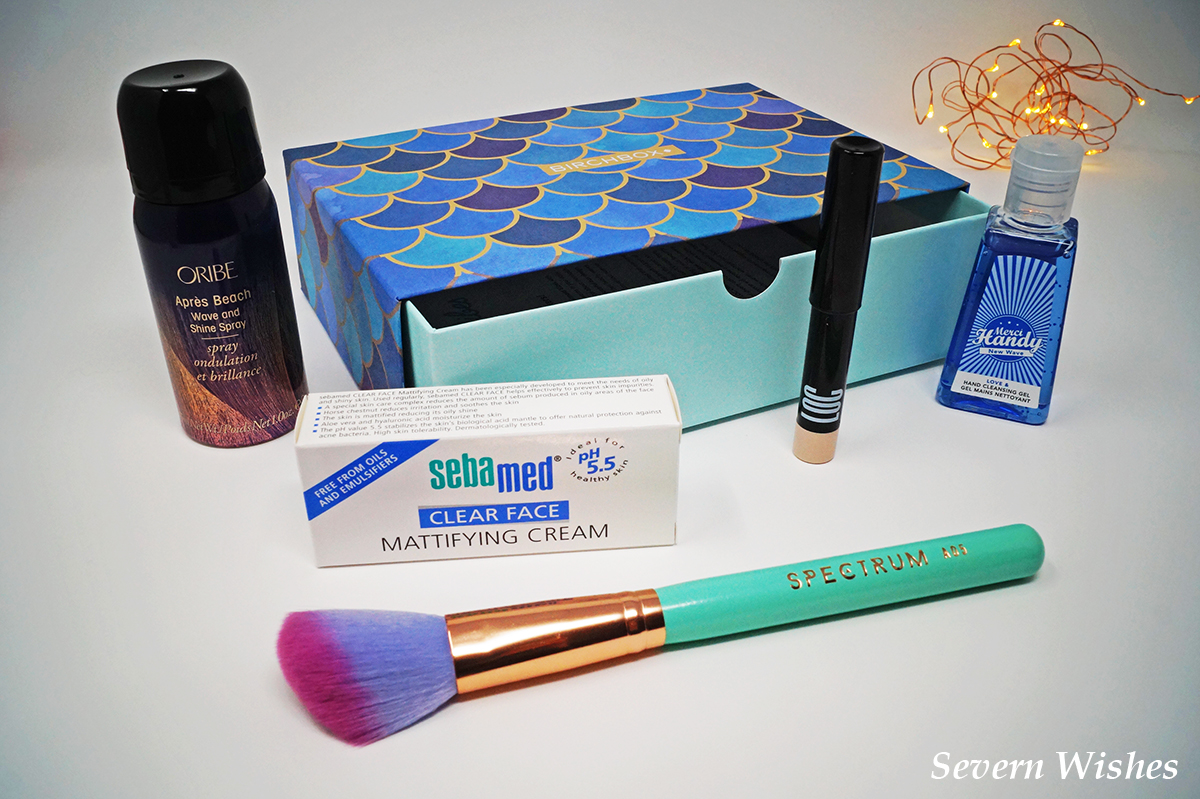
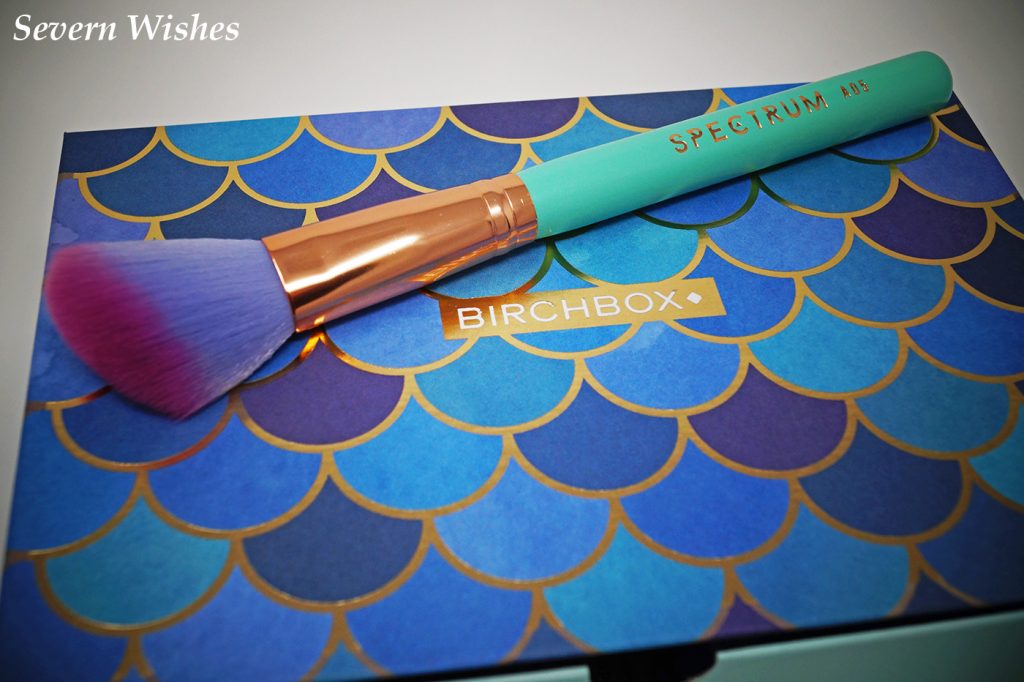
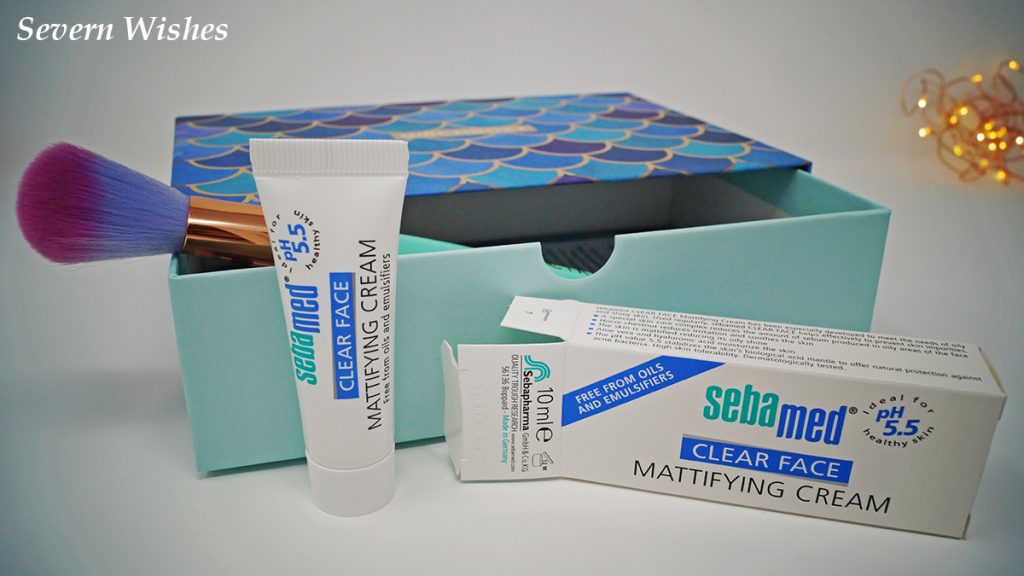
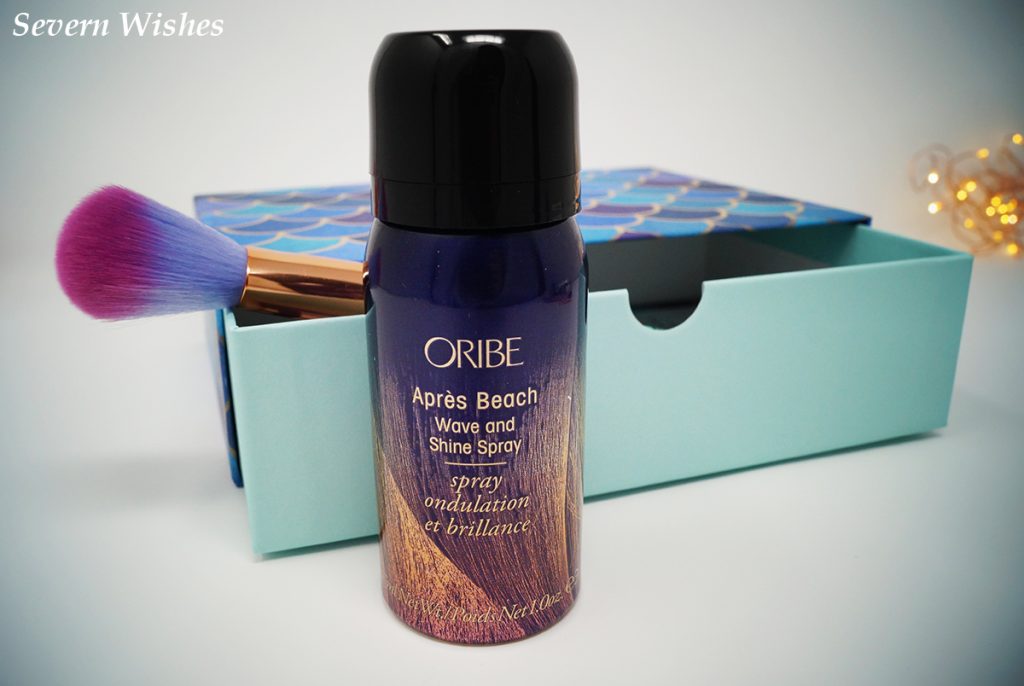
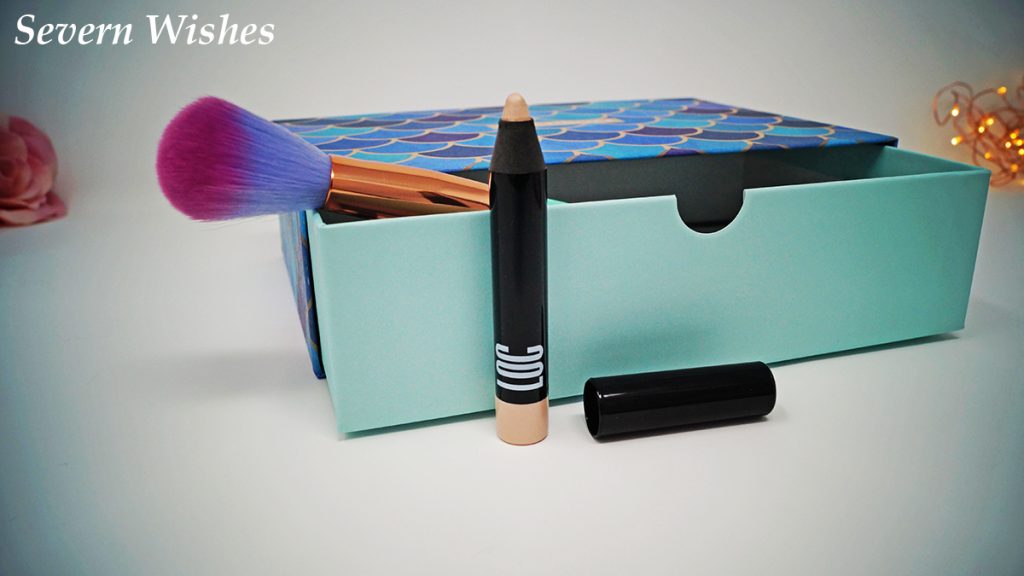


 My favourite items from the box are the LOC Eye Shadow Stick and the Spectrum Collections Glam Clam A05 Brush.
 Here is another image of my items that were inside my August Birchbox.
 (The Sunflower, Palm Tree and Eye were already sown on).
 If you ever did this as a child, then you had a great childhood! Picking an iron patch in the local shop, taking it home and choosing an item of your clothing for it to go on to. Usually a denim jacket in the 1990’s with patches covering the back! But I wanted to spruce up these already great shorts! I hope you like what I did!
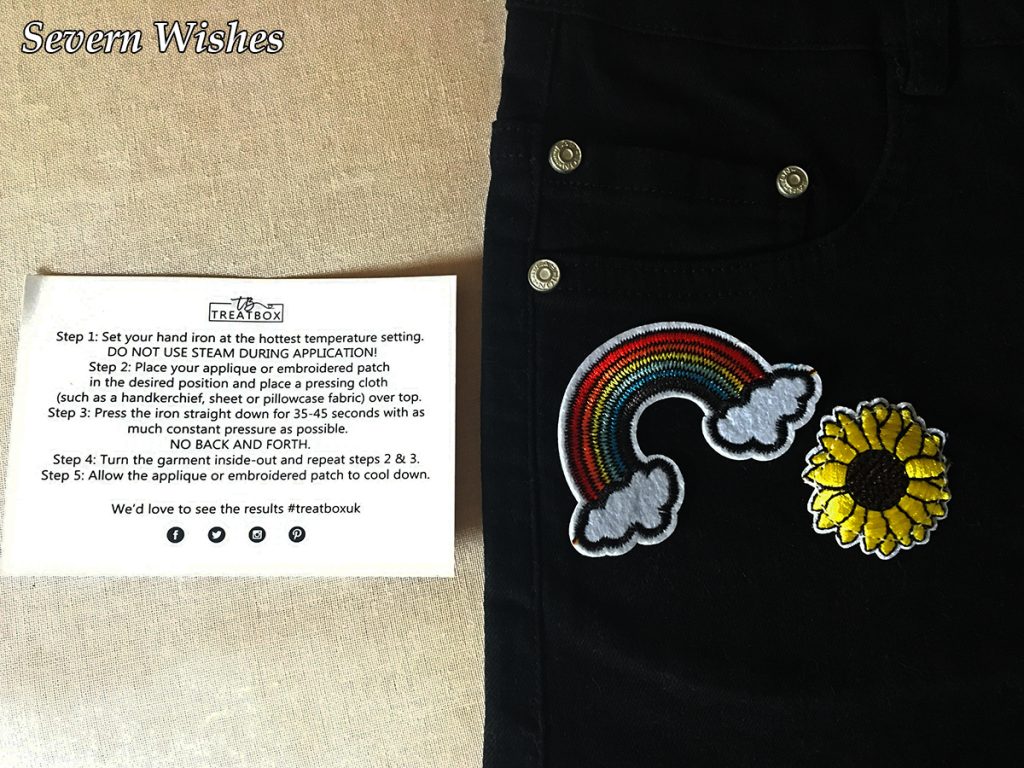 Here are the Treatbox Iron On Instructions and a closer look at the beautiful Rainbow patch that we had last year in our August 2016 box.
 Here is a closer look at the Flamingo and Pineapple which were in the July 2017 box.
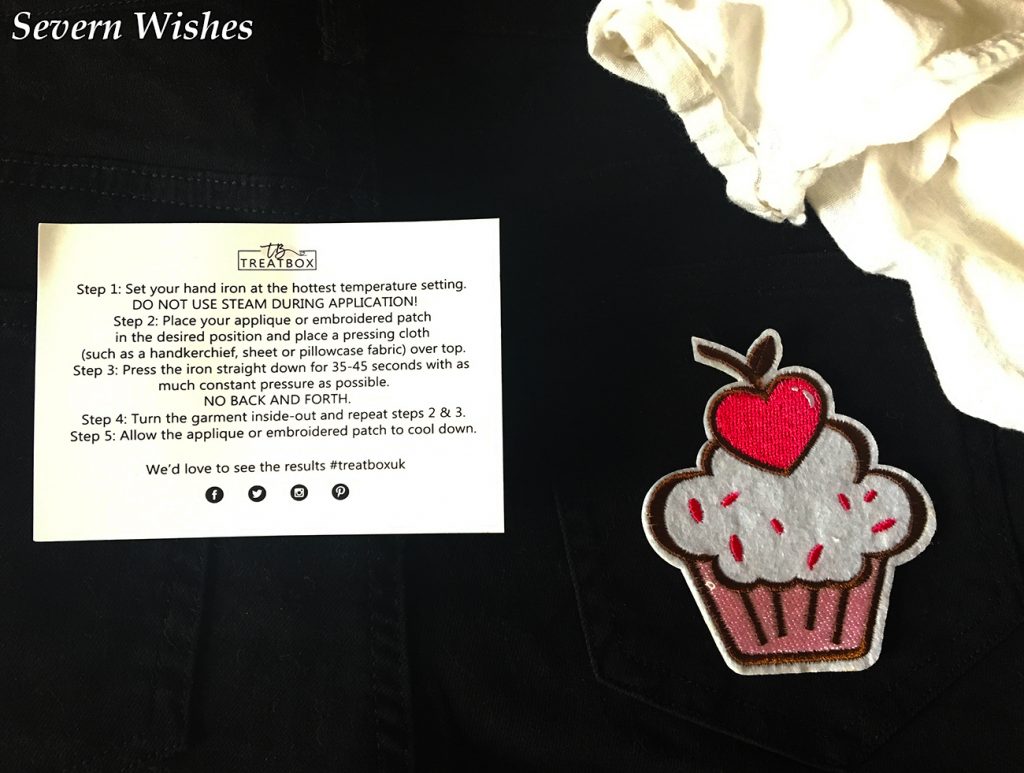 Recommending to use a handkerchief or an old pillow case to place over the patch while you are ironing is not only a tip but a definite necessity.
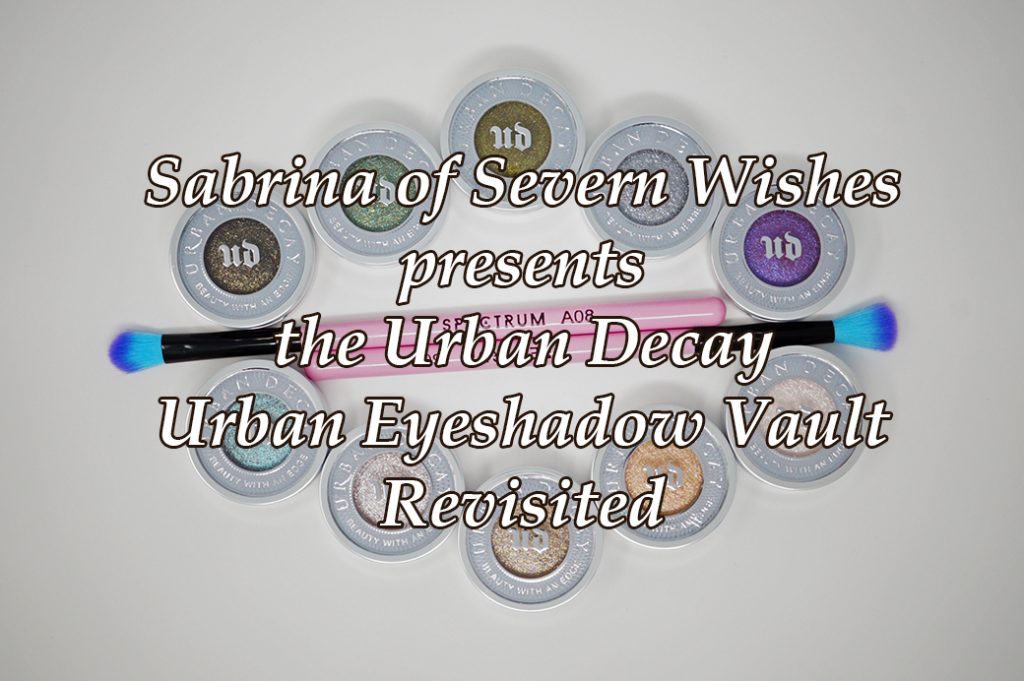 Revisiting the Urban Decay Urban Eyeshadow Vault
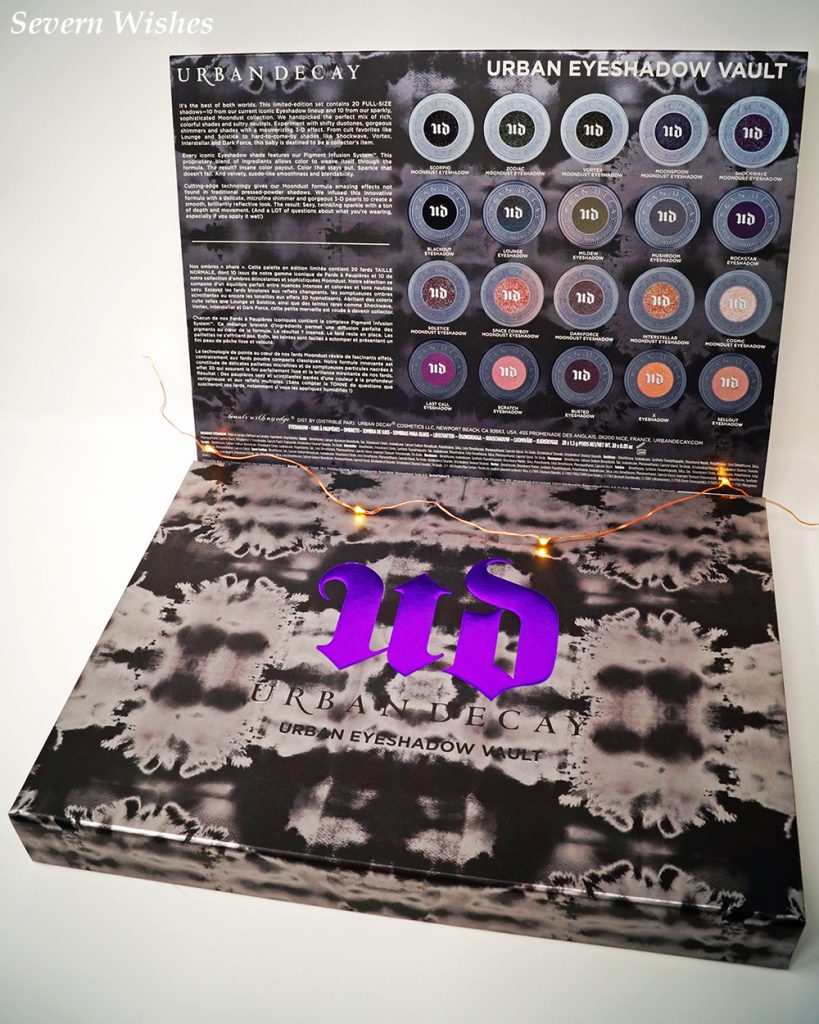 There are twenty wonderful pots inside this vault, and they are all gorgeous eyeshadow shades. I am going to show off some brand new swatch images, and then just a whole lot of random shots that I love. I have experimented for hours with photographing the pots and also added some of my spectrum brushes in some photographs too, to bring a whole lot of awesomeness to my blog today!
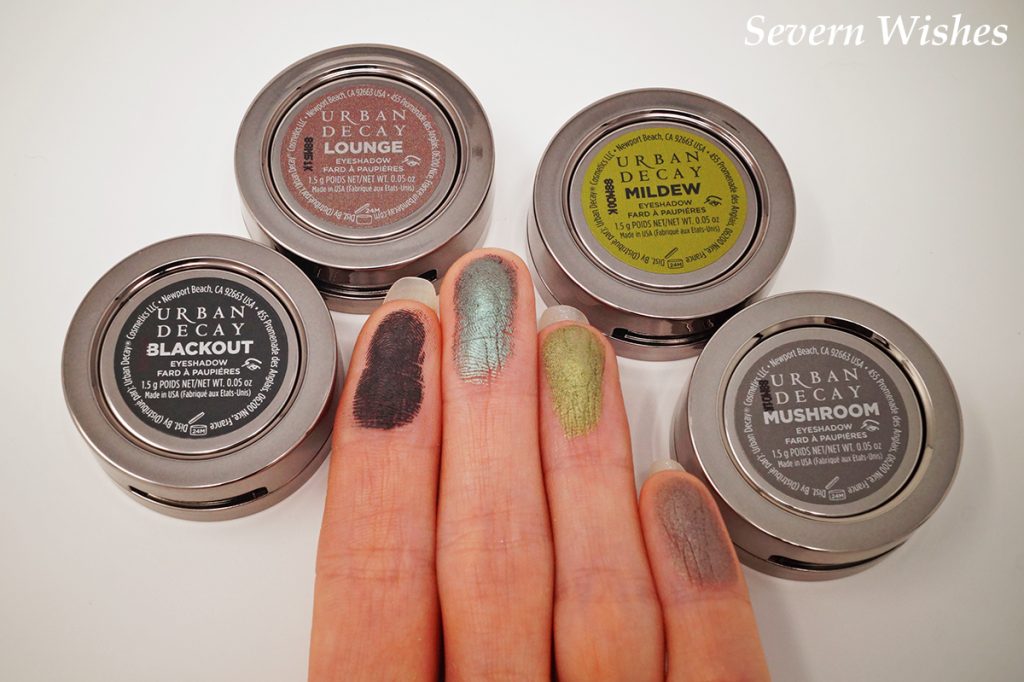 Last Call
 Rockstar
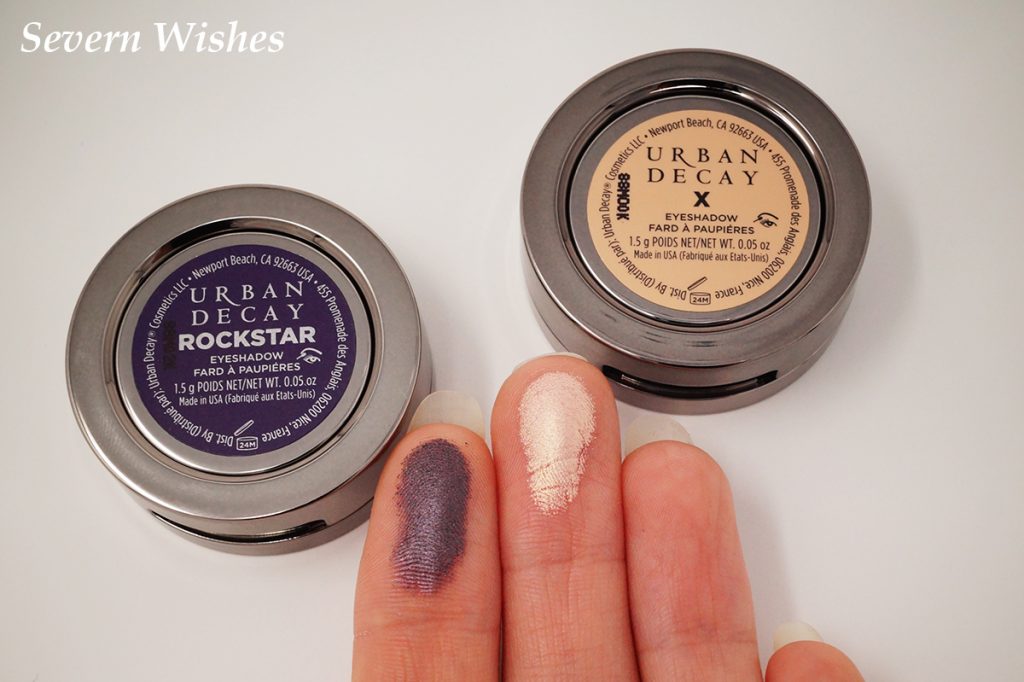 The Moondust Collection are in the Silver Pots. Here are my swatches.
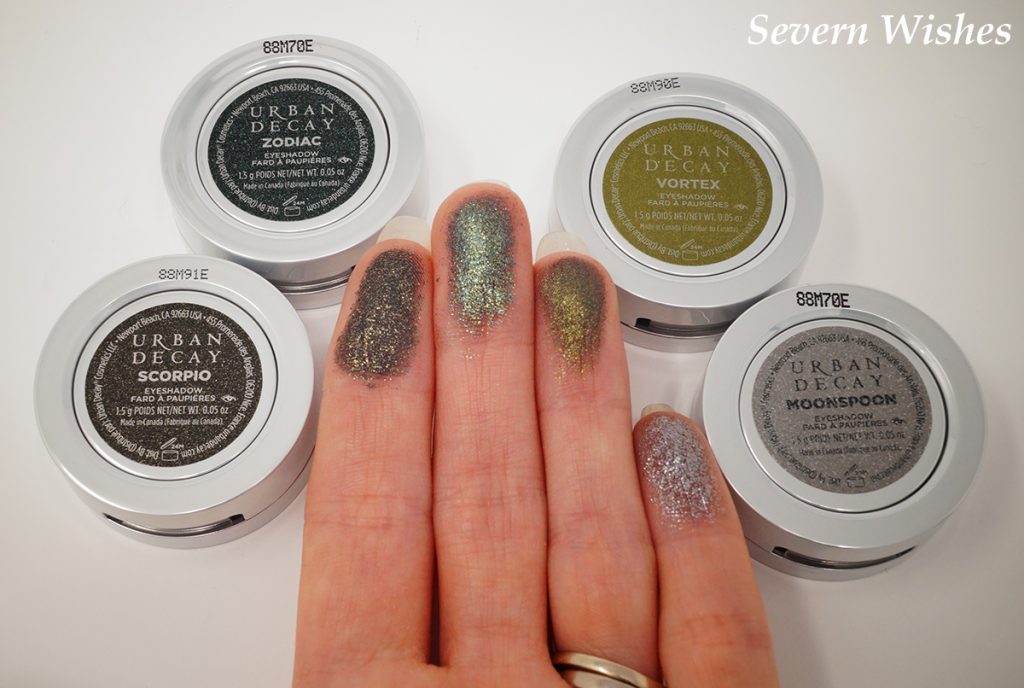 Solstice
 Shockwave
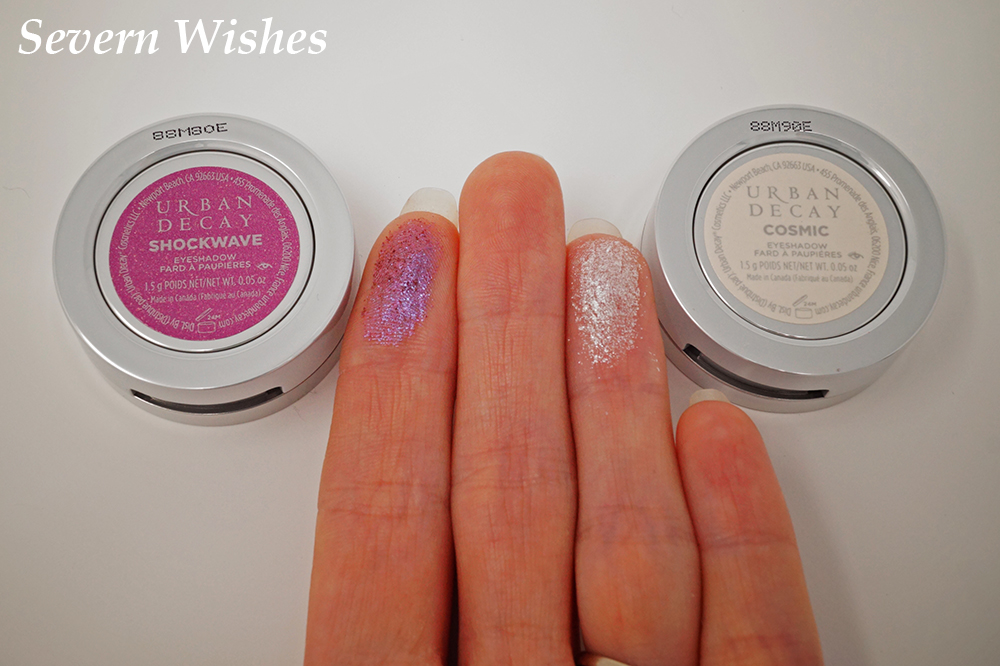 What I loved most about photographing these eyeshadow pots was the variety in the colours. They are wonderfully designed with such detail.
 A Little Mixture
 Stack and See
 An Incredible Set
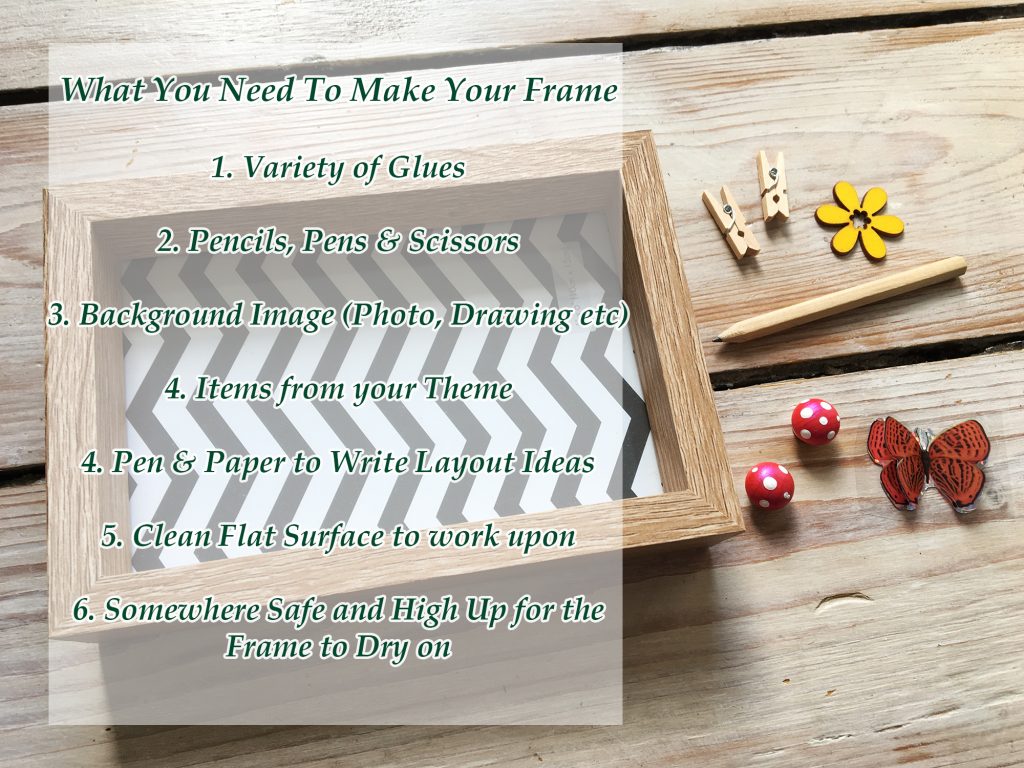
 (Here are a few of my examples to get you thinking…)
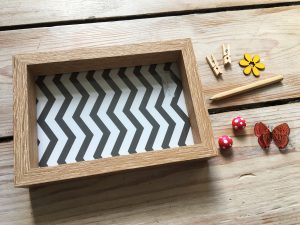


 ✩✩✩
✩✩✩
 (The Boat is Returning to Collect Passengers from Skomer).
 (View of the Car Park).
 (Some of the items we got at the Gift Shop).
 (Return Boat Docking at Martin’s Haven).
 (Farm Houses, Toilet Block and Accommodation on Skomer Island).
 (The Puffins Are Showing Affection).
 (A Puffin has Caught Sand Eels).
 (A Puffin Stands Proud).
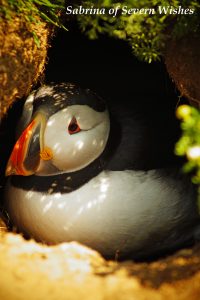 (A Puffin Protects its Burrow).
 (Sabrina in Action, Photographing Birds).

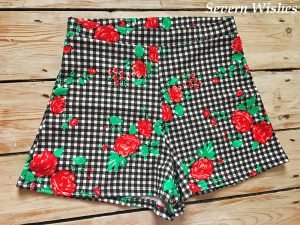 BooHoo Gingham Floral Shorts Review and Try On
 Details