Sabrina is a Lifestyle, Parenting and Product Review Blogger. A Writer, Photographer, Reviewer, Home Cook, Crafter & Nature Enthusiast. You will find a bit of all those categories here on Severn Wishes Blog, Welcome to Sabrina's Lifestyle Blogging & Honest Reviews.
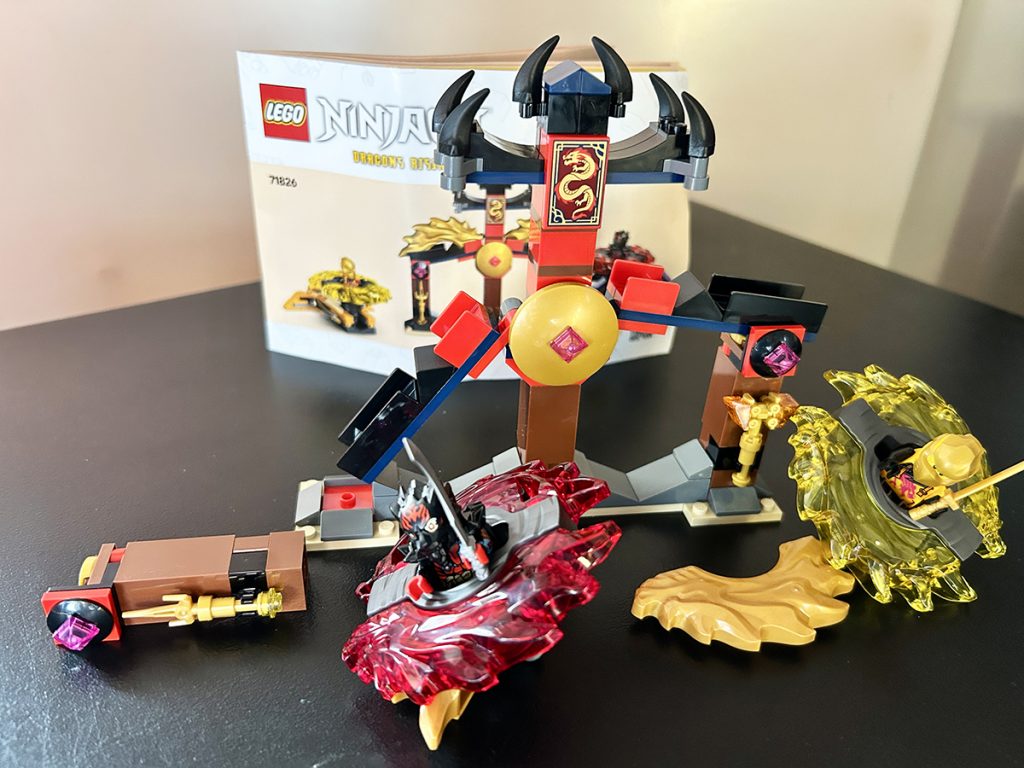
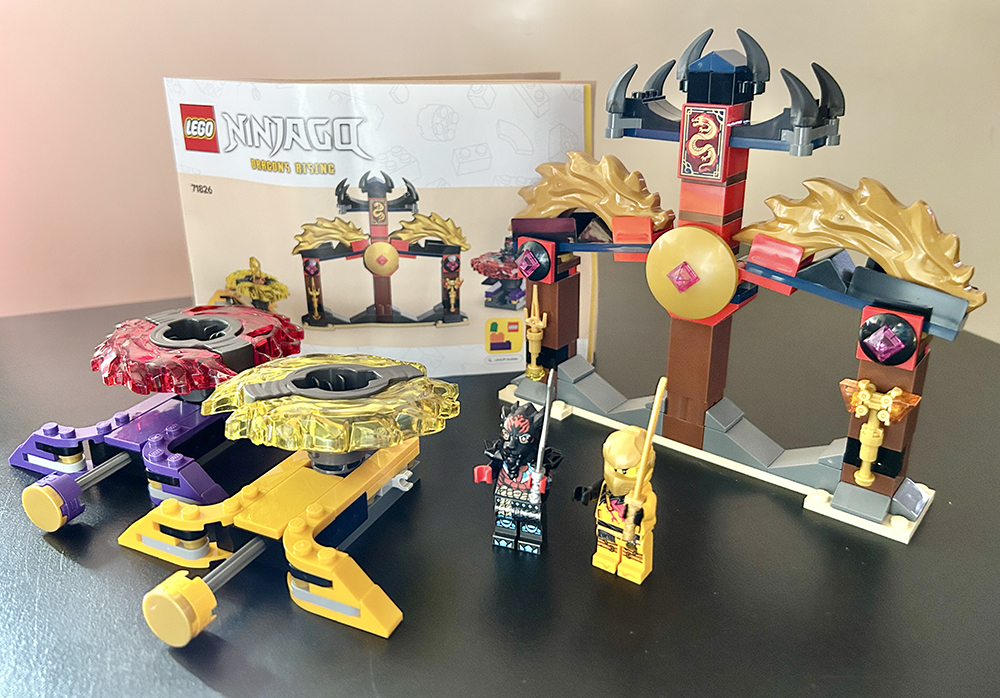
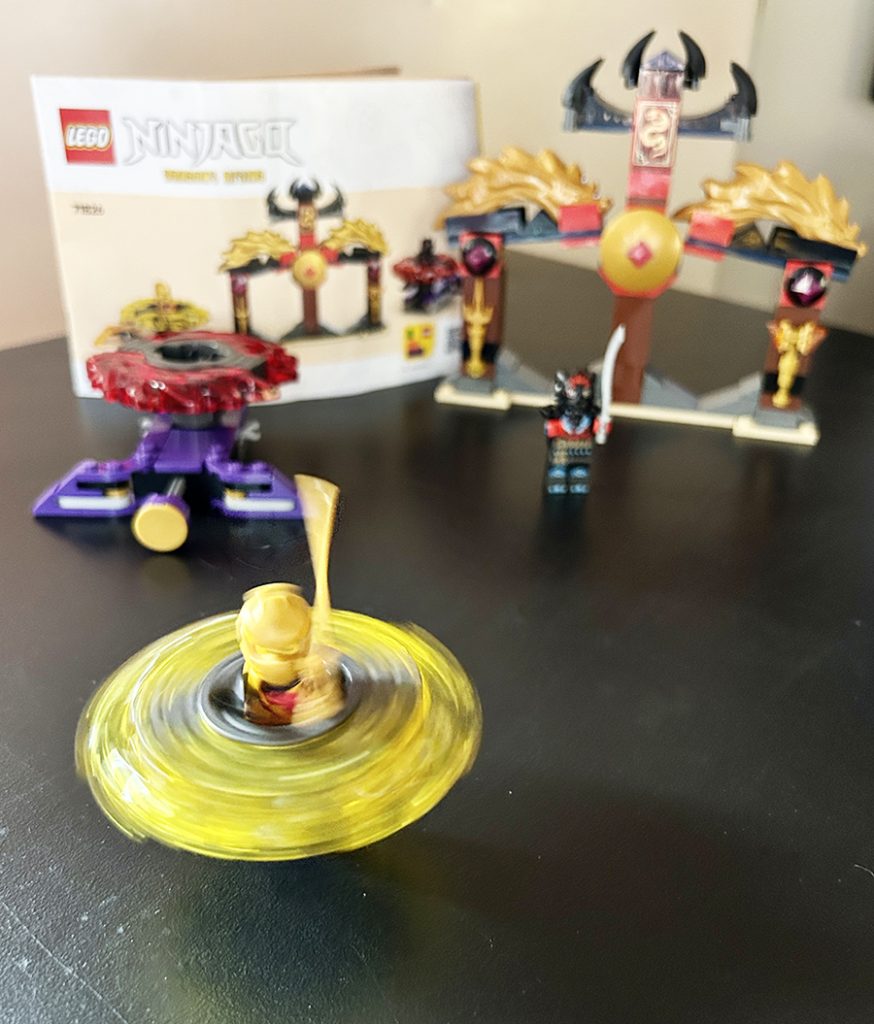
Hello! I’m Sabrina! I am an Argos Tester, this means that I often get items sent to me for the purpose of an online review. I thoroughly test the products and take photographs of them before submitting my findings and honest thoughts over to Argos. Sometimes I even do a video, and these are shown on my social media channels. This latest campaign I was asked to test out my first LEGO Ninjago which I was unfamiliar with until this campaign.
#ArgosTester #ArgosTesters #ArgosTestersCommunity
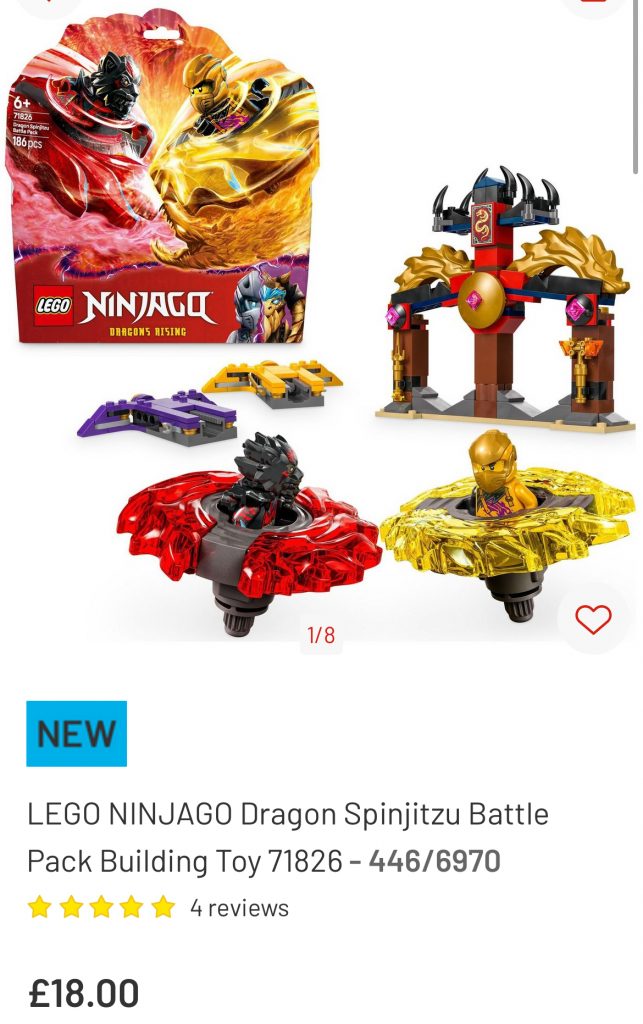
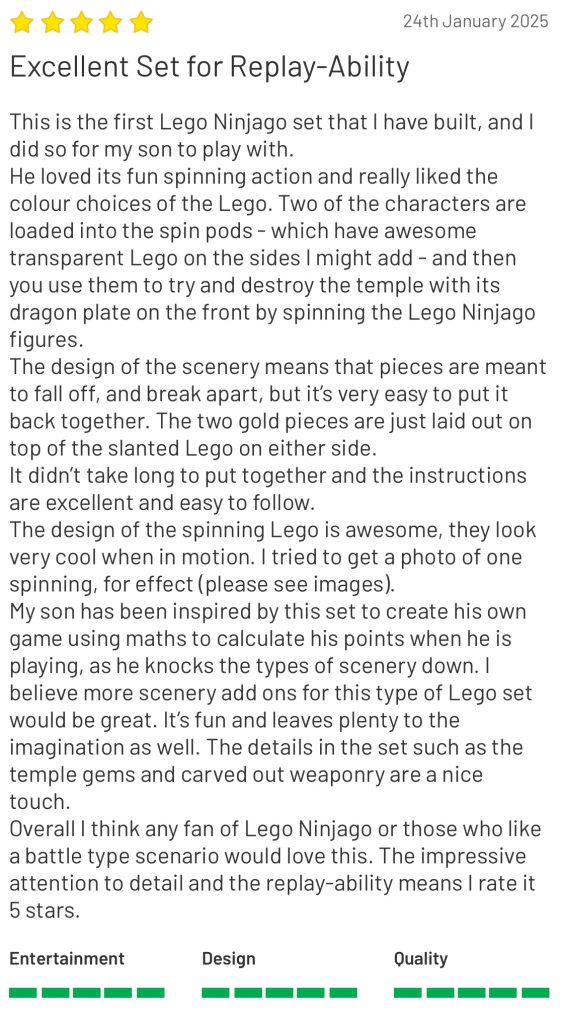
I have written this review about a product that I have been supplied for free, in order to test and then review it. This is my experience with said product and it is my honest review about the product listed below. I have already submitted my review to the Argos Website, and it has been accepted on to live public view when this blog post has been published. Please see my review on this screengrab below from the Argos website.All words and photography within this article are my own.
My Online Review
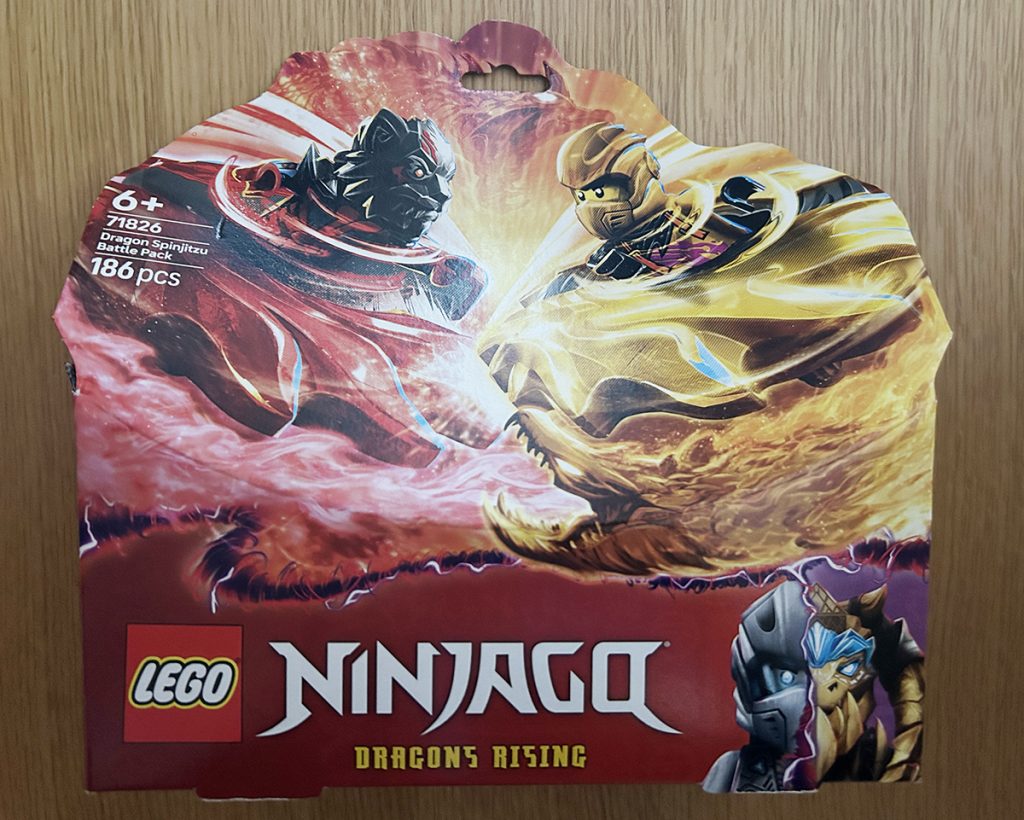
Product Information LEGO Ninjago Dragon’s Rising Spinjitzu Battle Pack Building Toy Lego Set No: 71826 RRP: £18.00 Argos Website Link (Prices correct as of February 27th 2025)
Thank you for reading this product review today, if you have any questions about this product then please let me know, I’m happy to answer them if I can, just comment below.For anything else please refer to the Argos website the link which is above at the end of the product information.
Please check out my social media for more product reviews too!
Thank you for visiting my blog today, have a great day.
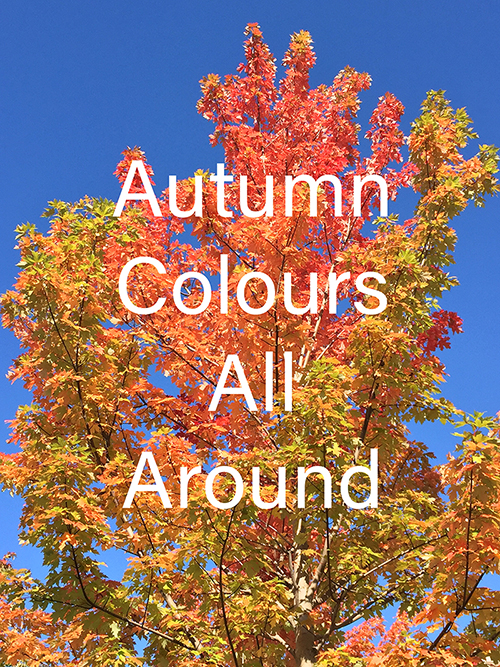
Autumn is such a beautiful time of the year, and it should be enjoyed by people of all ages and of all abilities too. But as the cost of living goes up again with our need for heating on and more food, not to mention the loom of Christmas… most people will vote to stay in, worrying they cannot afford to go out.
Well I’m in the same boat as all of you again this season, knowing that money will be tight but I also want to make the most of weekends I have my son. School takes up so many hours of the week, and the majority of children don’t really want to be stuck inside (unless the weather is gale force and torrential rain!). So it’s important to come up with some cheap ideas that will suit everyone and that can be fun of course, so here’s what I do.
See what can you do for free in your local area. Where do you begin to look?
Start off by writing down on a piece of paper the people in your household, their ages and abilities.
Do you need toilets frequently, baby changing facilities or access for a pram or wheelchair?
Once you have established the type of place you need to find you can look up on an online map what is available for free in your area.
Check local free magazines in supermarkets, check out social media by searching in events local to you by so many miles radius.
Some of these things can include;
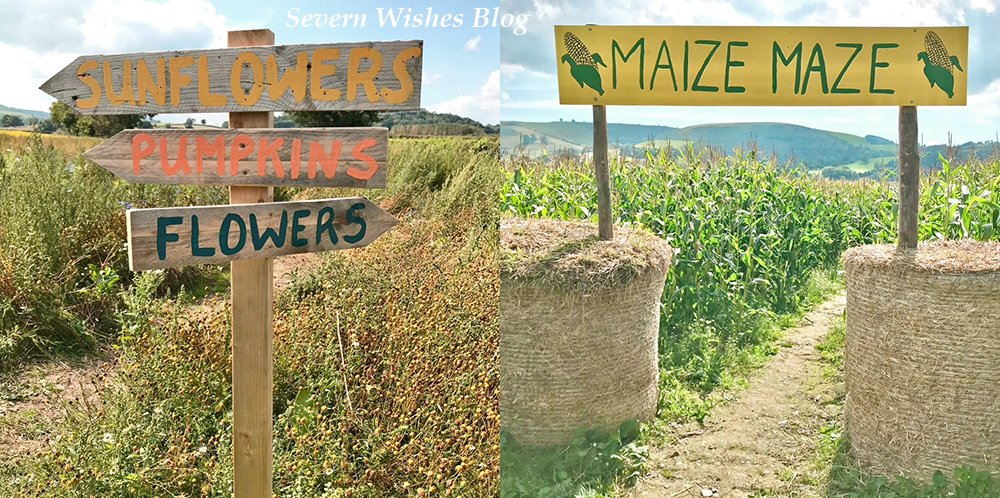
Public Footpaths. Canal Routes or Designated Walkways. Parks and Gardens. Local Heritage Sites. Castles or Stately Homes. Farms with Free Entry to look at Pumpkins, Flowers or do Maize Mazes. Nature Reserves with free car parking so you can do a Nature Walk to collect leaves. National Trust (some people will already be members, sometimes they have reduced entry fees).
What Can You Do While Out?
Enjoy a walk together as a family, don’t forget to take some photograph’s! Gather items to take home and make art and craft pieces another day. Go for a Nature Walk and talk about what you can see and hear (great for young children). Nature Bingo where you make a list before you go and then tick off the items as you find them. Discuss the life cycle of trees with older children and the importance of renewal each year.
(If you don’t mind spending a little money) Pumpkin Patch Picking Maize Maze or Woodland Trails Local Trust Properties or Heritage Sites
Sabrina’s Top Tip: Take a picnic or packed lunch with you, and drinks for everyone too which will save you money, even if you have to eat it in the car then it won’t matter because it’s still family time.
✩✩✩
Thank you for reading this blog post today, I do hope that I have given you some good ideas.
Have a great day and lots of fun if you take on board any of my tips!
Hello! I’m Sabrina! I am an Argos Tester, this means that I often get items sent to me for the purpose of an online review. I thoroughly test the products and take photographs of them before submitting my findings and honest thoughts over to Argos. Sometimes I even do a video, and these are shown on my social media channels. This latest campaign was to test out a brand new LEGO sets.
#ArgosTester #ArgosTesters #ArgosTestersCommunity
I have written this article about a product that I have been supplied for free, in order to test and then review it. This is my experience with said product and it is my honest review about the product listed below. I have already submitted my review to the Argos Website, and it has been accepted on to live public view when this blog post has been published. Please see my review on this screengrab below from the Argos website.All words and photography within this article are my own.
Product Details
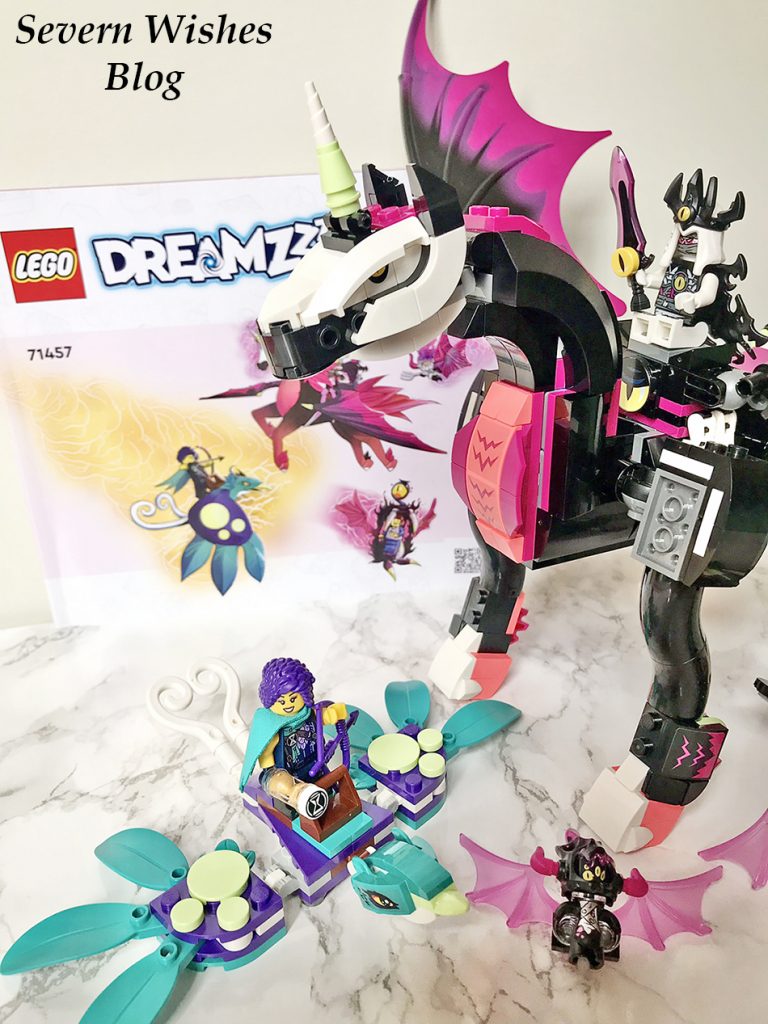
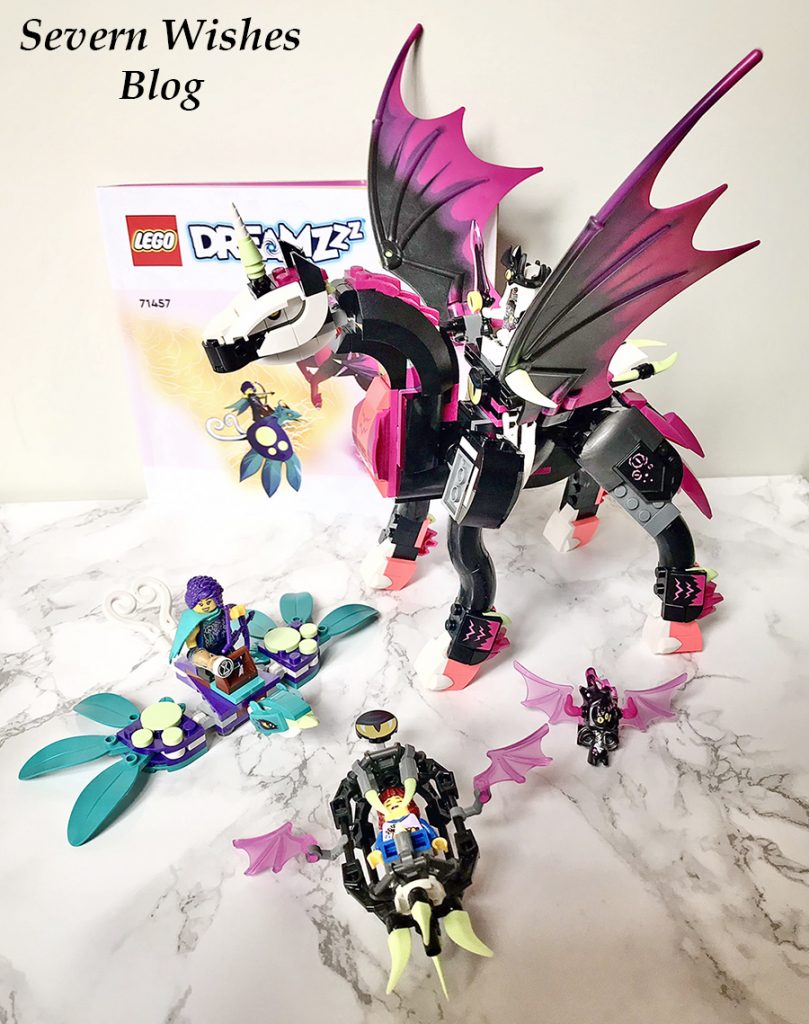
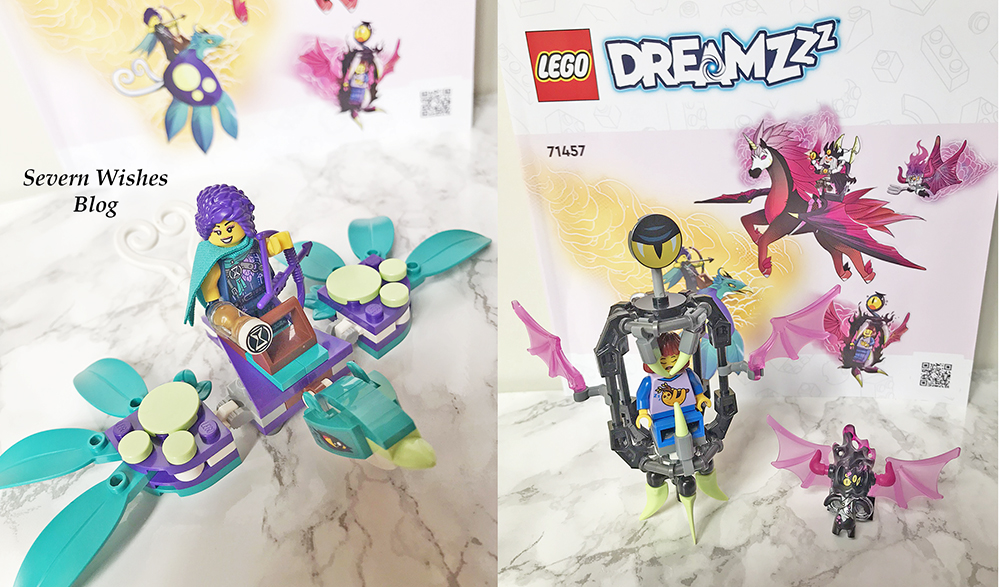
Name: LEGO DREAMZzz Set Number: 71457 RRP: £47.00 Product Details: 482 Pieces including specialised Mini Figures. Ages 8 and up. Fantasy Creatures and Characters are based on the LEGO DREAMZzz television show. Pegasus stands at 20cm tall once assembled. 2 building options for one character included (a bird or a butterfly). Argos Website:LINK to Product
LEGO Set Ideal for Fantasy Fans and Artistic Builders
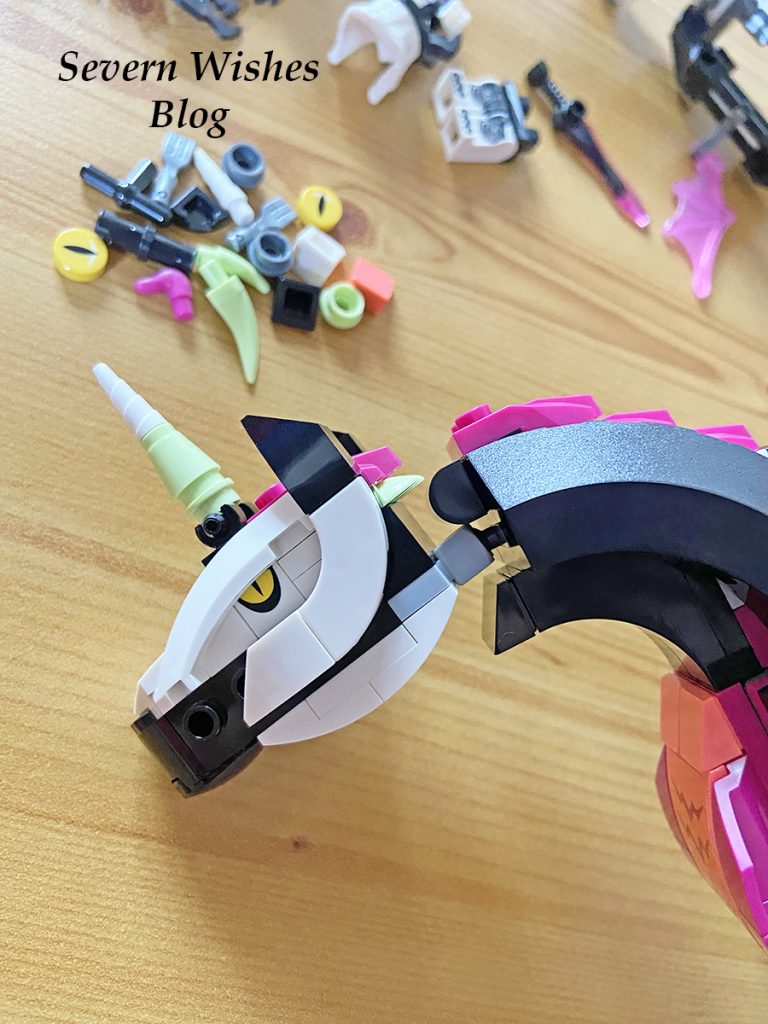
Examining this incredible LEGO set I was amazed at all the details and interesting ways that certain LEGO pieces were used to create something that looked entirely different. I’m no stranger to LEGO and its nice part usage, but this is my first ever DDREAMZzz set and it definitely had the wow factor from the moment I started to build it. It is a pretty complex set and designed for ages 8 up to adults, and I would say that it took around 3.5 hours to complete. The stickers really help add to the depth of the LEGO pieces. Overall I think it’s a much organised set and the builder also has the option on whether they want to build different aspects for the characters included. For example you could choose to build a bird or a butterfly; I chose the bird because I thought it looked amazing in the picture art included in the instructions. Talking of Art, it really added to the story for me, it’s not often that you get the LEGO imagined into picture scenarios so this was really cool. You have to concentrate a fair bit when building this set due to all of the posable sections of the Pegasus, the limbs all need to be correctly aligned in order for the LEGO to stand up properly and it was much heavier than I realised. The characters are also unique and have great facial expressions and hair and costume details too. The final look of the Pegasus is amazing, and I hope my accompanying pictures portray that. I wouldn’t change anything about this set, it’s unique, fun and I love anything to do with fantasy which is why I chose this one. I would recommend it to anyone who likes a fantasy genre or horses. If you’re building this to play it has tons of appeal with so much movement in every part of the set, but it also makes a great addition to any LEGO collector’s artistic display.
My Honest Opinion
Overall I would like to rate the 5 stars.
Quality 5✩ Features 5✩ Design 4✩ Playability 5✩
As with all LEGO the quality is always brilliant, but this set is like nothing I have ever built before. It was complex but it was very artistic which was fabulous. It has great parts usage and I loved how the build came together to make such an iconic piece; the Pegasus. I wasn’t aware that these DREAMZzz sets were based upon a television show, and I am sure when my son is older I can introduce him to the shows because they sound great. The playability and the imagination of this set is astounding, even if you love the concept and want to keep it as an artistic LEGO build. There was only one piece that caused me some concern which was the seat part of the nightmare character, it was not secure on the Pegasus due to only two contact studs. I used a spare piece of my own LEGO, a 4×4 studs in a square to increase the surface area so that the piece would sit and be better secured. This did not distract from the set as it’s hidden beneath. Overall it’s a set that has a wonderful theme, fun and unique characters, bright and vibrant colours of bricks and a set which looks incredible once it’s all built and displayed.
Thank you for reading this product review today, if you have any questions about the product please let me know, I’m happy to answer them if I can.For anything else please refer to the Argos website which you can find on the link I posted above in the Product Details.
Thank you for visiting my blog today, have a great day.
How to make Birthday Bags on a Budget – it can be done!
My son recently had his birthday and a part of me was disheartened by the fact that I couldn’t afford to throw him a birthday party, one where his friends could come. We had family things going on all week but nothing with his school friends.
After talking to him about it one afternoon a week before his birthday, I asked him if he would like to do anything for his birthday on the day besides attend school, He said that he would like to share his favourite things with his school friends. I thought it was a lovely idea so we chatted about what sort of items he would include. After a lengthy conversation I decided we could do some birthday bags, and I hunted around for the best bargains. I was on a strict budget to I checked where things were on offer and started making a list.
So how do you make up a birthday bag?
You need either a birthday bag or a party bag, there are many varieties available online. You can get them usually with a handle so they are perfect for little hands to hold. I also chose to buy the plastic cones because I didn’t want Oreos to break up and/or go stale in the bags. This worked perfectly to break things up into sections, the Edibles and the Toys.
How do you stick to your Budget and get the best value?
✩ Sabrina’s Top Tips ✩
There are several ways to stick to budget and also find the best deals, here are my tips. 1. Decide your budget and make a list of what you need to buy. 2. How many are you buying for? Sometimes it’s cheaper to buy 50 bags than 20, bare this in mind. 3. Watch out for “lowest price in 30 days” and other useful slogans on offers. 4. Compare supermarkets online before you go out to do the shopping. 5. Use supermarket offers if you have a discount card with them. 6. Visit budget stores and compare the items you have seen online. 7. Always read the online reviews and filter by most recent as well. 8. Bulk Buy – Depending on whether you can reuse an item in the future for something else or even sell the remainder of the items on, bulk buying can be beneficial. (For us the Oreo’s were cheaper to bulk buy and so were the party bags). My son will happily eat any leftover biscuits let me tell you. 9. Work out the maximum you would like to spend, divide that by how many you are buying for, let’s say it’s 20 children. So divide your budget by 20, and you will understand how much it will cost to do a bag per child. Once you’ve made some essential purchases work out what is remaining of your budget and only spend what you have left. It might be that you have to buy a massive bag of sweets and divide them by hand into little sweet bags like I did with the Oreo biscuits.
Think smarter with your money and not buying things simply for convenience.
Why did we choose the items?
Picking for a mixture of genders is always tricky, but I don’t know a child who doesn’t love stickers and sweets / chocolate biscuits. Oreo is the choice because my son has food allergies but luckily he can eat original Oreo. The cars were because they were pull-back and super cool but also a car is gender neutral in my eyes, same goes for the bouncy balls. I asked all the parents (or my son told me) what peoples favourite colours were, and then labelled the bags and added the toys in accordingly. If I had someone who loved Red they got a red tie on their biscuit cone and they got a red car and a red ball. I would’ve loved to have included bubbles too but they would have sent me over budget. You could swap the bouncy balls for bubbles if your child would prefer those.
I divided the stickers between the children’s bags and kept the rest for my own reward charts at home, meaning each sheet only cost me 4 pence. Bargain!
Total Spent: £30.00 Total of Children: 16 Cost per Child: £1.79
I don’t think this was too bad, 16 happy children for less than £30 (as we had leftovers) and it was much cheaper than throwing a birthday party. My son got to share his favourite items with his friends too!
We have also got left over bouncy balls, birthday bags, cone bags, 6 sweet bags and 4 cars. The leftover pieces we can use whenever we like or give away at other occasions.
At the end of the day you can’t put a price on a child’s happiness and my son was over the moon to help me give out these little bags of joy to all of his friends at school, so that they could all celebrate his happy birthday together.
Thank you for reading this blog post today, I hope you have found it interesting and perhaps got a few useful tips in case you ever decide to do bags for your child’s birthday or a birthday party.
Hello! I’m Sabrina! I am an Argos Tester, this means that I often get items sent to me for the purpose of an online review. I thoroughly test the products and take photographs of them before submitting my findings and honest thoughts over to Argos. This latest campaign was to test out brand new LEGO Sets, and because we need to choose something we haven’t reviewed before, I chose the modular construction LEGO. Not sure what that is? Keep reading my review.
#ArgosTester #ArgosTesters #ArgosTestersCommunity
I have written this article about a product that I have been supplied for free, in order to test and then review it. This is my experience with said product and it is my honest review about the product listed below. I have already submitted my review to the Argos Website, and it has been accepted on to live public view when this blog post has been published. Please see my review on this screengrab below from the Argos website.All words and photography within this article are my own.
Product Details
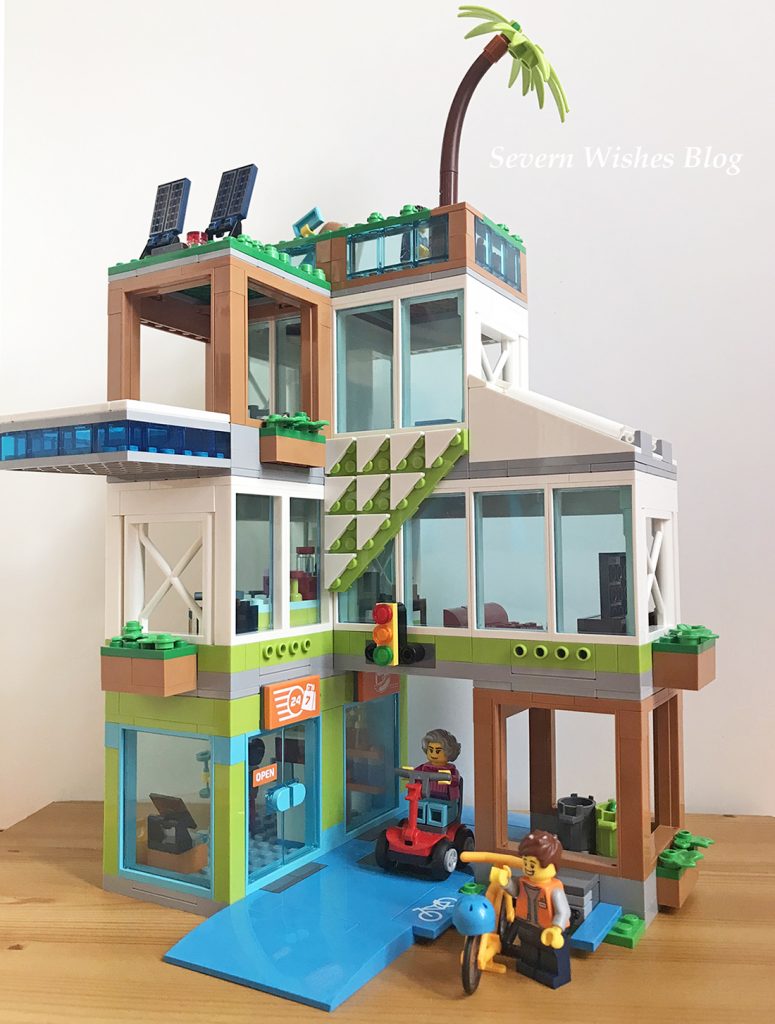
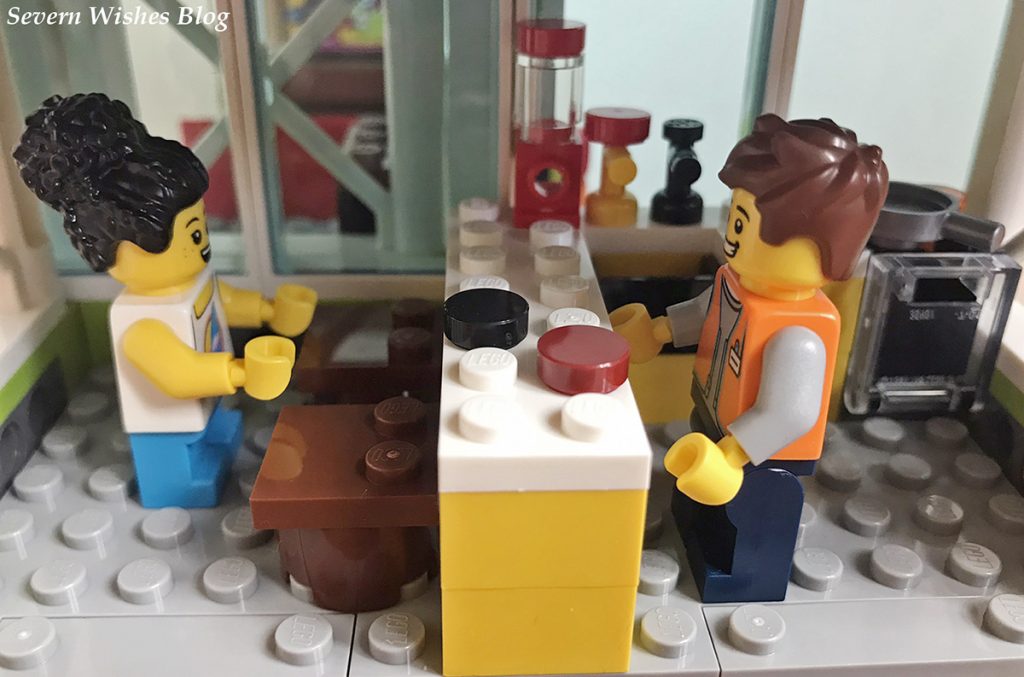
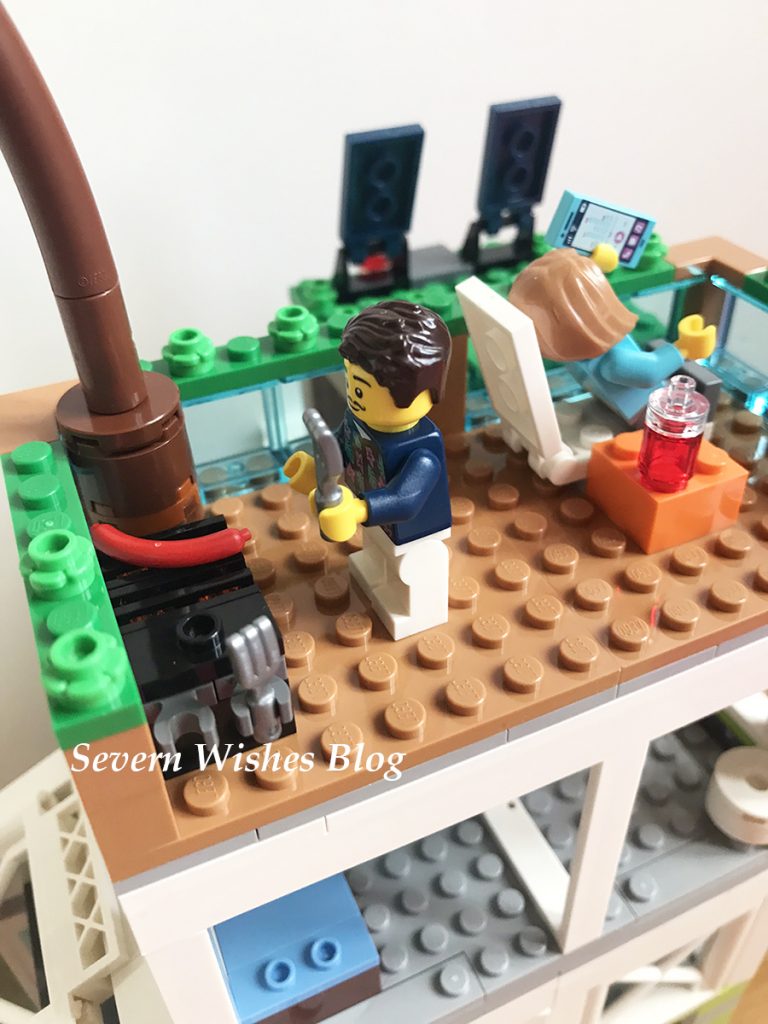
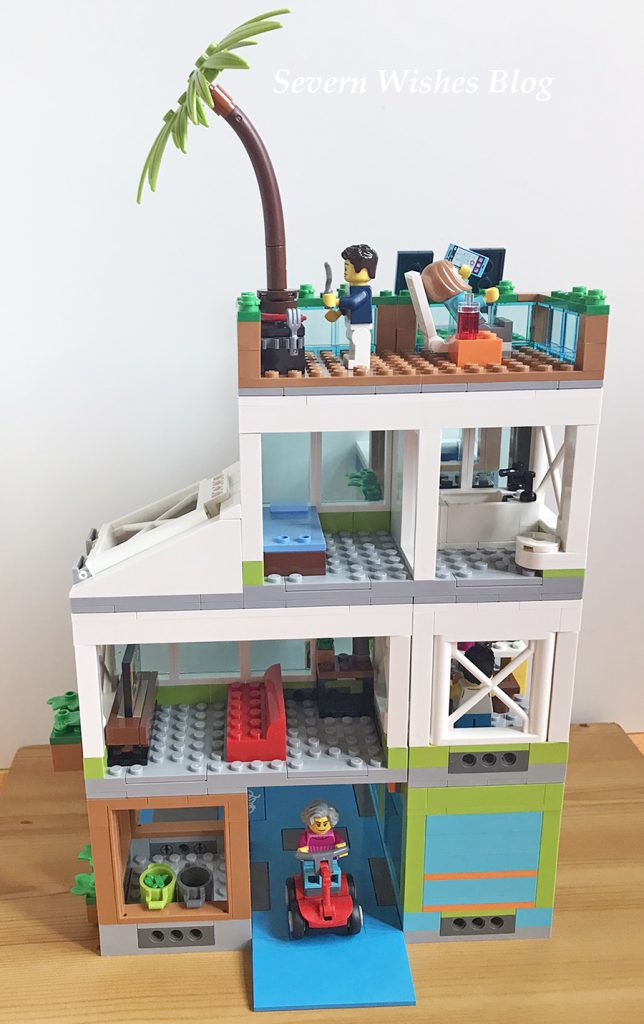
Name: LEGO City Apartment Building Modular Construction Set Set No: 60365. Ages: 6+ RRP: £75.00 Pieces: 688 pieces, including 6 mini figures, a bicycle and a mobility scooter. Description: Modular Rooms for easy reconfiguration and imaginative play, including roof terrace and swimming pool. Mixed age mini figures add to the play ability and the reality of the set. Excellent additional features such as stickers that add fun to some pieces like the signage and television set. Argos Website: LINK
My Honest Opinion
Overall I would like to rate the LEGO Apartment Modular Construction set 5 stars.
Quality 5✩ Features 5✩ Design 5✩ Originality 5✩ Playability5✩
My Argos Tester Review
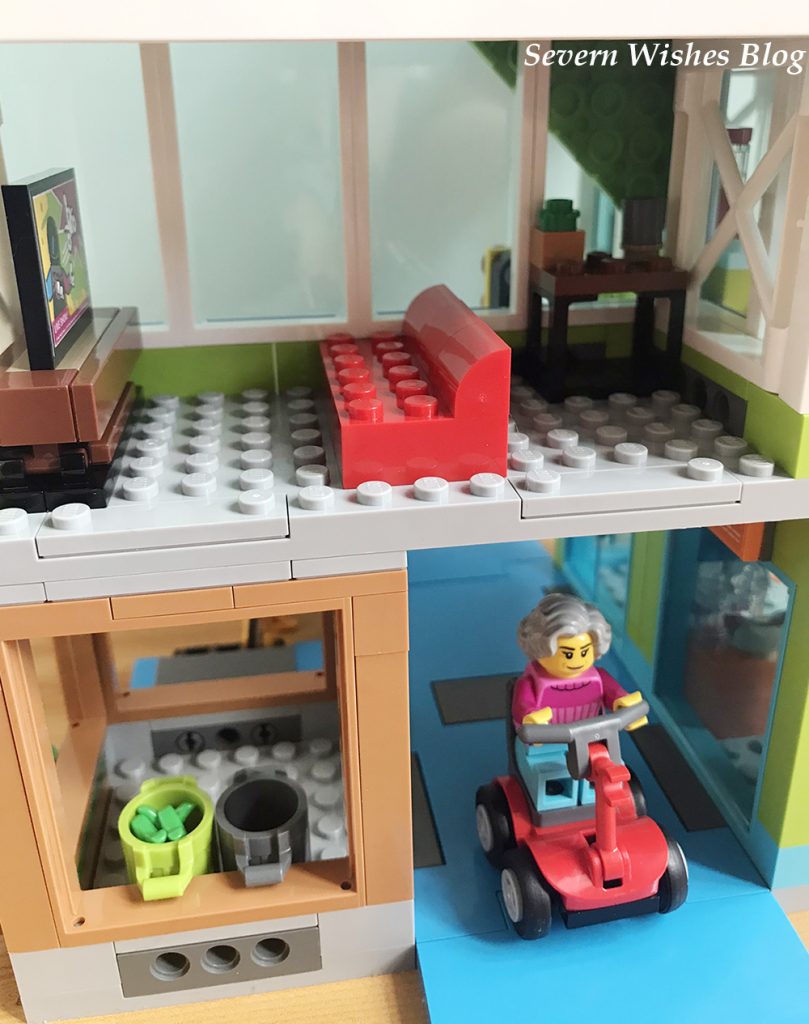
What a fantastically versatile set of LEGO. My son loved helping me to put it together and all the instructions were clear, nothing was difficult to fit together. The idea of the modular rooms is fantastic, we have never had LEGO like this before and it makes both play and reconfiguring so easy, even for little hands. I personally loved the diversity in age regarding the mini figures and their facial expressions and hair styles are great, they have changed a lot since I grew up with LEGO. Little features such as the drinks machine, dumbbells and bicycle are incredibly detailed. Every room has that basic layout that you would find in an apartment and I really liked the nice part usage with pieces I had seen previously being used as other things such as a post box as a cooker or fridge. Something else that’s great about LEGO city is that it can be attached to other sets and the layout can be altered to fit accordingly. The bicycle path goes underneath when you build it first of all, however you could rearrange the rooms so that it’s not an L shape but a rectangle and the bicycle lane can go in front of the building instead. It’s great that imagination can also now lead to our choices in how the final build looks like, the modular rooms are such an excellent feature and I hope we continue to see this type used in upcoming LEGO sets. Overall it took less than 4 hours to build, and I believe it will create countless hours of fun because there is so much left to the imagination whilst ensuring you have everything you need to start off with. A great first LEGO City set for any budding building I think, and a wonderful addition to a growing city of play. My son’s favourite aspects are the bicycle and the shop. As a parent I loved the design for its rearrange ability which will keep my son entertained for longer because after a week we can swap things around and it’s like having a different set then. Great for the imagination for those of any age.
Summary
Overall this LEGO City Set has hours of replay ability because of the fact it’s a modular construction, it’s so cool! By moving the rooms around you can create an entirely different layout, even move them every other day if you wanted to change it up. I feel like if my son was getting tired of the set I would simply reconfigure the layout and create a new look of the apartment for him. More LEGO should be made like this to give users more choices on how they want the end result of the build to look like. As LEGO say “rebuild the world” and you can certainly do that with this box of bricks, and really easily too! Whoever designed it is ace! I also loved the diversity in the LEGO figures, with different ages and jobs and many various faces, they are great new additions to the LEGO world. And the hair styles too, brilliant to see new ones! I have nothing bad to say about this set, I give it 5✩ across the board. I would actually love to see more modular LEGO so that sets could be rearranged with ease and built on a similar scale.
Thank you for reading this product review today, I hope you have enjoyed seeing what we thought of this set. I have no doubt that we will have many hours of fun creating LEGO scenarios with the figures and the apartment block.
If you have any questions about this set then please leave me a comment below or on my social media posts and I will do my best to answer them with the knowledge that I have gained from reviewing this product.For anything else please refer to the Argos website the link I posted above.
I am a huge believer in passing on knowledge to people when it might be useful to them, and for many years I had considered being a teacher. However my life took a different direction once I went off to university. It didn’t stop me from coming up with things that others may find handy though, it was just one of many reasons I decided to start my blog all those years ago.
After I became a parent I found I was coming up with lots of hacks and tips for my son that other parents might also find useful. This particular blog post today is all about NUMBERS! My son learnt his numbers 1 to 10 very quickly thanks to my tips and tricks, by the time he started preschool at 3 he could count to 31. He is now 4 and thanks to my encouragement he can count to a whopping 500!
The fab thing about my tips is that you may already have some of these items laying around in your home that you can use, and if not you can make your own cards like I have also done. Check out online second hand and local shops if you don’t have anything, as well as asking friends who may have slightly older children if they could have a clear out for you.Let me tell you about how I introduced and taught my son about numbers.
Child Clocks or Numbered Blocks
Your baby may already have toys with numbers on, things for age 6 month plus normally have various things on them, you may find a mix of nature and numerical combinations or well known characters with basic shapes and or numbers too. Toys and playmats also sometimes have numbers, those talking toys certainly will, but teaching your little one how to recognise a number visually is important.
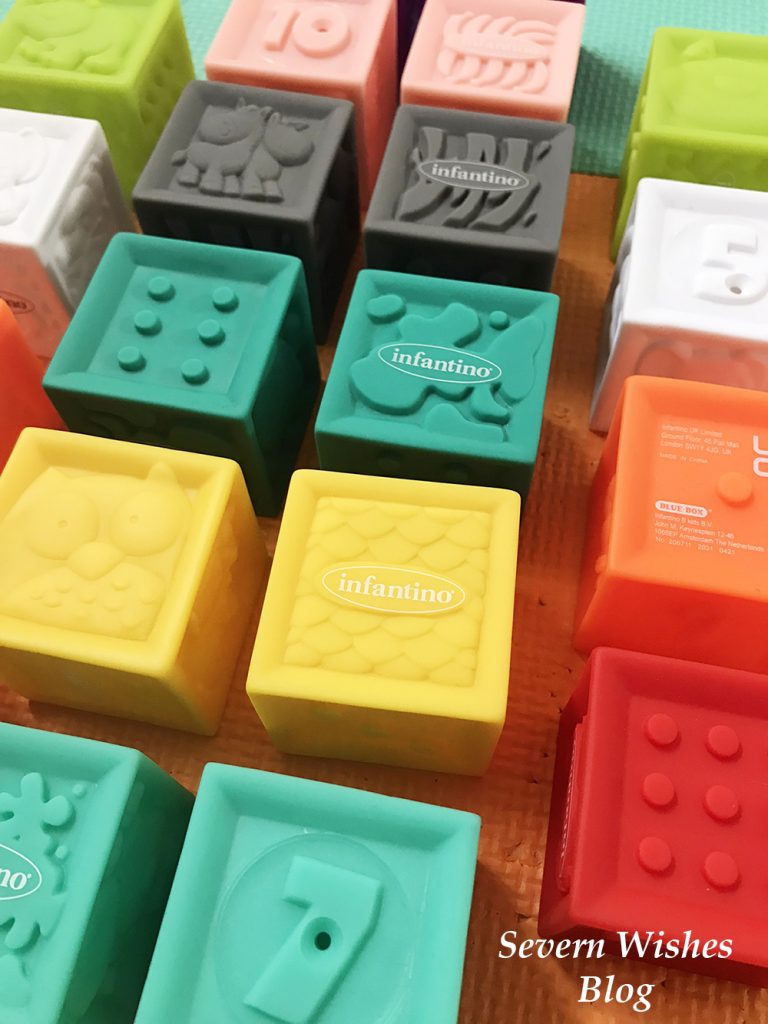
You can easily get wooden toys that contain clocks on them or boards with numbers that can be removed and set out in a numerical order. These toys are great for learning the starter numbers (1-10) but also for starting with basic mathematics too. I bought my son a board of numbers and he has a wooden clock as well gifted by a relative. The blocks in my image above were bought online and are of the brand Infantino, these BPA free plastic cubes have an array of animals and numerical variations on them such as dots and actual written numbers. They were some of the first numbers my son saw as a baby.
My son would like to count things around him, so say I gave him 4 smiley faces for his tea I would ask how many I had given him, soon he started counting everything. 2 swings at the park, 7 birds on the fence, 5 sheep in the field. And so on, and lots of praise and encouragement when they get something right is also essential. Make learning a fun thing to do and participate in.
You can also begin time telling by showing them a phone or a watch and asking them to find the time. If they have a child’s clock they can match that time. A children’s clock may just have turn-able clock hands or some have the digits that are also removeable too. For example it might be 10.30am so you ask them what that would look like on their clock and see if they select the numbers appropriately. Making it fun means that it is more likely to sink in to their mind. If they have breakfast at 7.30am every day, you could ask them what the time is on the kitchen clock if you have a steady routine, or if bedtime is 7pm too.
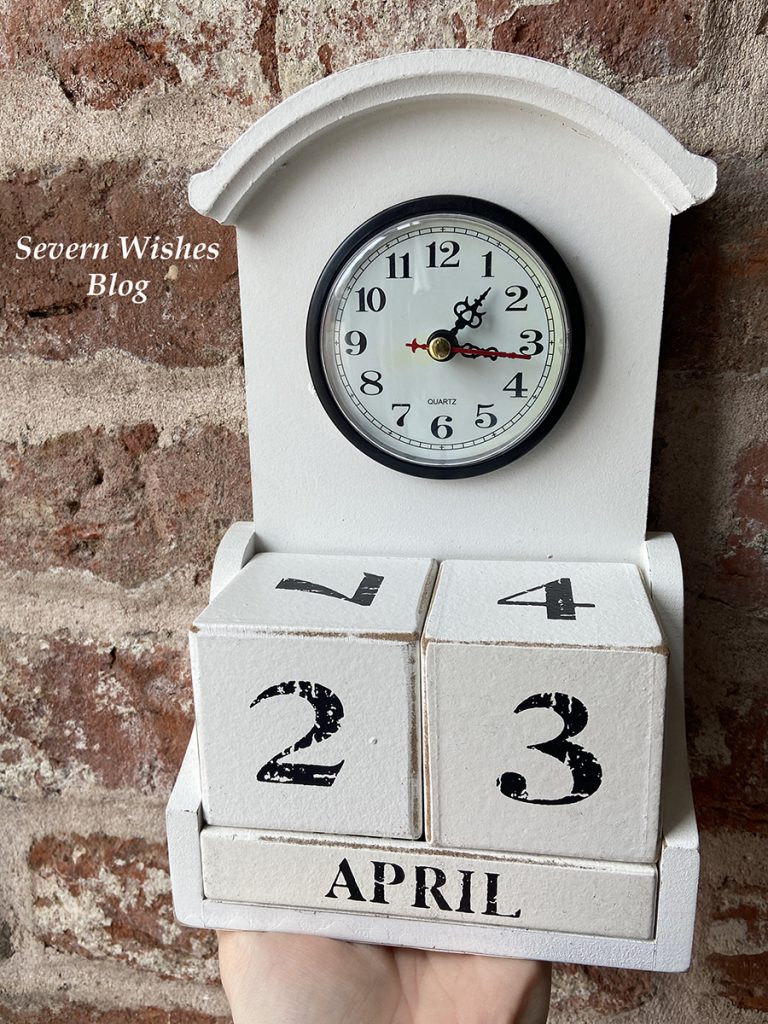
The Home Calendar Block
My calendar block is also a clock! Many of us will have a Calendar block at home, these blocks rotate daily and allow children to understand the passing of days into months. When my son was two I introduced him to my block set, and every single morning before breakfast we would rotate the blocks. I started by giving him one and me the other, I would say something like “Today is the 17th so we need a 1 and a 7, I have the 7, can you find me a 1 please?” And his interest developed from there. Soon I could ask him to find any of the numbers from One to Thirty One and he could place them on the block correctly. For the past two years we have done this every day and he has learnt to count up to 31 just by doing the calendar. My son also asked me why the months were different numbers, why it didn’t go up to Thirty Two and such, it sparked an interest which lead to me making his flashcards up to 50 numbers.
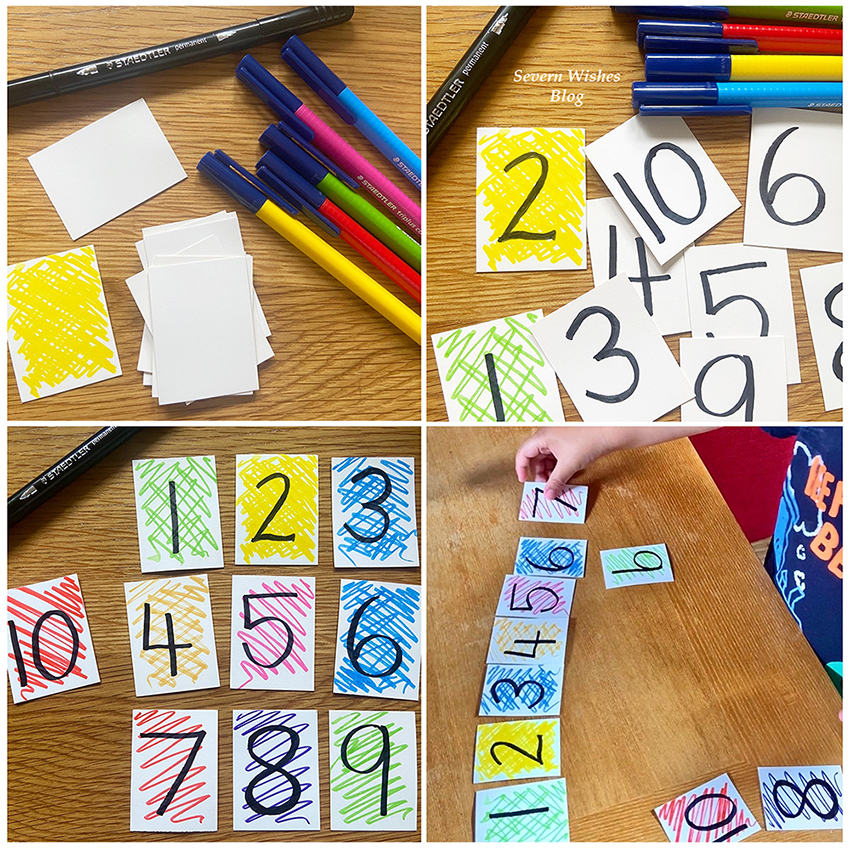
Flashcards – Bought or Homemade
Flashcards are great, you can buy them from most online toy retailers, or if are creative and have pens, like me you could make them. My son has 50 of these homemade numbers now, and thanks to some games he can count up to 500. He does number work at school, and even got an award recently for how good he was with counting numbers. Making it colourful and fun is inviting the child to participate. Always encourage but never force your child to learn, do it on their own terms when you are at home. Plus if it is fun they will be more likely to want to repeat the exercise. My son is currently doing writing practice for his letters and numbers and coming on great thanks to wipeable board books which I highly recommend because they are reusable.
Originally I only made ten numbers but my son was soon asking for more, and the more he enjoyed counting them and laying them out in their order, the more I wanted to continue making and encouraging that growth in learning.
When my son turned 3 I also made a set of flashcards that had the number and the written word such as One and 1 on them, this was so my son learnt the word associated with the number in preparation for reading and writing them.
Other Fun Number Related Activities
Playing Dominoes is another fun learning activity which requires the counting of numbers, and games like Yahtzee, Playing Cards or Rummikub are also fun to start with children of a going to school age.
However you keep using numbers in your child’s life, know this, you are helping them learn through play.
✩✩✩
Thank you for reading this parenting related blog post today. I have tons of parenting tips and hacks across my blog and social media. I even do a Monday Mum Hack on Instagram.
Hello! I’m Sabrina! I am an Argos Tester, this means that I often get items sent to me for the purpose of an online review. I thoroughly test the products and take photographs of them before submitting my findings and honest thoughts over to Argos. This latest campaign was to test a brand new Classic LEGO Set, and because LEGO is for all ages who doesn’t love to play? I know I do.
#ArgosTester #ArgosTesters #ArgosTestersCommunity
I have written this article about a product that I have been supplied for free, in order to test and then review it. This is my experience with said product and it is my honest review about the product listed below. I have already submitted my review to the Argos Website, and it has been accepted on to live public view when this blog post has been published. Please see my review on this screengrab below from the Argos website.All words and photography within this article are my own.
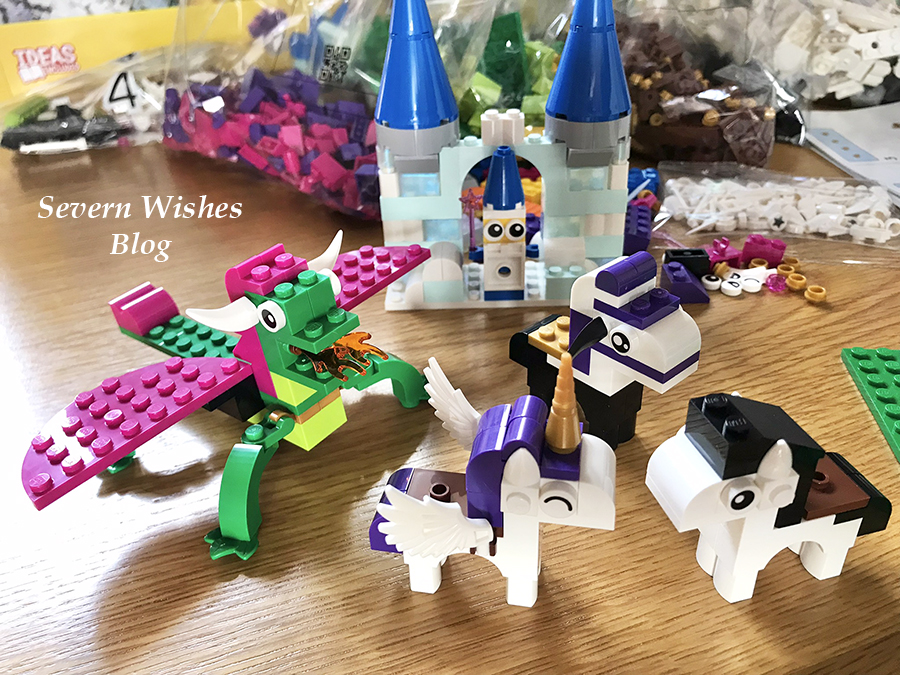
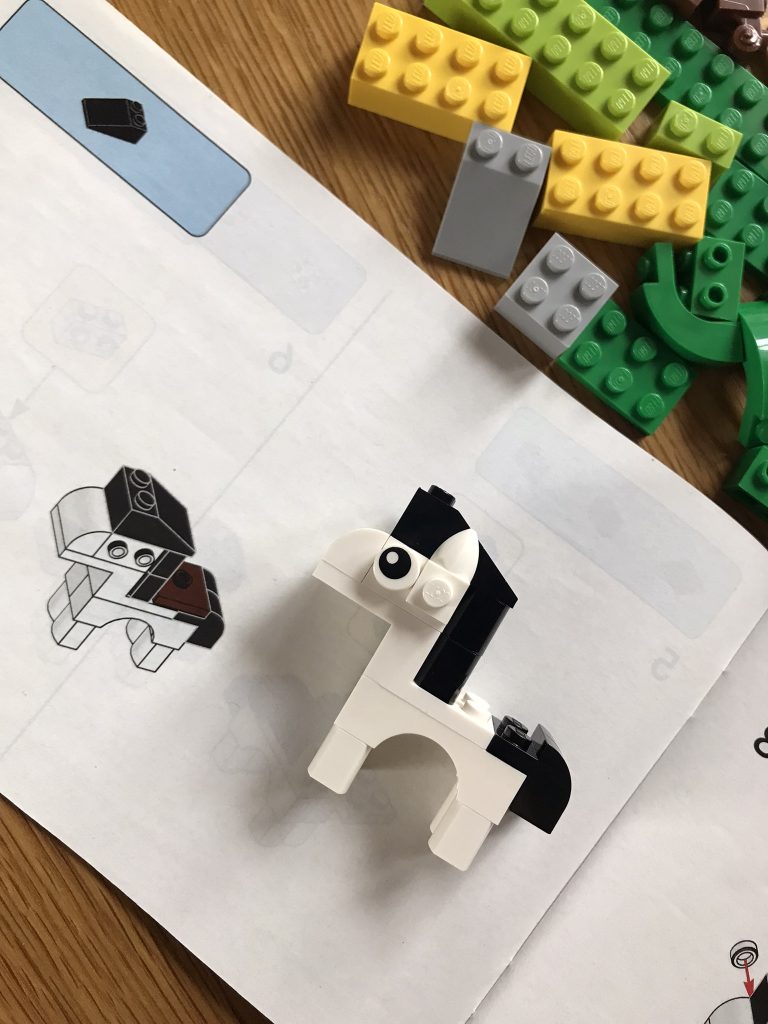
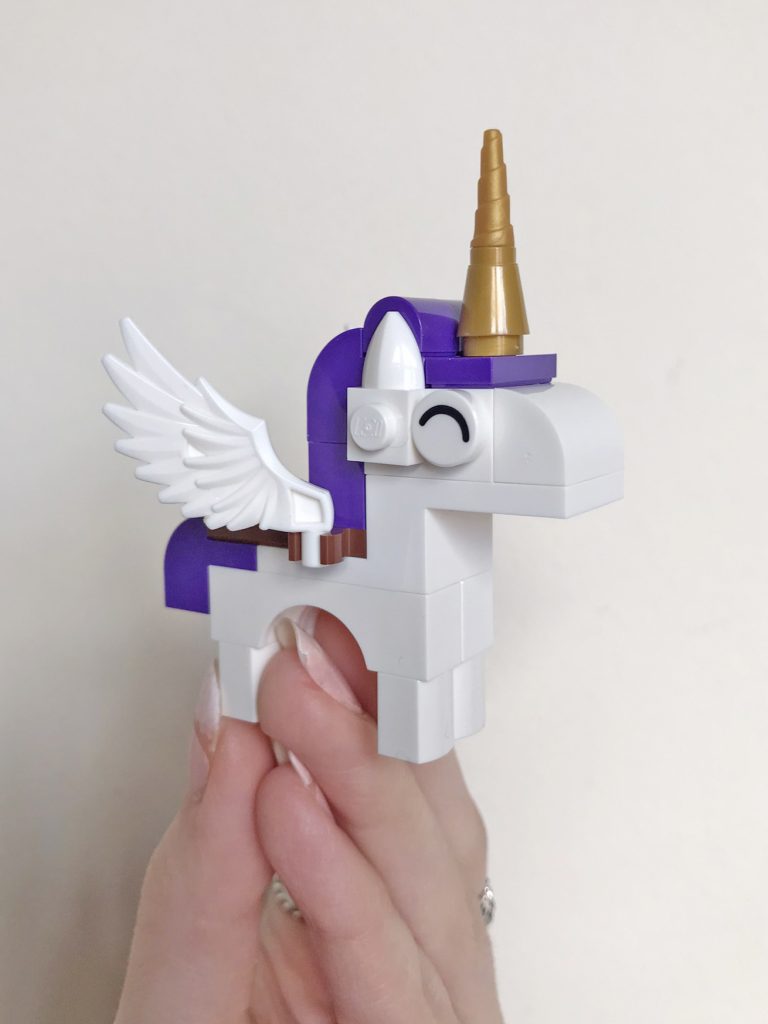
My Argos Tester written piece above as seen on the website on the product. We are only able to share six images when we submit a review to the website, and I took plenty more while building this LEGO and testing the contents, so you will see way more of my photography of this product as your scroll down through my blog post. How cute is the LEGO Horse?
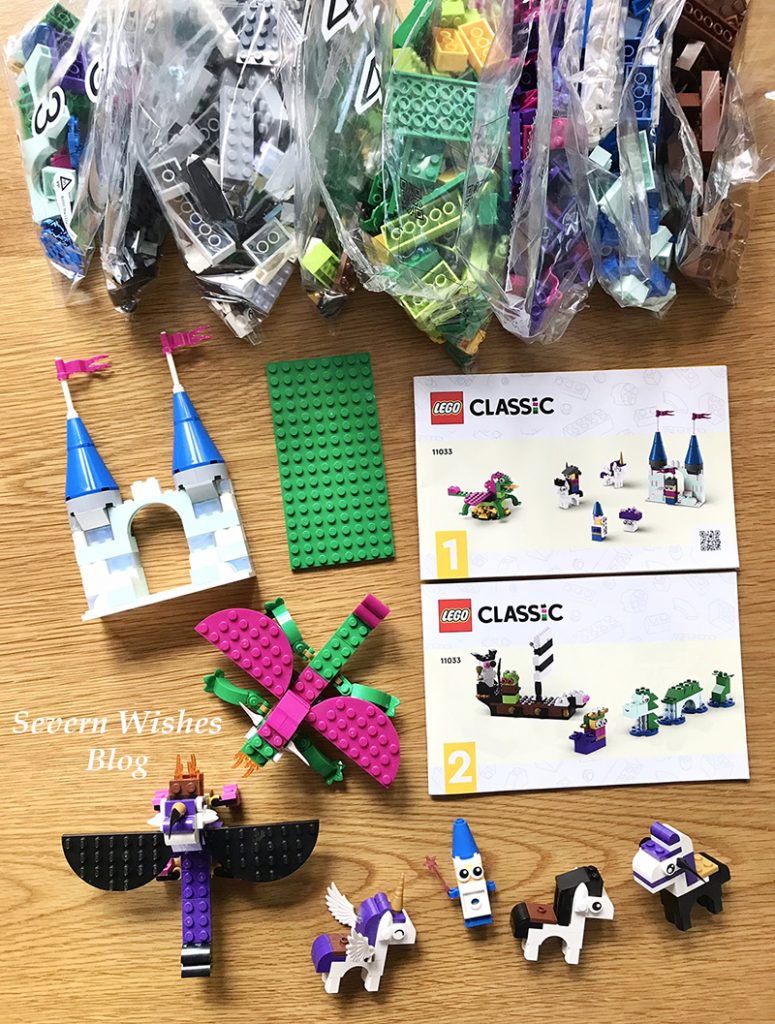
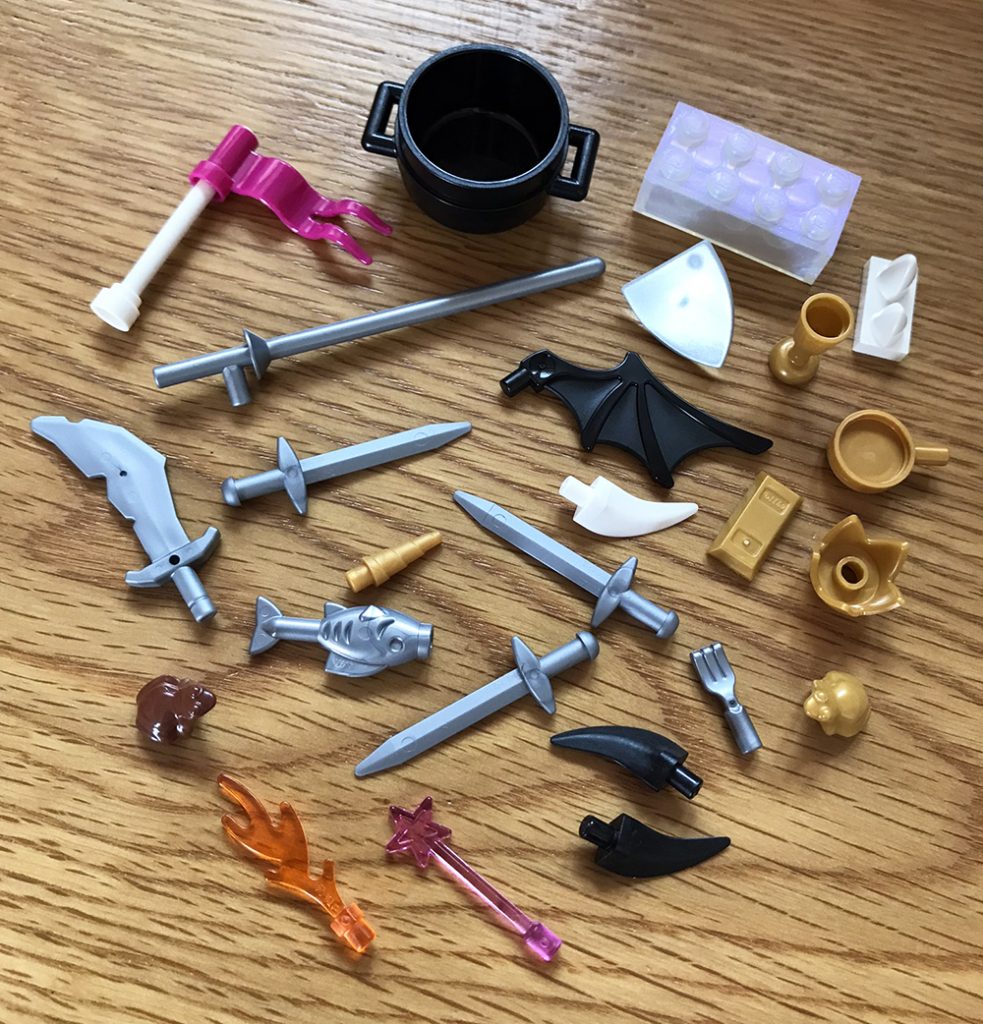
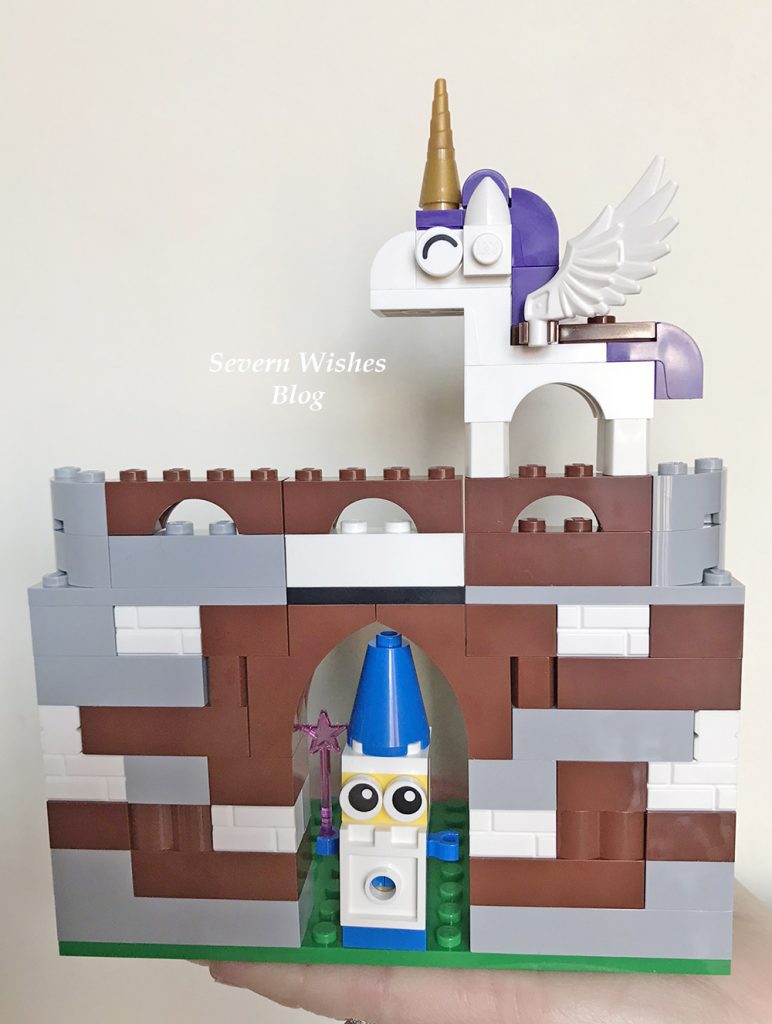
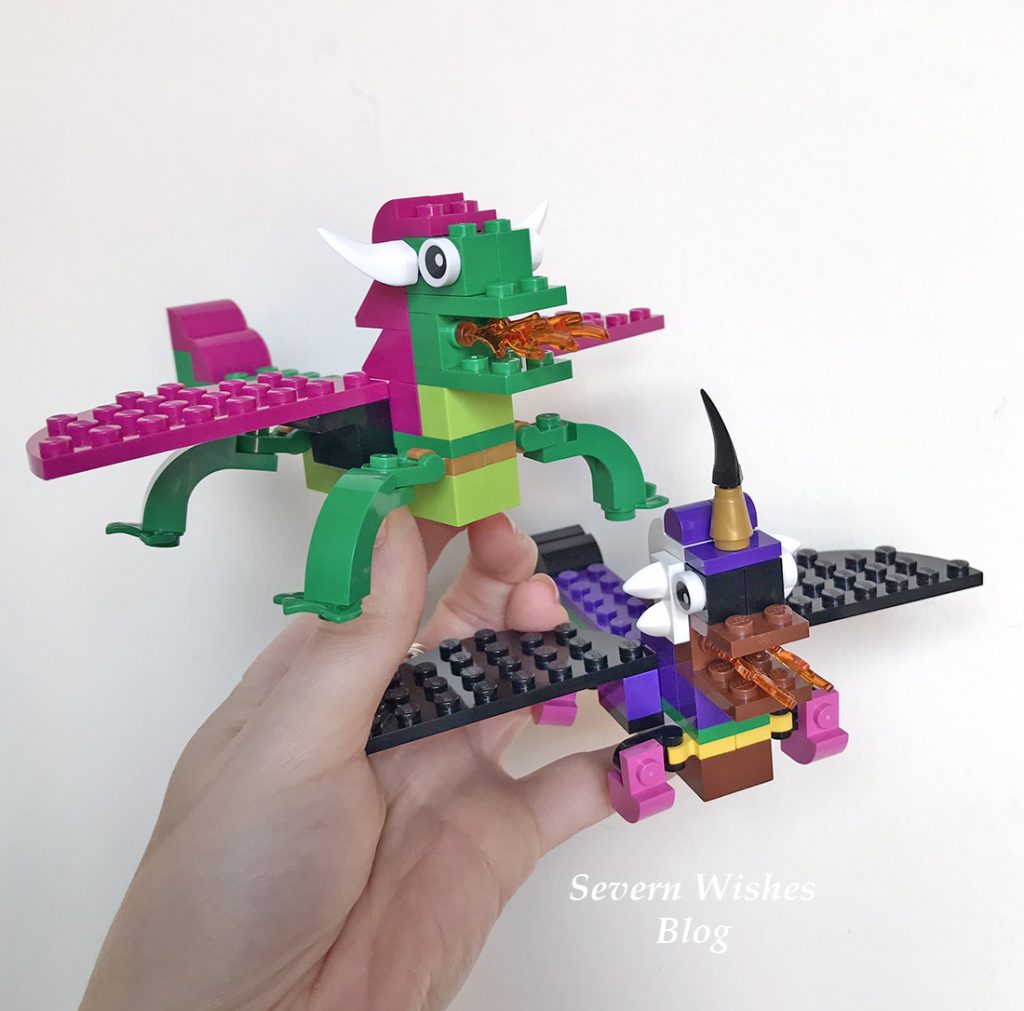
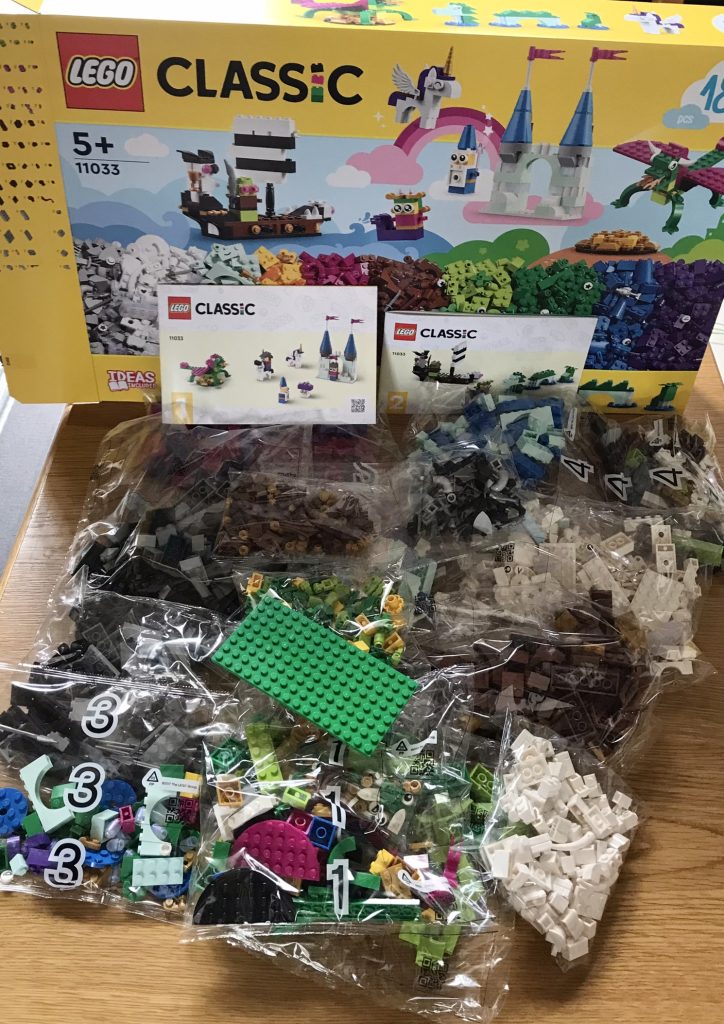
Product Name: LEGO Classic Creative Fantasy Universe Building Toys 11033 Product Price: £80.00 Product Link: Argos Website Product Information: This LEGO Classic Box contains 1800 pieces with brand new bricks and colours ideal for a Fantasy realm including Silver, Gold and Pearl. The books contain several step-by-step ideas and then there are bags more of all sorts of colours of bricks for people to use their imagination and create whatever they want to. Designed for ages 5 and up (due to smaller LEGO pieces) and Adults will also find this set very enjoyable with the view of creating mythological creatures and fantasy worlds. If you like Mermaids, Pirates, Wizards, Knights, Horses, Dragons, Unicorns and even Castles, this is the set for you. And even after you’ve made all of that there will be hundreds of bricks left over to build whatever you can dream up in your mind.
My Honest Opinion
Overall I would like to rate the LEGO Classic Creative Fantasy Universe 5 stars.
Overall Quality 5✩ Features 5✩ Design 5✩ Originality 5✩
The variety of pieces in this box is excellent and the quality of the LEGO bricks is at it’s usual high standard of manufacturing. I love how LEGO start you off with a few ideas in two small step by step books, but then your imagination just takes over and you can think up all sorts of things to make. With so many additional bricks too there is plenty for a whole family to get involved with it and do some creative making.We played for four hours and barely scratched the surface with how many hundreds of bricks still remained.
What I loved most, other than the fact you get hundreds of different kinds and colours of bricks in this set, is that you’re able to use your imagination in a brand new way. By creating LEGO Bricks and pieces that depict things you would find in a Fantasy world, people can create their own creatures and scenarios which I don’t think has been seen that much before in terms of it being a Classic Set. Specific LEGO like Disney, Pirates, Harry Potter, TV Show set ups etc, have that genre specific vibe with pieces you would always expect to see inside. But this LEGO set is totally new, and with bits you may find within those other types of sets, however it’s allowing you to use them how you wish to. Wands, Wings, Utensils, Swords, and hundreds of building bricks alongside these smaller unique pieces, they allow you to let your imagination come up with your own LEGO world.
I would recommend this set to any family that love LEGO or to an adult that loves fantasy and would like to start building basic creatures that they can then elaborate upon. I built my son a second Dragon just by following the instructions and seeing what other bricks were similar enough to do a second model. The same goes for the Horse, we were able to make multiple ones in different colours to mix it up a bit. I want to build a larger castle for my son, so that he can use some mini figures that he got from another set I bought him for Christmas, and combine the two.
Overall I recommend this LEGO set for its diversity and its attention to details. I will now share some more photography that we took during making and creating.
Thank you for reading this product review today, I hope you have enjoyed seeing what my family and I have made so far from reviewing this set. With hundreds of bricks still to use there is no doubt that we will have many hours of fun creating LEGO with the remaining bricks.
If you have any questions about this set then please leave me a comment below or on my social media posts and I will do my best to answer with the knowledge I have gained from reviewing this product.
Anyone who has ever put a child in school will know that there is so much to remember that it can make your head spin. For example, last weekend I labelled shoes, 37 items of clothing, 7 lunch boxes and a variety of other smaller items. Your child will have a Bag, a Lunch Box or Bag, quite often a Book Bag, a PE Kit and Bag as well as maybe other things to take in with them too. It’s a lot of work for one person (a single parent like me) to handle, and there are time saving ways of doing things and ways to make it easier on yourself too. Let’s see what ideas I have below and what I have done during these last two weeks in preparation for school starting up again.
Yearly Wall Planner and / or Yearly Diary Get a year long wall planner and some little round stickers to keep track of everything, make a key at one side and then add any appointments, school trips, swimming days, special dates (like those where additional things are required like dressing up or concerts) and keep updating it every time you know a knew agenda item. This is useful as well for the non-school days and other important reminders too such as Dentist, Doctors or Opticians for example. I think I would be lost without my wall planner.
Weekly Planner A weekly planner is also something that I have on my dining room table, it’s so that on a weekend I can prepare for the week ahead, read up on any paperwork sent home from school on a Friday and let my child know what is expected of them for that upcoming week. It could be school photo week or they are expected to bring an item in for show and tell, but we will know not to forget because of the planner. I can also arrange this planner in a way that has both adult and child organised, as well as meal planning if I have items to be used on a certain evening. A useful item and much better than a phone calendar you may forget to look at, but if you sit down to eat as we do together as a family, the planner is there for you to go through so everyone knows what is what and where and when.
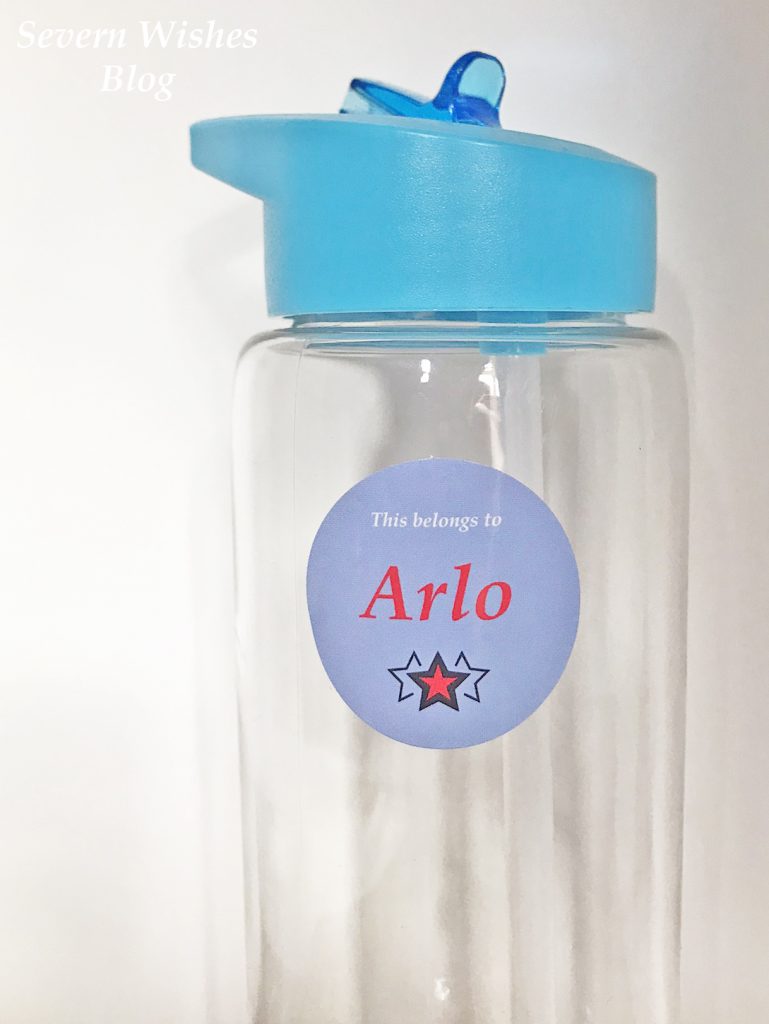
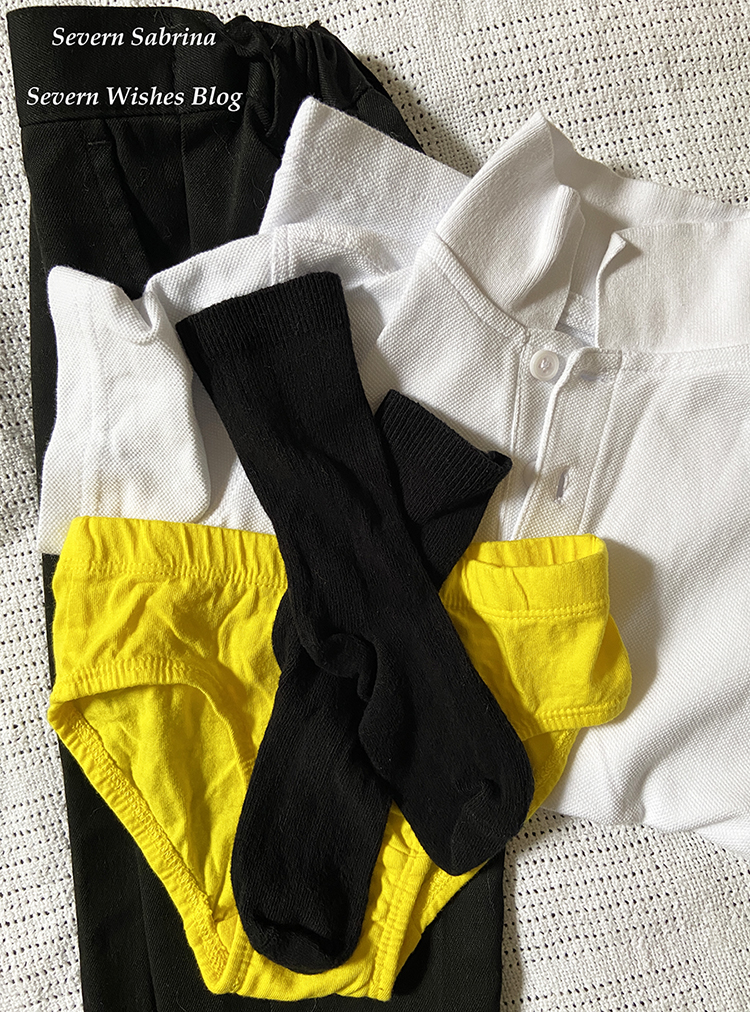
Labelling – It is so Important! Label all of your children’s items for school including their lunch boxes, clothing, bags and shoes. There is nothing worse than them going to school and losing something, and because it’s not labelled it’s unlikely to be returned to you. Schools tend to have lost property boxes that are checked at the end of every day or the end of the week and the items appropriately returned, but this cannot be done without labels. I used a permanent laundry pen to write on my sons clothing labels, and I used stickers for the more solid items. Consider using their full names or even getting their own personalised stickers printed as I have done. Especially if your child has a popular first name.
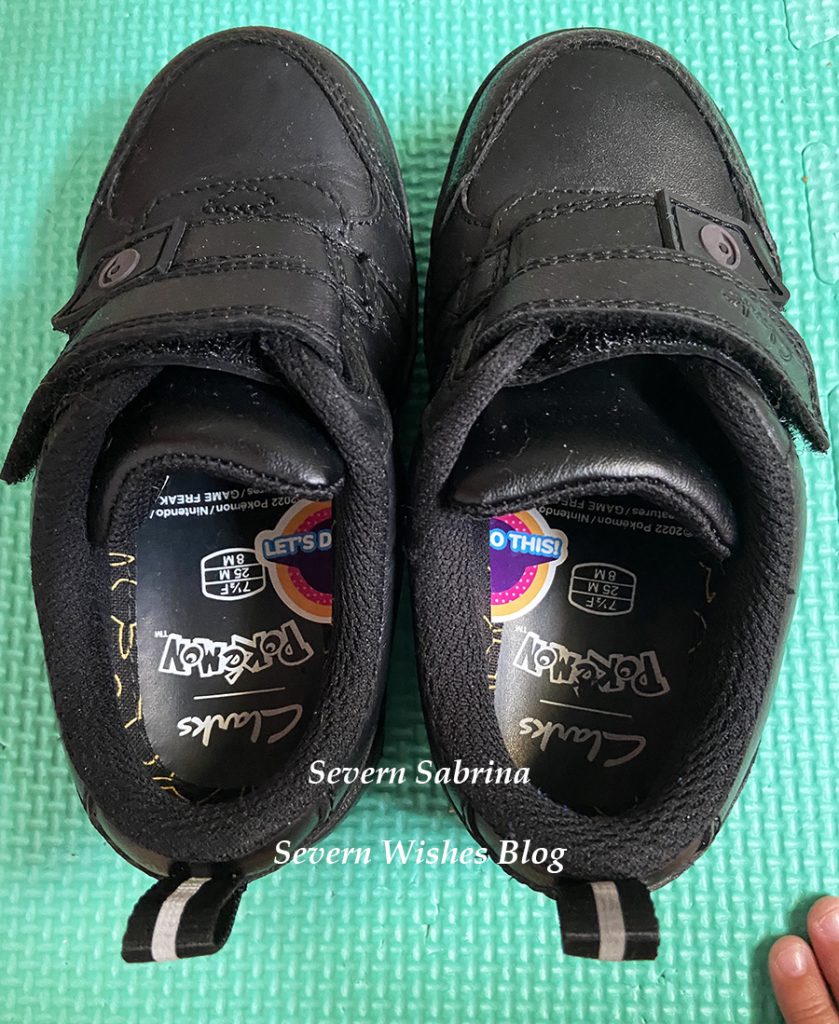
Use the halved sticker hack for getting your children to put their shoes on themselves and to ensure that everyone knows which shoe is who’s. The sticker inside hack allows them to put their shoes on the correct feet every time and it’s genius. Simply cut a large sticker in half and place either side of it into the shoes. When the shoes are correct the sticker will match and the child will know that they have the shoes the correct way to go on their feet. See my photo below for inspiration.
Clothes Piles per School Day Fold up any school clothing into “day piles” in their bedroom on a weekend ready for the school week ahead. This hack of mine is so useful, I did it over the summer too with day clothes as I was getting my son to practice getting dressed by himself. It’s so that I don’t have to police every single item of clothing going on every morning. My son has pants with the days of the week on them, and because that’s the item he will put on first he then has a pile beneath that. So you start with a pair of pants with his daily school uniform laying under it. Pants, Socks and Trousers, then his Polo Shirt last and his jumper is always downstairs and the last item to go on (to save any breakfast getting on it). It’s also so much easier on a Sunday to just make these piles up and put them in the correct bedrooms ready for the week. If you have to wash midweek, even doing two piles of clothing is better than searching drawers first thing on a Monday morning for that missing sock.
Save On Washing – Remove at the Front Door This is always a good one! Take off their school jumpers and any “still clean” uniform pieces as soon as you get home through the door before they have time to get messy and creased. Hang the jumpers up especially on hangers close to the front door ready for the next morning. This helps save on the clothes washing and the ironing by hanging them up safely as soon as they take them off. And it’s always a good idea that a school jumper be the last item to go on in a morning routine anyway, after breakfast and teeth brushing so that it stays cleaner for longer.
Something else you can do to save on washing is always wash with full loads, if that means you get to Thursday and it isn’t full yet then why not consider wearing those similar colours yourself so as to fill up the load space.
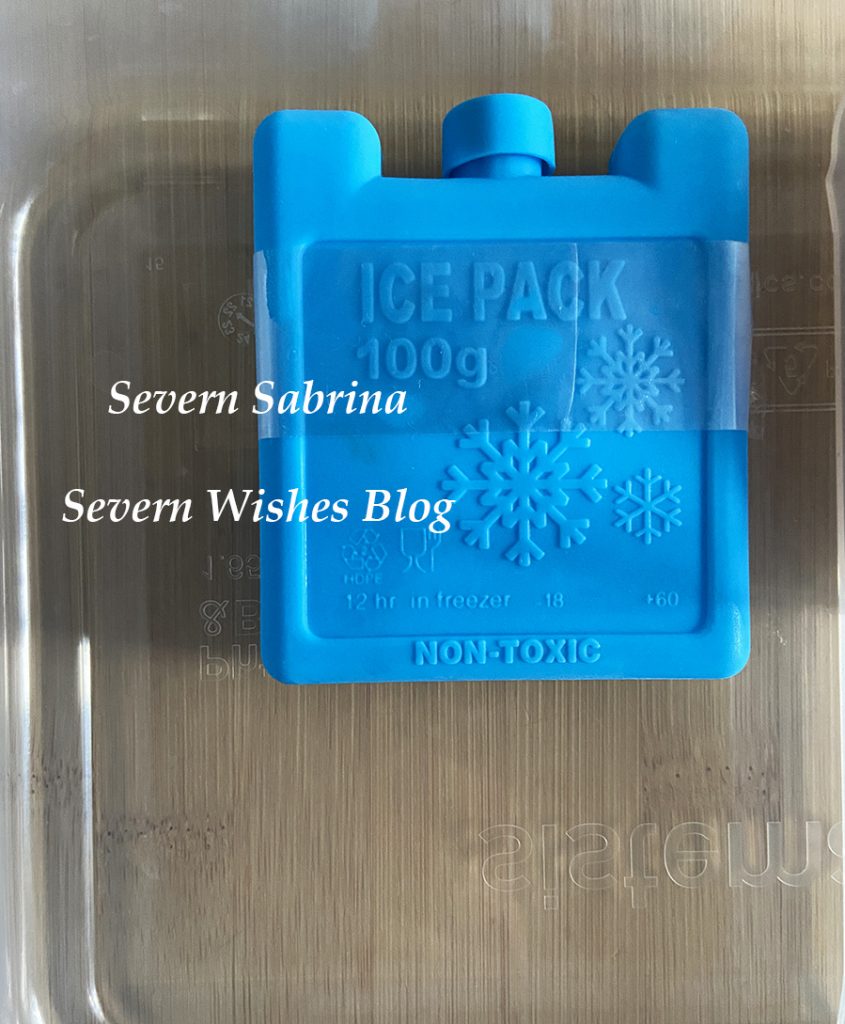
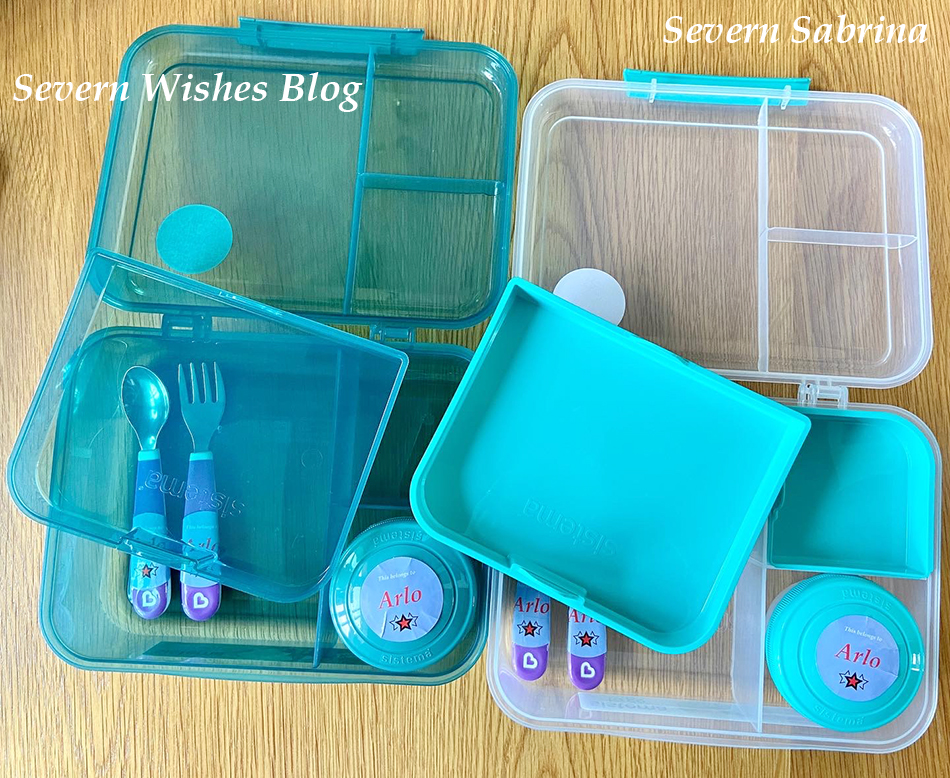
Mini Cool Blocks Investing in some mini cool blocks so that the children’s lunch food stays fresh is important during the warmer months of the year. I place a block under a removable plastic section of his large Sistema lunch box, or I place it at the bottom of the small cool bag I send with him. It’s important if he’s wanting chicken for his lunch which should be maintained at a low temperature to prevent it going off. These are great for adult lunches and days out throughout the year too.
Practice Makes Perfect and Less Stressed Children Practice the opening and closing of lunch boxes, bags with zips and coats too. We are getting to that time of the year where bags need to be closed from the weather and our coats need to be zipped up. During the summer holiday we might not have used those items very much so it’s good to refresh your children’s memories by having them practice doing these things again. Lunch boxes are another one, as they might have a new one this term and you’ll need to make sure they can safely open and close it in order to get at their food or snacks. It’s important that your children drinks enough water while they are at school too, so get them a reusable water bottle that they really like and will continue using throughout the day.
Thank you for reading this blog post today I really hope that you’ve liked it and found at least one of my ideas to be useful. By getting yourself and your family into good habits like these early on, it will make sure you have more time and energy to deal with anything else that happens. Because life nearly always throws you a curve ball when you just about have everything under control am I right?
I hope I see you again for another of my parenting articles, I hope you have a lovely month of September with (I also hope) minimal stresses.
We live in an age where so much is readily accessible to us, but there can be so much information out there that it can often be overwhelming, especially for first time parents. With so many websites, forums and blogs that can sometimes be opinionated and not necessarily filled with the facts. Every person knows where they would prefer to get their information from, some of us like books and others like the world wide web!
Sometimes you can have a baby that is completely different to any before it or any you have known, and you may need additional help or advice. During these times you should always turn to a Midwife, Doctor or Paediatrician if you have concerns of any kind.
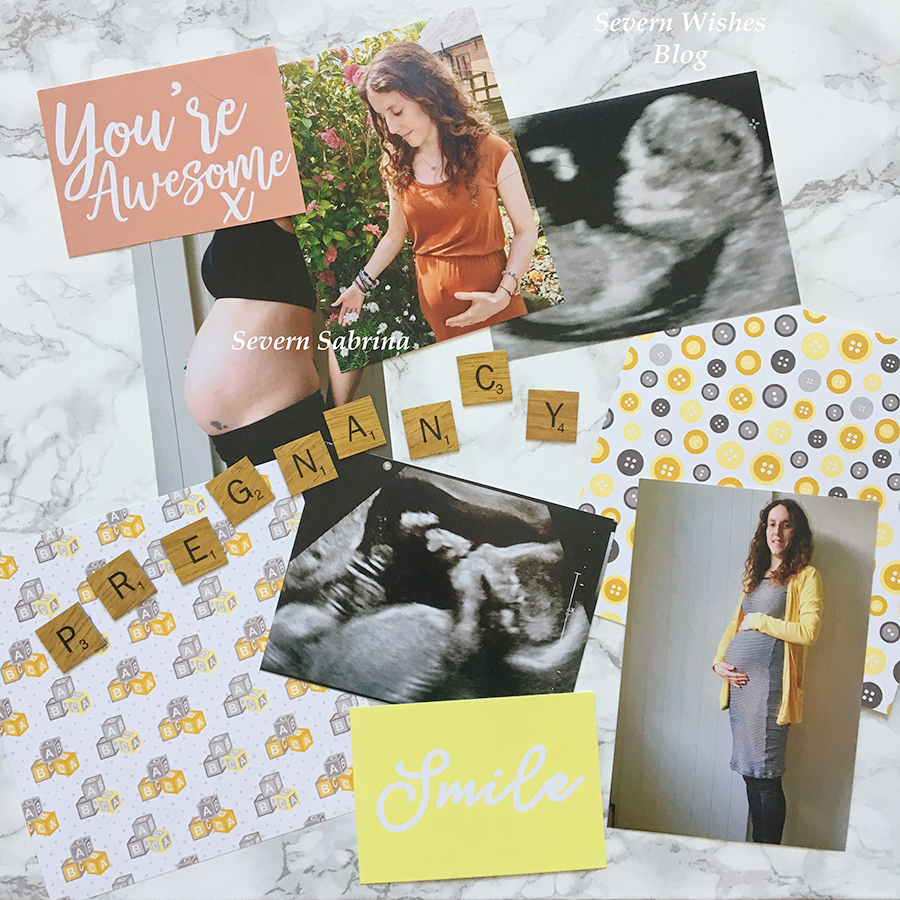
There were things I wished I had known more about before I had my son, and that was despite me reading both books and websites for hours at night when I had terribly painful SPD. I found lots of the websites and apps that I have listed below extremely useful at one point or another during the last four years. So I thought a blog post might help other expectant parents to see what information is available to them.
As a parenting blogger I often get asked about my personal opinion of which apps and websites have helped me since I became a mother. So in order to achieve this post I have gone back over four years of my browsing and researching and screenshot history, to bring you an alphabetical list of all the things that I have found the most useful. I have only included websites and apps that I used more than once and found them beneficial long term.
A Aptaclub Pregnancy and Birth B Bounty App B Baby Centre Apps and Email Newsletter and Website B Baby Names App B Baby and Child (British Red Cross First Aid)
D Duo ABC E Ella’s Kitchen E Emma’s Diary F Free Prints (Photos and FP Cards)
G Get Creative (CBeebies) G Go Explore (CBeebies) K Kicks Count Website
N NHS Website O Online 4 Baby Website
P Pokémon Smile (Teaching Toddler Teeth Brushing) P PooGoesHomeToPooland (Teaching How To Use The Toilet)
S Storytime (CBeebies) S Snapfish (Photo Printing)
Y Your Baby Club Website and Social Media
Let me now elaborate on a few of these now and the reasons why I found them so useful. Some of them are of course self explanatory, but others are really handy for tips and tricks. Some offer you freebies and others offer key medical advice or milestone information.
Bounty App The app gives you information on the progress of your baby whilst in the womb, and then after the birth it gives you key advice on milestones and growth. An app that I found generally fascinating to look at every week as my pregnancy progressed. Now that my son is older he is still on the app as a 48 month old! And the app offers me developmental advice and articles to read. The articles can be read at any time of your pregnancy and usually the app updates what is relevant to you at the time you need it. There are also useful check lists on it too. I score this app a 5✩.
Baby and Child (British Red Cross First Aid) First Aid is such an important part of human life, however most people go through their entire pregnancy without knowing how to do life saving procedures on babies or young children such as, choking, allergic reactions and dealing with illness. The Baby and Child App gives advice as well as videos that people can watch at their leisure for a variety of situations. Just some of what they cover include; Asthma, Bleeding, Burns, Choking, Epileptic Seizure, Fever, Head Injury, Meningitis, Vomiting etc. This app is one that I believe every single person should have on their phone, just in case. I score this app a 5✩.
Duo ABC I found this app while researching after my son had to start Speech and Language therapy. Due to the support being so sporadic due to the pandemic I did my own research, started my own lessons with my child at home, and created my own flash cards. But this app came up on a results search, and despite it being American my son found aspects of it to be beneficial. Writing the letters on the phone screen with his finger, sounding out letters and recognising upper and lowercase letters all helped on our journey. I did just 20 minutes with him a day for 3 months, alongside my other teaching and he soon knew his alphabet and could say all but 5 of the letters properly. If anyone is struggling with their child and they seem distanced from paper methods, try this app, just ten minutes a day with you, you may just see a difference as I did. I score this app 4✩.
Ella’s Kitchen Once your little one reaches the 6 month milestone and you consider starting to wean them alongside their daily milk amount, you may want some advice. Ella’s Kitchen App provide you with advice, recipes and you can sign up for a free pack with a journey poster, stickers and some vouchers for their snacks. It was fun when my son was little, but when he developed lots of food allergies I made my own recipes up. I score this app 4✩.
Emma’s Diary Emma’s Diary is a fun app where you can create all sorts of fun things to keep throughout your pregnancy, it also offers some information and it gives away bags of goodies at certain points of your pregnancy. It’s worth signing up to this as soon as you find out you’re pregnant to take advantage of all the items on offer. I score this app 4✩.
Free Prints (Photos and FP Cards) Free Prints have two useful apps, the first one is Photo’s and you get some free prints every month just pay the postage. And the second one is Cards where you get one free card a month like a postcard, just pay postage. Upgrade to proper cards for pennies and they offer lots of other fun affordable products throughout the year. The more you order the more deals you’ll get. I score these apps 4✩.
Get Creative (CBeebies) and Go Explore (CBeebies) Apps that I don’t know what I would have done without! When I became a single parent even taking a shower was tricky. Sitting my son on the bathroom floor safely on a bean bag when he was a toddler, my phone playing CBeebies programs and videos off the app were a godsend! Now he is older he is using the various parts of the app to learn all sorts of things like shape sorting, mathematics, role play like shopping and problem solving. The Creative app allows freedom in Art and expression using some of the CBeebies favourite characters, and the Go Explore is more about learning and fun, again with the usual friendly faces. Love these apps! In moderation of course. I score these apps 5✩.
Kicks Count Website Kicks Count is something that is really important, and all pregnant women should visit the website and learn about the importance of kick counting and the work this group do. It’s worth following them on social media too. I score this 5✩.
NHS Website When you have questions in the small hours of the morning the NHS website can have useful information or point you in the direction of help if you need it. I score this 5✩.
Online 4 Baby Website An excellent website for affordable baby items such as changing mats and muslin cloths. Worth a look when they have a sale on for certain! I score this website 4✩.
Pokémon Smile (Teaching Toddler Teeth Brushing) Whether you like Pokémon or loathe it, if you have a child that refuses to brush their teeth you will try literally ANYTHING to make that time of the day and night less stressful. For us it was this app that allowed my son to turn a corner! There is an icon of the mouth that follows them while they brush and indicates where to go next so they don’t miss any teeth. I score this app 5✩.
PooGoesHomeToPooland (Teaching How To Use The Toilet) Another app that is a little annoying but if it helps your child to understand that poo goes down the toilet and not on the floor then so be it! My son watched it every day for about a month and then got bored of it, but it certainly helped him realise that I score this app 3✩.
Storytime (CBeebies) Another CBeebies app and this one is all about books and stories. The app can read to your child or they can try and read themselves. The stories are often interactive as well, lots of fun. I score this app 5✩.
Snapfish (Photo Printing) Free photo’s every month just pay the postage, a great way to keep family up to date with how little one changes and you can make an album of their first year for less than £20. I score this app 4✩.
Your Baby Club Website and Social Media As a Blogger Writer for Your Baby Club I often provide them with useful articles surrounding parenting. These first hand experiences from parents go alongside their informative articles on the websites and on their social media platforms too. I score this 5✩.
Thank you for reading this blog post today, I do hope that you have found it useful. Please pass the link to my website on to family or friends who are expecting so that you can share these excellent websites and apps with them. Hopefully they will be just as happy with them as you were today! (I hope).
Keep on visiting Severn Wishes Blog for Parenting related blogging, Product Reviews and general Lifestyle Posts! Thank you! Have a lovely day!
Hello and Welcome! If you’re a regular visitor to Severn Wishes Blog then you’ll know that I love to do lots of Art and Craft! If you’re new here then hi, and after this blog post please check out the remainder of my fun Crafts in the section here.
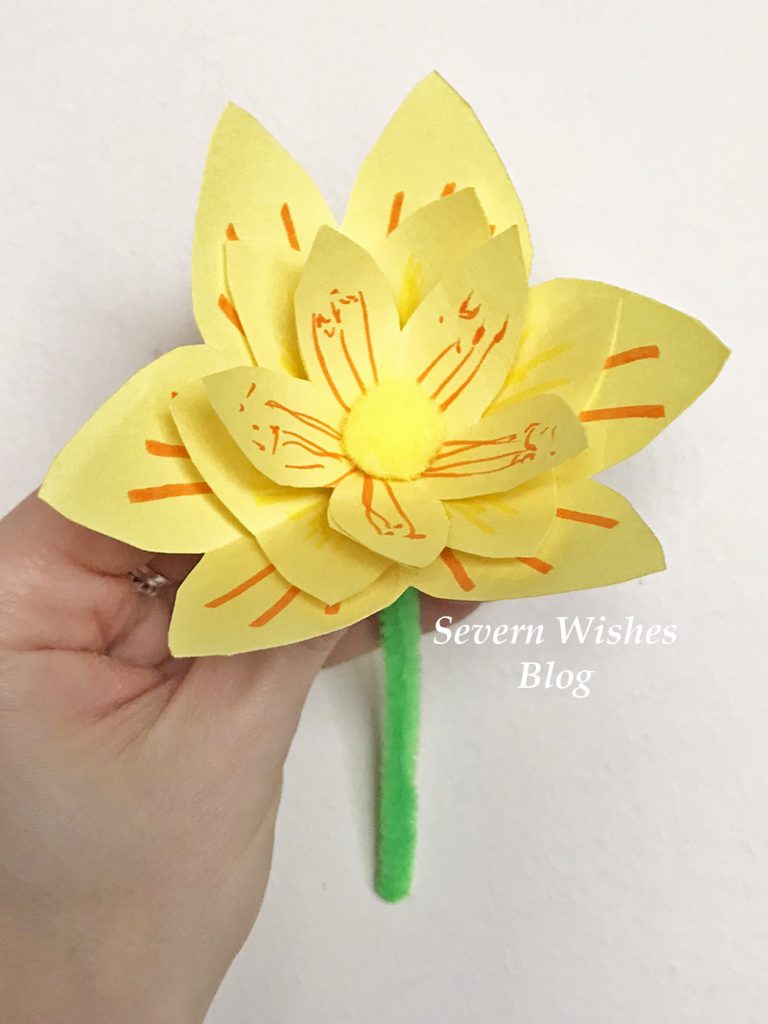
Paper Flowers are a wonderful alternative to buying fresh ones, the beauty of these homemade gifts is that they won’t wilt and have to one day be thrown away, these can be treasured by the loved one receiving them, forever! Give a single flower or make a bouquet it’s up to you!
What Do I Need?
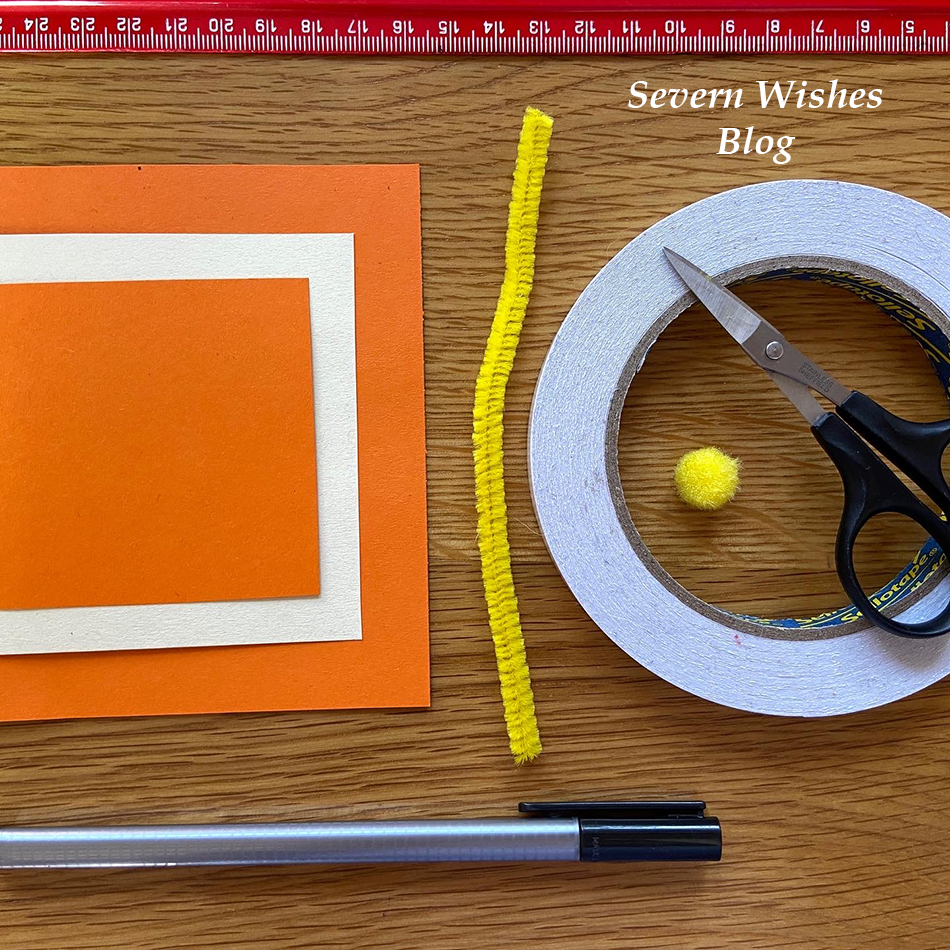
A Ruler (30cm) A Pen or Pencil Pipe Cleaners various Colours Thin Coloured Card or Thick Coloured Paper Pens for Decorating the Petals (optional) Fluffy Craft Balls (Flower Centres) Scissors
My Step by Step Visual Guide is really easy to follow, but I also uploaded videos to my social media if you would prefer to follow that! Carry on reading for my step by step and photographic guide.
SABRINA’S STEP BY STEP GUIDE
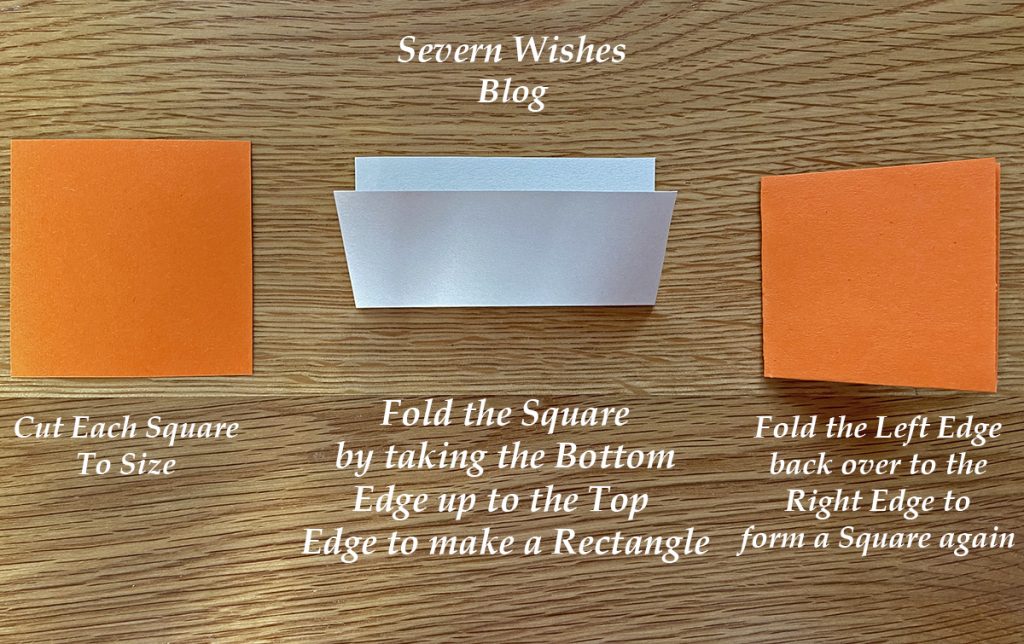
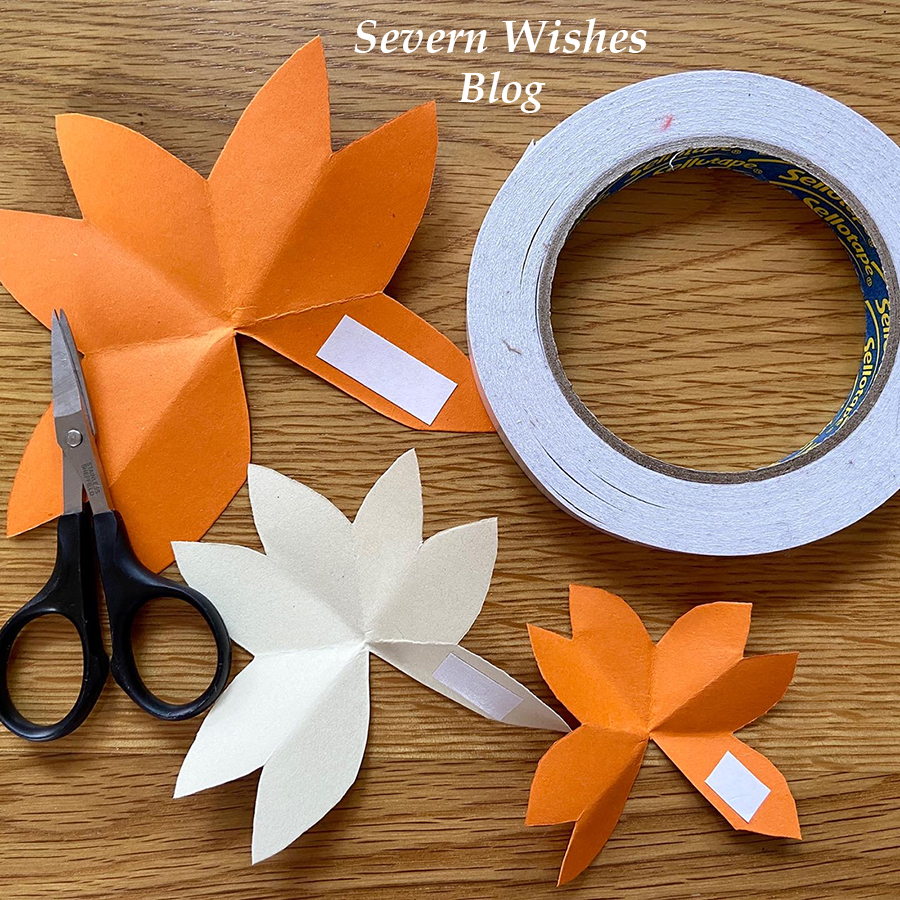
1. Cut Squares from your chosen Coloured Card. For example I made my Orange Flower with a 7cm, a 8cm and a 10cm Square. Three Squares is an ideal amount of layers but you can do just two or even more layers if you wish. Assemble these squares on a flat surface ready for the individual folding process. (See my images below for additional guidance).
2. Fold each square you have in half to form a rectangle, do this by folding the bottom line up to the top line and line up the crease and push flat. Repeat for every piece you have.
3. Next, you fold each rectangle back into a square shape by folding it from the left to right and flatten and crease down flat once again.
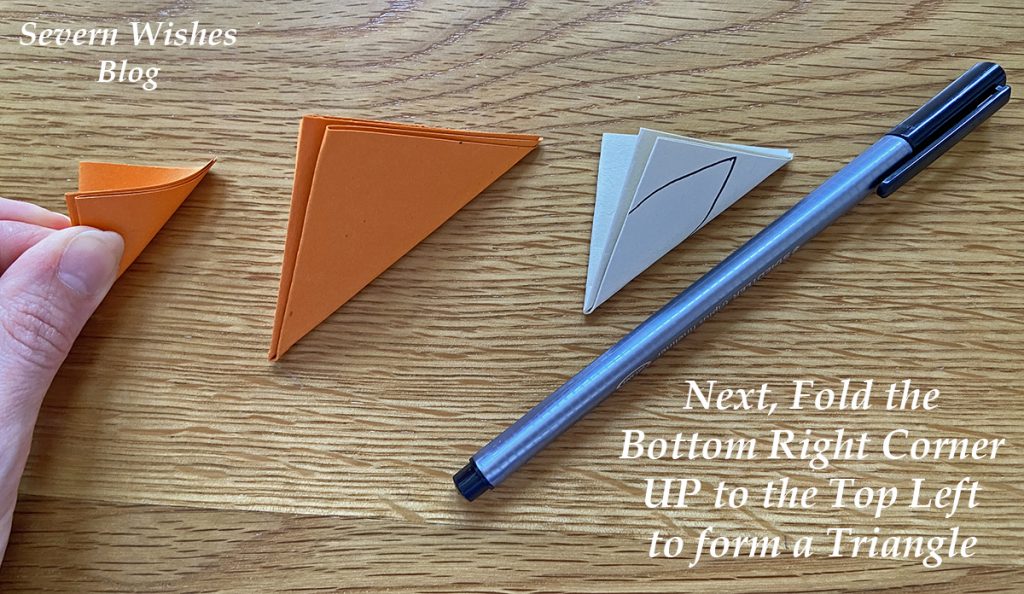
4. Finally you will have all your layers into folded squares, and these now need to be made into Triangles. But to do this correctly for the next steps you must not rotate them at all during the folding process. Make sure that you fold the bottom right corner of your squares up to the top left, flatten and crease.
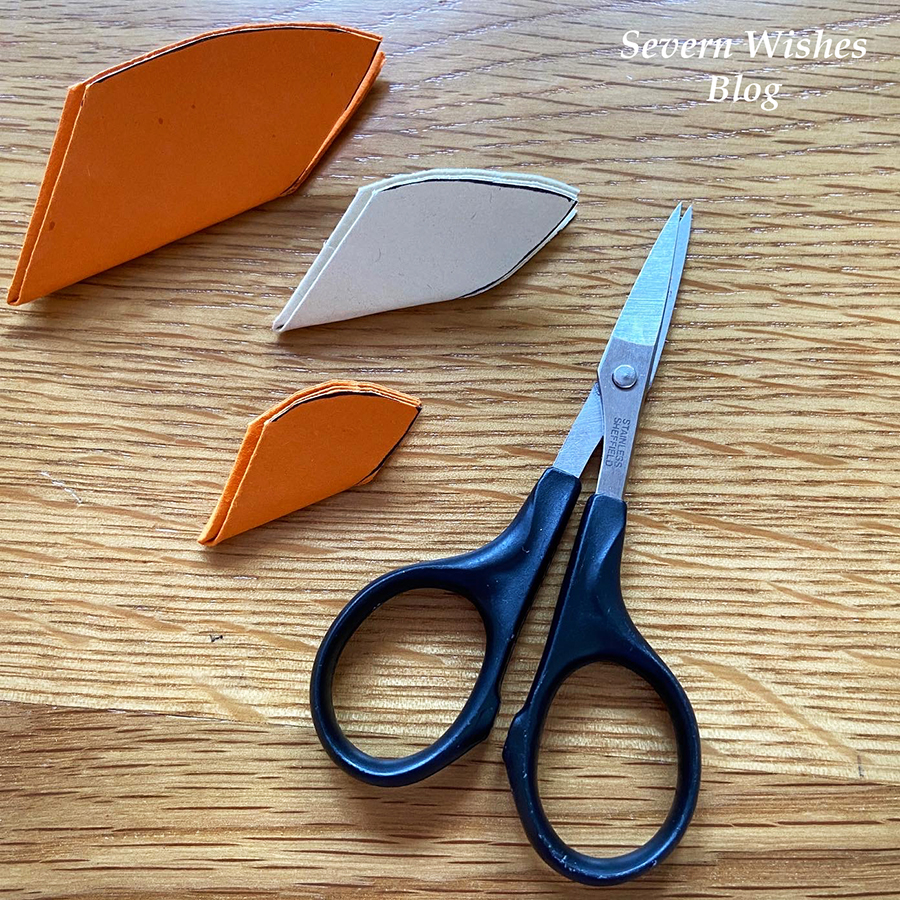
5. Next you need to draw a petal shape on every flattened triangle, make sure not to rotate it from when you folded it when you draw on it, otherwise it won’t cut intact during step 6.
6. Now you need to carefully cut out your shapes, gently follow the line and then discard these cut offs for the recycling because you don’t need them.
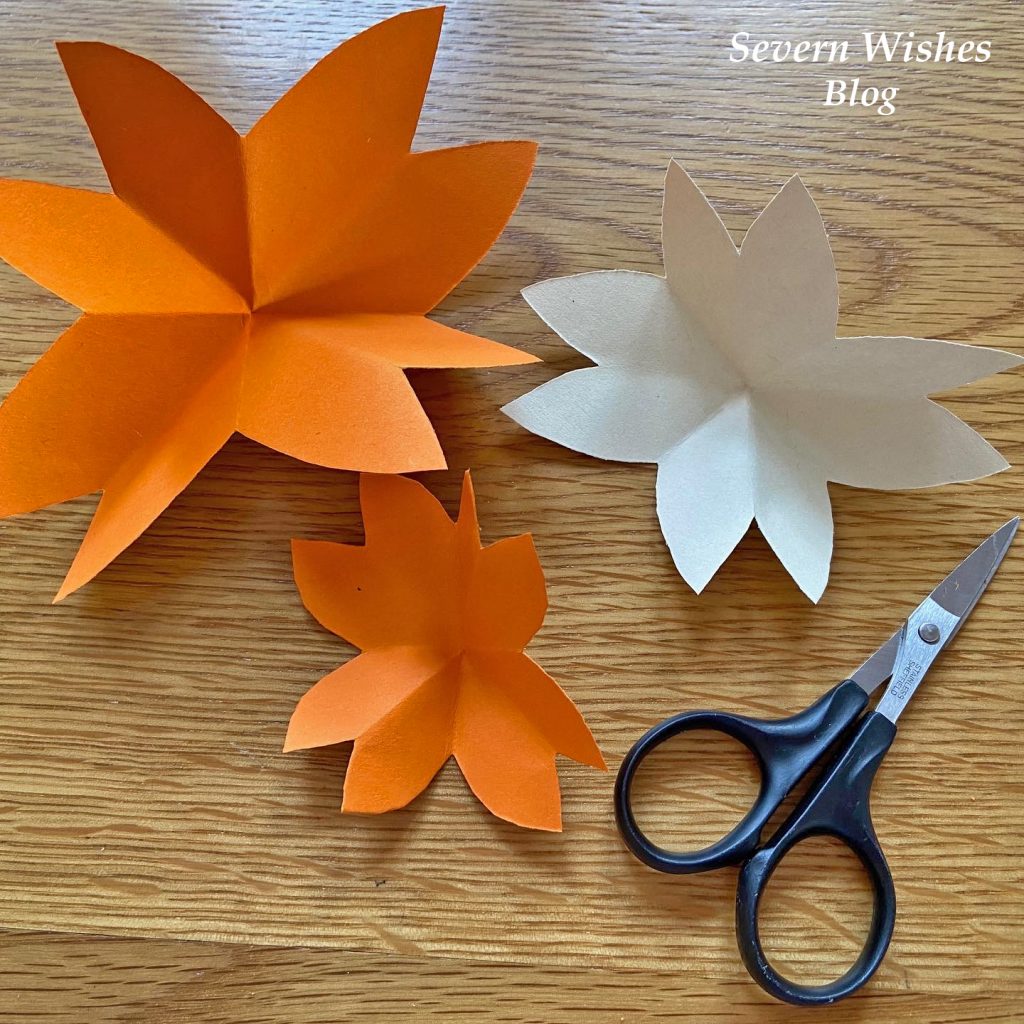
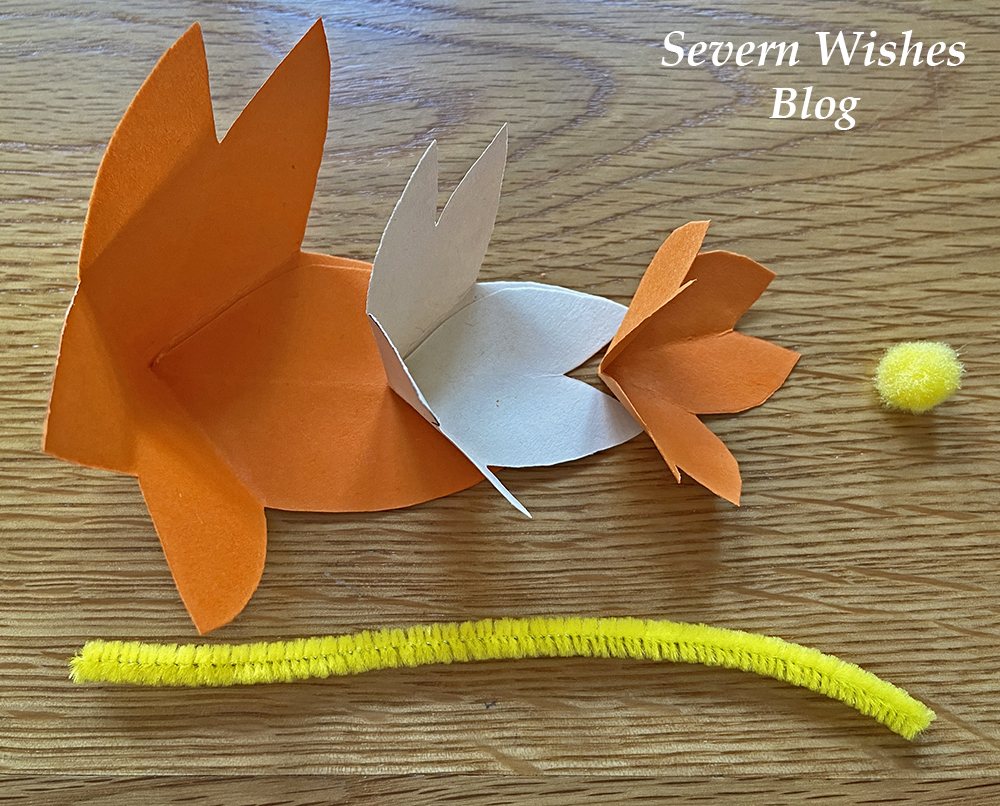
7. Time for the moment of truth, open out the flowers gently and slowly so as not to tear them. Lay them out flat and make sure they are an entire piece.
8. With the crease lines facing at each compass point you need to mark the petals that are in the South East corner of each flower. (See my images below if you are uncertain).
9. Carefully cut these petals away from the flower, be sure to only follow the crease lines of the folds when you cut and don’t be tempted to cut it too low in the centre, just enough for the spare petal to gently come free. You don’t need these now and these spare pieces can all be recycled at the end of your crafting session.
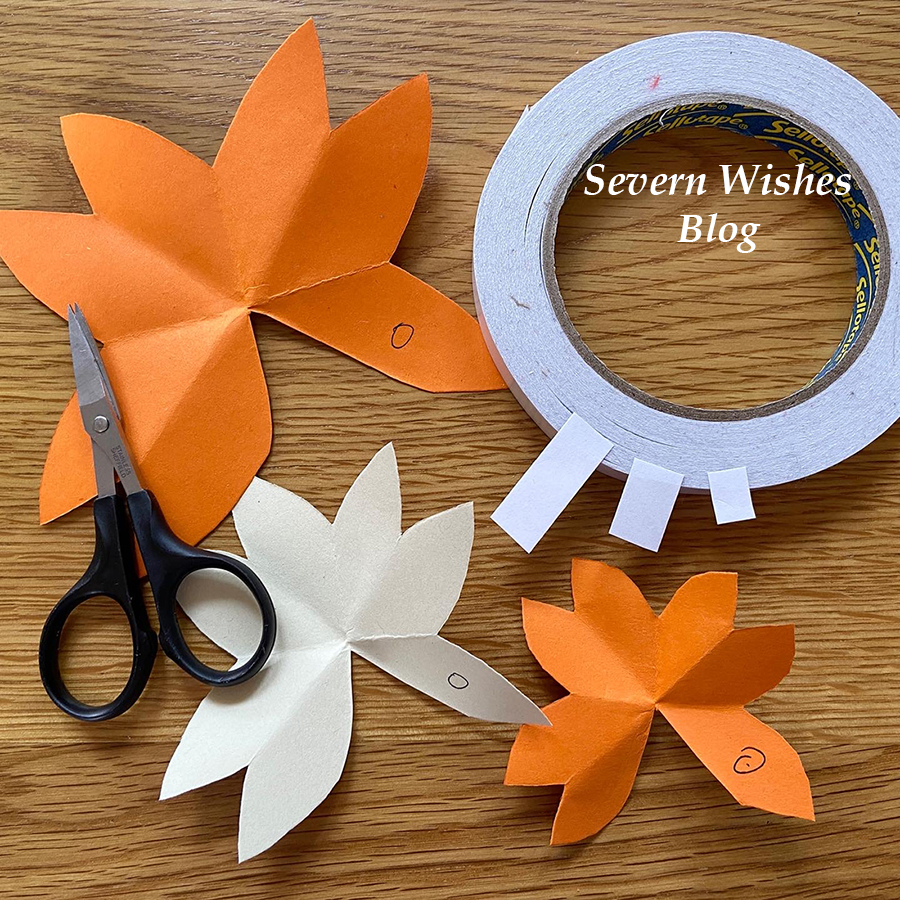
10. Next step is to mark the petal on the right of the one you just cut away, on each of your flower layers, and then stick a piece of double sided tape or a blob of glue on to that mark.
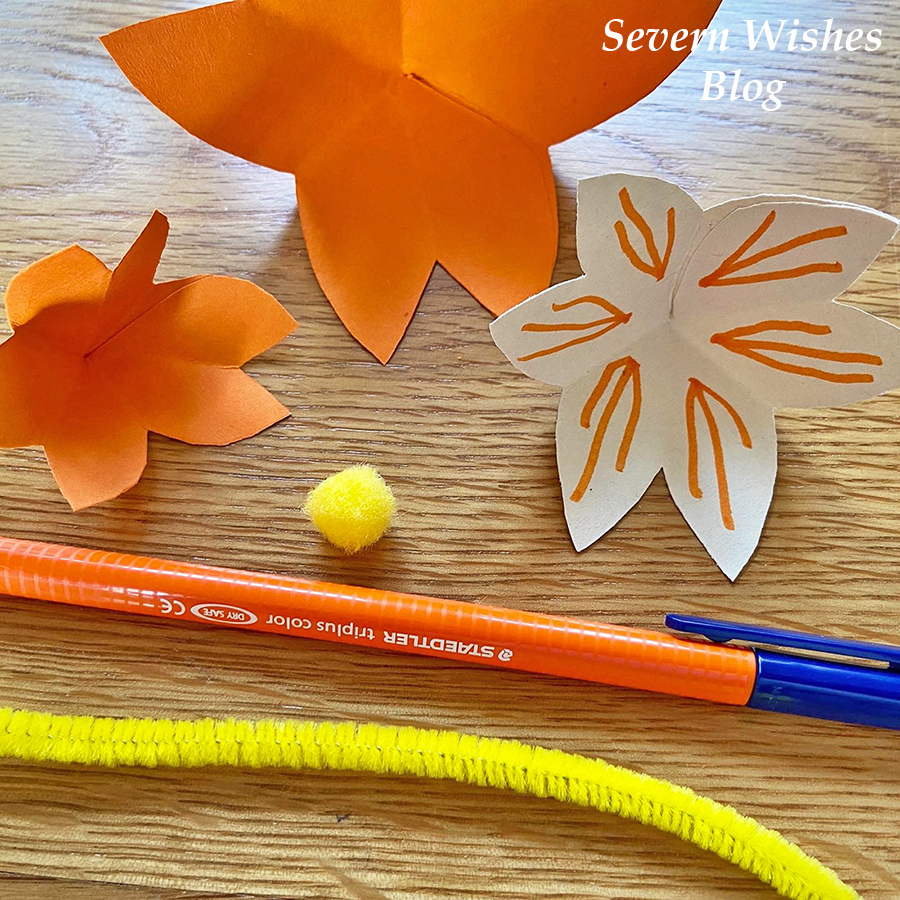
11. Doing each layer one at a time now, gently place the flower into your hand, and with the other hand carefully fold the petal on the left side over the petal on the right side. The creases and folds we made at the start should allow you to do this easily, if not gently fold the creases again and try again, the flower should (with some gentle persuasion) create a 3D flower with the shape similar to a cone. Push down on the glued part and make sure that you have aligned the petals and that it is stuck down. Repeat this for all flowers and layers that you want to make.
12. Carefully lay out each of the Flower layers now that they are 3D. You now need to decorate them if you want to with lines or dots before we assemble them. If making them with small children you may want them to decorate at Step 10, before you make them 3D.
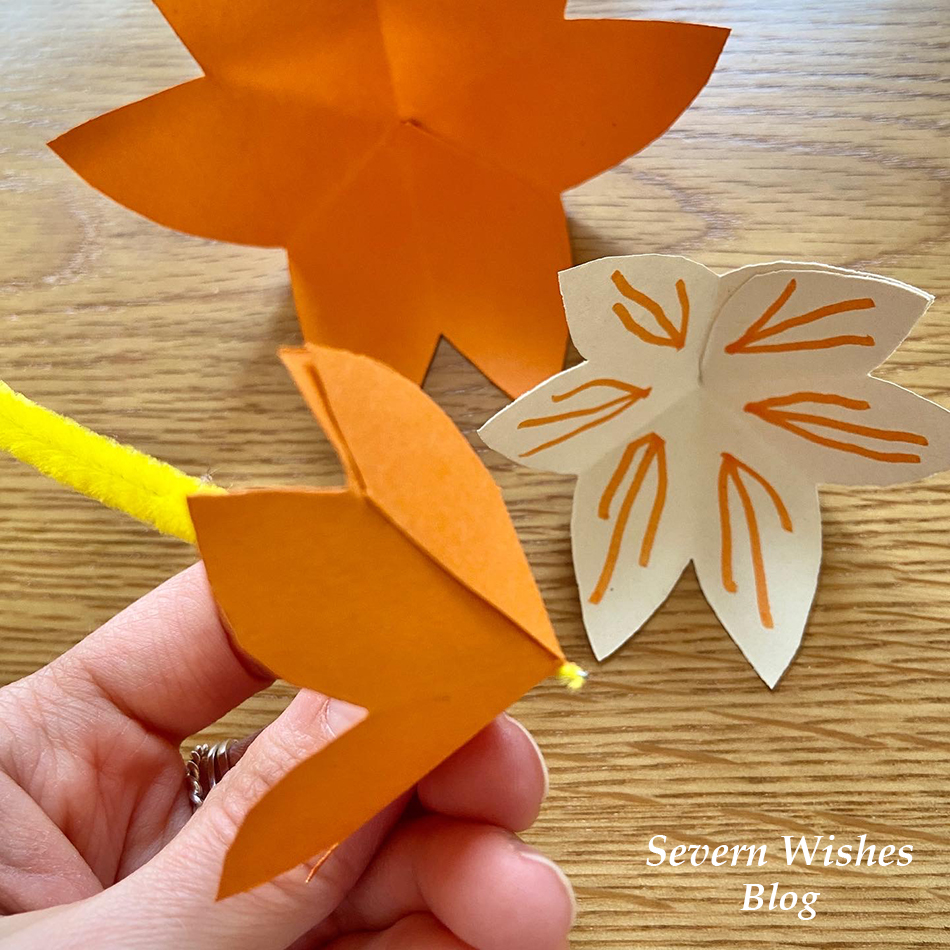
13. During this step you want to use the end of the Pipe Cleaner you have chosen to gently pierce through the middle of the Flower layers, take one at a time, and force the pin end of the Pipe Cleaner directly through the centre where the creases and folds meet. Once all of the layers are pierced you can now arrange them in order of size.
14. Assemble your finished Paper Flower by sliding the layers on to the Pipe Cleaner, you do want to leave about a 4mm bit of the pipe cleaner poking out so that you can push on a coloured fluffy craft ball (if you have one) and this neatens the whole look of the flower plus it covers the pointed end of the pipe cleaner.
15. Adjust the Petals by rotating the layers slowly on the pipe cleaner stem until you are satisfied with the flowers final look. I hope you are happy with your flower! You can play around and add other things too if you like! Be creative and I cannot wait to see yours! Tag me! #SabrinasHowToMake
✩✩✩
Thank you for reading this Craft related blog post today, I always love doing my “Sabrina’s How To Make’s”! And if you have any questions for me then please comment below on this post and I will happily answer them for you. If you make some flowers please tag me on social media using the hashtag #SabrinasHowToMake and I really look forward to seeing them!
✩ Sabrina ✩
By continuing to use the site, you agree to the use of cookies. more information
The cookie settings on this website are set to "allow cookies" to give you the best browsing experience possible. If you continue to use this website without changing your cookie settings or you click "Accept" below then you are consenting to this.