Sabrina is a Lifestyle, Parenting and Product Review Blogger. A Writer, Photographer, Reviewer, Home Cook, Crafter & Nature Enthusiast. You will find a bit of all those categories here on Severn Wishes Blog, Welcome to Sabrina's Lifestyle Blogging & Honest Reviews.
I love everything about a crisp Autumn day, the colours of nature in the trees, the warm sunshine and the cooler air. Wrapping up in warm clothing and taking a walk in the countryside cannot be beaten at this time of year. But how can you bring that beauty of Autumn into your home in simple yet beautiful ways and on a strict budget! Well here is how I do it!
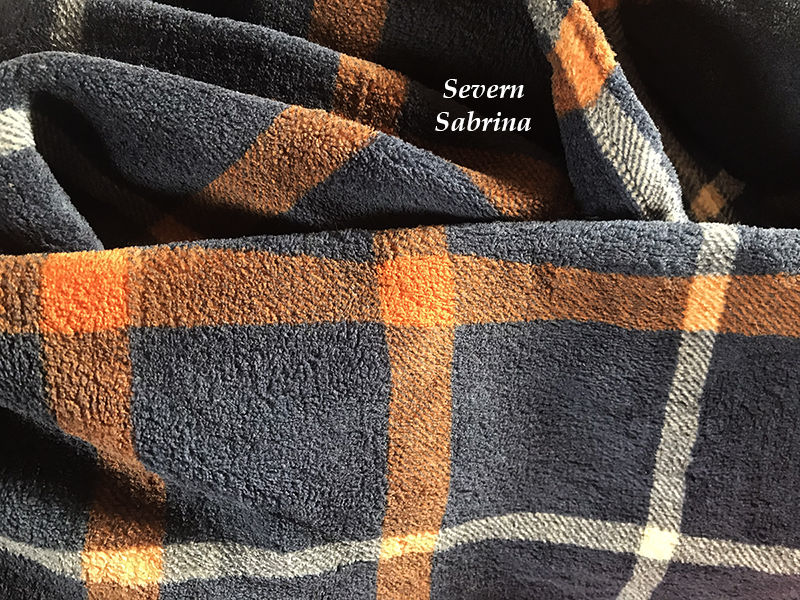
Throw – Dunelm
My Items I bought on a Budget for Autumn Décor over the last few years
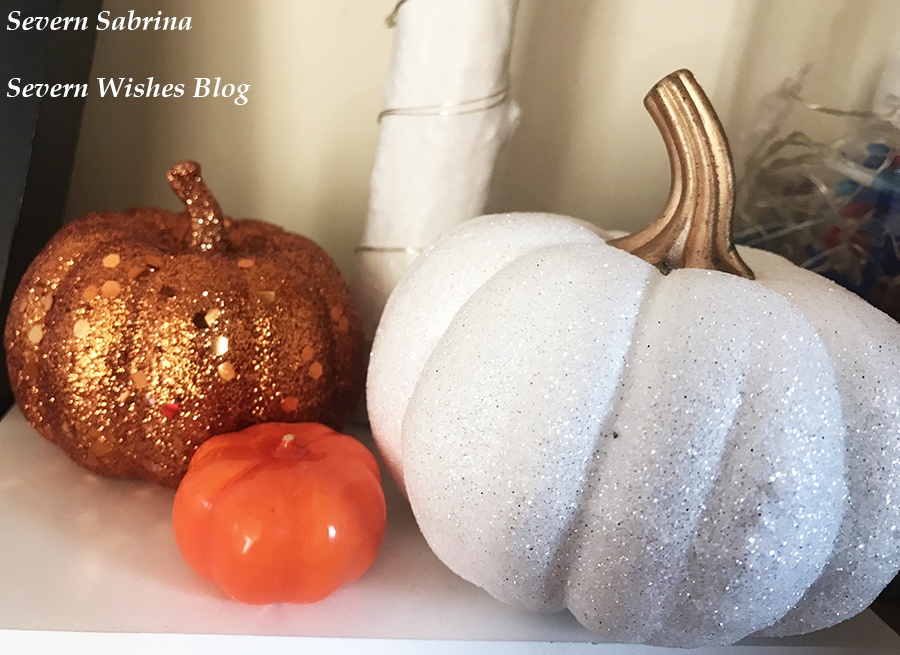
Glitter Pumpkins – Poundstretcher – £1 Plastic Light Up Pumpkin – B&M – £4 Artificial Autumn Leaves – The Works – £1 a bag (50 leaves per bag) Wreaths, Craft Items and Wooden Pieces – The Works / eBay – 50p – £5 Autumn Fleece Throws – Asda £6 / Tesco £6 / Dunelm £7+ Artificial Pumpkins / Pine Cones / Acorns – eBay – £4-£12 depending upon how many pieces you want and which country you decide to order them from (China prices are cheaper but you’ll wait around 3 weeks for the delivery). Autumn Cushions – Autumn Designed Cushions or Cushion Covers – Amazon / eBay / Dunelm £3 – £9
(Some of the items in my pictures I have purchased from years 2020, 2021 and 2022 and only similar items may now be available from their respective sellers).
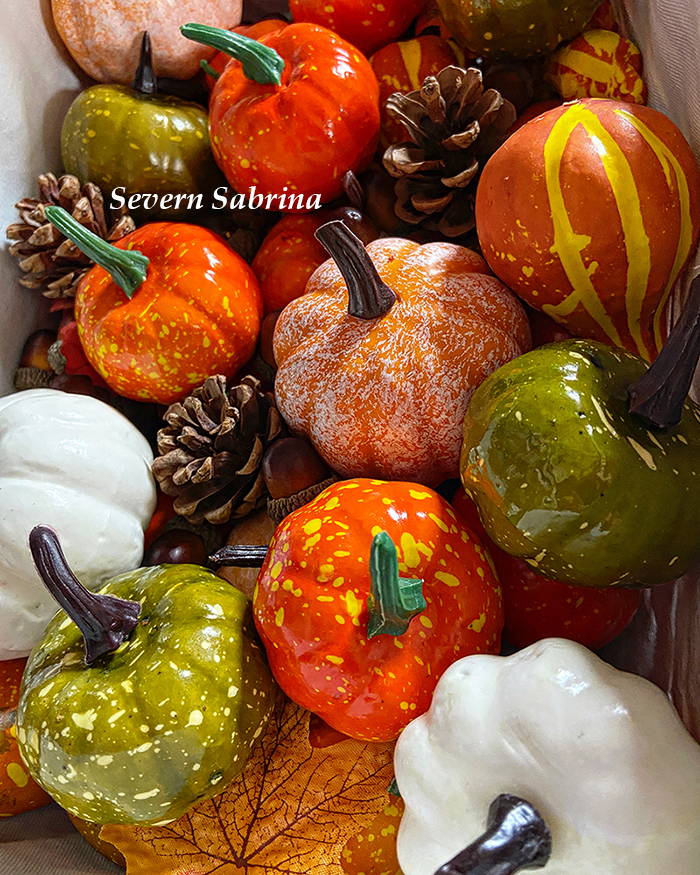
Glitter Pumpkins – Poundstretcher
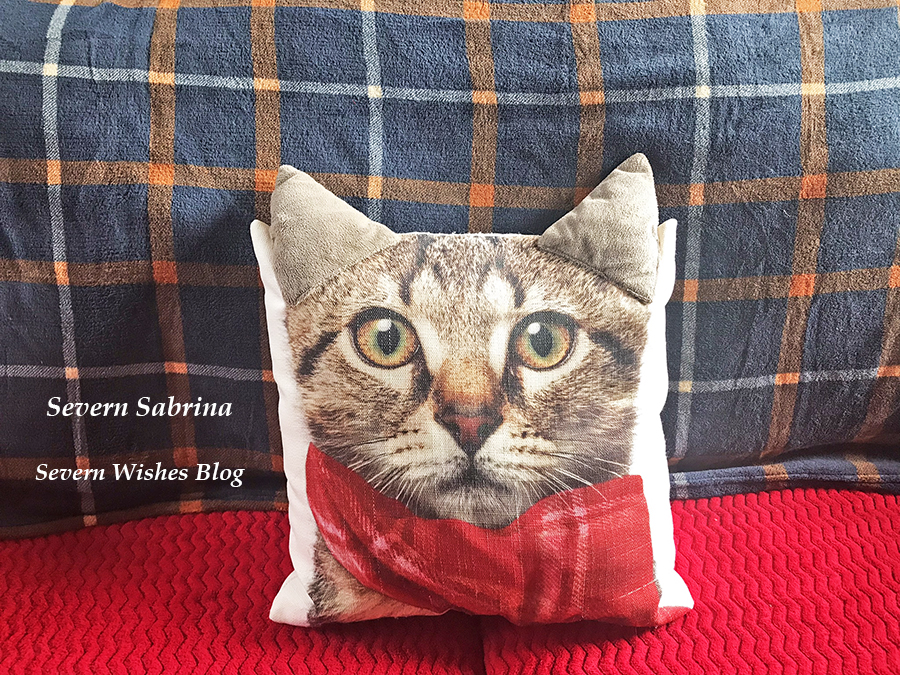
My delightful Cat in a Scarf Cushion from Next from 6 years ago.
I love nothing more than to cuddle up on my sofa with my cushions and fleece throws, getting cosy as the cold nights draw in. I have a whole box filled with throws, I have some for every season. It’s the turn of my Autumn throws like the one above, it’s navy and orange design emanating the colours of autumn.
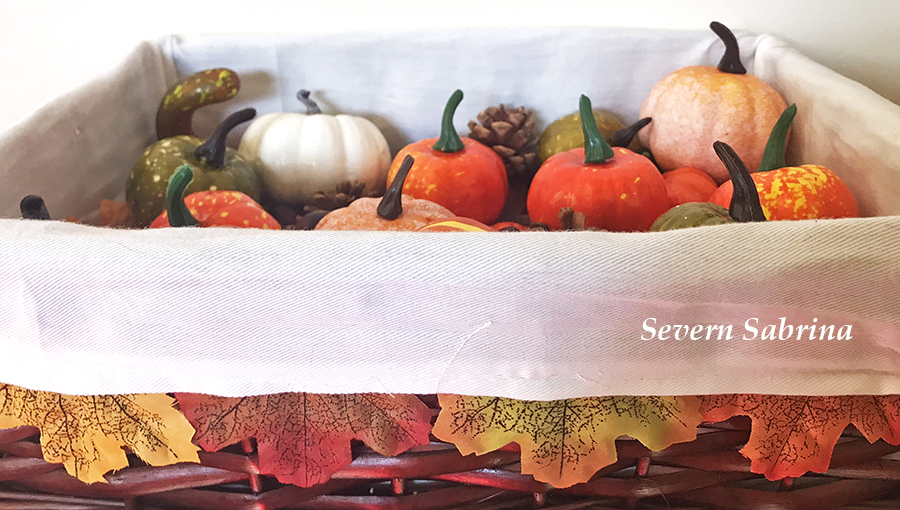
Autumn Basket
I used an old wicker basket that I had laying around to create an Autumnal display. Inside I placed artificial leaves, pumpkins and acorns, with some pine cones. Take some leaves and gently slot them in around the outside, so that no matter what angle you look across at it you will see an autumnal theme. You can use any spare Basket or even a Box you have laying around, paint it if you wanted to! And any size works too, the smaller your item the less things you’ll need to fill it up.
Autumn Basket from above
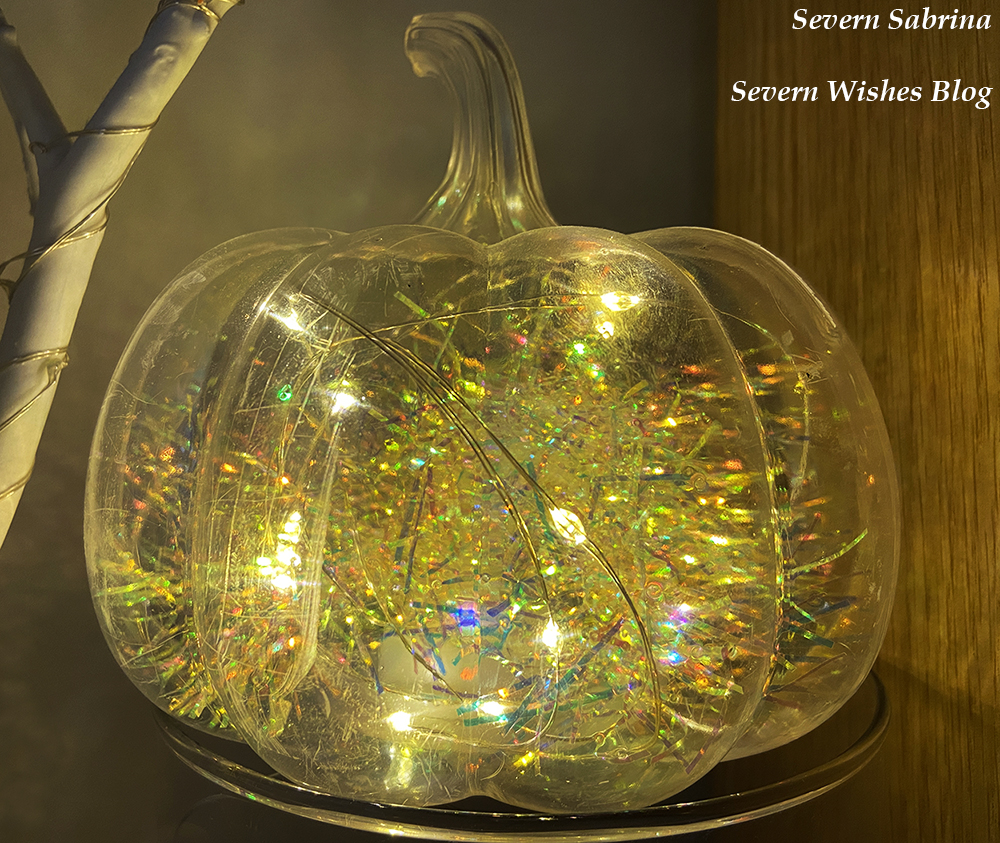
Light-Up Battery Pumpkin Clear – B&M (2021)
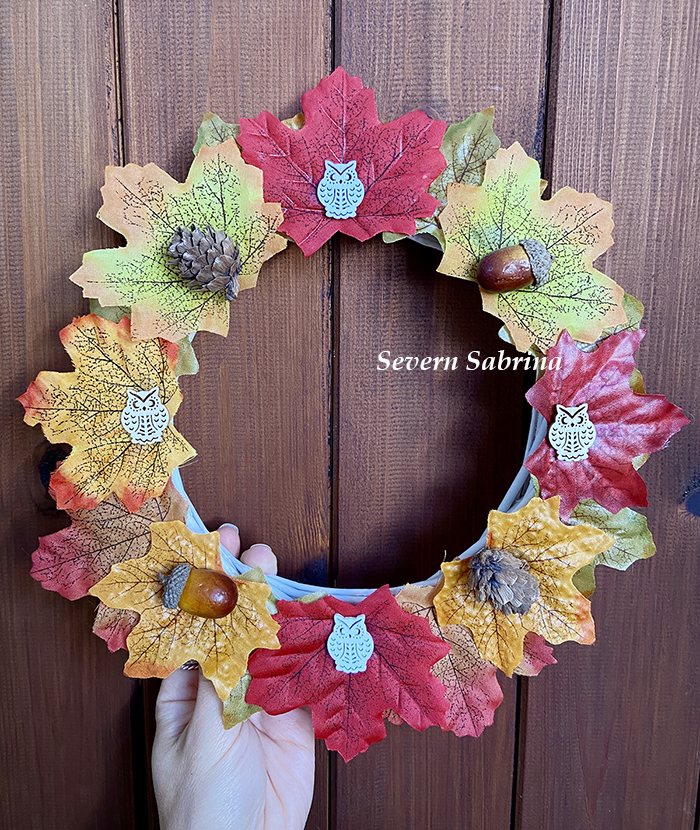
Autumn Wreath
An autumn wreath is simple to make from some of the items you’ve already bought for decorations like the pine cones and artificial leaves. You can also go on a nature walk, gather items off the floor (do not remove them from hedges or trees) and dry them out on a towel over the course of the next week. My wreaths are from The Works and eBay. You can buy them as Metal, Rattan or Wicker, but I try to buy plant based ones where they are sustainably grown and made when possible. To make a wreath take your circle base and then using a glue gun attach a selection of artificial leaves as a base layer for your other items like pine cones and artificial pumpkins. Leave it to dry for at least a day before hanging it up, or lay it flat as a centre piece of a table for example. You could stand a vase in the centre of it to continue the theme. I used some Wooden items as decorations for my indoor only wreath as well, which I picked up from The Works over the past two years. The Owls are a particular favourite of mine. I am proud with how both of my wreaths have turned out. See my images below.
Homemade Wreath I made 2021
My outdoor wreath is a metal ring that I have glued a selection of items including the artificial leaves and pumpkins, small pine cones and artificial acorns.
Homemade Wreath I made 2022
Thank you for reading this Lifestyle blog post today, I hope you have enjoyed looking at my Autumn décor and I do hope I have inspired you to decorate your own home – even if it is on a strict budget like mine has been over the last few years!
Your children may also enjoy making some Autumn Craft pictures with dried autumn leaves that can be painted and printed, or simply glue a nature picture together in autumn glory and all the colours you can find. It’s so easy to do a nice printed picture using dried shapes from nature and you can even display it in your home after as part of the seasons décor.
If you’re reading my blog today you might be in the same boat that I was last summer, which is wondering if it were time to make the move for your little one. The transition to a toddler bed is not one to be taken lightly, it is a huge step for our little person, and they deserve lots of time, patience and assistance from us (as their parent/s) to help them feel safe and secure in their new upgraded space.
Hopefully this article that I have combined with my review of the toddler bed that I bought, can help you to make informed decisions on what is best for you and your child/ren. Is it time? Only you will know by the actions and dependence your child currently has.
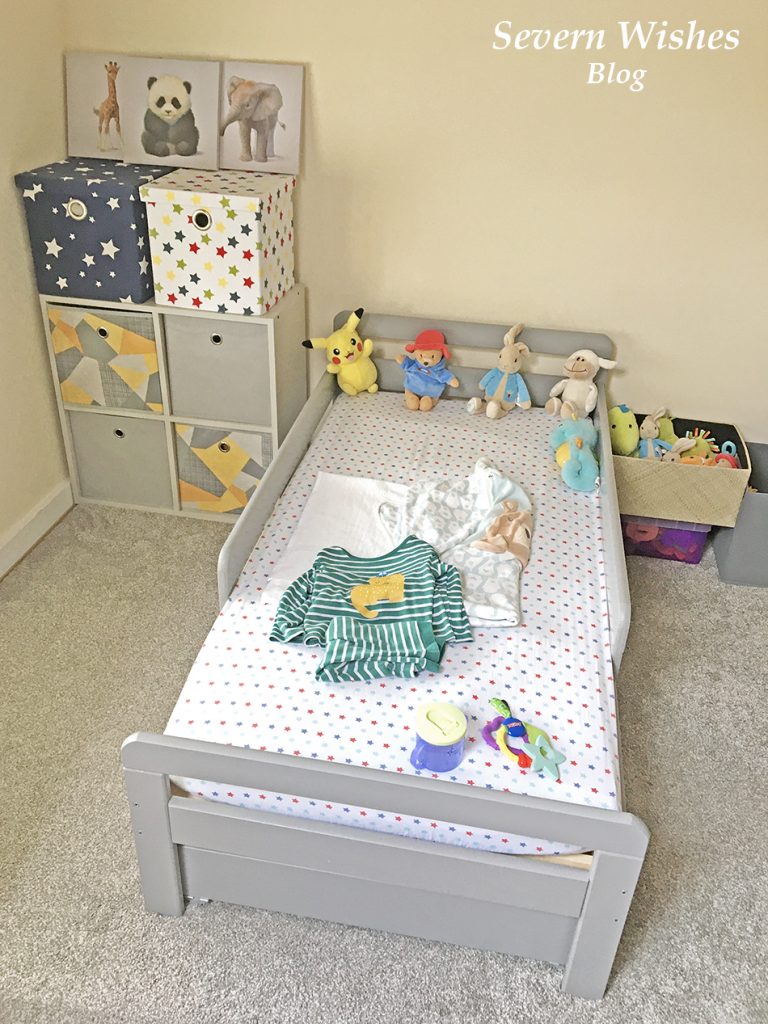
When the bed was finally in place…
When my son turned two I wanted him to start using a toddler bed and there were several reasons why I thought this needed to happen now. The first reason was that it was difficult to lower him inside his cot when he had fallen asleep in my arms, and he was now tall enough to consider trying to climb over. I didn’t want that to happen, so I purchased his first toddler bed after measuring up the space that I had in his bedroom.
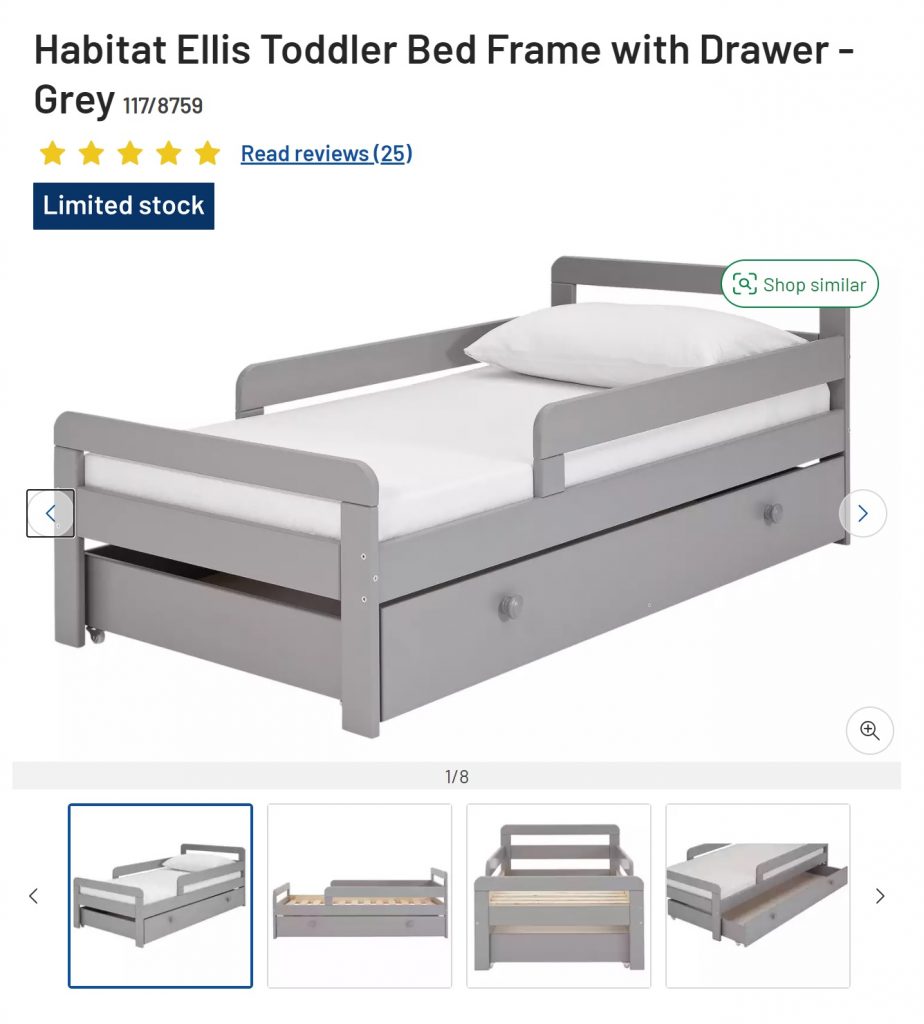
I bought the Argos “Ellis Toddler Bed” in Grey, to match my sons furniture, and then bought a mattress online. I had chosen this bed for three reasons, the first being its height from the floor, the second was that it came with a drawer for under bed storage, and the final reason was because of the three quarter sides.
My son moves frequently in his sleep and I knew that it would be quite a while before he could sleep safely without any sides to his bed. This bed was a great size for the price and I would hope it to last him two years at least due to the length. The handy draw keeps tidy all of the towels and bedding I use for my sons room and it is easy enough to slide in and out on its rolling caster wheels.
Bed Frame size L144, W75, H57cm. Required Mattress size L140, W70cm. Clearance between floor and underside of bed 19.5cm. Drawer size H18.5, W139, D73.5cm.
There are now limited stock on this bed but it does also come in different colours. Here is what I would give it on my review scores having used it now for a whole year.
Quality of Paintwork 4✩ Quality of Manufacturing 4✩ Quality of Finished Product 5✩ Correct Specifications 5✩ Product Design 5✩
Overall this product is excellent quality and although it was difficult to put together, overall we have been very happy with it. A fantastic size for toddlers and small children and my son hasn’t fallen out of it due to the great design with those side bars. Although he is average height for his age (at 3) he still has plenty of room left to grow into this bed.
The Transition from a Cot to a Bed – My Tips and Tricks
The biggest thing about change for toddlers is that it can be unnerving to them. They get anxious and have to get used to something over time, so don’t worry if this alteration in routine and sleeping area takes a few weeks for them to get used to. The best thing that you can do for the first few nights is to keep the routine the same, but just place them in the new bed. If you have a routine that ends with them being placed into bed keep doing that. Then on the second week add one new thing now that the child is older such as, can they now get into bed themselves because they are old enough to do so? It will make them feel bigger if they do it themselves and gives them confidence, but only when they are willing to get into bed on their own. Don’t forget to use positive reinforcement when they are on the bed or in the bed so that the praise gives them positive ideals of being in the furniture. Saying things as “What a lovely new bed you have!” and “Now that you are two/three you can sleep in this special big kids bed” and remember to let them know that this is a good thing, a positive step and not one away from you. Definitely praise little one when they get into bed without you having to prompt them too!
Getting the child to stay in bed is another matter though. Don’t worry if they frequently get out of bed or even tumble out of bed half asleep for the first few weeks, wondering where you are (especially if you have had them sleeping in your room up until this point). And the beauty of the toddler bed is its distance to the floor. They usually are only between 15 and 20cm from the floor. Make sure to implement rules in their new bedroom, such as no toys after bed time. The child is not too young at this age to be putting their own toys back into a box or tub or basket, so why not start them off if you haven’t already done so (good practice for preschool). I have found that it’s also a good idea to introduce a clock or show the time to a child at this age, and tell them that at “7 o’clock” (or whatever your bedtime is) their toys are put away and your bedtime routine begins. Personally we are in the room for 7.30pm but it can take up to an hour to settle my three year old, some nights a story or two is enough and other nights I’m still reading at the hour mark. But it’s just imperative that you keep the routine the same, even if the time differs slightly, it’s still the act of doing things in the order that they are used to, and the act of then getting them into their own bed.
Talk About Their Safe Space
I tell my son every single night that he is “safe in his bed” and he is “safe at home with mummy” and this has reinforced him to stay in his bed. For the first few weeks if he woke in the night he would come and find me because he wasn’t sure on things. Now he’s more than happy to climb into his bed and choose the stories he wants at bedtime. He knows that I’m never far away now, but his bedroom is a safe place for him to be. He doesn’t always come and find me now that he is older either. He often wakes (and I hear him) but he presses his singing toy and lays back down or he will have a sip of water from his bottle and then turn over and go back to sleep. Again positive reinforcement is key when organising their safe space. When little one wakes up they want to recognise where they are and that it is home or safe, favourite toys or items around the room will help.
If you find your little one is struggling initially with the bed transition then you could choose to sleep on the floor in their room for a few nights. Whenever they wake up in the night make sure they know that you aren’t far away and they are safe. It is totally normal for most children to find their new surroundings daunting, but remember to just keep praising and comforting, they will soon get there. All children are different and it could take a few weeks of patience to achieve the end goal, but everyone should sleep better once that is over with.
Ensure Comfort
Make sure that they are comfortable on a firm but soft mattress and that the room is an optimum temperature. I still use our Gro-Egg from when he was a baby to tell me the room temp! My son had sleeping bags until he was two and a half, he was happy to sleep in them until he got older then he kept trying to take them off. I gave him his own thin pillow at three years of age, and I now put him in Pyjamas and a blanket over him. I have bought a toddler duvet this summer ready for the colder winter months, now that he is old enough to be able to push it away from his own face.
Keep Stories Gentle at Bedtime
I have found that stories that talk about bedtime or going to sleep are best at bedtime, other books can just excite little ones too much. My son has an absolute favourite book about a bear and a baby bear and he’s on his way to going to sleep, and we read it every night. I can now recite it from memory while he falls asleep in my arms (that is how many hundreds of times I have read it). But it’s such a lovely and gentle book that talks about how much mummy bear loves little bear and she is never far away no matter what he is getting up to. Consider what you are doing during your bedtime routine and make sure that there is nothing that is causing your little one to become more awake as opposed to be falling asleep. The best books we have found come from The Works.
My sons favourite book that I highly recommend, we found it at The Works.
Thank you so much for reading this blog post that I have written today, I do hope that you have found it informative and if my lifestyle experience with my son can help you in some way then I am more than happy to share it.
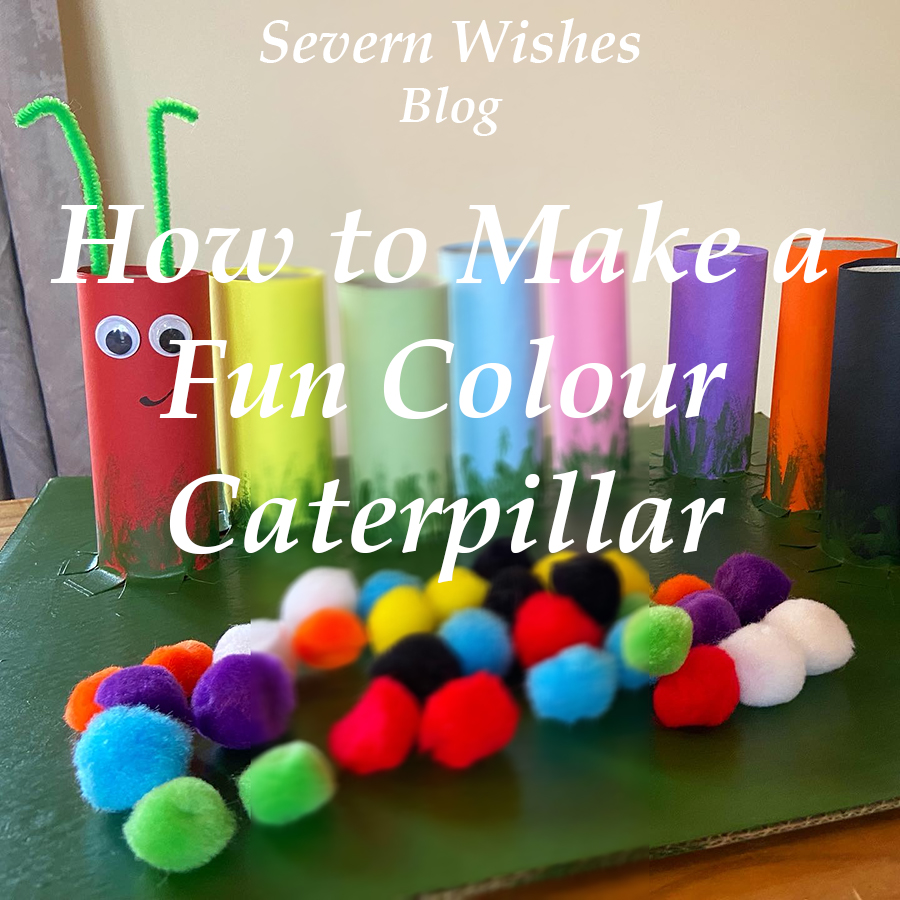
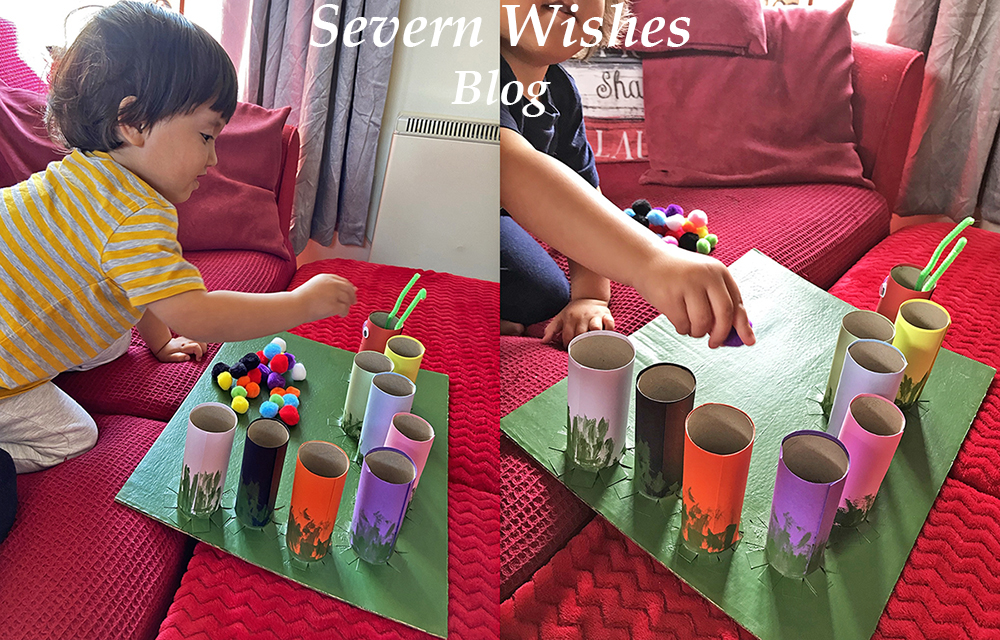
My Fun Craft Caterpillar is an easy to make craft project, that can help you to teach your toddler about colours and counting. You can make it any size you like and with only a few simple and non expensive items. Ideal for children aged two plus with good fine motor skills.
Designed for Age Group – 2 Years Plus (Supervised) Parent Difficulty to Make – 3/5 Time it takes to Make – 4 – 6 Hours Cost to Make – £10 Reasons to Make – Learning about Colours and Counting. Helps Develop Fine Motor Skills.
When my son began having issues with delayed speech I came up with several things to aid him in his communication. One of which was a Caterpillar friend that I made into several different items. Today I’m going to be showing you how I made my Fun Craft Colours Caterpillar!He is cute and great for helping little ones learn about colours, counting out and developing fine motor skills.
TOP TIP I wanted to help my son develop his fine motor skills as well as improve him saying different colours, picking up the Pom Poms and getting them to drop inside the correct tube does take some skills for little ones, so don’t worry if they have to learn how to do it. My son got the hang of it really quickly and was soon getting faster at doing it. One Tip is to show your little one what you want them to do, and then let them figure it out on their own a bit too. Always supervise but encourage and praise when they succeed.
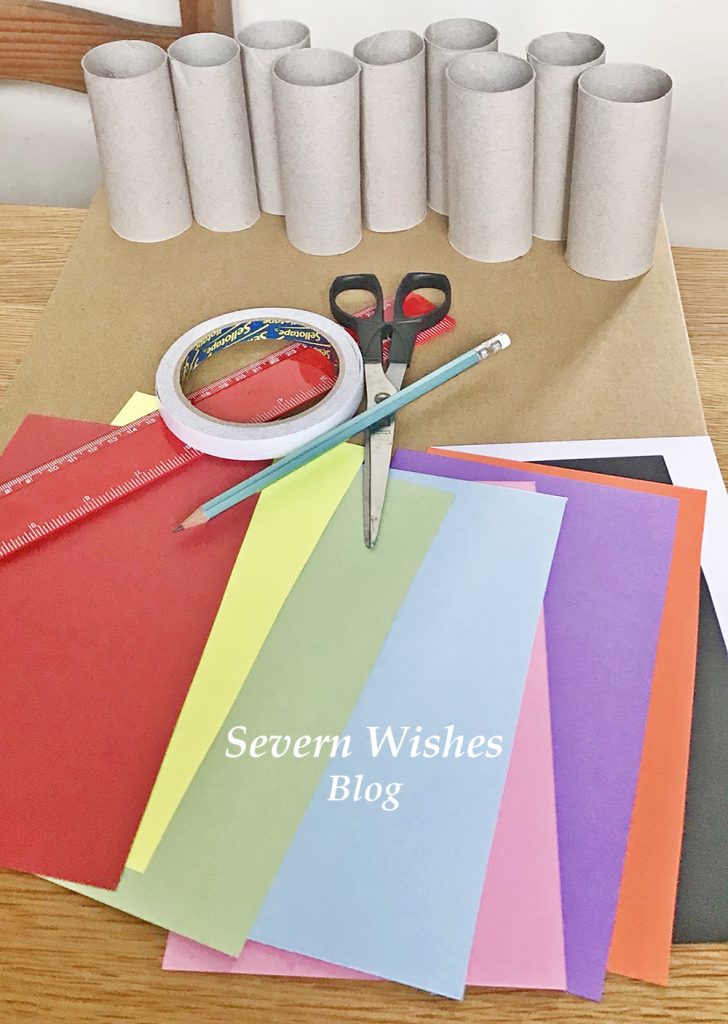
What You Will Need
Toilet Roll Tubes – You can use toilet rolls and kitchen rolls and just trim them so they are a similar height. Order your card and Pom Poms and work out how many rolls you will need, you require one roll per colour.
A Thick Cardboard Base – Do you have a sturdy box after going shopping or have had something delivered? You need a piece of strong thick cardboard either a Square or a Rectangle for your Base that the Caterpillar will stand on.
Coloured Card – You need to try and match the coloured card with the Pom Poms you are ordering. If you want to do a simple Caterpillar just go for a pack with Red, Yellow, Green and Blue mix, sometimes you get an Orange or a Pink in those packs. I bought two packs to ensure I got black, white, purple, pink and orange for my more complex Caterpillar.
Coloured Pom Poms – A toilet roll tube is a certain width across, so make sure you only order Pom Poms that are less than this. My tubes are 4cm wide so I purchased a bag of mixed coloured 2cm Pom Poms. This means they are easy enough to tip back out after every use. Also ensure you get non toxic child friendly craft items from reputable companies.
Double Sided Tape – You need this tape for cleanly applying your Card to your Rolls, this is the most time consuming of the craft build but it’s easier and less messy than waiting for lots of paint to dry. (See my How To below).
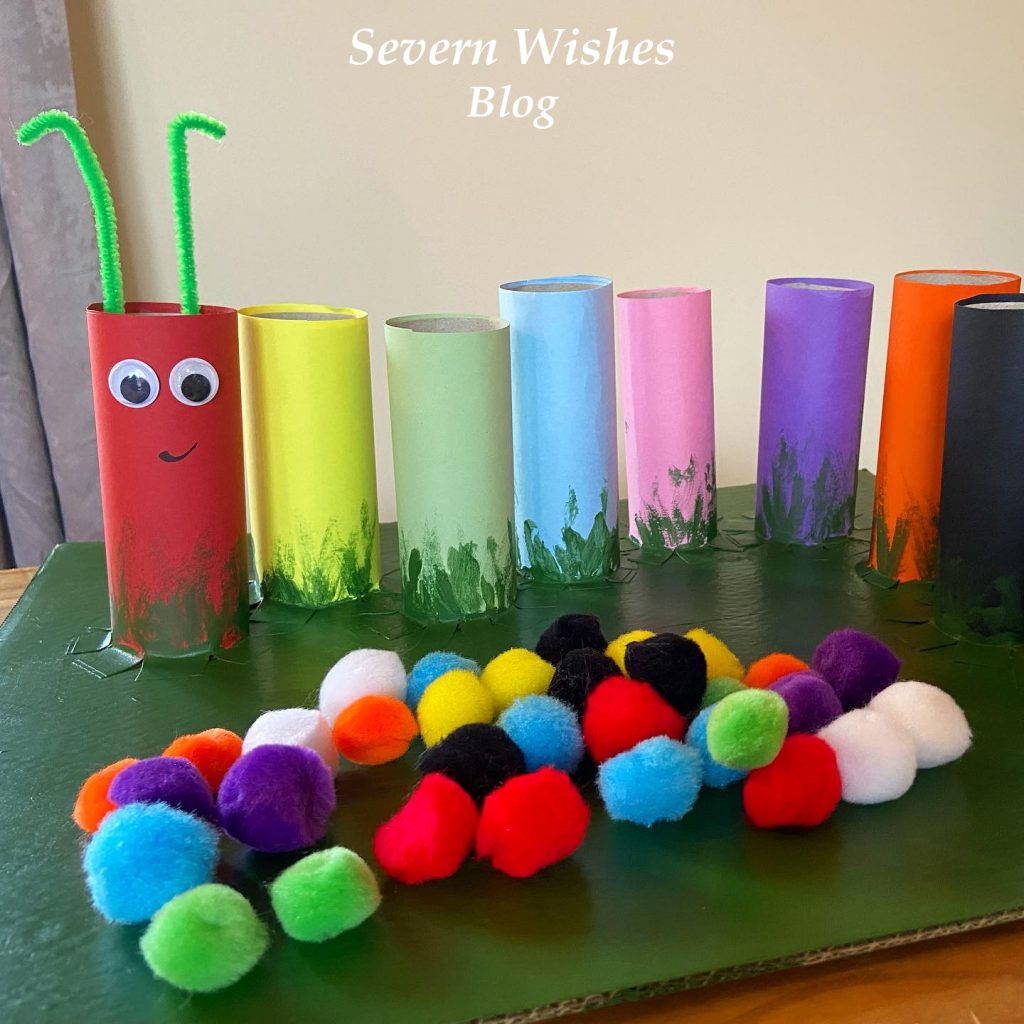
Paint for the Base – I chose to just paint my base Green, as if the Caterpillar were on a leaf or some grass. You can be as creative as you like! You only need to paint the base, once you have fixed on all your tubes (see my How To below for more clarity).
Stationery and Craft Extras – You may want to stick on googly eyes and feelers, or draw them on, it’s totally up to you, your Caterpillar, your choice! 🙂 You will also need a Pencil and a pair of Scissors.
Where I Got My Craft Items
Coloured Card Packs – Hobbycraft Online Pom Poms – Hobbycraft Online Goggly Eyes and Pipe Cleaners – Craft Bundle from The Works Double Sided Tape – Tesco Store Green Paint and Brush – The Works
How To Make Colour Caterpillar – Sabrina’s Step by Step Guide
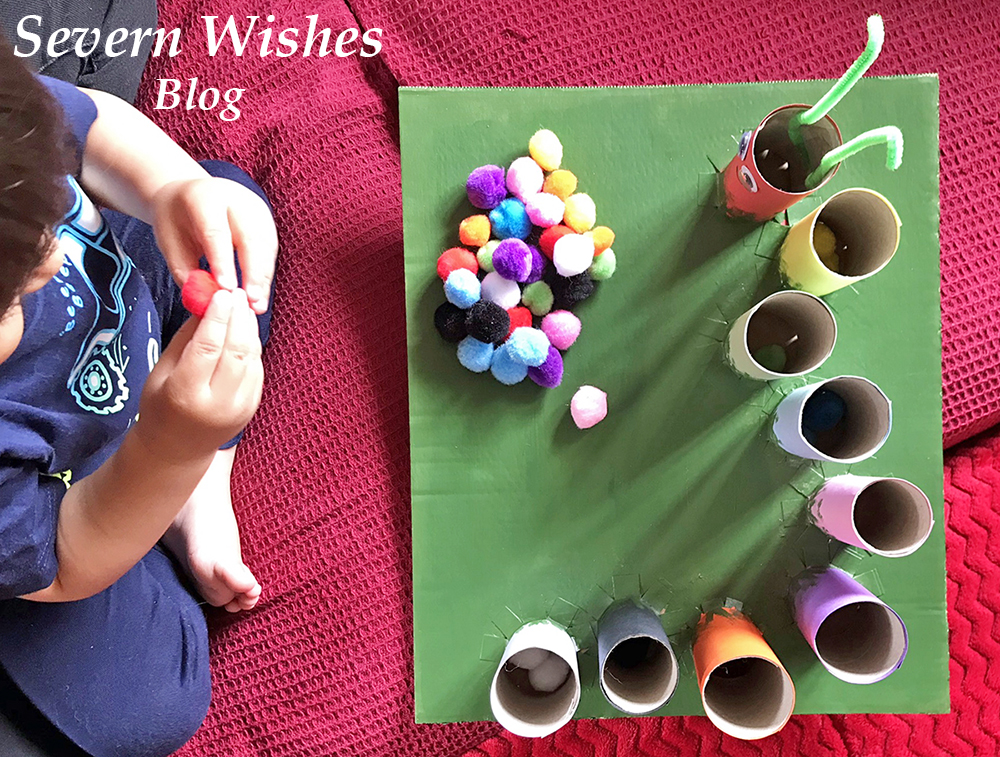
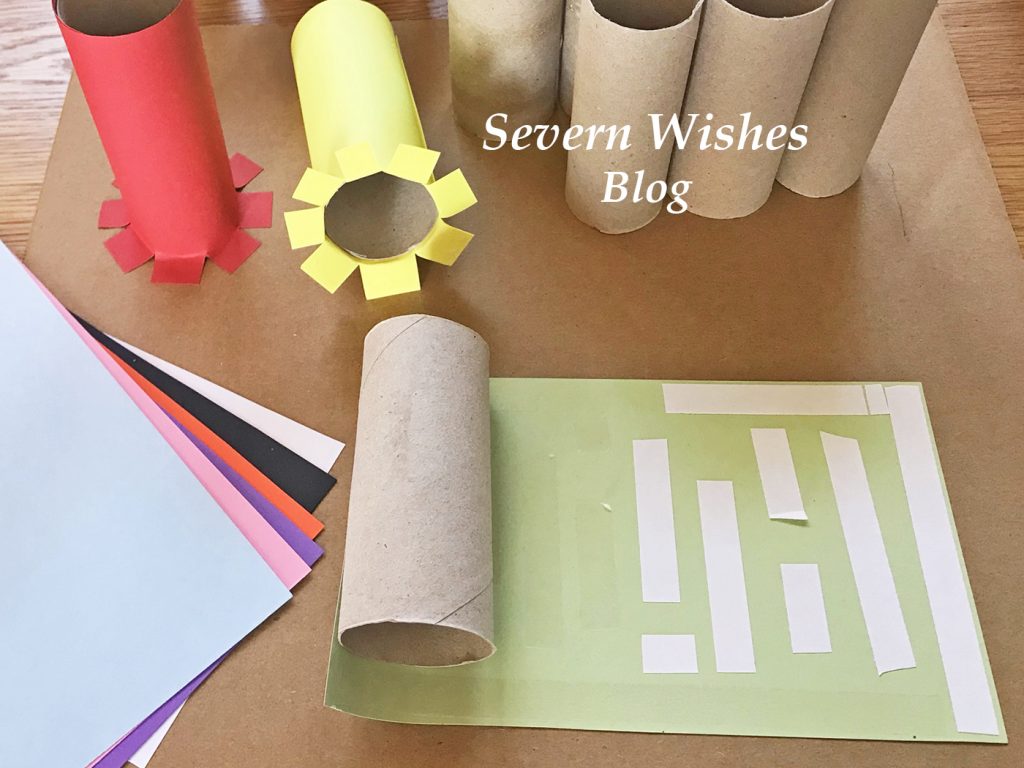
Step 1. Assemble all of your items as described above and ensure you have enough of what you need. Place a tube, a piece of coloured card and your desired amount of Pom Poms (I used 4 per colour) into individual piles. See what you have and how many tubes with the right colours and Pom Pom matches.
Step 2. Arrange the plain tubes on your base, and see how you would like them arranged. You need a one centimetre gap between each roll where it will be attached to the base. Bearing this in mind, arrange your tubes and mark with a pencil on the base where you would like them to go.
Step 3. Satisfied that you have all the pieces you need you can begin the card craft. Start by marking the pieces of coloured card for your tubes. For example mine were 15cm high, so I marked the card at 16cm with a pencil leaving the gap of one additional centimetre. Then cut all the card pieces to size ready for wrapping around the tube. TOP TIP ensure you leave enough card to wrap all the way around a tube with the extra at the bottom. You need at least a one centimetre section of card at the bottom of every tube for attaching it to the base.
SABRINA’S TOP TIPS: Don’t throw away pieces of card that you have left over from this make, I have plenty of Craft and Art ideas on my blog that you could use these bits for 🙂
Step 5. Cut strips of double sided tape, align them along the top and edges of the coloured card and down the centre, ensure there is enough at the edges. At what will be the base of the tube stack the pieces vertically, using a small gap between them, this will be cut in Step 7 to ensure an easy attachment to the cardboard base. Make sure you put tape on all of the coloured card pieces. TOP TIP Make sure to do this Step and on to Steps 6 to 7 at the same time and don’t leave the craft part way finished, otherwise the double sided tape will dry out before you can affix it to the base.
Step 6. Time to roll the card on to the tubes. Remove all of the double sided tape strips. Line up the top section of the cardboard with the edge of the tube, on a flat surface like a table, gently roll the tube along the card. The tape will stick well to the thin tube, using your thumb and first fingers you can smooth out the card as it sticks. Try keeping it in line at the top. Once you come to the end of the coloured card make sure the final line of it is secure to its tube, smooth with your fingers and hold the edge in place for a minute per tube making sure that its firmly stuck in place. Repeat this per tube, laying them down on their sides once you are finished.
Step 7. You now need to be cutting the base of each tube so that they can be attached to the base. Take the first coloured tube you want to attach to the base (I did a Rainbow so mine was Red) and using sharp scissors cut a one centimetre slice up into the card at the tube base. Rotate the tube around cutting vertical slices as you go. Then once cut all the way around, gently peel back the slices and make a base for your tube. Affix it into place on your cardboard base because they should already have the double sided tape attached. Press down firmly and hold for one minute. Repeat this action with all of the coloured tubes until they are all attached to the base. (See images above and below).
TOP TIP Painting the base last ensures the tubes stay in place after the double sided tape has helped stick them down on the base. It also neatens up any edges that may have tape sticking out or tubes that weren’t quite level.
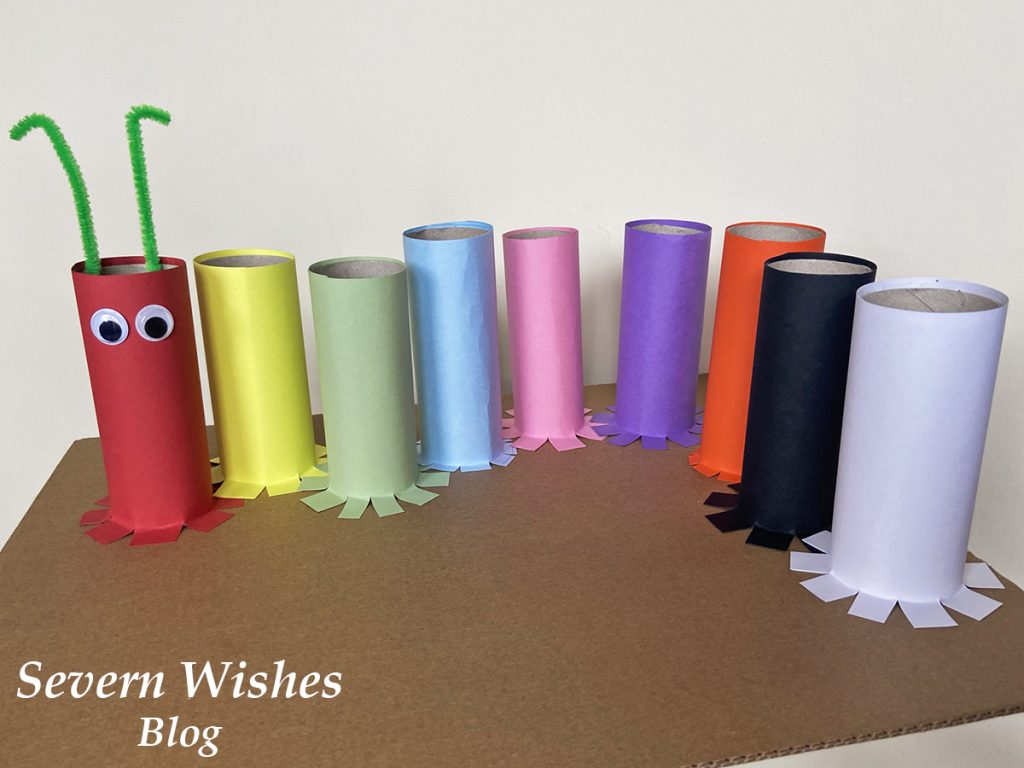
Step 8. With all your coloured tubes attached to the base you can now consider adding anything else to your caterpillar, and also paint the base with whatever paint you choose. I added googly eyes and some pipe cleaners as my Caterpillar feelers.
Step 9. Leave your Caterpillar to dry overnight before showing it to your little one. Ensure that you only play with it supervised either by you or another adult. The Pom Poms should be stored inside something that little ones can’t get into unless you are doing the toy together. Most children wouldn’t eat them at this age but better safe than sorry. I recommend a small plastic box like the really useful ones with the clip over lid handles.
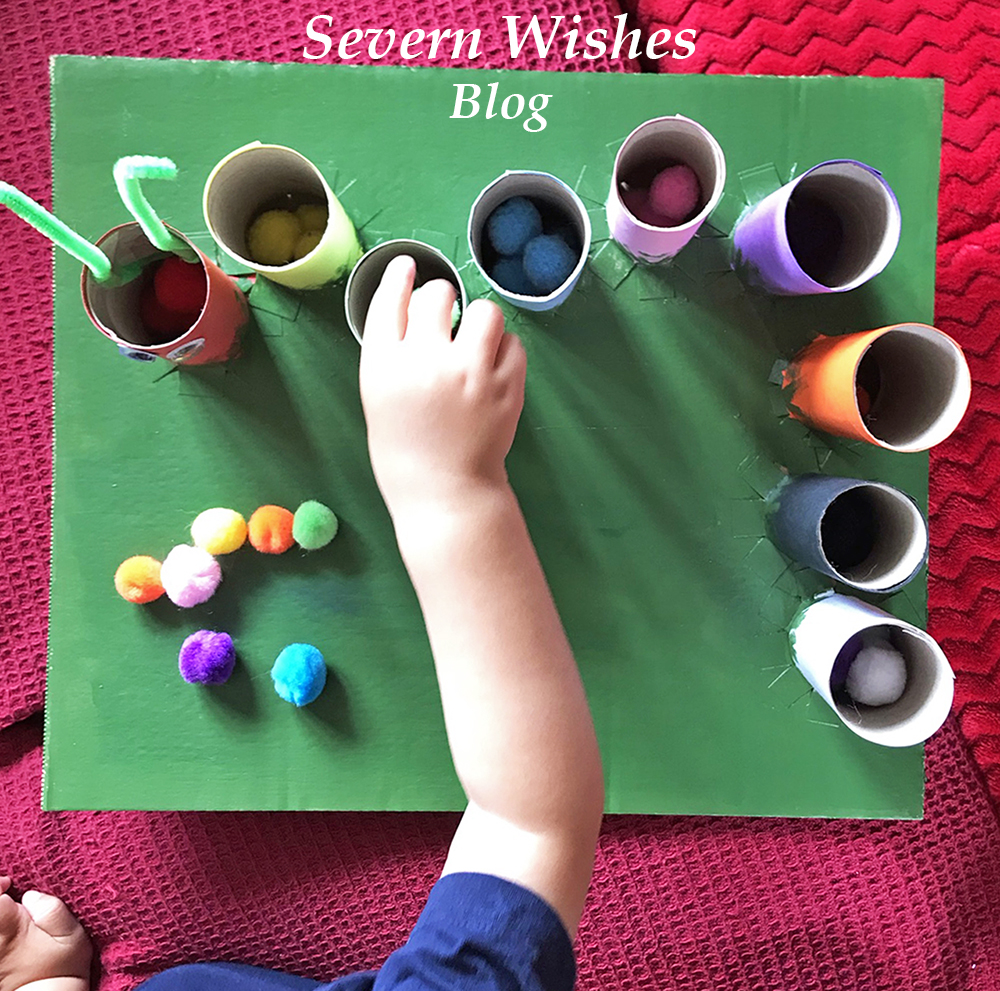
TOP TIP Your Caterpillar friend can now be used to teach colours and numbers! Ask your child to count how many body parts the Caterpillar has, how many Pom Poms fit in each tube, can they separate the colours correctly and add them to the correct tube? This craft project can be used for play and learning and will keep your child occupied for hours.
Have you enjoyed this Craft Project? I would love to know what you think! Please leave me comments on the blog section below or on social media. Please tag me if you make a Caterpillar of your own! Use the hashtag #SabrinasCraftCreations
Thank you for reading this blog post today, I hope I see you again soon!
Baby Books We Have Purchased and Why Reading To Baby While They Are Still In The Womb Is So Important
A lot of parents “to be” will speak and even sing to their babies while they are still confined to the mothers womb. This isn’t an uncommon practice, but what is becoming more and more popular is to read aloud to them. From around 24 weeks your baby will be able to hear your voice and start to distinguish it from others. If you regularly talk to your baby they may even move in response to your voice pattern. Being repetitive with your words each day can help with this too. Books that have a rhythm to them are supposed to be the most effective, and you can also introduce multiple languages in a basic form if you feel brave enough.
A baby can develop cognitive responses to what happens while they are inside the womb. For example if the mother relaxes to the same piece of music regularly, the baby is often soothed by the same thing when they hear it outside of the womb. This is because they recognise how their mother felt at that time. By taking the time to use speech and music in the run up to our children being born, we could be aiding them with learning. Scientists believe that talking to a baby in the womb and interacting with both feelings and sound, could be beneficial. It is also a great bonding exercise for the parents.
Scientists believe that babies not only become used to the regular voices, sounds and music that they hear, such as Mom and Dad, but they may also begin to pick up words and tones that are used often as well. Other things they can pick up on as they grow are whether or not they are getting repetitive environments. Some move around when they hear and feel the rumble of a car engine for example. Or if someone turns on a loud noise like a hoover or a coffee grinder in close proximity to bump, they can squirm like they want to move away from the loud noise. It is all a learning process.
When I first read about this on the Bounty Pregnancy App I found it all fascinating. I immediately went online to see if I could get any of the baby books that I remember being read to me in my younger years. If any of them were still available now I wanted to read them to my child. Luckily about one third of my chosen few were still in print, and so I set about ordering some. My plan is to read to my baby as a method of soothing them once they are born, and after reading this study I thought why not begin while baby is still inside me.
I ordered the following items from The Works, because they have some great deals on books, especially children’s ones. I managed to get 10 books for £10 on a weekend deal. Some were usually more than £3.00 each so it was a bargain! And they were delivered quickly which was a bonus.
I will put the website link at the end of my blog post for those of you who want to take a look at the current range.
Some of the books from my childhood in the 1980’s were favorable for me getting for my child. A lot of them taught about morals and about family, and making learning and understanding fun! I have also invested in newer titles that have been a hit with many of my friends who are already parents, such as “Mog the Cat” and books about Animals. We are big on both nature and Cats in my house, so anything along these lines would go down well. I think it’s really important that children learn about Animals and how to treat them right, in my opinion the younger that they recognise them the better.
A few of the titles that I have bought so far for our baby are these;
Mog and Bunny
Say Goodnight to the Sleepy Animals
Say Hello to the Animals
Say Hello to the Jungle Animals
Little Bear Won’t Sleep
The Large Family – Five Minutes Peace
The Large Family – All In One Piece
Counting 123
Five Little Dinosaurs
For both storyline and art work I would highly rate “Mog and Bunny”, the range of “Goodnight and Hello to the Animals” Books and also one of my childhood favourites “Five Minutes Peace”. I do plan on getting more books once we have exhausted this pile and are in need of something new to stimulate both our brains and baby too! I believe in reading, turning pages and showing pictures to children. I won’t be one of these tablet only mothers put it that way! Books all the way!
✩✩✩
So as my due date gets ever closer, I am talking to baby more and more. I am also encouraging my husband to read to baby as a way of them bonding. Hopefully our baby will know both of our voices when we meet, and this will allow us all to be more calm. I also look forward to reading to our baby and watching their reactions…
Do you enjoy reading books? Is there a title that you read or have read to your children that you can recommend? If so, please leave me a comment.
Don’t forget you can follow me on social media for more baby and bump updates! Such as Fashion choices and days out!
Have a great day and thank you for visiting Severn Wishes Blog!
By continuing to use the site, you agree to the use of cookies. more information
The cookie settings on this website are set to "allow cookies" to give you the best browsing experience possible. If you continue to use this website without changing your cookie settings or you click "Accept" below then you are consenting to this.