Sabrina is a Lifestyle, Parenting and Product Review Blogger. A Writer, Photographer, Reviewer, Home Cook, Crafter & Nature Enthusiast. You will find a bit of all those categories here on Severn Wishes Blog, Welcome to Sabrina's Lifestyle Blogging & Honest Reviews.
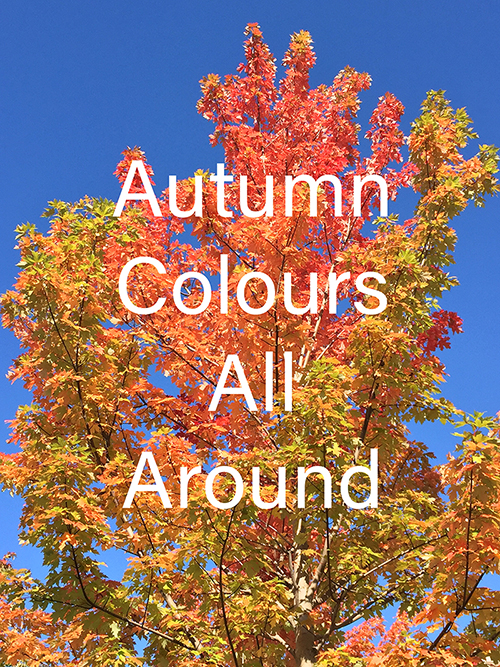
Autumn is such a beautiful time of the year, and it should be enjoyed by people of all ages and of all abilities too. But as the cost of living goes up again with our need for heating on and more food, not to mention the loom of Christmas… most people will vote to stay in, worrying they cannot afford to go out.
Well I’m in the same boat as all of you again this season, knowing that money will be tight but I also want to make the most of weekends I have my son. School takes up so many hours of the week, and the majority of children don’t really want to be stuck inside (unless the weather is gale force and torrential rain!). So it’s important to come up with some cheap ideas that will suit everyone and that can be fun of course, so here’s what I do.
See what can you do for free in your local area. Where do you begin to look?
Start off by writing down on a piece of paper the people in your household, their ages and abilities.
Do you need toilets frequently, baby changing facilities or access for a pram or wheelchair?
Once you have established the type of place you need to find you can look up on an online map what is available for free in your area.
Check local free magazines in supermarkets, check out social media by searching in events local to you by so many miles radius.
Some of these things can include;
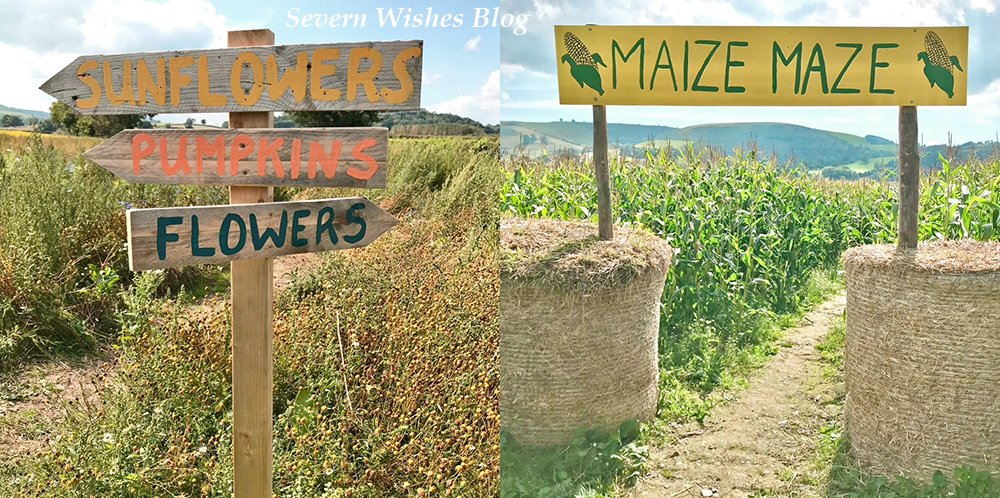
Public Footpaths. Canal Routes or Designated Walkways. Parks and Gardens. Local Heritage Sites. Castles or Stately Homes. Farms with Free Entry to look at Pumpkins, Flowers or do Maize Mazes. Nature Reserves with free car parking so you can do a Nature Walk to collect leaves. National Trust (some people will already be members, sometimes they have reduced entry fees).
What Can You Do While Out?
Enjoy a walk together as a family, don’t forget to take some photograph’s! Gather items to take home and make art and craft pieces another day. Go for a Nature Walk and talk about what you can see and hear (great for young children). Nature Bingo where you make a list before you go and then tick off the items as you find them. Discuss the life cycle of trees with older children and the importance of renewal each year.
(If you don’t mind spending a little money) Pumpkin Patch Picking Maize Maze or Woodland Trails Local Trust Properties or Heritage Sites
Sabrina’s Top Tip: Take a picnic or packed lunch with you, and drinks for everyone too which will save you money, even if you have to eat it in the car then it won’t matter because it’s still family time.
✩✩✩
Thank you for reading this blog post today, I do hope that I have given you some good ideas.
Have a great day and lots of fun if you take on board any of my tips!
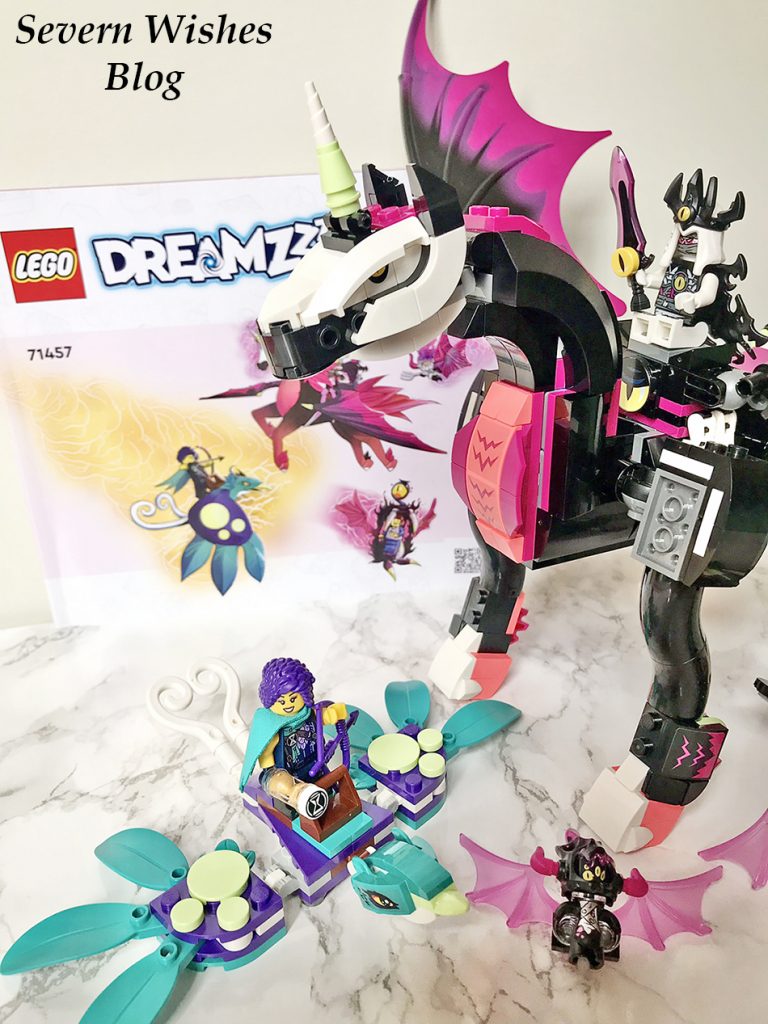
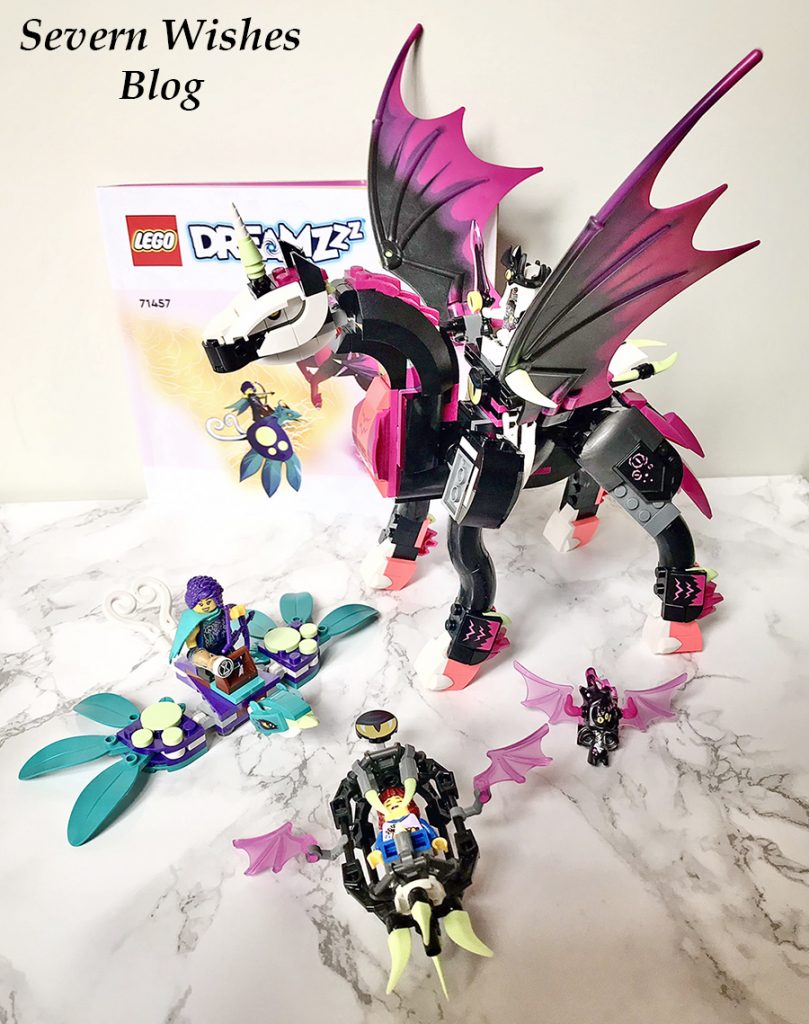
Hello! I’m Sabrina! I am an Argos Tester, this means that I often get items sent to me for the purpose of an online review. I thoroughly test the products and take photographs of them before submitting my findings and honest thoughts over to Argos. Sometimes I even do a video, and these are shown on my social media channels. This latest campaign was to test out a brand new LEGO sets.
#ArgosTester #ArgosTesters #ArgosTestersCommunity
I have written this article about a product that I have been supplied for free, in order to test and then review it. This is my experience with said product and it is my honest review about the product listed below. I have already submitted my review to the Argos Website, and it has been accepted on to live public view when this blog post has been published. Please see my review on this screengrab below from the Argos website.All words and photography within this article are my own.
Product Details
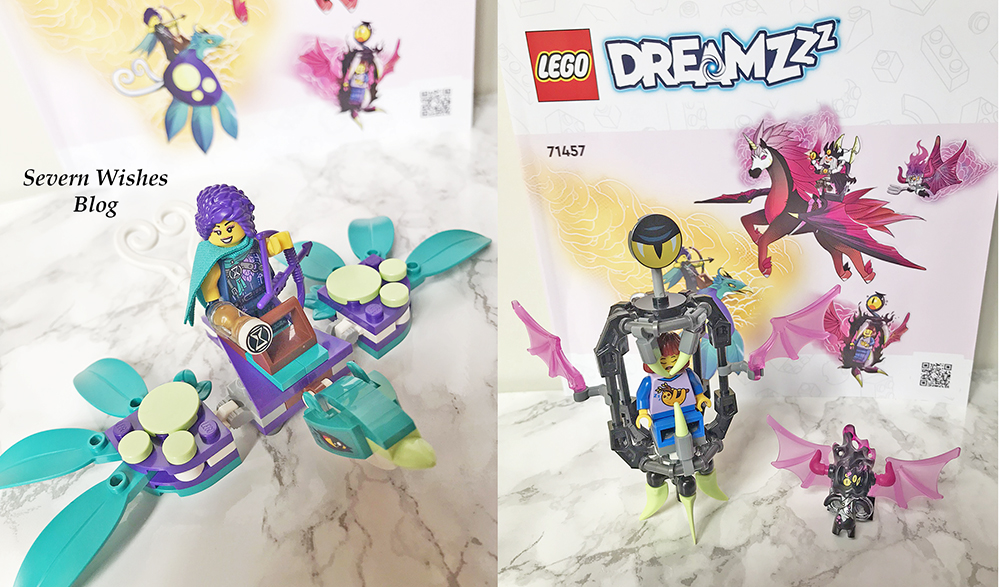
Name: LEGO DREAMZzz Set Number: 71457 RRP: £47.00 Product Details: 482 Pieces including specialised Mini Figures. Ages 8 and up. Fantasy Creatures and Characters are based on the LEGO DREAMZzz television show. Pegasus stands at 20cm tall once assembled. 2 building options for one character included (a bird or a butterfly). Argos Website:LINK to Product
LEGO Set Ideal for Fantasy Fans and Artistic Builders
Examining this incredible LEGO set I was amazed at all the details and interesting ways that certain LEGO pieces were used to create something that looked entirely different. I’m no stranger to LEGO and its nice part usage, but this is my first ever DDREAMZzz set and it definitely had the wow factor from the moment I started to build it. It is a pretty complex set and designed for ages 8 up to adults, and I would say that it took around 3.5 hours to complete. The stickers really help add to the depth of the LEGO pieces. Overall I think it’s a much organised set and the builder also has the option on whether they want to build different aspects for the characters included. For example you could choose to build a bird or a butterfly; I chose the bird because I thought it looked amazing in the picture art included in the instructions. Talking of Art, it really added to the story for me, it’s not often that you get the LEGO imagined into picture scenarios so this was really cool. You have to concentrate a fair bit when building this set due to all of the posable sections of the Pegasus, the limbs all need to be correctly aligned in order for the LEGO to stand up properly and it was much heavier than I realised. The characters are also unique and have great facial expressions and hair and costume details too. The final look of the Pegasus is amazing, and I hope my accompanying pictures portray that. I wouldn’t change anything about this set, it’s unique, fun and I love anything to do with fantasy which is why I chose this one. I would recommend it to anyone who likes a fantasy genre or horses. If you’re building this to play it has tons of appeal with so much movement in every part of the set, but it also makes a great addition to any LEGO collector’s artistic display.
My Honest Opinion
Overall I would like to rate the 5 stars.
Quality 5✩ Features 5✩ Design 4✩ Playability 5✩
As with all LEGO the quality is always brilliant, but this set is like nothing I have ever built before. It was complex but it was very artistic which was fabulous. It has great parts usage and I loved how the build came together to make such an iconic piece; the Pegasus. I wasn’t aware that these DREAMZzz sets were based upon a television show, and I am sure when my son is older I can introduce him to the shows because they sound great. The playability and the imagination of this set is astounding, even if you love the concept and want to keep it as an artistic LEGO build. There was only one piece that caused me some concern which was the seat part of the nightmare character, it was not secure on the Pegasus due to only two contact studs. I used a spare piece of my own LEGO, a 4×4 studs in a square to increase the surface area so that the piece would sit and be better secured. This did not distract from the set as it’s hidden beneath. Overall it’s a set that has a wonderful theme, fun and unique characters, bright and vibrant colours of bricks and a set which looks incredible once it’s all built and displayed.
Thank you for reading this product review today, if you have any questions about the product please let me know, I’m happy to answer them if I can.For anything else please refer to the Argos website which you can find on the link I posted above in the Product Details.
Thank you for visiting my blog today, have a great day.
Hello! I’m Sabrina! I am an Argos Tester, this means that I often get items sent to me for the purpose of an online review. I thoroughly test the products and take photographs of them before submitting my findings and honest thoughts over to Argos. This latest campaign was to test out brand new LEGO Sets, and because we need to choose something we haven’t reviewed before, I chose the modular construction LEGO. Not sure what that is? Keep reading my review.
#ArgosTester #ArgosTesters #ArgosTestersCommunity
I have written this article about a product that I have been supplied for free, in order to test and then review it. This is my experience with said product and it is my honest review about the product listed below. I have already submitted my review to the Argos Website, and it has been accepted on to live public view when this blog post has been published. Please see my review on this screengrab below from the Argos website.All words and photography within this article are my own.
Product Details
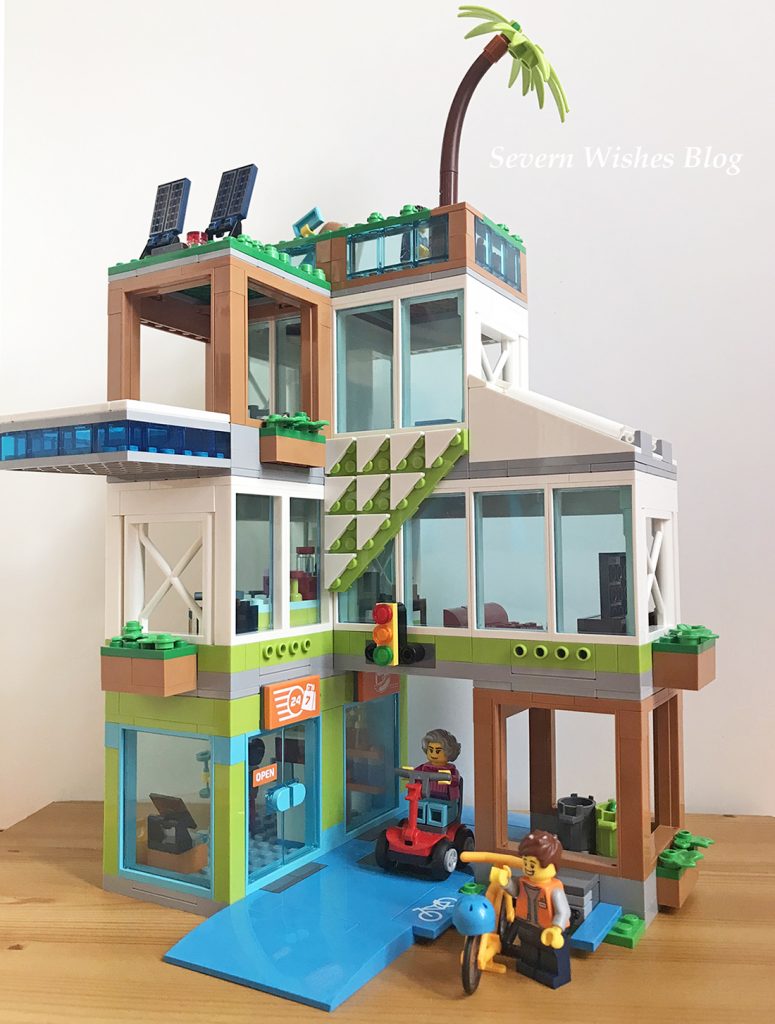
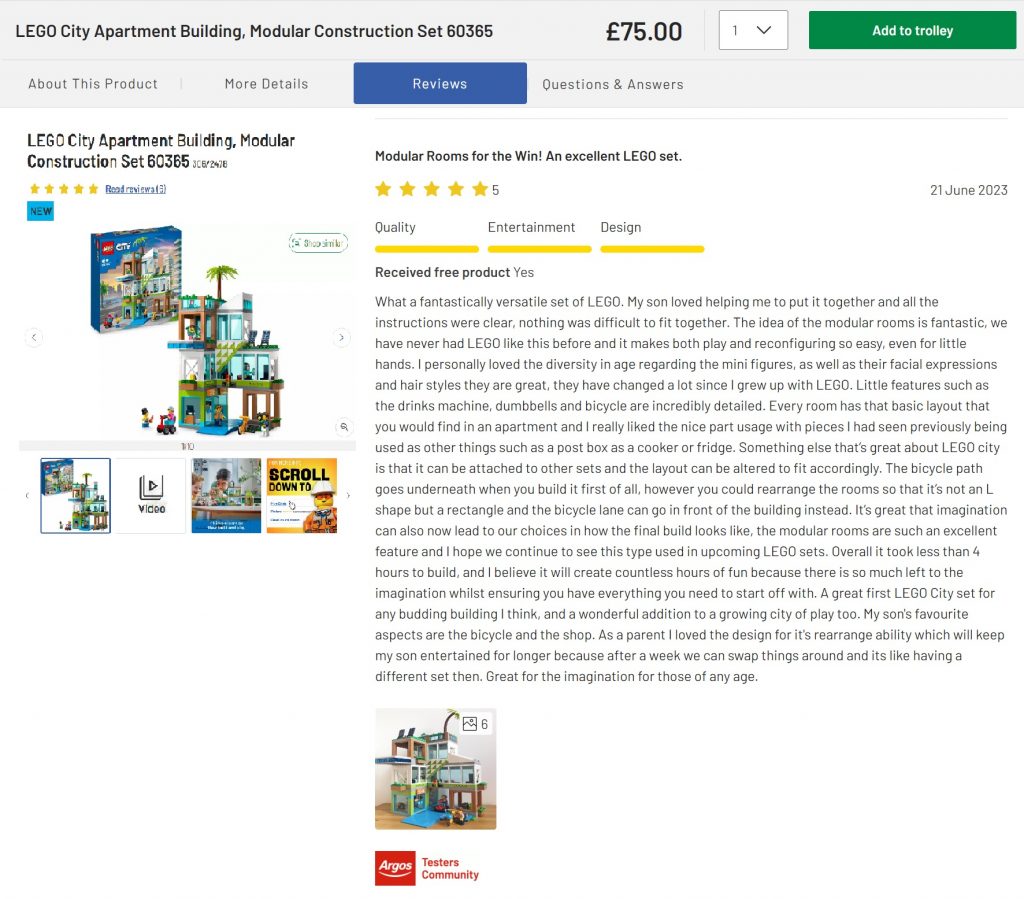
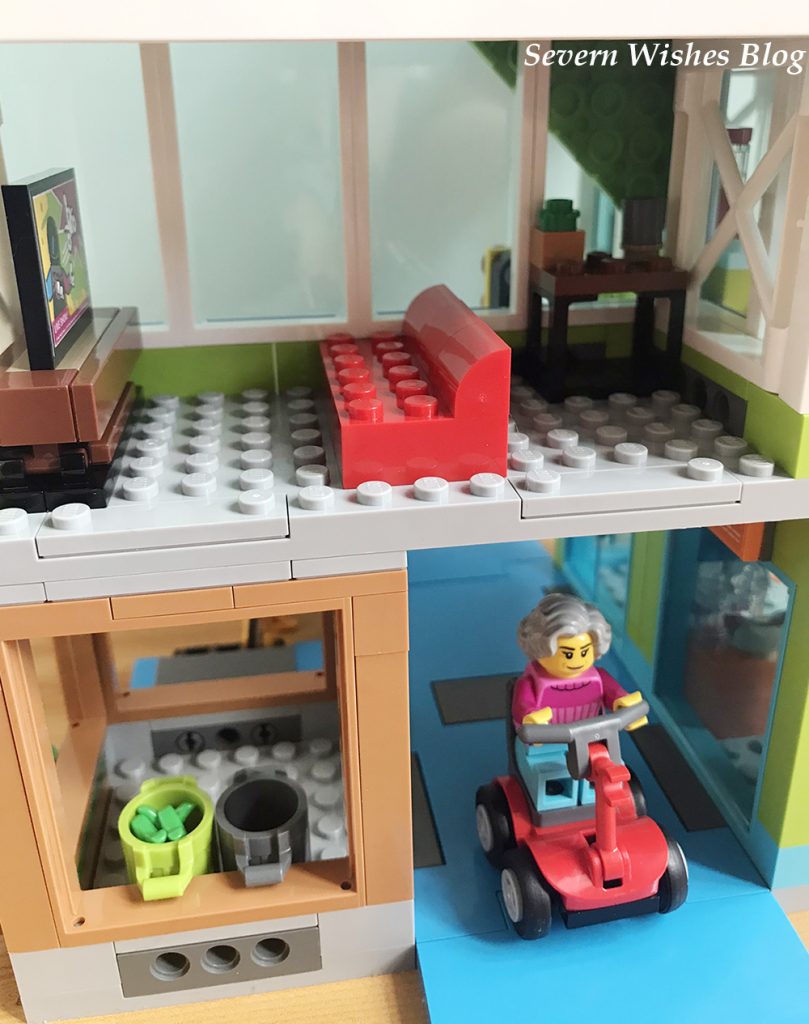
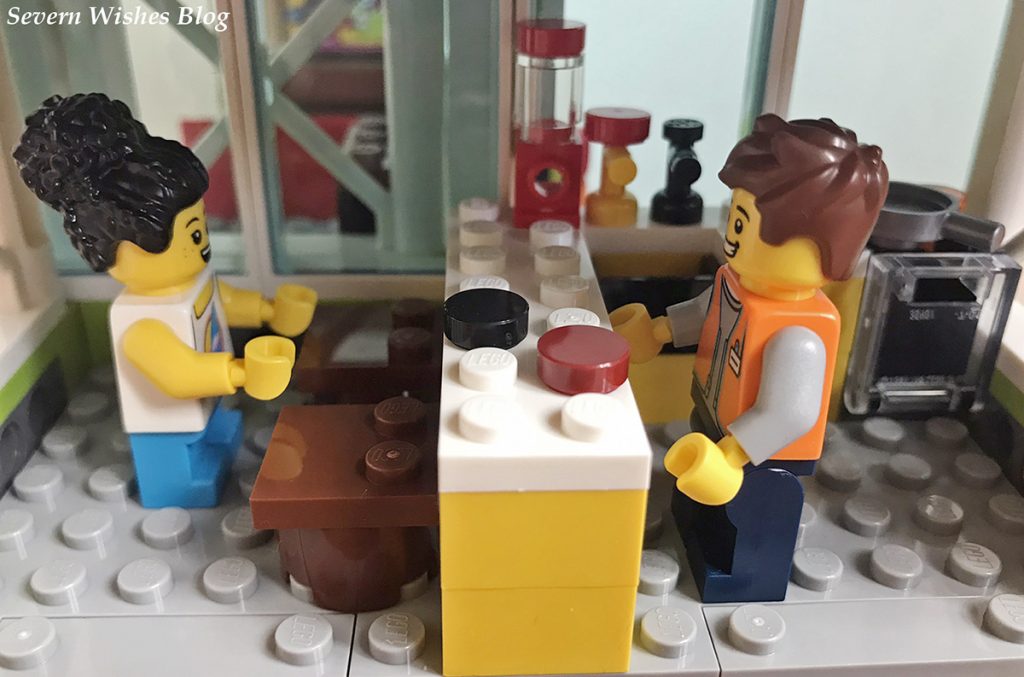
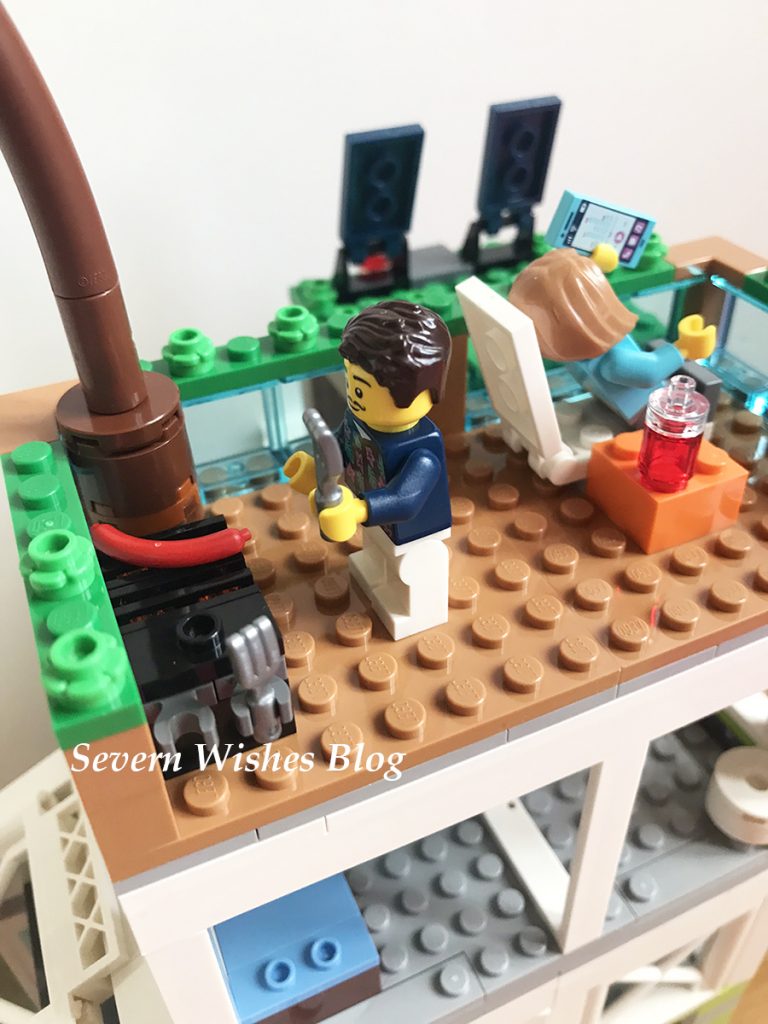
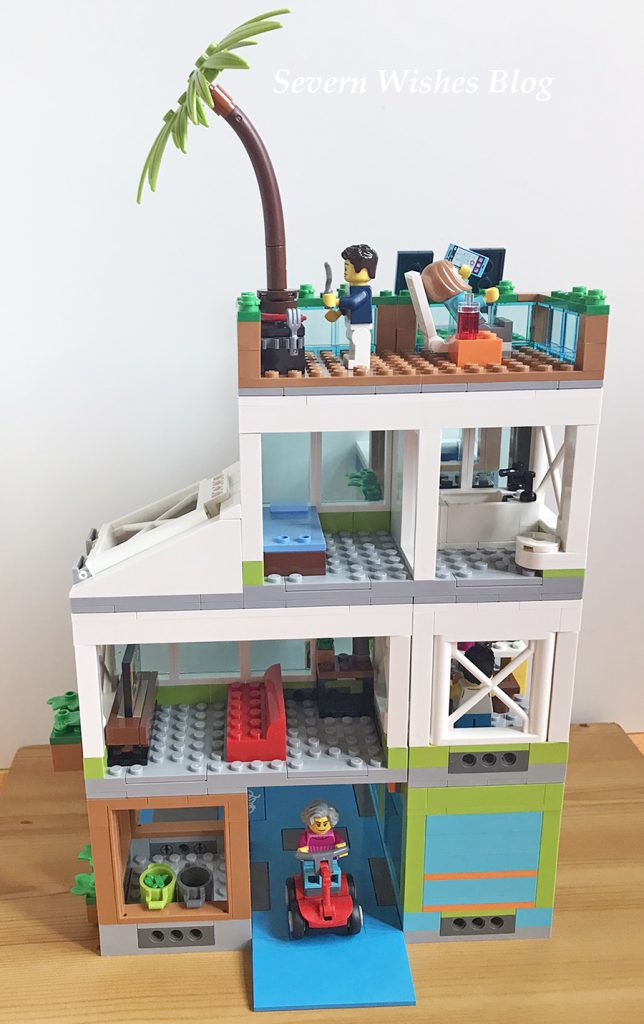
Name: LEGO City Apartment Building Modular Construction Set Set No: 60365. Ages: 6+ RRP: £75.00 Pieces: 688 pieces, including 6 mini figures, a bicycle and a mobility scooter. Description: Modular Rooms for easy reconfiguration and imaginative play, including roof terrace and swimming pool. Mixed age mini figures add to the play ability and the reality of the set. Excellent additional features such as stickers that add fun to some pieces like the signage and television set. Argos Website: LINK
My Honest Opinion
Overall I would like to rate the LEGO Apartment Modular Construction set 5 stars.
Quality 5✩ Features 5✩ Design 5✩ Originality 5✩ Playability5✩
My Argos Tester Review
What a fantastically versatile set of LEGO. My son loved helping me to put it together and all the instructions were clear, nothing was difficult to fit together. The idea of the modular rooms is fantastic, we have never had LEGO like this before and it makes both play and reconfiguring so easy, even for little hands. I personally loved the diversity in age regarding the mini figures and their facial expressions and hair styles are great, they have changed a lot since I grew up with LEGO. Little features such as the drinks machine, dumbbells and bicycle are incredibly detailed. Every room has that basic layout that you would find in an apartment and I really liked the nice part usage with pieces I had seen previously being used as other things such as a post box as a cooker or fridge. Something else that’s great about LEGO city is that it can be attached to other sets and the layout can be altered to fit accordingly. The bicycle path goes underneath when you build it first of all, however you could rearrange the rooms so that it’s not an L shape but a rectangle and the bicycle lane can go in front of the building instead. It’s great that imagination can also now lead to our choices in how the final build looks like, the modular rooms are such an excellent feature and I hope we continue to see this type used in upcoming LEGO sets. Overall it took less than 4 hours to build, and I believe it will create countless hours of fun because there is so much left to the imagination whilst ensuring you have everything you need to start off with. A great first LEGO City set for any budding building I think, and a wonderful addition to a growing city of play. My son’s favourite aspects are the bicycle and the shop. As a parent I loved the design for its rearrange ability which will keep my son entertained for longer because after a week we can swap things around and it’s like having a different set then. Great for the imagination for those of any age.
Summary
Overall this LEGO City Set has hours of replay ability because of the fact it’s a modular construction, it’s so cool! By moving the rooms around you can create an entirely different layout, even move them every other day if you wanted to change it up. I feel like if my son was getting tired of the set I would simply reconfigure the layout and create a new look of the apartment for him. More LEGO should be made like this to give users more choices on how they want the end result of the build to look like. As LEGO say “rebuild the world” and you can certainly do that with this box of bricks, and really easily too! Whoever designed it is ace! I also loved the diversity in the LEGO figures, with different ages and jobs and many various faces, they are great new additions to the LEGO world. And the hair styles too, brilliant to see new ones! I have nothing bad to say about this set, I give it 5✩ across the board. I would actually love to see more modular LEGO so that sets could be rearranged with ease and built on a similar scale.
Thank you for reading this product review today, I hope you have enjoyed seeing what we thought of this set. I have no doubt that we will have many hours of fun creating LEGO scenarios with the figures and the apartment block.
If you have any questions about this set then please leave me a comment below or on my social media posts and I will do my best to answer them with the knowledge that I have gained from reviewing this product.For anything else please refer to the Argos website the link I posted above.
Hello! I’m Sabrina! I am an Argos Tester, this means that I often get items sent to me for the purpose of an online review. I thoroughly test the products and take photographs of them before submitting my findings and honest thoughts over to Argos. This latest campaign was to test a brand new Classic LEGO Set, and because LEGO is for all ages who doesn’t love to play? I know I do.
#ArgosTester #ArgosTesters #ArgosTestersCommunity
I have written this article about a product that I have been supplied for free, in order to test and then review it. This is my experience with said product and it is my honest review about the product listed below. I have already submitted my review to the Argos Website, and it has been accepted on to live public view when this blog post has been published. Please see my review on this screengrab below from the Argos website.All words and photography within this article are my own.
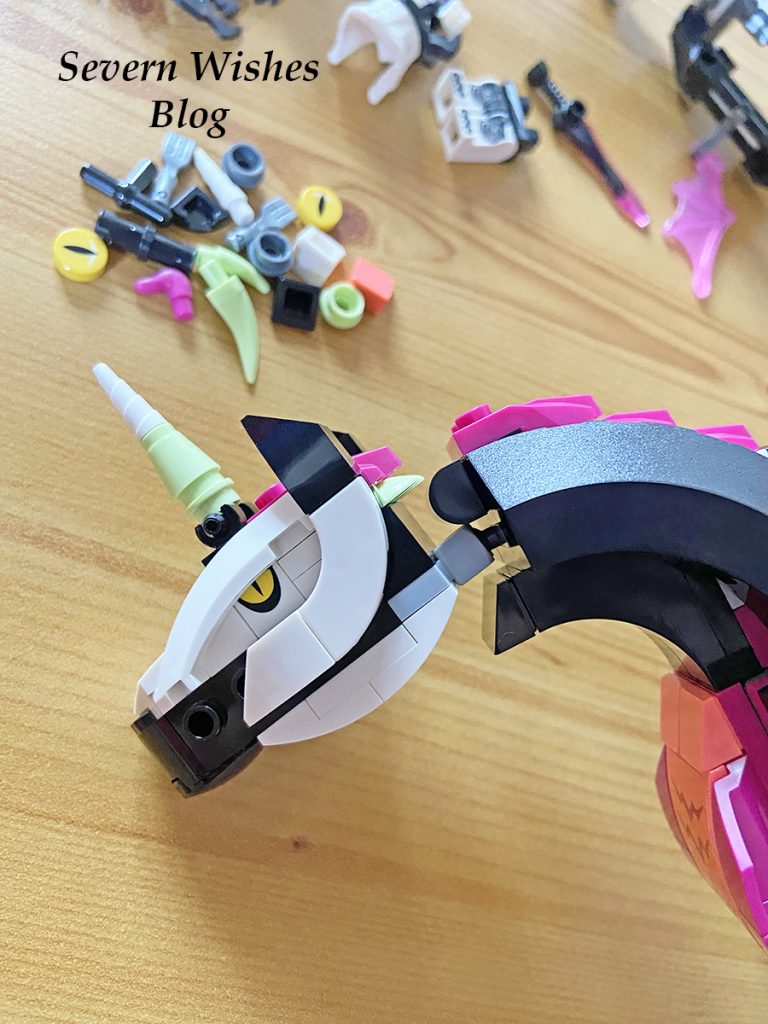
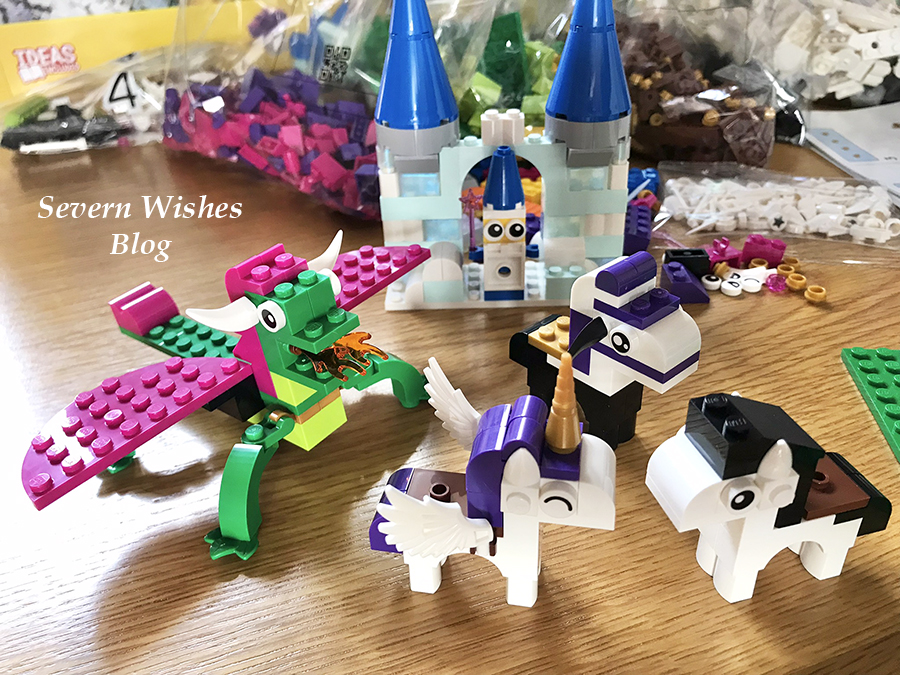
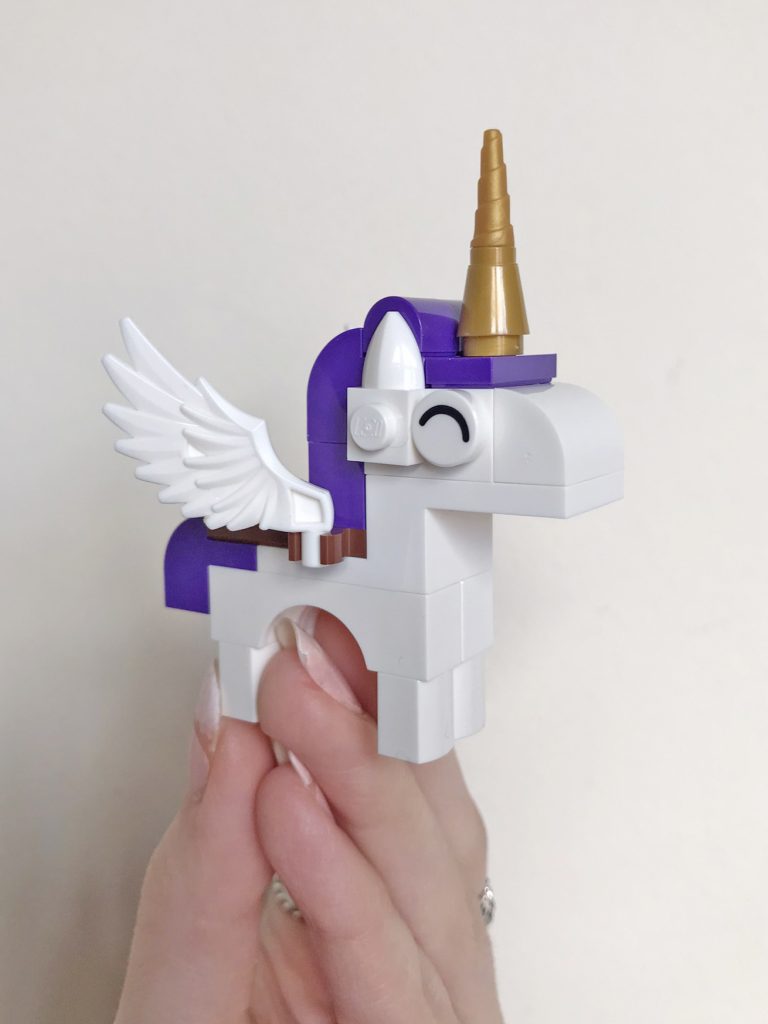
My Argos Tester written piece above as seen on the website on the product. We are only able to share six images when we submit a review to the website, and I took plenty more while building this LEGO and testing the contents, so you will see way more of my photography of this product as your scroll down through my blog post. How cute is the LEGO Horse?
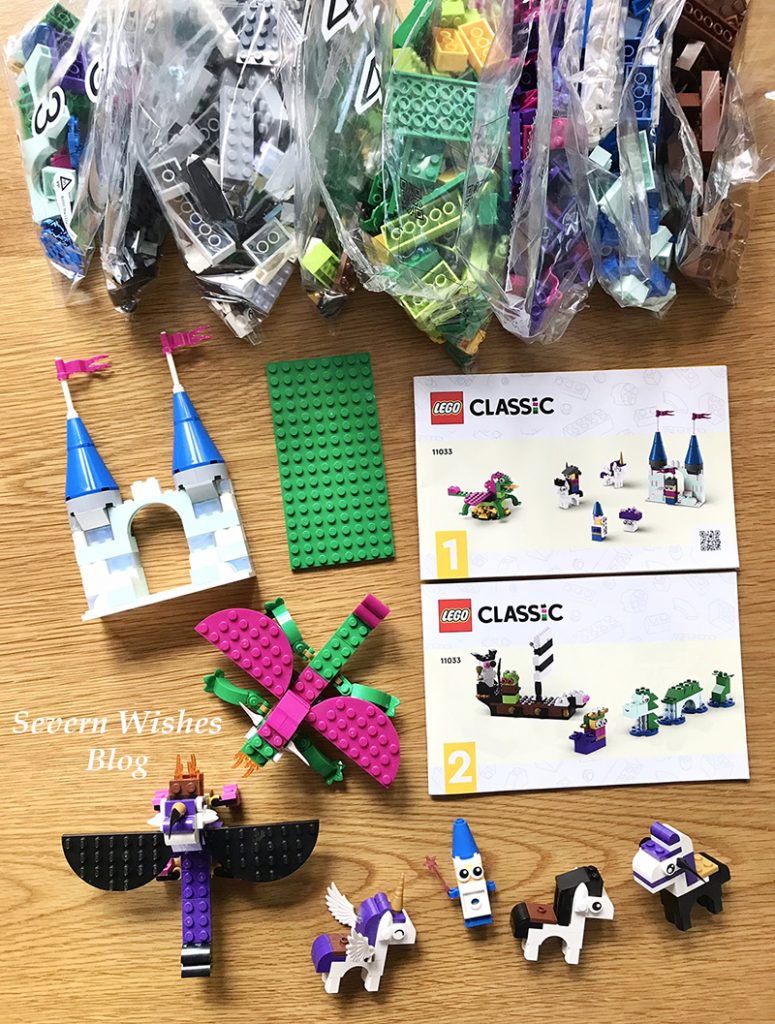
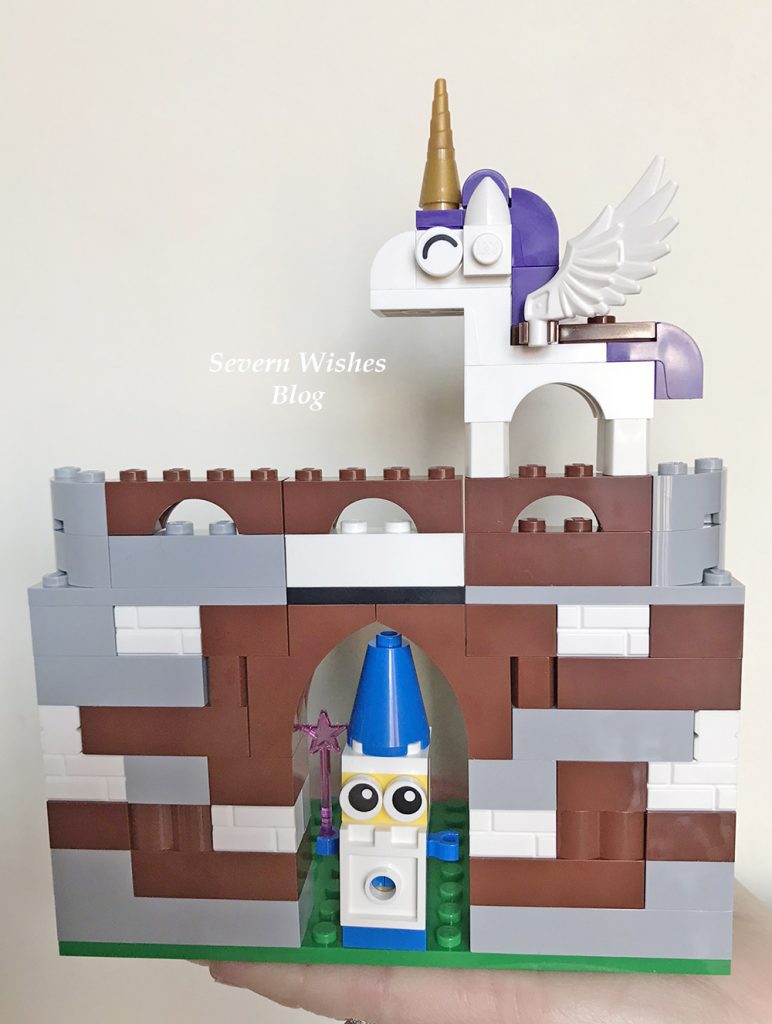
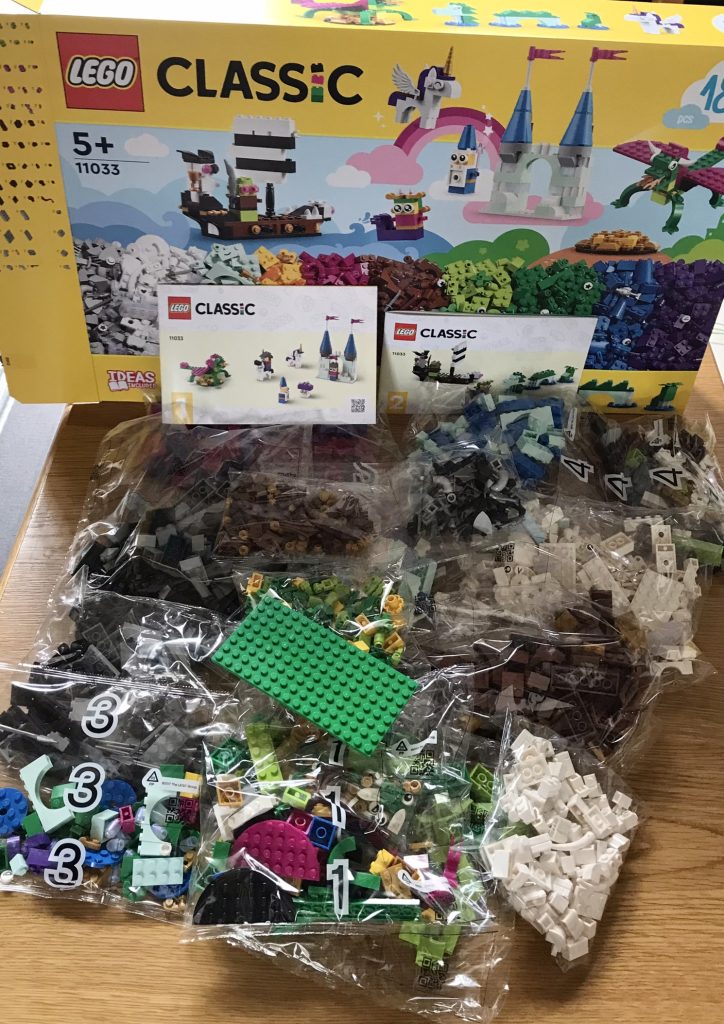
Product Name: LEGO Classic Creative Fantasy Universe Building Toys 11033 Product Price: £80.00 Product Link: Argos Website Product Information: This LEGO Classic Box contains 1800 pieces with brand new bricks and colours ideal for a Fantasy realm including Silver, Gold and Pearl. The books contain several step-by-step ideas and then there are bags more of all sorts of colours of bricks for people to use their imagination and create whatever they want to. Designed for ages 5 and up (due to smaller LEGO pieces) and Adults will also find this set very enjoyable with the view of creating mythological creatures and fantasy worlds. If you like Mermaids, Pirates, Wizards, Knights, Horses, Dragons, Unicorns and even Castles, this is the set for you. And even after you’ve made all of that there will be hundreds of bricks left over to build whatever you can dream up in your mind.
My Honest Opinion
Overall I would like to rate the LEGO Classic Creative Fantasy Universe 5 stars.
Overall Quality 5✩ Features 5✩ Design 5✩ Originality 5✩
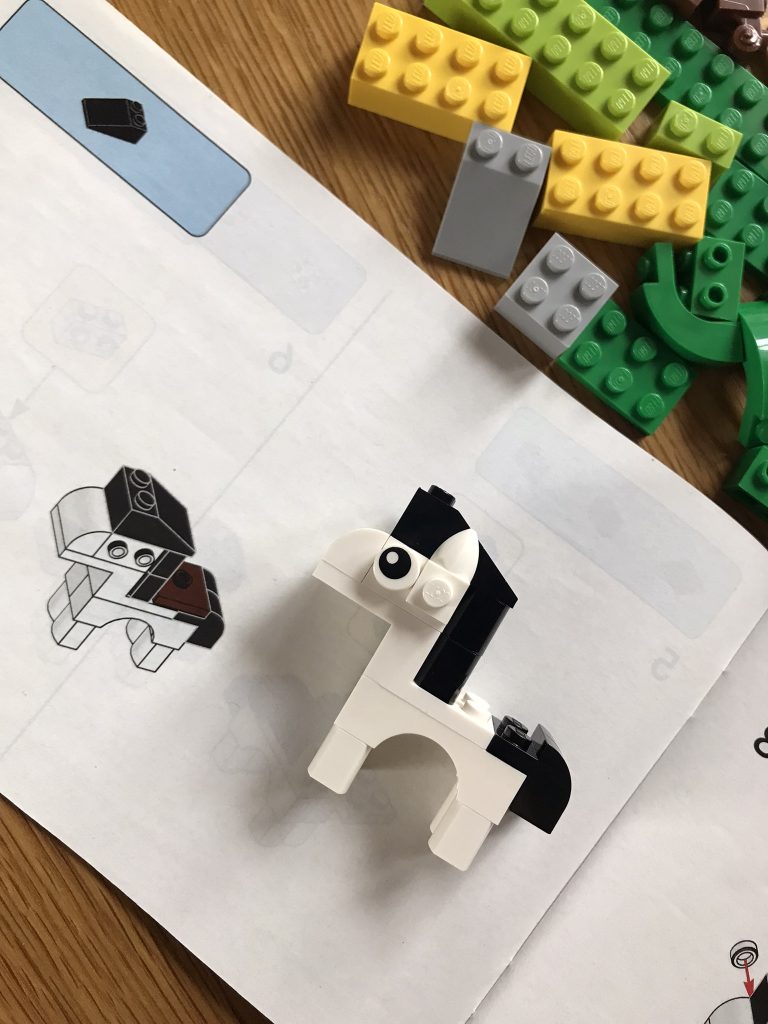
The variety of pieces in this box is excellent and the quality of the LEGO bricks is at it’s usual high standard of manufacturing. I love how LEGO start you off with a few ideas in two small step by step books, but then your imagination just takes over and you can think up all sorts of things to make. With so many additional bricks too there is plenty for a whole family to get involved with it and do some creative making.We played for four hours and barely scratched the surface with how many hundreds of bricks still remained.
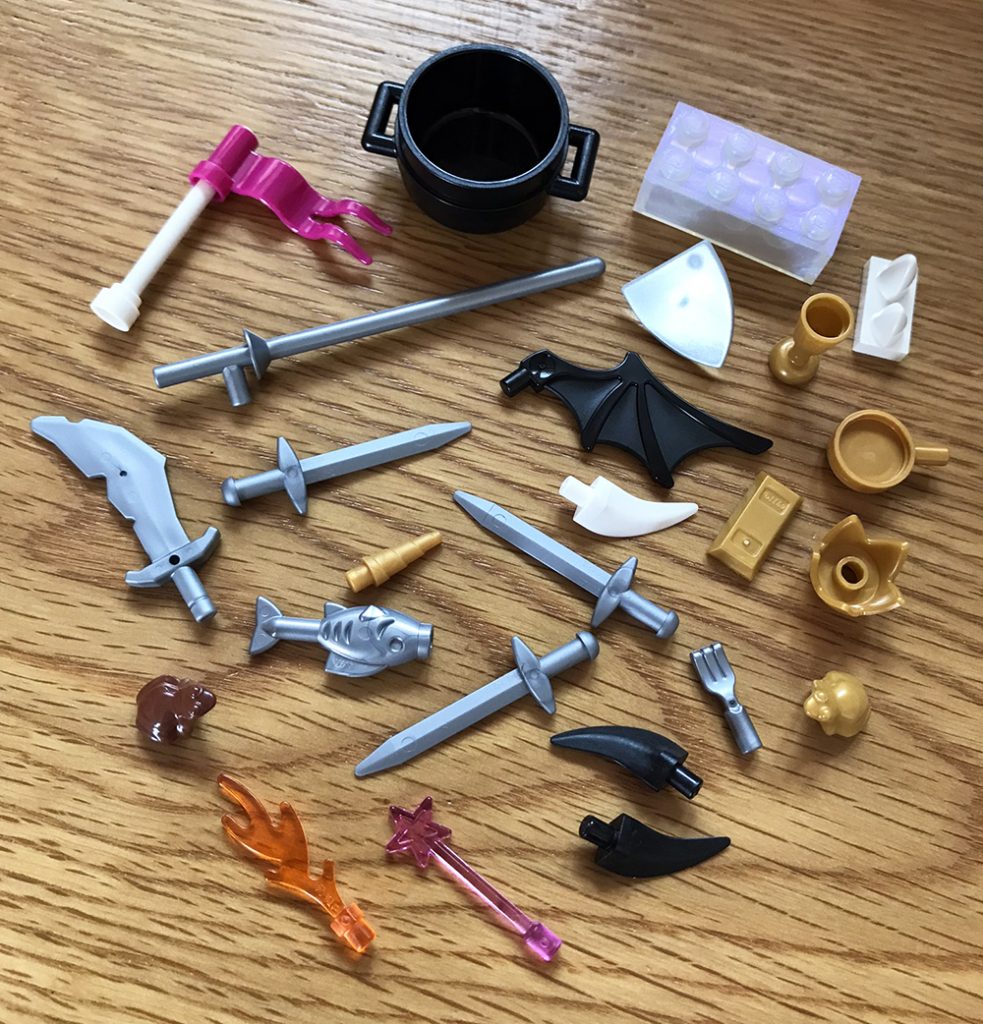
What I loved most, other than the fact you get hundreds of different kinds and colours of bricks in this set, is that you’re able to use your imagination in a brand new way. By creating LEGO Bricks and pieces that depict things you would find in a Fantasy world, people can create their own creatures and scenarios which I don’t think has been seen that much before in terms of it being a Classic Set. Specific LEGO like Disney, Pirates, Harry Potter, TV Show set ups etc, have that genre specific vibe with pieces you would always expect to see inside. But this LEGO set is totally new, and with bits you may find within those other types of sets, however it’s allowing you to use them how you wish to. Wands, Wings, Utensils, Swords, and hundreds of building bricks alongside these smaller unique pieces, they allow you to let your imagination come up with your own LEGO world.
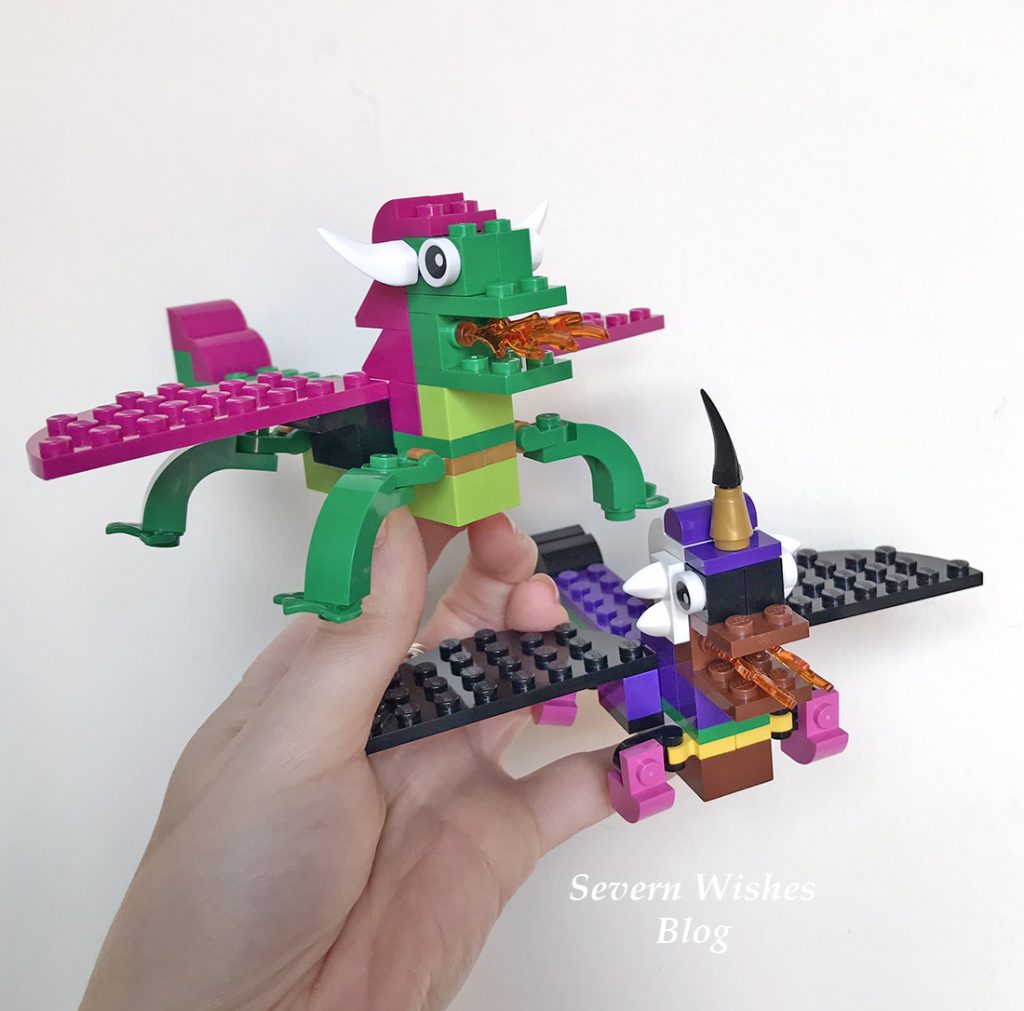
I would recommend this set to any family that love LEGO or to an adult that loves fantasy and would like to start building basic creatures that they can then elaborate upon. I built my son a second Dragon just by following the instructions and seeing what other bricks were similar enough to do a second model. The same goes for the Horse, we were able to make multiple ones in different colours to mix it up a bit. I want to build a larger castle for my son, so that he can use some mini figures that he got from another set I bought him for Christmas, and combine the two.
Overall I recommend this LEGO set for its diversity and its attention to details. I will now share some more photography that we took during making and creating.
Thank you for reading this product review today, I hope you have enjoyed seeing what my family and I have made so far from reviewing this set. With hundreds of bricks still to use there is no doubt that we will have many hours of fun creating LEGO with the remaining bricks.
If you have any questions about this set then please leave me a comment below or on my social media posts and I will do my best to answer with the knowledge I have gained from reviewing this product.
Hello everyone! It’s the final few days of February, lets end it on a positive note!
Have you ever wondered how you could be more productive with that time you spend scrolling on your phone? Would you also love the chance to win some free money? And no this is not a scam.
Well today I am going to show you two websites, give you my referrals for them so you can join up too, and show you how to make some free money if you get lucky.
Website number one for you to check out is all about your Postcode. Every day I spend less than five minutes checking my phone on a website called PickMyPostcode or PMP for short. Here you sign up with the postcode at your home address, and if your postcode comes up in one of their many draws then you get the free cash! I won £10 a few years ago and I am hoping that it won’t be long before I win again. There are more than 15 UK postcodes drawn every day across the draws so it can happen.
There are draws at 9am and 9pm called Stackpot. There is also a range of draws at Midday and one at 6pm which is a cheeky additional draw that’s right at the bottom of the page. It takes seconds to check each one, and if it’s a match to your postcode it will say CLAIM / COLLECT next to it. Then you can withdraw it to your PayPal account.
Here is a photo of today’s (27th February) draws and amounts.
Screenshot of the PMP Website
I must mention as well that you accumulate a bonus with this website, a penny for every single draw page you check. It soon adds up let me tell you. I am up to £65 now, and what happens is your bonus gets paid out to you when your postcode comes up. That’s double reasons to check it I think.
Amounts for draws vary but are usually from £5 to £100, but if they roll over for a few days when people don’t claim then you could see prize amounts in the region of £1000! So it’s important that you do check it every single day in case it’s your postcode that’s been drawn.
If this interests you then please click the link below this sentence and it will take you to the site where you can sign up. All you need is an email address and your postcode and it’s free to do.
So another awesome website that gives out free cash and prizes once a week on a Wednesday is ITV WIN. I only joined ITV Win at the end of last year, but I already won tokens to enter other competitions and £5 in Cash. This one is slightly more time consuming, but you sign up for ITV Win with your details including mobile number, email address and name, and you receive a profile where you can then pay to enter ITV competitions online, enter the free competitions when they are available, and also access WINSDAY. And it’s the Winsday section that you want.
Winsday occurs every Wednesday, and any tickets you’ve accumulated get drawn at random. If your ticket number matches you could win Prizes, Cash or Tokens. How you get the tickets is fairly straight forward too. Once you’ve made your account you go from the top of your profile and scroll down and you’ll see the Winsday graphic on the website. Clicking on it takes you to a video stream. You simply watch a few ITV adverts for things like Masked Singer, This Morning, Ant & Dec, Reality TV and Dramas, and as you watch the Ad’s tickets pop up and you tap them to collect. It keeps a tally for you bottom right of the video stream and your maximum is 30 a week. On average a ticket pops every 1-2 minutes, so I usually watch this a few nights a week while I am stirring the dinner or waiting for the veg in the oven say. Within 20 minutes I’ve got myself a few tickets for free, and they are drawn on a Wednesday afternoon. Just check your profile from Wednesday evening onwards to see if you have won anything.
Screenshot of when a ticket popped up for me today on Winsday video stream.
Screenshot of my account on ITV WIN showing I have 6 tickets so far this week.
When I won £5 a few weeks ago it was easy to withdraw it from my profile as well.
ITV WIN is a great way to try and win things for free and it’s certainly worth it when they draw hundreds of prizes for free every week for its members. Why not give it a try and see how easy it is to (hopefully) win some free money.
Below this sentence is the link to the ITV Win website through my referral and it’s free to sign up.
✩ ✩ ✩ I hope that you have found this blog post interesting today, I would love to hear from you if you do either of these already or if you’re going to sign up now that I have brought them to your attention. Remember that signs ups are only for people living in the United Kingdom.
Thank you and have a really lovely day! Good luck if you sign up!
✩ Sabrina ✩
N.B I am not endorsed or sponsored by either of these companies I am simply trying to give people the opportunity to win things for free, this is what I do myself every week. This post is not a sponsored and I am not getting anything for bringing these websites to your attention, I am just being a good citizen! Good luck and thanks for visiting Severn Wishes Blog today.
Hello and Welcome! If you’re a regular visitor to Severn Wishes Blog then you’ll know that I love to do lots of Art and Craft! If you’re new here then hi, and after this blog post please check out the remainder of my fun Crafts in the section here.
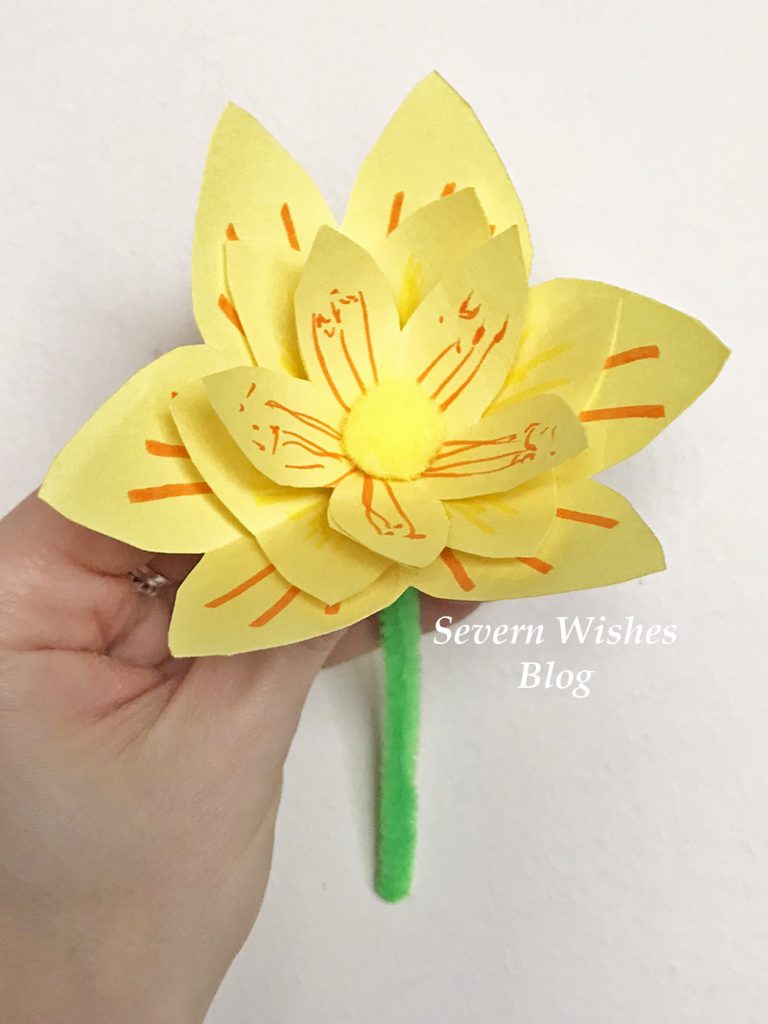
Paper Flowers are a wonderful alternative to buying fresh ones, the beauty of these homemade gifts is that they won’t wilt and have to one day be thrown away, these can be treasured by the loved one receiving them, forever! Give a single flower or make a bouquet it’s up to you!
What Do I Need?
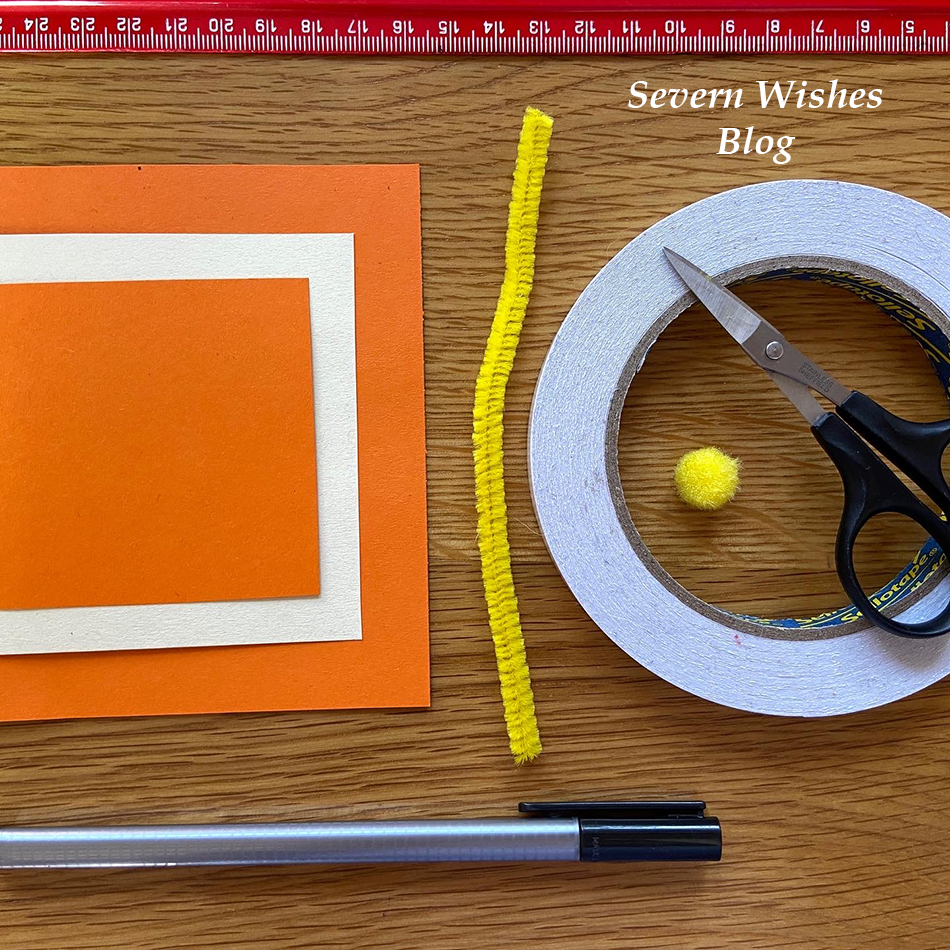
A Ruler (30cm) A Pen or Pencil Pipe Cleaners various Colours Thin Coloured Card or Thick Coloured Paper Pens for Decorating the Petals (optional) Fluffy Craft Balls (Flower Centres) Scissors
My Step by Step Visual Guide is really easy to follow, but I also uploaded videos to my social media if you would prefer to follow that! Carry on reading for my step by step and photographic guide.
SABRINA’S STEP BY STEP GUIDE
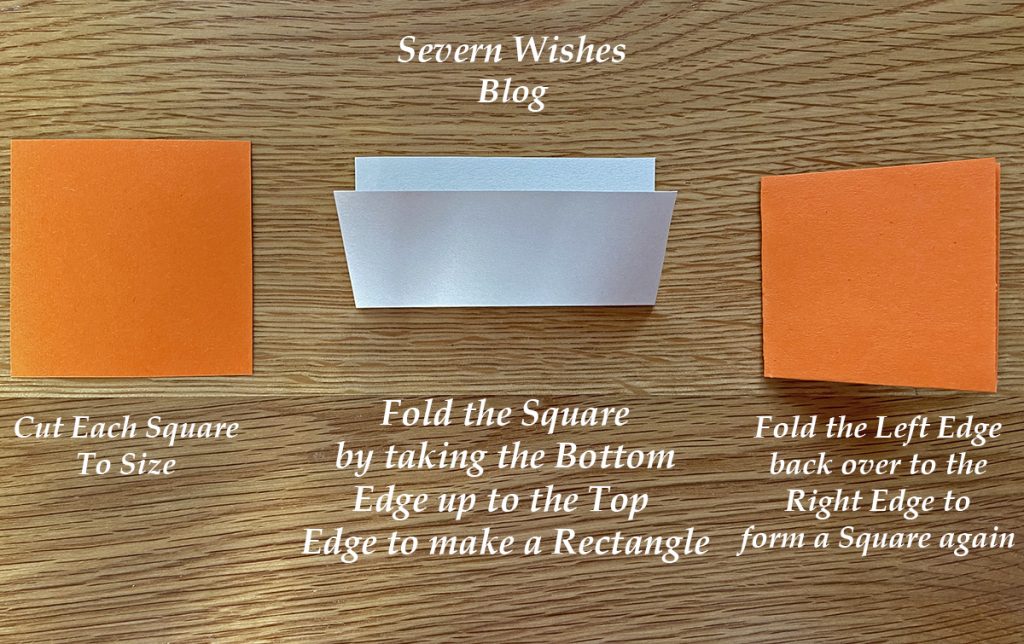
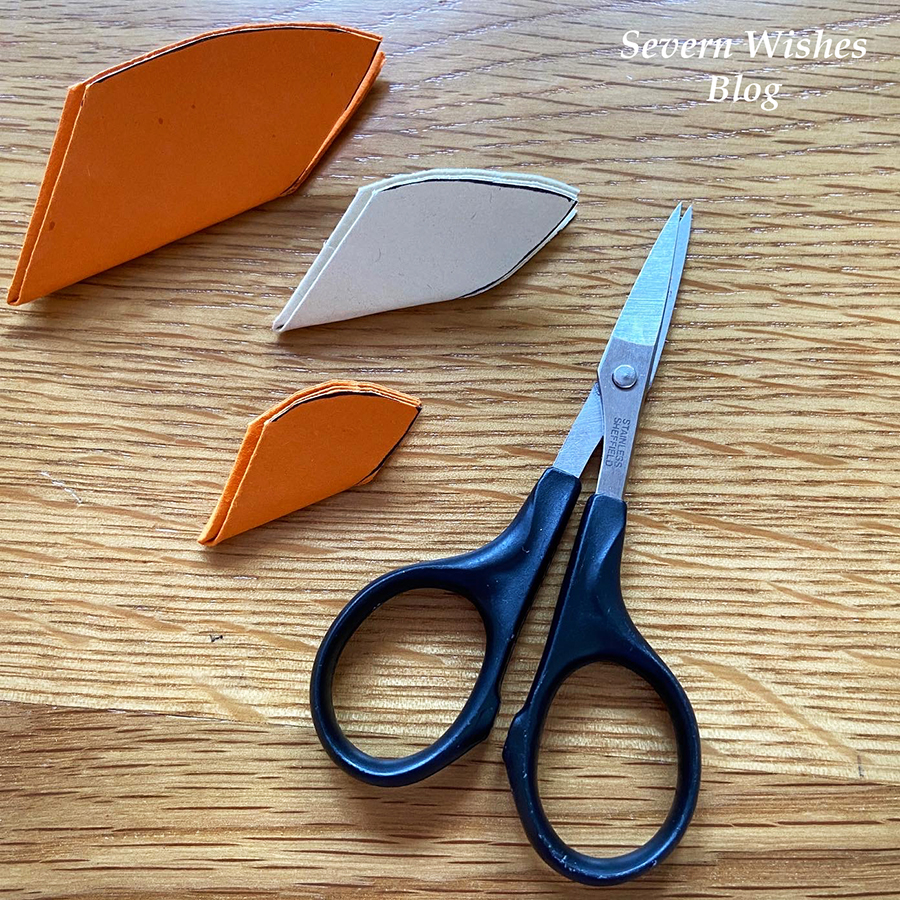
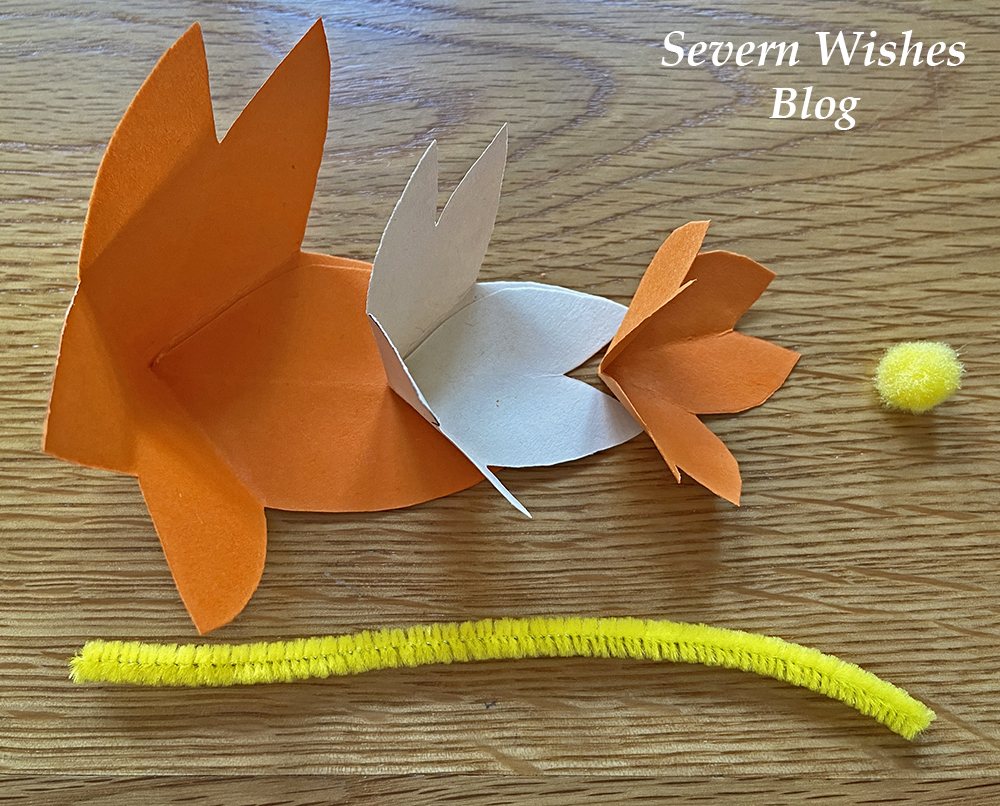
1. Cut Squares from your chosen Coloured Card. For example I made my Orange Flower with a 7cm, a 8cm and a 10cm Square. Three Squares is an ideal amount of layers but you can do just two or even more layers if you wish. Assemble these squares on a flat surface ready for the individual folding process. (See my images below for additional guidance).
2. Fold each square you have in half to form a rectangle, do this by folding the bottom line up to the top line and line up the crease and push flat. Repeat for every piece you have.
3. Next, you fold each rectangle back into a square shape by folding it from the left to right and flatten and crease down flat once again.
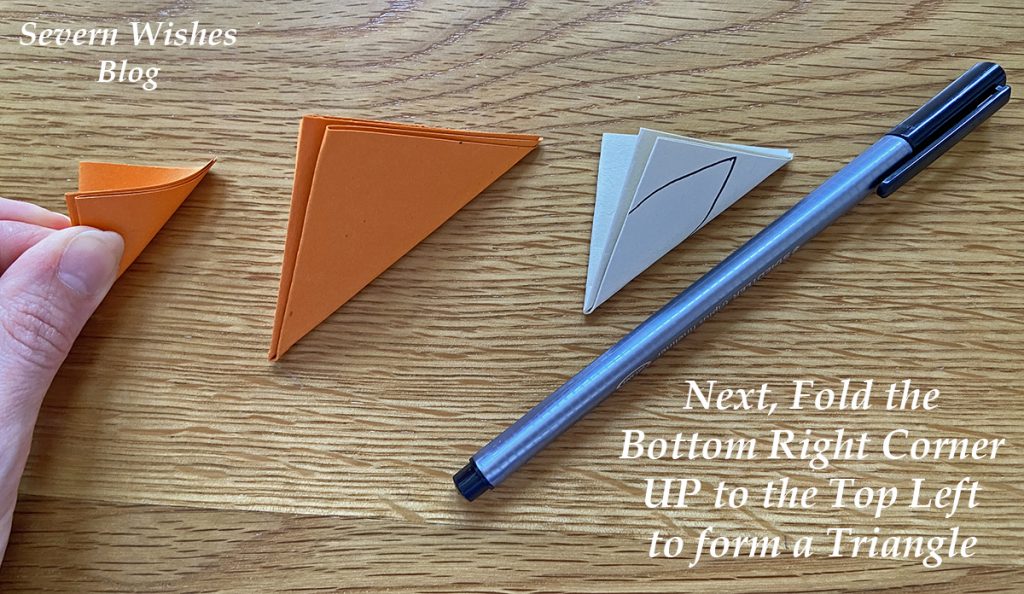
4. Finally you will have all your layers into folded squares, and these now need to be made into Triangles. But to do this correctly for the next steps you must not rotate them at all during the folding process. Make sure that you fold the bottom right corner of your squares up to the top left, flatten and crease.
5. Next you need to draw a petal shape on every flattened triangle, make sure not to rotate it from when you folded it when you draw on it, otherwise it won’t cut intact during step 6.
6. Now you need to carefully cut out your shapes, gently follow the line and then discard these cut offs for the recycling because you don’t need them.
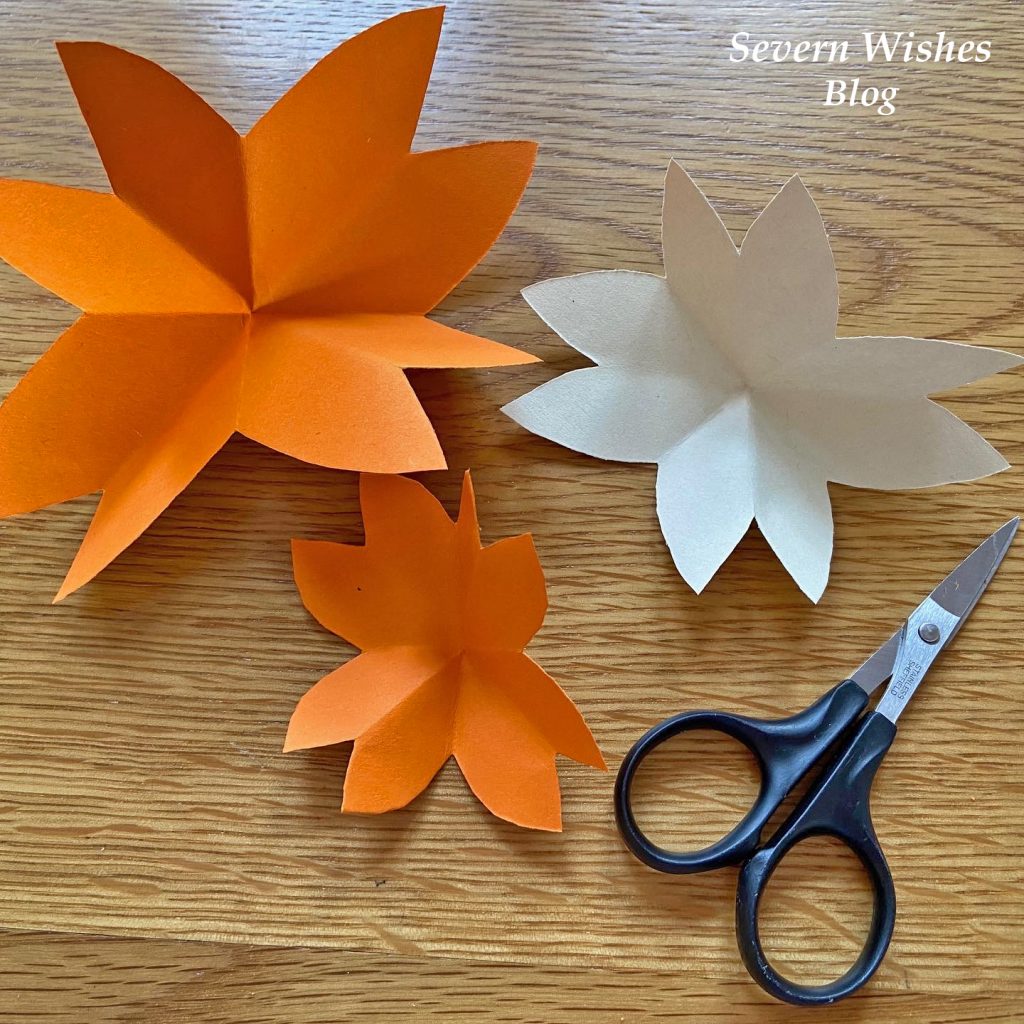
7. Time for the moment of truth, open out the flowers gently and slowly so as not to tear them. Lay them out flat and make sure they are an entire piece.
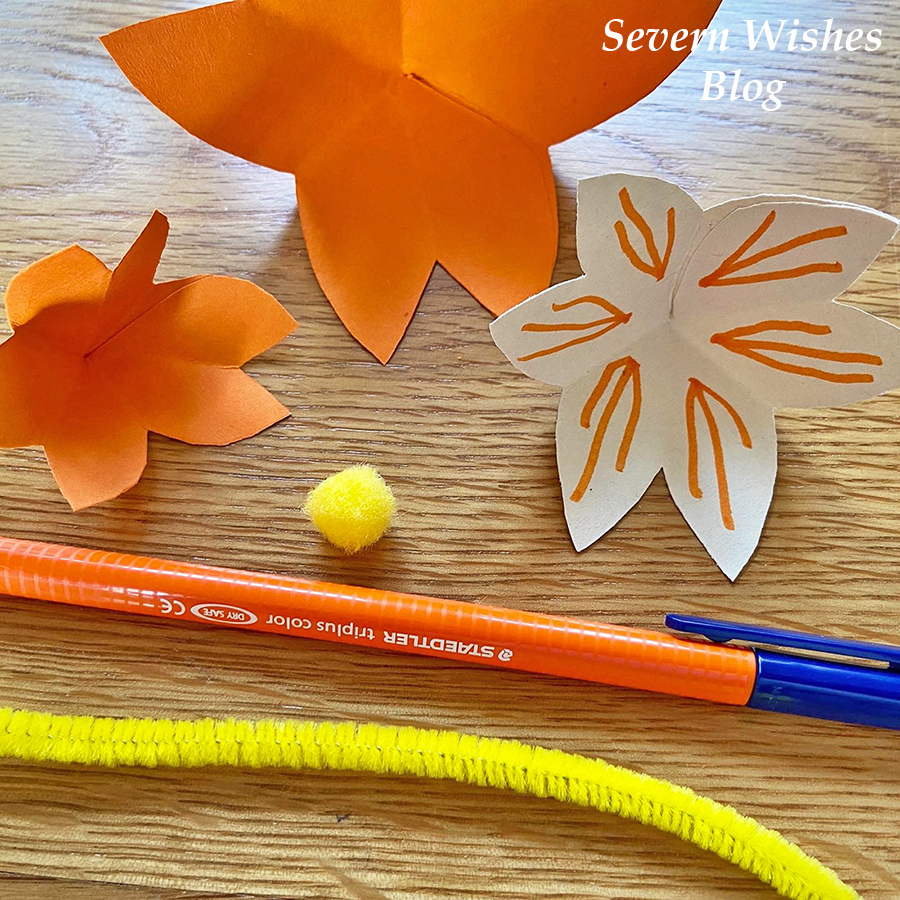
8. With the crease lines facing at each compass point you need to mark the petals that are in the South East corner of each flower. (See my images below if you are uncertain).
9. Carefully cut these petals away from the flower, be sure to only follow the crease lines of the folds when you cut and don’t be tempted to cut it too low in the centre, just enough for the spare petal to gently come free. You don’t need these now and these spare pieces can all be recycled at the end of your crafting session.
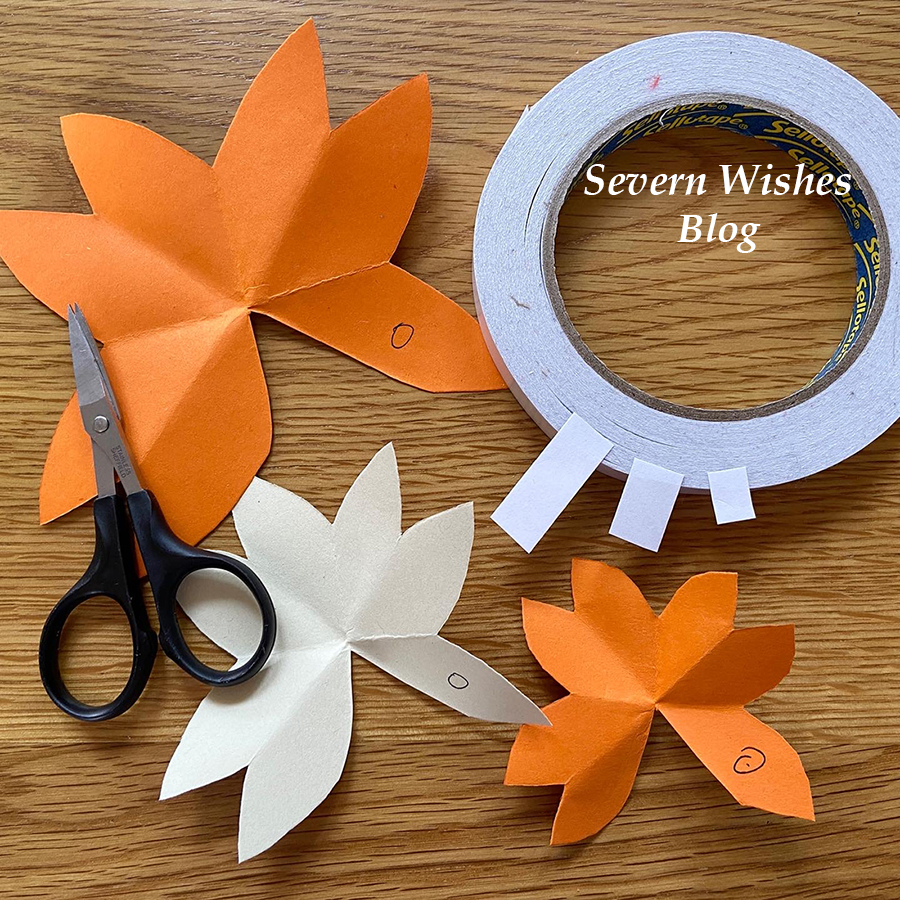
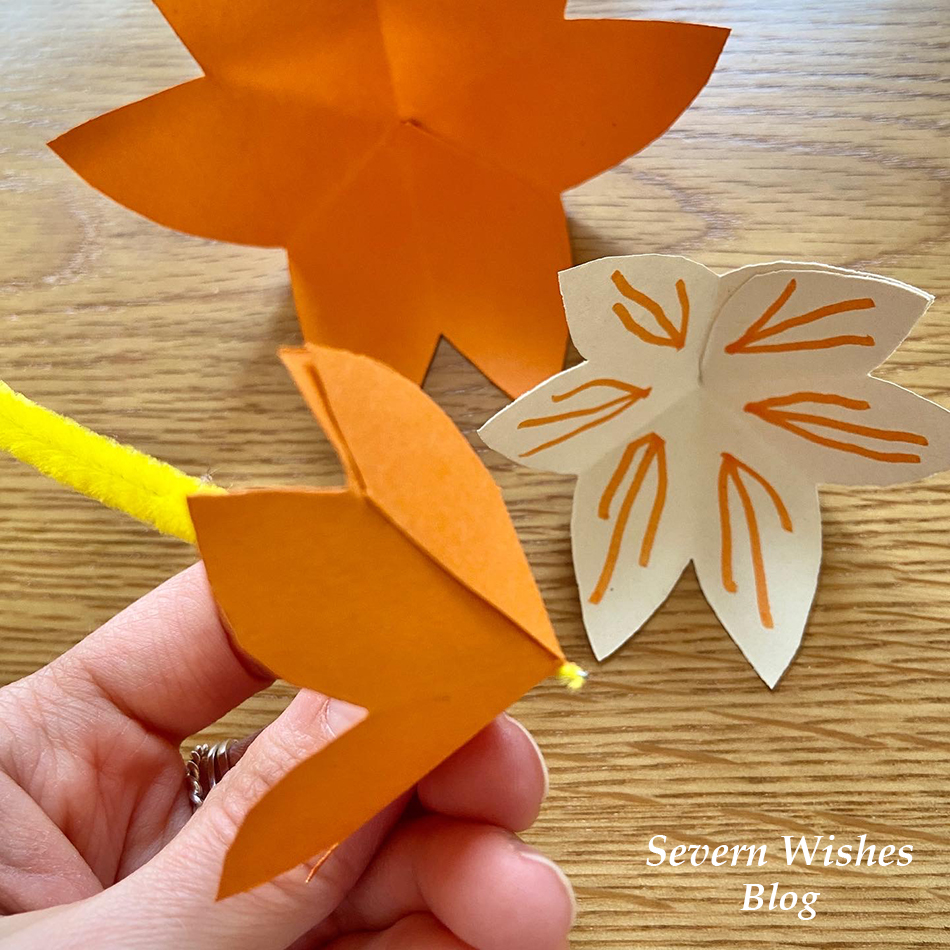
10. Next step is to mark the petal on the right of the one you just cut away, on each of your flower layers, and then stick a piece of double sided tape or a blob of glue on to that mark.
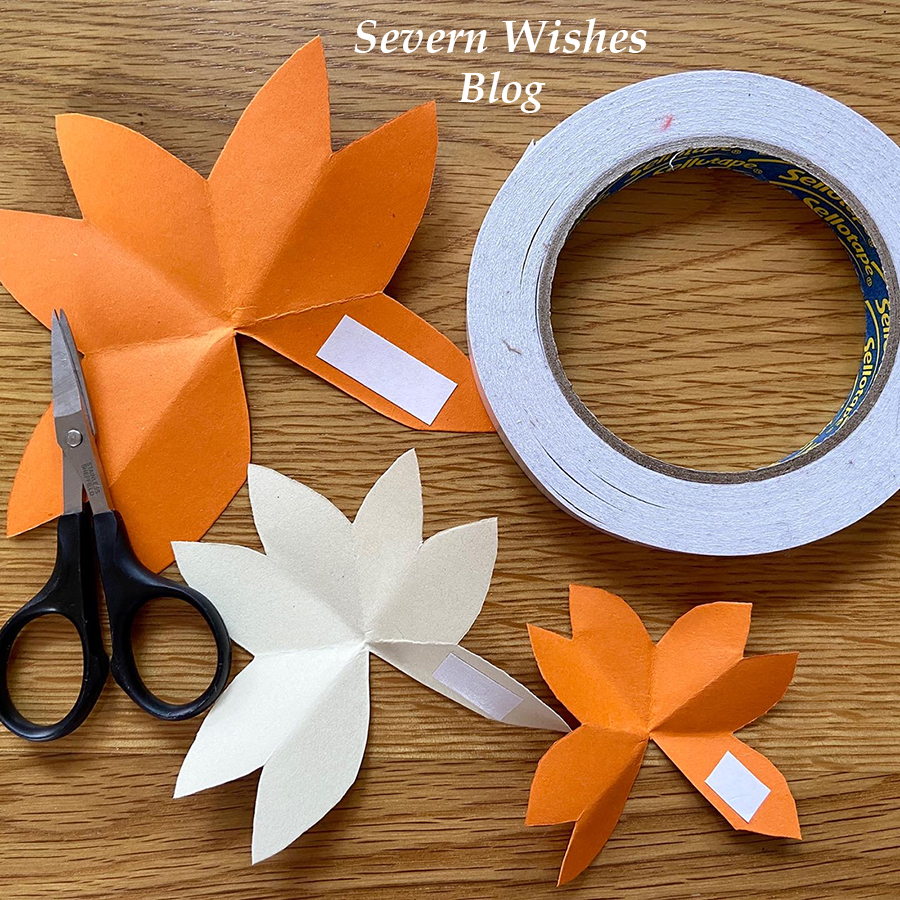
11. Doing each layer one at a time now, gently place the flower into your hand, and with the other hand carefully fold the petal on the left side over the petal on the right side. The creases and folds we made at the start should allow you to do this easily, if not gently fold the creases again and try again, the flower should (with some gentle persuasion) create a 3D flower with the shape similar to a cone. Push down on the glued part and make sure that you have aligned the petals and that it is stuck down. Repeat this for all flowers and layers that you want to make.
12. Carefully lay out each of the Flower layers now that they are 3D. You now need to decorate them if you want to with lines or dots before we assemble them. If making them with small children you may want them to decorate at Step 10, before you make them 3D.
13. During this step you want to use the end of the Pipe Cleaner you have chosen to gently pierce through the middle of the Flower layers, take one at a time, and force the pin end of the Pipe Cleaner directly through the centre where the creases and folds meet. Once all of the layers are pierced you can now arrange them in order of size.
14. Assemble your finished Paper Flower by sliding the layers on to the Pipe Cleaner, you do want to leave about a 4mm bit of the pipe cleaner poking out so that you can push on a coloured fluffy craft ball (if you have one) and this neatens the whole look of the flower plus it covers the pointed end of the pipe cleaner.
15. Adjust the Petals by rotating the layers slowly on the pipe cleaner stem until you are satisfied with the flowers final look. I hope you are happy with your flower! You can play around and add other things too if you like! Be creative and I cannot wait to see yours! Tag me! #SabrinasHowToMake
✩✩✩
Thank you for reading this Craft related blog post today, I always love doing my “Sabrina’s How To Make’s”! And if you have any questions for me then please comment below on this post and I will happily answer them for you. If you make some flowers please tag me on social media using the hashtag #SabrinasHowToMake and I really look forward to seeing them!
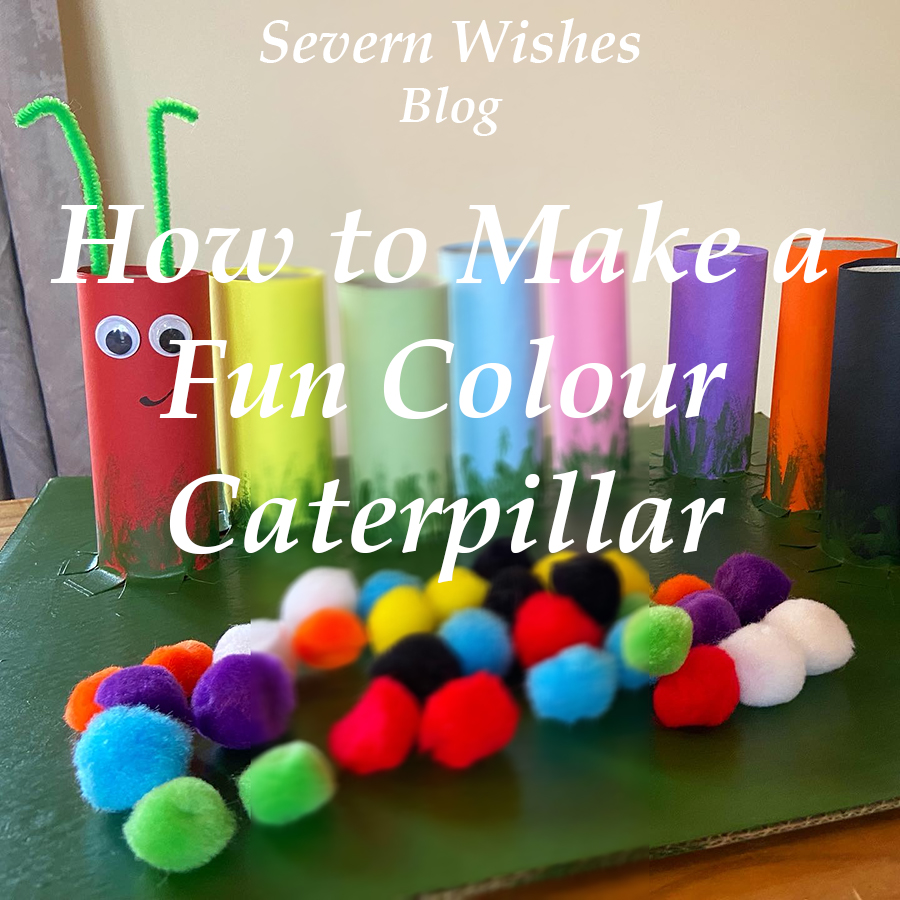
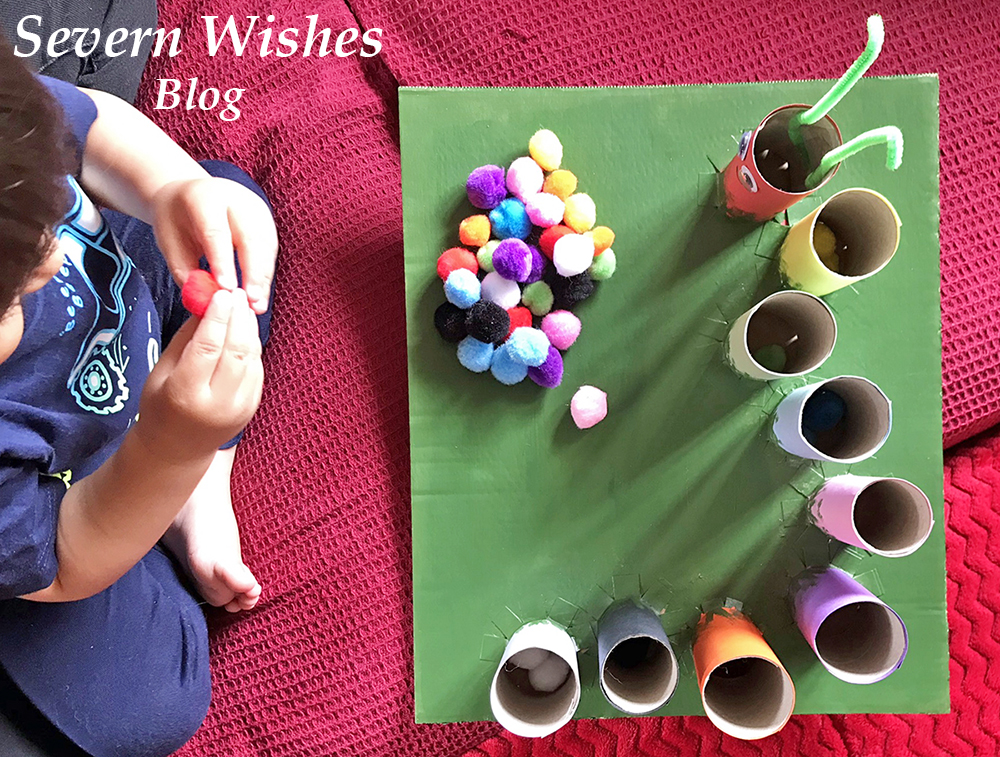
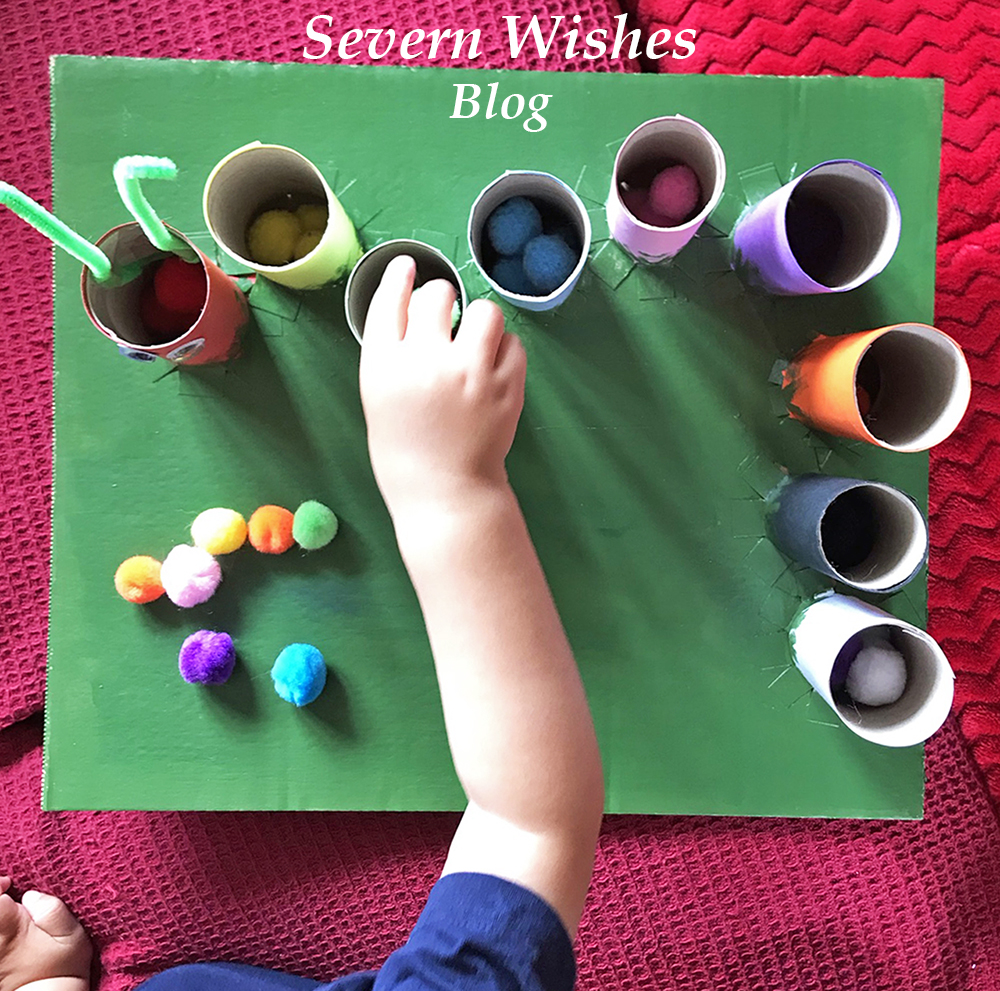
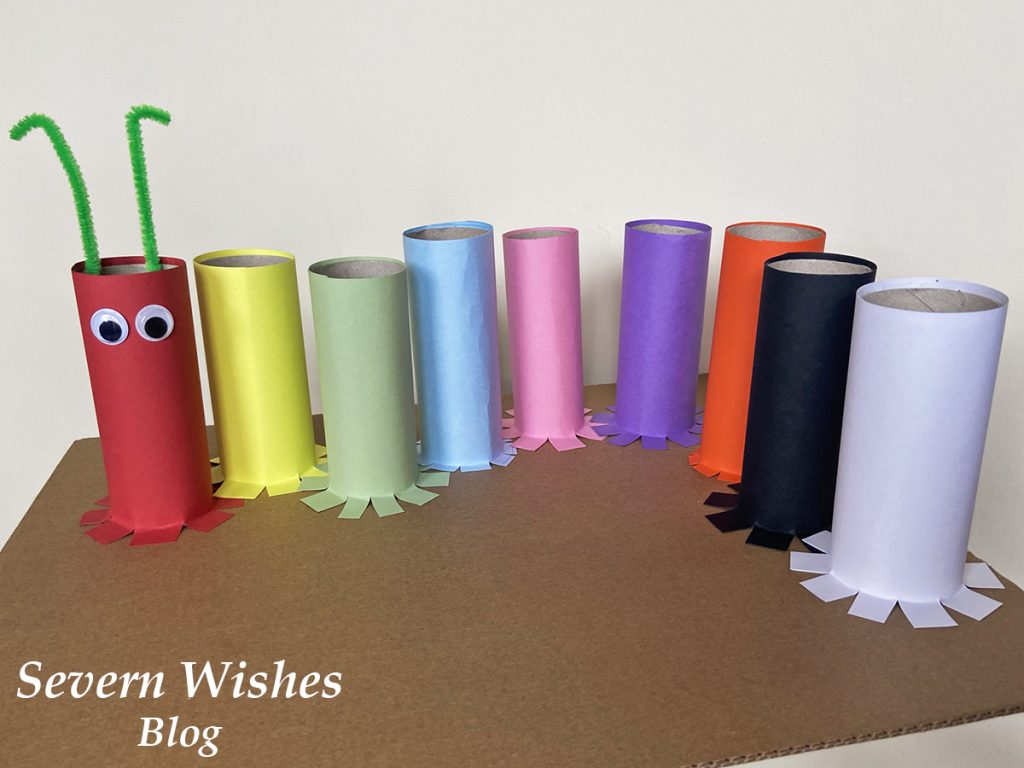
My Fun Craft Caterpillar is an easy to make craft project, that can help you to teach your toddler about colours and counting. You can make it any size you like and with only a few simple and non expensive items. Ideal for children aged two plus with good fine motor skills.
Designed for Age Group – 2 Years Plus (Supervised) Parent Difficulty to Make – 3/5 Time it takes to Make – 4 – 6 Hours Cost to Make – £10 Reasons to Make – Learning about Colours and Counting. Helps Develop Fine Motor Skills.
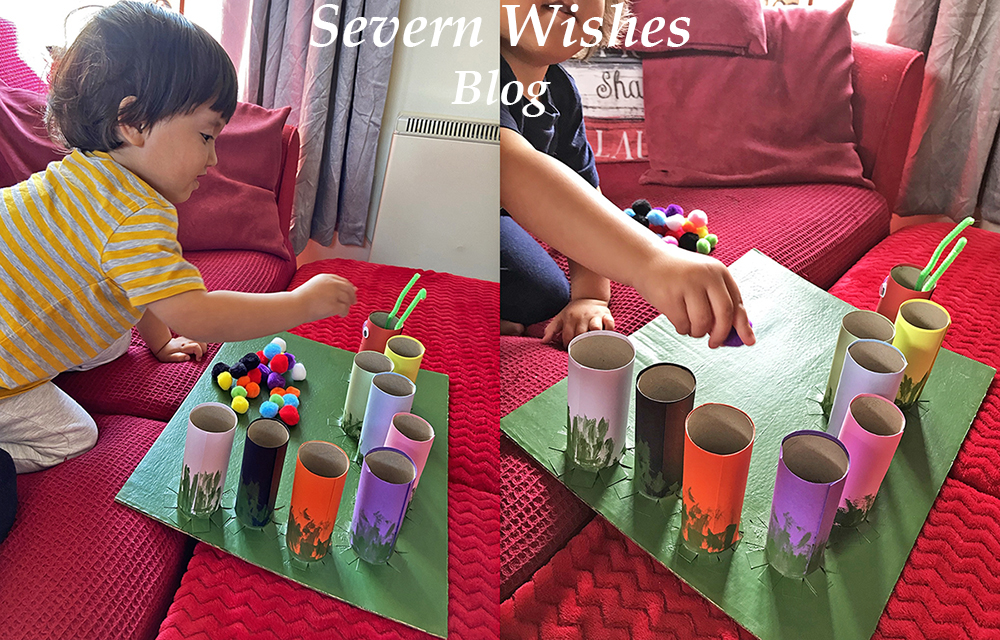
When my son began having issues with delayed speech I came up with several things to aid him in his communication. One of which was a Caterpillar friend that I made into several different items. Today I’m going to be showing you how I made my Fun Craft Colours Caterpillar!He is cute and great for helping little ones learn about colours, counting out and developing fine motor skills.
TOP TIP I wanted to help my son develop his fine motor skills as well as improve him saying different colours, picking up the Pom Poms and getting them to drop inside the correct tube does take some skills for little ones, so don’t worry if they have to learn how to do it. My son got the hang of it really quickly and was soon getting faster at doing it. One Tip is to show your little one what you want them to do, and then let them figure it out on their own a bit too. Always supervise but encourage and praise when they succeed.
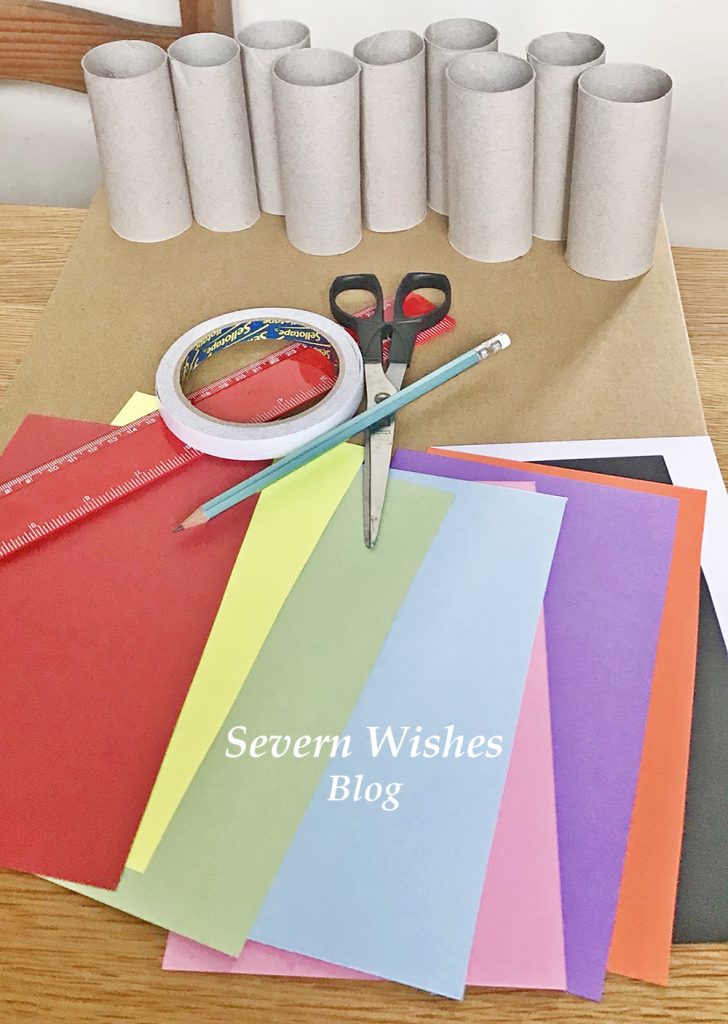
What You Will Need
Toilet Roll Tubes – You can use toilet rolls and kitchen rolls and just trim them so they are a similar height. Order your card and Pom Poms and work out how many rolls you will need, you require one roll per colour.
A Thick Cardboard Base – Do you have a sturdy box after going shopping or have had something delivered? You need a piece of strong thick cardboard either a Square or a Rectangle for your Base that the Caterpillar will stand on.
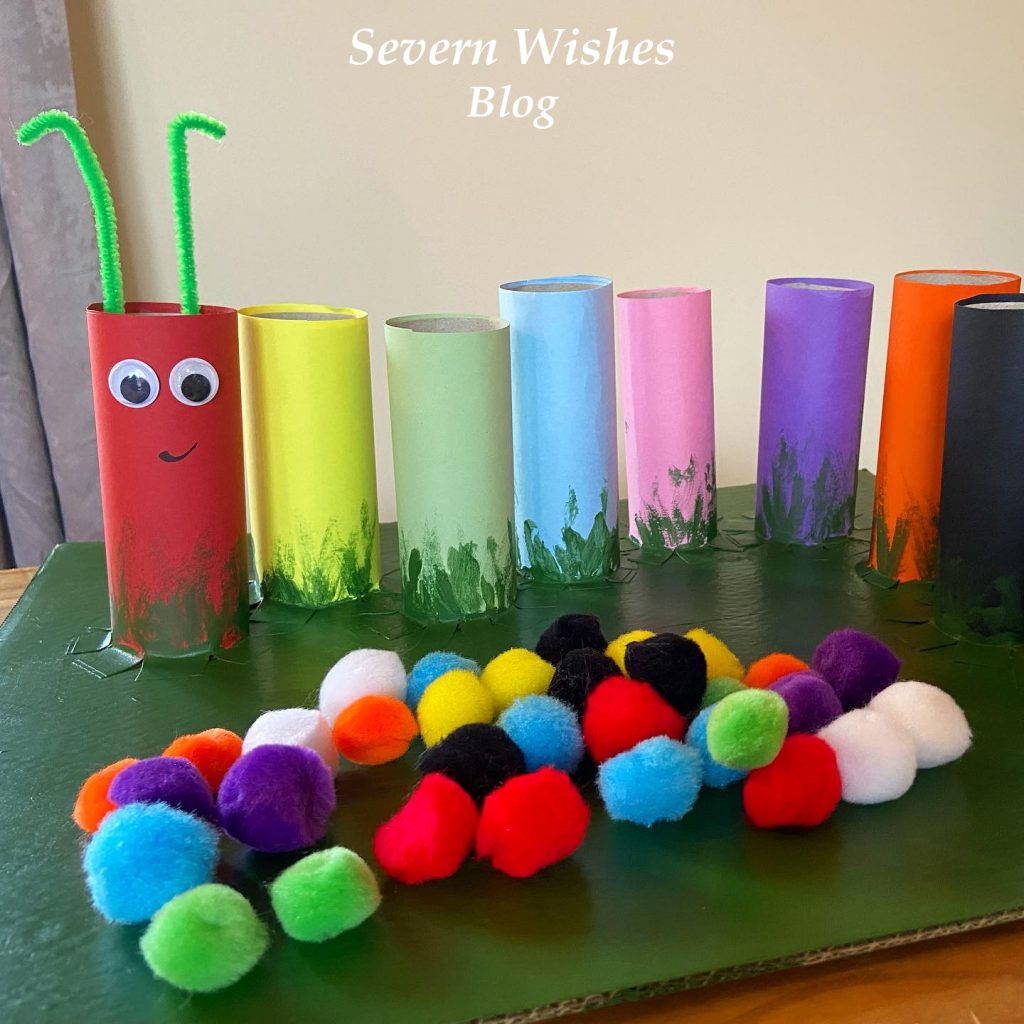
Coloured Card – You need to try and match the coloured card with the Pom Poms you are ordering. If you want to do a simple Caterpillar just go for a pack with Red, Yellow, Green and Blue mix, sometimes you get an Orange or a Pink in those packs. I bought two packs to ensure I got black, white, purple, pink and orange for my more complex Caterpillar.
Coloured Pom Poms – A toilet roll tube is a certain width across, so make sure you only order Pom Poms that are less than this. My tubes are 4cm wide so I purchased a bag of mixed coloured 2cm Pom Poms. This means they are easy enough to tip back out after every use. Also ensure you get non toxic child friendly craft items from reputable companies.
Double Sided Tape – You need this tape for cleanly applying your Card to your Rolls, this is the most time consuming of the craft build but it’s easier and less messy than waiting for lots of paint to dry. (See my How To below).
Paint for the Base – I chose to just paint my base Green, as if the Caterpillar were on a leaf or some grass. You can be as creative as you like! You only need to paint the base, once you have fixed on all your tubes (see my How To below for more clarity).
Stationery and Craft Extras – You may want to stick on googly eyes and feelers, or draw them on, it’s totally up to you, your Caterpillar, your choice! 🙂 You will also need a Pencil and a pair of Scissors.
Where I Got My Craft Items
Coloured Card Packs – Hobbycraft Online Pom Poms – Hobbycraft Online Goggly Eyes and Pipe Cleaners – Craft Bundle from The Works Double Sided Tape – Tesco Store Green Paint and Brush – The Works
How To Make Colour Caterpillar – Sabrina’s Step by Step Guide
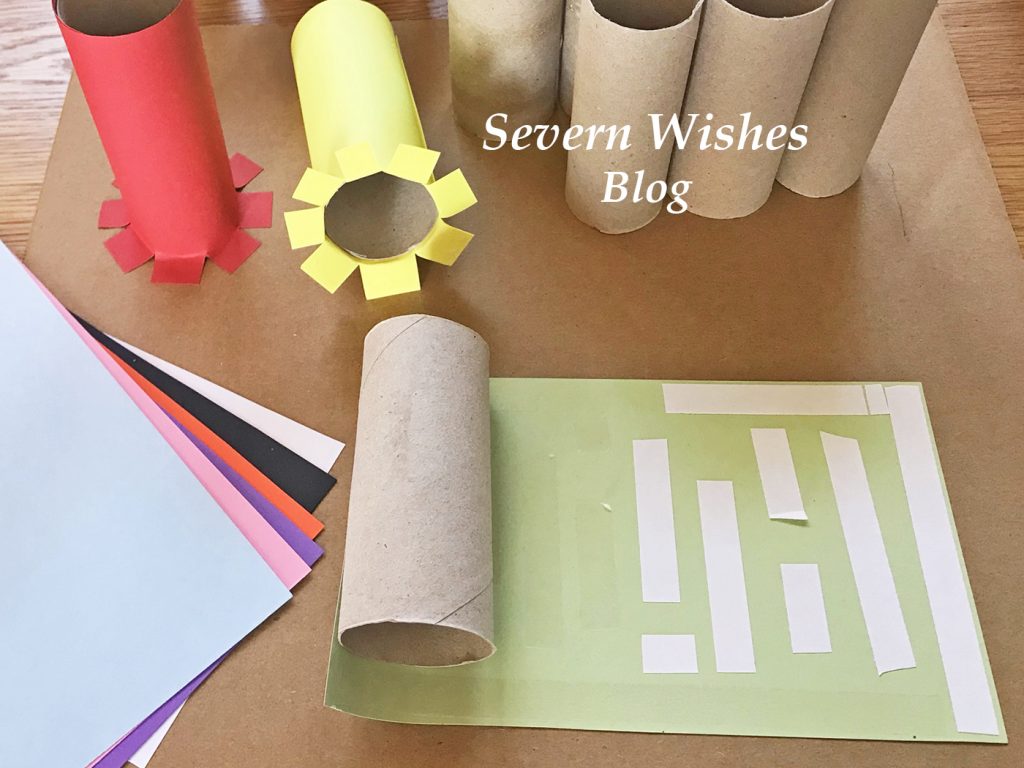
Step 1. Assemble all of your items as described above and ensure you have enough of what you need. Place a tube, a piece of coloured card and your desired amount of Pom Poms (I used 4 per colour) into individual piles. See what you have and how many tubes with the right colours and Pom Pom matches.
Step 2. Arrange the plain tubes on your base, and see how you would like them arranged. You need a one centimetre gap between each roll where it will be attached to the base. Bearing this in mind, arrange your tubes and mark with a pencil on the base where you would like them to go.
Step 3. Satisfied that you have all the pieces you need you can begin the card craft. Start by marking the pieces of coloured card for your tubes. For example mine were 15cm high, so I marked the card at 16cm with a pencil leaving the gap of one additional centimetre. Then cut all the card pieces to size ready for wrapping around the tube. TOP TIP ensure you leave enough card to wrap all the way around a tube with the extra at the bottom. You need at least a one centimetre section of card at the bottom of every tube for attaching it to the base.
SABRINA’S TOP TIPS: Don’t throw away pieces of card that you have left over from this make, I have plenty of Craft and Art ideas on my blog that you could use these bits for 🙂
Step 5. Cut strips of double sided tape, align them along the top and edges of the coloured card and down the centre, ensure there is enough at the edges. At what will be the base of the tube stack the pieces vertically, using a small gap between them, this will be cut in Step 7 to ensure an easy attachment to the cardboard base. Make sure you put tape on all of the coloured card pieces. TOP TIP Make sure to do this Step and on to Steps 6 to 7 at the same time and don’t leave the craft part way finished, otherwise the double sided tape will dry out before you can affix it to the base.
Step 6. Time to roll the card on to the tubes. Remove all of the double sided tape strips. Line up the top section of the cardboard with the edge of the tube, on a flat surface like a table, gently roll the tube along the card. The tape will stick well to the thin tube, using your thumb and first fingers you can smooth out the card as it sticks. Try keeping it in line at the top. Once you come to the end of the coloured card make sure the final line of it is secure to its tube, smooth with your fingers and hold the edge in place for a minute per tube making sure that its firmly stuck in place. Repeat this per tube, laying them down on their sides once you are finished.
Step 7. You now need to be cutting the base of each tube so that they can be attached to the base. Take the first coloured tube you want to attach to the base (I did a Rainbow so mine was Red) and using sharp scissors cut a one centimetre slice up into the card at the tube base. Rotate the tube around cutting vertical slices as you go. Then once cut all the way around, gently peel back the slices and make a base for your tube. Affix it into place on your cardboard base because they should already have the double sided tape attached. Press down firmly and hold for one minute. Repeat this action with all of the coloured tubes until they are all attached to the base. (See images above and below).
TOP TIP Painting the base last ensures the tubes stay in place after the double sided tape has helped stick them down on the base. It also neatens up any edges that may have tape sticking out or tubes that weren’t quite level.
Step 8. With all your coloured tubes attached to the base you can now consider adding anything else to your caterpillar, and also paint the base with whatever paint you choose. I added googly eyes and some pipe cleaners as my Caterpillar feelers.
Step 9. Leave your Caterpillar to dry overnight before showing it to your little one. Ensure that you only play with it supervised either by you or another adult. The Pom Poms should be stored inside something that little ones can’t get into unless you are doing the toy together. Most children wouldn’t eat them at this age but better safe than sorry. I recommend a small plastic box like the really useful ones with the clip over lid handles.
TOP TIP Your Caterpillar friend can now be used to teach colours and numbers! Ask your child to count how many body parts the Caterpillar has, how many Pom Poms fit in each tube, can they separate the colours correctly and add them to the correct tube? This craft project can be used for play and learning and will keep your child occupied for hours.
Have you enjoyed this Craft Project? I would love to know what you think! Please leave me comments on the blog section below or on social media. Please tag me if you make a Caterpillar of your own! Use the hashtag #SabrinasCraftCreations
Thank you for reading this blog post today, I hope I see you again soon!
Sometimes we are all guilty of spending too much time on technology, and now that the weather is improving we should all be putting down our TV remotes and phones and getting outside! (I know that you’re thinking about doing that now, as you read this blog post on a piece of tech, but please bare with me as I have some great activities you’ll want to be inspired by I’m sure!)
So where to begin! If you’re not naturally adventurous for the great outdoors it can seem a bit overwhelming! So how about we just start small! I have come up with a range of things to suit everyone, outdoorsy types and not so much! All you need to do is choose one of these to do each day during the school break or even at the Easter weekend and voila you have some outdoor fun, nature related or outdoor activity to enjoy!
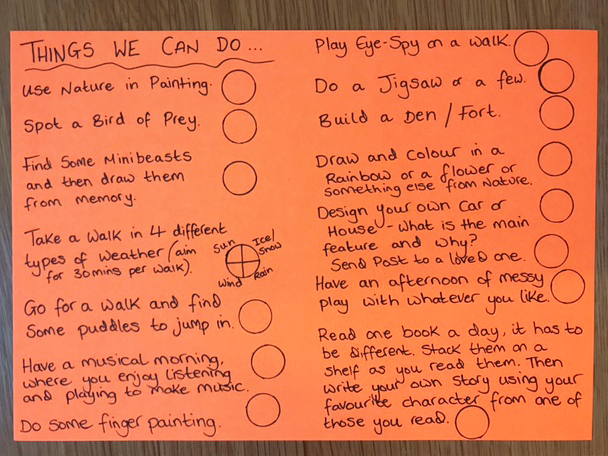
Here are my 15 “Things We Can Do” of Fun Ideas to do Indoors and Outdoors…Weather Dependent!
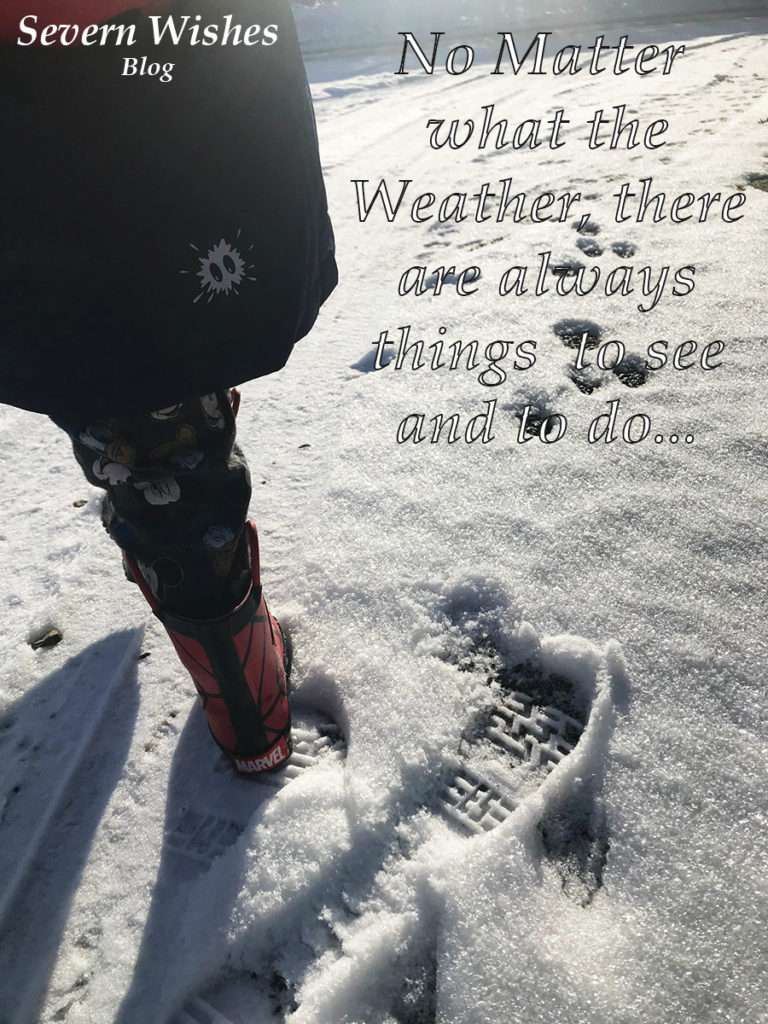
🥚 Use Nature in a Painting – Use sticks or leaves to paint with! 🥚Spot a Bird of Prey – Look up and see what is flying above your head! 🥚Find Some Minibeasts and Draw Them from Memory – Bugs can be colourful and interesting! 🥚Take a Walk in 4 Different Types of Weather – No matter what the weather it can be fun to take a walk!
🥚 Go For a Walk and Find Some Puddles to Jump in – Who doesn’t like jumping in a puddle! Wear wellies!
🥚 Have a Musical Morning, Listening or Playing – Music can help you relax!
🥚 Do Some Finger Painting – Draw the trunk of a tree and make the leaves with your fingers! 🥚Play Eye-Spy on a Family Walk – Eye Spy is great for a range of ages! 🥚Do a Jigsaw on a Rainy Day – Jigsaws can be a fun family activity on a rainy day or a board game!
🥚 Build a Den or Fort Together – Who doesn’t love building a den! Cushions and Throws work well!
🥚 Draw and then Colour in something you’ve seen in Nature on your Walk, a Rainbow, Tree, Flower etc
🥚 Design your own Dream Car or Dream House (for older children to imagine)
🥚 Create Post for a Loved One and Walk to a Post Box to Send it – Draw a Picture or Write a Letter
🥚 Have an Afternoon of MESS with Messy Play or Fun with Paint or Food items – Paint and Rice Crispies…
🥚 Read More! Read as a Family, decide on what your Favourite Book is and why – Books help you learn!
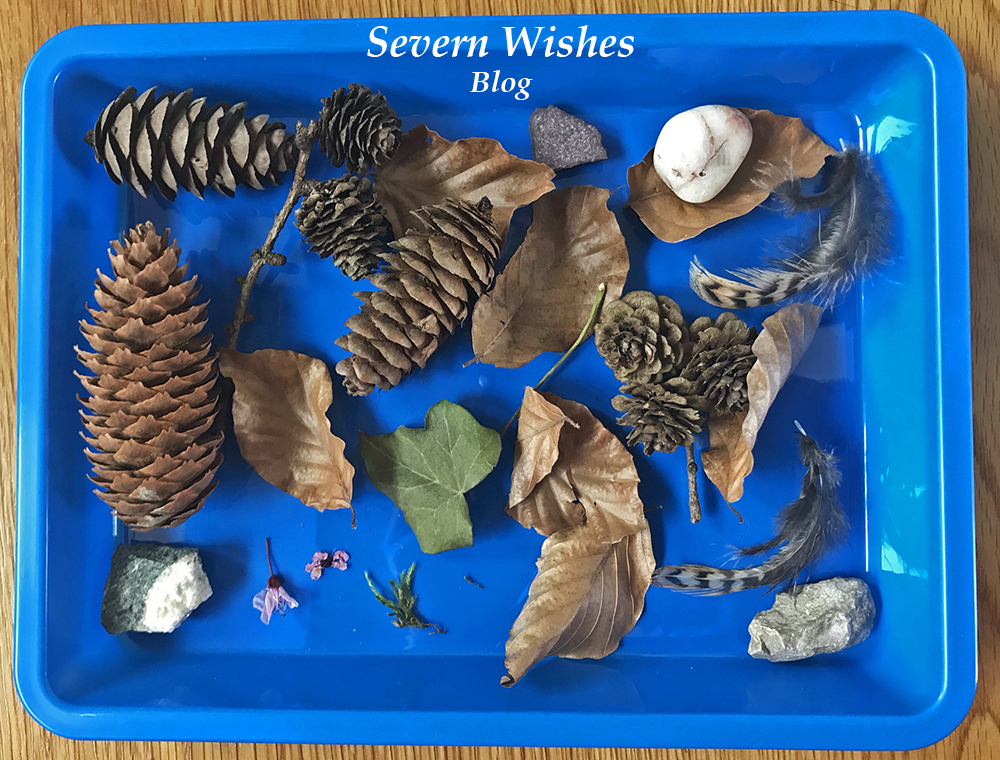
🥚 Nature Hunter Gatherers – Collect some things from in your local area to look at when you get home such as leaves and pinecones, things that have fallen from trees and bushes. Don’t deliberately destroy nature though! Fallen Leaves are great, discover what tree they come from by looking at the shape!
The image above is from when my son and I did a day of Nature Hunter Gatherers. It was a lovely warm day and we spent six hours outside having fun, games and walking. This activity is great for learning about where things come from such as pinecones and feathers. Make sure you do this on a dry day. We took a long walk through our village and picked up things that we found on the ground. Leave them somewhere cool and dry for a few days to dry out and make sure there are no creatures living in them before you handle them again!
I highly recommend getting some coloured trays like these, they were only £3 for a pack of 3 from The Works. Perfect for both Art and Craft and collecting things too!
✩✩✩
Picking Up Litter
If your children are a little older than mine you might want to pop gloves on when you go on your walk, take a plastic bag with you, and do a litter picking up hour in your local village or town. This helps the environment and the animals and birds in your area from getting injured.
🥚 Easter Ideas 🥚
You could also do Easter themed Drawings, Colouring In and Games such as an Easter Egg Hunt in your house or garden this weekend.
Check out my previous Easter blog posts for Art and Craft ideas and Baking fun… Here…
Thank you for reading this blog post today! I hope that I have inspired you to do at least one of these activities with your own family. Let me know in the comments section or on my social media if you get up to anything fun in the next few weeks!
I am fortunate to be an Argos Tester, this means that I often get items sent to me for the purpose of an online review. I test products and take photographs of them before submitting my findings and thoughts to Argos. For February I was offered Children’s Toys. I was excited at the thought of testing something that my young son would be a huge part of, and his opinions would matter during the reviewing process.
#ArgosTester #ArgosTesters #ArgosTestersCommunity
I have written this article about a product that I have been supplied for free, in order to test and then review it. This is my experience with said product and my honest review about the product which is listed below. I have already submitted my product review to the Argos Website when this post has been published.
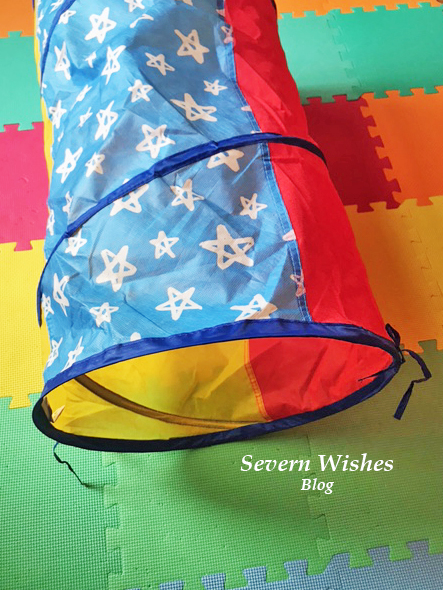
My Honest Opinion on the Product
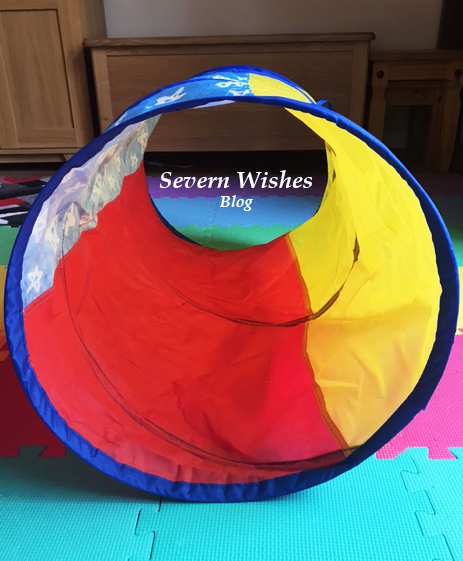
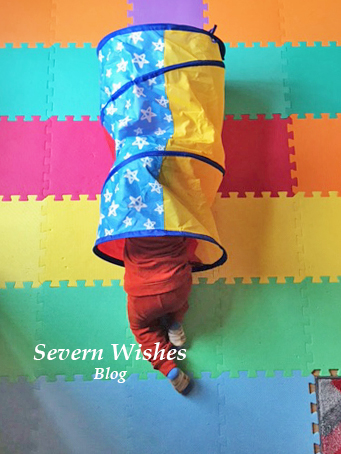
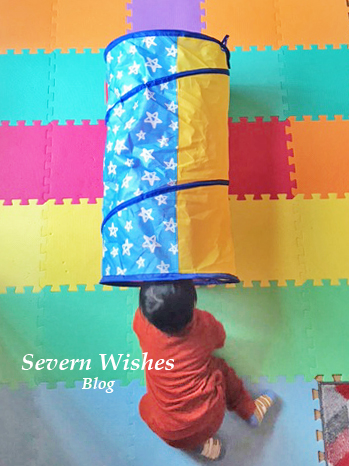
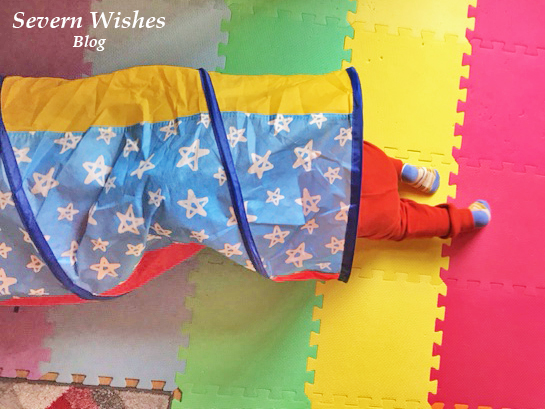
I have been rather happy with the overall look and quality of this product. The Pop Up Tunnel is something that doesn’t only entertain my toddler, but we can add learning into play and he also gets exercise indoors on poor weather days. It is bright and inviting and my son wanted to play with it immediately after I had set it up for him. I look forward to setting it up outside in the summer too on some outdoor play mats. I think it’s an excellent product for the price it is available at, and most children would have the imagination to be able to use it effectively. Because it folds away neatly it even fits into our large toy chest so it takes up no additional room. This product is ideal for any parents who may have a toddler or young child with lots of energy like mine. The best features are the ideal length (it is not too long to overtake your floor but long enough for a toddler to crawl through and have lots of fun), its bright colours and fun stars pattern, the genius tabs at either end so it can be securely fastened and put away for another day, and finally the imagination factor of it!
✩✩✩
Sabrina’s Top Tips for Using this Tunnel for Learning during Play
Once your child is used to the tunnel and is having fun with it, then there are several ways you can use it to increase learning while your child is playing. Words such as “Through” for them crawling through the tunnel is a good one, as well as “In”, “Out” and “Under”. You can also name the various Colours such as “Red”, “Yellow” and “Blue” and the “Stars” on the pattern too. See if your toddler can indicate which is which and say them back.
✩✩✩
Usage of the Product
The tunnel is made from material that is not waterproof, and is only wipe clean, so it is best used indoors and on a soft surface such as carpet, a rug or play mats. Keep food and drink away from it in my opinion. It will move around and slip easily on a wooden floor so perhaps look at where is safest in your home to set it up. Always supervise your child or children when using toys. The tunnel can be used outdoors in dry weather but I would suggest it was still set up on play mats still to avoid the material getting torn by anything sharp or pointed.
Product Name: Chad Valley Bright Stars Pop Up Play Tunnel
Product Details: A Red, Yellow and Blue Tunnel with White Stars. Ideal for children aged 2 years and over. Pop Up means it has minimal assembly required and also folds away neatly using the tabs at either end to secure and store reasonably flat. It is advisable to supervise children at all times while using this toy tunnel and to keep any sharp toys or furniture away from the material to prolong use. It can be used indoors or outdoors, but should only really be used on a flat and soft surface indoors, ideally set up on play mats or carpet. Due to the nature of the material it should be stored appropriately. Play Mats that can be set up outdoors is also a good idea when planning to use this outside because this tunnel is not waterproof.
Product Dimensions: H42cm W80cm D42cm
Product Description: Ideal for bringing children into a world of imagination. This tunnel can be anything they want it to be, and you can also use it with other items such as when children want to build a den for example. A tunnel to a secret dinosaur world, a secret passageway out into the world of spies… this can be whatever your child can dream up.
Argos Website Price: £8.00 (Correct as of 14th February 2021)
My Argos Tester Review Submission
My son was over the moon with this bright & fun tunnel he loves anything with stars on. It took no time to set up & easily packed away again, tabs either end secure it together almost flat so storage is no issue when not in use. A lovely item filled with possibilities with a bit of imagination, good for learning, teaching & great exercise on days we can’t get out of the house.
If you are interested in finding out more about this product then please click the link above in my Product Details section to go to the Argos website.
Thank you for reading this review, have a lovely day.
There are many ways to introduce toddlers and young children to nature. No matter where you live there will always be something to see. So here are my top tips on how you can start showing off the nature where you live, to your children. It’s never too early to start learning!
And I am sure that David Attenborough would agree with me when I say that “You’re never too young or too old to learn about the world around you”.
By making things fun children are more likely to learn and remember the information you are portraying.You can still stay safe at home but enjoy nature around where you live by keeping to social distancing guidelines.
Here are my Top 5 things to do at Home but Outside! Be it in your Garden or if you don’t have one you could just go on a Walk around your village or town or park. It may be lockdown but that doesn’t stop you walking socially distanced from other families.
Children are more likely to learn and listen if you turn things into fun and a game. So why not make your own games up, or take a look at my ideas below.
1. Bird Spotting 2. Bug Finding 3. Pick a Creature – Try To Find It 4. What Is That I See? What Is Around My Home 5. Eye Spy Lockdown Edition
1. Bird Spotting is easy enough to do, take a notepad and pen with you and write everyone’s names at the top. Make columns down the page and write down every different sort of bird that you spot. The person who spots the most species of birds is the winner!
2. Bug Finding is great fun in a small space, depending on how old your children are you could just spot basic bugs and say things like “Beetle” or “Spider” or you can go into what type of bug you are looking at such as “Stag Beetle” etc. You could even ask little ones to draw what they saw on the walk from their memory when you get back home.
3. Pick a Creature is a great game to play with children who already know what certain animals are. Take a walk and get everyone to pick something, one person might count Crows, the other Cats, another Pigeons, but whatever it is they have to keep score of their creature until you get home.
4. What is that I see? Use your knowledge of things around where you live and discuss things with your children like the seasons, if there are evergreen trees, what colour the flowers are you can find, any buildings and their purpose etc.
5. Eye Spy Lockdown Edition is literally eye spy but your children are only allowed to pick one type of thing during your walk. You could say just birds, or just objects, whatever is best for your children’s age.
Books I Recommend
I recently invested in several books for my son who is two and a half. He is interested in matching things up lately so I thought books with pictures of things to spot when we go out for a walk are ideal. I also have a number of nature books I have collected over my lifetime, anything with large pictures and easy to see nature depicting scenes are engaging for most children.
“Usborne Minis” are Great little books ideal to carry with you on a walk, and they have a range so you could pick which is most relevant to you and where you live, for example Birds, Trees or Bugs. There are always National Trust books and also RSPB for birds. Another great book I own is the DK Pocket Nature Wildlife of Britain book, it’s a few years old now but has excellent photography and information about British wildlife.
Of course you can always use a search engine on your phone to find out what you’ve seen, but the joy of these sorts of books is being able to mark things off when you have spotted them. The Usborne Mini book set have stickers for you to place on a grid inside the book in order to tick them off. This is great because you also have to identify the sticker as well as the creature or tree for example. Simple but it’s still learning at its best.
Thank you for reading this post today, I hope I have inspired you to get out and about in your area with your children (or just your other half). I have many more lockdown friendly ideas coming up over the next few weeks, so please check back another time if you enjoyed this post.
Have a lovely week!
✩ Sabrina ✩
By continuing to use the site, you agree to the use of cookies. more information
The cookie settings on this website are set to "allow cookies" to give you the best browsing experience possible. If you continue to use this website without changing your cookie settings or you click "Accept" below then you are consenting to this.