The Transition of moving my son from a Cot to a Toddler Bed, my Tips and First Hand Experiences plus Reviews of the Purchases I made.

If you’re reading my blog today you might be in the same boat that I was last summer, which is wondering if it were time to make the move for your little one. The transition to a toddler bed is not one to be taken lightly, it is a huge step for our little person, and they deserve lots of time, patience and assistance from us (as their parent/s) to help them feel safe and secure in their new upgraded space.

Hopefully this article that I have combined with my review of the toddler bed that I bought, can help you to make informed decisions on what is best for you and your child/ren. Is it time? Only you will know by the actions and dependence your child currently has.

When the bed was finally in place…

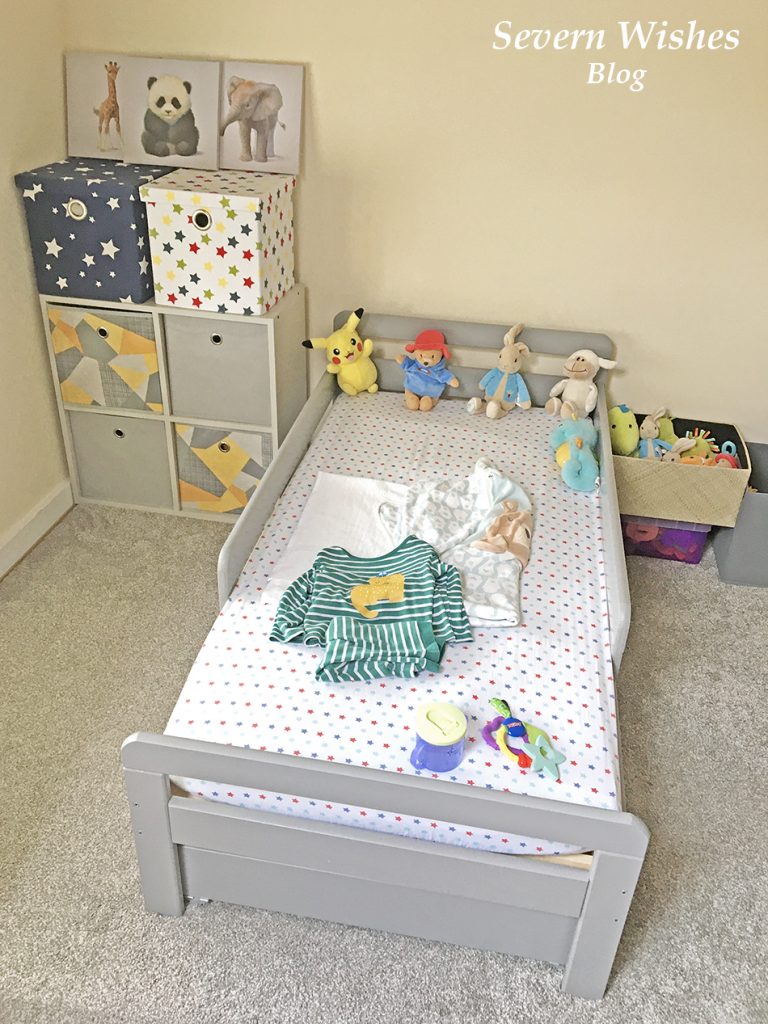
When my son turned two I wanted him to start using a toddler bed and there were several reasons why I thought this needed to happen now. The first reason was that it was difficult to lower him inside his cot when he had fallen asleep in my arms, and he was now tall enough to consider trying to climb over. I didn’t want that to happen, so I purchased his first toddler bed after measuring up the space that I had in his bedroom.

I bought the Argos “Ellis Toddler Bed” in Grey, to match my sons furniture, and then bought a mattress online. I had chosen this bed for three reasons, the first being its height from the floor, the second was that it came with a drawer for under bed storage, and the final reason was because of the three quarter sides.

My son moves frequently in his sleep and I knew that it would be quite a while before he could sleep safely without any sides to his bed. This bed was a great size for the price and I would hope it to last him two years at least due to the length. The handy draw keeps tidy all of the towels and bedding I use for my sons room and it is easy enough to slide in and out on its rolling caster wheels.

Bed Frame size L144, W75, H57cm.
Required Mattress size L140, W70cm.
Clearance between floor and underside of bed 19.5cm.
Drawer size H18.5, W139, D73.5cm.

There are now limited stock on this bed but it does also come in different colours. Here is what I would give it on my review scores having used it now for a whole year.


Quality of Paintwork 4✩
Quality of Manufacturing 4✩
Quality of Finished Product 5✩
Correct Specifications 5✩
Product Design 5✩


Overall this product is excellent quality and although it was difficult to put together, overall we have been very happy with it. A fantastic size for toddlers and small children and my son hasn’t fallen out of it due to the great design with those side bars. Although he is average height for his age (at 3) he still has plenty of room left to grow into this bed.

The Transition from a Cot to a Bed – My Tips and Tricks

The biggest thing about change for toddlers is that it can be unnerving to them. They get anxious and have to get used to something over time, so don’t worry if this alteration in routine and sleeping area takes a few weeks for them to get used to. The best thing that you can do for the first few nights is to keep the routine the same, but just place them in the new bed. If you have a routine that ends with them being placed into bed keep doing that.
Then on the second week add one new thing now that the child is older such as, can they now get into bed themselves because they are old enough to do so? It will make them feel bigger if they do it themselves and gives them confidence, but only when they are willing to get into bed on their own.
Don’t forget to use positive reinforcement when they are on the bed or in the bed so that the praise gives them positive ideals of being in the furniture.
Saying things as “What a lovely new bed you have!” and “Now that you are two/three you can sleep in this special big kids bed” and remember to let them know that this is a good thing, a positive step and not one away from you. Definitely praise little one when they get into bed without you having to prompt them too!

Getting the child to stay in bed is another matter though. Don’t worry if they frequently get out of bed or even tumble out of bed half asleep for the first few weeks, wondering where you are (especially if you have had them sleeping in your room up until this point). And the beauty of the toddler bed is its distance to the floor. They usually are only between 15 and 20cm from the floor.
Make sure to implement rules in their new bedroom, such as no toys after bed time. The child is not too young at this age to be putting their own toys back into a box or tub or basket, so why not start them off if you haven’t already done so (good practice for preschool).
I have found that it’s also a good idea to introduce a clock or show the time to a child at this age, and tell them that at “7 o’clock” (or whatever your bedtime is) their toys are put away and your bedtime routine begins.
Personally we are in the room for 7.30pm but it can take up to an hour to settle my three year old, some nights a story or two is enough and other nights I’m still reading at the hour mark. But it’s just imperative that you keep the routine the same, even if the time differs slightly, it’s still the act of doing things in the order that they are used to, and the act of then getting them into their own bed.


Talk About Their Safe Space

I tell my son every single night that he is “safe in his bed” and he is “safe at home with mummy” and this has reinforced him to stay in his bed. For the first few weeks if he woke in the night he would come and find me because he wasn’t sure on things. Now he’s more than happy to climb into his bed and choose the stories he wants at bedtime. He knows that I’m never far away now, but his bedroom is a safe place for him to be. He doesn’t always come and find me now that he is older either. He often wakes (and I hear him) but he presses his singing toy and lays back down or he will have a sip of water from his bottle and then turn over and go back to sleep.
Again positive reinforcement is key when organising their safe space. When little one wakes up they want to recognise where they are and that it is home or safe, favourite toys or items around the room will help.

If you find your little one is struggling initially with the bed transition then you could choose to sleep on the floor in their room for a few nights. Whenever they wake up in the night make sure they know that you aren’t far away and they are safe. It is totally normal for most children to find their new surroundings daunting, but remember to just keep praising and comforting, they will soon get there. All children are different and it could take a few weeks of patience to achieve the end goal, but everyone should sleep better once that is over with.


Ensure Comfort

Make sure that they are comfortable on a firm but soft mattress and that the room is an optimum temperature. I still use our Gro-Egg from when he was a baby to tell me the room temp! My son had sleeping bags until he was two and a half, he was happy to sleep in them until he got older then he kept trying to take them off. I gave him his own thin pillow at three years of age, and I now put him in Pyjamas and a blanket over him. I have bought a toddler duvet this summer ready for the colder winter months, now that he is old enough to be able to push it away from his own face.


Keep Stories Gentle at Bedtime

I have found that stories that talk about bedtime or going to sleep are best at bedtime, other books can just excite little ones too much. My son has an absolute favourite book about a bear and a baby bear and he’s on his way to going to sleep, and we read it every night. I can now recite it from memory while he falls asleep in my arms (that is how many hundreds of times I have read it). But it’s such a lovely and gentle book that talks about how much mummy bear loves little bear and she is never far away no matter what he is getting up to. Consider what you are doing during your bedtime routine and make sure that there is nothing that is causing your little one to become more awake as opposed to be falling asleep. The best books we have found come from The Works.

My sons favourite book that I highly recommend, we found it at The Works.

Thank you so much for reading this blog post that I have written today, I do hope that you have found it informative and if my lifestyle experience with my son can help you in some way then I am more than happy to share it.

✩ Sabrina ✩

September 2021 Treatbox Reveal and Review


Wow! Hello September!

Time to do the latest subscription box Reveal and Review for TreatboxUK!

This is box number 66 for me! Which is a crazy thought!

I have purchased so many incredible months of TB over the last 5 years!


What are all the items inside the box?

Treatbox Original Self Care Journal
Treatbox Original Colouring In Print “It’s all about finding the calm in the chaos”
Cotton Heart Socks
Seed and Bean Lavender Single Origin Dark Chocolate Vegan Bar
Pukka Night Time Organic Tea x 2 Individual Bags
Lavender Coloured Silk Eye Mask
Treatbox September Calendar Print


My Honest Opinion on the September Box

What a sweet box! When I opened it to discover the colour in card I instantly loved this idea! Colouring in the numbers on the sheet with a colour that best represents our day and how we feel, how amazing is that! And at the end of the month you get a whole beautiful picture to enjoy. Everyone’s pictures will be unique of course which makes it all the more special. I have used pens for mine so the colours really stand out, I will share my finished image on my socials at the end of September.

The other contents inside the box that I loved include the cute socks and the self care journal – another fab idea and another Treatbox UK original too. The eye mask looks very comfortable and is so soft.

I have yet to try the night time tea and the chocolate, but both sound delicious, the chocolate is Vegan and I’m intrigued about the flavour too, it’s Lavender Dark Chocolate Ooo!

Here are some more pictures of this months products.


Thank you for reading this Treatbox unboxing post, I really hope you enjoyed it.

Wishing you a happy and healthy September!

✩ Sabrina ✩

August 2021 Treatbox UK Reveal and Review

Well, Hello! Nice to see you again!

It’s time to Reveal and Review the August 2021 Treatbox!

I wanted to give time enough to let everyone receive their box before I revealed all the contents.

Contents of the August box…

3 Treatbox Original Cards featuring a Sea Theme
Blue “Smile” Toiletries Bag
The Soap Story – Sea Minerals Soap Slice
August Calendar Print
Sea Breeze & Fresh Linen Wax Melts
Pure Heavenly Chocolate – Dark with Sea Salt
Blue Onyx Precious Stone in Organza Bag
Treatbox Bingo Card – Summer Self Care

My Honest Opinion

What a fantastic box this month! I loved the Sea theme and how neatly all the items slotted within it. I also enjoyed seeing items that we have NEVER HAD BEFORE 😀 Yay! This makes me SO happy!!! After buying so many years of constant boxes from Treatbox I’m always hopeful to get useful items or unique pieces.

The precious stone and the smile bag are my favourite items this month. The Treatbox UK originals like the bingo card and the trio of summer sea cards are also really nice. You can choose to keep them or pass them on to someone to keep the positivity going! The soap slice made the whole box smell so nice! I am looking forward to taking a bath with that! And the chocolate looks delicious! I am saving that for a night in on my own! I am not a fan of wax melts, but they smell lovely, so I won’t be melting these but using them to make my room smell nice instead!

Thank you for reading this unboxing post, I hope you enjoyed it.
Hopefully I will see you again soon. Have a great month of August!

✩ Sabrina ✩

July 2021 Treatbox Reveal and Review

Oh isn’t this July Treatbox just Peachy!


Hey Everyone! I am hoping this blog Reveal and Review finds you all keeping well! I’m back on my blog after a short blogging break where I was spending time with family, just in time to bring you this unboxing! It was my son’s third birthday last week! I know, right? Three! Time is flying! It doesn’t feel like more than a week since I did the last Review! So here we go! Thanks for joining me today it means a lot!

So what was inside the July box? Well…

Peaches Fridge Magnet
Just Peachy Notes
“You’re Braver than you Think!” Keyring
Peach Hand Cream from BubbleT
TreatboxUK Original Meal Planner Pad

The Juicy Peach – Tasty Mates – Peaches and Cream Gummy Sweets
Treatbox Original Poster (to Colour in at Home) “Do NOT Forget to be Kind to Yourself”

What My Opinion Is Overall…

I loved the theme this month! Peaches was a very cool theme! With some Treatbox Original items amongst the fun vegan sweets and the useful hand cream, July was a fun box overall! A lovely little Keyring with its positive quote, a colouring page with an important reminder to all, and cute little notes with “just peachy” on them. I loved that we received a magnet tis month because it’s been quite a while since we had one. I am forever using my Treatbox pads as meal planners so to have one this month is really useful in my eyes! I love staying organised! I’m generally very happy with the July box and I’m looking forward to using the items and trying those delicious sweets!

Thank you for reading this unboxing post today, I hope you enjoyed it. Hopefully I will see you pop by Severn Wishes Blog again soon. Enjoy the summer sunshine safely!

✩ Sabrina ✩

June 2021 Treatbox Reveal and Review

That time has come around again for me to Reveal the contents of the Treatbox for the month. And I will then Review the products I have found inside. Welcome to the June 2021 Treatbox Reveal and Review.

Inside the June 2021 Box there was…

Treatbox Print “Note to Self”
A Bag of Popcorn Shed Cherry Bakewell Flavour
A Willow & Rose Compact Mirror
Grey Socks with Hearts
Vitamasques Vitamin C Cherry Brighten Mask
Treatbox Original Pin “You Got This”
Treatbox Notebook “You’re So Cool & I’m Not Even Mad About It”


My Honest Opinion


June 2021 was a box that I was feeling So So about to be honest with you, I opened it and got excited by only half of the box. As someone who is not a fan of cherry smell or taste I will be passing on some of these gifts to family members. I did however LOVE the Socks! Right up my alley! I didn’t think I needed yet another compact mirror, until I broke one of mine *face palm* so that ended up being a very appropriate item for me this month! The other products include the Treatbox original pin which is very cool! A little reminder of “You Got This” is always useful when I have moments when I am doubting myself! I was thinking of putting this one somewhere in my car! (Because my hallway and bedroom already have some pins on show!) The print is also pretty cool as is the little notebook. I would have just loved some stationery for a change instead of yet another notepad! I make lots of lists and notes and I have still not finished all the notepads I have received from my Treatbox subscriptions. That is food for thought perhaps! I would also love to see a month with no mask too, and replaced by something we could get stuck in to instead, like adult colouring, craft or something useful…

Thank you for reading this blog post review today, I hope you have enjoyed it, and that you pop by Severn Wishes Blog again sometime soon.

✩ Sabrina ✩

Spectrum Collections Zodiac “Dark Matter” Black Mascara, and Why it is My New Every Day Favourite

Today I am reviewing the Spectrum Zodiac “Dark Matter” Black Mascara.

When I bought this I was hoping to find myself a new “every day” mascara, both for easy application and removal. I don’t get a lot of time to do things like self care and to apply make up in a morning, so it has to be a breeze! I barely wear any makeup these days anyhow! But I did want something to make my eyes “pop” when I do go out, even if that’s just for a food shop.

After all, even though we are still wearing masks, your eyes are still on show aren’t they?! Might as well make them look nice!

With a thin brush and dark black mascara in the tube, this Mascara glides on easily and I found one tiny clump out of the entire first application to both sets of lashes! Already a huge tick for me, there is nothing worse than having to scrape off a ton of excess clumps of mascara lumps before you can begin applying it.

The tube is a small size but is ideal for storing at home or in a makeup bag to take out and about with you. A little application of it went a long way too! I found that it stayed on my lashes well, I didn’t end up with any fallout on my cheeks during the day, despite going out and about and doing some sweat producing housework!


When it came to removing it (I always use Garnier Micellar Water to remove my makeup) one cotton pad of micellar water was enough to clean it from both of my eyes. And I didn’t wake up to panda eyes the next morning having missed any which was great!

My Overall Review Scores

Appearance 5✩
Quality 5✩
Design 5✩
Staying Power 5✩

The Zodiac Dark Matter Mascara is an excellent product that I am very happy with.
Overall I rate it 5 Stars due to having tested it thoroughly in a range of daily scenarios, I was impressed with its staying power and the ease to remove as well. A fantastic product that is now my daily go-to mascara for an every day look.

If anyone is out there looking to get anything from Spectrum Collections (I recommend their brushes too!) then please feel free to use my referral code and get a discount of 15%.

REFERRAL CODE LINK

Why is it my New Favourite?

It is a wonderful little Mascara wand, with barely a clump in sight, easy application and removal! It’s just what you want in an every day Mascara! Lightweight, Black and Defining! Just Perfect!

I hope to see you on Severn Wishes Blog again soon I hope! Thank you for reading this review!

✩ Sabrina ✩

How to Make Pretty Mother’s Day Cards For Your Loved Ones and How to Create Beautiful Paper Flowers

With much of the United Kingdom still in lockdown and people unable to purchase their usual items for loved ones, I have decided to write this blog post to help people out. Mother’s Day is a special day for everyone who is classed as a Mummy, whether that is to furry children, human children, step children or children who may still reside inside us. It’s for Grandmothers, Nan’s and Great Grandparents too don’t forget, so why not make a loved one a card and let them know you’re thinking of them.

I have several ideas that should suit most people, because Mother’s Day Cards are usually floral or feminine, but you can personalise your design to fit the people in your life. If you can draw then even better! I’m not very good at drawing so I prefer to use paper and card to create pretty cards instead. This blog post is all about how I make cards using coloured card and paper.

WHAT YOU WILL NEED

Coloured Paper and Coloured Card
A Pencil
Items to Draw Around – to make the Circles for the Flowers
Scissors
Coloured Pencils or Crayons if you are Drawing
Pens – Mixed Colours and Thickness
Glue or Sticky Tape
Ruler
Coloured Tissue Paper
Pipe Cleaners

HOW TO MAKE YOUR CARD – 3D FLOWERS

Step 1. Take a piece of pale coloured card and fold it in half to get your card shape. Decide if your design is going to be a landscape or portrait style.


TOP TIP 1. When you come to make your shapes maximise the paper by doing them close to one another and along one edge. It makes it easier to cut them out but also and more importantly you’re not wasting any of the paper, and the leftovers can be used on your next awesome project!

Step 2. Draw around circular items in order to make your petals. Carefully cut them out and then fold them in half to create your three dimensional petals.


TOP TIP 2. The ideal size for the petals for an A4 Card design (an A5 when it is folded) are the size of a Nail Varnish bottle. Draw around the base of the bottle when it is stood up on the card. Another tip is to cut out one shape and use that as a guide to cut out the other petals so you get them the same size.

Step 3. Arrange your design on the Card first before gluing anything down, so as to make sure it all fits nicely.


Step 4. Glue or Stick the Card pieces down and finish decorating with any details or wording that you choose.

HOW TO MAKE A TISSUE PAPER FLOWER

You Will Need;
A Coloured Pipe Cleaner
Sheets of Coloured Tissue Paper

Step 1.
Lay out your tissue paper flat, you want to cut it into equal rectangles. Once cut you stack them one on top of the other.

Step 2. Fold the tissue paper stack into a concertina, like a fan, until it is all folded and flatten it down. Stick the pipe cleaner in the middle, folding it over and under the stack, then wrap the remainder of it around.

Step 3. Next you need to trim the edges of the tissue paper, you can round them off or make them pointed, it depends on how you would like your flower to look like at the end. This determines the shape of the petals of your flower.

Step 4. Once the ends are trimmed lay the flower concertina across your hand with the pipe cleaner part pointing down. You want to gently and carefully tease the layers of the flower up and out. Once they are all up spread them out and make it look like the petal layers of a real flower.

(There is a video tutorial on this on my Facebook page as well).

Check out my images below!

My Tips for Opening your Flower: Open the tissue paper out gently and carefully, you should start to see a fan shape at first, and then you can raise the inner layers of the flower, just start by pulling upwards towards the middle part where the pipe cleaner is so as to make the flower look three dimensional.

Step 5. When you are finished it should look like my images below. Bend the pipe cleaner a little to make it look like a flower. Fan the petals out gently to make it three dimensional.

Paper Flower Dimensions

It depends upon how much you trim on the ends to create the petal shapes of your flower, but here are some rough dimensions of the size that your flowers will be. The larger the flower the easier it is to fluff up. Why don’t you experiment like I have below with different shaped petals and layering different colours of tissue paper too!

Rectangle Size 20cm equals a 17cm flower
Rectangle Size 15cm equals a 12cm flower
Rectangle Size 7.5cm equals at 7cm flower

HOW TO MAKE YOUR CARD – Happy Mother’s Day – Their Favourite Flower or Favourite Item

Step 1.
Work out what your loved ones favourite thing is, then you want to write the words Happy Mother’s Day either vertical or horizontal on the folded A5 card. You incorporate those words into the item, such as the stem of the flower, or the base of an item like a slice of cake. (See my photo below for inspiration).

Step 2. To make a flower you need to cut twelve identical coloured card petals. Layer them up on the card to make the flower, don’t forget the middle bit either.

TOP TIP 3. If you want the petals to all be the same cut one and then use that one to draw around to make the additional ones.

Step 3. Other things you could do include a slice of cake with a triangle piece of card decorated with smaller shaped pieces. Or draw an outline and let smaller children colour them in.

Another easy thing to do is a card of family hand prints.

Other Card Designs that are Easy to Achieve are…

Flat Flowers
Three Dimensional Flowers
Drawing Bouquet of Flowers
Family Hand Prints
Cake Slice Drawing
Favourite Animal

Use a Ruler and Pen to make the stem lines and the bow, colour them in with pens and draw little flowers on the end of the stems. I did daisy like shapes, but if you can draw better then me be creative with it! Do any colour combination that you like. Add some wording around your design like “Happy Mother’s Day”.

I really hope that you have enjoyed this blog post and find it beneficial. If you do make some cards I would love to see them! Please tag me on any of my social media using the hashtag #SabrinasArtandCrafts

Thank you and I wish you all a lovely Mother’s Day.

✩ Sabrina ✩

Argos Tester Review of the JLAB Talk Pro USB Microphone and it is an Awesome bit of Tech

I am very fortunate to be an Argos Tester, this means that I often get items sent to me for the purpose of a review. For November I was offered technology related items. I was excited at the prospect of testing something that would be so useful to me with my writing.

#ArgosTester #ArgosTesters #ArgosTestersCommunity

This post has been written by myself about a product that I have been supplied for free, in order to test and then review it. This is my experience with said product and my honest review about the product that is listed below. I have already submitted my product review to the Argos Website when this post has been published.

Argos Tester Review

The Talk Pro is a professional piece of tech that is simple to set up & easy to use. It looks so stylish with the black & blue design & has varying modes for different types of sound streaming & recording. I have used this microphone with a speaking voice, singing voice & a narration type of use. The microphone sound on playback was clear & of excellent quality. Overall I am hugely impressed  by this tech & I will be retiring my four year old current mic in favour of using this one, the quality surpasses anything I already owned.

PRODUCT DETAILS

Product Name: JLab TALK PRO USB Microphone

Product Information: The Ultimate Professional Microphone. This piece of tech has 4 Different Pattern Modes and 3 Condensers that suit all types of microphone usage. This is ideal for Streaming, Gaming, Narration, Singing, Meetings, Duets, Dual Voice Synchronisation, Recording Music and / or the Voice. With Volume and Gain controls and easy to use buttons and levels, it is simple to set up and use. With a 3m long cable, and a USB connection this Mic can be set up quickly for a wide range of reasons.

Product Price: £149.99 (RRP)

Product Link to Argos Website: JLab Talk Pto USB Microphone

My Honest Opinion and Thoughts on the Talk Pro

The JLAB Talk Pro Microphone is both professional looking and clear sounding. I have tested this thoroughly with Narration over video, simple voice recording, singing into the microphone and more. As a blogger and gamer a piece of equipment like this is essential for good video editing. I’m very lucky to have gotten the opportunity to have this particular product.

What I really like about the Talk Pro is how sturdy it is. Inside the box you receive a base for the microphone, this is not only strong but easy to attach and assemble to the microphone itself. You gently pull the legs of the base away from one another until you can stand it up on a flat surface. It looks very professional once it’s all set up.

I like that the colour scheme of Black and Blue compliments the design of the microphone, such as the Blue lights indicating volume and which mode you are using, in correlation to the Blue accents on the physical piece of equipment, such as the base tripod. An aesthetically pleasing piece of tech.

The sound quality during both streaming and recording whilst using this device is hugely impressive. I have a four year old mic from another brand which has served me well for my blogging years so far with creating video narration and things. I have now discovered however, after rigorous testing on my part, that the quality of sound from the Talk Pro is on a totally other level. Not only is there clarity but it picks up everything in a quality that, even when being recorded, is maintained throughout the piece, be it speaking or singing.

Overall this piece of technology is simple to start using for anyone who needs a clear way of getting their voice heard and recorded. Great for multiple uses such as work as well as hobbies. I am very satisfied with the product and highly recommend it for anyone who relies on a good microphone quality on a regular basis.

Thank you for reading this review, I hope you have enjoyed it. You can purchase this product or read more about it by looking online from Argos, I have left the link in the product description above. If you have any questions about it please leave me a comment below and I will do my best to answer them.

✩ Sabrina ✩

Sabrina’s How To Make Your Own Unique Gift Tags This Festive Season

I have always had some creative flare, but one thing I had never done before was to make my own Christmas Present Tags! I came up with lots of ideas while spending time at home.

I took the plunge this November and ordered the things I would need to design them. I already had two awesome sets of Staedtler Pens in both fine line and bold. I also had various sequins. But I needed the tags and the string. I tried my best to use natural string and cardboard that was made from recycled materials.

What you could do if you can’t get any of these brown tags, is to cut up some old Christmas Cards and make them into similar shapes like these, add things like sequins in order to sparkle them up.

String Christmas Lights

The easiest of all my tag designs to make, you will need both thicker pens and fine pens of the same colour. The trick is to create the light shape with the finer pen and then colour it in with the same thicker style pen after. Make sure you leave the small crescent shape on one side of each light bulb so it looks three dimensional.

Begin by drawing the lines and bulb attachments with one pen, dark colours work best for this part. Then choose the pen colours you want for your bulbs. Ensure you don’t put the same shades next to one another and alternate colours like Red and Green for a Christmas look.

The size of your bulbs will depend on how many you want to do across your tag. If it’s just lights and no writing then you can fill up the space. If you plan to write “Merry Christmas” for example then perhaps do the lights top and bottom of the tag and leave the middle area blank.

Check out my images for some inspiration. Give it a go on a piece of plain paper and decide which way to do your bulbs, before doing them on to a tag.

Snow Scene with Tree

If you aren’t very good at drawing then you can still achieve something like this tag, just take your time and follow my instructions.
Check out my videos on my Facebook Page too!

You need a brown pen, the finer the tip the better, and you want to start by drawing the outline of your tree. Fill in the branches afterwards, getting smaller to the ends. Next to add a 3D aspect to your tree draw circles for holes and darken undersides of larger branches and the trunk to add shadows. Use a silver, white or light blue mixture of pens now to create the snow. You could do a snow scene or just do the tree. Be creative and have fun! Look at mine below for some inspiration.

The Christmas Tree

I quite like the abstract or deconstructed Christmas Tree type of tags. Mainly because when I try to draw symmetrical and lifelike trees they never look quite right. If you’re good at drawing trees however, then putting one in the centre of a tag would look really great!


Use a nice dark green pen for your tree. Add either stick on crafty bits and pieces or draw on some festive decorations, or do a bit of both! PVA glue is best because it will dry clear! If you want to do a more 3D tag then glue dots or adhesive squares also work well too.

Me on the other hand, I prefer to do the continuous line and have a sequin star on the top, kind of a tree!

Christmas Sparkle

If you have various diamanté, sequins or sparkles you want to use on your tags then you need to come up with designs that suit them. Check out my tags below for some ideas. Hanging decorations or bauble type designs work best for rounded craft items.
Think about when items hang on a tree, what they look like. Window decorations like a line of hanging stars or snowflakes are also very nice.

Sequins can be used on their own or accompanying pen lines.
Use your imagination and design your thoughts on a piece of plain paper first using a pencil, once happy with it, you can then transfer the ideas to a tag.

You can purchase the brown tags in most craft shops, online at places like The Works, Hobbycraft and Amazon. Try and pick ones that are already made from recyclable material.

I had previously bought my pens online from Amazon, Sequins from The Works and my Glue is also from The Works too. Other crafty items have been purchased by me over the years from various shops and also Tesco superamrket, they had a nice range of sequins this year too.

Other fun tags include, “Merry Christmas”, Holly, Baubles, Rudolph, Robin, Christmas Trees, Christmas Lights, Snowflakes, Snowmen, Santa Claus, Snowy Scenes, Penguins, Stars and things such as “Ho! Ho! Ho!” and “Let It Snow”.

Thank you for reading this post today, if you do give making Christmas tags a go then I would love to see them! Tag me on social media using the hashtag #SabrinasChristmasCrafts

Have a great Christmas!

✩ Sabrina ✩

You can see my tutorial videos on my Facebook page here…

Sabrina’s Dairy Free No Bake Cheesecake Recipe

Dairy Free Coconut and Vanilla Cheesecake with Dark Chocolate Shavings
Method Step No.4

Sabrina’s Dairy Free Cheesecake Recipe

Ingredients


120g of Dairy Free Spread
250g of Biscuits (I use Plain Digestives and Oreos)
240g Free From Tesco Soft Cheese (2 tubs at 170g each)
100g Caster Sugar
1 Teaspoon of Vanilla
100ml of Double Vegan Cream

Method

1. Crush your biscuits, whatever way you like! Food Bag and a Rolling Pin! Food Processor, you want them fine with not many chunks.

2. Melt your dairy free spread in a saucepan on a low heat, once liquid pour in your biscuits just a quarter at a time, keep stirring with a wooden spoon until all the melted spread and biscuit crumbs are combined.

3. Pour this into a cake tin or glass dish, round is best, and press down firmly. You want to refrigerate this base for at least four hours before adding the topping.

4. For the cheesecake topping you need to take a large bowl and using a wooden spoon, you beat the soft cheese and the sugar together. Mix until smooth, add the vanilla or any other flavouring you would like at this point. You may want to use a food mixer or hand mixer for the next part to make it easier.

5. Whip up the double vegan cream until it forms peaks, it should be smooth, then using the wooden spoon gently combine it with the cheesecake topping in the large bowl. The mixture should be folded together and stirred gently. Try not to over whip the mixture.

6. Once the base is chilled you can spoon this cheesecake on top, use a spatula to level it out. If you want to add anything like fruit or chocolate, you are better leaving that until serving or at least the next day so that the cheesecake is totally set.

7. Remove from the fridge about twenty minutes before serving. This cheesecake will last up to 5 days in a fridge. Make sure that you cover it fully before leaving it in the fridge when it’s finished.

Method Step No.3
Method Step No.5
Method Step No.6

If you need any help with this recipe then feel free to leave me a comment and ask me anything. If you make a cheesecake you can tag me on my social media and let me know how it turned out! I would love to see your creations! Because the cheese alternative is coconut based, you should try and pair your flavourings with the coconut for a tasty combination.

I did Vanilla and Dark Chocolate shavings in mine. I would be tempted to do either Lemon or Mango.

✩ Sabrina ✩