Sabrina is a Lifestyle, Parenting and Product Review Blogger. A Writer, Photographer, Reviewer, Home Cook, Crafter & Nature Enthusiast. You will find a bit of all those categories here on Severn Wishes Blog, Welcome to Sabrina's Lifestyle Blogging & Honest Reviews.
Welcome to Severn Wishes Blog where I, Sabrina, regularly review a wide variety of things such as this Treatbox! This subscription box has been going for years and I buy one every month as a gift to myself. I review said box here on my website and showcase the products on my social media platforms too, it’s known as Sabrina’s Reveal and Review.
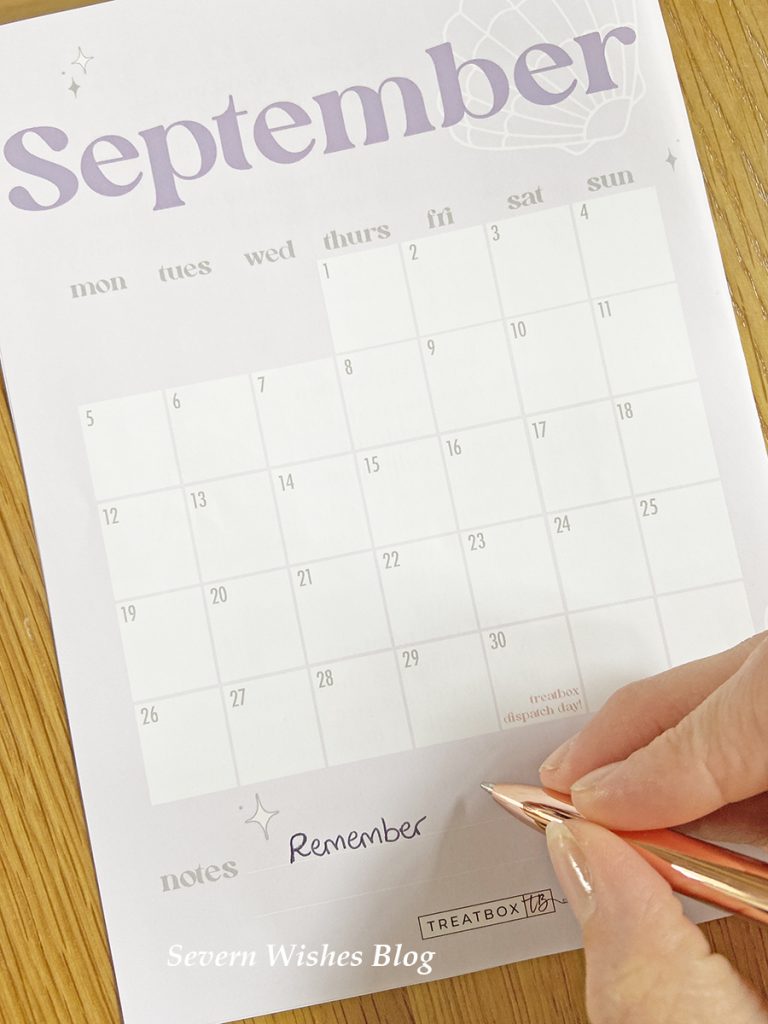
So what’s inside the September box? Well this month our Calendar Print reads “holding on to the last bit of summer” and I am so glad that they did! I’m not ready to admit that it’s over with for yet another year.
A beautiful lilac tissue paper and a white heart sticker leads me into unwrapping a box filled with pretty pieces and Treatbox UK originals.Let’s see exactly what’s inside…
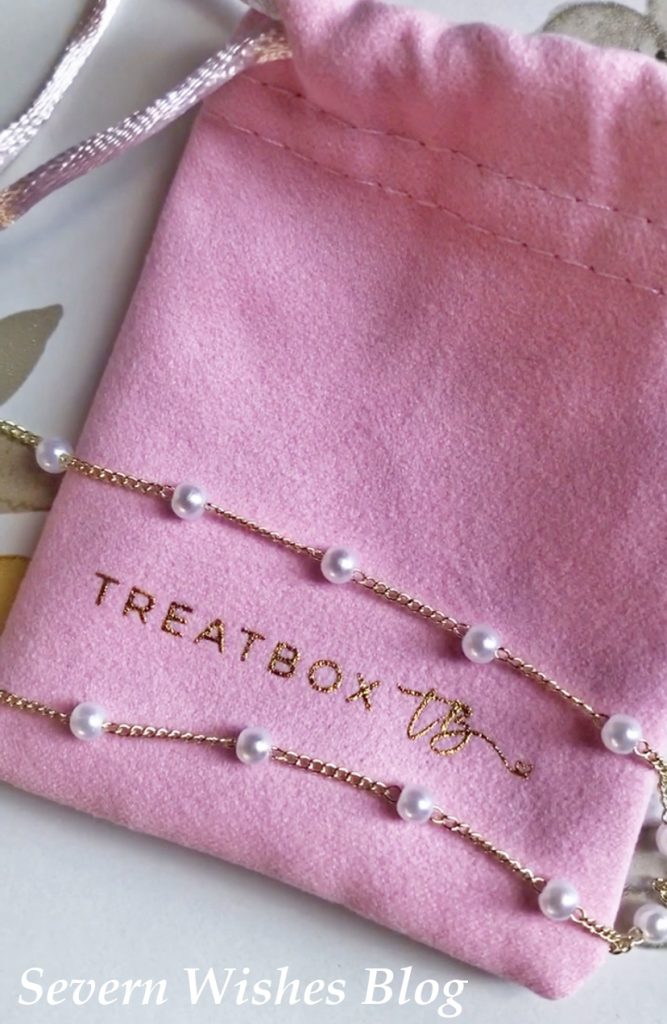
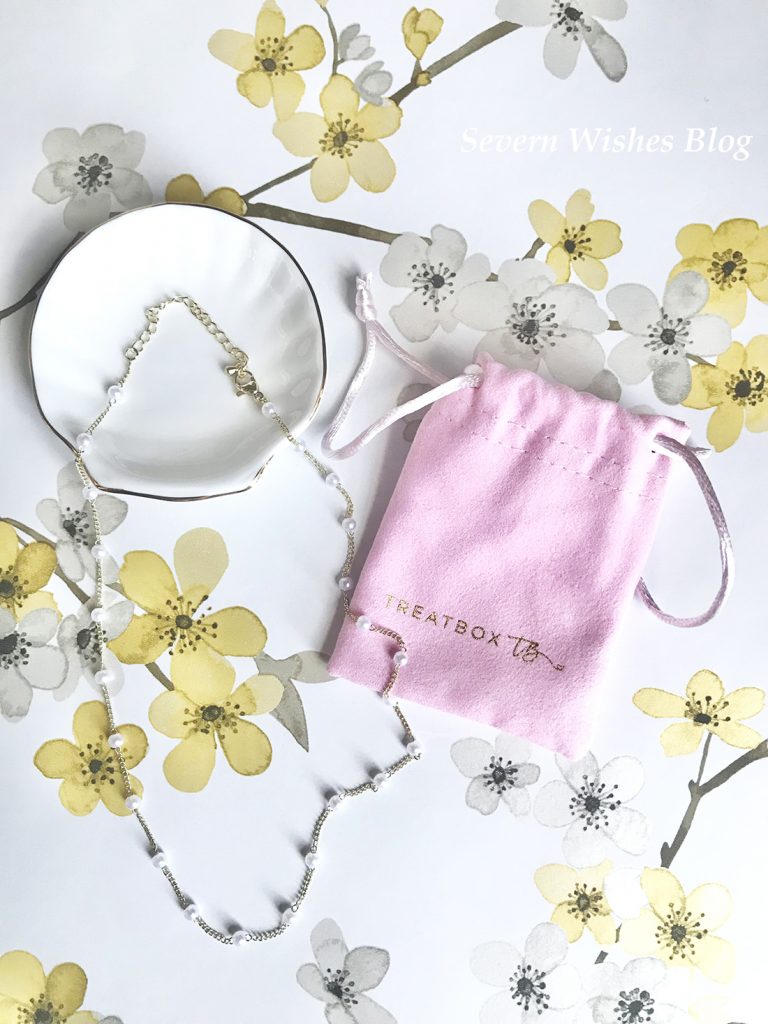
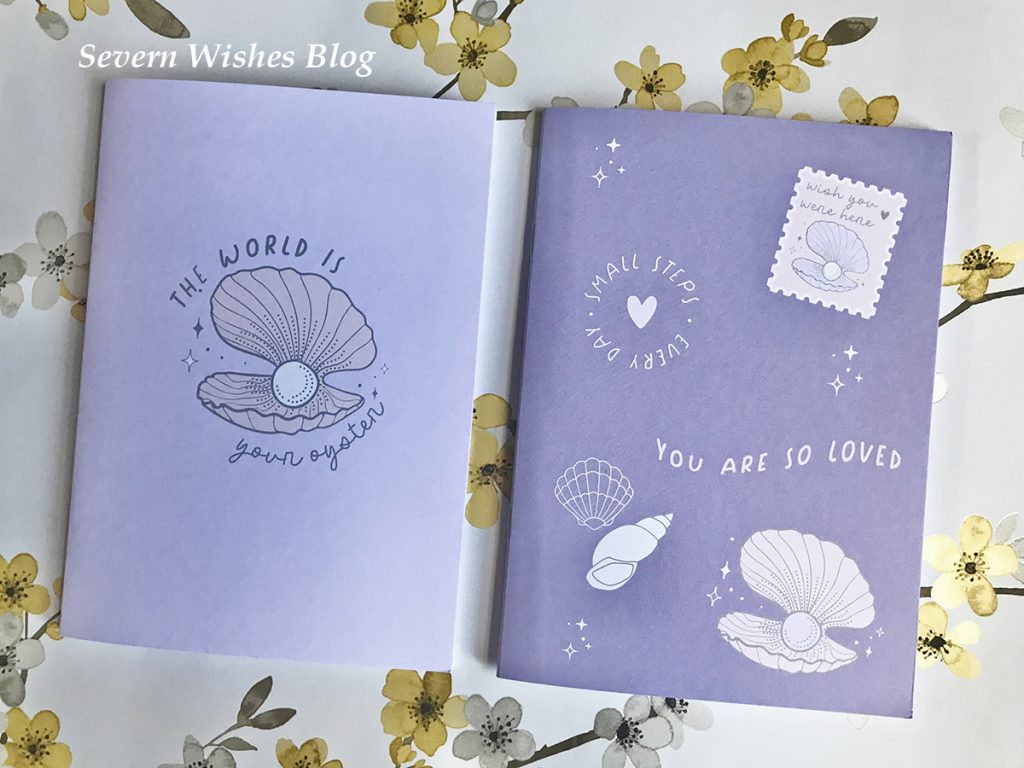
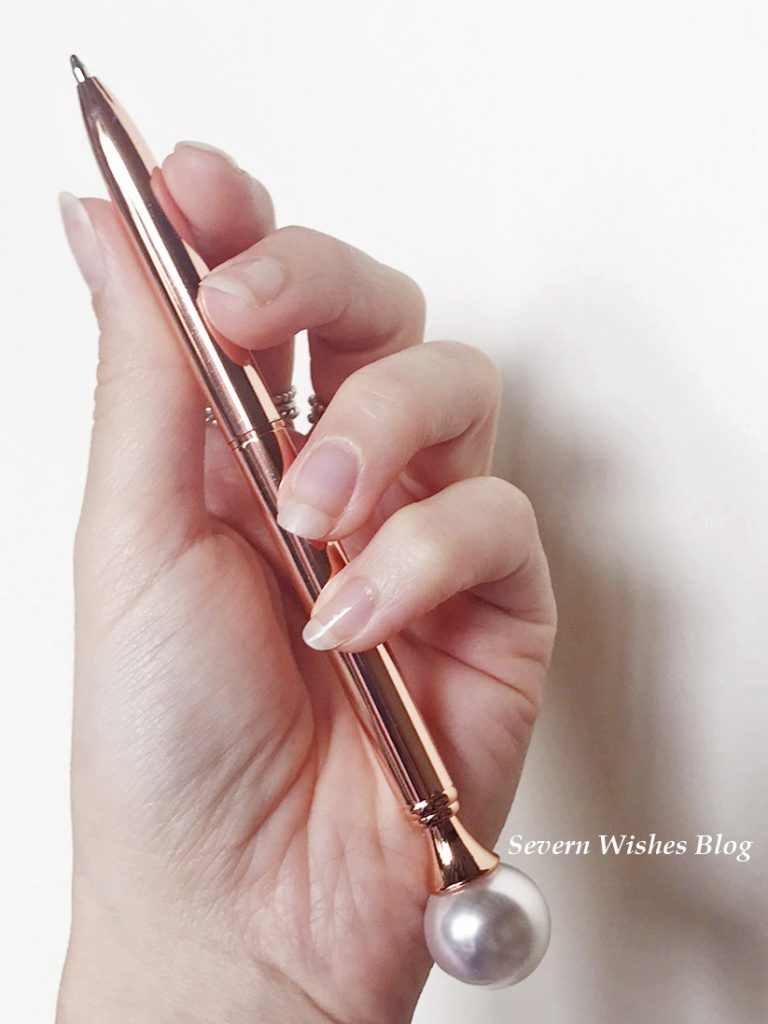
Treatbox Original Calendar Print ~ September 2022 Treatbox Original Blank Page Notebooks with Seaside Design x 2 A5 Treatbox Original Item – Pink Jewellery Bag with Pearl Beads and Gold Chain Oh K! Age Defence Hand Mask with Bakuchiol Shell Shaped Trinket Dish in White and Gold Stationery ~ Rose Gold and Pearl Topped Pen Daily Concepts Multi-Functional Mother of Pearl Soap Sponge
Here are some more of my photographs!
What Are My Thoughts?
Overall this is a very nice box filled with several items that we have not had before from previous months. The necklace in its own original Treatbox bag, the original designed notepads and the trinket dish are stand out items for me due to their quality and appearance.
The other items are also good and I look forward to trying out the hand mask this month and using the pen. I tried it out already and it’s black ink inside and writes nicely and smoothly.
I really look forward to giving the sponge a go as well! Keep a look out on my social media images for the products in use over the coming weeks.
Thank you for joining me for another Reveal and Review from me, Severn Sabrina!
Don’t forget to follow me on social media for more updates and individual product reviews too. Search #SevernSabrina or #SevernWishesBlog
Anyone who has ever put a child in school will know that there is so much to remember that it can make your head spin. For example, last weekend I labelled shoes, 37 items of clothing, 7 lunch boxes and a variety of other smaller items. Your child will have a Bag, a Lunch Box or Bag, quite often a Book Bag, a PE Kit and Bag as well as maybe other things to take in with them too. It’s a lot of work for one person (a single parent like me) to handle, and there are time saving ways of doing things and ways to make it easier on yourself too. Let’s see what ideas I have below and what I have done during these last two weeks in preparation for school starting up again.
Yearly Wall Planner and / or Yearly Diary Get a year long wall planner and some little round stickers to keep track of everything, make a key at one side and then add any appointments, school trips, swimming days, special dates (like those where additional things are required like dressing up or concerts) and keep updating it every time you know a knew agenda item. This is useful as well for the non-school days and other important reminders too such as Dentist, Doctors or Opticians for example. I think I would be lost without my wall planner.
Weekly Planner A weekly planner is also something that I have on my dining room table, it’s so that on a weekend I can prepare for the week ahead, read up on any paperwork sent home from school on a Friday and let my child know what is expected of them for that upcoming week. It could be school photo week or they are expected to bring an item in for show and tell, but we will know not to forget because of the planner. I can also arrange this planner in a way that has both adult and child organised, as well as meal planning if I have items to be used on a certain evening. A useful item and much better than a phone calendar you may forget to look at, but if you sit down to eat as we do together as a family, the planner is there for you to go through so everyone knows what is what and where and when.
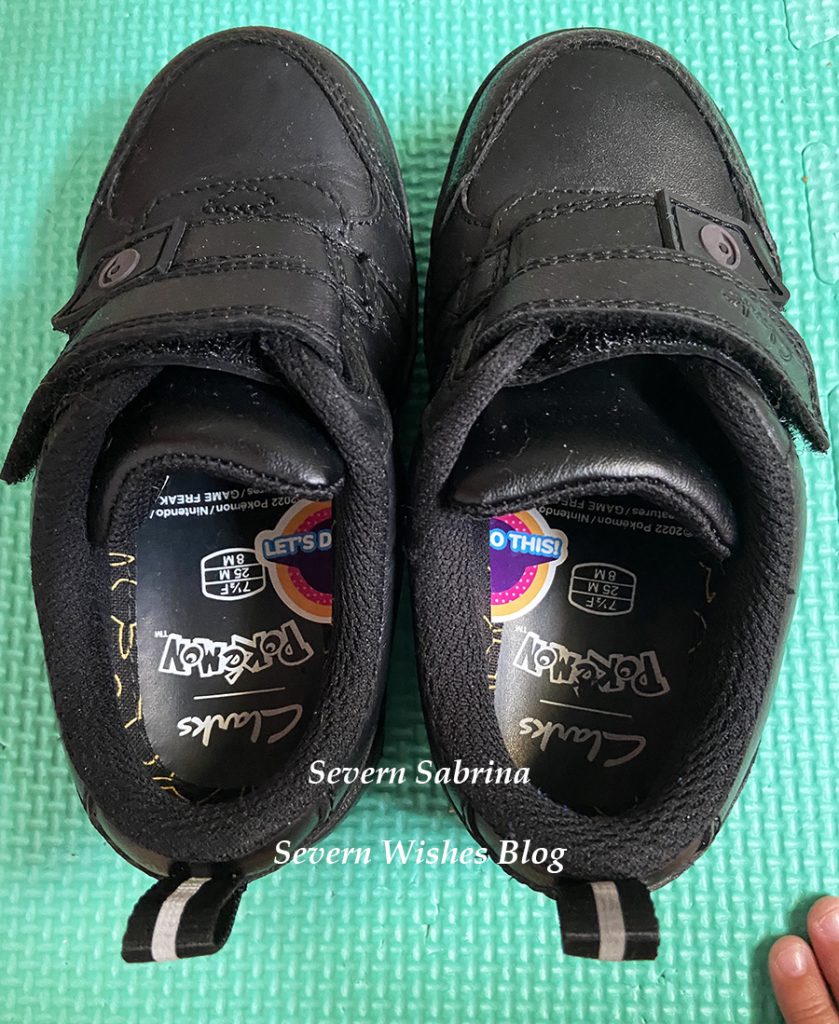
Labelling – It is so Important! Label all of your children’s items for school including their lunch boxes, clothing, bags and shoes. There is nothing worse than them going to school and losing something, and because it’s not labelled it’s unlikely to be returned to you. Schools tend to have lost property boxes that are checked at the end of every day or the end of the week and the items appropriately returned, but this cannot be done without labels. I used a permanent laundry pen to write on my sons clothing labels, and I used stickers for the more solid items. Consider using their full names or even getting their own personalised stickers printed as I have done. Especially if your child has a popular first name.
Use the halved sticker hack for getting your children to put their shoes on themselves and to ensure that everyone knows which shoe is who’s. The sticker inside hack allows them to put their shoes on the correct feet every time and it’s genius. Simply cut a large sticker in half and place either side of it into the shoes. When the shoes are correct the sticker will match and the child will know that they have the shoes the correct way to go on their feet. See my photo below for inspiration.
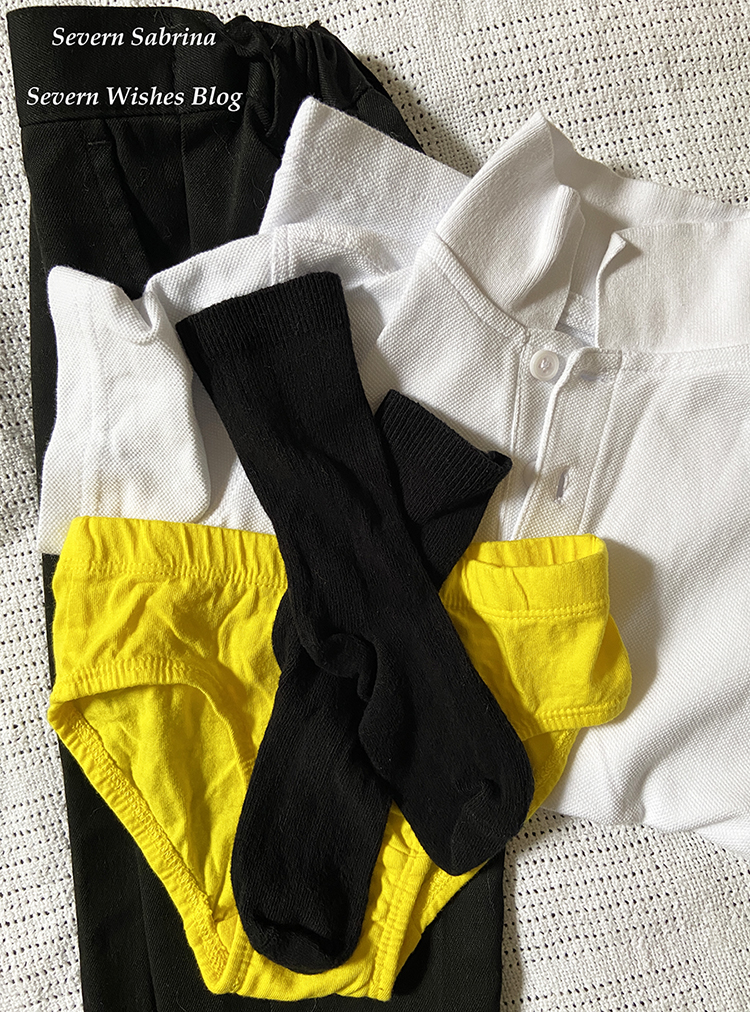
Clothes Piles per School Day Fold up any school clothing into “day piles” in their bedroom on a weekend ready for the school week ahead. This hack of mine is so useful, I did it over the summer too with day clothes as I was getting my son to practice getting dressed by himself. It’s so that I don’t have to police every single item of clothing going on every morning. My son has pants with the days of the week on them, and because that’s the item he will put on first he then has a pile beneath that. So you start with a pair of pants with his daily school uniform laying under it. Pants, Socks and Trousers, then his Polo Shirt last and his jumper is always downstairs and the last item to go on (to save any breakfast getting on it). It’s also so much easier on a Sunday to just make these piles up and put them in the correct bedrooms ready for the week. If you have to wash midweek, even doing two piles of clothing is better than searching drawers first thing on a Monday morning for that missing sock.
Save On Washing – Remove at the Front Door This is always a good one! Take off their school jumpers and any “still clean” uniform pieces as soon as you get home through the door before they have time to get messy and creased. Hang the jumpers up especially on hangers close to the front door ready for the next morning. This helps save on the clothes washing and the ironing by hanging them up safely as soon as they take them off. And it’s always a good idea that a school jumper be the last item to go on in a morning routine anyway, after breakfast and teeth brushing so that it stays cleaner for longer.
Something else you can do to save on washing is always wash with full loads, if that means you get to Thursday and it isn’t full yet then why not consider wearing those similar colours yourself so as to fill up the load space.
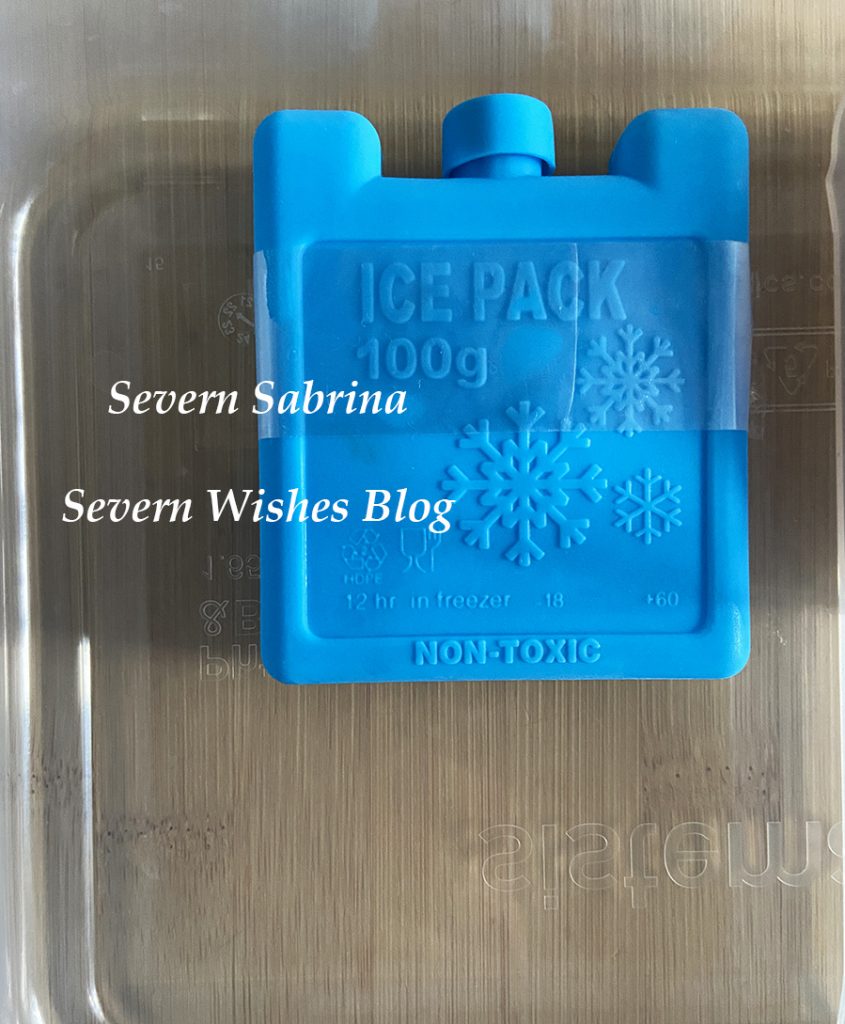
Mini Cool Blocks Investing in some mini cool blocks so that the children’s lunch food stays fresh is important during the warmer months of the year. I place a block under a removable plastic section of his large Sistema lunch box, or I place it at the bottom of the small cool bag I send with him. It’s important if he’s wanting chicken for his lunch which should be maintained at a low temperature to prevent it going off. These are great for adult lunches and days out throughout the year too.
Practice Makes Perfect and Less Stressed Children Practice the opening and closing of lunch boxes, bags with zips and coats too. We are getting to that time of the year where bags need to be closed from the weather and our coats need to be zipped up. During the summer holiday we might not have used those items very much so it’s good to refresh your children’s memories by having them practice doing these things again. Lunch boxes are another one, as they might have a new one this term and you’ll need to make sure they can safely open and close it in order to get at their food or snacks. It’s important that your children drinks enough water while they are at school too, so get them a reusable water bottle that they really like and will continue using throughout the day.
Thank you for reading this blog post today I really hope that you’ve liked it and found at least one of my ideas to be useful. By getting yourself and your family into good habits like these early on, it will make sure you have more time and energy to deal with anything else that happens. Because life nearly always throws you a curve ball when you just about have everything under control am I right?
I hope I see you again for another of my parenting articles, I hope you have a lovely month of September with (I also hope) minimal stresses.
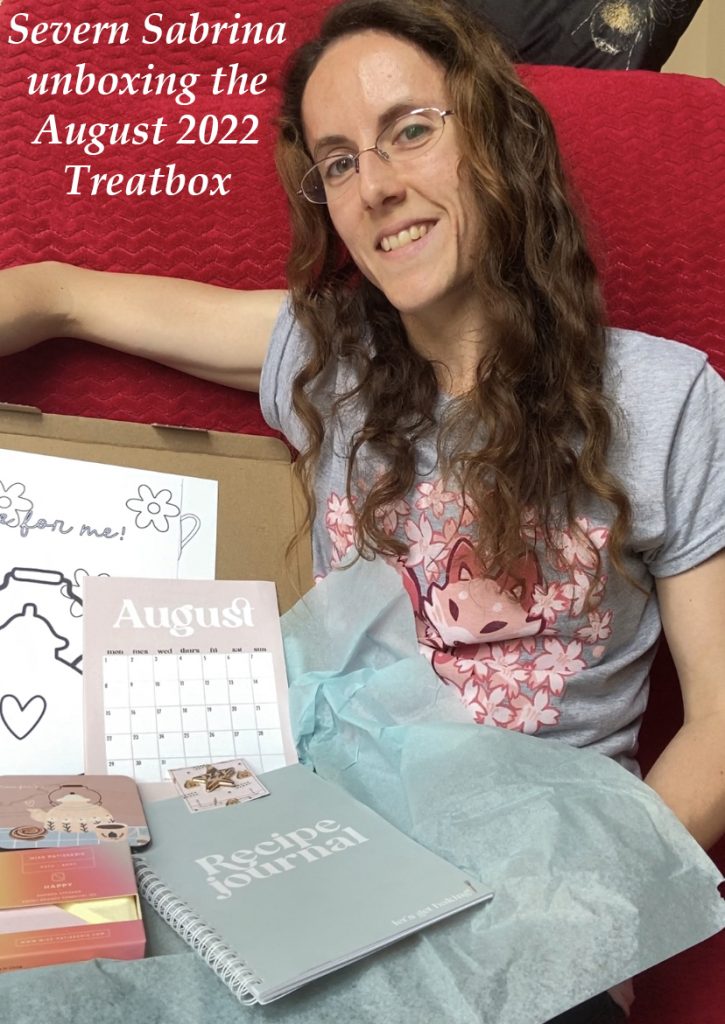
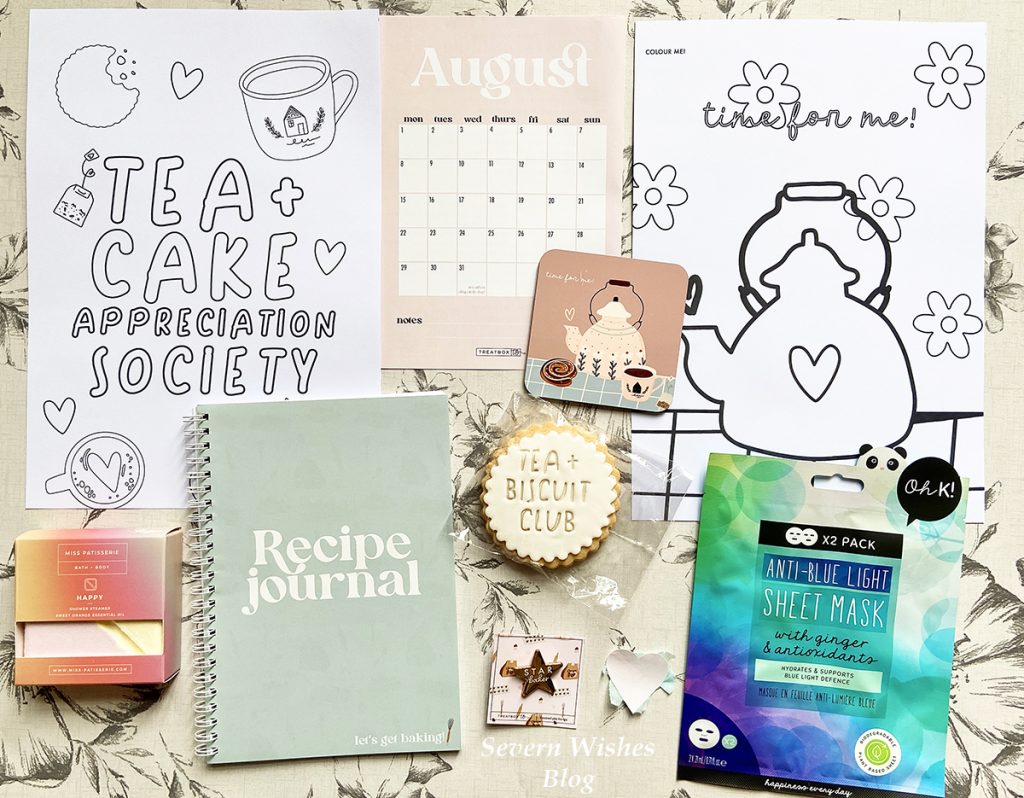
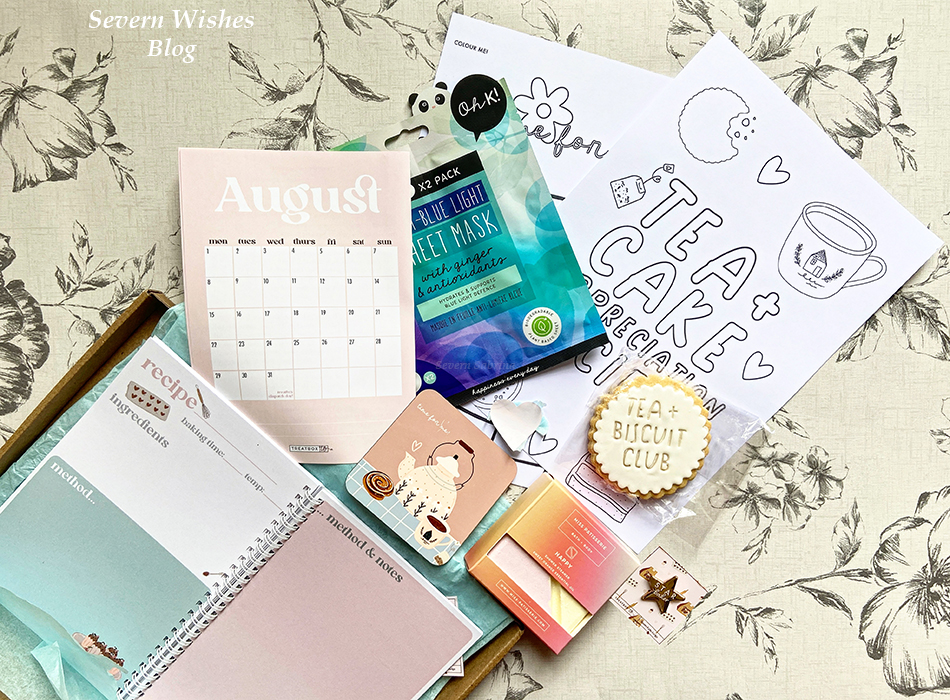
So what did the August box offer us for this month of treats?
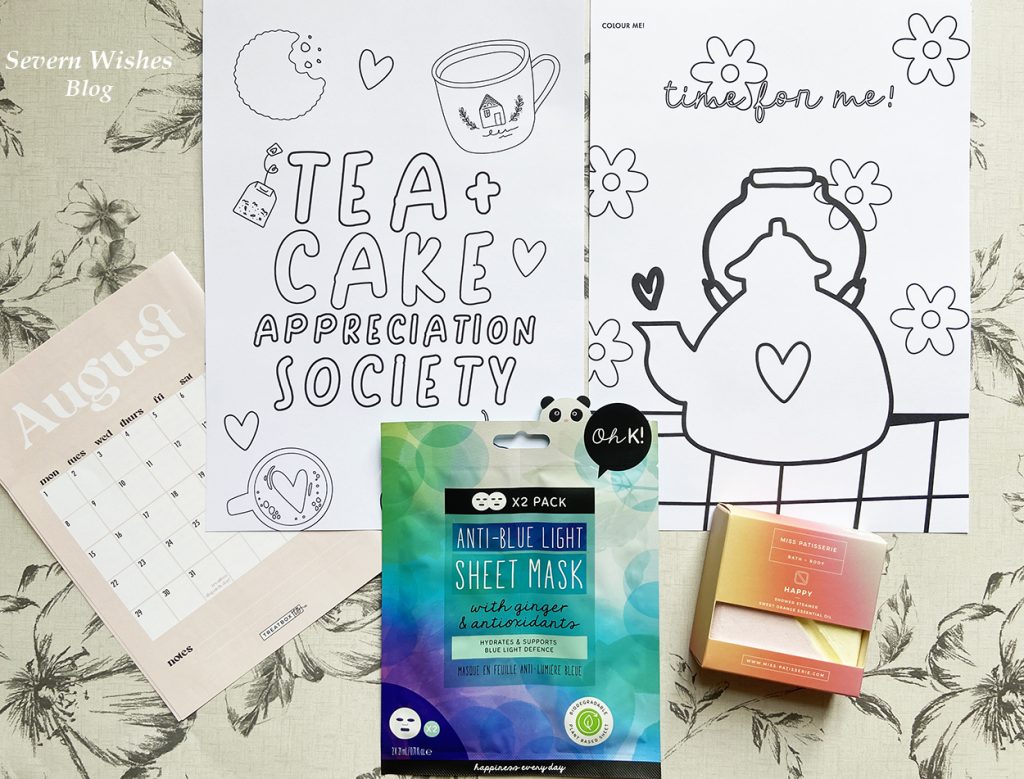
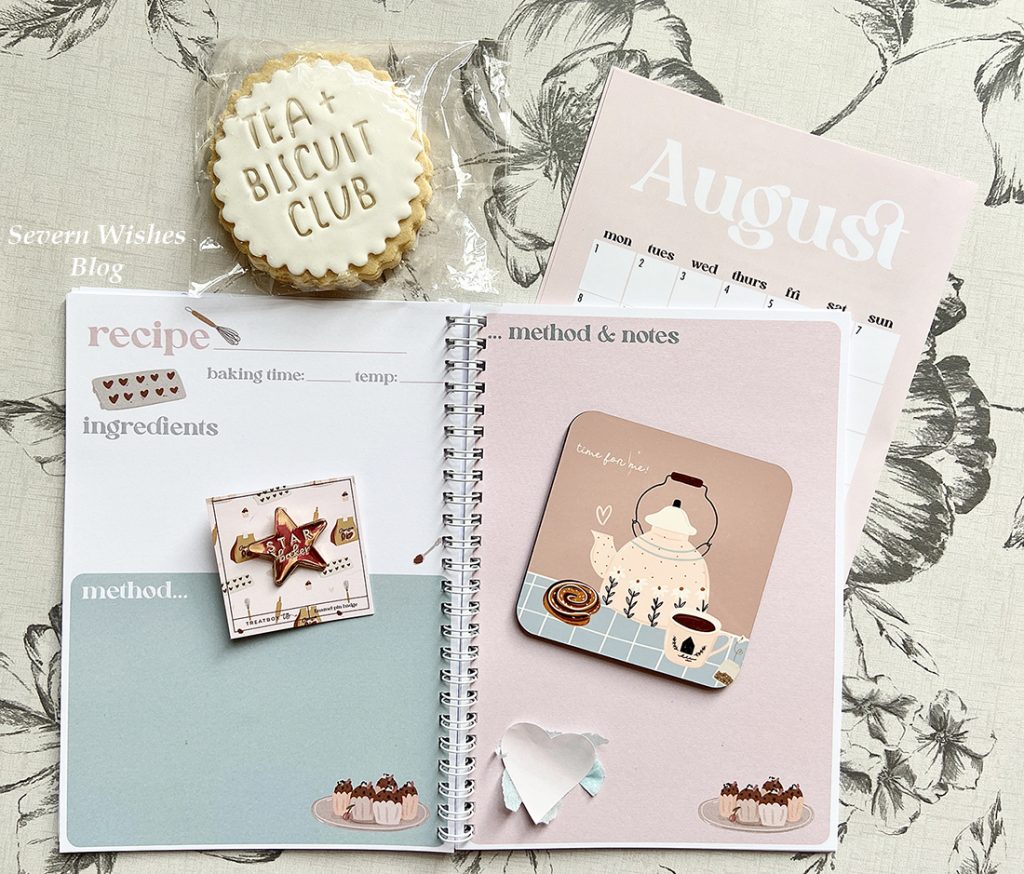
Treatbox Original Calendar Print Treatbox Original Colour Me In Pages x 2 A4 Treatbox Original Item – Bound Recipe Journal Notebook Oh K! Anti-Blue Light Sheet Masks x 2 with Ginger and Antioxidants Gardners Cookie / Biscuit – “Tea + Biscuit Club” Quote – Vegan Treatbox Original Item – Enamel Pin Badge “Star Baker” Treatbox Original Item – Drinks Coaster “Time for Me” Miss Patisserie “Happy” Essential Oils Shower Steamer Block
Here are some more photographs!
What is my Honest Opinion on the items in this August box?
We have some of the usual items in this box which include (of course) the Calendar Print and a biscuit which are regular in Treatbox and are very nice. I also see there is a Mask again this month but it’s actually two separate masks which is slightly better value as we can do two this month, or invite a friend around for a pampering session!
The Treatbox original products are unique and are really in keeping with the baking theme this month, which include the Drinks Coaster and the Recipe Journal. As someone who does a lot of cooking that is really handy! The Star Baker Pin is very fun and I have a friend that this is perfect for, I will be gifting this to her because she bakes far more and far better than I do! Ha!
The set of two colouring sheets are fun and are back this month. I always find Adult Colouring to be calming for me. Check out my social media for updates on these as I fill them in as the weeks progress…
What do we have left to talk about? Well if you watched my unboxing video on August 2nd you will know that I started having an allergic reaction to the Shower Steamer block during my recording, orange is something I became allergic to a couple of years ago and I could no longer eat or drink this without feeling poorly. When I smelt the shower block my nose instantly started to run and my eyes started to itch. Sadly I had to wrap this product up in the Treatbox plastic packaging as soon as I hit the stop button. I quickly photographed it later that day, before wrapping it again and giving it to my mother so that it was removed entirely from my house. Such a shame because I liked how the product sounded in principal! I hope my mother enjoys it!
So what are the best items this month? I really think the quality of the Treatbox UK original products are excellent and they are items that can be continually used and enjoyed and are also useful. The coaster will brighten your day, the journal is ready for whenever recipe inspiration strikes, and the rest of the items can be enjoyed over the course of the next four weeks. Keep checking my social media for individual item reviews. I will let you know how I get on with the mask!
Thank you very much for joining in for another Reveal and Review from Severn Sabrina!
Wishing you a great August month!Don’t forget to follow me on social media for more updates and individual product reviews too.
We live in an age where so much is readily accessible to us, but there can be so much information out there that it can often be overwhelming, especially for first time parents. With so many websites, forums and blogs that can sometimes be opinionated and not necessarily filled with the facts. Every person knows where they would prefer to get their information from, some of us like books and others like the world wide web!
Sometimes you can have a baby that is completely different to any before it or any you have known, and you may need additional help or advice. During these times you should always turn to a Midwife, Doctor or Paediatrician if you have concerns of any kind.
There were things I wished I had known more about before I had my son, and that was despite me reading both books and websites for hours at night when I had terribly painful SPD. I found lots of the websites and apps that I have listed below extremely useful at one point or another during the last four years. So I thought a blog post might help other expectant parents to see what information is available to them.
As a parenting blogger I often get asked about my personal opinion of which apps and websites have helped me since I became a mother. So in order to achieve this post I have gone back over four years of my browsing and researching and screenshot history, to bring you an alphabetical list of all the things that I have found the most useful. I have only included websites and apps that I used more than once and found them beneficial long term.
A Aptaclub Pregnancy and Birth B Bounty App B Baby Centre Apps and Email Newsletter and Website B Baby Names App B Baby and Child (British Red Cross First Aid)
D Duo ABC E Ella’s Kitchen E Emma’s Diary F Free Prints (Photos and FP Cards)
G Get Creative (CBeebies) G Go Explore (CBeebies) K Kicks Count Website
N NHS Website O Online 4 Baby Website
P Pokémon Smile (Teaching Toddler Teeth Brushing) P PooGoesHomeToPooland (Teaching How To Use The Toilet)
S Storytime (CBeebies) S Snapfish (Photo Printing)
Y Your Baby Club Website and Social Media
Let me now elaborate on a few of these now and the reasons why I found them so useful. Some of them are of course self explanatory, but others are really handy for tips and tricks. Some offer you freebies and others offer key medical advice or milestone information.
Bounty App The app gives you information on the progress of your baby whilst in the womb, and then after the birth it gives you key advice on milestones and growth. An app that I found generally fascinating to look at every week as my pregnancy progressed. Now that my son is older he is still on the app as a 48 month old! And the app offers me developmental advice and articles to read. The articles can be read at any time of your pregnancy and usually the app updates what is relevant to you at the time you need it. There are also useful check lists on it too. I score this app a 5✩.
Baby and Child (British Red Cross First Aid) First Aid is such an important part of human life, however most people go through their entire pregnancy without knowing how to do life saving procedures on babies or young children such as, choking, allergic reactions and dealing with illness. The Baby and Child App gives advice as well as videos that people can watch at their leisure for a variety of situations. Just some of what they cover include; Asthma, Bleeding, Burns, Choking, Epileptic Seizure, Fever, Head Injury, Meningitis, Vomiting etc. This app is one that I believe every single person should have on their phone, just in case. I score this app a 5✩.
Duo ABC I found this app while researching after my son had to start Speech and Language therapy. Due to the support being so sporadic due to the pandemic I did my own research, started my own lessons with my child at home, and created my own flash cards. But this app came up on a results search, and despite it being American my son found aspects of it to be beneficial. Writing the letters on the phone screen with his finger, sounding out letters and recognising upper and lowercase letters all helped on our journey. I did just 20 minutes with him a day for 3 months, alongside my other teaching and he soon knew his alphabet and could say all but 5 of the letters properly. If anyone is struggling with their child and they seem distanced from paper methods, try this app, just ten minutes a day with you, you may just see a difference as I did. I score this app 4✩.
Ella’s Kitchen Once your little one reaches the 6 month milestone and you consider starting to wean them alongside their daily milk amount, you may want some advice. Ella’s Kitchen App provide you with advice, recipes and you can sign up for a free pack with a journey poster, stickers and some vouchers for their snacks. It was fun when my son was little, but when he developed lots of food allergies I made my own recipes up. I score this app 4✩.
Emma’s Diary Emma’s Diary is a fun app where you can create all sorts of fun things to keep throughout your pregnancy, it also offers some information and it gives away bags of goodies at certain points of your pregnancy. It’s worth signing up to this as soon as you find out you’re pregnant to take advantage of all the items on offer. I score this app 4✩.
Free Prints (Photos and FP Cards) Free Prints have two useful apps, the first one is Photo’s and you get some free prints every month just pay the postage. And the second one is Cards where you get one free card a month like a postcard, just pay postage. Upgrade to proper cards for pennies and they offer lots of other fun affordable products throughout the year. The more you order the more deals you’ll get. I score these apps 4✩.
Get Creative (CBeebies) and Go Explore (CBeebies) Apps that I don’t know what I would have done without! When I became a single parent even taking a shower was tricky. Sitting my son on the bathroom floor safely on a bean bag when he was a toddler, my phone playing CBeebies programs and videos off the app were a godsend! Now he is older he is using the various parts of the app to learn all sorts of things like shape sorting, mathematics, role play like shopping and problem solving. The Creative app allows freedom in Art and expression using some of the CBeebies favourite characters, and the Go Explore is more about learning and fun, again with the usual friendly faces. Love these apps! In moderation of course. I score these apps 5✩.
Kicks Count Website Kicks Count is something that is really important, and all pregnant women should visit the website and learn about the importance of kick counting and the work this group do. It’s worth following them on social media too. I score this 5✩.
NHS Website When you have questions in the small hours of the morning the NHS website can have useful information or point you in the direction of help if you need it. I score this 5✩.
Online 4 Baby Website An excellent website for affordable baby items such as changing mats and muslin cloths. Worth a look when they have a sale on for certain! I score this website 4✩.
Pokémon Smile (Teaching Toddler Teeth Brushing) Whether you like Pokémon or loathe it, if you have a child that refuses to brush their teeth you will try literally ANYTHING to make that time of the day and night less stressful. For us it was this app that allowed my son to turn a corner! There is an icon of the mouth that follows them while they brush and indicates where to go next so they don’t miss any teeth. I score this app 5✩.
PooGoesHomeToPooland (Teaching How To Use The Toilet) Another app that is a little annoying but if it helps your child to understand that poo goes down the toilet and not on the floor then so be it! My son watched it every day for about a month and then got bored of it, but it certainly helped him realise that I score this app 3✩.
Storytime (CBeebies) Another CBeebies app and this one is all about books and stories. The app can read to your child or they can try and read themselves. The stories are often interactive as well, lots of fun. I score this app 5✩.
Snapfish (Photo Printing) Free photo’s every month just pay the postage, a great way to keep family up to date with how little one changes and you can make an album of their first year for less than £20. I score this app 4✩.
Your Baby Club Website and Social Media As a Blogger Writer for Your Baby Club I often provide them with useful articles surrounding parenting. These first hand experiences from parents go alongside their informative articles on the websites and on their social media platforms too. I score this 5✩.
Thank you for reading this blog post today, I do hope that you have found it useful. Please pass the link to my website on to family or friends who are expecting so that you can share these excellent websites and apps with them. Hopefully they will be just as happy with them as you were today! (I hope).
Keep on visiting Severn Wishes Blog for Parenting related blogging, Product Reviews and general Lifestyle Posts! Thank you! Have a lovely day!
I hope this blog post finds all of you well as you’re reading this!
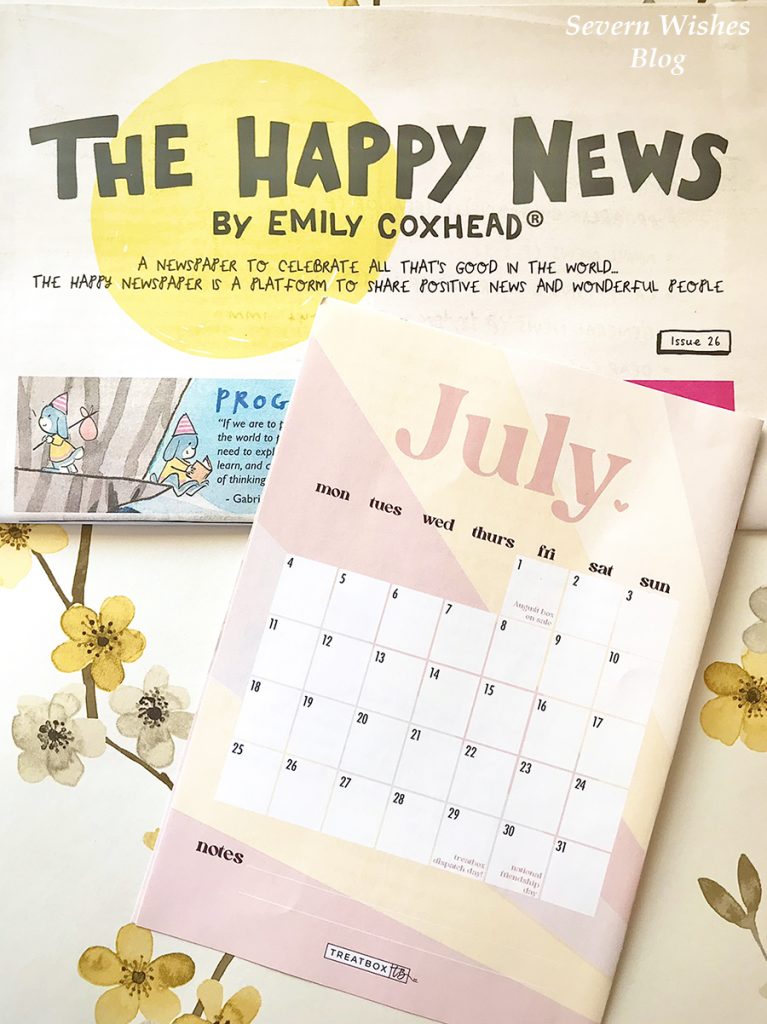
So we are just over half way through the year now and it’s time for the July Treatbox UK Reveal and Review.
Thank you for joining me for this unboxing! It’s time to look at the products in this months box and for me to review them for you!
If you would prefer to watch my video then head to my Facebook or Instagram.
The July box features TB OR – Treatbox Original Products only available by ordering from Treatbox UK.
What’s Inside the July Treatbox UK?
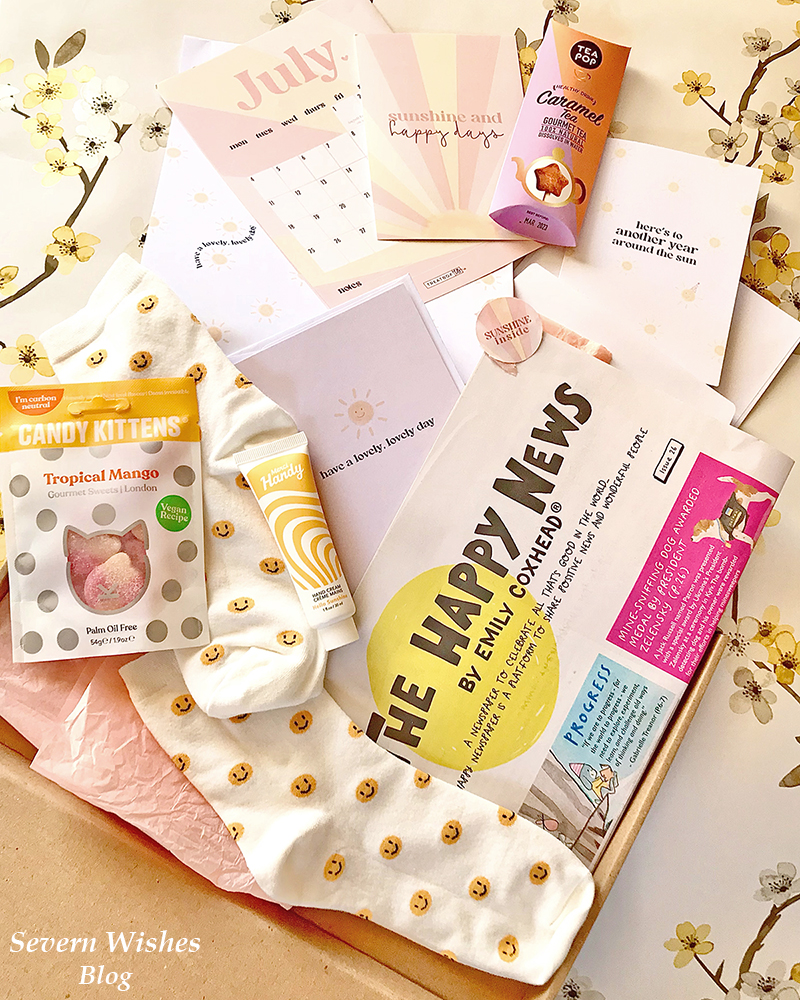
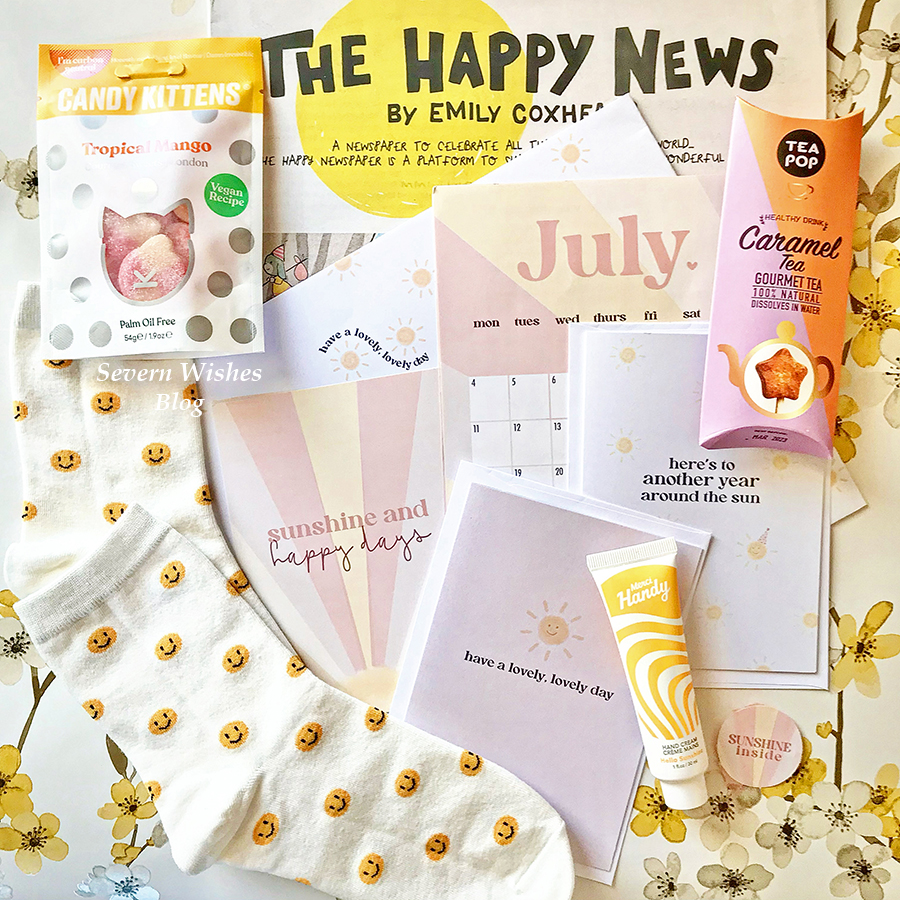
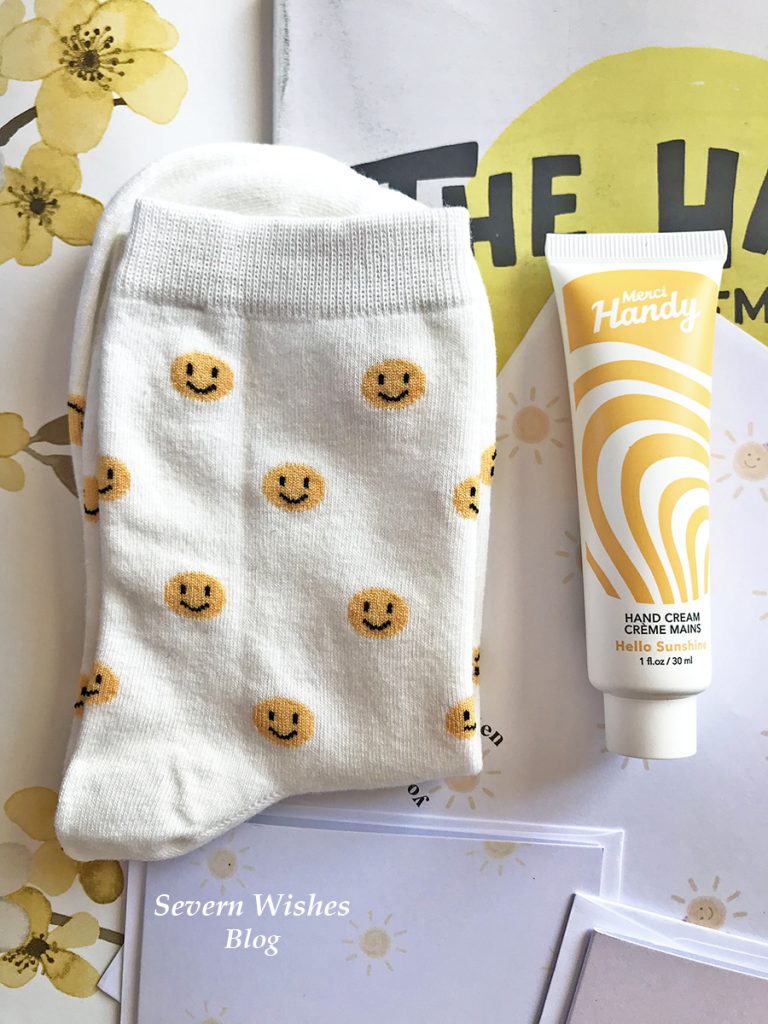
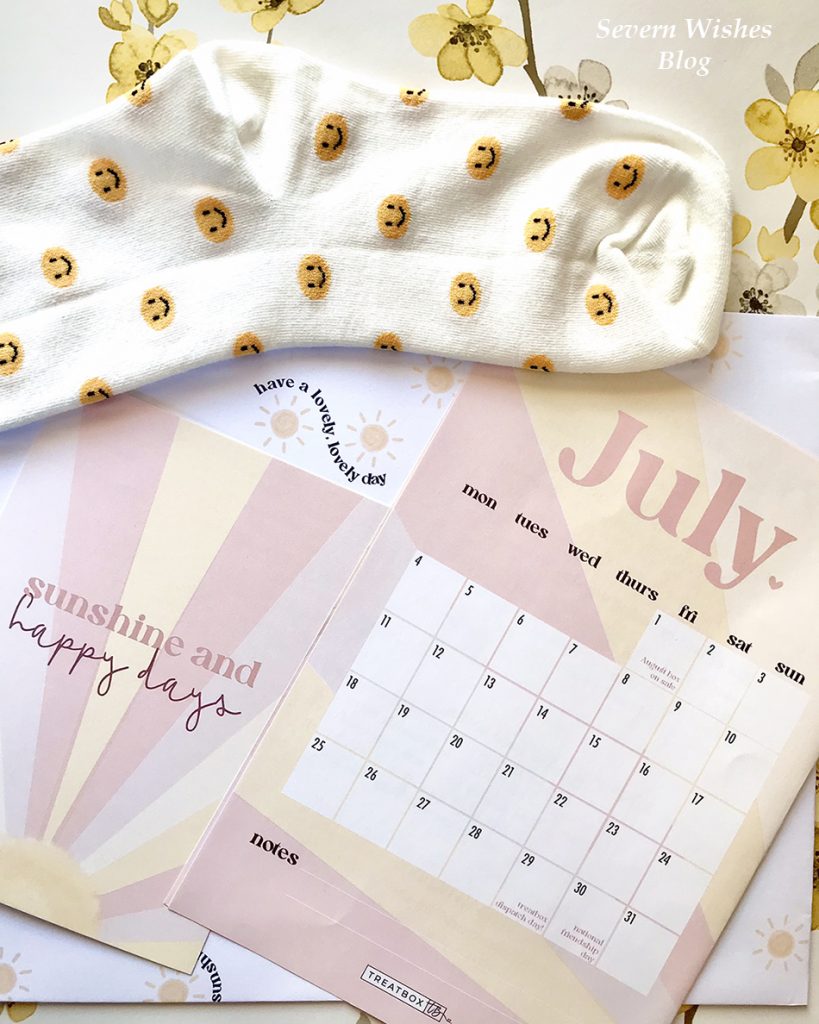
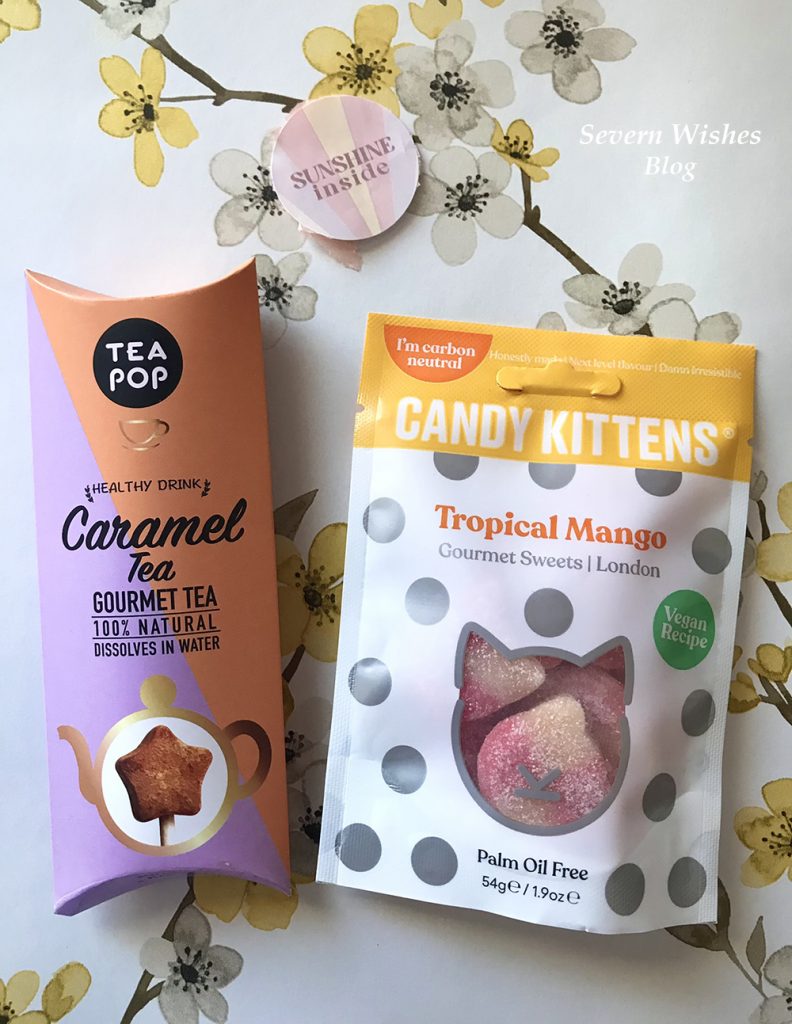
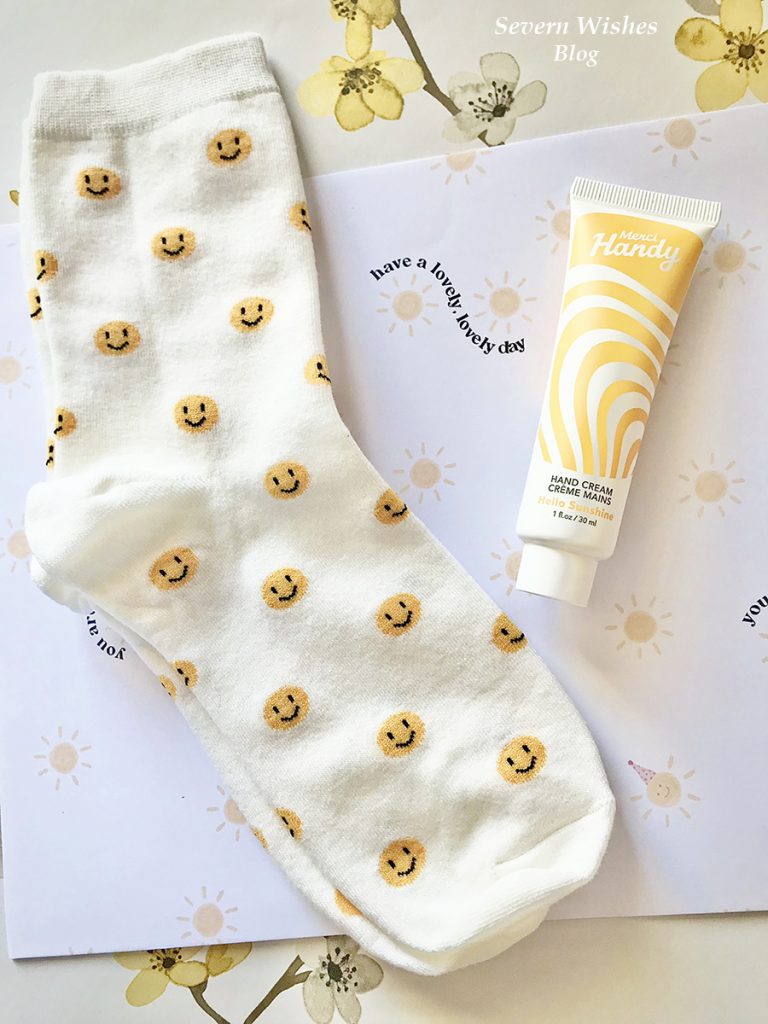
July Calendar Print TB OR A6 Print “sunshine and happy days” Smiley Face Socks TB OR Greetings Cards – 2 Cards for Passing on the Sunshine Merci Hand Cream in Hello Sunshine scent 30ml Candy Kittens – Tropical Mango flavour 54g The Happy Newspaper by Emily Coxhead issue 26 Tea Pop Gourmet Tea – Caramel flavour (in my box but may vary)
My Honest Opinion of the July box
What a box of sunshine! When I opened up the Treatbox and I saw the theme was sunshine and happy vibes it was just what I needed to boost my week. We had socks again and I was really happy about that because I love the quality of the socks! They are soft and cute as usual with smiley faces on this time! And what I also loved was the fact that we can pass on the happiness and sunshine from our July box by sending the Treatbox UK cards on to someone we care about!
The Merci hand cream smells lovely like summer flowers on a sunny day, a light cream that melts into your hands and comes in a handbag size to boot! Perfect for use all year round! It made my skin feel very soft after I used it a couple of times.
The Candy Kittens sweets are Vegan, Palm Oil Free and are now Carbon Neutral too! You get 54g to enjoy of this treat with natural fruit flavours in Tropical Mango. Yum!
We have the Happy Newspaper which I haven’t read all of yet, but hearing about happy stories and inspiring people is always a good thing. It’s important that we focus on some of the good things happening in the world even when times are hard, because if you look hard enough there is always some good news to find somewhere.
I haven’t had the Tea Pop yet because we are having a heatwave in the UK right now and I cannot stand drinking a hot drink when I’m already feeling very warm. However I did have an idea for this which was… make up the tea – I had Caramel flavour – and then pour it into an ice cube tray and freeze it! Pop these Caramel flavoured ice cubes into Pepsi Max or Water and make it a new flavour! Seeing as the heatwave is set to continue for yet another week I will make room in my freezer and do this! I will post about it on my Instagram and let you know how I get on!
Finally there are the Print, Wrapping Paper and the Cards – Treatbox Original Products – all made with the theme of sunshine! July is meant to be the happy and sunny month of the year (if we’re lucky) and so far we seem to be having just that! May the sunshine continue! I look forward to passing the cards on to people when it is appropriate to use them, and using the paper to wrap a present for someone.
Here are some more photographs now of the products I got within this box.
Thank you for joining me as I have unboxed and reviewed this July subscription box today. Treatbox UK is currently the only monthly box I am subscribed to and the reason for that is due to consistently great content and products that I hold in high regard. Providing items that are Vegan, Carbon Neutral, Sustainable and Healthy are very important to me. I get a treat but I’m also not harming the planet in the process.
I wish you a lovely month of July 2022! Please stop by again soon for another Reveal and Review!
“Sticker Marketis an online custom sticker printing provider in the UK. We are a one-stop-shop for stickers, labels, postcards, business cards, magnets, swing tags and many more.”
This month I am collaborating with the UK business Sticker Market UK. I was approached by them due to my honest reviews and already having worked with many UK based businesses. Thank you for choosing and trusting me to give your business the shout out that it so definitely deserves.
I have been really looking forward to bringing you this blog post, I have had lots of fun designing, and then testing and photographing this particular unique product. As someone who likes to stay organised I am always using stickers, be it on my wall planner, journal, calendar, reward chart for my son (the list goes on), but to be able to design and have printed my very own sticker, now that was something I had never done before.
Sticker Market provides printing for your own custom designs and can print a wide range of sizes and shapes to suit your needs. I chose Circle stickers for my set, however Rectangle and Square are available too.
Sticker Market pride themselves on offering Cheap Personalised Sticker Printing in the UKand offer competitive prices. They also do Business Cards.
What Did I Design and Why?
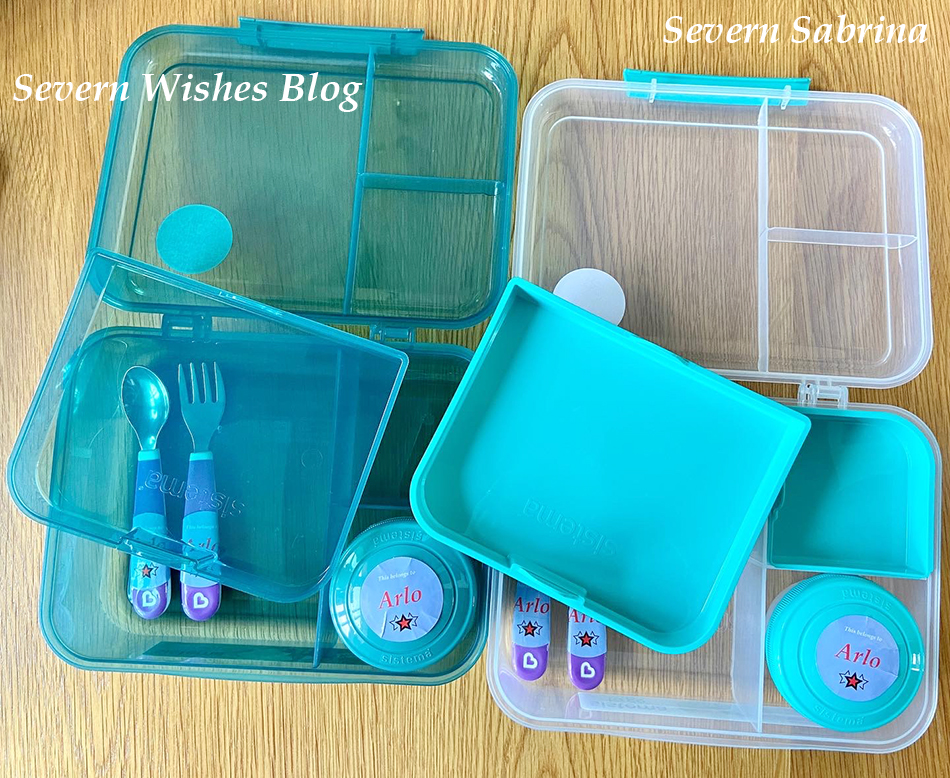
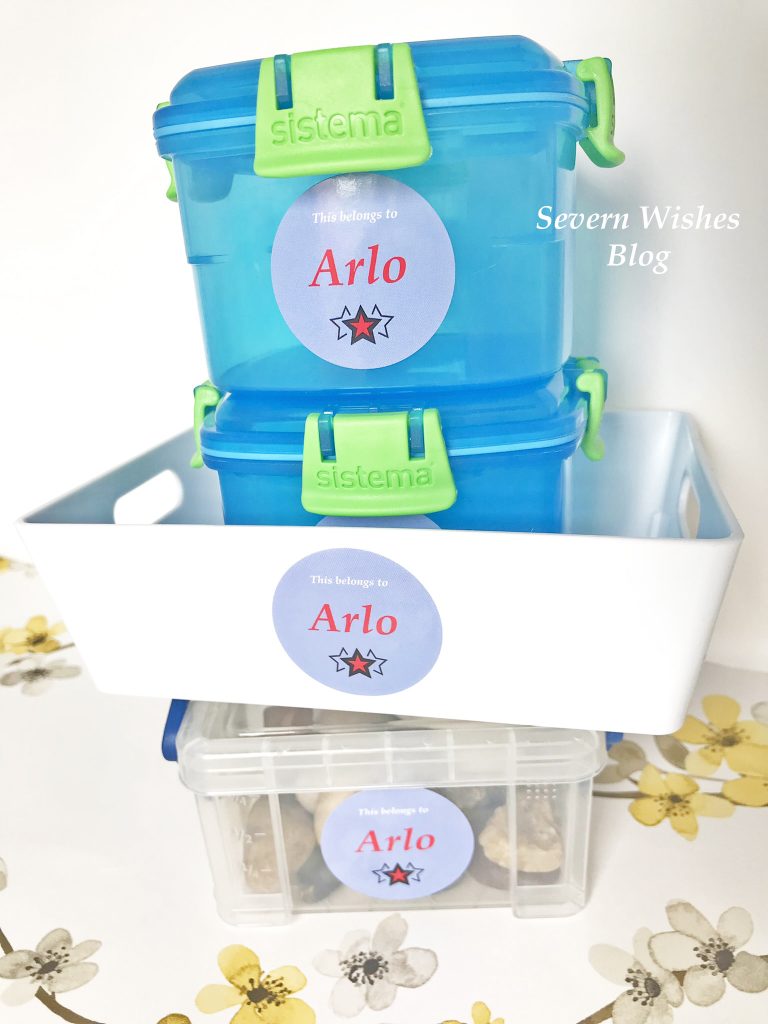
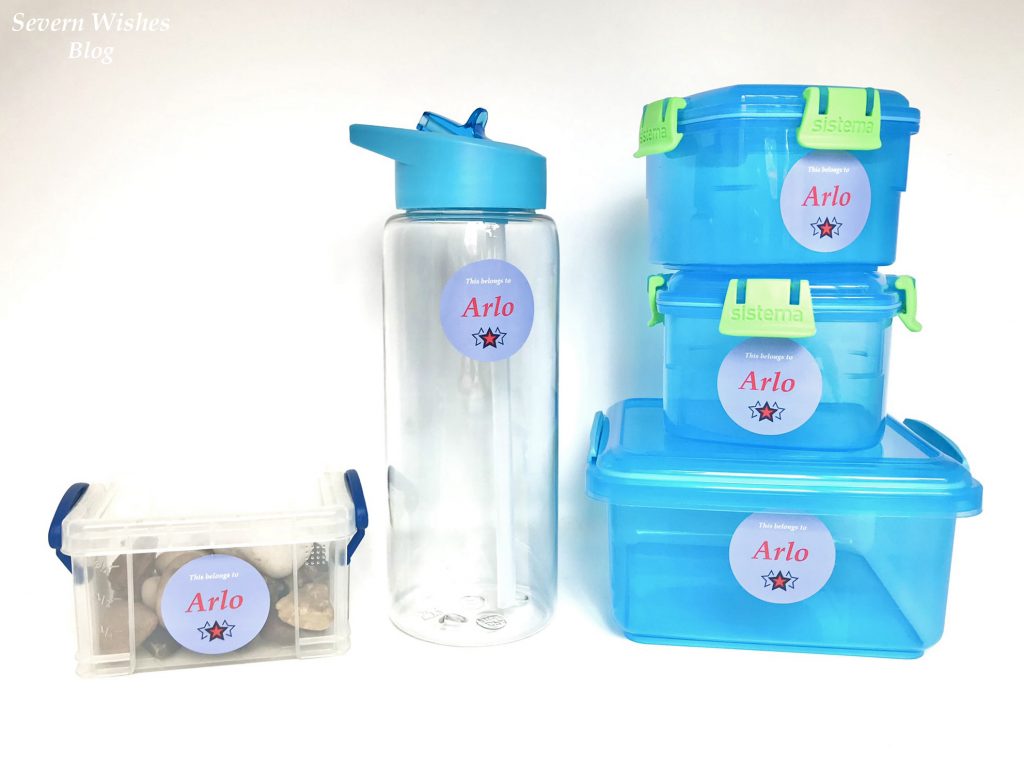
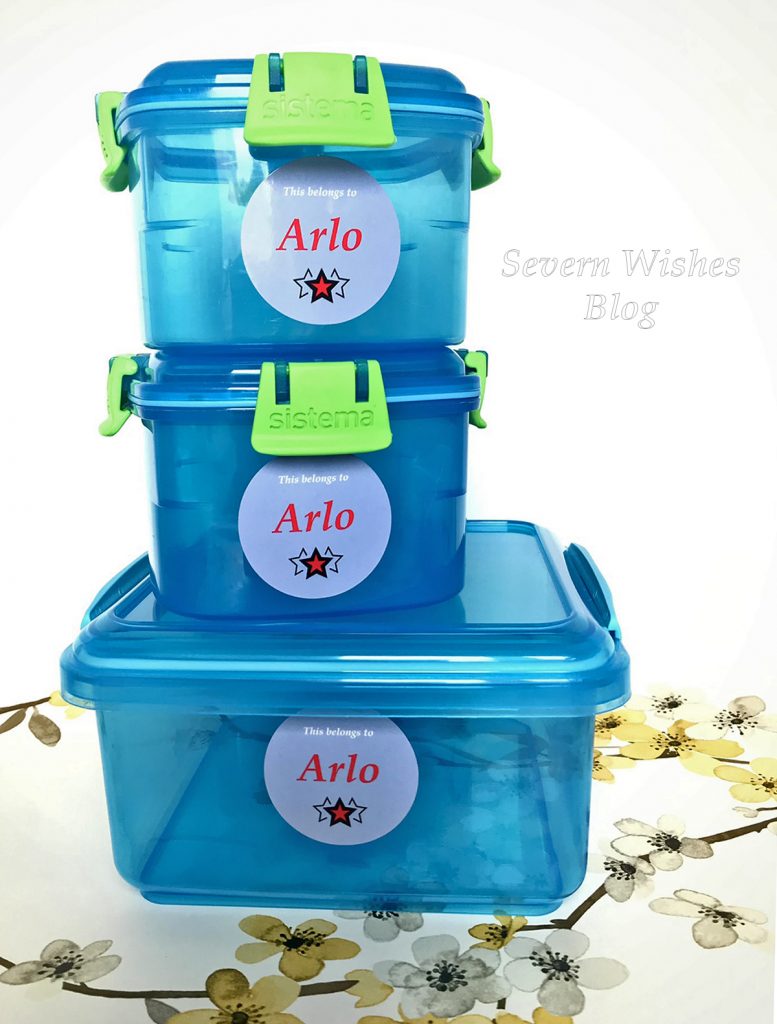
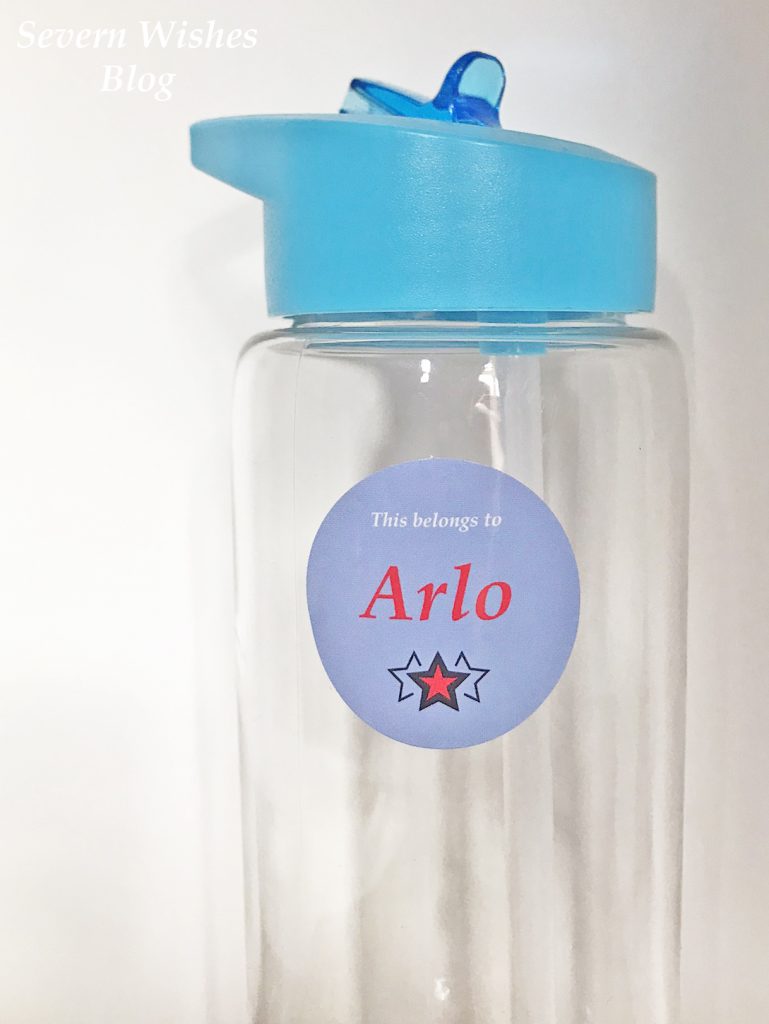
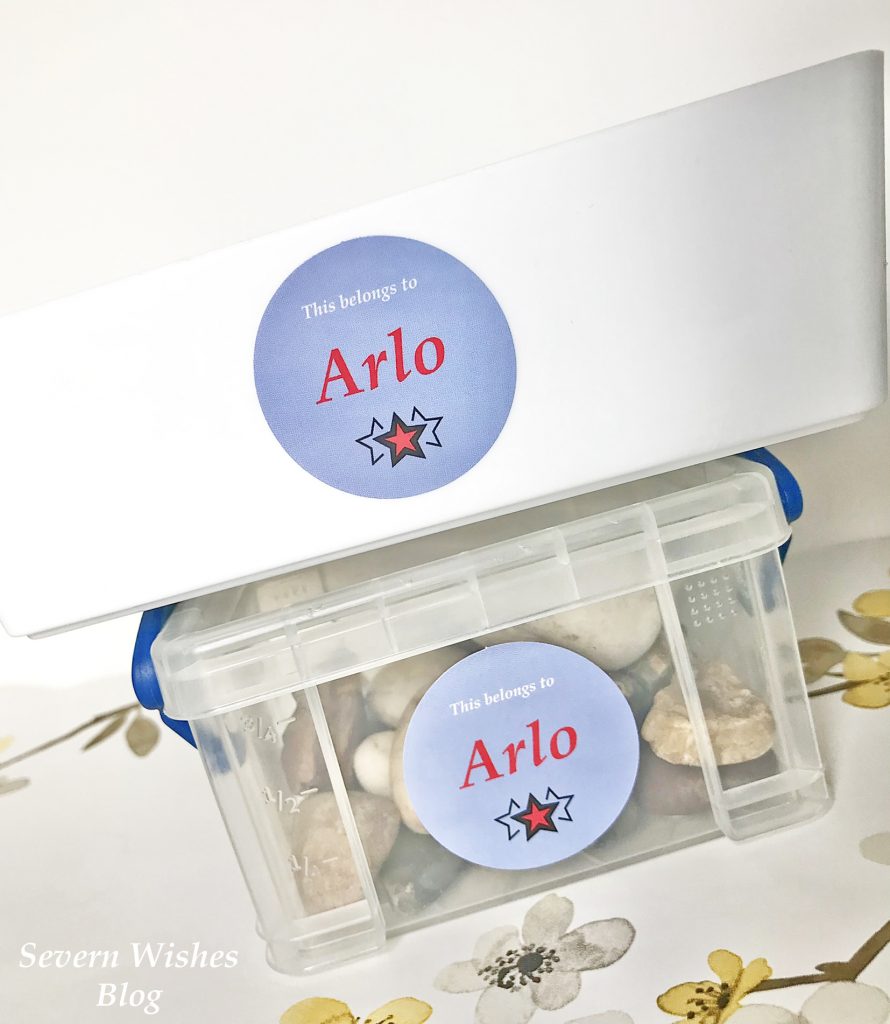
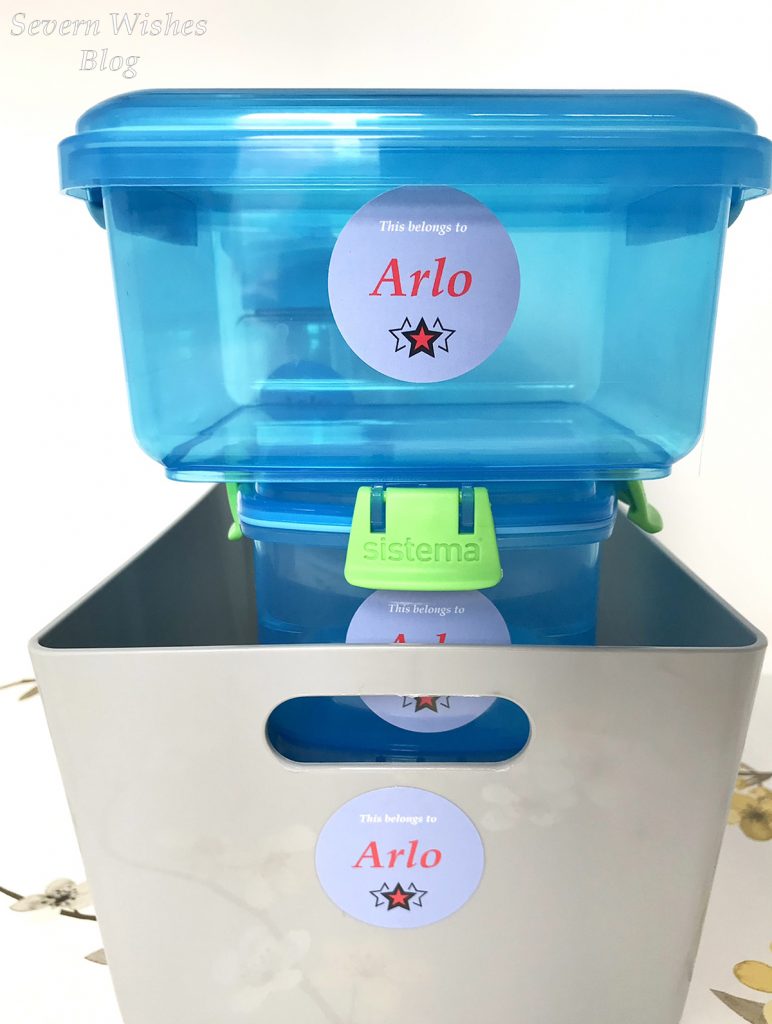
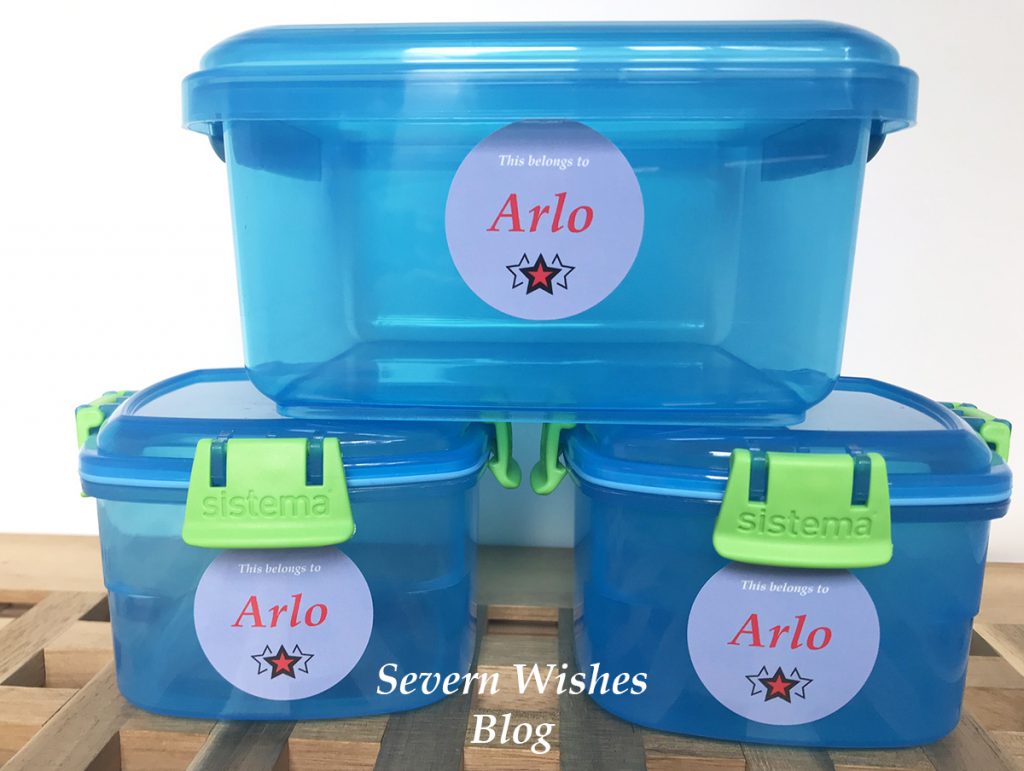
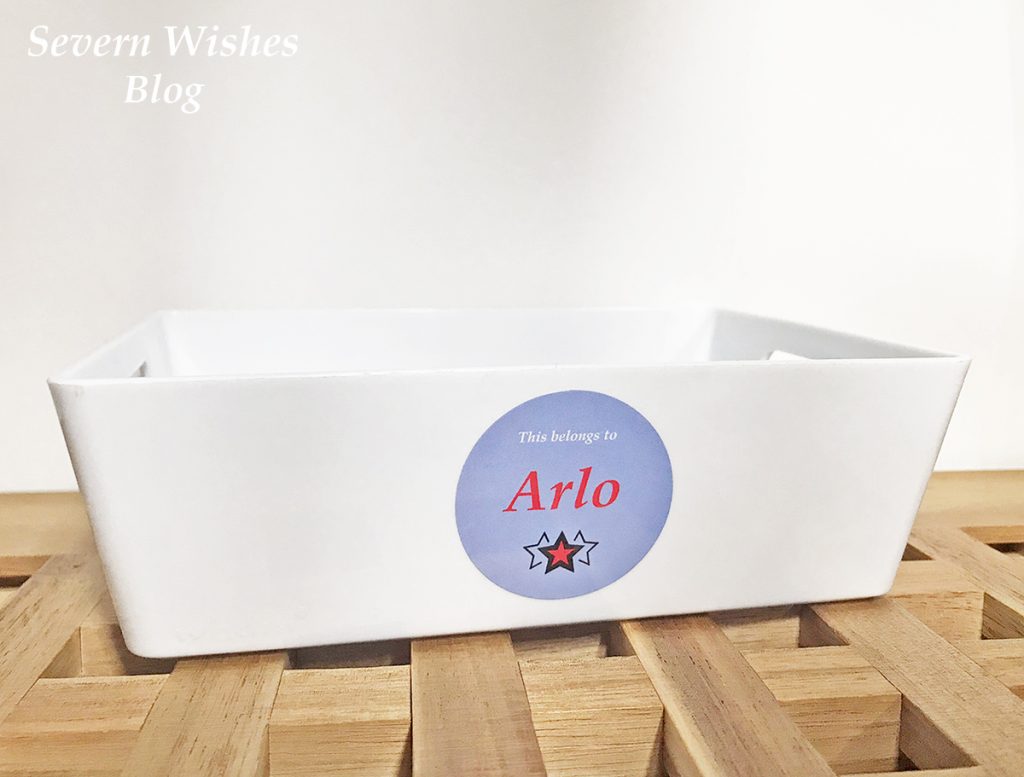
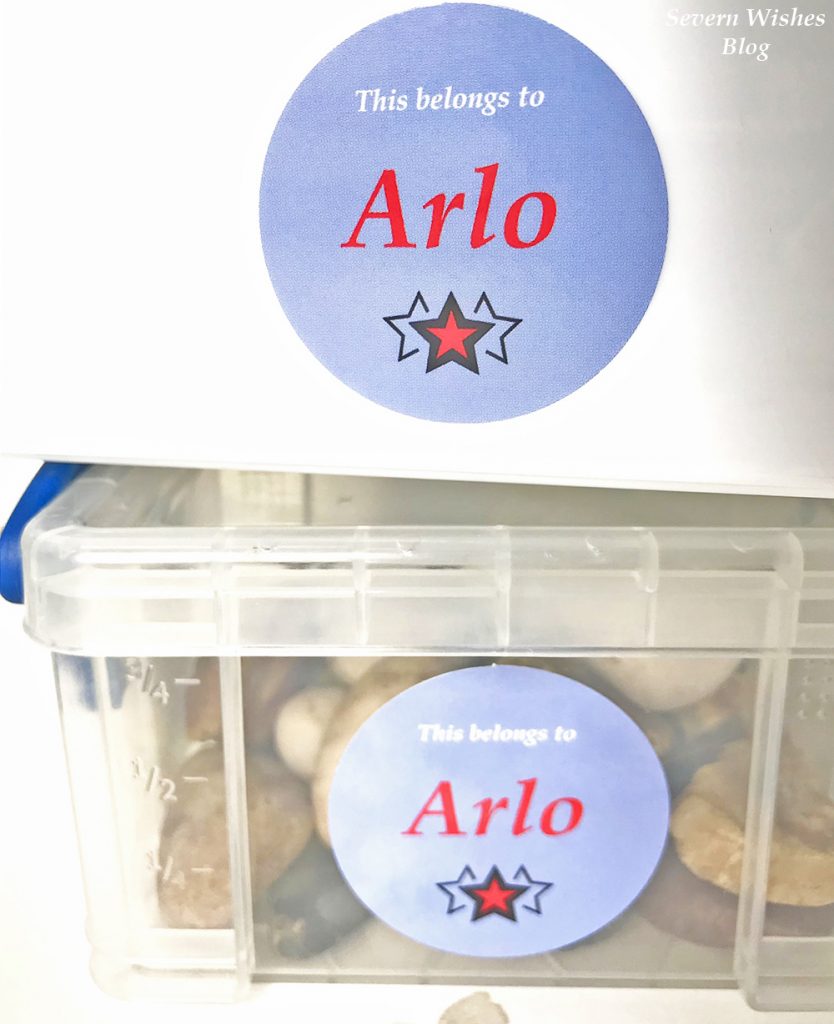
I have designed my own personal Sticker so that I can easily organise my sons school items, water bottle, lunch box, snack box etc. It’s so much faster than writing out a label and sticking it on, it’s neater and far more legible too! Plus my son chose stars on my design so he knows that it is “his” sticker. I have also used them around my home for items that only my son uses such as his nature pot which houses all the rocks we find on walks and days out. As well as his lunch items I labelled his tray that we use for school paperwork every week.
Stickers are a fun and easy way to keep things organised and in this case so that people know what item belongs to whom etc. I chose to use this collaboration for my sons benefit, but during the product photography I found myself dreaming up all sorts of ways you could utilise this type of product.
So my final design reads “This belongs to Arlo” and my son chose stars as a symbol to make it his own.
When I realised I was able to design my own sticker it took me a few hours to consider that I was better off designing one to make my life easier. And that’s why I chose to make one to label all of my sons belongings that will be heading to school with him in September!
It took me a couple of hours to nail the design that I wanted, and then another hour to knock it out on my Photoshop software – bearing in mind I had to Google how to do a few things because I only ever use the basic editing tools for my photography like the brightness! – but making my own sticker was lots of fun!
I showed my son the final product and he read his name out loud before giving me the thumbs up. It was a simple yet effective design that I hoped he would soon learn was just for his items. After emailing it in and receiving the final proof from Sticker Market, I was very happy to go ahead and they got to printing. The whole start to finish was slick and I was well informed of the progress right up to when they shipped the box out to me.
Products in Use and Product Testing
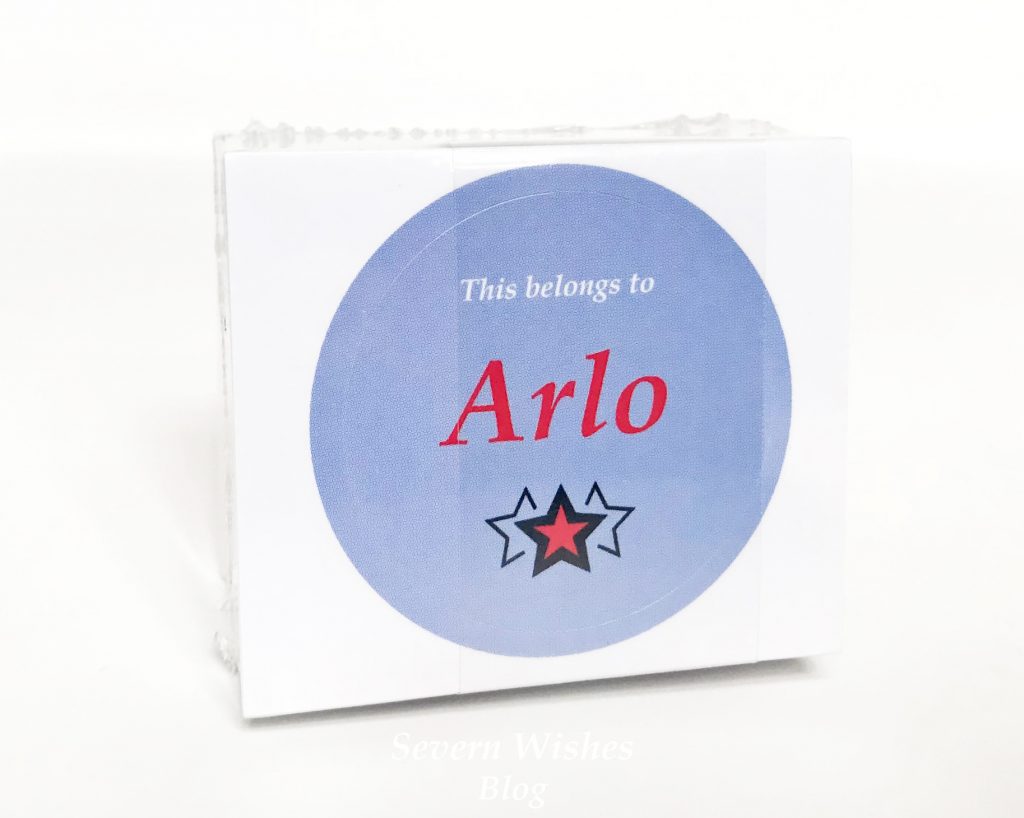
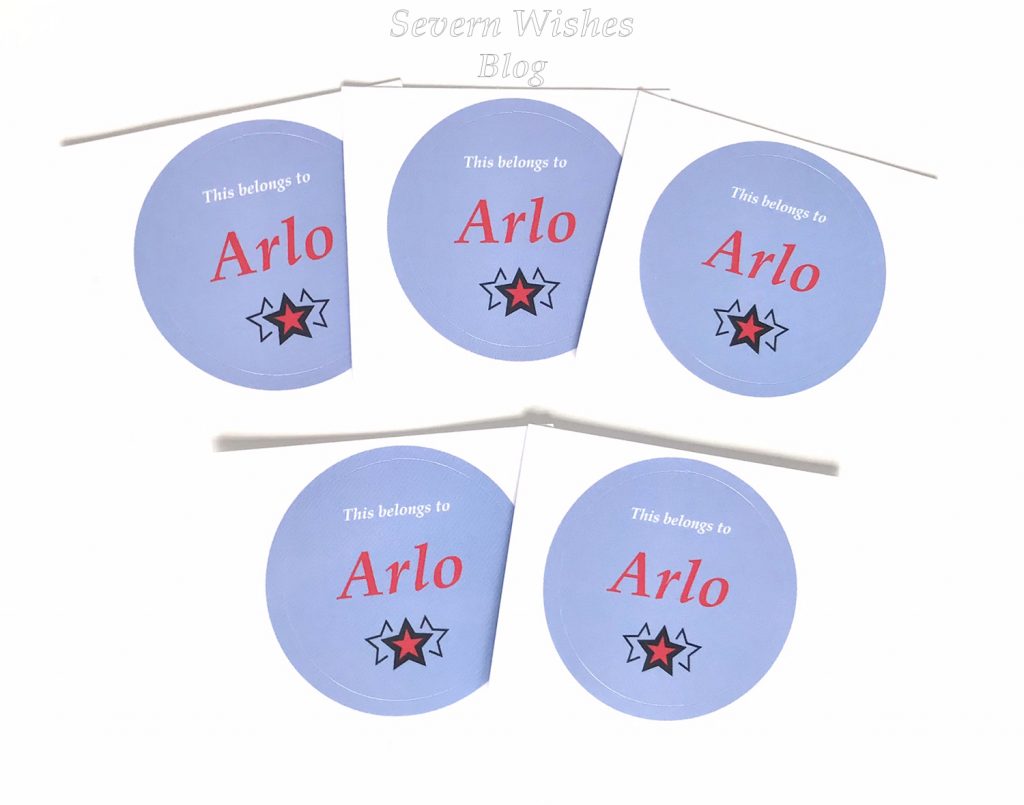
Once the stickers were in my possession I found it really useful that they were cut individually, and not in sheets. This saves so much time and also storage space by having them in a neat little stack this way. Sheets take up so much more room I think (and yes I’m a parent with many sticker sheets and reward charts!). The Sticker is printed Bright and Bold and Sharp. My Sticker design looked just like it did on my screen from when I created it, I was very happy.
Now the time had come to get peeling and get sticking!
I gathered all of the items that I wanted to place stickers on to, and began to photograph them as well as test out the stickers durability by handling the items the stickers were attached to. I was impressed with how sticky they were on the variety of surfaces that I chose to use them on.
As you can see in my photography the Stickers I created stand out on a variety of different coloured surfaces and I was happy with their overall look. I chose my background colour so that it would stand out against many things. Knowing the lunch boxes were all blue, I didn’t want anything that would get lost against their vibrant colour. People need to bear these things in mind when designing their own stickers and think, what am I going to use them on. You might also consider whether or not you will need waterproof stickers and other aspects too.
My Overall Opinion
From start to finish this collaboration has been smooth and the customer service has been excellent. During the design process every question that I had was answered and my needs met. Delivery was fast and I was kept up to date with regards my stickers being printed and posted. I was also sent an email with a proof of what my sticker would be like which was an excellent feature. The quality of the Art Stickers that I chose are excellent, they are sharp and the colour is bold, the text is easy to read and the sticker itself is printed smoothly, there are no definitive lines from the printing process. I would definitely use Sticker Market UK in the future if I wanted any stickers printing.
As I mentioned earlier I was imagining lots of ways these Stickers could be utilised in daily life, so here are nine ways I have come up with, in which you could use Sticker Market products.
1. Weddings – Personalised Stickers for Wedding Favour Bags or Gifts or even sealing Invitations 2. Birthday Party – Design your own Stickers for a special birthday party or for Party Invitations 3. School – Whether you’re a teacher or a parent you could design a personalised set of stickers for your child/children or for saying “Great Work” to your class. 4. Keeping Belongings in Check – you might have several children with similar items, by designing their own stickers that they can attach to various items, nobody will argue again over what is there’s. 5. Holiday – Going on Holiday? It’s a good idea to mark up personal items and stickers are a fast way to do just that. 6. Small Business – Do you send out products as a small business? You could get business cards or seal packaging with your own unique stickers printed by Sticker Market UK. 7. Journals / Planners – You could design yourself a motivational sticker “You’ve Got This” and stick them where you need extra motivation to achieve, you can design many possible combinations. 8. Calendars – Need Stickers with peoples names on OR activities such as Swimming or Music Lesson, to save time writing it all out you could use stickers to keep track of your busy schedule. 9. Work Space – People in the office always stealing your stapler or holepunch? Not anymore because you can get your name put on some unique stickers and then put them on everything.
My Product Testing Ratings
Overall Appearance When in Use 5✩ Overall Product Quality 5✩ Customer Service 5✩ Delivery 5✩
I have based these ratings over a week worth of product testing including the sticker holding in place while objects are used and handled. I am satisfied with the durability and overall look of the stickers and rate this service as a 5/5.
Where Can You Find Sticker Market UK
If you want to find out more and browse products and current prices for yourself then please visit any of the following links I have supplied below. The website is your first port of call, because you can see exactly what is currently trending and any offers available. You can also contact Sticker Market directly from the website for any queries you might have.
The Sticker Market UK Website is Available HERE The Sticker Market UK Facebook Page HERE The Sticker Market UK Twitter Feed HERE The Sticker Market UK Instagram Reel HERE
Below are some examples of the types and styles of Stickers available at Sticker Market UK.
Sticker Market Quote “Premium Experts in sticker printing with endless product labelling possibilities. Premium quality custom stickers at the cheapest price.”
How I Created This Review
I have been provided with a sample of Stickers in order to provide this Review. Product Testing and Honest Reviews are what I pride myself in giving my readers. Compared to other collaborations this blog post is slightly different, I was first asked to design the sticker that I wanted. That way it was more personal to me, as if I were an actual customer. So I did this, emailed it over and then this design was printed and sent out to me in order for me to test it. I got to keep the product (stickers) in exchange for this honest blog post and the product photography. The company outlined below contacted me directly for the purpose of this review.
Sticker Market, 8 St James’s Square, London, SW1Y 4JU.
Thank you for choosing to read Severn Wishes Blog today, I hope that you have found this review interesting and insightful. I certainly learned a lot more about the types of stickers that were available nowadays through exploring what Sticker Market UK had to offer.
I hope to see you again soon for my next product review, you never know what I might be asked to test next! How exciting!
Welcome to todays lifestyle blogging article “Sabrina’s Top Twelve Ways to Save Money, Spend Less on Electric and Use Less Energy Around the Home”. With the rising cost of living and lots of other prices changing, I figured I would share the ways in which I, Sabrina, a single parent, save money on a daily basis. And by drilling some of these into your head and completing them daily, you will soon see how great they are and hopefully I can help save you some money! Lets begin!
✩✩✩
✩Close Your Curtains – either to keep the heat inside during colder months or to keep the heat out and keep your home cool during hot days. I often see people not closing their curtains in an evening and I wonder if they know how much energy they’re losing. As for the summer it works the same way, don’t open them in a morning to let the heat in, just leave them shut and return to a much cooler room than if you had opened them.
✩Time your Showers – We can all be guilty of letting the hot water run over us and our minds drift off into a tangent of thoughts and procrastinations. However by either setting alarms or by playing a timed playlist on your phone while you shower, you will be saving yourself water and electricity and even time! I personally have a selection of 30 minute music playlists, and I know that when I reach the final song my half an hour of bathroom ablutions time is up! Give it a go yourself and see how you get on.
✩Close Your Doors – even by pushing your doors within an inch or twos gap of the frame will prevent lots of heat escaping in the winter. I usually pop a door stopper on the other side of said door once we are in (for example) the lounge with no intention of moving for an hour or two. This stops children or pets pushing the door open too far and letting your heat escape into a hallway for example.
✩Invest in some USB Chargeable Lights – So I have several of these around my home and various types. I have bars in the hallways so I don’t have to bother turning any lights on, they have sensors so when you walk within range they just pop on. Useful for saving money on electricity! Also great if you forget to turn lights off because these USB ones turn off after 30 seconds to 1 minute (depending on brand). Other chargeable lights include ones that are freestanding and you simply charge them up and then turn them on and let them drain down. One that I have takes about an hour to charge but lasts up to six hours – great in an evening if I don’t need much light.
USB Chargeable Motion Sensor Light Bars
✩Light Bulbs – one weekend or day off pop around your home with another person. One goes up a ladder and checks bulbs and the other writes down on a piece of paper what types and if they are energy saving and how many watts are the maximum. Then, next time you’re out shopping go and buy the bulbs that are energy saving and cost less to run. These bulbs usually last for ten years or up to 10,000 hours – whichever comes first!
✩Watering a Garden – if you spend water from inside your home to water your garden it will slowly start to become a lot of expense. Instead buy one or two black dustbin type plastic barrels (roughly £14 each) and they come with a lid too! Use a watering can to dip into them and remove water as and when you need it. Set them up in a part of your garden where rain water can easily fill them up. You’ll be surprised how fast they fill on a rainy day! Use the water from the butts for your garden plants before turning your home taps on! It will save you money on your water bill especially if you’re on a meter.
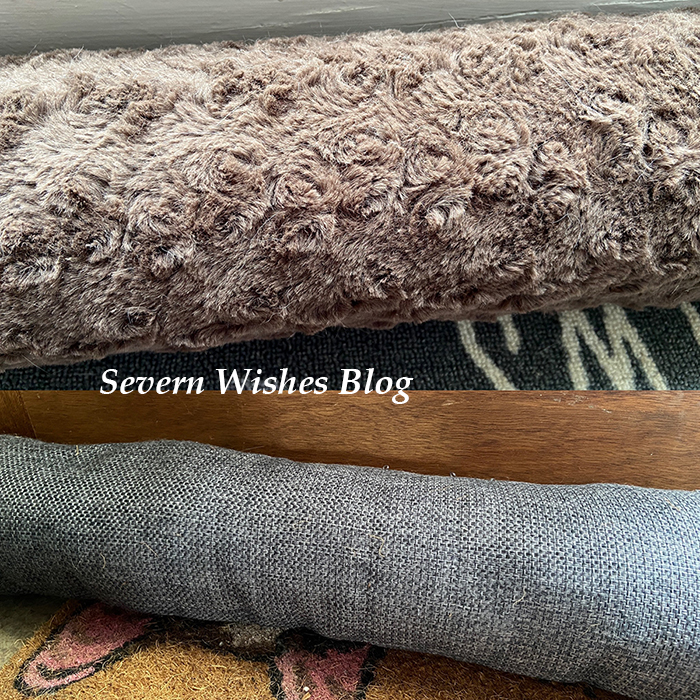
✩Buy or Make Draught Excluders – I have one on the inside of each door of my home, they keep draughts out and stop your heat escaping through holes under doors. If you cannot afford one because they often retail at around £15 these days, and you are good at seeing! Then you could always try and make one out of some old clothes and some stuffing. Might be fun to do with your children!
Draught Excluders for Doors
✩Buy Thicker Curtains or Lined Curtains ready for Winter – I bought lined curtains for £15 in the fabulous Dunelm sale last year. And I also built a pole above my front door and put two curtains up there as well. One reason was to keep the heat inside during the winter because doors easily let your heat escape. Two is also from a security aspect, if you have a window next to your front door then people may be able to look inside easily, a curtain across prevents them from seeing anything.
✩Invest in Fleece Throws – I love a nice comfortable throw, but by putting a couple where you frequently sit down will also save you money. I have one folded up across the bottom of my bed, I have two on my sofa. If I’m cold in an evening I will put that over me or around me and not touch the thermostat on the heating. Maintaining an optimum temperature for your heating is also a great start, then use other things such as wearing another layer of clothing or by covering yourself up with a throw while sitting down to help save the pennies. Fleece Throws can start from as little as £4 each in places like Tesco and Dunelm, I bought 3 at £6 each last year. They are large ones and one covers both mine and my sons legs when we sit and watch television in an evening. Fleece throws are also easy to wash and fast to dry due to the material.
✩Clothes Airers and Camping Pegs – no I’m not mad! I’m letting you in on my clothes drying secrets! So for £20 or less you can buy a large freestanding clothing airer at a supermarket and a packet of camping peg hooks from a local do it all shop. You’ll be able to dry more clothes outside this way and in more weather types simply by pinning the airer down to your lawn with the pegs. This way it doesn’t blow over, but you can easily pull up the pegs and pick up the whole thing to move it indoors if the weather takes a turn. I regularly do this with small thinner items all year round if it’s windy and the sunshine is out. Any reason to not use the tumble drier I will surely take it! You can save lots of money by drying even half a load of washing outdoors.
✩Turning it OFF! – I’m a big believer in “if you aren’t using it then turn it off” and this goes for lights, appliances and electronics. There are only 6 things that are always on, either because they are constantly running or on standby in my home, they are the Broadband Box, the Sky TV Box, the Boiler, the Washing Machine, my electronic Doorbell and the Fridge/Freezer. Everything else is off, I only put the oven or microwave or drier on when they are actually going to be used. It saves me a ton of electricity by turning things off at the socket and not leaving them standing idle – plus with a small child you don’t want them turning on appliances that might get hot! So there are double reasons for clicking that off switch on the wall. It’s the same with main lights, if you leave a room just turn it off. Finished cooking dinner and done with that Oven? Just turn it off.
✩Grow Your Own – Every year I try and grow things but this year I am pulling out all the stops to try and grow more fruit and vegetables. Combining my rain catching water tubs with a watering can, I can easily water the tubs I have created. Follow me on my social media for updates on this because I will be documenting photographically just how well we do through the Summer and into the Autumn. Even if you have a balcony not a garden, you can get vertical planters nowadays where you can grow things such as herbs, raspberries or strawberries, tomatoes and chill peppers. I don’t have a patch that I am able to dig up, so I am simply using pots to grow everything. Check out my Instagram for more photographs on how I am managing to do this. Also, teaching your children (if you have any) about the importance of nurturing something while it grows is an excellent life lesson.
✩✩✩
Thanks for reading this blog post today. I would love it if you would get in touch, write a comment below if you found any of this useful or you liked some of my ideas. Do you have any awesome ideas yourself for saving money?
If you implement any of my hacks yourself I would love to hear from you on here or on social media. You can tag me #SevernSabrina if you want me to see it too.
As we reach half way through the year I cannot begin to wonder how fast the remainder of 2022 will go! So let us make the most of it and treat ourselves when it is within our means to do so!
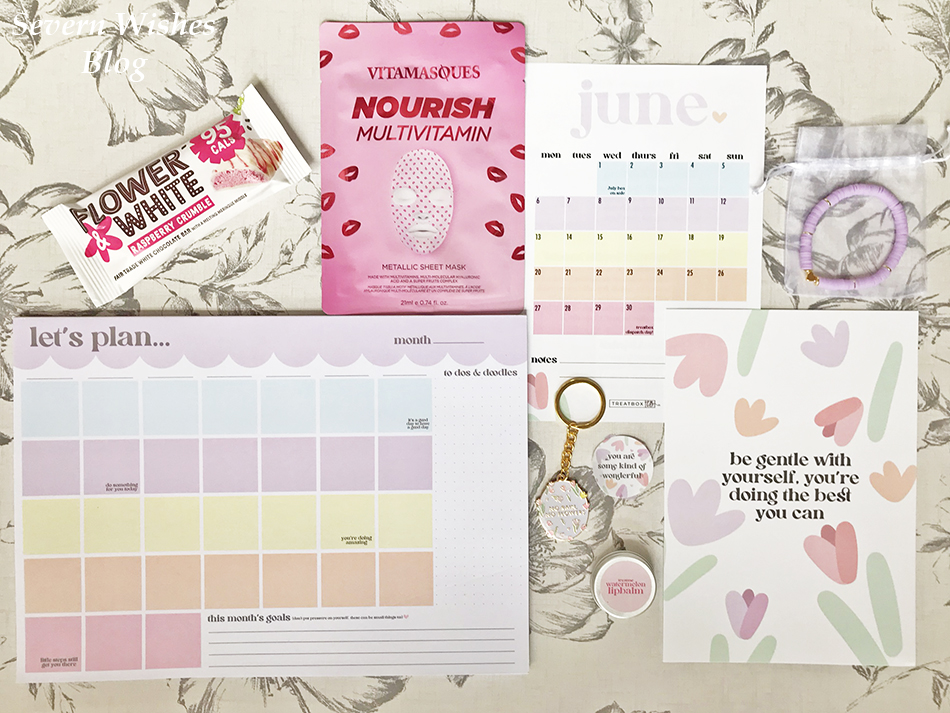
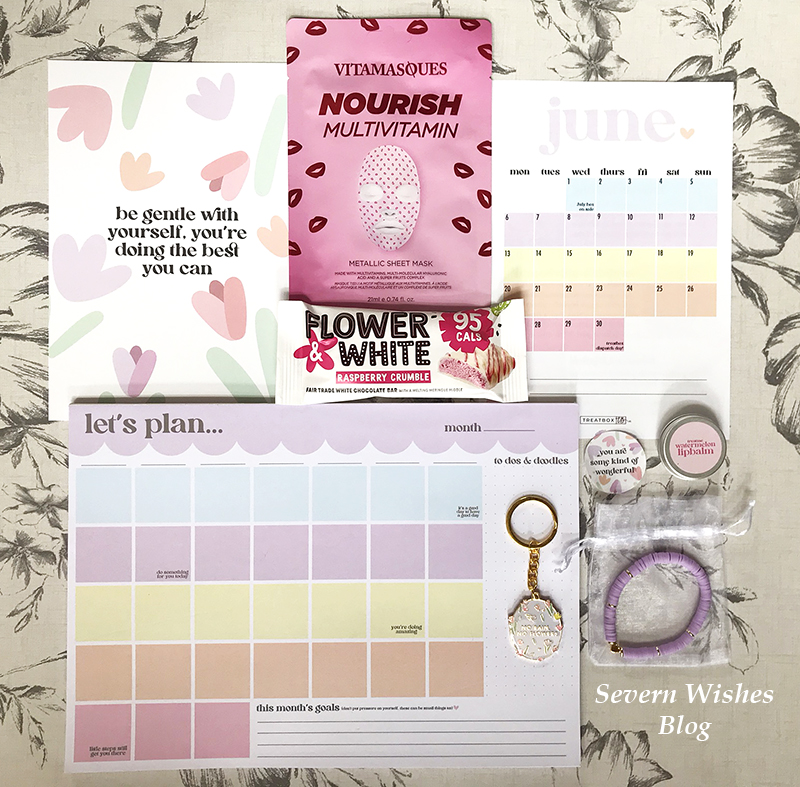
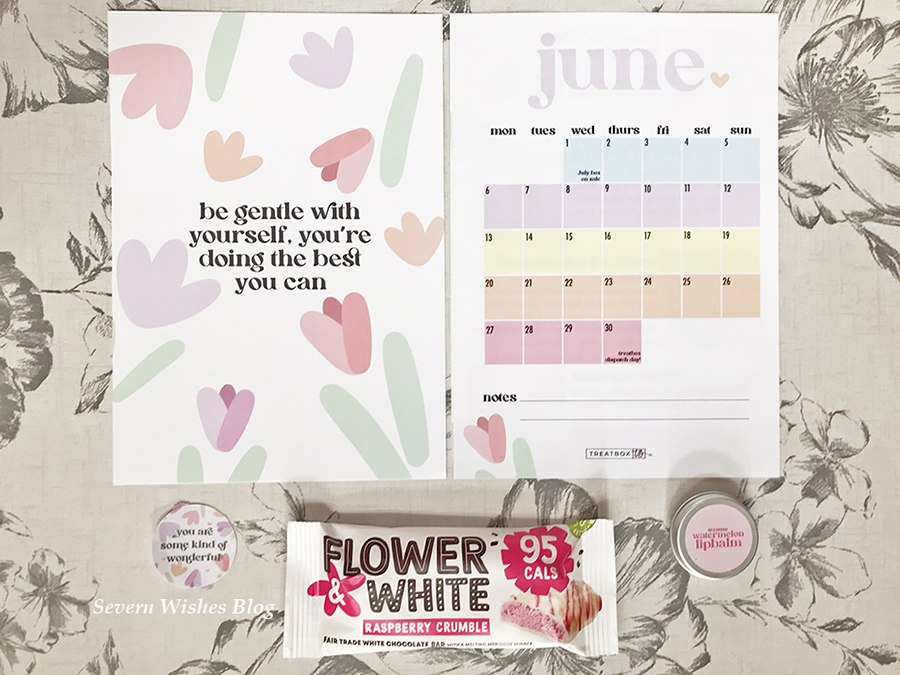
What was inside the June 2022 Treatbox UK?
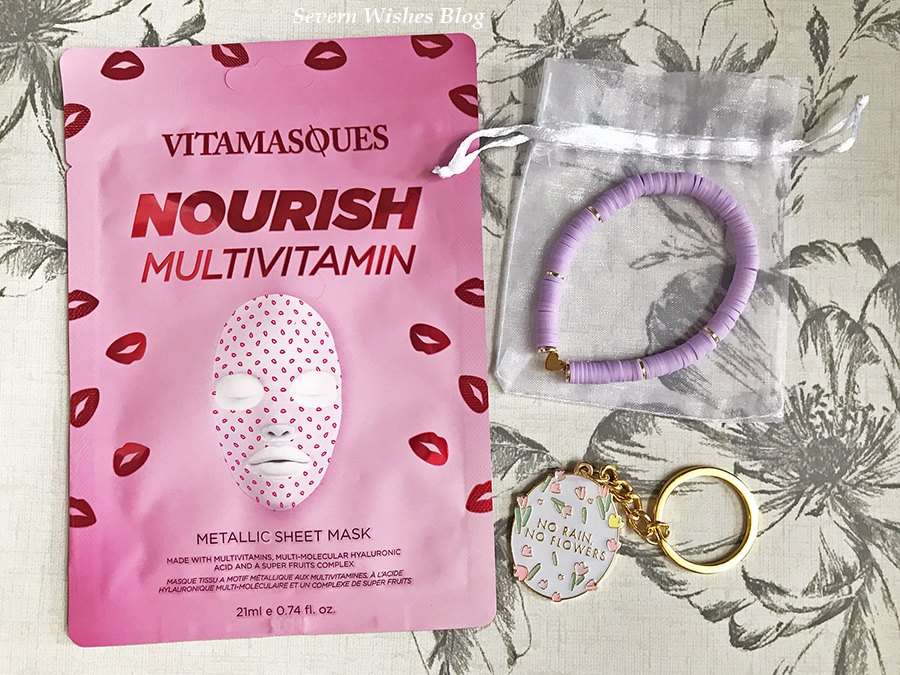
June 2022 Calendar Print Treatbox Original Planner and Monthly Notepad (2+ years worth of monthly pages) Watermelon Lip Balm 10ml Handbag Size Pot Flower & White ~ White Chocolate and Raspberry Crumble Bar 20g Vitamasques Nourish Multivitamin Metallic Sheet Mask 21ml Treatbox Original Gold Keyring with Quote “No Rain, No Flowers” Treatbox Print “be gentle with yourself, you’re doing the best you can” Heishi Bracelet with Gold Heart Centre (Colours at Random mine was Lilac)
My Honest Opinion for this Month
What a fabulous planner! I am all for staying on top of things like appointments and birthdays, I don’t like using my phone for everything these days as I’m trying to reduce my screen time. So using something like this Treatbox Original planner is right up my street! I love how colourful is is too!
I also really like the print this month, and the bracelet is stunning. It is lightweight and pretty against any skin tone, I received Lilac and Purple shades are some of my favourites so yay!
The Lip Balm is super summery and I have it on right now as I’m typing this out! It smells good too!
Love the fact that the Calendar Print and the Planner have the same design, colours are good!
I am looking forward to using the face mask this coming weekend on my down time self care hour and I am also going to enjoy munching the chocolate bar! White Choc and Raspberry is one of the best combinations out there, am I right?
Finally, a pretty keyring which I am going to stick on the opposite side of my handbag to the other keyring we got a few boxes ago!
Thanks for reading my Reveal today, and if you enjoyed it then don’t forget to follow me on some of my social media for all the latest photography and opinions on the Treatbox UK products when in use.
If you enjoyed this review then please check out my latest posts after you’re finished with this one.
Have you ever bought a Treatbox after seeing one of my reviews? I would love to hear from you if you did!
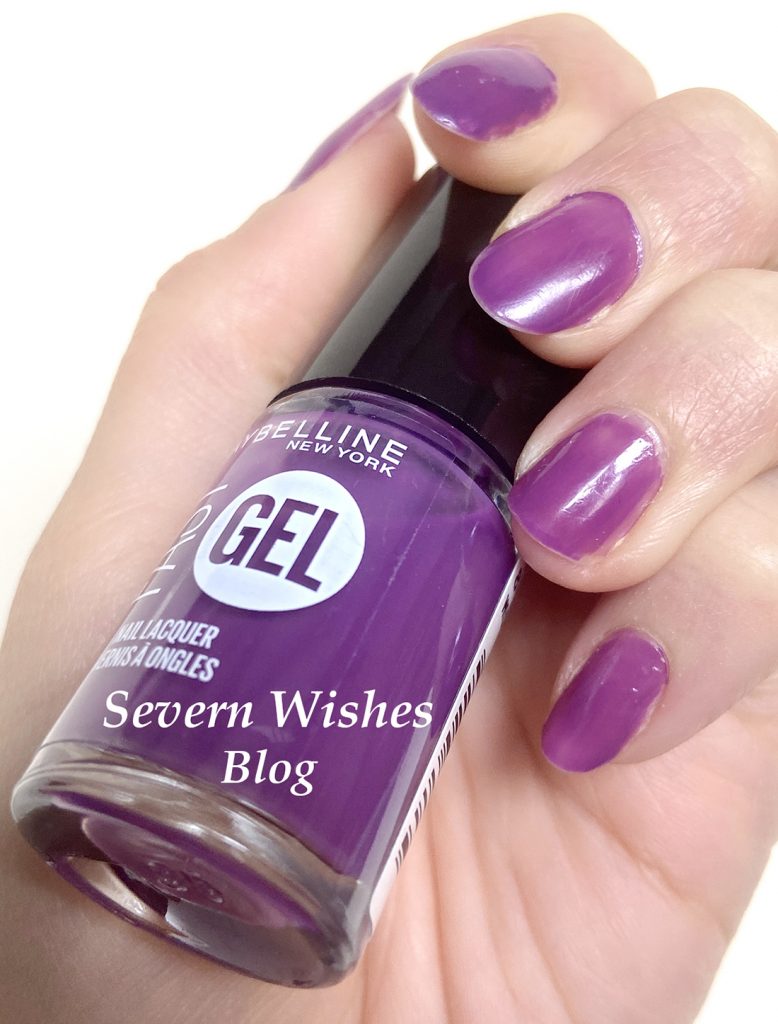
If you LOVE Purple Nail Shades THIS is the one for you!
Hello and Welcome to my Product Review today!
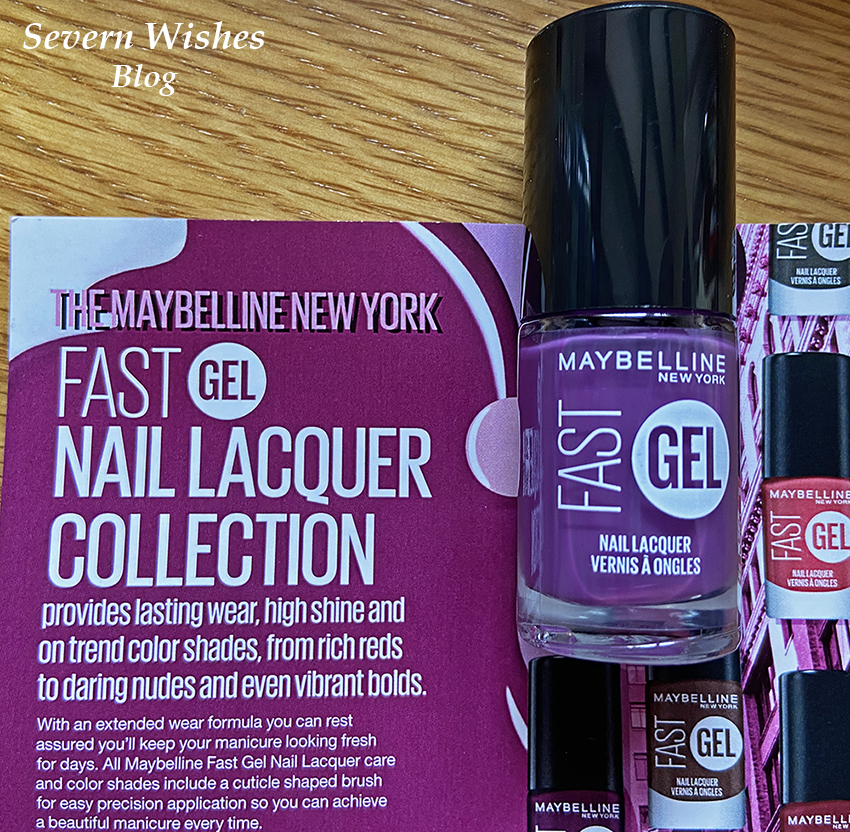
This Spring I became part of the UK Maybelline Team of Bloggers who Review products that are brand new out in the country. Maybelline New York is one of the leading brands worldwide for make up. I am grateful to have the chance to write reviews for them. Today I am reviewing the Fast Gel Nail Lacquer.
To see my other Maybelline Reviews after you’ve read this one, please click the Maybelline Category on the homepage of my blog.
I have been sent this sample for free for the purpose of providing a written review and photography across my social media platforms. I am always honest in my critique and review a product solely upon my own personal experience of using it.
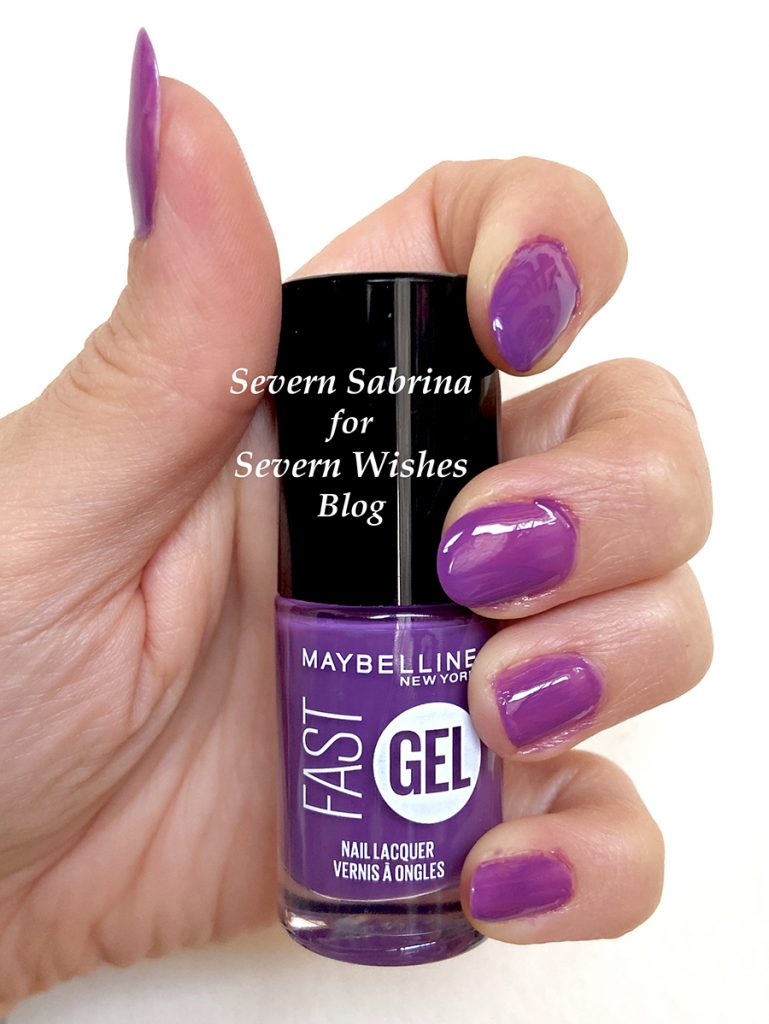
Day Number One – Two Coats – One Hour After Application (Above)
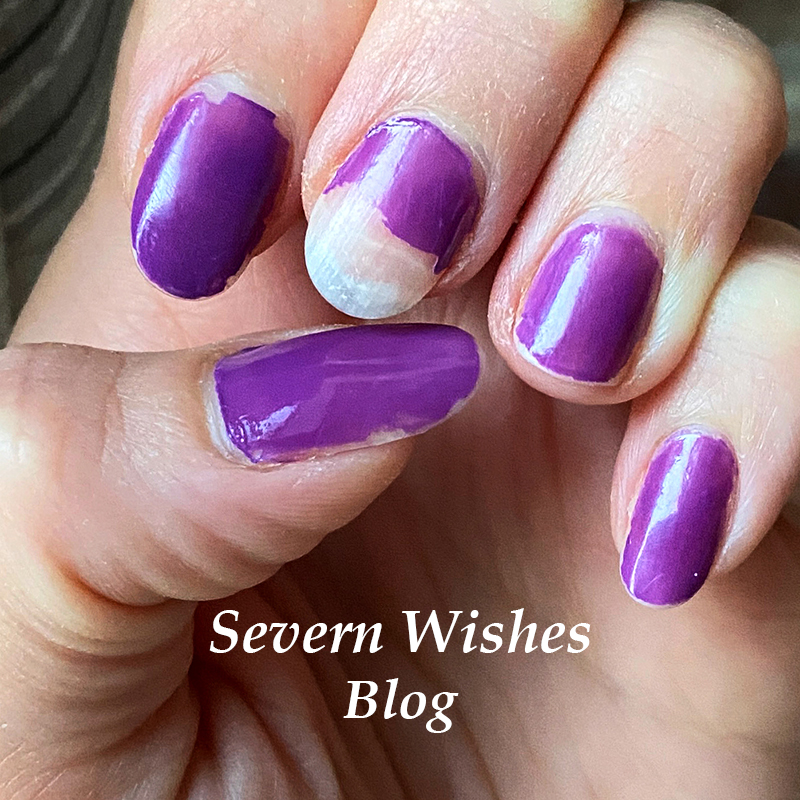
Day Number Three – Minimal Chipping – Slight Loss of Shine (Below)
About this Product
Name: Maybelline New York Fast Gel Shade: No.8 Wicked Berry Size: 6.7 ml
Day Number Seven, Minimal Chipping on all but one Nail, still shiny as you can tell by the reflection on the nails (Above).
✩✩✩
My Overall Opinion of the Product
I have been impressed by the quality of this product overall, and the staying power was excellent. I tested this Nail Lacquer over 7 days, taking periodic photographs to watch the progress. I painted a clear gel base to my nails before applying the Fast Gel from Maybelline, but I chose not to paint a clear top coat on my nails for two reasons. One was so as to test this product without an additional layer and two was so that the colour and shine of the original product was in no way altered.
Overall Appearance in Use 4✩ Overall Product Quality 4✩ Colour Choices 5✩ Staying Power 5✩
The Fast Gel did lose its original heavy glossy shine by Day 7, but some shine still remained on them (see image above), and they certainly looked good from a distance. If you wanted perfect nails for a whole week for example then I feel this Gel Lacquer would definitely go the distance, providing it was applied correctly and if you also applied a top coat too. I chose not too, and I feel they would have lasted a week or longer intact if I had done the top coat and if I didn’t do any gardening (LOL) that is how my middle nail became so chipped.
✩✩✩
Thanks for reading my Product Review today, there are plenty more just like this across my blog, why not check out the categories because I review all sorts of things.
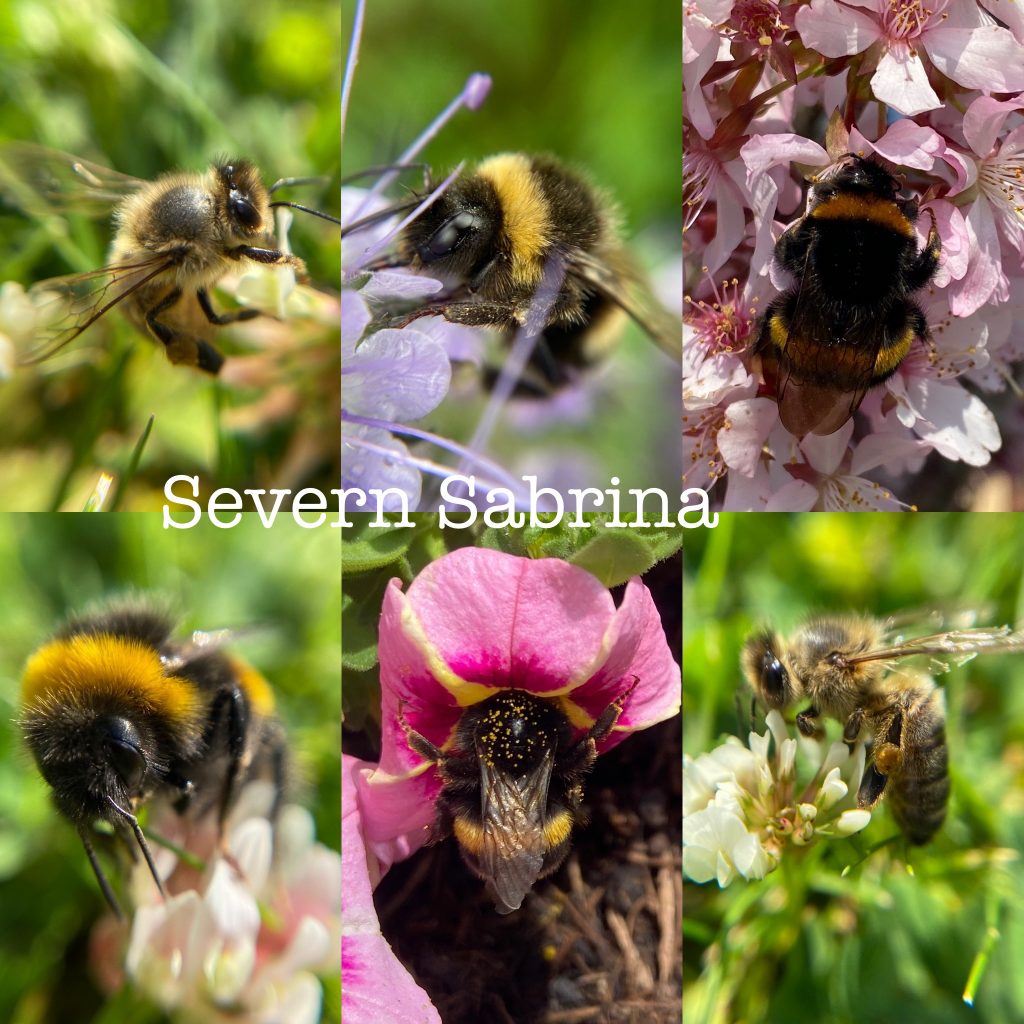
Here is a Photo montage of Bee’s that I have taken this past year… as a Nature Photographer I am constantly making images.
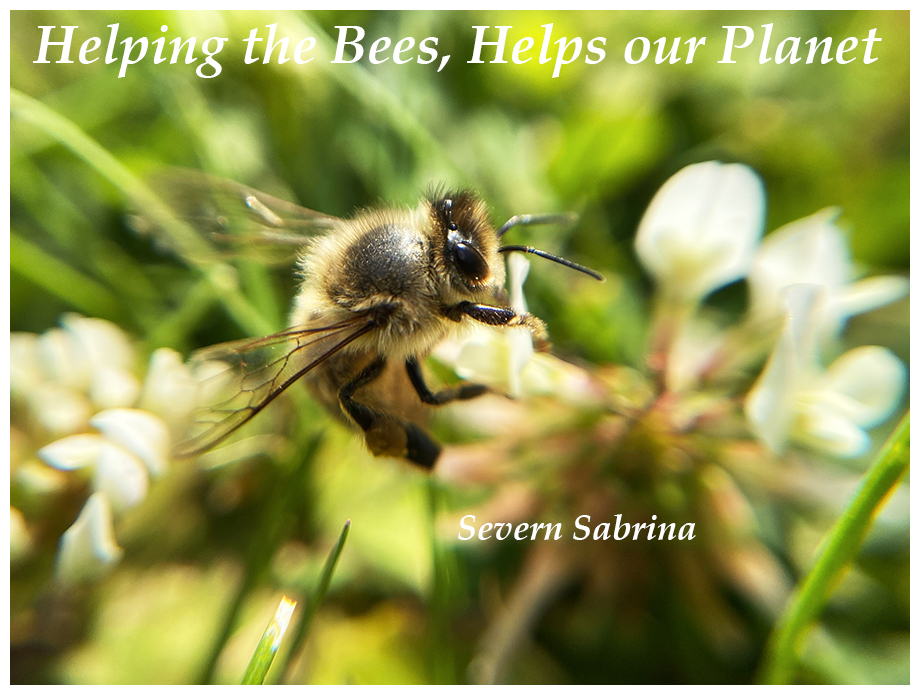
AWESOME FACTS ABOUT BEES
Bees are insects that have 6 legs and 5 eyes.
Bees have been around for approximately 30 million years.
Here in the United Kingdom we house around 270 species of Bees.
Worldwide there are more than 20,000 species of Bees.
Honey made from Bees was found inside the tombs of Egyptian Pharaoh’s and it would still be edible today.
Honey Bees communicate with one another through dancing moves!
Bees can fly up to 20 MPH!
Male Bees are called Drones.
Female Bees are called Worker Bees.
The Queen Bee can lay up to 2000 eggs a day and a hive will only have one Queen.
A Honey Bee will only make 1 Tablespoon of honey in their lifetime.
Some species of Bee are solitary and live alone except for reproduction moments, these often live underground too!
On average a Bee will fly 32,000 miles in their lifetime and visit more than 1 million flowers!
Honey Bees live in Bee Hives where they work together to make Honey.
If a Bee loses its stinger it will die – so make sure not to hit them and let them just fly around you and fly off again – once they realise you’re not a flower you won’t interest them anyway!
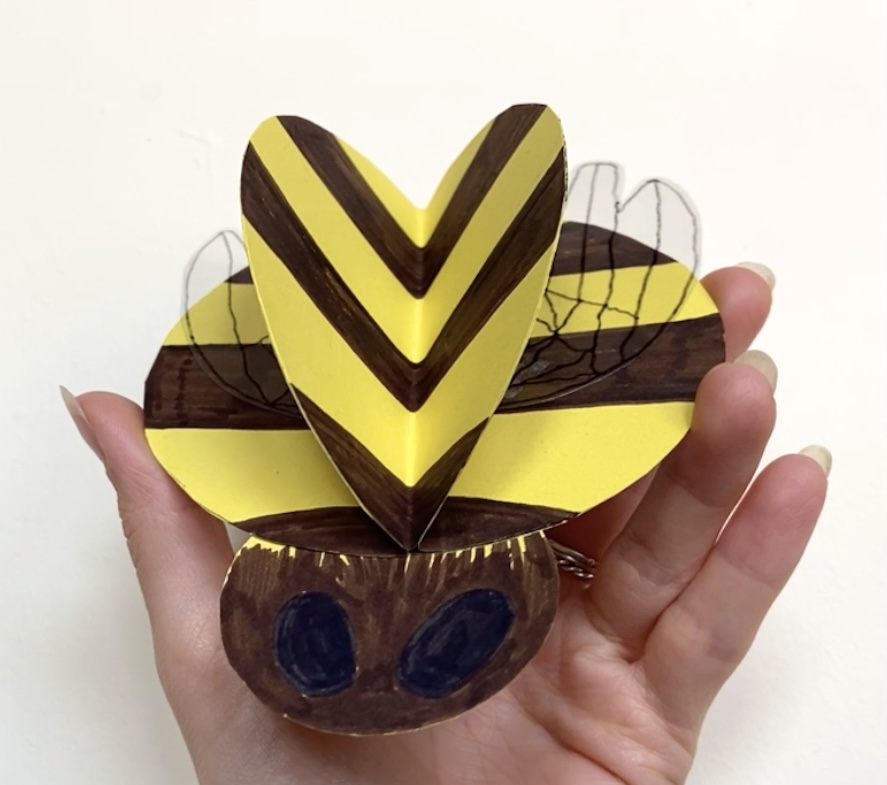
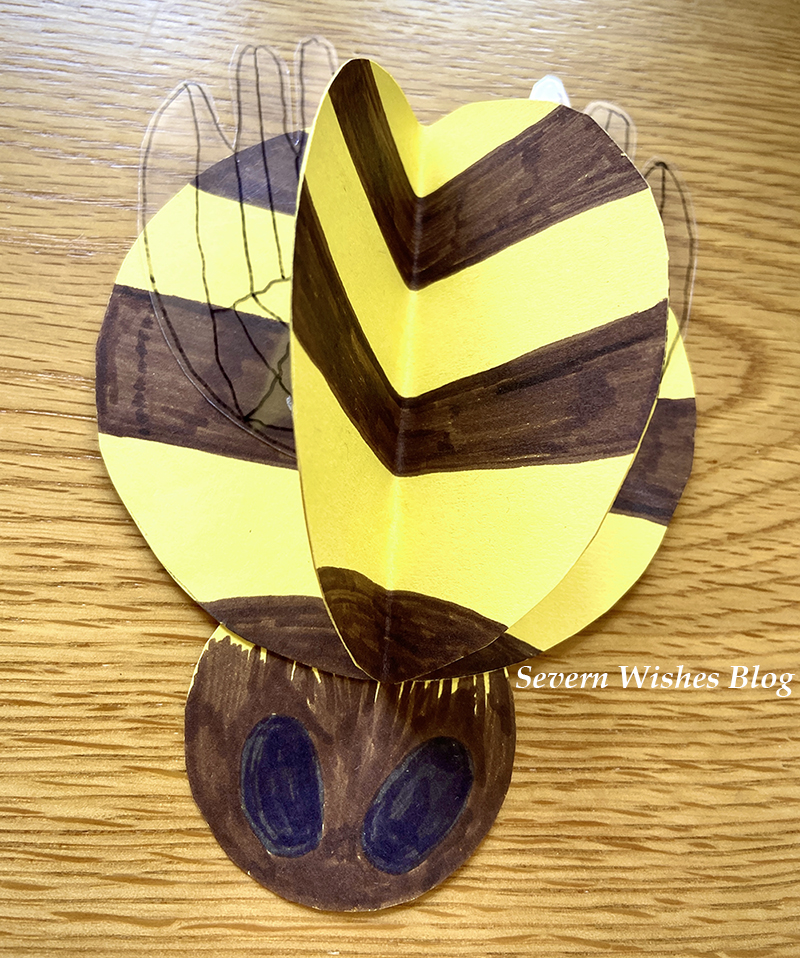
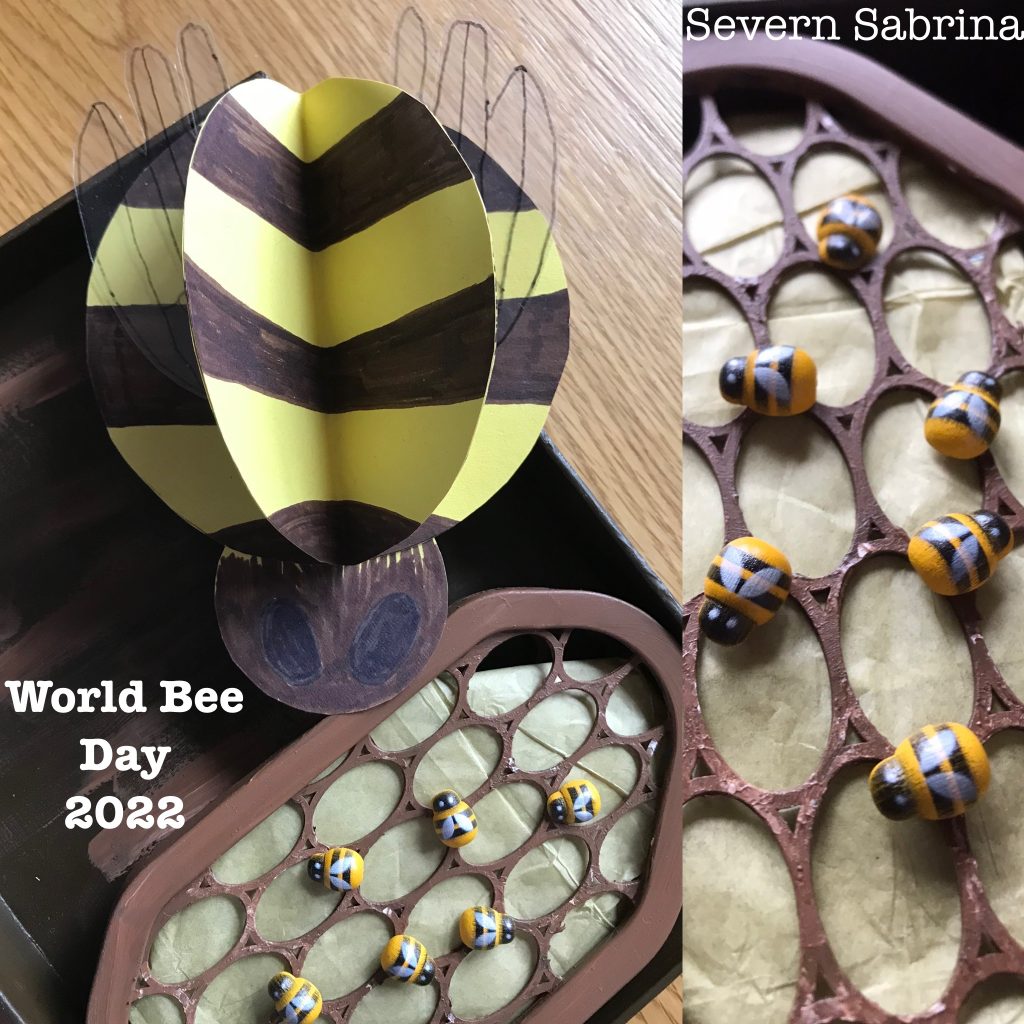
SABRINA’S HOW TO MAKE A 3D BEE!
I thought what better way to immortalise the Bee than to make your very own 3D craft version of one! I came up with this last year but sadly I missed the deadline for World Bee Day 2021, so I have saved it all for today! World Bee Day 2022! They are fairly easy to make and I will now tell you exactly what you need before we begin the how to method!
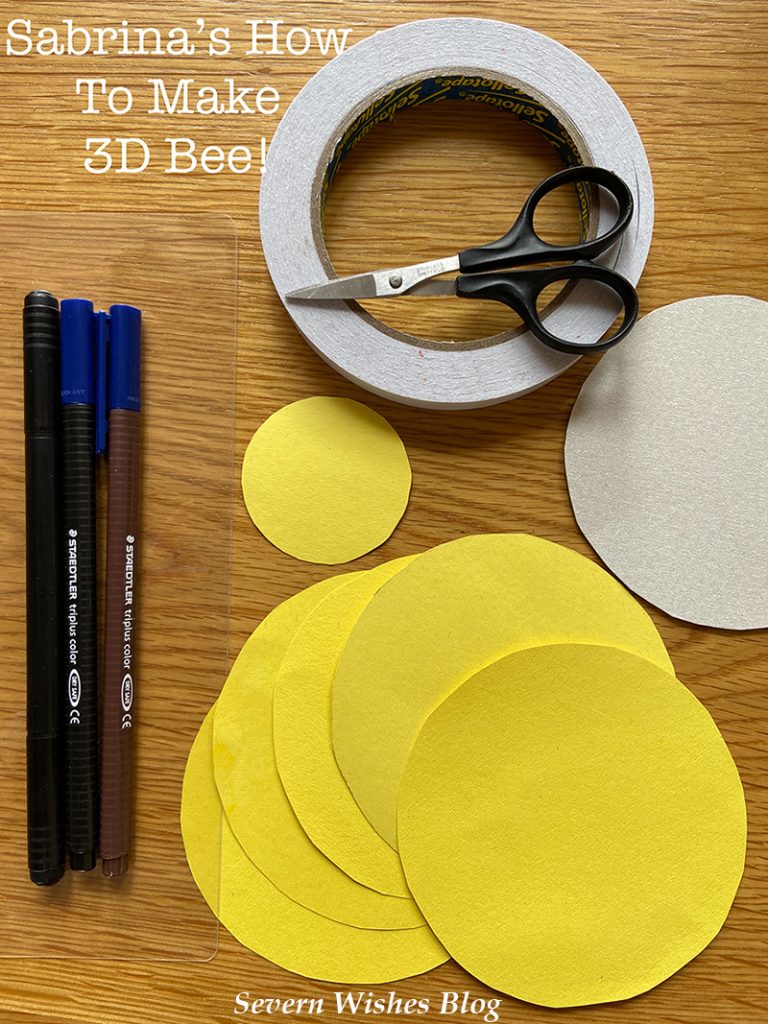
One Sheet of A4 Thin Yellow Card or Thick Paper One Scissors One Piece of Cereal Box Card Pens – black and brown A Permanent Pen – Black with a Fine End (for the Wings) Double Sided Sticky Tape A Piece of Thin Plastic (mine was off some toy packaging) (for the Wings) Two Circular Objects to Draw Around – 1 for the Small Bee Head and 1 for the Body Circles
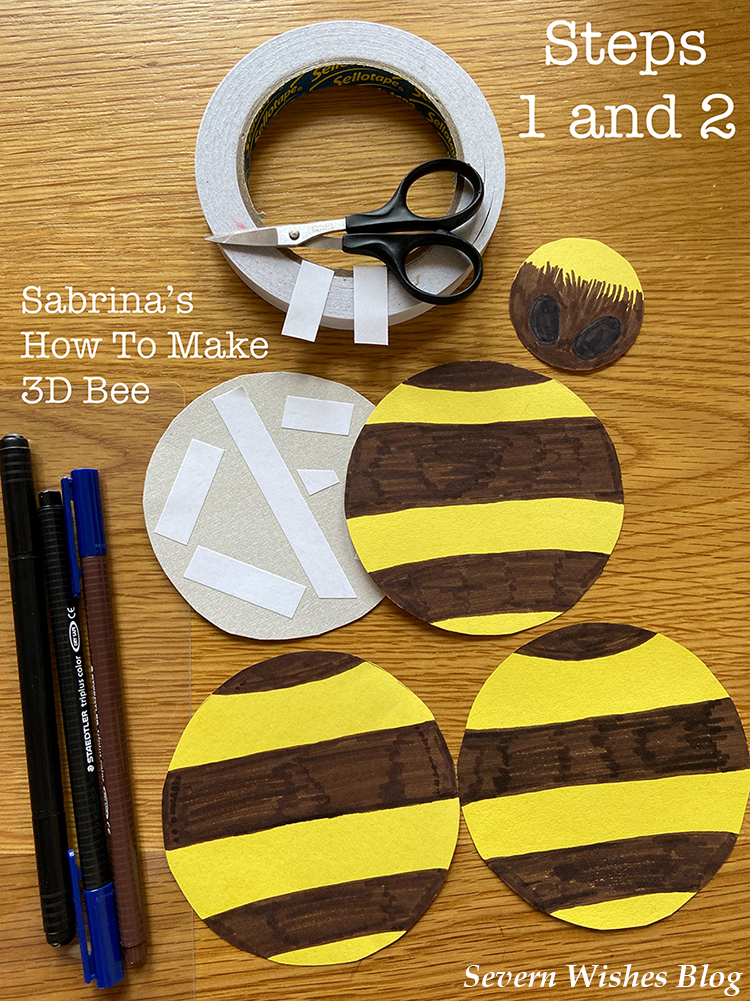
Step 1. Cut All of Your Circles Out – You need 1 head, 1 main body out of box card and four out of the yellow card. The yellow and the body have to be the same size, but the head needs to be 1/4 of the size. Put some double sided sticky tape on the cereal box card circle because this will be your base to work the rest up on. Put the other yellow circles down on a flat surface ready for their details.
Step 2. Draw some sections on the 4 yellow circles that will become the Bee body, you will need to have 3 sections that are lined horizontally and similar in size to each of the other matching circles (See image below). Colour these in Brown. The best thing to do is to have them on top of one another, mark the section the same and attempt to line them up with the opposite side. With the small Circle that is yellow (the Bee head), you need to draw two large Oval Eyes in Black, and then do some vertical lined streaks in brown so it looks like fur. Leave the top section of it Yellow, we will be sticking it to the body shortly.
Step 3. Stick the Head to the Body using double sided tape with only 1/4 of it attached to the Card and the rest sticking out. Now place the Bee in front of you, with the head facing you (facing South). You want to now take one of the striped yellow body sections, choose the one that is least lined up. Put some double sided tape on the back of it and stick it down on to the main card body, covering the edge of the head, with the stripes going horizontally across the Bee body. Place this beneath something heavy for a few minutes so as to stick it all into place while we do steps 4 and 5.
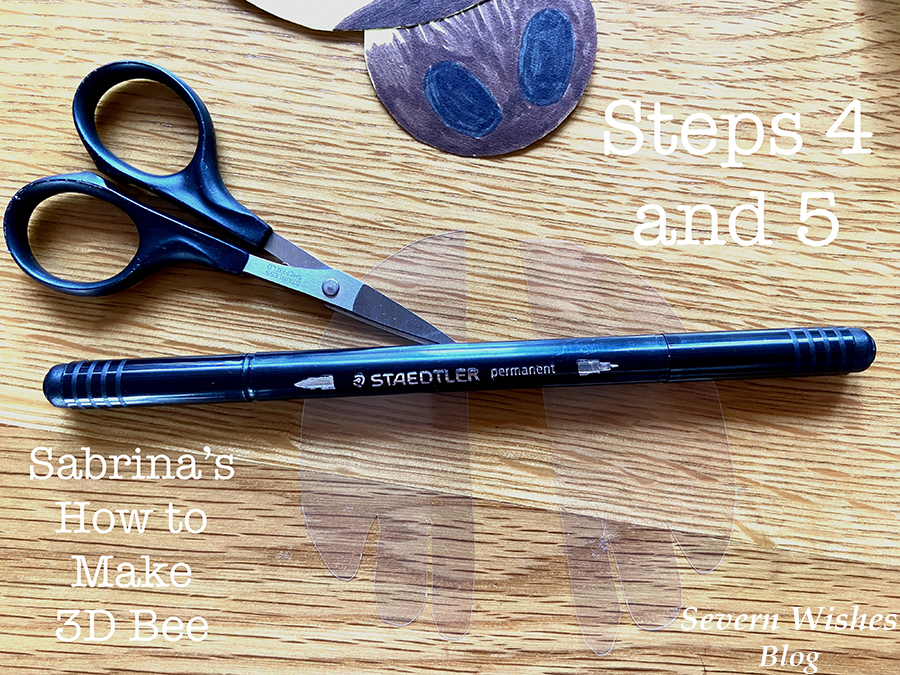
Step 4. Take your Plastic now and Scissors and permanent pen. You want to draw out two identical wings, Bee wings tend to have some ridged ends but you can just do ovals with a pointed end if you’re not confident (See Images below). Look at my Bee montage at the start of this blog post for wing inspiration! Once you are happy with the drawing cut them out, and make sure they’re the same size by overlapping them and trimming any overhanging edges.
Step 5. Draw some lines down the wings with the permanent thin pen, try to match the Bee wings (again take inspiration from my pictures at the start but be creative too this is your own Bee!) and match each other, make the same marks on both wings by having them side by side as you create the lines. Place them off to one side to fully dry. (If you use normal pen on plastic it will likely rub off).
Step 6. Now it comes to the tricky part, you need to take your Bee body parts and fold them in half, all three of them with the coloured lines on the inside of the half fold. Make sure that the centre is through the middle of the horizontal lined sections. Do this for all three and also make sure they are folded the same across the sections so when stacked together they are the same (or close as you can).
Step 7. Once you have folded them and they do match best they can, you need to take two of them to start with, and place some double sided tape strips on the one side of each one, so that is one taped only the left underside and one taped only on the right on the yellow underside of each of them. Take a look at my photograph below for clarification on the folds and the tape.
Step 8. Take your folded Bee body circles and place one on either side of the main Bee body with the head. Line them up with the circle that is already on it, the one you put the tape on the left underside goes on the left, and the right taped side on the right. When you push the body middles together they should be flush and straight in the centre and aligned with the head. Make sure the stripes line up and are horizontal to the head that is facing south, and the crease line for your folds should be straight up from that facing north. If this is accurate you can now remove the double sided tape, stick one side down at a time, to the main body. Then do the opposite side (see Step 7 and 8 images) and this leaves you with the other half of each circle standing up on end. The final circle you still have will go in between them causing the body parts to stand up 3D.
Step 9. Attaching the final circle on to the body is just about lining it up. First you need to put some double sided tape on to the pieces that are already attached to the Bee body that you stuck down in Step 8. (See image Steps 9 and 10 to clarify this next step). With the double sided tape now in place but not removed the tabs yet, you first line up the circles, look at it and think do the edges match and is it horizontal across the body? If the answer is yes then remove the tape tabs and stick that final circle on to the top of the Bee in between the other pieces.
Step 10. Press and hold the Bee body firmly now, gently run your fingers down each of the sides to press the circles fully together and ensuring the tape grips flush. Once they look like they are fully stuck with no gaps anywhere you can now make sure your wings are dry from earlier.
Step 11. Take your plastic wings from before, line them up with where you want them to go on the Bee body (they are usually attached to the middle section of a bee’s body). Then take two thin strips of double sided tape and match those up on either side, stick down the tape. (See Step 10 and 12 image for wing tape placement).
Step 12. Attach the wings now and make sure you press them down on to the tape for at least a minute to ensure the plastic gets a really good grip. Hold the Bee upside down and make sure they don’t come loose, if they do then press again.
Step 13. Tidy up any lines on the Bee and trim any edges with scissors that aren’t in line to neaten her up. Then you have your Queen Bee! You could hang her up somewhere or make her a little hive…
HAPPY WORLD BEE DAY! You now have a friendly Bee to live in your home and remind you of their importance, coolness and cuteness.
WHAT CAN YOU DO TO HELP THE BEES?
Make a wildflower pot, planter or corner of your garden and attract bees and help them with their pollinating. You can get wild flower seeds free with some things such as “30 Days Wild) and Brands often give them away with food products too.
Don’t pull out all of your weeds, leave a few because bees need them especially because weeds are usually the first flowers of the new season.
If a Bee comes into your house leave it alone, open some windows and let it find its way out, do not attack it or attempt to catch it because it may sting in fear and then it will sadly die. Most Bee’s will head straight back out a door or window when they smell the fresh air.
Visit a local Apiary and But Local Honey products when possible.
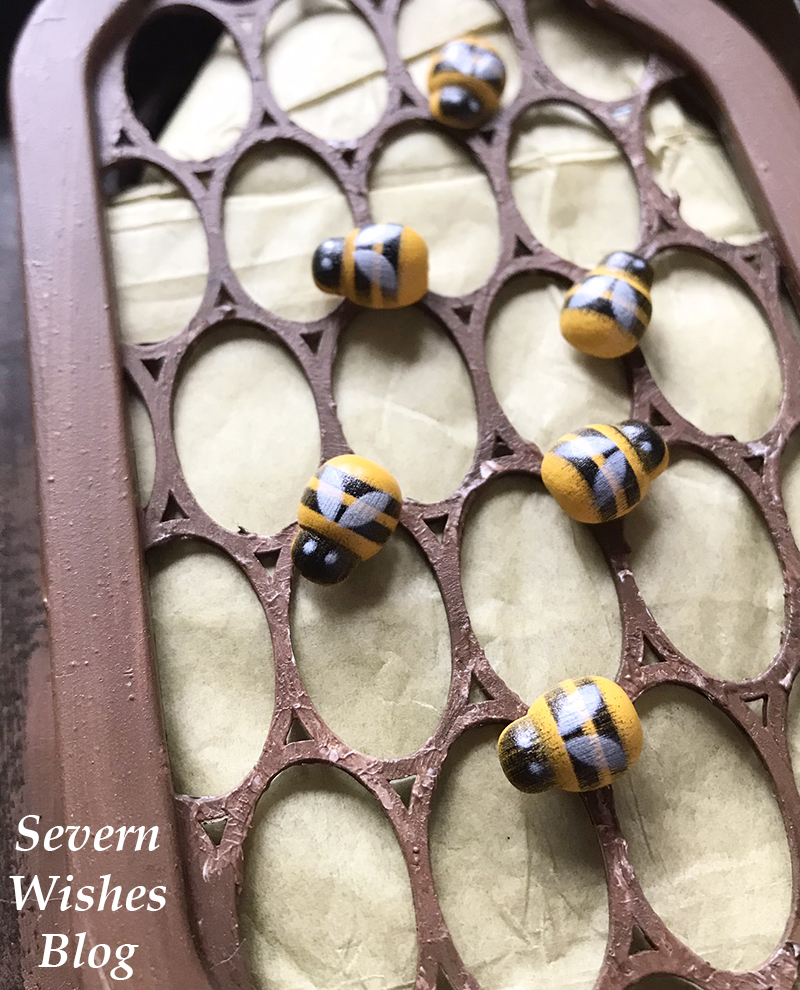
WOULD YOU LIKE TO MAKE A CRAFTY BEE HIVE? What You Will Need
Tiny Craft Wooden Bees (Found in The Works craft shop) A Narrow Sided Box or a Lid from Something (Rectangle is best) Disposable Dehumidifier Pot Lids – doesn’t matter what colour as you will Paint them Brown Paint and a Paintbrush
Step 1. Paint your box and the humidifier pot lids you have collected, they should be brown or a mixture of brown and black and yellow. Step 2. Leave them to dry somewhere flat overnight at least. Step 3. Place something to resemble honey and nectar between the lids, maybe tissue paper? Step 4. Stick the Two (or more) lids together to form mini hive type structures. Step 5. Stick the lids into the box and stick your Bee’s around. Done!
Thank you for taking the time to read this blog post today, I hope you have enjoyed it. If you make any Bee’s please share your pictures with me on social media, use the hashtag #SevernSabrina and #SabrinasHowToMake or tag me on them using @Severn_Sabrina or @SevernWishes Blog.
Have a wonderful World Bee Day 2022!
✩ Sabrina ✩
By continuing to use the site, you agree to the use of cookies. more information
The cookie settings on this website are set to "allow cookies" to give you the best browsing experience possible. If you continue to use this website without changing your cookie settings or you click "Accept" below then you are consenting to this.