FOOD WEEK ON SEVERN WISHES

Delicious Recipes That I Love To Cook – Time Saving Ideas For Healthy Eating And Tasty Eating
My Culinary Background
If there is one thing I love, it’s eating food and cooking food. I was first taught how to cook by my grandparents, I was very young at the time, and it began with simple things like Omelette and decorating your own homemade Pizza dough. Then we moved on to more complex things like Lasange and Pies. But as I got older I carried on with my interest in cooking, I started to experiment with flavours, and I also liked various parts of my heritage to come through in the meals that I cooked.
When I went off to University my Nan had written out some of her basic recipes in a little book for me – just in case I forgot anything. It is kept safely away now in case I ever need it, but most of it is now cooked through memory. I am forever grateful for her teachings, and she still tells me about new things now and again more than twenty three years since we began cooking together.
I met my husband at University, and at the time he couldn’t believe how much I ate! I was this tiny petite women and everyone in my family used to say I had a hollow leg! I won’t ever forget when I first cooked for him, I introduced him to a whole new world of flavours when we first met. There were foods he had never tried before, and there were things we also tried together too. And since then I have branched out into cooking even further, into both his background and his culture, and even into some more diverse parts of the world after going travelling with him. We both love to try something new!

My husband does suffer with an array of allergies, the majority of which are food related. This was problematic when we went travelling. Since we began living together (almost ten years ago now!) I evolved my ways of cooking to exclude the things he couldn’t have and simply substitute them for something else.
One thing I do like to do is eat healthily but by making sure its tasty and enjoyable. I often pass my recipes on to family and friends, but I wanted to share some of my favourites on my blog too. Because they can be adapted for whether or not you eat certain meats, or are vegetarian, the possibilities are endless, if only you know what goes together. And that comes with years of experience in the kitchen.
What I wanted to achieve by writing and sharing this blog post was to help you cook, give you new and easy to follow recipes and if you love what I’m putting out you can tell me and then I can write more posts like this one!
So for now… Let’s talk Time Saving in the Kitchen!
Time Saving in my eyes is this, you don’t have to cook everything from scratch every night of the week. It means you either have leftovers in the fridge or a batch of something in the freezer that can either be cooked in the oven straight from or defrosted during the day and then heated on the hob later…
All you need to ensure is that all the ingredients you choose to cook with haven’t already been pre-frozen. So don’t defrost raw meat, cook it in this recipe and then freeze it again. Use fresh foods and then have some bags or tubs at the ready to freeze your leftovers if that’s what you plan to do. If storing in a fridge Glass is best, the amazing Glass Pyrex range of sized dishes with lids are an excellent investment to make. I have the set that can go straight from cold to hot such as fridge to oven.
Let’s Make Some Tasty Food!
Today I am going to share three of my favourite time saving recipes with you. This will either do you 8 portions to eat, refrigerate or freeze. It’s up to you!
✩✩✩✩✩✩✩
Sabrina’s Tasty Italian Ragu
My Meaty and Tomato Ragu can be used for any of the following meals; Spaghetti Bolognese, Lasagne, Chilli Con Carne, OR simply Ragu Sauce to eat with Rice, Pasta or Potatoes.
All you would need to do is add additional herbs and spices to the Recipe below in order to make one of the meals above. Or leave the sauce as it is, and you can serve it with a wide variety of side dishes. If you aren’t sure how to turn this Ragu into one of the above meals leave me a comment and I’m happy to respond with that you’ll need.

✩ Ingredients ✩
Mince Beef – 400-600 grams (10-20% Fat is best)
Pork Mince 250-500 grams (Low Fat is best)
Lean Bacon or Lardons 250 grams – Diced (not Smoked for Children)
Tomato Puree – 100 grams
Chopped Plum Tomatoes – 3 Tins (400 grams each)
Carrots – 4 Large – Diced Fine
Large White Onion – 2 Sliced or Diced Fine
(Optional) Celery Sticks – 4 Diced Fine
Fill the 3 Empty Plum Tomato Tins with Boiling Water, then add these contents to a jug (careful the tins will go hot!) and add a Beef stock cube/pot to this and then stir through.
Vegetable Oil – 1 Tablespoon
Pepper – To Your Taste
Salt – To Your Taste
Oregano – 3 Tablespoons
Basil – 1 Tablespoon
Rosemary – 1 Teaspoon
✩ TOP TIPS ✩
You are aiming for around 1kg of Meat in this Ragu and it will then Serve Approx 10-12 Portions of Food.
If you have a Food Processor Use It! Blitz the Onions and Carrots together on Dice for a quicker start to your Ragu. Add your Optional Extra’s after this stage too so everything is the same size!
✩ Recipe ✩
1. In a large saucepan brown the meats together. You need very little oil due to the fat and then drain half of the fat off after around fifteen minutes.
2. Make sure your meats are cooked through and then add your tomato ingredients and then the jug of stock.
3. Simmer for twenty minutes with the lid on the saucepan.
4. Add all of your herbs and the diced vegetables, and mix well.
5. Simmer the saucepan now with a lid on top for around 1 hour. The liquid should reduce down and the sauce begin to thicken.
6. You know when your Ragu is ready because it will taste “together” with all the flavours having marinated as one and it will have thickened up nicely.
7. You can serve this with a range of side dishes, or freeze it all!
✩ Storage ✩
You can store this meal in freezer bags or in tubs, it will keep for a month! Remember to defrost a portion before you reheat it, and then you can also add other spices into it once it is chilled too!
✩✩✩✩✩✩✩
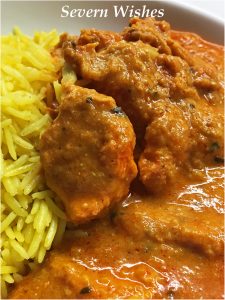
Sabrina’s Tasty Chicken Curry
My Curry is a mixture between a Chicken Tikka and a Chicken Bhuna. It isn’t spicy but it isn’t mild either, and it has a few vegetables in it as well. You can choose to leave these whole for adults or dice them finely for children who might be a little picky…
It’s also nice to consider adding other things to curry to bulk it out, peppers and onions work best but so do a variety of other vegetables. You can also bulk it out with additional tomatoes that aren’t just made for the sauce but left as chunks.
If you don’t want to use Chicken you could use a vegetable such as Cauliflower. Or Pork Belly is a nice meat for Curry, but it would need to be left in to Simmer for longer to make it tender.
 If I am eating a portion of my curry alone I cheat by using one of those microwave Pilau Rice to go with it! They are Super Tasty and convenient! If you’re doing Rice for a few people though and on a regular basis then I highly recommend you invest in buying a Rice Cooker. They save you loads of time and you don’t have to stand their making sure your rice doesn’t stick to the bottom of the pan. Ours is from a simple one from Argos!
✩ Ingredients ✩
Chicken – Diced 400-600 grams (Portions 4-6)
Tomato Puree – 100 grams
Chopped Plum Tomatoes – 1 Tin (400 grams)
Plain Yoghurt – 100 grams
Large White Onion – 1 Sliced or Diced
(Optional) Yellow Pepper 1 Sliced into Chunks
(Optional) Red Pepper 1 Sliced into Chunks
Vegetable Oil – 1 Tablespoon
Salt – Pinch
Pepper – To Your Taste
Sugar – Pinch
Paprika – 1 Teaspoon
Garam Masala – 2 Tablespoons
Cumin – 1 Teaspoon (Mild) / 1 Tablespoon (Medium)
Chilli Powder – 1 Teaspoon (Mild for Children) / 1 Tablespoon (Medium)
Lemon Juice – 1 Tablespoon
Garlic – To Your Taste
Coriander Leaf – 2 Tablespoons
Curry Powder – 1 Tablespoon
(Optional) Ginger – 1 Teaspoon Sliced Thinly and Diced
(Optional) Coconut – Dried or Raw or Shredded – 1 Tablespoon
50ml of Warm Previously Boiled Water
✩
✩ Recipe ✩
1. Fry the Onion and Chicken in a Pan until Browned in a little oil. Add the Chunks of Pepper and Fry until Softened.
2. Start Making Your Sauce In Another Larger Saucepan that has a lid, by combining the tinned and packet items first such as the Tomato ingredients and yoghurt.
3. Then add the spices and herbs in to the saucepan one at a time, stir the pot thoroughly after each one.
4. Once all ingredients are combined add the browned chicken and onions to the mixture and stir through until all the pieces are coated.
5. Finally add the Water and Simmer the Pan for up to 1 hour. Stir every few minutes to avoid sticking and stirring through the flavours.
6. The Curry is Ready when the Sauce has Reduced down and Thickened, and the Chicken is left tender and moist and cooked through.
7. Serve with Rice and perhaps a Naan Bread which is also delicious to mop up any sauce!
✩
✩ Storage ✩
This meal can be cooled and stored in the fridge for two days or it can be frozen in portions once it is cooled and can be used within one month. Defrost thoroughly in the fridge over night before reheating.
✩✩✩✩✩✩✩
Sabrina’s Tasty Mediterranean Vegetable Pasta Bake
One dish that I love to make that also contributes to two of your five fruit and vegetables a day is my tasty Mediterranean Veg Pasta Dish!
 What you will need for this tasty dish is a selection of your favourite vegetables that pair well with a tomato based sauce. I will firstly explain my main ingredients for this dish and then outline the other things you can choose to put in if you want… This also includes a choice of Topping as well!
✩ Ingredients ✩
Pasta 80 grams per person – the Shape is your decision
Tomato Puree – 50 grams (100 grams if you like a rich sauce)
Chopped Plum Tomatoes – 1 Tin (400 grams)
Large White Onion – 1 Diced
Green Pepper – 1 Sliced and Diced into Chunks
Yellow Pepper 1 Sliced and Diced into Chunks
Red Pepper 1 Sliced and Diced into Chunks
(Optional) Courgette – 1 Sliced
(Optional) Cherry Tomatoes – 3 or 4 per person
(Optional) Small Red Onion – 1 Diced
Oregano – 1 Tablespoon
Basil – 1 Tablespoon for Sauce 1 Tablespoon for Top
Garlic – As Fresh or Granules or Salt or Diced – 1 Tablespoon
Black Pepper – To Your Taste
Salt – To Your Taste
✩ TOP TIPS ✩
Use a Glass Tray for Pasta Bake, it makes it so easy to transfer from appliances!
De-Seed your Peppers before dicing them to ensure no seeds in your meal.
✩ Recipe ✩
1. While you boil a pan three quarters full for your Pasta to become cooked in, preheat an oven to 180’c (160’c Fan).
2. Place your chopped and diced vegetables into a tray, coat with a little oil and oven bake for 25 minutes. (This includes the peppers and onions and any of your optional extras etc). Stir after this time and put on for a further 15 minutes.
3. To make your sauce combine in a jug the tomato puree, chopped tomatoes and herbs and spices. Stir thoroughly. Season it to taste and place to one side.
4. Cook your pasta on a hob while your vegetables soften for their final minutes in the oven.
5. Once cooked strain your pasta. You then want to add it to the Roasting Vegetables in the tray. In order to do this remove the tray from the oven, place on a heat protective surface and stir the contents of it together.
6. Then quickly add your sauce from the jug and stir, followed by the pasta and stir. Your sauce should coat all of your ingredients, if it doesn’t seem like enough fill halfway up the now empty tomatoes tin with partly cooled boiled water. Add in 1/4 of the amount in the tin at a time, stirring constantly until all of in the tray is coated in sauce. You don’t want your pasta swimming!
7. Shake the tray from side to side gently allowing the contents to settle flat. At this stage you can add some cherry tomatoes on to the top and a sprinkle more of some basil if you like basil. These tomatoes will bake on the top nice and soft.
8. Put the Pasta Bake into the oven at the same temperature as earlier (160’c) and leave it for around 15 to 20 minutes. If at this stage you want to add some grated cheese on top, carefully remove the tray, wobble it and stir at the edges to make sure it isn’t sticking. If it is sticking then stir it all thoroughly before sprinkling on your cheese.
9. Bake for more 10 minutes or until the cheese is melted and browning. Serve in bowls with Garlic Bread on the side! Yum!
✩ Storage ✩
This pasta will keep overnight in the fridge for leftovers the next day. Ensure it is heated through thoroughly in smaller bowls when you come to finish it off.
 ✩ Additional Tips ✩
You can choose to add meat to the Vegetarian Pasta Bake if you wish, just remove one of the vegetables from the “you choose” part and keep the same amount of grams. For example, 100g of Chicken Breast Chopped OR 100g of Bacon Lardons (Avoid Smoked and Limit Portion for Children Due To Salt Content).
If you don’t like one of my ingredients remove it and substitute it for something else. It could be a herb or a spice or a vegetable. It will of course alter the taste slightly, but we’re all different at the end of the day.
Adding a little Grated Cheese on top of your food is definitely allowed in my house!
Don’t be afraid of just putting your favourite vegetable next to the meal on the plate, you don’t have to put it inside a meal if you don’t want to. Do that fresh every time you cook and that will count towards your five a day too.

Delicious!
✩✩✩✩✩✩✩
Thank you very much for reading this post, I hope you have enjoyed it. If you cook any of my recipes please leave me a comment and let me know how you get on! And if you want to republish any of my recipes then please credit me as the original recipe creator! Thank you!
✩ Sabrina ✩
