Sabrina is a Lifestyle, Parenting and Product Review Blogger. A Writer, Photographer, Reviewer, Home Cook, Crafter & Nature Enthusiast. You will find a bit of all those categories here on Severn Wishes Blog, Welcome to Sabrina's Lifestyle Blogging & Honest Reviews.
My Delicious Red Wine Casserole Recipe is a winner for the whole family to enjoy. And it’s got plenty of vegetables in it too, with a rich red wine gravy sauce.
You can have a tasty dinner in 3 hours, with a 30 minutes preparation time and a 2.5 hour cooking time. Easy to do and leave in the oven while you do something else! It is a very handy recipe to have when you have to help your children with homework this Autumn.
I will do my ingredients list as if you were serving 4 people. I do this meal for my son and I, and it then reheats well the next day when stored in a fridge once it has cooled from the original cooking. I do it in a Pyrex Casserole Dish with a lid, and it can then be cooked and stored easily.
Ingredients
Vegetables 4 Carrots (1 Medium Carrot per person) – finely diced is best. 2 or 3 Large White Onions (at least half a large onion per person) – finely diced or small pieces. 1 Tin of Chopped Tomatoes 400g (Make sure to add some warm water to the tin, add this in to the dish in order to create your liquid for your stock). (Optional) Mushrooms – Small Washed Button Mushrooms are best.
Accompaniment / Side
Long Grain Rice prepared per person. 1 Tin of New Potatoes 600g (serves 4 people) This can be added to the Casserole and they will cook during the time frame. 500g Mashed Potato prepared during the final half an hour of cooking.
Meat / Vegetarian Alternative
300g – 500g of Casserole Meat of your Choice – I use Beef or Chicken or Quorn – all of which go really well with the Red Wine Sauce. Plain Flour for Coating the Meat (Contains: Wheat)
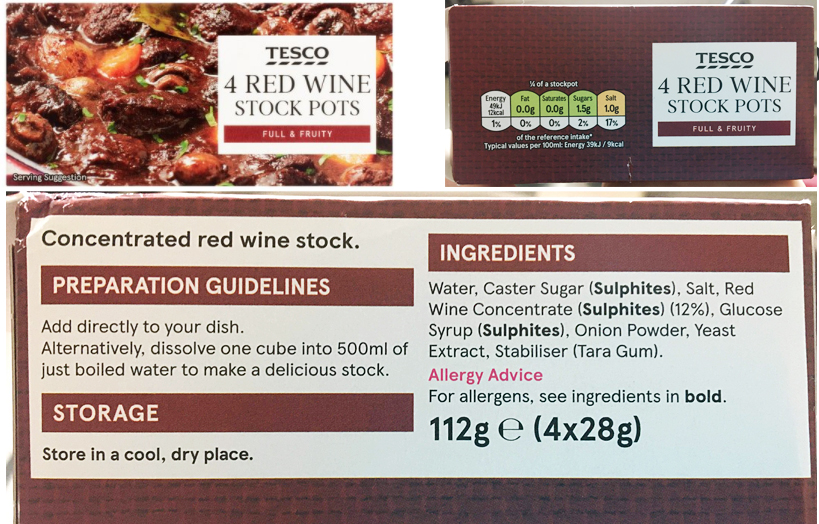
Sauce Tesco Red Wine Stock Pot – 1 for a 4 person Casserole. (Contains: Sulphites)
Tesco Stock Pot Red Wine Packaging 4 x 28g
Method
1. Start by preparing your meat, it will require 2 hours or up to 2.5 hours of cooking time. Mix your cut up raw meat with some plain flour in a bowl. You want bite size pieces and all coated in flour. Then you want to fry these off in a tiny bit of oil until sealed but not overcooked, you don’t want the meat to go dry.
2. Next you need to prepare your vegetables. Dice and Fry your Onions after you finish with the Meat/Veg Option. Dice with a knife or throw them all into a food processor to chop them up, it won’t matter to the end result, but you don’t want too big pieces. Don’t cook the Carrots, there is so need, you just want to chop and add them to the casserole dish, they will cook in the stock.
3. Speaking of Stock, that is your next thing, pop your chopped tomatoes in the dish, add water to the tin, and then add that to your dish. You need to add the stock pot, mix thoroughly.
4. Add the rest of whatever you have, vegetables, fried onions, sealed meat, mix together in the stock and then pop the lid on. Preheat your oven and cook at 160 degrees (fan oven) for 2 hours. Check and stir the casserole at that point and then pop it back in the oven for another 30 minutes. (You can do your mashed potato or rice during this half an hour if you didn’t add potatoes to the dish).
5. Be careful when you remove it from the oven as it will be very hot. Serve in bowls with your chosen accompaniment, and enjoy!
Thank you for reading this Recipe post today, I hope you will give this one a go if you can find the stock pots. I love Tesco own products and I love to shout about something if it’s an excellent product, and these most definitely are! They are affordable and allow you to make something that is both delicious and healthy. Please let me know in the comments below if you do this recipe and how it turns out! I hope you like it!
These cookies of mine are not only delicious, but dairy free and made with dark chocolate chips which add a real depth of flavour too! I haven’t baked anything else since I perfected this recipe! I can guarantee you’ll love them too! I have been trying and testing my cookie bakes for years and I have finally found a bake that I am totally happy with, I was so happy with the recent batches of cookies that I just had to share them with you. Did you see my images and videos all over my social media?
Trust me when I say you’ll love these cookies, I don’t even contemplate buying cookies anymore because these are just as good, in fact they taste even better in my honest opinion! So why don’t you give them a go and see what you reckon? If you need them to be GF then change the Flour, if you don’t need them to be DF then alter the spread to regular butter. Just make sure you follow my other ingredient amounts and the method exactly!
The trick with these cookies is to refrigerate the dough for a minimum of 20 hours, and then you must bake all the cookie dough batches within 3 days of making the dough. It will keep for a couple of days in the fridge if it’s well wrapped and air tight. This time around I baked one batch of cookies at 20 hours and the next batch the morning after around 36 hours after I first mixed my dough. The second batch tasted the best!
The longer you refrigerate the dough for the chewier the cookies will be. You could freeze some dough if you weren’t going to use it all in the time frame, but make sure you use it within a month if you do that. You will also need to add extra minutes to the cook time if you’re baking the dough from frozen too.
Because this is one of my quicker prep time recipes I used an average sized Mug as a measurement for the ingredients instead of scales and grams. Sometimes I don’t get a lot of time to bake with my toddler in tow! So if you want a recipe that is fast to prepare in an evening, ready to bake the following afternoon, then this is the one for you! This amount of ingredients made approximately 14 Cookies. If you make my cookies please share and tag me on social media.
Author: Severn Sabrina Prep Time: 15 Minutes Refrigerate Time: 20 to 40 Hours Cook Time: 8 to 10 Minutes Serves: 14 Cookies Allergens: Contains Egg, Gluten, Soya Lecithin.
Ingredients
½ a Cup of Dairy Free Spread (softened in the microwave in a small bowl) 1/3 a cup of Caster Sugar 2/3 a cup of Soft Brown Sugar 1 Egg 1 Teaspoon of Vanilla Essence 1 Teaspoon of Baking Powder ½ Teaspoon of Salt 1 and ½ Cups of Plain Flour A Bag of Dark Chocolate Chips (100g ish)
You Will Need
Two Bowls – 1 Large and 1 Medium A Sieve A Tablespoon and A Teaspoon A Wooden Spoon A Flat Oven Tray Baking Parchment A Microwave and a Small Microwavable Bowl
SABRINA’S TOP TIPS! Don’t over microwave the spread, just twenty seconds should be enough and then stir it gently until it melts and is smooth and pourable. You can use the same piece of baking parchment if you’re baking two lots of cookies, just place the next set of cookie dough mounds in the gaps that weren’t touched on the paper on the previous bake!
Method
1. In a large bowl you need to mix up the two sugars with the softened spread. Mix with a spoon until it is all smooth.
2. Next you add the egg and vanilla and once mix until it’s smooth and combined. I always do it by hand because this is a quick recipe, just put some effort into the hand mixing for a good 60 seconds. It should look smooth and pale.
3. In a separate bowl, sieve the flour to remove any large lumps, and then add the baking powder and the salt. Mix together well.
4. You now want to take your time combining the wet and dry ingredients. So use the sieve once again to sieve the dry ingredients into the wet, do this a quarter at a time, and between each quarter you want to stir the bowl and combine them. Once that quarter is mixed in to the wet ingredients you start with another quarter of dry, and so on. Once you have mixed all the ingredients together you will be left with a smooth and pale dough.
5. Now it’s time to add the dark chocolate chips or chunks, I prefer chunks because they stay a little more stable in the dough.
6. Refrigerate the dough overnight at least, and when it comes to baking you can do as little or as much as you’d like. It’s best to test a couple of cookies on your oven for a time frame before doing a full batch. Everyone has a different oven.
7. When you get to the baking stage I always recommend you take a Tablespoon size of cookie dough, using two spoons to press the dough together, and then gently make a little round mound of it as your cookie size. I use baking parchment over a flat oven tray so as to stop the cookies from sticking. Leave a space of approximately 6cm between each mound so they have space to spread out.
8. Bake for around 8 minutes, the best way to tell if they are done is that the colour changes around the edges of the cookie. You don’t want them to go too browned otherwise they will be overdone and more crunchy than chewy. I do mine at 180’c fan assisted oven for around 8 minutes. Set for 6-8 and then check them, some cookies could take up to 10 minutes.
9. Once they’ve begun to change colour on the edges remove them from the oven and leave them to sit for five minutes. Then you can gently pull them off and let them cool completely before eating them or storing them in an airtight container. They will last for 3 days if you make them air tight about an hour after baking.
Before…
You Can Make This Recipe Gluten Free by Using Gluten Free Flour!
After…
Thank you very much for reading this post today, if you do try my recipe please let me know how you got on. If you have any questions about my bakes then feel free to leave a comment, I’m more than happy to answer them and give you more tips.
You can keep up with all my cooking and baking by following me on my various social media pages.
Have a lovely weekend!
✩ Sabrina ✩
You should refrigerate the dough before baking it!
Freshly Baked!
Thanks for visiting Severn Wishes blog! See you soon!
Good Day All! It’s time for a cookery related blog post today. If you follow me on social media you will have seen me share images of this one already, it’s a great alternative to a take away, and it costs a fraction of the price of one too! It’s a simple recipe, easy to make and complete in just a few minutes. Of course I am making mine dairy free because of my sons allergies, I have worked on this recipe for months. You can use alternatives and I will outline those in my recipe below if you want to alter it.
So why am I sharing this particular recipe? Well, I really miss a proper Chicken Tikka, and I thought with a little experimenting I could make a recipe I would really enjoy. Coconut is often used in curry sauce anyway, so by using coconut yoghurt as part of the base it eliminates the dairy aspect and allows me to play with the spices. This recipe I have made is great, although proper Tikka has nuts and dairy in, usually Almonds, and I can’t have either because of my son. It is also more red in colour, so I am considering adding some Paprika next time! So I will be continually trying to better this recipe and cooking in every aspect of my life, but this is the best I have so far. If I make an awesome adjustment I will edit this post! But for now my Curry is both Tasty and a little spicy too!
This is my Dairy Free Chicken Tikka Style Curry Recipe
Author: Severn Sabrina Prep Time: 20 Minutes Cook Time: 40 Minutes Total Time: 60 Minutes Serves: 2 for Curry & Rice OR 4 (if you add sides) Allergens: This Recipe is Dairy Free unless you change the Yoghurt
You Will Need
A Teaspoon A Wooden Spoon A Bowl for the Marinade A Medium Saucepan A Knife for Chopping A Flat Oven Tray Scissors for Cutting the Chicken
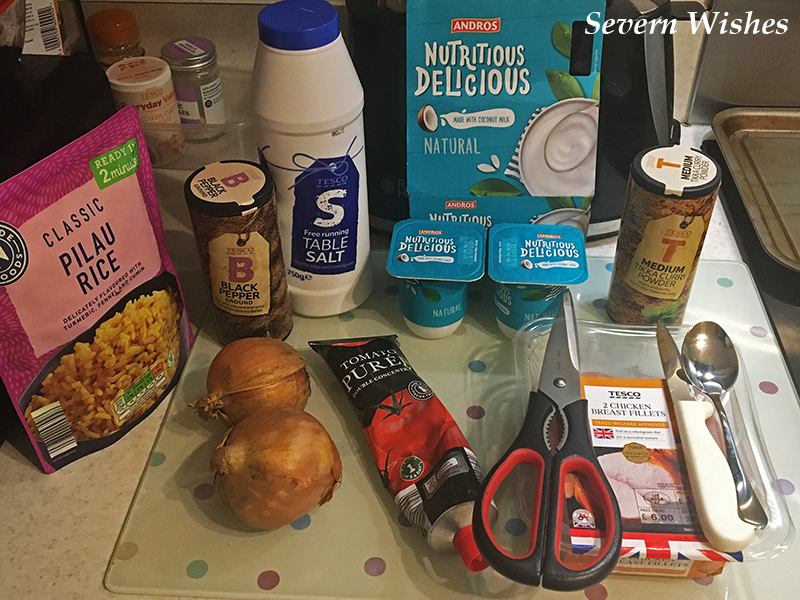
INGREDIENTS
Pilau Rice (it compliments the flavours of my sauce but you can have plain white rice if you would prefer) I sometimes just use a microwave rice packet for convenience. 300g Chicken or for a Vegetarian Alternative use Quorn Chunks White Onion – 2 Onions chopped two different ways, large chunks and diced 2 Pots of Coconut Yoghurt (average size from a usual pack of 4 pots)
Optional Extras (to increase it for the amount peopleyou’re serving) 1 Pepper diced into bite sized cubes and fried off with the onions 1/2 Tin of Chopped Tomatoes (if you prefer a more tomato based curry with less spice) Poppadoms and Chutneys Naan Bread (Shop bought usually contains Dairy) Chips
For the Marinade 1 Pot of Coconut Yoghurt 1 Teaspoon of Tikka Curry Powder (or something similar)
For the Sauce 6 Teaspoons Tomato Puree 1 Small Pots of Coconut Yoghurt (You can use regular yoghurt if not doing DF) 2 Tspn Tikka Curry Powder OR 1 Tspn of Garam Massala + 1 Tspn Cumin Salt and Pepper to taste
(If you want to make a more complex curry sauce look through my blog for my other recipes).
METHOD
1. Start by chopping your onions and frying it off in a saucepan with a little oil. You want the onions to be softened but not caramelised. Once they are cooked you can start to build the sauce up. Start by using a teaspoon to measure out the other sauce ingredients and add them into the onions. Including the spices, yoghurt and tomato puree. Stir gently to combine. Leave this on a low heat stirring it frequently. Your sauce should resemble mine in the image below.
Onions Ready to Fry, Chicken Marinade and Ready to Chop Fresh Chicken.
2. Then take your chicken, cut it bite size pieces, try and get them all roughly the same size so they cook evenly. You want to marinade the raw chicken for as long as possible before cooking it, so I would often do this as a first step and then go ahead to chopping and cooking. But it all works the same way and it will be just as soft and tender but slightly less flavoursome than if you marinaded it for a few hours! So if you’re planning to do this recipe and have some time on your hands, marinade the chicken in the fridge for a couple of hours before putting it in the oven. (With a toddler in tow I often just get a short window to cook!) When you do get to this stage you should lay the chicken pieces out evenly on a tray and oven them for around 20 minutes at 180’c. They should look baked and coated, cooked through and still tender. See my images below as a guide.
3. For the next step you want to remove the cooked chicken pieces from the oven tray gently, and set them down in the sauce, try not to lose much of their tasty marinade coating! This will add extra flavour to your sauce. Stir all of the chicken up with the sauce and then leave it on a low heat for around twenty minutes.
Mix the oven cooked chicken with the sauce you made earlier.
4. Serve the curry as soon as your rice is cooked and hot, half and half works well, you could even accompany it with some poppadoms and chutneys, a naan bread to tear and share or even do half rice and half chips while the oven is hot – if you’re that way inclined! 😉 There should be plenty of that tasty sauce for dipping things in whatever way you decide to serve it!
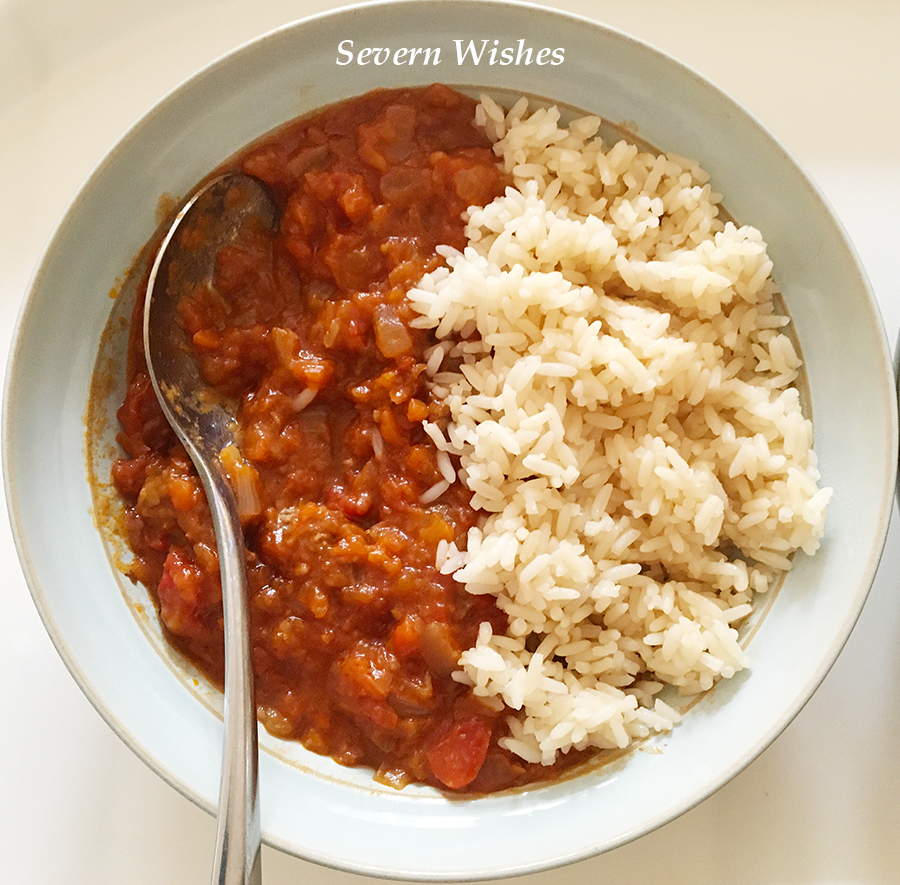
The Final Curry Dish Served with Pilau Rice
Thank you very much for reading this post today, if you do try my recipe let me know how you got on. If you have any questions feel free to leave a comment, I’m more than happy to answer them.
If you’ve been following my blog for a while then you’ll know that food is a huge passion of mine. Coming up with new recipes and experimenting is a hobby of mine. But today, with all this talk about panic buying amidst this deadly virus, I couldn’t help but think, what can I do now to help others…
My epiphany was this! My Ideas On How To Make Your Food Go Further!
There are certain things that most of us keep in our kitchen during week to week shops or our larger monthly stock ups, so I wanted to focus on those to begin with. The issue right now is that due to bulk panic buying some of our staples are very hard to get a hold of. Take a look at the meals below to see if any of them would appeal to you or your family. Then see how you can make them go further with my recipe adjustments.
All of these recipes are my own, so if you wish to recreate one please credit me and notify me on where you have used it, thank you.
Keep those handy takeaway boxes ready to freeze any leftover freshly cooked meals, extra vegetables or leftover homemade sauces.
Author: Severn Sabrina Prep Time: 45 Minutes Cook Time: 40 Minutes Serves: 4 to 6 people Allergens: Wheat Flour, Barley and Soya in the Gravy Granules
COTTAGE PIE Serves 4 to 6 people (sometimes with leftovers if its children’s portions) Ingredients 1 or 2 Large White Onion – Diced 3 or 4 Large Carrots – Diced 500g Mince Beef – Cooked & put through a processor to make smaller pieces 1kg Potatoes – Cooked and Mashed Gravy Granules – I use the Bisto Onion Gravy Granules Additional foods to add to make it go further… Baked Beans x 1 Tin Mixed Dice Vegetables x 1 Cup ~~~ Most people will have a bag of frozen veg or veg that needs to be used up. Dicing it up small and adding it to your cottage pie gravy is a great way to get extra veg into children as well as help an adult get their 5 or more a day! Same with the tin of beans! Pour off a little sauce if there is lots in the tin, but the tomato sauce actually helps you to get a lovely gravy. The beans bulk out the cottage pie filling while adding your veg in take. You can even add all of this into a large casserole dish, and cook it in the oven for an hour, even the veg if cut small enough will cook in the gravy, locking in all the vitamins…
My Cottage Pie is a family favourite! If you cannot get fresh meat then using a tin of Minced Beef and Onion would work just as well!
Author: Severn Sabrina Prep Time: 30 Minutes Cook Time: 30 Minutes Serves: 4 to 6 people Allergens: Dairy will be present in Naan Bread if you choose it as a side
CHICKEN CURRY (You can use one of my Recipes already on my blog for the method) Serves 4 to 6 people (sometimes with leftovers if its children’s portions) Ingredients 2 Large White Onion – Diced and Chopped into two sizes 50g Tomato Puree (this is for your homemade sauce) 2 Tin of Chopped Tomatoes (for your sauce) 500g of Chicken cut into bite size pieces 100g of Yoghurt, I use Dairy Free Coconut Yoghurt Serve with Rice and / or Naan Bread Sauce – I prefer to make my own to my taste but you can use a jar of sauce, but if you do use a jar you only need 1 Tin of the Chopped Tomatoes. You then add curry spices like Cumin, Paprika, Garam Masala and Chilli. As well as Garlic and Coriander usually! (See my Recipes for more on making sauce and a method for the curry too). Additional foods to add to make it go further… New Potatoes x 1 Tin (They’ll cook in the sauce on a low heat for 20 mins) 1 or 2 Peppers Sliced thinly (fry these a little with your onion then add) Cauliflower Diced up x 1 Cup (Chopped small it will cook in the sauce)
Here is one of my recent Curry dishes, this one was with extra Peppers and Potatoes
Author: Severn Sabrina Prep Time: 25 Minutes Cook Time: 40 Minutes Serves: 4 to 6 people Allergens: Check Jar if you purchase a sauce, otherwise none.
CHILLI CON CARNE Serves 4 to 6 people (sometimes with leftovers if its children’s portions) Ingredients 2 Large White Onion – Diced 4 Large Carrots – Diced 1 Tin of Plum Tomatoes (they are sweeter but you need to chop them) 1 Tin of Chopped Tomatoes (you could use 2 of these and no plum if easier) 500g Mince Beef or Pork or both – Cooked & then put through a processor to make the pieces of meat smaller – or use Quorn or Soya Mince 1 Tin of Red Kidney Beans Serve with Rice Sauce – I use a packet or a jar for convenience but you can make a sauce, you have done the basics with the tomatoes already. So add the tomatoes to a bowl, then add Cumin, Garlic and Chilli to your own taste. Additional foods to add to make it go further… Baked Beans x 1 Tin (some people don’t like Red Beans so you could use Baked Beans (Haricot Beans) instead. Peppers – as many or as little as you like, if one needs using up do it! Mixed Dice Vegetables x 1 Cup (You can add other basic veg if you don’t have enough or you want to do a vegetarian style chilli).
✩ ✩ ✩
Author: Severn Sabrina Prep Time: 25 Minutes Cook Time: 30 Minutes Serves: 4 to 6 people Allergens: Check the Jar of Sauce if you buy one.
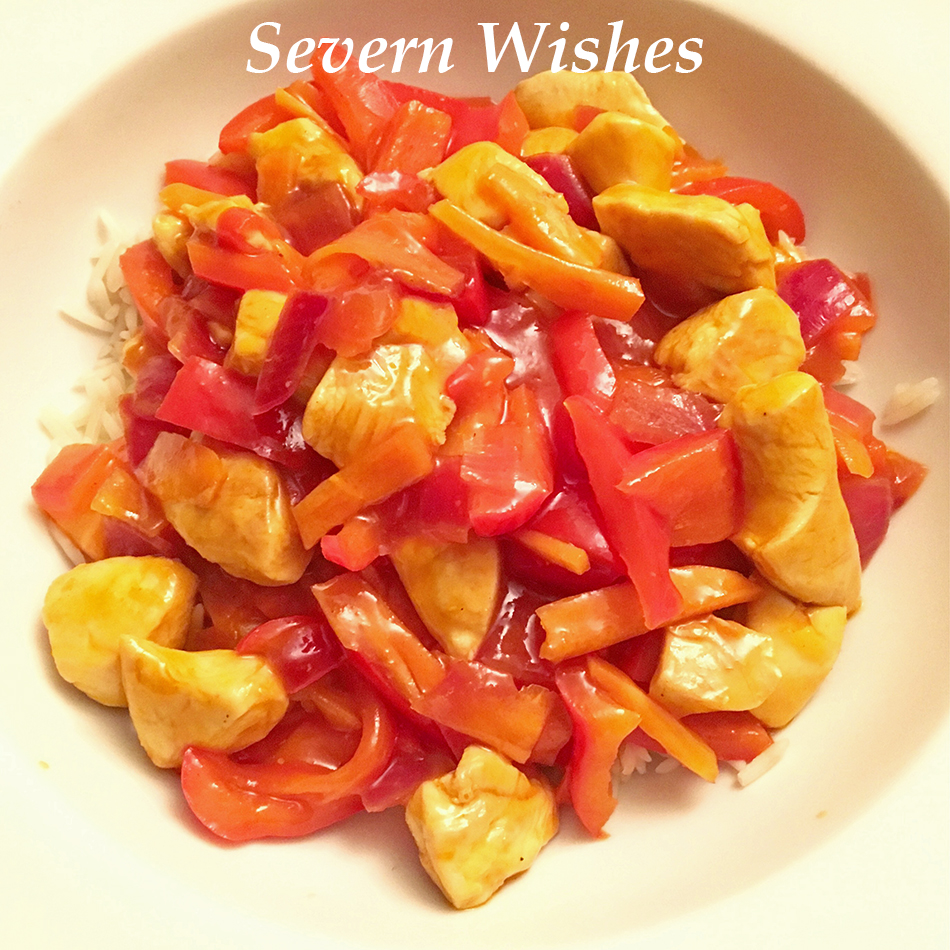
SWEET AND SOUR CHICKEN Serves 4 to 6 people Ingredients 500g Chicken Breast (Diced) or a Vegetarian Alternative Tin of Pineapple – Cut into Small Chunks – 1 Ring per person Peppers – 1 Yellow and 1 Red Cut into Small Long Pieces 1 Large Onion – Diced into Small Long Pieces 2 Carrots – I Peel and Slice them with the Peeler into long thin shards! Serve with Rice Sauce – I always buy a cheap jar of sauce, the cheaper the better! Alternatives This dish is so easy to make and these flavours are quite specific, if you aren’t keen on that much pineapple then do one ring total or leave it out but then you should add more of the other ingredients.
✩✩✩
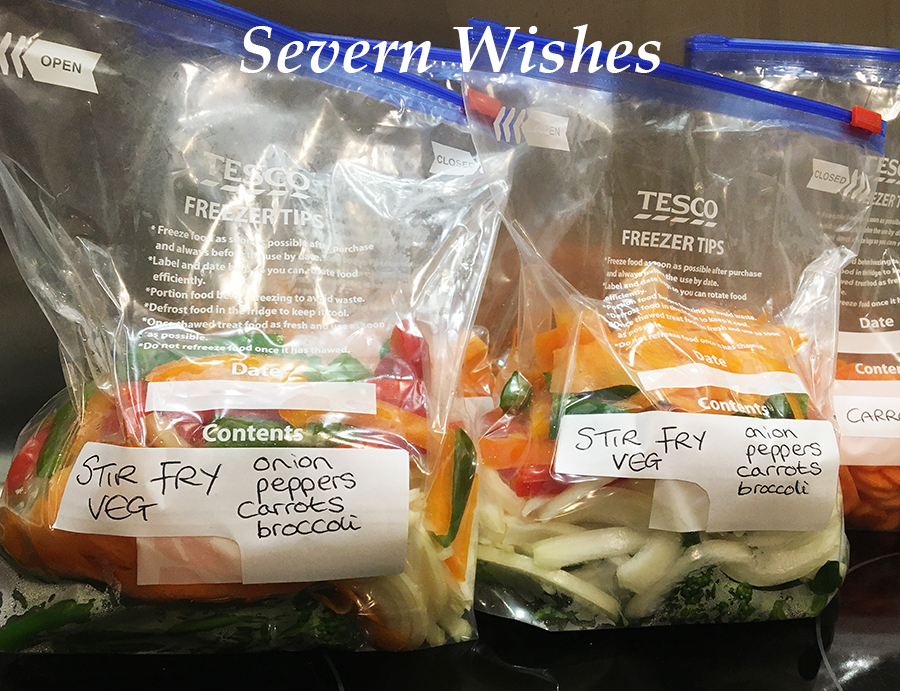
Fresh meat, fresh fruit and fresh vegetables are hard to get hold of in my area right now. When I did a home delivery order most of what I asked for was either out of stock or I was given a substituted alternative closest to what I wanted. This was very inconvenient and I have ended up spending 4 hours in total, chopping, peeling and bulk freezing some of the fresh veg before it went bad. I created mixed veg bags including a stir fry mix!
TOP TIP: Only make a freezer portion size for what you or your family members would eat at a meal time! Then there is no waste when you defrost it to use!
Washed, Chopped and Sliced, Ready to Freeze. MY TOP TIP always squeeze the air out of the freezer bags before popping them into the freezer to save space!
You can make 6 portions of Vegetable Stir Fry using the following raw vegetables, washed, chopped and ready to cook or freeze: 3 Coloured Peppers – 1/2 a sliced pepper per portion 1 Broccoli Head – cut into thin stems 1kg Carrots – I use a peeler to slice mine into strips 1 White Onion for every 2 Portions – Diced into small chunks ~ Add any of the following to make it go further and become 8 portions~ Water Chestnuts – I use Tinned x 1 Bamboo Shoots – I use Tinned x 1
Adding Noodles OR Rice on the Day you make the Stir Fry for extra bulking out of your food. Either use 1 Packet of Stir Fry Noodles once your veg is cooked, or a packet of Microwave Noodles or a Microwave Rice (all down to your preference) and one of these makes this meal double in amount.
Using a bought Sauce or Making a Sauce?
Adding a bought sauce to this stir fry is great, but if you’re feeding more than 4 people then 1 jar is only just enough. TOP TIP: Make sure you add 2 cm of warm or hot water to the bottom of the jar, replace the lid and give it a good shake, add this to your stir fry, no sauce left in the jar and wasted!
Don’t be scared of not using all the sauce, you can you half, replace the lid and use the rest within 2 or 3 days usually (always check the label).
Alternatives for Sauce… Make your own! You will need… Garlic fresh or paste, Ginger fresh or paste, Sweet Chilli Sauce or Chilli Sauce (if you like it hot!) Salt, Pepper and Chinese Five Spice! I prefer the pastes as it makes things so easy!
In a small bowl mix up a tablespoon of everything above! Less of the hot chilli though unless you like it spicy! Add more or less and experiment with the taste until it’s to your preference. Add this to your stir fry when you add the noodles. One of each paste does me around 7 or 8 stir fry’s or Chinese orientated meals. Chinese Five Spice goes a long way too!
A Pasta Bake is also a great way to use up Vegetables about to go stale and any leftover sandwich meats or leftover sausages for example. This is a firm fave of mine, bacon chunks, peppers and tomato!
I really hope I have given you some inspiration on some family favourites and ideas on how you can make them go a lot further during this difficult time. You can of course substitute the meats for vegetarian alternatives or swap out the vegetables you don’t like for others too.
Experiment with what you’ve got to use up and so long as you’re making healthy meals with vegetables in you’re already winning for the day! If you liked any of my meals after making them please leave me a comment, I would love to know how you got on.
Is there anything you would like to cook but need some help with? I’m an experienced cook and perhaps have experience of the dish, please comment and ask me 🙂 I’m happy to help!
Stay In and Stay Safe Friends. I might go do some baking now I’m done with my savoury cooking! If you’re after sweet treats check out those recipes that are on my blog already too!
Welcome to Sweet Treats Week on Severn Wishes. This half term I wanted to share my top 5 baking treats with you all, hopefully you’ve got some time this week to make them with me! Check out my Instagram for more food pictures and recipe ideas too!
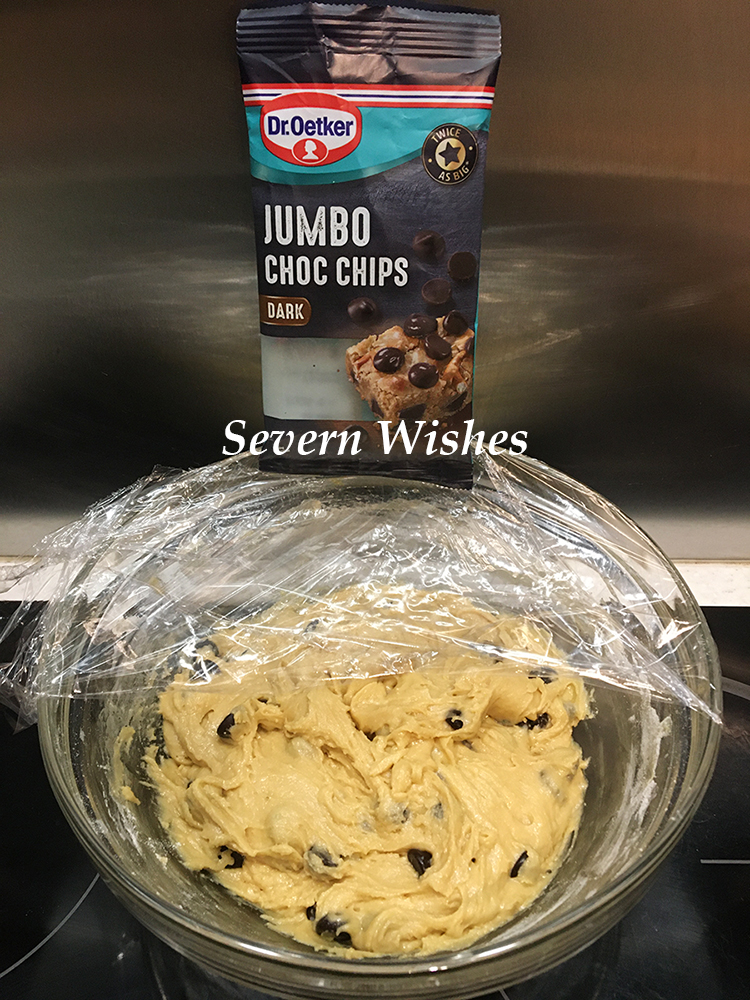
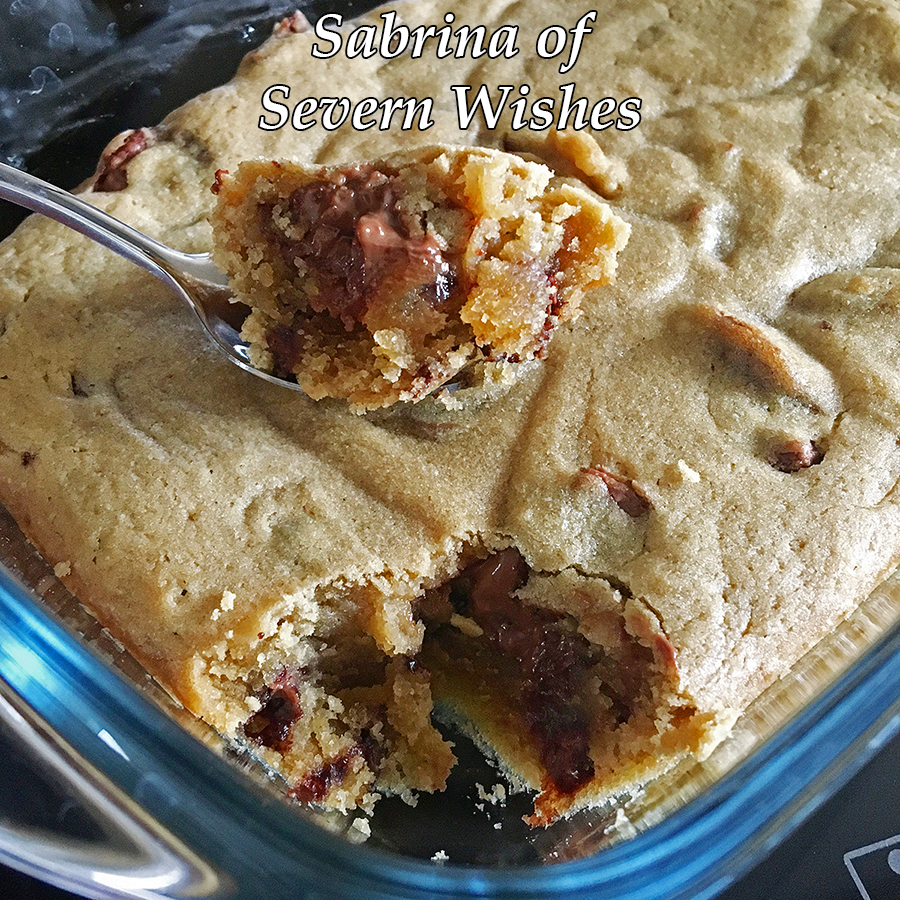
Finished Cookie Dough, Yummy!
Day 2 is Sabrina’s Warm and Gooey Cookie Dough Recipe.
This fantastically easy recipe is great if you want a hot desert ready in under an hour. It’s egg free too! I make mine with a dairy free butter and use dairy free chocolates. But you don’t have to if you prefer the real thing. This warm desert is best served about thirty minutes after it’s finished baking, cooled off a little bit but while it’s still warm and gooey. Great on its own or you can pair it with a nice vanilla or coconut ice cream for example.
What You Will Need
A Glass Dish measuring approximately 12cm x 17cm / 5″ x 7″ and preferably with a lid for easy storage after its cooled down! A Large Mixing Bowl A Wooden Spoon A Sieve
Ingredients
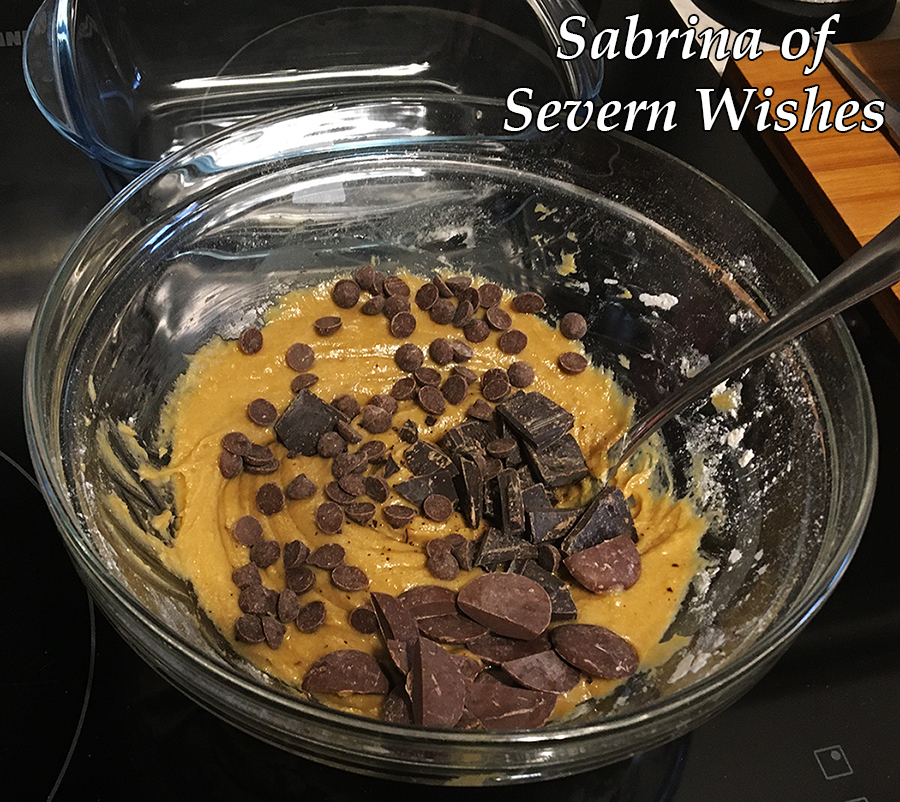
150g Plain Flour 115g Butter (Dairy Free Spread) 110g Light Brown Sugar Water (Per Tablespoon – See Method) 1 Tablespoon of Vanilla Chocolate Chips or Chunks (As many as you like but a nice ratio between dough and chocolate) I used around 60g of dairy free chocolate chips.
Additional Information: This sized portion will make 4 portions when transferred into pudding bowls. This is a rich desert and you can divide it up into 8 portions if you want to have it accompanied with something else such as ice cream. Keep any leftovers inside the glass dish with the lid on at room temperature, eat it within 48 hours. If you want it warm and extra gooey then microwave a portion for 20 seconds in the microwave.
Dairy Free Cookie Dough with Various Dairy Free Chocolates
Cookie Dough Variations
Add Chunks of Chocolate Brownies. If you have already made brownie earlier in the week you could put small lumps of your softest brownie into the cookie dough along with some chocolate chips. Just ensure they are submerged in the dough so as not to overcook near the top!
Method Steps
1. First you will need to soften the butter a little, add the measured out spread into the large mixing bowl, melt it at 10 second intervals in the microwave and stir after each one. Once softened you add your measured out sugar. Mix until smooth and combined.
2. Sieve your measured flour into the bowl now, make sure once it’s all in you carefully mix it. Then when smooth you add your Vanilla and Chocolate Chips.
3. You now need to add some water to the mixture, add it a tablespoon at a time until you achieve a Cookie Dough consistency. It usually takes between 4 and 8 tablespoons to achieve the dough like substance. Once you’re happy transfer it to your preferred baking dish.
Step 3. Ready to Bake!
4. Now it’s time to bake! Preheat your oven to 180’c and cook in the centre of your oven until the cookie dough top goes golden and slightly brown. The best way to test the dough is right for you is to carefully touch the top, beware it will be hot, so leave it a minute outside of the oven and push down on the top. I like mine to be like a Cookie on the top, and then soft and gooey underneath! Mine took around 24 minutes!
5. As I described above, leave the glass dish out of the oven for around 30 minutes after the bake is complete. Serve the dough after this, it won’t be too hot that way, it should just be warm and gooey!
Thanks very much for joining me on my blog for this recipe! Thank you very much for joining me for Sweet Treats Week! I do hope to see you here again tomorrow!
If you make any of my recipes be sure to tag me on social media, leave me a comment here on my blog. Any questions about a recipe please don’t hesitate to ask them! If you recreate this recipe somewhere else please credit me for it and name me and my blog, or even better link back to this original post too! Thanks everyone!
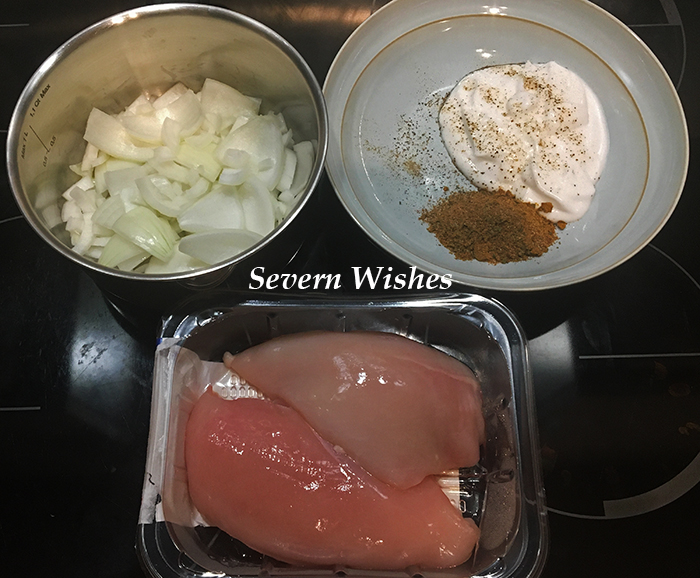
What makes my recipe different to others? My “Special” Curry is Free From for my family! The great thing about my recipe is that you can put any meat with it or even vegan alternatives such as Quorn with it. Whatever protein you fancy really! Even fish if you’re that way inclined! The combined flavours work well with everything, but I prefer Chicken and… Potato! Yes… you’ll see!
I use my nifty little food processor (Russel Hobbs Mini Chopper) to save chopping time but if you don’t have a processor then just chop the vegetables as small as possible with a knife and watch those fingers!
The Free From Bit! This curry recipe is DF, NF and GF and it serves 4-6 people. So many curries in the supermarkets contain dairy and nuts. Even local take away restaurants cannot guarantee things being free from certain ingredients. Our family has a wide range of allergies so I’ve learnt to cook my recipes alternatively and figure out what works without it including an allergen. This has been my best recipe to date! You can follow this and it be great for you and your family as well! Plus it’s 3 of your 5 a day!
What can you serve with it? You can serve this curry with a nice Rice, Basmati is a good choice or Pilau, and you can easily get GF rice these days, I recommend Tilda or Tesco’s own brand rice for their flavour! Naan Bread is delicious but obviously it’s not DF or GF so do be careful there! Poppadoms and Chutneys are a great accompaniment but again some of these will not be GF and some even contain Nuts! If you don’t have any allergies then you can have any of these (or all of them) with the curry! If you choose all of the above you will serve at least 6 people…
Sabrina’s Special Free From Curry Prep Time: Up To 60 Minutes Cooking Time: 90 Minutes Serves: 6 People (8 if you include side dishes)
Ingredients
500g – 600g of your chosen Protein into bite size pieces for frying
400g Tomatoes – use a tin of Plum Tomatoes for the Sauce, pop them into a food processor until smooth and a sauce like consistency, use plum will taste sweeter
1 Large Onion Diced Finely for the Sauce, you can pop this in the food processor before you prepare the tomatoes until shredded very fine
1 Large Onion Chop into bite size pieces ready for frying
2 Peppers – Chopped into short slices (Red or Yellow) ready for frying
4 Tablespoons of Tomato Puree for the Sauce
The Sauce needs to be made of the following spices and seasonings; 4 Tablespoons of Garam Masala 1 Tablespoon of Cumin 3 Tablespoons of Coriander Leaf 1 Tablespoon of Garlic 1 Tablespoon of Paprika 2 Tablespoons of Chilli Powder (Mild) (Use Hot if you can handle it) 30ml of warm water Salt and Pepper to your taste.
Oil for Frying
400g – 500g Potatoes – Cut into bite size chunks and washed
Method
Prepare all of the ingredients as stated above, diced and chopped.
You need to have a large saucepan and a frying pan warming with a little oil in each. First begin by adding the chopped onion and peppers to the frying pan. Add the tiny diced onion and some garlic to the large saucepan.
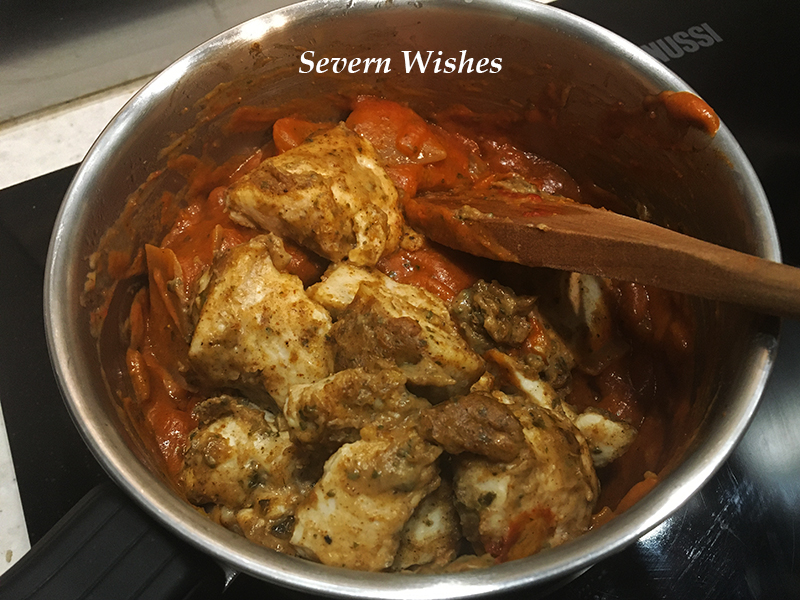
Fry off all the ingredients, once the saucepan with the diced onion is nicely caramelised, you can add the sauce ingredients from the list above and mix well. Leave the Onion and Peppers inside the Frying Pan to caramelise and then add the chicken.
Put your plum tomatoes in a food processor and then once blended add them to your saucepan. Next you’ll need to continue frying off the protein and vegetables in the frying pan until thoroughly cooked.
Add anything additional you require for the sauce, that includes the tomato puree and seasonings. Taste it before you add your meat and vegetables so you can tell if it needs more chilli or more salt and pepper.
Simmer your sauce on a low heat, adding the contents of the frying pan which should now be nicely cooked and combined in flavour. You need to continue to simmer this for at least an hour for the flavours to coat everything and for the sauce to thicken up.
Now is the perfect time to add the Potatoes! They will cook inside the sauce and do not need boiling before hand. Use fresh or tinned whatever you have at hand. Leave it to simmer for a while…
Taste test at one hour to ensure the potato are cooked and the chicken is tender, stir occasionally during this hour of cooking time to ensure it’s not getting stuck to the bottom or sides. It should gradually thicken. If you don’t think there is enough sauce when you add all the contents and mix it then add 10ml of water at a time and mix in until the sauce covers everything.
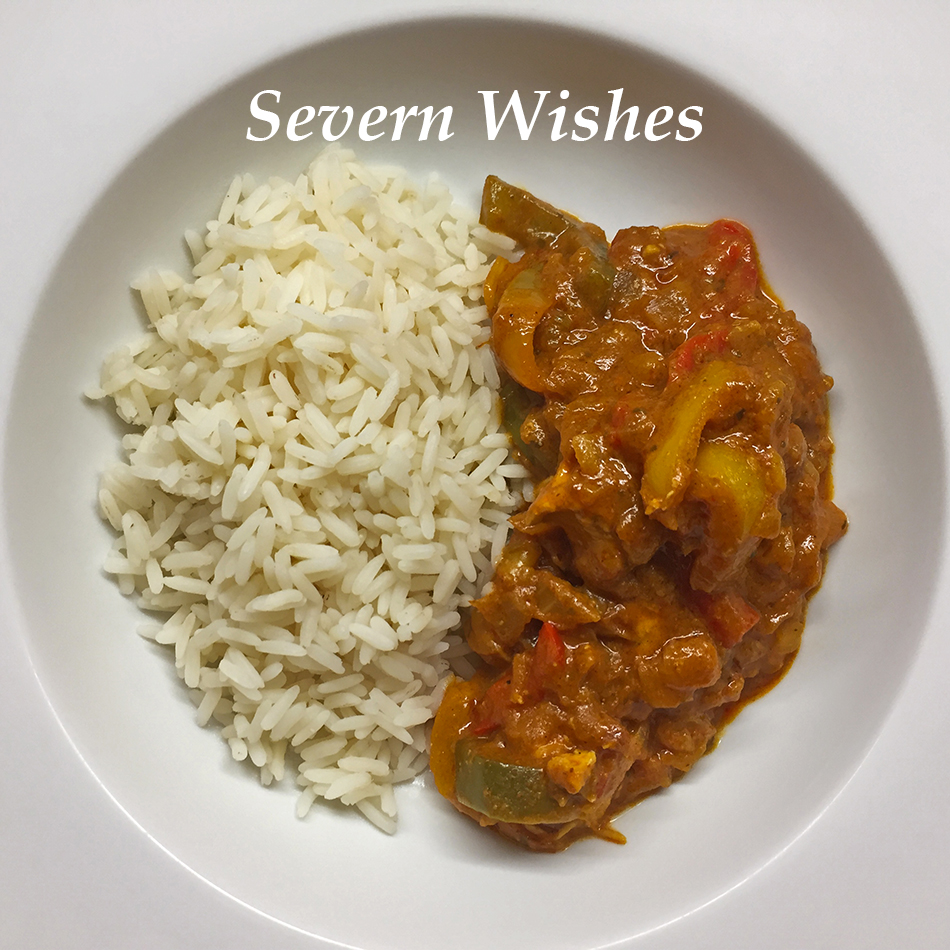
Serve immediately with Rice and any of the other sides I suggested.
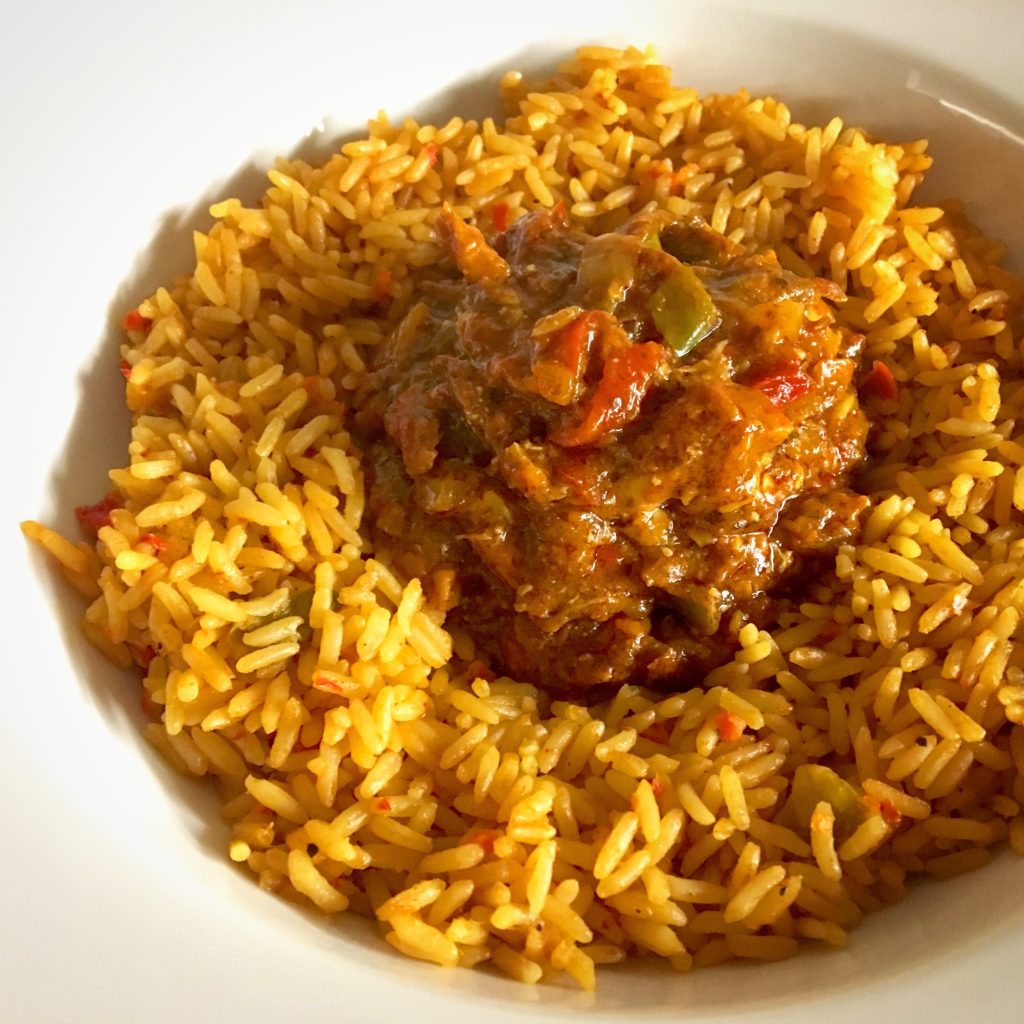
Here is my curry when I served it with Pilau Rice and No Potato in this one either… you don’t have to add them it’s optional.
Thank you reading this post today, I really hope you like the look of my recipe, if you give it a go yourself then please tag me on social media to let me know and show me the end result too!
How To Make Delicious Dairy Free Vegetable Nuggets For All The Family To Enjoy!
Today I will be showing you how to make tasty, nutritious and dairy free vegetable nuggets that contain four different vegetables. They are great fun for your children to eat as finger food and your older children can dip them in the sauce if they choose. This recipe is ideal for weaning and beyond.
Veggie Nugget (broken so you can see the soft inside)
✩✩✩
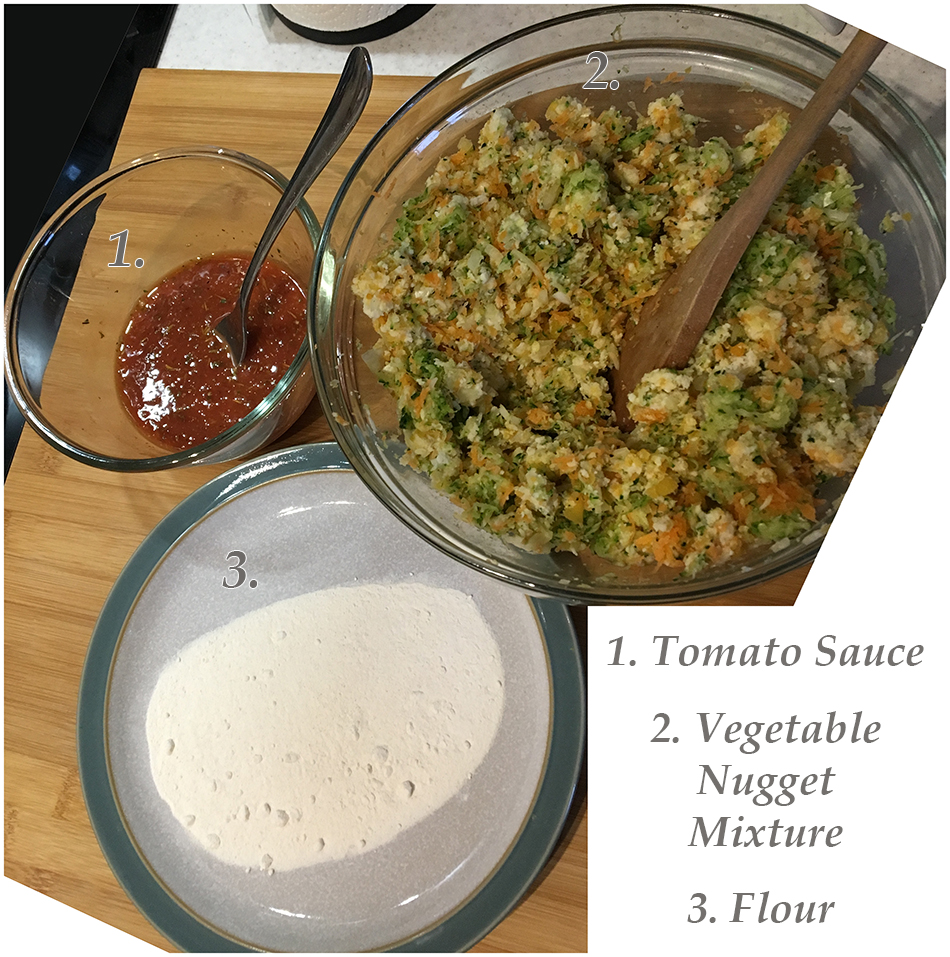
Ingredients for Sabrina’s Veggie Nuggets
3 Tablespoons of Tomato Ketchup 1 Tablespoon of Reduced Salt Soy Sauce 1 Tablespoon of Mixed Herbs 1 Large Egg (Beaten) 160 grams of Breadcrumbs (approx) roughly 4 slices of bread – I always use the 2 end bits if I have them! 6 Medium Carrots – Grated and Squeezed 2 Courgettes – Grated and Squeezed 100 grams of Swede Cooked First, then Diced Finely using a Chopper 1 Large White Onion Diced Finely 50 grams of Dairy Free Alternative to Italian Style Hard Cheese Plain Flour (6 tablespoons approx) spread this onto a small plate ready for rolling…
✩✩✩
Method
To make the sauce combine tomato ketchup and soy sauce together. Double the amount if you are preparing these nuggets for people to dip into the sauce straight after cooking them. Use half of the sauce for the vegetables mixture and leave half for the dip.
Once you have prepared all of the vegetable ingredients as directed above, you will need to ensure the mixture of vegetables isn’t too wet. Take a handful of the grated and chopped veg and place it between a few paper towels, a muslin cloth or a clean tea towel. Squeeze and press it in the cloth to squeeze out as much liquid as possible. Do this with all of the grated veg.
Get a large mixing bowl and crack the egg into it. Add the herbs and stir until combined. Next add some of the tomato dip. Next add the squeezed vegetables, then lastly add the hard cheese (or alternative) and the breadcrumbs, stir it all thoroughly. You don’t want lots of the same type of veg in each ball, try and mix it so you get a variant of all the ingredients. (I do my breadcrumbs in a small food mixer).
Place the flour onto a small plate ready to roll your nuggets in.
To make a nugget take a small handful of the combined mixture and roll between your palms. Top Tip! Do this with wet hands so it doesn’t stick to you! Roll them out into oval shapes, and then once happy you can roll each one in flour to coat it.
Have a large frying pan ready on your cooker with some oil getting hot. You should place the nuggets down gently so as not to break them or splash the oil. Fry each one until lightly browned all over. Top Tip! Use a pair of tongs to adjust them while frying to make sure you do all of the sides. Keep topping up the oil after every few nuggets.
Once they are cooked set the nuggets to one side on a piece of kitchen roll so as to drain any excess oil from them and let them cool a little, and then serve them while they’re still warm in a large bowl with the remainder of the tomato dip. They are great for a children’s party or a finger food family night in.
Squeezing the Veg so as to remove as much moisture as possible.
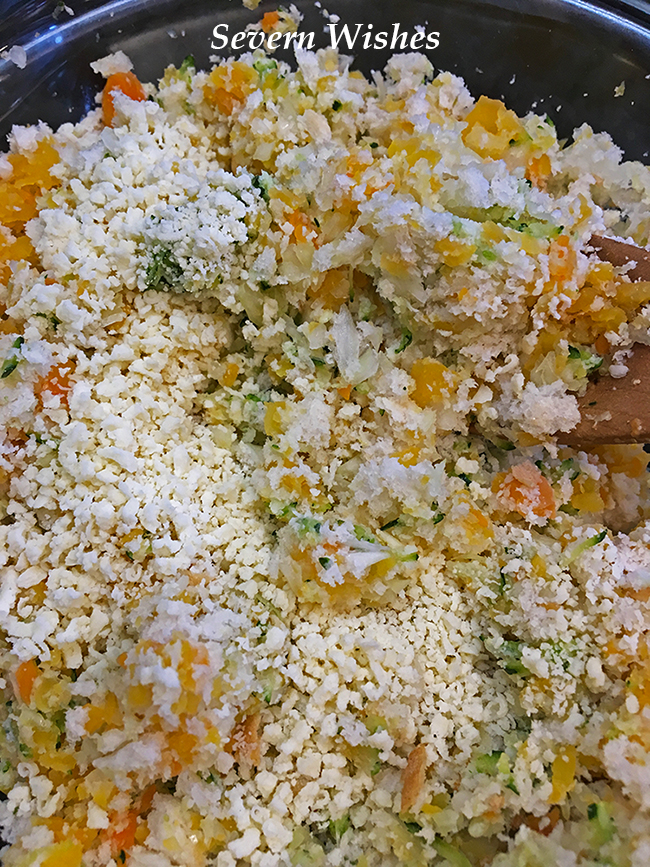
Veggie Nugget Mixture Ready For Mixing and Rolling
Vegetable Nuggets are ideal for children who are weaning at around 10 months and older, when they are learning to hold and bite into foods. They are great for getting your children to eat vegetables. The tomato dip provides a fun element for older children. The leftovers can be frozen, defrost over night and re-fry them to give them a crunchy outside again. My Recipe made me approximately 24 Nuggets.
Once you have rolled your nuggets between your palms you can get ready to fry them… My Top Tip is to have some done so you can fry one set while you make the next set…
FryingTips
When frying the Nuggets take care and turn them frequently so that they cook evenly on all sides. You also need to maintain the oil so that they sit in a few millimetres at all times to avoid sticking to the pan.
Finished Veggie Nuggets
These Nuggets are great, and rather tasty too, that is providing you like the Veg I have chosen. You can substitute the Courgette for Mushrooms if you prefer those! And you can also do these without being dairy free by using a regular cheese like Parmesan if you wish.
✩✩✩
Thank you for visiting, I hope you have enjoyed reading about this recipe, if you decide to give it a go then please leave me a comment with how it went afterwards… Check out my other recipes on the category list!
A great way to enjoy some tasty Chinese style cuisine this week is to do it yourself. To celebrate Chinese New Year I thought that I would share my own recipes with you all. Many people think it’s a complicated type of cuisine to make but if you’re good at following step by step recipe guides like mine, then you can create my delicious dishes in your own kitchen!
In today’s blog post I’m going to outline some of my own tips and tricks, as well as share my own recipes on how to make some flavoursome Chinese meals. Follow my instructions as much as you can, and substitute the meats for other meat or fish or a vegetarian alternative where I indicate you can with this symbol ⇕ . You can decide which of the sauces you’d rather make too, I will show you a few.
Why not give some cooking a go this Chinese New Year week! I’ve worked out that you can make 4 of my dishes for 4 people, plus a bowl of Sabrina’s Special Egg Fried Rice, for around £6.50 per person. That’s a heck of a lot cheaper than ordering in! On average a dish from a Chinese Takeaway comes in at around £7.00 in most parts of the UK. You can have 3 dishes and a rice for the same price! All you have to do though is cook it!
SHOPPING LIST
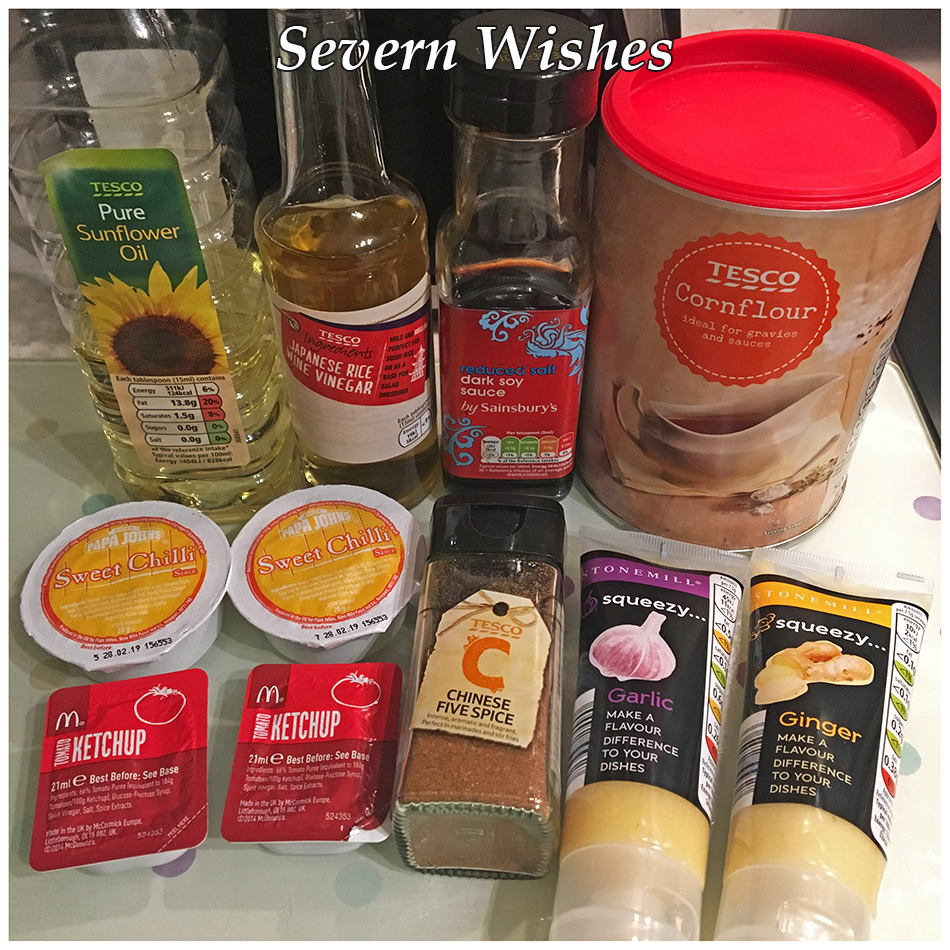
Stir Fry Pork ⇕ 500g is £2.75 at Tesco Stir Fry Beef ⇕ 375g is £3.50 at Tesco Chicken Fillets ⇕ 500g £4.00 at Tesco Rice Wine Vinegar – £1.99 for 150ml Reduced Salt Soy Sauce 65p for Tesco own brand or £1.30 for Amoy Egg Noodles – Range from 80p to £1.40 – You need 150g for 2 people Rice Noodles – Range from 90p to £1.80 – You need 300g for 4 people Spring Onions – 55p for 100g at Tesco Peas – Petit Pois Frozen at Tesco for £1.60 for 1kg 6 Free Range Eggs – Medium are 85p at Tesco 4 Peppers 2 Red 1 Green 1 Yellow 55p each at Tesco 2 White Onions – 85p per kg at Tesco Carrots 59p per kg at Tesco Jasmine Rice – Thai Jasmine Rice 1kg £2.00 at Tesco Chinese 5 Spice Jar 85p at Tesco Cornflour £1.30 at Tesco Sunflower Oil 500ml 80p at Tesco Seasame Oil – 250ml £1.80 at Tesco Sweet Chilli Sauce – don’t have this at home buy supermarket own Tomato Sauce – don’t have this at home buy supermarket own Garlic – if you don’t have this at home buy supermarket own or jar Ginger – fresh or jar or paste all work the same Chilli – fresh or jar of flakes is fine but fresh taste better Black Bean Sauce – Various Brands and Sizes Available
Remember that for some of these items you will have leftover amounts of them that you can use the next time that you cook Chinese food, such as the Petit Pois, the Rice Wine Vinegar, the Cornflour and the Soy Sauce.
Optional Extras
Bean Sprouts for the Stir Fry & Chow Mein Dish – 300g for 50p Tesco White Cabbage are 79p each in Tesco Water Chestnuts 225g Tin at Tesco for £1.10 Button Mushrooms – 90p for 200g at Tesco
I have worked out that your shopping list will cost between £27 and £30 depending on supermarket offers and whether or not you pick those offers or brands versus own brand. I shopped at Tesco but prices are similar else where when I looked online. For 4 people this equals approximately £6.50/£7.00 each, that is for the 4 people to have 3 Chinese Dishes and Rice.
TIME TO COOK
How To Make The Crispy Meat Element of the Dishes.
One of the most delicious parts of Chinese food is crispy strips of meat seasoned with Chinese spices. You can pick up a jar of Chinese 5 Spice for less than £1 in most supermarkets, and because it’s so strong in flavour it goes a long way.
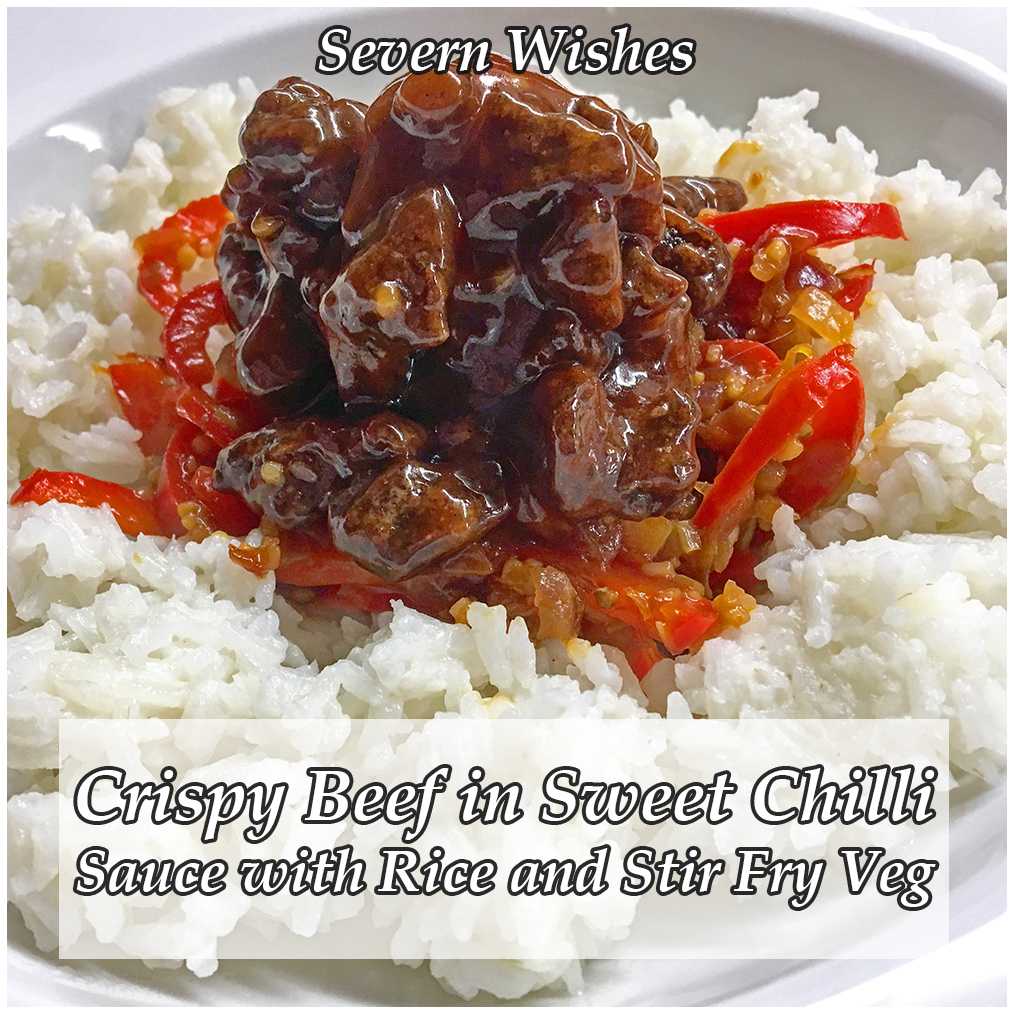
Options for this type of meal are… Crispy Beef in Sweet Chilli Sauce Crispy Pork in Sweet and Sticky Sauce
Ingredients
Meat In Strips (your choice from Shopping List) Cut It If Not Already 5 Tablespoons of Cornflour 3 Tablespoons of Chinese 5 Spice
How To Prepare
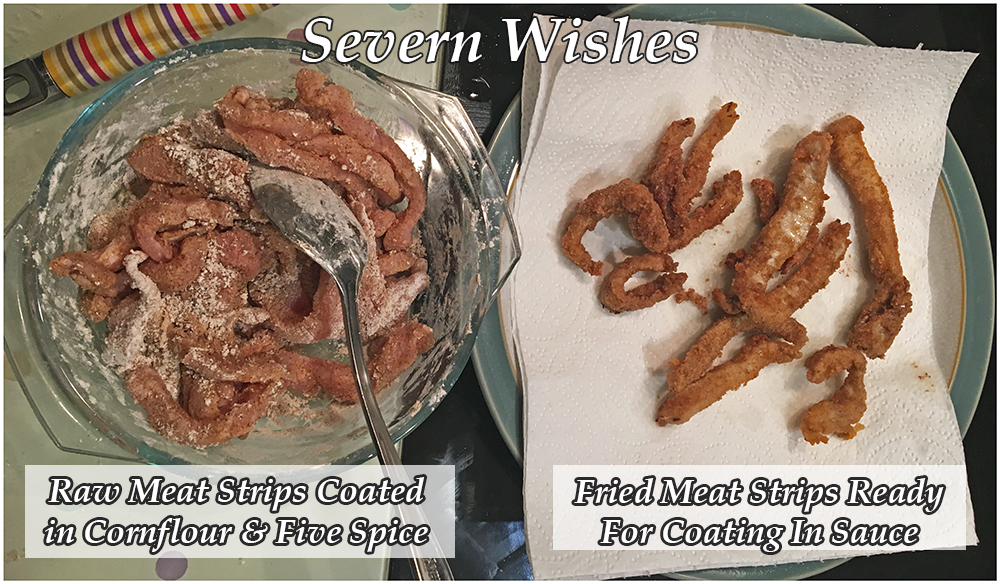
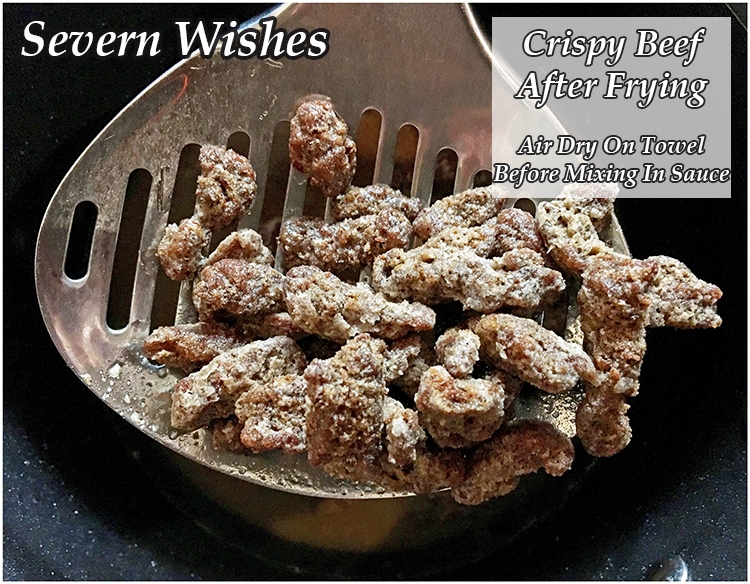
You need a small saucepan that you pour oil in to until it is around an inch deep. You need to heat this on a hob until it’s very hot before you place meat inside to fry. The Meat Strips take around four minutes to cook through depending upon their thickness, so always test one piece before you do the remainder. You will also need several pieces of kitchen roll/towel to place your fried goods upon to drain and soak up any excess oil.
In bowl number one you need to place the cornflour and Chinese 5 Spice, mix it using a spoon. You need to coat each piece of meat in this mixture, by adding meat slowly a few at a time, once coated place them into the hot oil and time them frying. Remove them from the saucepan using a spoon or spatula with holes so as to drain the oil. Dry the strips on some towel until they are ready to mix with your chosen sauce.
A great way to use up those Takeaway Sauces you get given is to use them like I did to make a Chinese Sauce. See my image below…
How To Make Chinese Sauces
Here are my recipes for some sauces and stir fry meals I love to make. They are easy to follow and take around half an hour to prepare and cook.
There is one sauce that I always buy because it is more expensive to try and make it, that is black bean sauce. You can pick this up in most supermarkets for between 35p to £1.50. Packets or Jars depending upon if it’s for a one off dish or for several if you wish to make it again. Black Bean Sauce is the Perfect accompaniment with Chicken.
Chicken in Black Bean Sauce Serve this with chunky chopped Onions, ribbons of Carrots and sliced Green Peppers.
Crispy Meat in Sweet Chilli Sauce Serve with Carrot Ribbons, Onions and a chopped Chilli Pepper. 2 Tablespoons of Soy Sauce 2 Tablespoons of Tomato Sauce 4 Tablespoons of Sweet Chilli Sauce 4 Tablespoons of Rice Wine Vinegar
Crispy Meat in Sweet and Sticky Sauce Serve with fried peppers and onions. 1 Tablespoon of Garlic 2 Tablespoons of Soy Sauce 3 Tablespoons of Tomato Sauce 3 Tablespoons of Sweet Chilli Sauce 4 Tablespoons of Rice Wine Vinegar
Chicken Chow Mein Sauce with Onions 1 Tablespoon of Garlic 1 Tablespoon of Ginger 3 Tablespoons of Soy Sauce 2 Tablespoons of Sesame Oil 5 Tablespoons of Boiling Water 1/2 A White Onion Chopped Chunky & Fried Add other Veg as Optional Extras
Add the Chow Mein Sauce to pre-cooked Rice Noodles or Thin Egg Noodles and your already fried and seasoned meat. If you want a richer flavour then marinate the chicken in soy sauce for an hour prior to frying it.
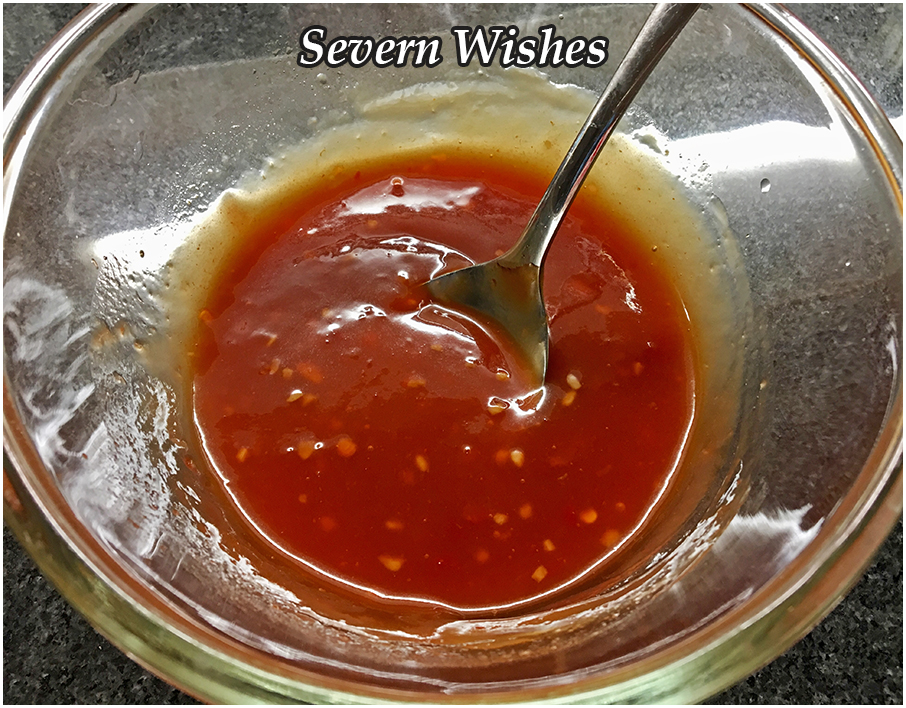
Homemade Sweet Chilli Sauce
Crispy Beef in Sweet Chilli Sauce
As Delicious As It Looks!
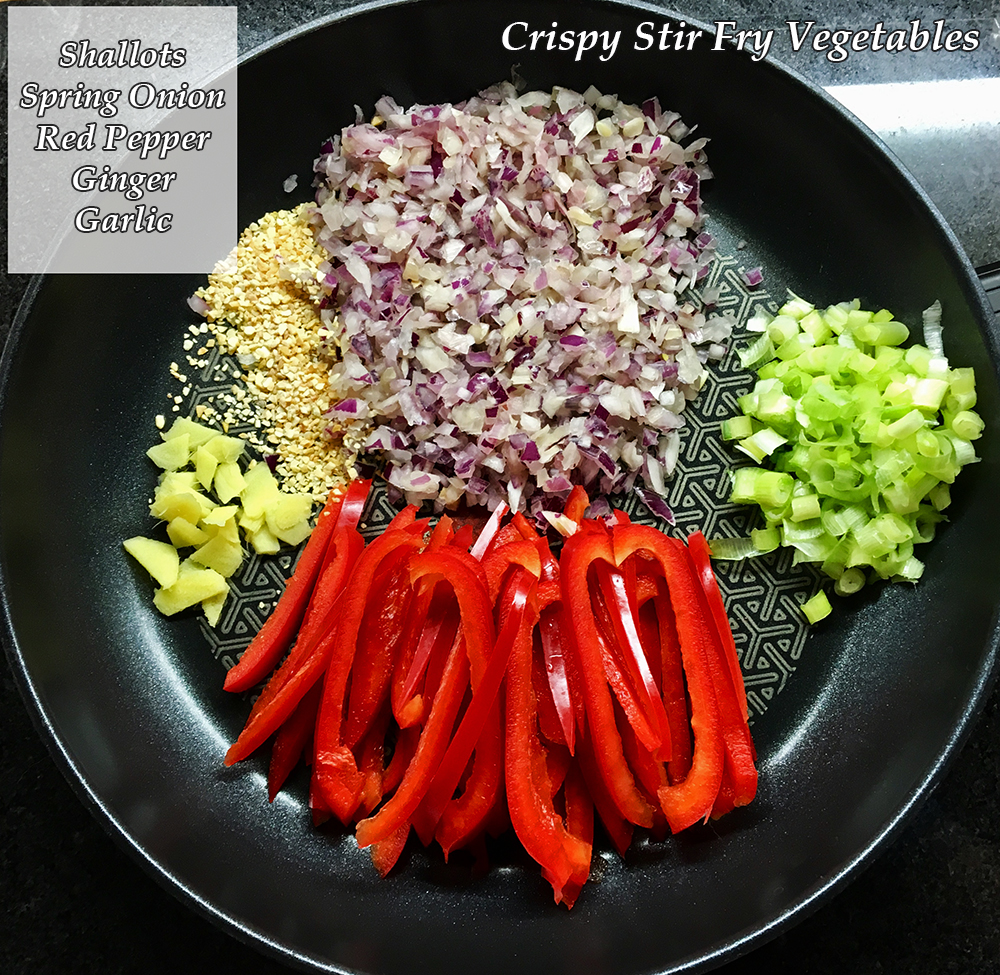
Sabrina’s Delicious Stir Fry
You need 2 pans. Once prepared fry all your Vegetables together in a little oil. In the other pan, take some of the garlic, ginger and spices and add them to season your main element while you cook it, don’t forget to season with pepper and salt. Once everything is cooked combine the main and the vegetables. Add your noodles and a splash of boiling water to the pan. Stir fry until cooked, serve immediately.
Meat / Fish / Vegetable of your choice (Main Element) Shallots OR White Onion 2 Tablespoons of Ginger 2 Tablespoons of Garlic 2 Peppers – 1 Yellow & 1 Red – Sliced Long Ways 1 Tablespoon of Chinese 5 Spice – Season Chosen Main Noodles of your choice Add Spring Onions too if you like Onion as much as I do for a pop of colour!
Fry all these tasty vegetables together to begin your Stir Fry.Soy and Chilli Chicken Stir Fry with Onion, Yellow Pepper & Egg Noodles.
How To Make Sabrina’s Special Egg Fried Rice
Egg Fried Rice is relatively easy to make and is a great accompaniment to lots of Chinese dishes. You can partially cook this dish too to save time! Cook the rice either on the hob or preferably in a Rice Cooker if you have one. Then you’re ready to begin.
Ingredients
Jasmine Rice – 300g – 400g Cooked 2 Tablespoons of Oil 2 Tablespoons of Soy Sauce 1 Teaspoon of Garlic Peas or Petit Pois – 1 Small Cup – 150g approximately Spring Onions – 4 to 6 Chopped Up – 100g plus Scrambled Eggs – 3 Medium Eggs season with Salt, Pepper & Soy Sauce to your tastes
Method
In a large frying pan add oil soy sauce and garlic, then fry the Spring Onions and Peas together. Add the Eggs (previously whisked in a small bowl) and scramble together using a wooden spoon on a high heat. Turn the heat down and add the cooked rice. Mix thoroughly and add any more seasoning to taste. Fry until hot and all flavours are combined. Serve in a large bowl so people can help themselves and scatter some fresh spring onion on top.
The Final Dishes
Your final options for the Chinese Dishes are…
Main Dish 1. Crispy Pork with Sweet Sticky Sauce & Stir Fry Vegetables Main Dish 2. Chicken in Black Bean Sauce with Vegetables Main Dish 3. Chicken Chow Mein with Rice Noodles Main Dish 4. Crispy Beef with Sweet Chilli Sauce & Stir Fry Vegetables Main Dish 5. Soy and Chilli Chicken Stir Fry with Egg Noodles Side Dish. Sabrina’s Special Egg Fried Rice Side Dish. Stir Fry Vegetables
Thank you for joining me on Severn Wishes, I hope you enjoyed this lengthy food post! Let me know in my comments or tag me on social media if you make any of my recipes!
✩ Sabrina ✩
By continuing to use the site, you agree to the use of cookies. more information
The cookie settings on this website are set to "allow cookies" to give you the best browsing experience possible. If you continue to use this website without changing your cookie settings or you click "Accept" below then you are consenting to this.