Sweet Treats Week – Day 2 – Sabrina’s Warm and Gooey Cookie Dough

Welcome to Sweet Treats Week on Severn Wishes. This half term I wanted to share my top 5 baking treats with you all, hopefully you’ve got some time this week to make them with me! Check out my Instagram for more food pictures and recipe ideas too!

Finished Cookie Dough, Yummy!

Day 2 is Sabrina’s Warm and Gooey Cookie Dough Recipe.

This fantastically easy recipe is great if you want a hot desert ready in under an hour. It’s egg free too! I make mine with a dairy free butter and use dairy free chocolates. But you don’t have to if you prefer the real thing. This warm desert is best served about thirty minutes after it’s finished baking, cooled off a little bit but while it’s still warm and gooey. Great on its own or you can pair it with a nice vanilla or coconut ice cream for example.

What You Will Need

A Glass Dish measuring approximately 12cm x 17cm / 5″ x 7″ and preferably with a lid for easy storage after its cooled down!
A Large Mixing Bowl
A Wooden Spoon
A Sieve

Ingredients

150g Plain Flour
115g Butter (Dairy Free Spread)
110g Light Brown Sugar
Water (Per Tablespoon – See Method)
1 Tablespoon of Vanilla
Chocolate Chips or Chunks (As many as you like but a nice ratio between dough and chocolate) I used around 60g of dairy free chocolate chips.

Additional Information: This sized portion will make 4 portions when transferred into pudding bowls. This is a rich desert and you can divide it up into 8 portions if you want to have it accompanied with something else such as ice cream. Keep any leftovers inside the glass dish with the lid on at room temperature, eat it within 48 hours. If you want it warm and extra gooey then microwave a portion for 20 seconds in the microwave.

Dairy Free Cookie Dough with Various Dairy Free Chocolates

Cookie Dough Variations

Add Chunks of Chocolate Brownies. If you have already made brownie earlier in the week you could put small lumps of your softest brownie into the cookie dough along with some chocolate chips. Just ensure they are submerged in the dough so as not to overcook near the top!

Method Steps

1. First you will need to soften the butter a little, add the measured out spread into the large mixing bowl, melt it at 10 second intervals in the microwave and stir after each one. Once softened you add your measured out sugar. Mix until smooth and combined.

2. Sieve your measured flour into the bowl now, make sure once it’s all in you carefully mix it. Then when smooth you add your Vanilla and Chocolate Chips.

3. You now need to add some water to the mixture, add it a tablespoon at a time until you achieve a Cookie Dough consistency. It usually takes between 4 and 8 tablespoons to achieve the dough like substance. Once you’re happy transfer it to your preferred baking dish.

Step 3. Ready to Bake!

4. Now it’s time to bake! Preheat your oven to 180’c and cook in the centre of your oven until the cookie dough top goes golden and slightly brown. The best way to test the dough is right for you is to carefully touch the top, beware it will be hot, so leave it a minute outside of the oven and push down on the top. I like mine to be like a Cookie on the top, and then soft and gooey underneath! Mine took around 24 minutes!

5. As I described above, leave the glass dish out of the oven for around 30 minutes after the bake is complete. Serve the dough after this, it won’t be too hot that way, it should just be warm and gooey!

Thanks very much for joining me on my blog for this recipe! Thank you very much for joining me for Sweet Treats Week! I do hope to see you here again tomorrow!

If you make any of my recipes be sure to tag me on social media, leave me a comment here on my blog. Any questions about a recipe please don’t hesitate to ask them! If you recreate this recipe somewhere else please credit me for it and name me and my blog, or even better link back to this original post too! Thanks everyone!

 Sabrina 

Sweet Treats Week – Day 1 – Sabrina’s Extra Special Chocolate Brownies

Welcome to Sweet Treats Week on Severn Wishes. This half term I wanted to share my top 5 baking treats with you all, hopefully you’ve got some time this week to make them with me! Check out my Instagram for more food pictures and recipe ideas too!

Sabrina’s Chocolate Brownies

Day 1 is Sabrina’s Extra Special Chocolate Brownies

Brownies can be tricky, but if you follow my recipe one step at a time you should be able to recreate my incredible triple chocolate brownies! Since needing to go dairy free I’ve even made these brownies free from dairy by substituting the butter for a dairy free spread and then I swapped the triple chocolate chips for only dairy free chocolates, and they still taste incredible! So do whichever version you would prefer, the difference in butter doesn’t change the end result.

My recipe will make around 20 brownies once you cut them after they have cooled. They are quite rich which is nice because they will last longer! They will last around 3 days in a sealed container, the best way to keep them is to store them at room temperature. TOP TIP Reheat a square or two for between 10 and 20 seconds in the microwave and serve them with ice cream! Yum!

Sabrina’s Triple Chocolate Style Brownies (A.)

What You Will Need

A Glass Dish or Baking Tray measuring approx 26cm x 20cm (8 x 10″)
Baking Paper or Parchment
A Saucepan
A Large Mixing Bowl
A Wooden Spoon
A Metal Spoon
A Whisk – Manual or Mechanical
A Sieve
A Knife
A Cooling Rack
Something To Store Them Inside After They Are Cooled

Step 5. Once Smooth Add Your Chocolates To The Mix!

Ingredients

3 Free Range Eggs (Fresh is best for baking)
175g Plain Chocolate (for melting) (You can use dairy free chocolate too)
175g Butter (or Dairy Free Spread)
200g Caster Sugar
75g Plain Flour
50g Cocoa Powder

Additional Flavours or Additional Chocolates… There Are Endless Possibilities! What Would You Do? Here are my favourites…

Brownie Variations

A. Triple Chocolate Brownies require 75g of White Chocolate Chips and 75g of Milk Chocolate Chips (or use different varieties of dairy free chocolates). Add these at Step 5.
B. Chocolate Orange Brownies require 100g of Chocolate that is Orange Flavoured, dairy free choc orange bars from Asda are fab or a few broken segments of a Terry’s Chocolate Orange are best! Put these pieces in the mixture at Step 5 instead of chocolate chips.
C. Mint Chocolate Brownies require 75g of Chocolate that is Mint flavoured, with such a strong flavour of chocolate it can be used as part of the melted part at the start of the bake. For a more Minty flavour later on you could add some Aero Mint Chocolate Balls when the brownie is almost cooked! Push them into the top of the brownie before the top is solid leaving just a little sticking out so they don’t melt and or burn!

Sabrina’s Chocolate Orange Brownies (B.)

Method Steps

1. First you need to place your butter and plain chocolate into a saucepan. Break the chocolate into small bits so it melts faster. Only melt on a low heat slowly. Keep stirring the melting mixture frequently until it is smooth with no lumps left. TOP TIP I only have my hob one setting 1 or 2 for melting, you don’t want to burn the mixture! I don’t like melting chocolate in a microwave, it’s too easily burnt!

2. Set the melted chocolate mixture to one side and allow it to cool. You can now preheat your oven to 180’c, 160’c for a Fan Assisted or 350F or Gas Mark 4. Cut a piece of baking parchment for your tray and push it inside.

3. In a large bowl break the 3 Eggs, make sure no shell falls in. Using a wooden spoon mix them up, add the Caster Sugar gradually while stirring. You then need to Whisk them both up together until they are combined and smooth with a light and creamy colour.

4. Using a Large Metal Spoon, you now fold in the cooled melted chocolate and butter mixture, one spoonful at a time. Keep stirring it through the creamy mixture, keep going one spoon at a time until all of the smooth thick liquids are combined into one large one. It should be a lot and not lumpy. TOP TIP If the chocolate mixture is still hot it instantly cooks the eggs and you end up with a curdled concoction! Make sure its cool, lukewarm is best, and stick to my one spoon at a time method!

5. Finally you need to Sieve the Cocoa Powder and the Plain Flour into your liquid, again you do this gradually, shaking a little into the bowl and mixing it through until it disappears. Repeat until all the dry ingredients are in the bowl and the mixture should now be a thick pour-able liquid. Add your chocolate chips or buttons or other bits now! Mix them in thoroughly.

6. Pour the mixture entirely into your tray with the parchment inside it. The mixture should sit just over half way inside giving it a little room to rise up slightly. Add any toppings like chocolate chips now, or part way through if they are not bake stable. Shake the tray from side to side before pushing it into the oven, so the bake is level.

7. Bake it with the correct setting for your oven, you’re looking for an even bake with the slightly crisp topping, it should change colour, it should be soft but cooked in the centre. On average this bake takes between 20 and 30 minutes, depending upon tray used and oven type. Just keep an eye on it, take it out and stick a knife into it. When the knife comes out almost clean, pull the tray out. Leave it on top of your oven for ten minutes, try the knife again. Remember if you hit a melted chocolate chip you may think it’s not cooked when it is! For this reason don’t be tempted to over cook it! They should be soft with the additional chocolates melted inside when you cut it!

Remember to wobble the tray so the mixture goes flat!

Thank you very much for joining me for Sweet Treats Week! I hope to see you again tomorrow!

If you make any of my recipes be sure to tag me on social media, leave me a comment here on my blog. Any questions don’t hesitate to ask them! If you recreate this recipe somewhere else please credit me for it and name me and my blog or even better link back to this original post! Thanks everyone!

Sabrina

Sabrina’s Chocolate Orange Brownies (B.)

All The Free’s From Chocolate Cake Recipe

It’s time for another Free From recipe!

As most of you regular Severn Wishes readers will know, my son was born with a number of allergies. I love to cook and baking is something that I am gradually getting better at. I wanted to make up a recipe that was easy and that I could use with what I usually find in my baking cupboard. But not only that, it had to taste like proper chocolate cake. There’s nothing worse than it not resembling what you know and love!

This moist and soft chocolate cake recipe is egg free and dairy free. You could even change the flour to make it gluten free too if you like. I made it normally first, and then with gluten free baking flour when my sister (she’s coeliac) visited us, and both times it still baked as a soft sponge. Delicious! A great treat if you’re doing Veganuary this year! Why not make this Vegan delight at the end of the month? Give you a treat to look forward to!

This cake serves 10 people, you only want a small slice as it’s rich!
Time to Prepare, Make and Bake is… 1 Hour 30 Minutes
Preheat your Oven to a Temperature of 180’c or 360’F
You will need baking parchment to line your 8″ Tin
You shall need a Jug for the Sauce, one Large Bowl and one Small
You will also need a Sieve, a Spoon and a Whisk
And finally a Cooling Rack

Ingredients

For the Cake:

175g Flour – I used plain or a mixture of Plain and Raising, or use GF
200g Caster Sugar
50g Cocoa Powder
1 Teaspoon Baking Soda
1 Teaspoon of Vanilla Extract – You could use Mint Flavouring instead
240ml Tepid Water
120ml Vegetable Oil

For the Sauce to pour on top:

4 to 6 Tablespoons of Tepid Water
2 Tablespoons of Golden Syrup or Maple Syrup
2 Tablespoons of Cocoa Powder
130g of Icing Sugar

Sabrina’s Free From Chocolate Cake

Method – Making the Cake

Step 1. Sift the Flour, Cocoa Powder, Caster Sugar and Baking Soda together in a large bowl. Make sure you mix them together thoroughly to combine.

Step 2. In a small bowl mix oil, water and vanilla together and stir until mixed.

Step 3. Gradually stir your wet mix bowl into the dry ingredients. Once you have combined them use a whisk or hand processor in order to make the mixture smooth. Mix until all the liquid is combined with the dry mixture.

Step 4. Pour your smooth mixture into the lined cake tin and shake gently from side to side to make it even inside.

Step 5. Bake in the Centre of your Preheated Oven, between 26 and 32 minutes depending upon oven type. Keep an eye on your cake so that it doesn’t over bake, use a knife of skewer in the centre, when it comes out clean it’s baked.

Step 6. Once cooked gently transfer the cake to a rack so that it can cool. You don’t want to pour on your sauce until it is cooled. Make sure the cake is completely cool before serving, you don’t want your sauce running off!

Method – Making the Sauce

Step 1. Sift the cocoa powder and icing sugar together in a bowl. Mix with a spoon until combined and a brown colour over all.

Step 2. Pour the syrup of your choice and the water into the bowl, make sure you stir it immediately and keep stirring until the ingredients resemble a smooth consistency. Start with 4 Tablespoons of water, if it’s not resembling a sauce that is pour-able then you can add more, one spoonful at a time until it’s how you want it to be. It can vary on the size of the spoon you use for example. TIP: Always better to start with less water and add it gradually, if it’s too wet to start with then you’re going to be measuring out more sugar which is a consistency much more difficult to get right.

Step 3. Cover this sauce until your cake is cooled and ready to serve, cut your cake slices, plate them up and then pour the sauce on to each piece. It’s easy to make more sauce if you need it and only takes a matter of minutes!


Thank you for coming to Severn Wishes today to read this recipe blog post. I hope you have enjoyed it. Can you please leave me a comment on this post if you try the recipe, and let me know what you think!

Have a great week!

Sabrina

Sabrina’s Special Free From Curry

Sabrina’s Special Free From Curry

What makes my recipe different to others? My “Special” Curry is Free From for my family! The great thing about my recipe is that you can put any meat with it or even vegan alternatives such as Quorn with it. Whatever protein you fancy really! Even fish if you’re that way inclined! The combined flavours work well with everything, but I prefer Chicken and… Potato! Yes… you’ll see!

I use my nifty little food processor (Russel Hobbs Mini Chopper) to save chopping time but if you don’t have a processor then just chop the vegetables as small as possible with a knife and watch those fingers!

The Free From Bit! This curry recipe is DF, NF and GF and it serves 4-6 people. So many curries in the supermarkets contain dairy and nuts. Even local take away restaurants cannot guarantee things being free from certain ingredients. Our family has a wide range of allergies so I’ve learnt to cook my recipes alternatively and figure out what works without it including an allergen. This has been my best recipe to date! You can follow this and it be great for you and your family as well! Plus it’s 3 of your 5 a day!

What can you serve with it? You can serve this curry with a nice Rice, Basmati is a good choice or Pilau, and you can easily get GF rice these days, I recommend Tilda or Tesco’s own brand rice for their flavour! Naan Bread is delicious but obviously it’s not DF or GF so do be careful there! Poppadoms and Chutneys are a great accompaniment but again some of these will not be GF and some even contain Nuts!
If you don’t have any allergies then you can have any of these (or all of them) with the curry! If you choose all of the above you will serve at least 6 people…

Sabrina’s Special Free From Curry
Prep Time: Up To 60 Minutes
Cooking Time: 90 Minutes
Serves: 6 People (8 if you include side dishes)

Ingredients

500g – 600g of your chosen Protein into bite size pieces for frying

400g Tomatoes – use a tin of Plum Tomatoes for the Sauce, pop them into a food processor until smooth and a sauce like consistency, use plum will taste sweeter

1 Large Onion Diced Finely for the Sauce, you can pop this in the food processor before you prepare the tomatoes until shredded very fine

1 Large Onion Chop into bite size pieces ready for frying

2 Peppers – Chopped into short slices (Red or Yellow) ready for frying

4 Tablespoons of Tomato Puree for the Sauce

The Sauce needs to be made of the following spices and seasonings;
4 Tablespoons of Garam Masala
1 Tablespoon of Cumin
3 Tablespoons of Coriander Leaf
1 Tablespoon of Garlic
1 Tablespoon of Paprika
2 Tablespoons of Chilli Powder (Mild) (Use Hot if you can handle it)
30ml of warm water
Salt and Pepper to your taste.

Oil for Frying

400g – 500g Potatoes – Cut into bite size chunks and washed

Method

  1. Prepare all of the ingredients as stated above, diced and chopped.
  2. You need to have a large saucepan and a frying pan warming with a little oil in each. First begin by adding the chopped onion and peppers to the frying pan. Add the tiny diced onion and some garlic to the large saucepan.
  3. Fry off all the ingredients, once the saucepan with the diced onion is nicely caramelised, you can add the sauce ingredients from the list above and mix well. Leave the Onion and Peppers inside the Frying Pan to caramelise and then add the chicken.
  4. Put your plum tomatoes in a food processor and then once blended add them to your saucepan. Next you’ll need to continue frying off the protein and vegetables in the frying pan until thoroughly cooked.
  5. Add anything additional you require for the sauce, that includes the tomato puree and seasonings. Taste it before you add your meat and vegetables so you can tell if it needs more chilli or more salt and pepper.
  6. Simmer your sauce on a low heat, adding the contents of the frying pan which should now be nicely cooked and combined in flavour. You need to continue to simmer this for at least an hour for the flavours to coat everything and for the sauce to thicken up.
  7. Now is the perfect time to add the Potatoes! They will cook inside the sauce and do not need boiling before hand. Use fresh or tinned whatever you have at hand. Leave it to simmer for a while…
  8. Taste test at one hour to ensure the potato are cooked and the chicken is tender, stir occasionally during this hour of cooking time to ensure it’s not getting stuck to the bottom or sides. It should gradually thicken. If you don’t think there is enough sauce when you add all the contents and mix it then add 10ml of water at a time and mix in until the sauce covers everything.
  9. Serve immediately with Rice and any of the other sides I suggested.
Here is my curry when I served it with Pilau Rice and No Potato in this one either… you don’t have to add them it’s optional.

Thank you reading this post today, I really hope you like the look of my recipe, if you give it a go yourself then please tag me on social media to let me know and show me the end result too!

Sabrina

Sabrina’s Dairy Free Vegetable Nuggets

How To Make Delicious Dairy Free Vegetable Nuggets For All The Family To Enjoy!

Today I will be showing you how to make tasty, nutritious and dairy free vegetable nuggets that contain four different vegetables.
They are great fun for your children to eat as finger food and your older children can dip them in the sauce if they choose.
This recipe is ideal for weaning and beyond.

Veggie Nugget (broken so you can see the soft inside)


Ingredients for Sabrina’s Veggie Nuggets

3 Tablespoons of Tomato Ketchup
1 Tablespoon of Reduced Salt Soy Sauce
1 Tablespoon of Mixed Herbs
1 Large Egg (Beaten)
160 grams of Breadcrumbs (approx) roughly 4 slices of bread – I always use the 2 end bits if I have them!
6 Medium Carrots – Grated and Squeezed
2 Courgettes – Grated and Squeezed
100 grams of Swede Cooked First, then Diced Finely using a Chopper
1 Large White Onion Diced Finely
50 grams of Dairy Free Alternative to Italian Style Hard Cheese
Plain Flour (6 tablespoons approx) spread this onto a small plate ready for rolling…


Method

To make the sauce combine tomato ketchup and soy sauce together. Double the amount if you are preparing these nuggets for people to dip into the sauce straight after cooking them. Use half of the sauce for the vegetables mixture and leave half for the dip.

Once you have prepared all of the vegetable ingredients as directed above, you will need to ensure the mixture of vegetables isn’t too wet. Take a handful of the grated and chopped veg and place it between a few paper towels, a muslin cloth or a clean tea towel. Squeeze and press it in the cloth to squeeze out as much liquid as possible. Do this with all of the grated veg.

Get a large mixing bowl and crack the egg into it. Add the herbs and stir until combined. Next add some of the tomato dip. Next add the squeezed vegetables, then lastly add the hard cheese (or alternative) and the breadcrumbs, stir it all thoroughly. You don’t want lots of the same type of veg in each ball, try and mix it so you get a variant of all the ingredients. (I do my breadcrumbs in a small food mixer).

Place the flour onto a small plate ready to roll your nuggets in.

To make a nugget take a small handful of the combined mixture and roll between your palms. Top Tip! Do this with wet hands so it doesn’t stick to you! Roll them out into oval shapes, and then once happy you can roll each one in flour to coat it.

Have a large frying pan ready on your cooker with some oil getting hot. You should place the nuggets down gently so as not to break them or splash the oil. Fry each one until lightly browned all over. Top Tip! Use a pair of tongs to adjust them while frying to make sure you do all of the sides. Keep topping up the oil after every few nuggets.


Once they are cooked set the nuggets to one side on a piece of kitchen roll so as to drain any excess oil from them and let them cool a little, and then serve them while they’re still warm in a large bowl with the remainder of the tomato dip. They are great for a children’s party or a finger food family night in.

Squeezing the Veg so as to remove as much moisture as possible.
Veggie Nugget Mixture Ready For Mixing and Rolling

Vegetable Nuggets are ideal for children who are weaning at around 10 months and older, when they are learning to hold and bite into foods.
They are great for getting your children to eat vegetables.
The tomato dip provides a fun element for older children.
The leftovers can be frozen, defrost over night and re-fry them to give them a crunchy outside again.

My Recipe made me approximately 24 Nuggets.

Once you have rolled your nuggets between your palms you can get ready to fry them… My Top Tip is to have some done so you can fry one set while you make the next set…

Frying Tips

When frying the Nuggets take care and turn them frequently so that they cook evenly on all sides. You also need to maintain the oil so that they sit in a few millimetres at all times to avoid sticking to the pan.

Finished Veggie Nuggets

These Nuggets are great, and rather tasty too, that is providing you like the Veg I have chosen. You can substitute the Courgette for Mushrooms if you prefer those! And you can also do these without being dairy free by using a regular cheese like Parmesan if you wish.

Thank you for visiting, I hope you have enjoyed reading about this recipe, if you decide to give it a go then please leave me a comment with how it went afterwards… Check out my other recipes on the category list!

✩ Sabrina ✩

Our Weaning Journey

Our Weaning journey began delicately due to our son having suspected allergies. He is exclusively breastfed and he cluster fed for the first 5 months of his life. He was born slightly premature at 37 + 5 and after having bad jaundice at birth, it took him many weeks to recover. We spent so much time in hospital at the start that our first month with him went by in a blur. Problems with allergies began at around 12 weeks, so it was a steep learning curve in the next 10 to 12 weeks that followed.

Then, when it came to Baby A reaching the 6 month milestone he was still in size 3-6 month clothing and breast feeding up to 14 times in 24 hours. We hoped that Weaning would satisfy him more so and because we could introduce cooled boiled water with his meals, it would take a bit of pressure off me. This did work, but he had such an appetite that he continued regular breastfeeding including a minimum of two feeds a night, plus day times and extra weaning snacks. We had ourselves one hungry baby!

I recall the health visitor questioning how much I was feeding him at our 6 month visit… she couldn’t believe how much I was saying he ate, I’m almost sure she thought I was lying. I had read in a parenting book that you cannot over feed a baby, because they will simply refuse to eat it. Our son wanted more and more food as the days went by, so I used motherly instincts and I watched my baby for cues. So I continued on with my busy breastfeeding schedule plus I began our weaning journey in a rather swift fashion.

We Tried A Range Of 4 Month Plus Puree, These Are A Few Of Them Little One Loved.

Baby A enjoyed many things that we tried first off, including individual vegetables such as Carrot, Potato, Parsnip, Sweet Potato, Apple and Strawberry. There were only 2 things he spat out which were Prune and Peas. And I don’t blame him for either! Ha!

After doing some reading and noticing how keen Baby A was with eating and being fed, we decided to do 6 weeks of Purées to start with. We maintained that he was to ingest nothing dairy of course, I checked packaging meticulously or I made my own. This worked well, starting with a few mouthfuls twice a day for the first week, followed by doubling the amount in subsequent weeks. By the time we got to week 6 Baby A was eating 70g of fruit purée for breakfast and 70g of vegetable purée in the early evening. He also tried Melty Puffs around this time too.

Prices of Purée vary, but they usually cost anything from 40p all the way up to £1.50. They also range in size so look out for that. We made the most of any offers that were on in supermarkets and also used any store credit points and vouchers we had picked up to get our initial 6 week stash of purée.
Boots vouchers can go a long way if you sign up to the Clubcard and baby club before hand. Keep a look out on social media for offers too.

Minced Beef and Onions with Mashed Potato (7M)

He was enjoying the food we were giving him and he was obviously hungry. We were approaching his 8 month mark when we began moving to thicker purées and food with more textures. I was bulk cooking mashed vegetables at this point and freezing them in small pots (roughly 80g each). Some combinations included Potato and Carrot, Carrot and Swede, Carrot and Parsnip and Parsnip and Sweet Potato.

At 8 months Baby A was eating between 70g and 100g for breakfast, between 100g and 130g for his lunch and between 130g and 150g of food in the evening. This was on top of 12 breast feeds still most days, and we had began to try him on some more snacks. The melty puff kind that melted on his tongue were a real hit! Luckily they came in many flavours.

We also gave him fruit such as Raspberries, Strawberries and Melon as an evening pudding if he was feeling particularly hungry.

Minced Pork and Onions with Carrot and Potato Mash (8M)

Baby A ate most things from Day Dot but turned his nose up at the taste of Cucumber and also highly disliked the taste of Peppers. Some foods took a couple of times before he decided that he liked them, usually very strong tasting food groups. He was unsure about things like Tomato, Scrambled Eggs and Pasta, but we persevered and he eats them now. The trick is to leave a food for 2-3 weeks then try it with them again.

One thing I loved about Weaning was the way he learned and every day you saw him remember. Within two weeks he understood that cutlery went into his mouth, he began to chew even when food was super soft, and he was also cutting several teeth while we were trying most new foods. He did so well with all these milestone changes and I’m very proud of him.

Mashed Carrot and Swede with a Small Chicken Steak and some Rice (9M)

One thing I would recommend to mum’s who want to cook healthy meals for their little ones is to invest in a good strong vegetable mash utensil and a mini food processor. Mine is called the Russel Hobbs Mini Food Processor 22220 Mini Chopper and I cannot rate it high enough! It was used every day for 3 months and I still use it to dice up chewy meat because it saves me so much time. I still use it for my now one year old boy.

Russel Hobbs Mini Chopper In Use

At nine months Baby A began eating some more of the food I prepared for us adults. This includes the meat and sauce of bolognese but we gave him mashed vegetables and not much pasta. He ate my cottage pie (all of it), we had chicken steaks that I had diced in a blender with soft vegetables and rice, sausages were diced and served with mash and veg, and he even ate flaky white fish with rice and veg too!

I also used a weaning book that my mother had bought for me that had some great ideas inside for weaning recipes and snacks. I altered most of them to suit the various allergies in my family of course. Homemade Veggie Nuggets were by far my favourite thing to make, I bulked cooked them which was time consuming but then they’re frozen for convenience.

Minced Beef and Onions, Carrot and Swede Mashed with a Homemade Veggie Nugget

By the time he reached 10 months of age Baby A had 8 teeth and was eating 80% of what we were. He still loves his baby related snacks too! These include Vegetable Puffs, Rice Cakes and Flavoured Shaped Corn Snacks. A lot of these are Organic too.

Some Of The Baby And Toddler Snacks We Buy Regularly.
A Few Of The Pouches We Tried And Tested From 7 Months Plus

These snacks are very affordable from places like Aldi who have their Mamia range. If you sign up to Ella’s Kitchen on their website they will send you a pack and a voucher to try bits from their range which are purchasable at most large supermarkets and Boots stores.

Our little one loves to feed himself firm snacks but has been more than happy for us to feed him things that require a spoon such as fruit purée, cottage pie, mashed vegetables and the like. It’s so important to get your little one to eat their fruit and veg, and it doesn’t matter if you have to create a mashed version in order for them to eat it. Try different combinations and see what your baby likes. Keep a food diary to keep track!

Some of the 7 month snacks are little one loves.

Sabrina’s Weaning Tips For Parents

My top 4 tips for any parents about to wean a baby would be these…

1. Take it slowly and calmly. Your Baby will be intrigued but it can also be a stressful experience for all of you. All healthy Baby’s generally have a good gag reflex and don’t confuse this for choking, stay calm if they cough or spit things out and take all foods – even the purées – at a slow pace!

2. Start with Veg! You don’t want your little one to have too many sweet flavours in those first weeks, this is because when it comes to the savory kind they are less likely to want it. Start with Veg Purée or Mash and go from there…

3. If you plan on doing Baby Lead Weaning, then you must let your little one use their hands. Be prepared for mess! Get a good highchair, get a mat for the floor and keep plenty of baby wipes at hand too!

4. Keep a Food Diary! This is a useful tip for all new parents. It’s a great way to keep track of what baby has eaten, if your little one was to have a rash or reaction to anything they had eaten you can go back and check the diary before trying the substance again. Those first couple of months are critical in preparing baby for stronger tastes and good food habits, so start them early on the main products that your household enjoys together and move forward from there.


All Parents Should Definitely Sign Up To…

1. Ella’s Kitchen via the Website
You get a free pack in the post with tips, a board with stickers, ideas for foods and even some vouchers for baby snacks.

2. Boots Parenting Club
Using your Boots Advantage Card on the Boots App or Website you can add the addition of the Parenting Club which gives you bonus deals, free products and vouchers every month. For example we got a free bottle, a free weaning book and some promotions on nappies and baby food. Check the app each month for new promotions and deals. You also get extra points on your card when purchasing certain products in store and online too.

Ella’s Kitchen Have A Great Website and Their Melty Puffs Are A Real Hit!

✩ Russel Hobbs Mini Chopper Review ✩

I would highly recommend this chopper to any parents who want to make a lot of their own food for their baby. Not only is it simple to use, easy to clean and maintain, but it allows you to make just enough food for a large portion that can be good for a day, or if you’re bulk cooking into baby sized pots it made 6 pots of food no problem. The best thing about this mini processor is it’s size, it takes up very little room in my cupboard and is portable enough to take away for a weekend to a relatives house without being a burden.

Design 5/5
Features 5/5
Value for Money 5/5

RRP £16.00

Joie High Chair Review

We highly recommend the Joie High Chair because it is affordable and also has some great features. These include the large sturdy tray, the beautiful animal design on the seat itself and the large fabric basket underneath which is great for storing extra bits and pieces close by for when you need them, such as bibs, wipes and toys.
We only have one suggestion, that the straps could either be entirely removable for cleaning purposes or that they be a different colour than white, because they really show up every bit of food dirt.

Design 5/5
Features 4/5
Value for Money 5/5

RRP £55.00

Munchkin Products Review

We have been really impressed by the Munchkin Apple Bowls and Plates, as well as their range of Spoons too.
We picked most of them up at various baby events in Supermarkets and on Amazon UK. They are affordable and well made.
They are designed for different stages of Weaning and further interactions with food, ranging from 4 months right up until Toddler ages.
Our son found the spoons easy to eat off and the divider apple plates are a great idea when trying different foods at meal times. Or for separating the meal and the dessert when you get to that stage.

Designs 5/5
Features 5/5
Value for Money 5/5

Thank you for reading this post today, I hope you have found it interesting. If you try any of the products that I have recommended then please let me know in the comments below if your little one liked it.

If you have any questions about any of the products I have mentioned then feel free to also comment and ask me anything, I will do my best to answer you honestly.

Sabrina

How to make Chinese Food from Scratch at Home for this Chinese New Year

Happy Chinese New Year!
新年快乐

A great way to enjoy some tasty Chinese style cuisine this week is to do it yourself. To celebrate Chinese New Year I thought that I would share my own recipes with you all. Many people think it’s a complicated type of cuisine to make but if you’re good at following step by step recipe guides like mine, then you can create my delicious dishes in your own kitchen!

In today’s blog post I’m going to outline some of my own tips and tricks, as well as share my own recipes on how to make some flavoursome Chinese meals. Follow my instructions as much as you can, and substitute the meats for other meat or fish or a vegetarian alternative where I indicate you can with this symbol ⇕ . You can decide which of the sauces you’d rather make too, I will show you a few.

Why not give some cooking a go this Chinese New Year week! I’ve worked out that you can make 4 of my dishes for 4 people, plus a bowl of Sabrina’s Special Egg Fried Rice, for around £6.50 per person. That’s a heck of a lot cheaper than ordering in! On average a dish from a Chinese Takeaway comes in at around £7.00 in most parts of the UK. You can have 3 dishes and a rice for the same price! All you have to do though is cook it!

SHOPPING LIST

Stir Fry Pork ⇕ 500g is £2.75 at Tesco
Stir Fry Beef ⇕ 375g is £3.50 at Tesco
Chicken Fillets ⇕ 500g £4.00 at Tesco
Rice Wine Vinegar – £1.99 for 150ml
Reduced Salt Soy Sauce 65p for Tesco own brand or £1.30 for Amoy
Egg Noodles – Range from 80p to £1.40 – You need 150g for 2 people
Rice Noodles – Range from 90p to £1.80 – You need 300g for 4 people
Spring Onions – 55p for 100g at Tesco
Peas – Petit Pois Frozen at Tesco for £1.60 for 1kg
6 Free Range Eggs – Medium are 85p at Tesco
4 Peppers 2 Red 1 Green 1 Yellow 55p each at Tesco
2 White Onions – 85p per kg at Tesco
Carrots 59p per kg at Tesco
Jasmine Rice – Thai Jasmine Rice 1kg £2.00 at Tesco
Chinese 5 Spice Jar 85p at Tesco
Cornflour​ £1.30 at Tesco
Sunflower Oil 500ml 80p at Tesco
Seasame Oil – 250ml £1.80 at Tesco
Sweet Chilli Sauce – don’t have this at home buy supermarket own
Tomato Sauce – don’t have this at home buy supermarket own
Garlic – if you don’t have this at home buy supermarket own or jar
Ginger – fresh or jar or paste all work the same
Chilli – fresh or jar of flakes is fine but fresh taste better
Black Bean Sauce – Various Brands and Sizes Available

Remember that for some of these items you will have leftover amounts of them that you can use the next time that you cook Chinese food, such as the Petit Pois, the Rice Wine Vinegar, the Cornflour and the Soy Sauce.

Optional Extras

Bean Sprouts for the Stir Fry & Chow Mein Dish – 300g for 50p Tesco
White Cabbage are 79p each in Tesco
Water Chestnuts 225g Tin at Tesco for £1.10
Button Mushrooms – 90p for 200g at Tesco

I have worked out that your shopping list will cost between £27 and £30 depending on supermarket offers and whether or not you pick those offers or brands versus own brand. I shopped at Tesco but prices are similar else where when I looked online. For 4 people this equals approximately £6.50/£7.00 each, that is for the 4 people to have 3 Chinese Dishes and Rice.

TIME TO COOK

How To Make The Crispy Meat Element of the Dishes.

One of the most delicious parts of Chinese food is crispy strips of meat seasoned with Chinese spices. You can pick up a jar of Chinese 5 Spice for less than £1 in most supermarkets, and because it’s so strong in flavour it goes a long way.

Options for this type of meal are…
Crispy Beef in Sweet Chilli Sauce
Crispy Pork in Sweet and Sticky Sauce

Ingredients

Meat In Strips (your choice from Shopping List) Cut It If Not Already
5 Tablespoons of Cornflour
3 Tablespoons of Chinese 5 Spice

How To Prepare

You need a small saucepan that you pour oil in to until it is around an inch deep. You need to heat this on a hob until it’s very hot before you place meat inside to fry. The Meat Strips take around four minutes to cook through depending upon their thickness, so always test one piece before you do the remainder. You will also need several pieces of kitchen roll/towel to place your fried goods upon to drain and soak up any excess oil.

In bowl number one you need to place the cornflour and Chinese 5 Spice, mix it using a spoon. You need to coat each piece of meat in this mixture, by adding meat slowly a few at a time, once coated place them into the hot oil and time them frying. Remove them from the saucepan using a spoon or spatula with holes so as to drain the oil. Dry the strips on some towel until they are ready to mix with your chosen sauce.

A great way to use up those Takeaway Sauces you get given is to use them like I did to make a Chinese Sauce. See my image below…

How To Make Chinese Sauces

Here are my recipes for some sauces and stir fry meals I love to make. They are easy to follow and take around half an hour to prepare and cook.

There is one sauce that I always buy because it is more expensive to try and make it, that is black bean sauce. You can pick this up in most supermarkets for between 35p to £1.50. Packets or Jars depending upon if it’s for a one off dish or for several if you wish to make it again. Black Bean Sauce is the Perfect accompaniment with Chicken.

Chicken in Black Bean Sauce
Serve this with chunky chopped Onions, ribbons of Carrots and sliced Green Peppers.

Crispy Meat in Sweet Chilli Sauce
Serve with Carrot Ribbons, Onions and a chopped Chilli Pepper.
2 Tablespoons of Soy Sauce
2 Tablespoons of Tomato Sauce
4 Tablespoons of Sweet Chilli Sauce
4 Tablespoons of Rice Wine Vinegar

Crispy Meat in Sweet and Sticky Sauce
Serve with fried peppers and onions.
1 Tablespoon of Garlic
2 Tablespoons of Soy Sauce
3 Tablespoons of Tomato Sauce
3 Tablespoons of Sweet Chilli Sauce
4 Tablespoons of Rice Wine Vinegar

Chicken Chow Mein Sauce with Onions
1 Tablespoon of Garlic
1 Tablespoon of Ginger
3 Tablespoons of Soy Sauce
2 Tablespoons of Sesame Oil
5 Tablespoons of Boiling Water
1/2 A White Onion Chopped Chunky & Fried
Add other Veg as Optional Extras

Add the Chow Mein Sauce to pre-cooked Rice Noodles or Thin Egg Noodles and your already fried and seasoned meat. If you want a richer flavour then marinate the chicken in soy sauce for an hour prior to frying it.

Homemade Sweet Chilli Sauce
Crispy Beef in Sweet Chilli Sauce
As Delicious As It Looks!

Sabrina’s Delicious Stir Fry

You need 2 pans. Once prepared fry all your Vegetables together in a little oil. In the other pan, take some of the garlic, ginger and spices and add them to season your main element while you cook it, don’t forget to season with pepper and salt.
Once everything is cooked combine the main and the vegetables. Add your noodles and a splash of boiling water to the pan. Stir fry until cooked, serve immediately.

Meat / Fish / Vegetable of your choice (Main Element)
Shallots OR White Onion
2 Tablespoons of Ginger
2 Tablespoons of Garlic
2 Peppers – 1 Yellow & 1 Red – Sliced Long Ways
1 Tablespoon of Chinese 5 Spice – Season Chosen Main
Noodles of your choice
Add Spring Onions too if you like Onion as much as I do for a pop of colour!

Fry all these tasty vegetables together to begin your Stir Fry.
Soy and Chilli Chicken Stir Fry with Onion, Yellow Pepper & Egg Noodles.

How To Make Sabrina’s Special Egg Fried Rice

Egg Fried Rice is relatively easy to make and is a great accompaniment to lots of Chinese dishes. You can partially cook this dish too to save time! Cook the rice either on the hob or preferably in a Rice Cooker if you have one. Then you’re ready to begin.

Ingredients

Jasmine Rice – 300g – 400g Cooked
2 Tablespoons of Oil
2 Tablespoons of Soy Sauce
1 Teaspoon of Garlic
Peas or Petit Pois – 1 Small Cup – 150g approximately
Spring Onions – 4 to 6 Chopped Up – 100g plus
Scrambled Eggs – 3 Medium Eggs season with Salt, Pepper & Soy Sauce to your tastes

Method

In a large frying pan add oil soy sauce and garlic, then fry the Spring Onions and Peas together. Add the Eggs (previously whisked in a small bowl) and scramble together using a wooden spoon on a high heat. Turn the heat down and add the cooked rice. Mix thoroughly and add any more seasoning to taste. Fry until hot and all flavours are combined. Serve in a large bowl so people can help themselves and scatter some fresh spring onion on top.

The Final Dishes

Your final options for the Chinese Dishes are…

Main Dish 1. Crispy Pork with Sweet Sticky Sauce & Stir Fry Vegetables
Main Dish 2. Chicken in Black Bean Sauce with Vegetables
Main Dish 3. Chicken Chow Mein with Rice Noodles
Main Dish 4. Crispy Beef with Sweet Chilli Sauce & Stir Fry Vegetables
Main Dish 5. Soy and Chilli Chicken Stir Fry with Egg Noodles
Side Dish. Sabrina’s Special Egg Fried Rice
Side Dish. Stir Fry Vegetables

Thank you for joining me on Severn Wishes, I hope you enjoyed this lengthy food post! Let me know in my comments or tag me on social media if you make any of my recipes!

✩ Sabrina ✩

Well Being and Health – Easy Ways To Make The Most Of Vegetables

Easy Ways To Make The Most Of Vegetables


We often throw away a lot of fruit and vegetables that have a habit of going off before we get around to using them. In this post today I’m going to outline the ways in which I make the most of vegetables and how easily you can so to.


Sabrina’s Top Tip is to invest in a blackboard or a meal planner or even both! That way you won’t forget to use what’s in your fridge! Plan out one night a week that is a Treat Night where you can have something tasty like chips with your evening meal, but otherwise mix up your vegetables so as not to get bored with the weekly selection.


Buy Frozen

You often get a lot more veg for your money with frozen, and it’s just as good for you with most brands choosing to freeze hours after the vegetables are picked. Frozen often gives you more per kilo as well, with things such as broccoli because you’re not paying for the weight of its stork, or spinach for example which is frozen in far larger quantities than you find it in fresh packets. Frozen veg also has the added benefits of you only using what you need each time rather than you wasting with cutting sections of fresh veg up when preparing them.


Make a Soup or Sauce

Usually I make a soup or a sauce out of veg that needs using up, or left over veg that wasn’t all eaten during something like a roast dinner.


Use your Peelings – They are the most nutritious parts!

If you often peel potatoes, parsnips, carrots and sweet potato, but throw those peelings away, you should consider making your own vegetable crisps out of them.
A greatly tasty and healthy snack for children between meals or as a starter while the evening meal is cooking. Keep them for 48 hours in a clean lidded Tupperware box to keep the crunch!


Save Money By Using the Stems

If you prepare Cauliflower and/or Broccoli regularly, do you ever use the stems? There are a few options to save you throwing them away.
Make Cauliflower Rice by putting the stems and any left over florets into a processor to make cauliflower rice.
Make an easy vegetable curry by cubing the stems of cauliflower with any left over potato and cook them a little longer than you would usually to soften them up.
You can take broccoli stems and either shave them finely using a peeler and fry them with stir fry vegetables or dice them and add them to pasta dishes.


Buy Seasonal to Save Money

Look into buying Seasonal Vegetables that are on offer in Supermarkets. Some of the larger ones in the United Kingdom do weekly deals too! Make sure you plan your week around this and use up the items that will spoil first so as to ensure no waste.

 I hope you’ve enjoyed this short post and my vegetable tips!

✩ Sabrina ✩


3 Delicious Recipes Suitable for Pregnant Women including Homemade Egg Free Ice Cream.

FOOD WEEK ON SEVERN WISHES


Sabrina’s Delicious Recipes for Pregnant Women and their Families.

I have always been a cook, and from a young age too. But what I didn’t bargain for was all the things I couldn’t eat or had to alter or avoid during pregnancy. These included runny eggs, smoked meats and processed foods. I decided almost a year before I had gotten pregnant that I would make some changes to my diet. Less processed foods, less chocolate and snacks, more fruit and vegetables and definitely more healthy recipes. I swapped my bacon twice a week for just on a Saturday morning, cut down red meat to one night a week and ate more lean white meat instead.

Trying to do this for just one person is difficult, and it took a number of weeks to convince my husband to swap with me to certain items. I told him we could have everything in moderation. You could still eat a bag of crisps at lunchtime, you could still have a pudding after your evening meal, and we still had a takeaway delivered every fortnight on a Friday. But in between we would snack on healthier choices, eat more vegetables with our evening meal and cut down on the amount of processed meats we were eating.

It took about a month, but I began to feel better for the choices that I had made. And once we were in fact expecting, I looked through the internet and my cookbooks to find recipes that I could adapt to our new regime. This included changing minced beef for lean pork mince which is a healthier alternative, removing meat altogether from a recipe in some cases and putting in two vegetables instead, and even making my own cakes and ice creams that didn’t contain any eggs.

Depending upon whether or not you’ve been unwell during the first trimester of your pregnancy or not, can determine what and how much you’ve been eating. I certainly made up for missed nutrients in my second trimester and it’s also when you should have more energy and appetite so you will enjoy it more. However come the third trimester there isn’t a great deal of room for you to indulge, so smaller portions, little and often became my way to go.

The remainder of this blog post will outline three of my favourite recipes that I have made during this pregnancy. It includes a starter, a main course and a dessert and if I know any nutritional information I will include them. And I will also include how long the prep and cooking took me so you know the details of each recipe and the rough amount the quantities of it will make too.

STARTER

✩ Chicken and Bacon Salad with Egg ✩

It may be light but it is very flavoursome, the salad portion is one of your five a day, and you can choose to add a dressing or sauce of your choice as well. You should be able to multitask through the prep so long as you keep an eye on the things you are cooking while chopping the salad for example.

Serves 4
Prep 15 minutes
Cook 10 minutes
Total Time 25 minutes

You Will Need;

✩ A Grill Frying Pan with a little oil
✩ A nice deep bowl per person for serving
✩ Colander for Washing the Salad
✩ A Sharp Knife for preparing the salad
✩ A pair of Kitchen Scissors for cutting the chicken and the bacon
✩ A deep saucepan filled with water for boiling the eggs

✩ Ingredients ✩

✩ Mixed Salad Leaves – your preference – 50 grams per person
✩ Chicken Breasts – 1 small breast per person – cut into shreds
✩ Streaky Bacon – 2 Rashers per person – cut into shreds
✩ Eggs – to Hard Boil – 1 egg per person
✩ Cherry or Plum Tomatoes – your preference – washed and halved – several per person
✩ Cucumber – Washed and Sliced into Chunks – 3cm of Cucumber per person
✩ Croutons – You can use shop bought ones if you want to save time
✩ Grated Parmesan or Grated Cheddar Cheese – your preference

✩ Method ✩

1. Boil the Water for the Eggs and Hard Boil
2. Grill the Chicken and Bacon together until cooked
3. Wash the salad and chop accordingly
4. Arrange the salad at the bottom of the bowls
5. Arrange the other ingredients on top of the leaves making sure the chicken is last
6. Grate some cheese over the top and finish with any dressing you may want
7. Serve immediately

TOP TIP – In order for a Salad to be classed as one of your five a day you need to eat 80 grams or more of it. By combining the grams of the salad leaves with the cucumber and tomato you should achieve the correct amount for it to count!
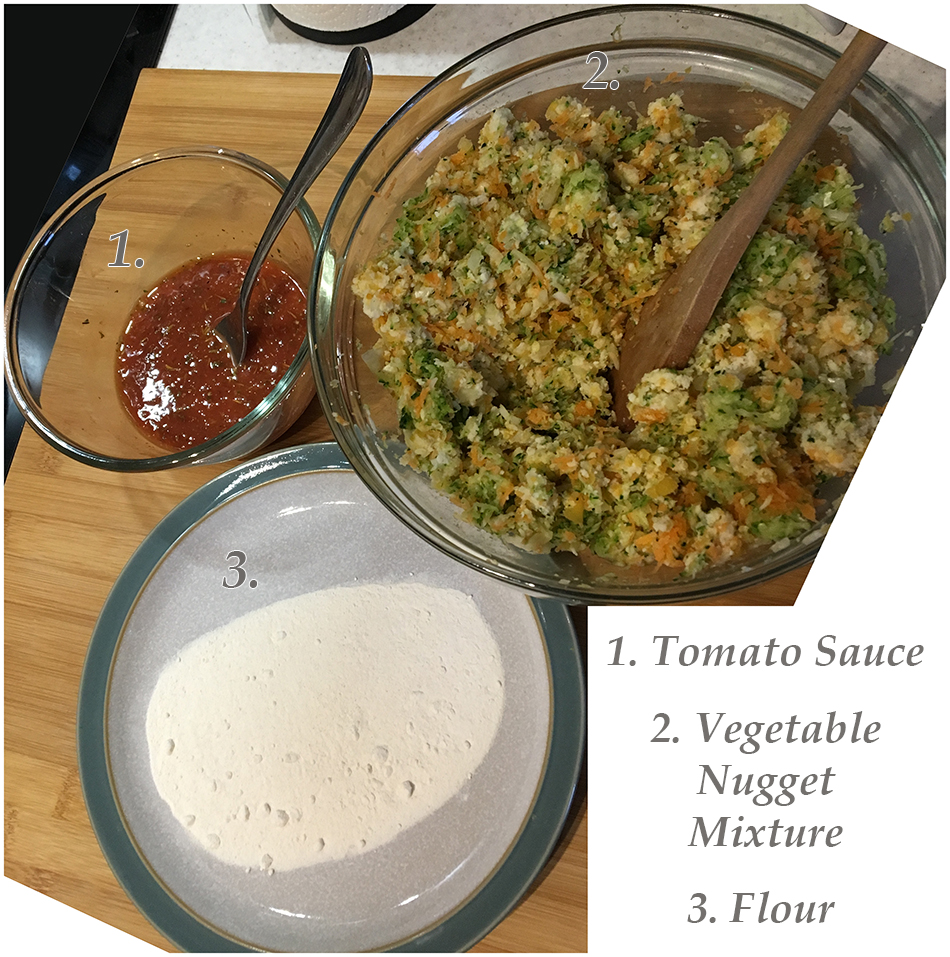
MAIN

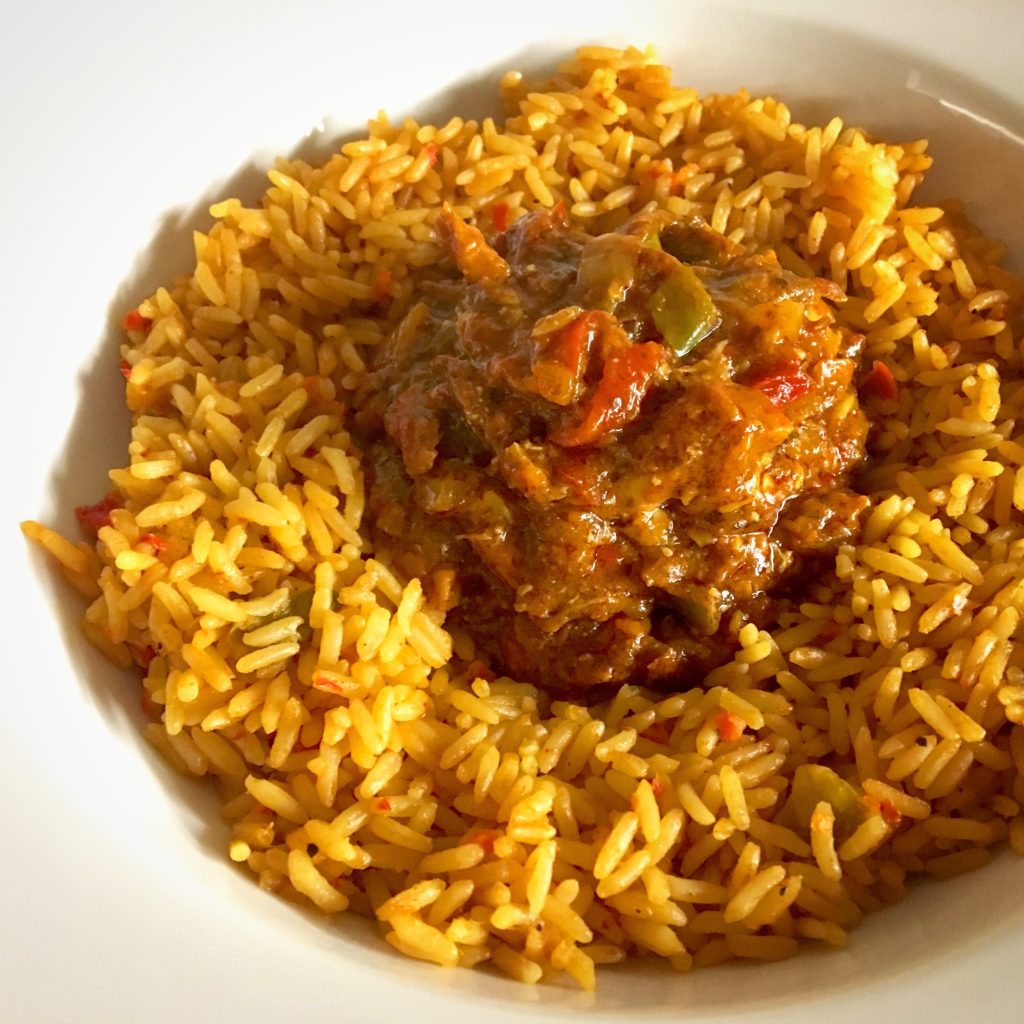
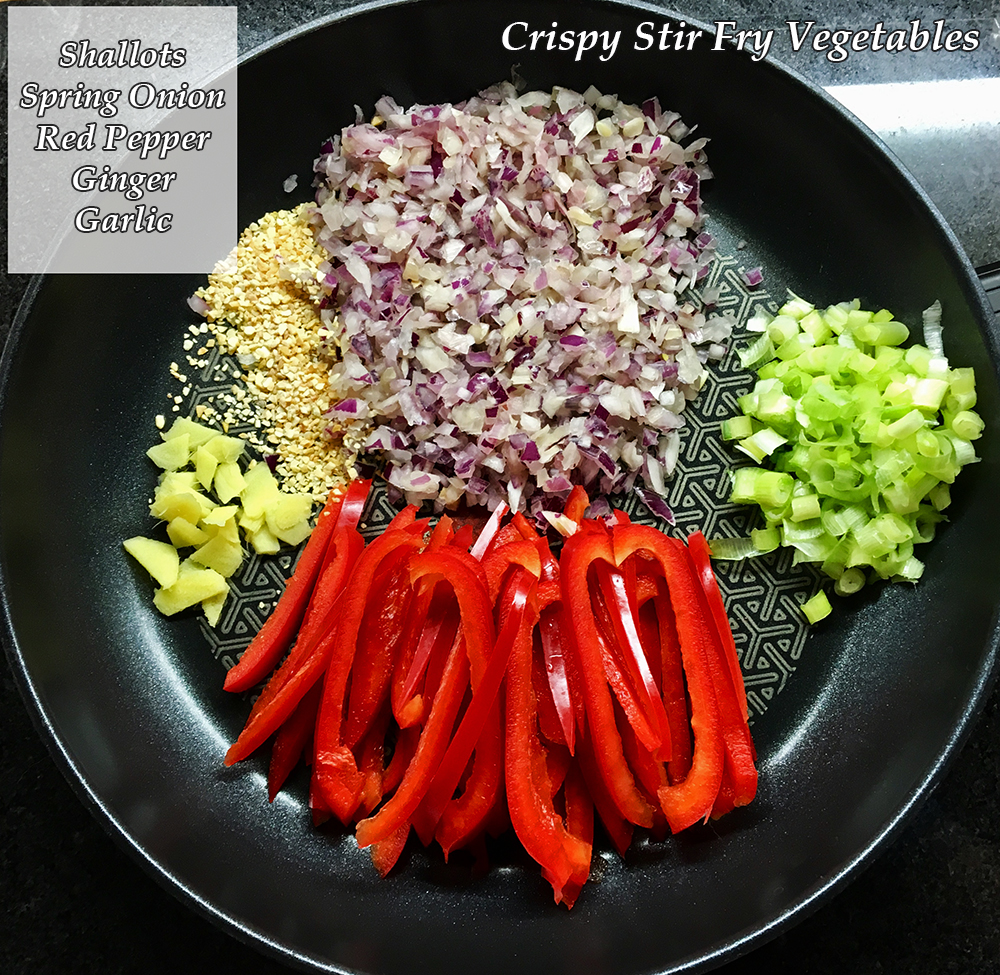
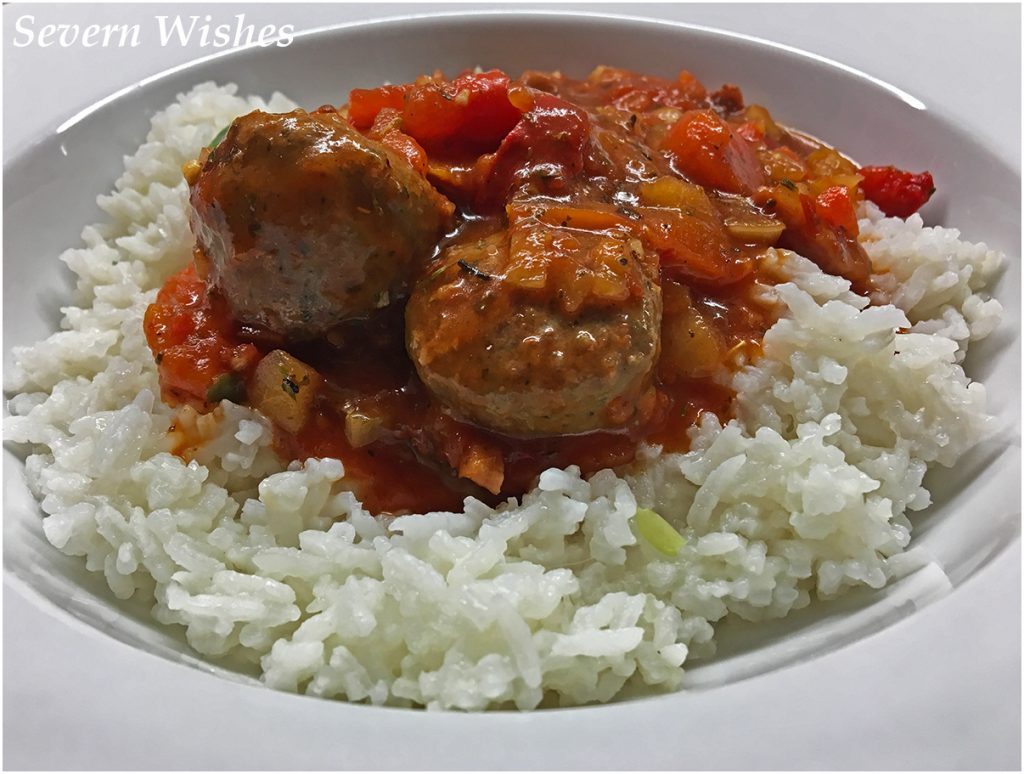
✩ Sabrina’s Mild Spicy Meatballs in Tomato and Pepper Sauce with White Rice ✩

My family friendly Meatball Recipe is mildly spicy and tasty, it also contains two of your five a day with all the vegetables contained in the sauce… You can choose to remove or up the amount of spice dependent on your own tastes.

Serves 4
Prep 1 hour
Cook 1 hour
Total Time 2 hours

You Will Need;

✩ A Large Saucepan with a Lid to cook the main sauce
✩ A Wooden Spoon
✩ Rice Cooker OR Large Saucepan with a Lid to cook the rice
✩ A Small Frying Pan
✩ Small Bowl
✩ Bowls to Serve the Meal in


✩ Ingredients ✩

For Meatballs

✩ Lean Mince Beef (10% Fat or less – 500 grams)
✩ Salt and Pepper To Taste
✩ 1 Egg
✩ Italian Mixed Herbs (1 Tablespoon)
✩ Onion Powder (1 Teaspoon)
✩ Garlic Powder / Dried (1 Teaspoon)

For Sauce

✩ Chopped Tomatoes (1 Tin – 400 grams)
✩ Large White Onion (2 Onions – Finely Chopped)
✩ Carrots (2 Carrots – 200 grams approx)
✩ Plum Tomatoes (1 Tin Chopped – 400 grams)
✩ Red Pepper (1 Pepper Sliced and Diced)
✩ Beef Stock Cube/Stock Pot – (Pots Do Melt Quicker)
✩ Mild Chilli Powder – 2 Tablespoons
✩ Oregano Herbs – 2 Tablespoons
✩ Basil Herbs – 1 Tablespoon
✩ Tomato Puree (50 grams)
✩ Garlic Powder / Dried / Fresh (1 Tablespoon)

✩ Method ✩

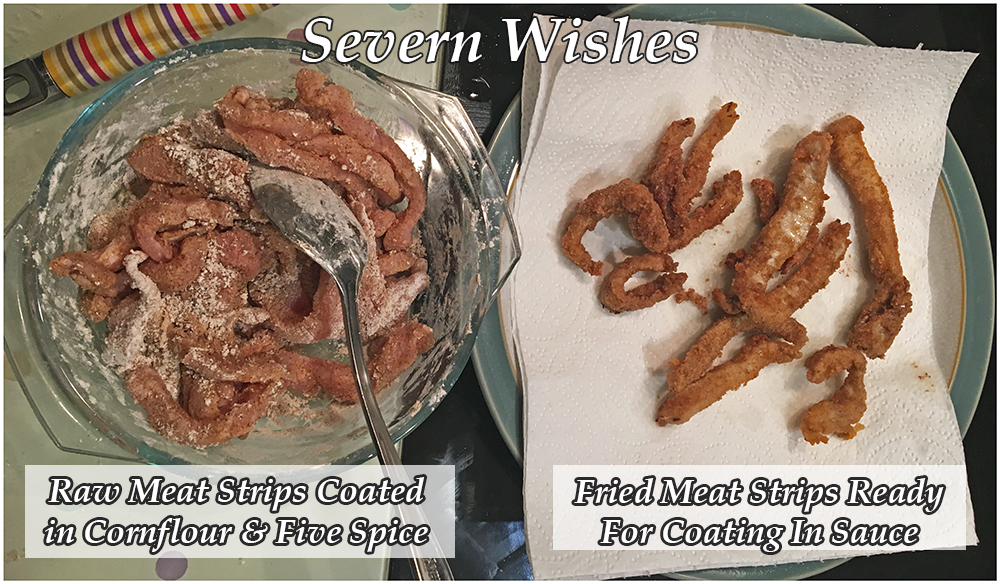
1. To make the Meatballs add the binding ingredients to a small bowl and mix. Using clean and dry hands roll small amounts of Mince Beef together into meatball sized shapes and put them through the mixture to coat.
2. Fry off the Meatballs in a pan with a little oil, sealing the flavour in. Then add them to the saucepan ready for cooking within the sauce.
3. Fry the Onion and Peppers together once all the meatballs are done.
4. Once cooked through add the onion and peppers to the saucepan, then add the other vegetables ingredients including the tomatoes and carrots.
5. Stir these thoroughly and then add one beef stock cube/pot.
6. Add all of the Herbs and Spices listed next, stir through until dissolved.
7. Simmer on a low heat stirring occasionally for up to an hour, until the sauce has thickened and the meatballs are cooked all the way through.
8. Serve on a bed of Rice and if you want to, a sprinkle of cheese on the top! Yum!

TOP TIP – Always add the spices last before starting the simmering, they will dissolve into the liquid and really marinate over the hour as the liquid is absorbed. This also gives the meatballs time to cook through too and absorb those delicious flavours!


DESSERT

✩ Egg Free Vanilla Soft Scoop Ice Cream 

A delicious homemade ice cream, the vanilla stands out just enough and because it’s soft scoop it’s easy to eat and can be paired with so many things. Alternatively just eat it on it’s own…

Serves – 12 people
Prep – 5 minutes
Cook – 5 minutes
Chill Time – 3 hours
Total Time – 3 hours and 10 minutes
Nutrition – Egg Free, Vegetarian and Gluten Free.

You Will Need;
✩ An Ice Cream Churner Whose Inner Pot Has Been Frozen Prior To Use (Overnight)
✩ A Large Shallow Saucepan
✩ A Wooden Spoon
✩ A Tub For Freezing The Ice Cream In Afterwards

✩ Ingredients ✩
✩ Double/Heavy Cream – 2 Cups
✩ Milk – 3/4 Cup
✩ Salt – 1/8 Teaspoon
✩ Sugar (White) – 3/4 Cup
✩ Vanilla Essence – 2 Teaspoons

✩ Method ✩

1. Add all of the ingredients to a large shallow saucepan.
2. Heat them on a Medium Heat until it begins to Bubble.
3. When Bubbling starts Turn Off the Heat and Mix until all the Sugar is Dissolved.
4. Allow the Mixture to Cool down to Room Temperature.
5. Pour the Mixture into a previously chilled Ice Cream Churner according to fill level and follow the manufacturers directions for quantity and times.
6. Once Churned properly carefully Spoon the Mixture into a Tub and Freeze for 3 hours before Serving. This is a Soft Scoop Ice Cream and is easy to remove.

TOP TIP – It’s a good idea to serve some fruit with this kind of ice cream, it always turns out so soft and delicious it’s nice to give some texture to it.

I hope that you will enjoy my recipes from this blog post, or that it has perhaps inspired you with some healthy eating options to try! You can enjoy this food whether you’re pregnant or not and I hope you’ll consider trying this delicious food!

Thank you for reading, this has been Food Week on Severn Wishes Blog!

✩ Sabrina ✩

Healthy and Nutritious Snacks for Pregnant Women

FOOD WEEK ON SEVERN WISHES


Healthy and Nutritious Snacks for Pregnant Women

If there’s one thing that I’ve learnt so far during my pregnancy it’s this, you cannot always know what you’re going to want to eat! Snacking is fine providing you have a healthy and balanced diet with enough of the Vitamins and Protein that you and your baby need.

I’m now into my third trimester and I’m supposed to be consuming the extra 200 calories a day. However some days I find this quite difficult. Guidelines suggest that these calories are made up from low-fat dairy products, nuts and seeds, extra portions of fruit and vegetables, lean meats and wholegrain.

For my size and current weight I was advised at the start of my pregnancy to aim for between 2000 and 2250 calories every day. That can now be increased to between 2250 and 2500 calories but maintaining my healthy choices.

I have been monitoring my daily intakes using my Fitbit app on my iPhone. This allows me to see several things including the amount of Carbohydrates, Proteins and Fats I’ve consumed for that day. It’s a good way to keep track and is fairly accurate.

As my next image will demonstrate, most days begin in the same way, usually I eat cereal with milk so that I maintain a good fibre and calcium intake first thing. But then it really depends on what I feel like as to how much I eat at lunchtime. Sometimes it’s bread related, sometimes a whole hot meal, but other times it’s a mixed salad with added proteins… what I’m getting at is every day is varied. It also depends on how busy I am and if I’m working or at home. As you will see from these statistics from the first few days of May, my calories had an average of 2,400.

One thing I do maintain is eating between 3 and 6 fruit and vegetable portions in every 24 hours. Some days that is easy and others not so much. Although one trick is to drink a glass of orange juice or smoothie, this counts as 1 of your 5 a day and also contributes to your liquids intake which should be between 2 and 3 litres.

I’m going to be doing a blog post on some of my favourite healthy recipes that may help you if you struggle to get your recommended daily amounts. Lots of these are meals that I have eaten while being pregnant too.

One thing I’ve been pretty reliant upon is healthy snacks. I’ve eaten a lot more yoghurt and a lot more fruit related portions since my pregnancy began. For a time I went off sugary snacks which in a way was great, as I was only eating naturally occurring sugars and not processed ones. Though occasionally now I find myself reaching for a snack sized chocolate bar, but that’s still okay! Due to all the other more healthy snacks I’ve been consuming.

Here is one idea, why not keep a food diary if you don’t have an app so that you can keep track.

Here is a list of the things that I’ve been eating regularly and also a couple of other ones that pregnancy books and apps have recommended! I have included a few images of some of my foods too!

Low Fat Yoghurt with Fruit / Seeds

Scrambled Egg on Wholegrain Toast

Plain Porridge with Fruit

Smoothies – Banana and Raspberry is tasty and so is Strawberry and Mango!

Popcorn – Not the sugary sort but plain

Low Fat Yoghurt and Granola / Oat Cereal

 Crackers with Cheese and Grapes

Bread Sticks and Cheese

Grapes and Apple Slices (80-90 grams is 1 of your 5 a day)

Banana Bread / Banana Cake / Banana and Dark Chocolate Chip Cake


Baked Beans on Toast

Fruit – I love Berries like Raspberries in a bowl with two pieces/squares of shaved dark chocolate grated on top (only the good stuff!)

Mixed Salad Leaves and a Tablespoon of Grated Cheddar Cheese


You’ll notice that many of these snacks could be considered breakfast related, and they are all pretty simple and quick to prepare as well.

I will admit I do enjoy cereal and yoghurt related snacks the most. But I have also enjoyed discovering new things these past few months too.


I hope that this blog post has inspired you with some healthy eating snacks whether you’re pregnant or not!

Thank you for reading!

✩ Sabrina ✩