Fun Ways to Spend Quality Time with your Children both Indoors and Outdoors this Easter

Sometimes we are all guilty of spending too much time on technology, and now that the weather is improving we should all be putting down our TV remotes and phones and getting outside! (I know that you’re thinking about doing that now, as you read this blog post on a piece of tech, but please bare with me as I have some great activities you’ll want to be inspired by I’m sure!)

So where to begin! If you’re not naturally adventurous for the great outdoors it can seem a bit overwhelming! So how about we just start small! I have come up with a range of things to suit everyone, outdoorsy types and not so much! All you need to do is choose one of these to do each day during the school break or even at the Easter weekend and voila you have some outdoor fun, nature related or outdoor activity to enjoy!

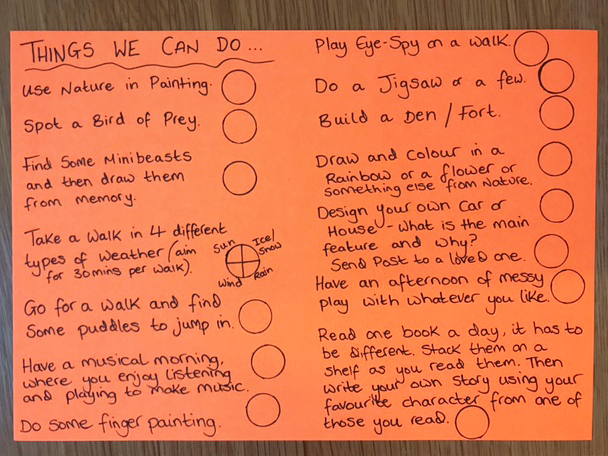
Here are my 15 “Things We Can Do” of Fun Ideas to do Indoors and Outdoors… Weather Dependent!

🥚 Use Nature in a Painting – Use sticks or leaves to paint with!

🥚
Spot a Bird of Prey – Look up and see what is flying above your head!

🥚
Find Some Minibeasts and Draw Them from Memory – Bugs can be colourful and interesting!

🥚
Take a Walk in 4 Different Types of Weather – No matter what the weather it can be fun to take a walk!

🥚 Go For a Walk and Find Some Puddles to Jump in – Who doesn’t like jumping in a puddle! Wear wellies!

🥚 Have a Musical Morning, Listening or Playing – Music can help you relax!

🥚 Do Some Finger Painting – Draw the trunk of a tree and make the leaves with your fingers!

🥚
Play Eye-Spy on a Family Walk – Eye Spy is great for a range of ages!

🥚
Do a Jigsaw on a Rainy Day – Jigsaws can be a fun family activity on a rainy day or a board game!

🥚 Build a Den or Fort Together – Who doesn’t love building a den! Cushions and Throws work well!

🥚 Draw and then Colour in something you’ve seen in Nature on your Walk, a Rainbow, Tree, Flower etc

🥚 Design your own Dream Car or Dream House (for older children to imagine)

🥚 Create Post for a Loved One and Walk to a Post Box to Send it – Draw a Picture or Write a Letter

🥚 Have an Afternoon of MESS with Messy Play or Fun with Paint or Food items – Paint and Rice Crispies…

🥚 Read More! Read as a Family, decide on what your Favourite Book is and why Books help you learn!

🥚 Nature Hunter GatherersCollect some things from in your local area to look at when you get home such as leaves and pinecones, things that have fallen from trees and bushes. Don’t deliberately destroy nature though! Fallen Leaves are great, discover what tree they come from by looking at the shape!

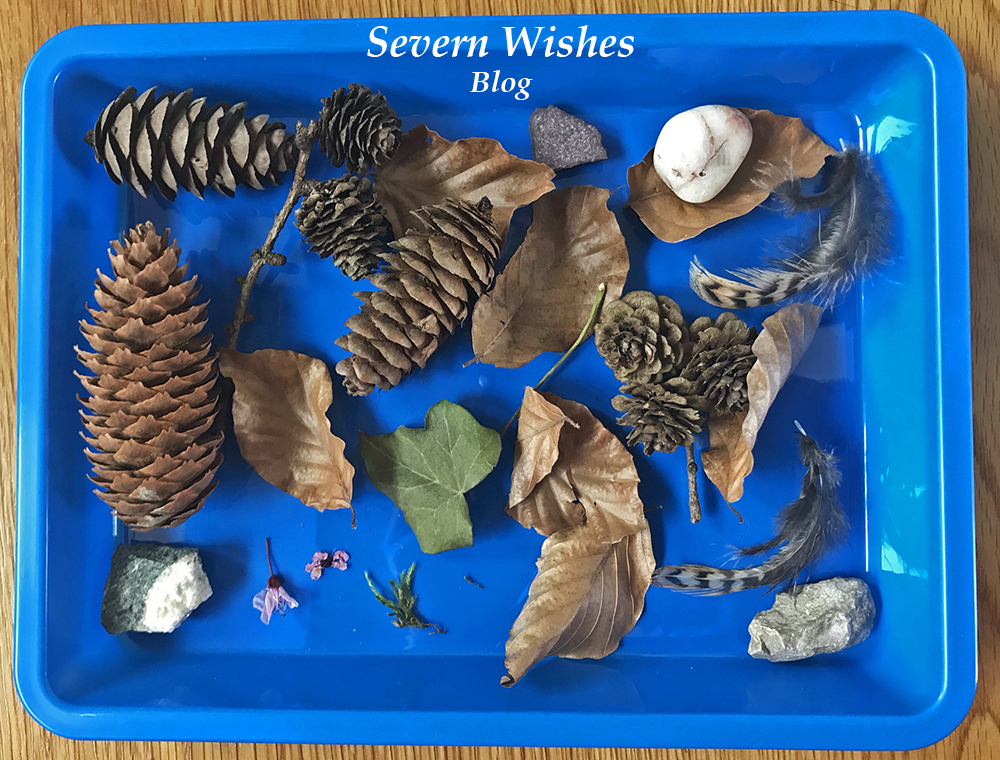
The image above is from when my son and I did a day of Nature Hunter Gatherers. It was a lovely warm day and we spent six hours outside having fun, games and walking. This activity is great for learning about where things come from such as pinecones and feathers. Make sure you do this on a dry day. We took a long walk through our village and picked up things that we found on the ground. Leave them somewhere cool and dry for a few days to dry out and make sure there are no creatures living in them before you handle them again!

I highly recommend getting some coloured trays like these, they were only £3 for a pack of 3 from

The Works. Perfect for both Art and Craft and collecting things too!

✩✩✩

Picking Up Litter

If your children are a little older than mine you might want to pop gloves on when you go on your walk, take a plastic bag with you, and do a litter picking up hour in your local village or town. This helps the environment and the animals and birds in your area from getting injured.

🥚 Easter Ideas 🥚

You could also do Easter themed Drawings, Colouring In and Games such as an Easter Egg Hunt in your house or garden this weekend.


Check out my previous Easter blog posts for Art and Craft ideas and Baking fun… Here

Thank you for reading this blog post today! I hope that I have inspired you to do at least one of these activities with your own family. Let me know in the comments section or on my social media if you get up to anything fun in the next few weeks!

✩ Sabrina ✩

Sabrina’s How To Make Your Own Unique Gift Tags This Festive Season

I have always had some creative flare, but one thing I had never done before was to make my own Christmas Present Tags! I came up with lots of ideas while spending time at home.

I took the plunge this November and ordered the things I would need to design them. I already had two awesome sets of Staedtler Pens in both fine line and bold. I also had various sequins. But I needed the tags and the string. I tried my best to use natural string and cardboard that was made from recycled materials.

What you could do if you can’t get any of these brown tags, is to cut up some old Christmas Cards and make them into similar shapes like these, add things like sequins in order to sparkle them up.

String Christmas Lights

The easiest of all my tag designs to make, you will need both thicker pens and fine pens of the same colour. The trick is to create the light shape with the finer pen and then colour it in with the same thicker style pen after. Make sure you leave the small crescent shape on one side of each light bulb so it looks three dimensional.

Begin by drawing the lines and bulb attachments with one pen, dark colours work best for this part. Then choose the pen colours you want for your bulbs. Ensure you don’t put the same shades next to one another and alternate colours like Red and Green for a Christmas look.

The size of your bulbs will depend on how many you want to do across your tag. If it’s just lights and no writing then you can fill up the space. If you plan to write “Merry Christmas” for example then perhaps do the lights top and bottom of the tag and leave the middle area blank.

Check out my images for some inspiration. Give it a go on a piece of plain paper and decide which way to do your bulbs, before doing them on to a tag.

Snow Scene with Tree

If you aren’t very good at drawing then you can still achieve something like this tag, just take your time and follow my instructions.
Check out my videos on my Facebook Page too!

You need a brown pen, the finer the tip the better, and you want to start by drawing the outline of your tree. Fill in the branches afterwards, getting smaller to the ends. Next to add a 3D aspect to your tree draw circles for holes and darken undersides of larger branches and the trunk to add shadows. Use a silver, white or light blue mixture of pens now to create the snow. You could do a snow scene or just do the tree. Be creative and have fun! Look at mine below for some inspiration.

The Christmas Tree

I quite like the abstract or deconstructed Christmas Tree type of tags. Mainly because when I try to draw symmetrical and lifelike trees they never look quite right. If you’re good at drawing trees however, then putting one in the centre of a tag would look really great!


Use a nice dark green pen for your tree. Add either stick on crafty bits and pieces or draw on some festive decorations, or do a bit of both! PVA glue is best because it will dry clear! If you want to do a more 3D tag then glue dots or adhesive squares also work well too.

Me on the other hand, I prefer to do the continuous line and have a sequin star on the top, kind of a tree!

Christmas Sparkle

If you have various diamanté, sequins or sparkles you want to use on your tags then you need to come up with designs that suit them. Check out my tags below for some ideas. Hanging decorations or bauble type designs work best for rounded craft items.
Think about when items hang on a tree, what they look like. Window decorations like a line of hanging stars or snowflakes are also very nice.

Sequins can be used on their own or accompanying pen lines.
Use your imagination and design your thoughts on a piece of plain paper first using a pencil, once happy with it, you can then transfer the ideas to a tag.

You can purchase the brown tags in most craft shops, online at places like The Works, Hobbycraft and Amazon. Try and pick ones that are already made from recyclable material.

I had previously bought my pens online from Amazon, Sequins from The Works and my Glue is also from The Works too. Other crafty items have been purchased by me over the years from various shops and also Tesco superamrket, they had a nice range of sequins this year too.

Other fun tags include, “Merry Christmas”, Holly, Baubles, Rudolph, Robin, Christmas Trees, Christmas Lights, Snowflakes, Snowmen, Santa Claus, Snowy Scenes, Penguins, Stars and things such as “Ho! Ho! Ho!” and “Let It Snow”.

Thank you for reading this post today, if you do give making Christmas tags a go then I would love to see them! Tag me on social media using the hashtag #SabrinasChristmasCrafts

Have a great Christmas!

✩ Sabrina ✩

You can see my tutorial videos on my Facebook page here…

Book Review of How to Draw Kawaii Animals in Simple Steps by Yishan Li from Search Press. A Great Book for Beginners.


I have been supplied this book for the purpose of a review. I have not paid for this product, it was a competition win in order to keep but review it. Thank you to Search Press Art for giving me this opportunity to review this great book.

My First Attempts


A great book for beginners! It certainly is just that. I was impressed by the simplicity of the book but with excellent results. This book would make an ideal Birthday or Christmas gift for people of all ages, providing they liked drawing or were a fan of animals.

Here are some of my attempts at drawing, my Racoon isn’t half bad!

Product: Book on Drawing
Book Title: How To Draw Kawaii Animals in Simple Steps By Yishan Li
Publisher: Search Press
Pages: 28 Animals across the pages, each drawn with 8 steps

Awesome Pages Included in this Book
Back Cover


I am someone who really and honestly cannot draw! I mean everyone can draw in some capacity but I draw most things badly, so I jumped at the chance to use these simple steps to improve my drawing abilities.

The book is so easy to follow, with 8 simple steps to the general shape of the animals. And then you are free to add your own details. They give you inspiration with one coloured in and completely detailed animal per page, so you can attempt a similar end result.

The steps are easy, you need a pencil, and I would recommend a rubber, so that you can erase any lines that you don’t need when you complete the finer details. Some lines are there to build shape but not needed at the end.

There are all sorts of animals, fish and birds in this book, something for everyone’s tastes.


(Left) My Fox (2nd Attempt) Side by Side with the Book version and original (Right).

I would and have given this Book a 5 Star Review. It has something for everyone, with a variety of animals, easy steps to follow and it also gives people the freedom to add their own details, as well as getting great results.

Thank you reading this review today. You can find this book on Amazon by typing the title into their search bar.

✩ Sabrina ✩