Sabrina is a Lifestyle, Parenting and Product Review Blogger. A Writer, Photographer, Reviewer, Home Cook, Crafter & Nature Enthusiast. You will find a bit of all those categories here on Severn Wishes Blog, Welcome to Sabrina's Lifestyle Blogging & Honest Reviews.
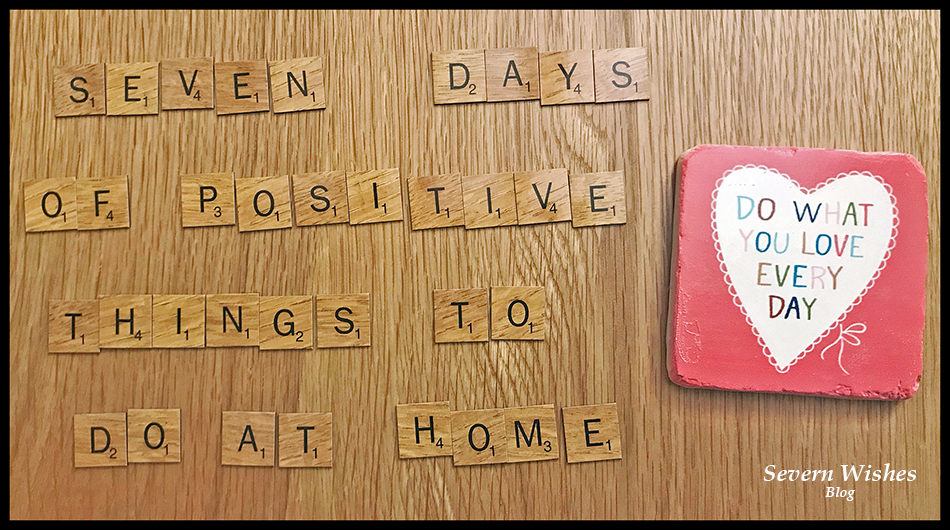
Sabrina’s Top Tips for having a more Positive 7 Days
Everyone seems to be feeling a bit low lately, it’s bound to be the Winter Blues mixed in with everything to do with the Pandemic. There are so many people who have found themselves working from home again, and many young people who are studying at home again too. With all this time stuck at home there are lots of anxious feelings and negativity, so I’m here with some suggestions to try and put a positive spin back into your home environment!
So here is my solution to tackle the blues, try to take half an hour out of your day as a family unit, every afternoon for the next week, after work is over and after the schooling is done for the day. Pick one of these ideas of mine to do together, a different one every day in any order you like.
I guarantee they will have you feeling more positive by the end of day 7! You can do them in any order you like! Or do one of them twice if it’s a hit! If you play along please comment on this post or on my socials at the end of the week and tell me which activity your family preferred and whether these activities did in fact work for you and increase your family’s positive attitudes.
Go for a Walk (Weather Dependent) and play a game as you go! Ideal for parents with younger children who are still enthralled by the nature of “eye spy”. But the fresh air and endorphins combined should make all of you feel better too. Older children may want to go for a jog or a bike ride if that’s more your thing, so long as it’s half an hour outdoors with your family, all together.
Watch a Funny TV Show or Cartoon. Laugher really can help you to feel better, even for a brief moment, so why not stick on a tv show or a favourite cartoon that never failed to make you laugh and giggle together. Tom and Jerry is a good one!
Bake or Make Something Delicious! I have a ton of recipes on my blog and some don’t even take that long to do. So why not make some chocolate crispy cakes or even some rocky road, something simple and even something that doesn’t require baking to save you time! Then you’ll have a tasty treat for a few afternoons to come! See what you’ve got in the cupboard! Here is my baking section HERE.
Get Creative. You can do one of two things with this creative activity depending upon the age of the people in your household. Either, do a rotating draw-off where by you each start with a piece of A4 paper and one coloured pen (all varying colours) and you keep rotating the papers every minute, do this until 4 minutes is up. Everyone should’ve drawn on each of the pieces of paper. No talking! See what you’ve come up with! Share them with me on social media! #SabrinasCreativeCrafts OR You can play the Sentences Game. The idea is to make up a creative story, it should be funny, and you once again rotate the papers. This time you want long strips and not A4. Cut a vertical A4 in half twice or get your strips. Once the first minute is up and the first sentence has been written, you all fold over the section and pass it on. When the time is up you each open up the papers to find a story.
For example; There once was a man who couldn’t find his shoes. I think I want some KFC he thought. He headed off in the direction of the sunset. In the end his dog ran away and joined the circus.
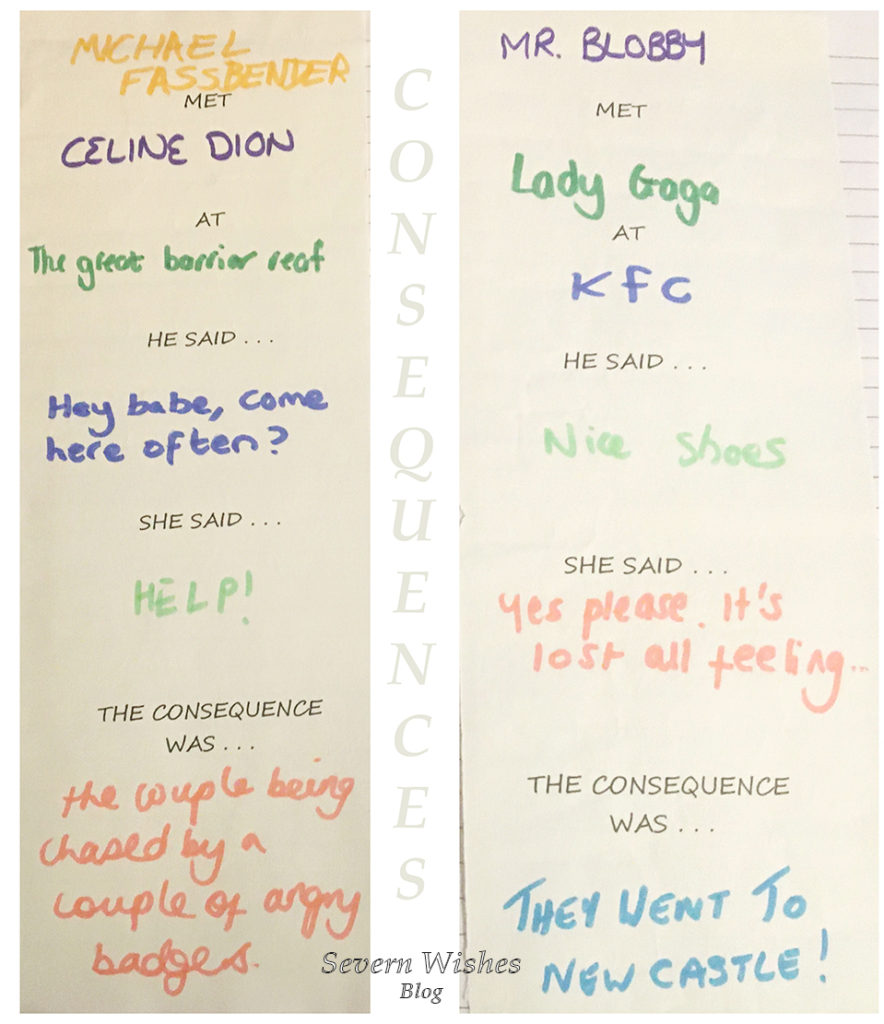
If you have teenagers then you could play the game another way, this is called CONSEQUENCES, you start by writing on each of the papers the following things, add extra if you have a large family so that everyone will get a go at each section when the papers are passed on. They usually go like this… ___ Met ___ At ___ They said ___ What happened next was ___ OR The Consequence was ___
Then unroll it after everyone has had their turn and the sections are completed, then take turns in reading them out. See my photo below this list for an idea of what it would look like when you finished! Warning my examples may cause laughter!
Photos! Another fun thing that would brighten your spirits is to look back at any photo albums that you have or digital slideshows. You could even play a game while you look through them. Every time that your mum is seen with sunglasses on she gets a point, each time someone hasn’t got their hat on when they should you lose a point! First person to spot the water in the photos gets a point. Etc etc! Make up some rules before you start and say that the first person to 10 points gets out of doing the washing up tonight! Or the winner chooses what’s for dinner the next night! Involve one another in every day things.
Write a List of Goals and Aspirations for 2021 – but only write the do-able ones! For example, I want to bake a cake for mums birthday. OR I would like to walk a mile on the next weekend that is dry and sunny. When you achieve something, even if it’s a little thing, you feel so much better about having accomplished it. Setting some realistic goals now for the year might seem silly when we don’t know what’s around the corner, however even if the goals are just for the people in your bubble, it’s still doable. Put them up on your fridge or board and tick yours off when you have completed it.
Make a Meal Together. No matter how old you all are there is something fun about making dinner together. May I suggest something that everyone can get stuck into such as Fajitas, Curry, Sausages and Mash or Lasagne (dietary requirements permitting). I have tons of recipes on my blog if you need inspiring! But making and preparing food together before you eat it can be a real bonding experience, and it can also be important for teaching younger children where foods come from or that by mixing this with that you achieve this outcome. Food is something that has been so important during the first lockdowns so I thought I would continue on with that and try and get you back into your kitchen to make something you love together. Check out my Recipes HERE.
Why Not Try And Make My Delicious Cookies? Click the link in section 3 for the recipe!
The Consequences Game – Imaginative Fun for the older children in your family.
I really hope that you’ve enjoyed this blog post and that you would like to participate in my week of positivity. If you do participate in any of them or attempt to get those in your bubble to do so, then please let me know how you got on! I can’t wait to see if you make anything as well 🙂 tag me online! And thanks for joining me!
Halloween is one of those holidays where people either love it or loathe it. Whether or not you like Fancy Dress and Decorating your Home, it’s an important right of passage for your little ones to experience the fun of a Halloween.
If it’s their first Halloween then I have lots of ideas that you could achieve easily at home and make some nice memories and keepsakes to show the child when they are older.
With the pandemic still affecting us all, there are many children who would love to be trick or treating and having fun and games with their friends. It’s highly likely not to happen this Halloween 2020, however that doesn’t mean you cannot do things at home.
WHAT IS IN THIS BLOG POST… HALLOWEEN 2020
Fancy Dress Photo Shoot Fun – My Tips and Tricks
Hand and Feet Print Halloween Decorations – Fun Family Keepsakes
Halloween Games with Treats to be Found (at home) – My Lockdown Halloween Trick or Treat Ideas
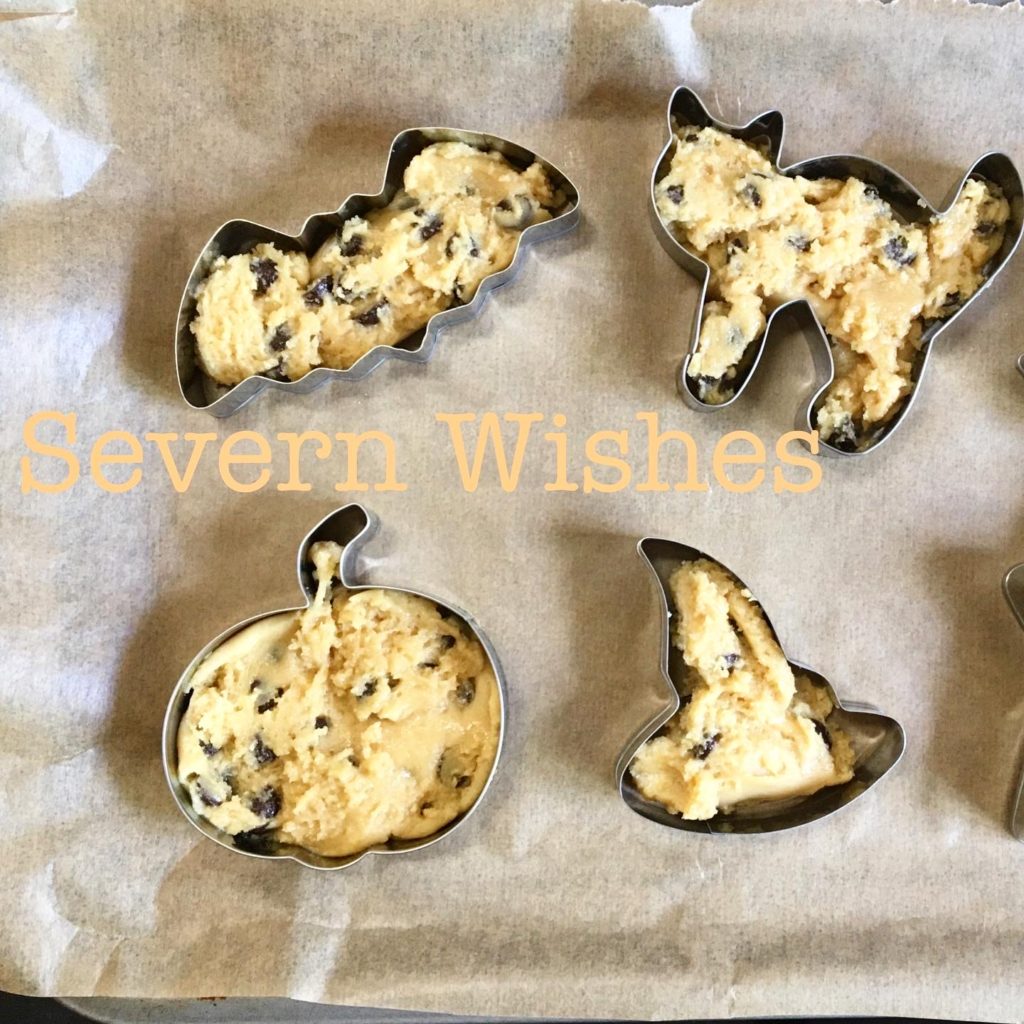
Baking with Halloween Shapes – Fun Baking Tips for the Family to do together
What Else Can You Do With Halloween Baking Cutters as Stencils!
Fancy Dress Photoshoot at Home
One way in which I always like to remember a holiday event or day is to do a photo shoot. For the last two years I have dressed my son up and surrounded him with a variety of Halloween related items. I got some good photographs doing this at home that I can treasure. If you set it up correctly you won’t need to pay anyone to take photographs for you.
You Will Need
A decent camera or a phone with a decent camera A camera which has a timer if you want to do a family portrait Natural light coming through a door or window is best for colours Fancy Dress items and any props that you would like to include
My Photography Tips
Natural Light is important to get clear and sharp imagery.
Use fairy lights to add depth to your image (supervised around the child/ren of course).
Props are important and make sure you arrange them so they can be seen, if you’re going for a theme try and stick to it.
If you want things to be inside the frame then choose your layout carefully and keep looking through the camera lens as a guide.
A sofa or chair is ideal to sit a baby on or you could even use a ball pit or a rocker with a sheet over it to block out any unwanted branding or colours.
Set up your photo shoot before you get a baby ready otherwise they may get fed up rather quickly if you ignore them to move things around.
If you can get a large pumpkin or a cushion you can sit babies inside or on top, just make sure to always have their necks supported!
If you can’t pull off a Photoshoot then why not use some Free Filters on some Photo Apps. Some of them are highly detailed. We did one to show you just how cool! And if you have older children they might be more interested in that too!
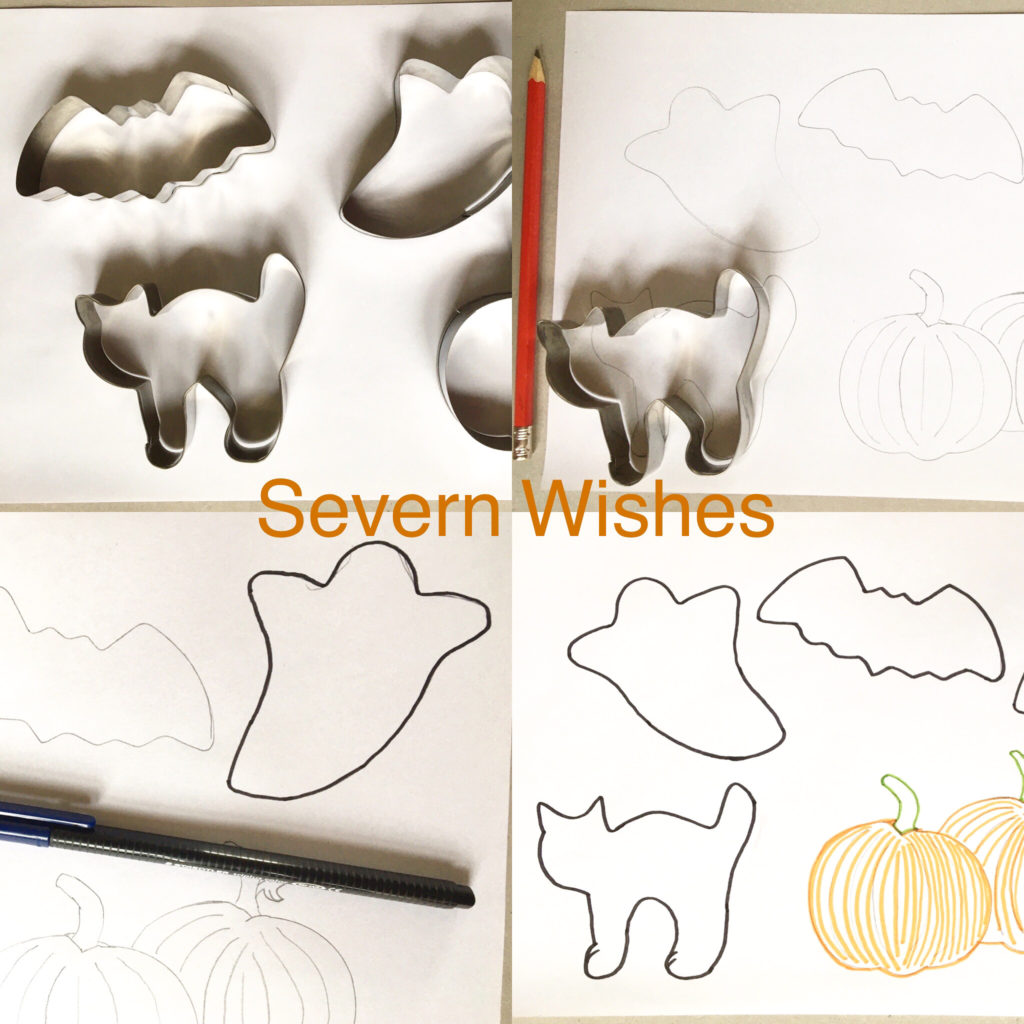
4 WAYS TO USE HALLOWEEN BAKING CUTTERS AS STENCILS
I’m not very good at drawing so using these cutters as outlines was a great idea for me! If you can draw well you won’t need to do this! Ha! Ha!
Halloween Decorations
Halloween Posters
Halloween Colouring In
Halloween Baking
I drew around the shapes and outlined them in pen, then let my child colour it in.
Halloween Decorations
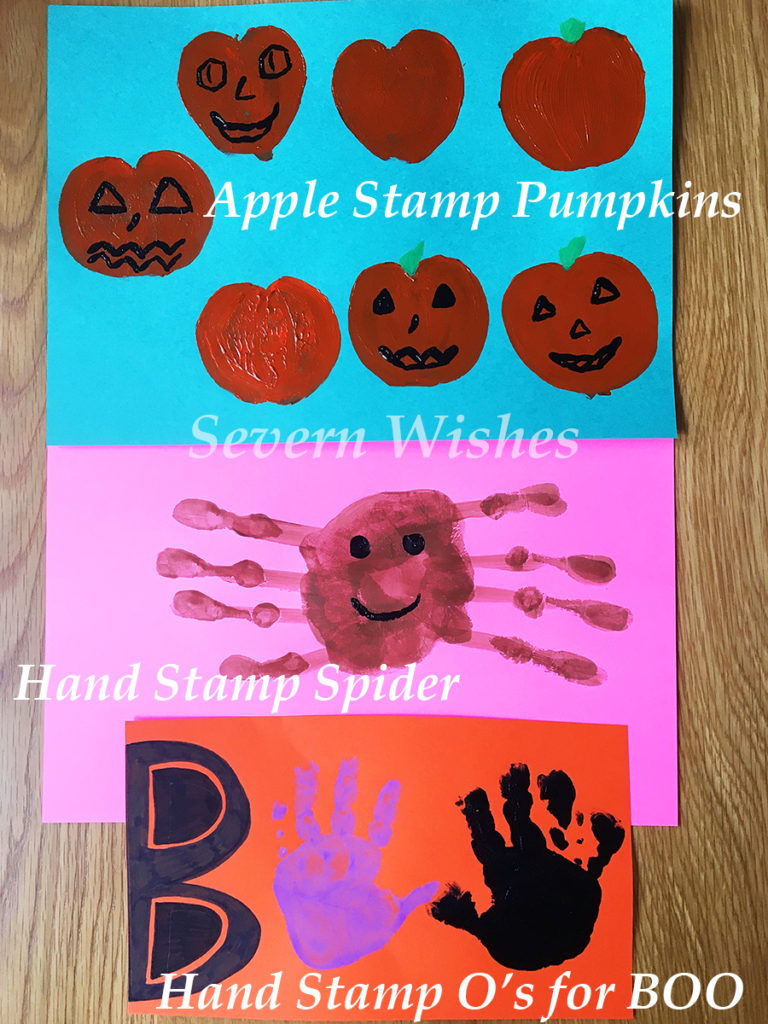
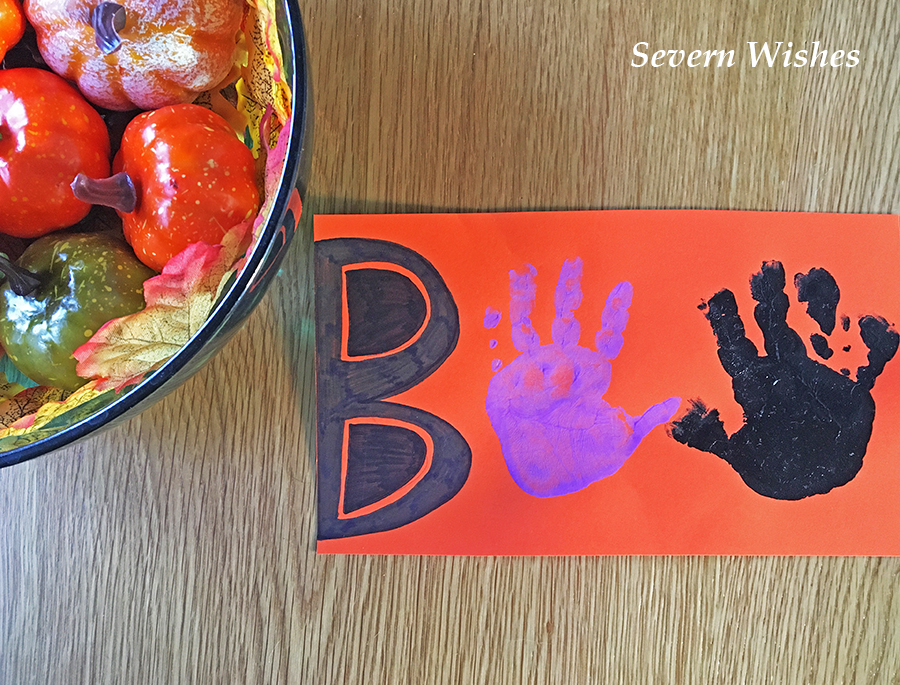
Making Halloween Decorations is easier than you think! So long as you have got some card and some paint. There are tons of ways you can make nice posters or decorations. Here is how I have made mine…
Pumpkins – Apples Halved and Dipped in Paint. Spider – Hand Prints leaving off the thumb so fingers make 8 legs. BOO – B and two hands for the O’s. Ghost – Foot Print (upside down)
I’m planning to cut out the Pumpkins once they are fully dry and hang them up against my window.
You can make a Halloween poster for your window or you can cut the items out and hang them up with string.
Trick or Treat at home won’t be the same, but it can still be fun! Check out my ideas below!
1. Make Every Room A Different Theme with a Different Sweet to Find. You can tailor them to meet the needs of your family, no choke-able sweets for little ones etc. If you don’t do Sweets you could use Numbered Fruit like Apples which result in a Toy prize if they find them all.
2. Make It A Halloween Treasure Hunt with the Treasure being Sweets! Write little clues on paper for the kids to follow. Create traps and fun obstacles for them to overcome, riddles and rhyming works well too! “Where you Sleep, Often Deep, Beneath the Covers is what you Seek!” things like that, E.G Under their bed covers is a Sweet or another Clue.
3. Use A Dice And Clues to Make a Halloween Game of your Own! Using how many rooms you have and how many children, you can send each child off to a room where they have to either complete a task or seek and find the next clue, which once put together with their siblings answers, will reveal their bounty of Treats! E.G Two Siblings, they each find a clue on paper, one reads KITC and the other HEN and when put together they go to the KITCHEN for the next clue etc.
HALLOWEEN BAKING
I have done some step by step baking videos on my Halloween cookie baking and these are available to watch on my Facebook page, I will drop you the link here Severn Wishes on Facebook.
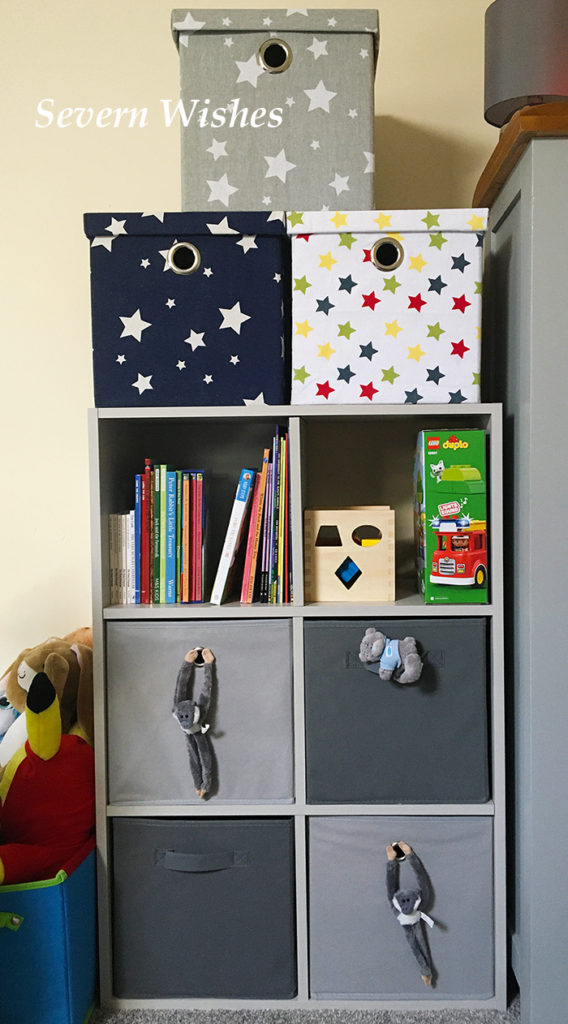
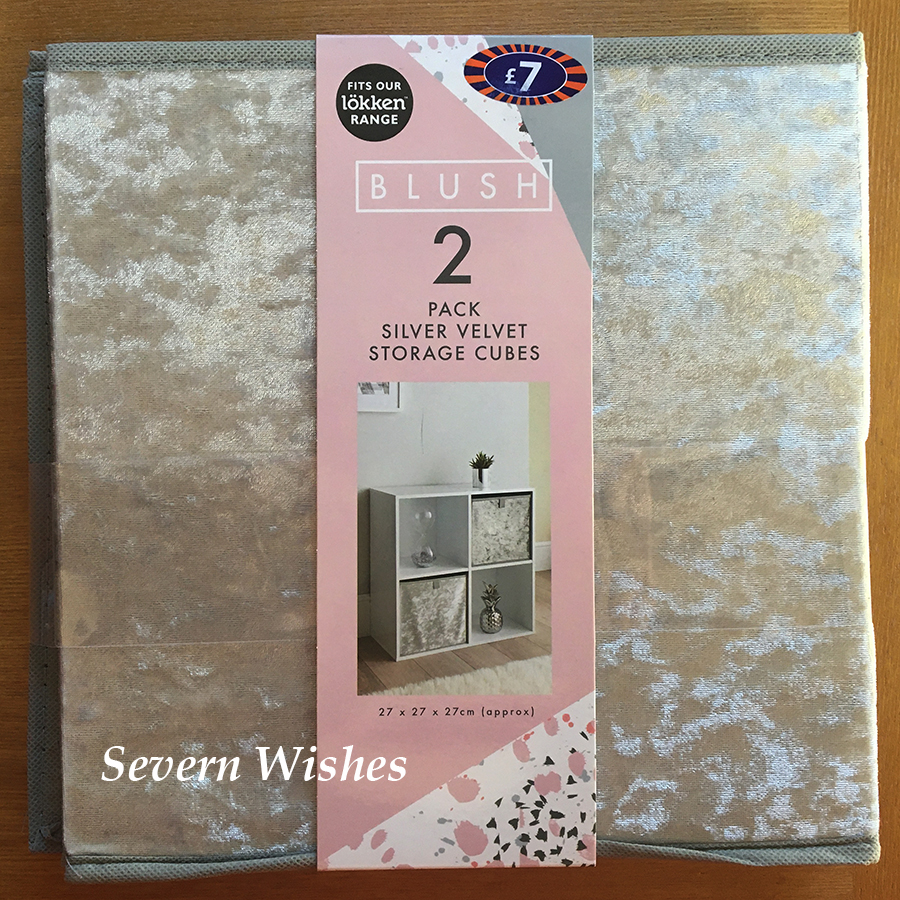
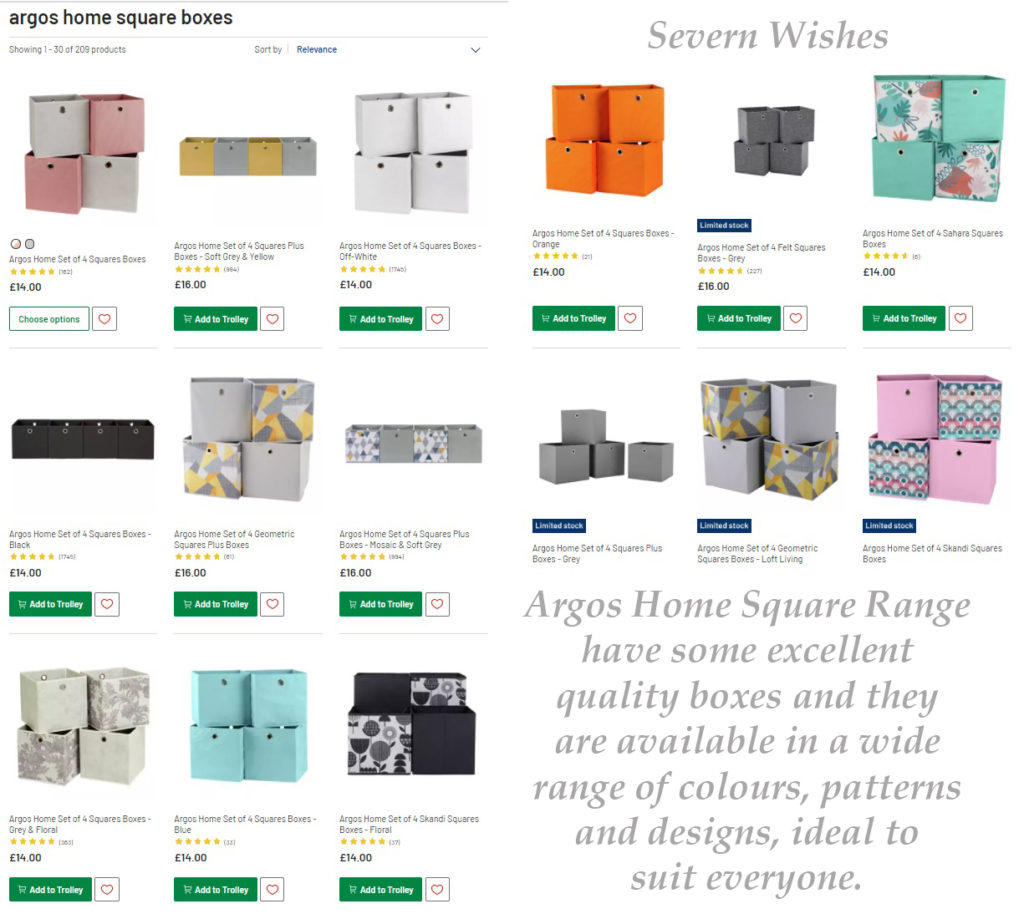
Featuring… Aldi Stars Boxes Argos Silver Grey Boxes B & M Dark Grey Fabric Boxes
I think every parent will agree with me when I say “mess is a fact of having children” but that doesn’t mean you can’t have a tidy home when the children are asleep, or for when relatives come around! And can I just say, Square Furniture really excites me, its versatility knows no bounds!
But first, Tidy Hacks! When my son was only twelve months old I began a routine with him which involved us tidying up once we have finished with certain things. It started with me showing him then handing him the item and encouraging him to copy me. So… Books went back in his Book Tub and toys went back in the Toy Box. He soon realised that it was important to tidy up. My son took to it really well, he even puts balls back in his ball pit now, and has done since he was eighteen months of age. Instilling this notion early enough has paved a way for a toddler who understands how important it is to put something back when you have finished with it. My first TIP is to allocate boxes for different items, such as, the Grey box is for books, the Red box is for Cars, the Blue box is for trains and the Green box is for animals.
There is no right or wrong way to have your home, however one thing is for sure, cleaning it is far easier when everything has its own place. Boxes are filled and put back on to shelves. I love furniture and I love how it brings a room together too. I have a large wooden chest in my lounge along with several small lidded boxes to store my sons toys in. I always like to have that option to tidy things away completely, in case I have family over for example, or I may need the space to do messy play.
In my son’s bedroom I have several pieces of furniture that are square and contain various storage tubs and boxes. They look neat and tidy and are easy enough to maintain. The boxes are made of fabric and are often purchasable in many styles and colours to maintain the theme for your chosen bedroom. Great for anywhere in the house, such as hallway or living room too. Do you have any Square Furniture? I think they’re just great!
I have always been a fan of the clean lines that square furniture gives you. And with so many places now creating the relevant boxes to go into these holes, you have a wide range of choice to make your home how you want it.
B & M Boxes
Excellent Value for Money Square Storage Boxes
Argos – Great Quality and in a Variety of Colours and Patterns. Boxes are in packs of 4 with 2 Sizes Available. And prices start from £14.00 for 4 boxes. Argos also do lidded Square Storage Cubes in fabric and a leather look, which can double as seating for children in a bedroom too.
B & M – Fabric Boxes and Velvet Boxes, Good Quality but Less Choice Available (I only found Bright Pink, Blush Pink, Dark Grey and Silver). The Velvet ones were £7 for a pack of two and are very soft and of good quality. The fabric boxes are not as nice but definitely do the job well enough though and are ideal for toys, they were £5 for a pack of two.
Aldi – Special Buys Baby Event – Stars Boxes – Multiple Colours Available and were £3.99 each box. They were only available for a limited time.
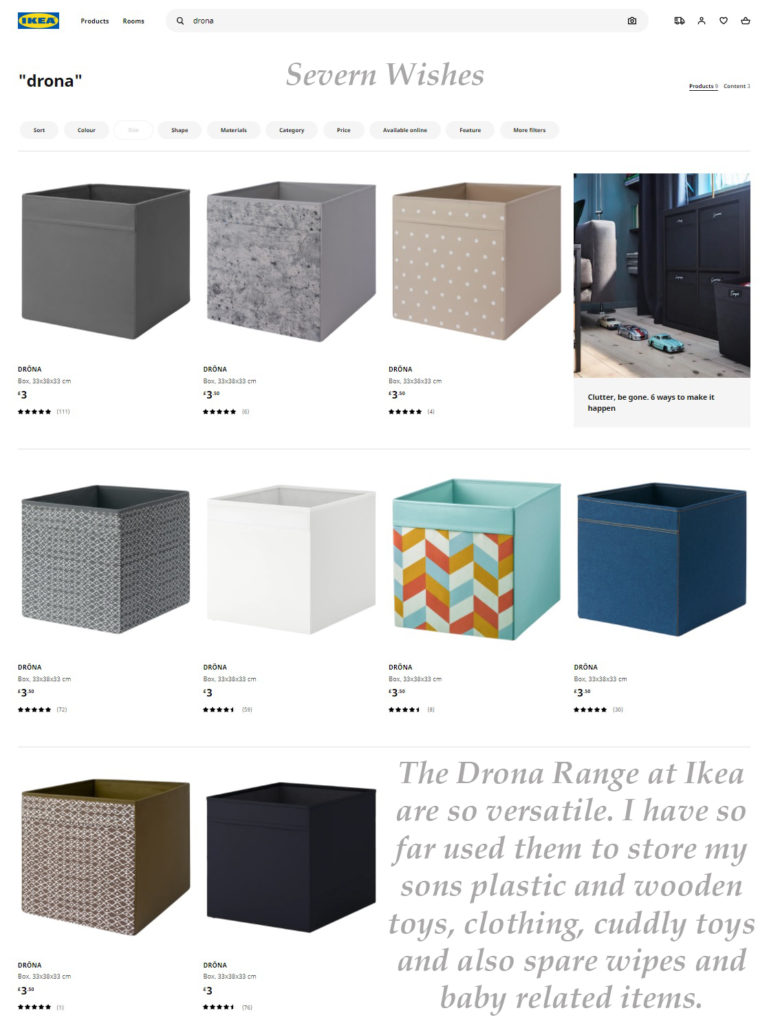
Ikea – Several styles of boxes and tubs available from Ikea and many colours and patterns as well. They range from £3.00 upwards for a single box and the range is called Drona.
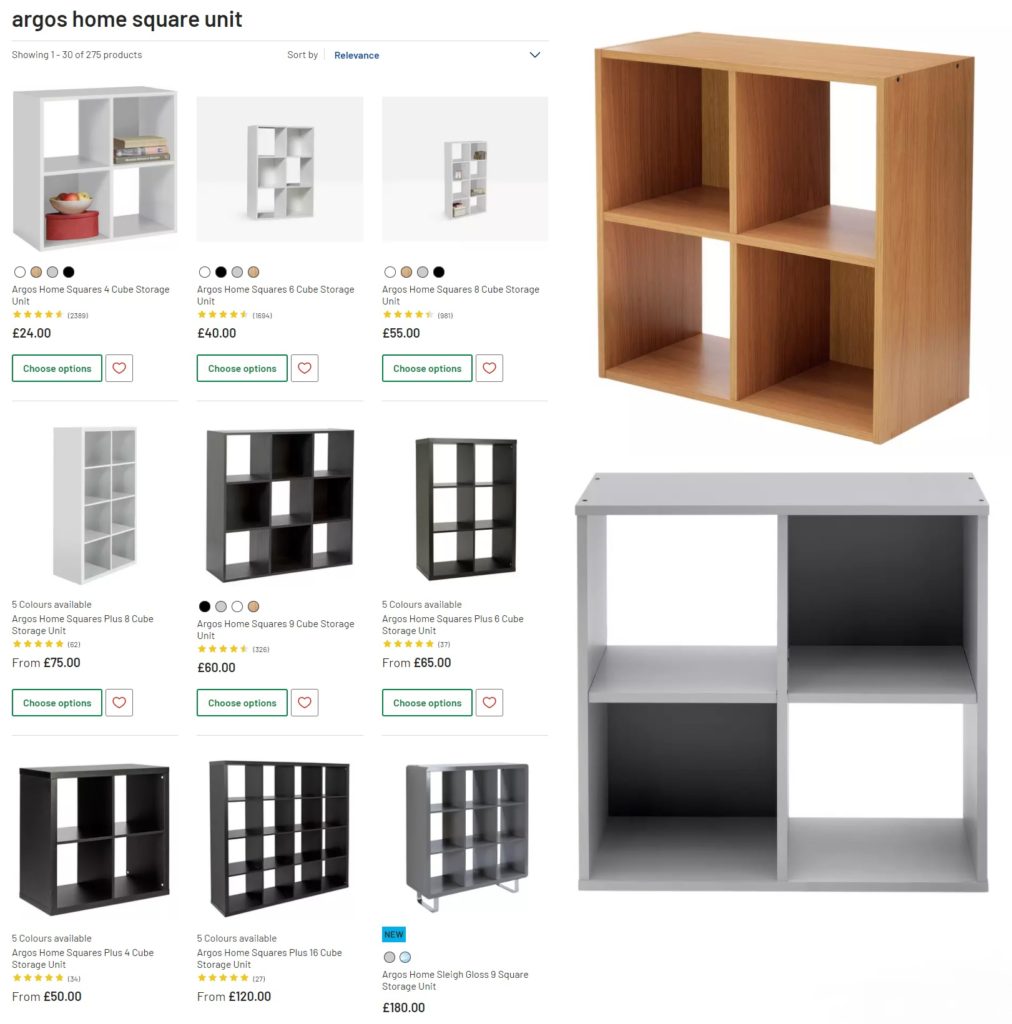
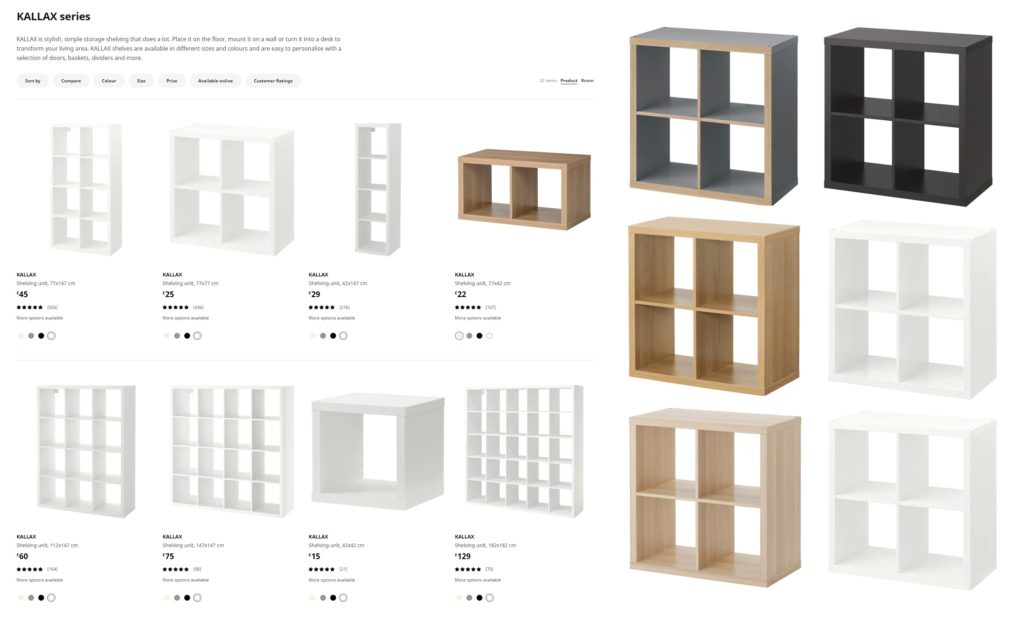
The furniture I purchased for my sons room is from Argos. But Ikea do a similar range as well named Kallax. Due to the Pandemic it has been far easier for me to get a delivery or click and collect option from my local Argos stores, mainly because its almost a two hour drive for me to get to an Ikea store, so I would rely on an online order and delivery.
My final TIP for keeping a house tidy is this, get one box out at a time, and teach your child/ren that once they are finished with that box, it gets packed up and placed back on to the unit or into the bedroom it came from. Then they can get another box of toys out to play with. In-still this idea at a young age and they should keep respecting their play space long enough to keep wanting to tidy up after themselves. These types of storage are so easy too, there isn’t anything complicated about it. You just need a system of what goes into what box, but you could always get labels for them too!
Great Value Square Furniture
Argos Home Squares range from £24 to £120. Colours Available are Putty (Light Grey), Oak Effect, Black and White.
Ikea Kallax Square furniture range is from £19 to £129. Colours Available are Black/Brown, White, High-Gloss White, Oak Effect, White Stained Oak Effect and Grey-Wood Effect.
Thank you for reading this blog post today, I hope I have given you some inspiration on how to make your own homes more tidy by using square storage to its full potential.
Check out my Instagram for more inspirational images on storage and tidiness.
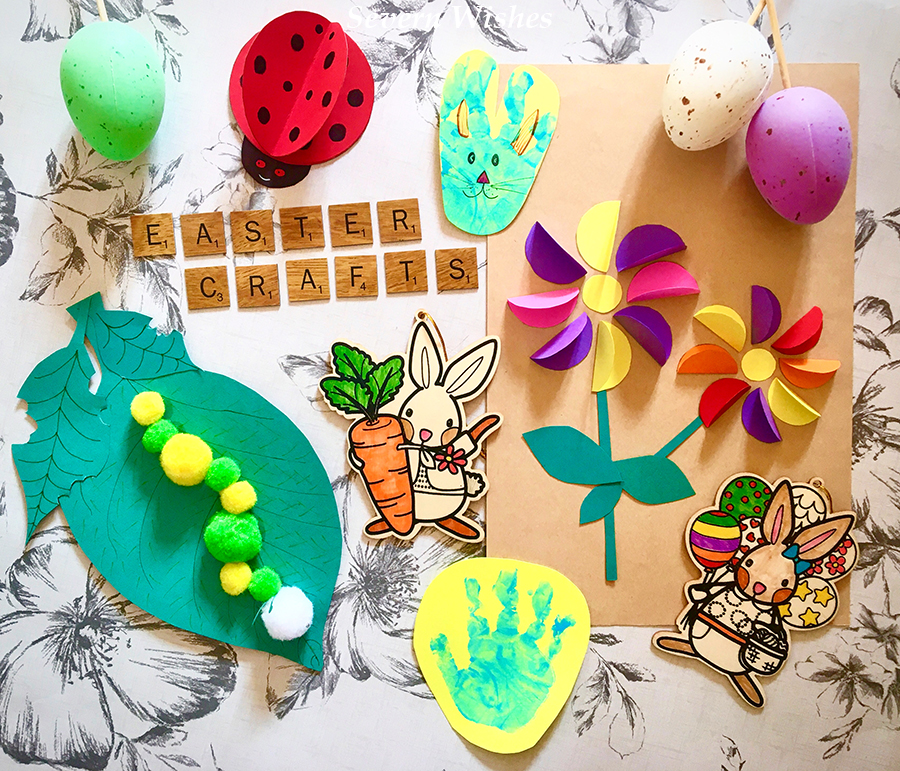
Fun to Make ~ Easter Art and Crafts ~ with Sabrina of Severn Wishes
I have wanted to do this blog post for the last three years, and I have always been too busy to complete it! Mainly because it is a mixture of writing the blog, creating and making the craft items, and then taking the step by step images, processing all of those and then putting the entire lot together in one blog post. It is both time consuming and a lengthy in process too. So what changed this year? Well for one thing, I was more determined to do some more craft this year, but isolation has also made me re-evaluate what’s important, and that is to make happy memories with my son. No matter what is going on outside our home, he doesn’t understand, and it is my job to keep things as normal as possible, so extra fun, extra learning and extra memories are all on the table at the present time. I’m so glad you could join me to hopefully make some memories of your own!
So without any further ado, let’s get our crafty fingers at the ready! Depending upon which Crafty Project you wish to undertake you will need a variety of items. My idea is this, pick an item from the four below, and then match the “You Will Need” items with what you already have at home. Providing you have all the necessary bits and bobs then feel free to scroll down to that Project and then get cracking with my Step by Step guides! Happy Crafting!
1. 3D Friendly Ladybird 2. Wiggly Caterpillar 3. 3D Paper Flower (Can be Framed or Made into an Easter Card) 4. Hand Print Easter Bunny Rabbit 5. Other Craft Ideas
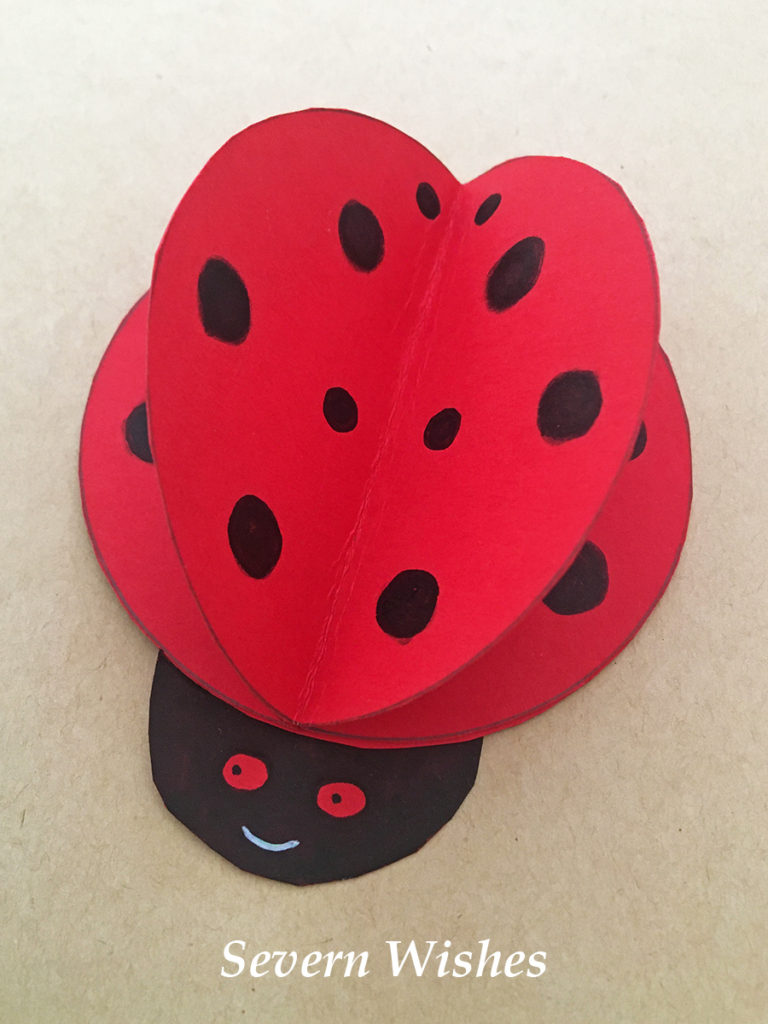
1. 3D Friendly Ladybird
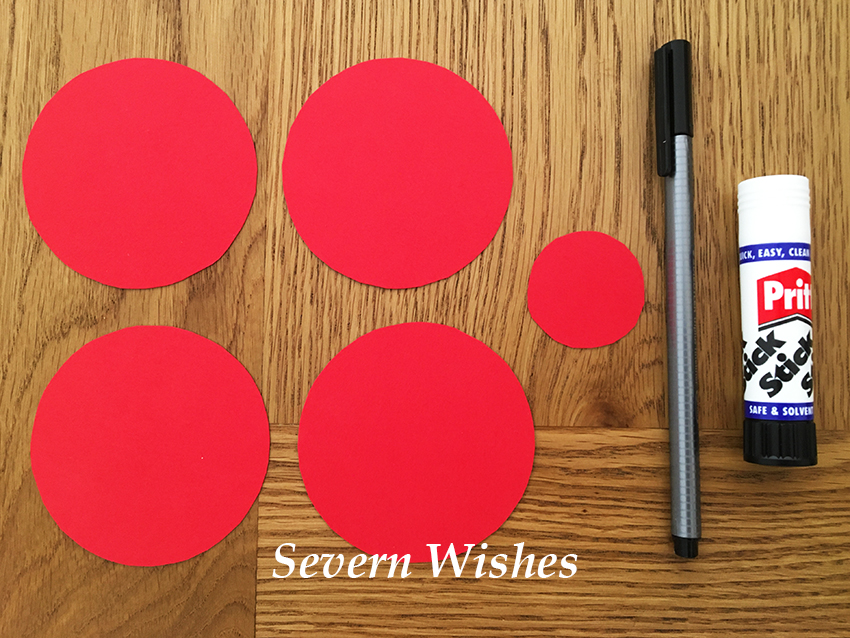
You Will Need Pritt Stick or Glue Coloured Paper and / or Card Circular Objects to Draw Around (This will determine the size of your Ladybird) Pencil Scissors Black Pen Googly Eyes (if you have some but not essential)
This is the easiest of my crafts today, and will take around twenty minutes to make. You can make it any size, any colour that you like. Why not make one for each member of the family? I am going to make several of them to put around my son’s bedroom. He loves Gaston from Ben and Holly’s Little Kingdom, so my son is the inspiration behind this particular craft project.
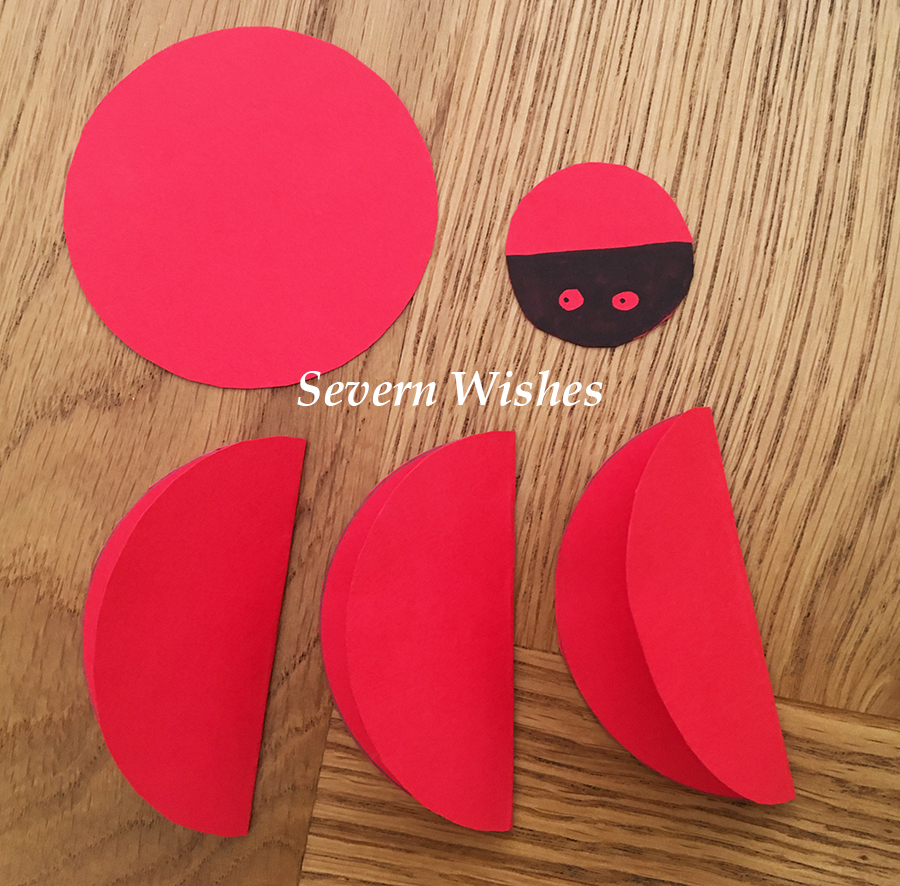
Step 1. Choose the Size of your Ladybird. Choose your colour. Draw around a Circular object so that you have 4 Circles the same size, and then you will need a smaller circle for the head, judge this depending upon the size of the body. Cut out these 5 circles and then you’re ready to begin.
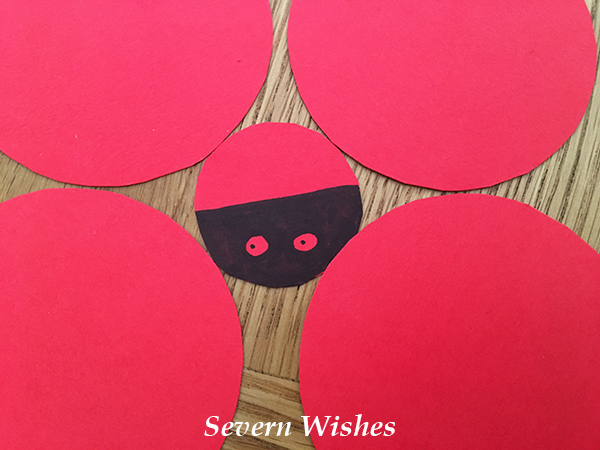
Step 2. On the small circle draw a line across the centre, you want to colour the half of this circle in with black pen. Don’t forget to draw eyes on it too like mine, if you don’t have any fun stick on eyes to hand! Then pop this face to one side you won’t need it now until Step 6.
Step 3. Take 3 out of the 4 Large Circles and fold them in half across their centre. Gently crease them with your fingers, take a look at my image below to see how they should look.
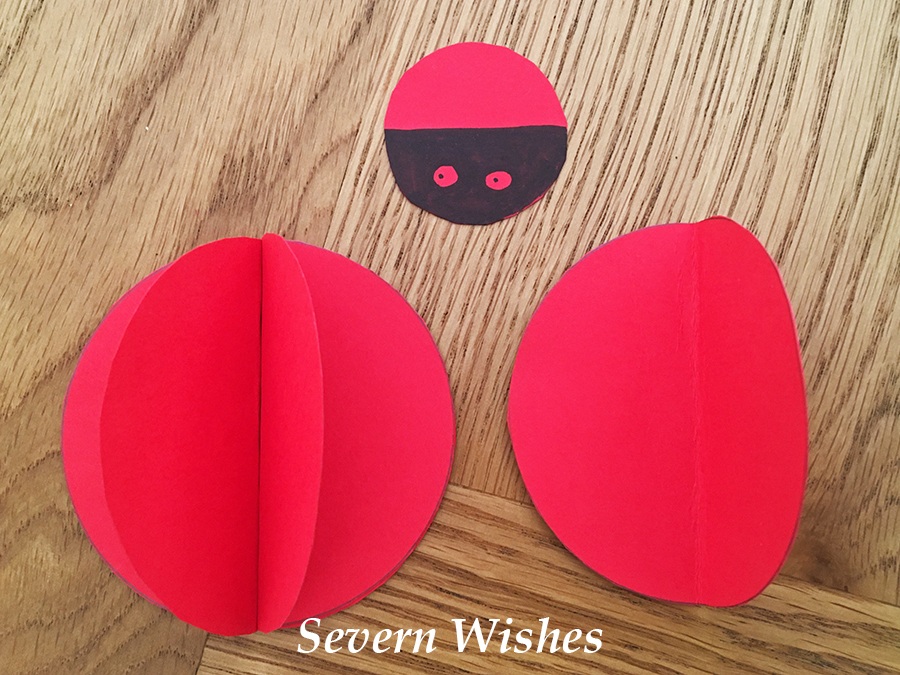
Step 4. Take the flat circle and cover it lightly in glue or pritt stick, I always prefer a glue stick when messing with card, less mess! Then take two of your folded circles, stick glue on their side that faces flat, place them back to back and glue them down on to the flat circle so that they make a V shape.
Step 5. Take the remaining Circle that is folded in half and cover it in glue before pressing it down into the centre of your Ladybird body, covering the two below neatly. You now have a finished insect body.
Step 6. You can now glue the head on by placing the glue on to the half you didn’t colour in, make sure you line it up with the V of the Ladybird to make it look right. See my image below.
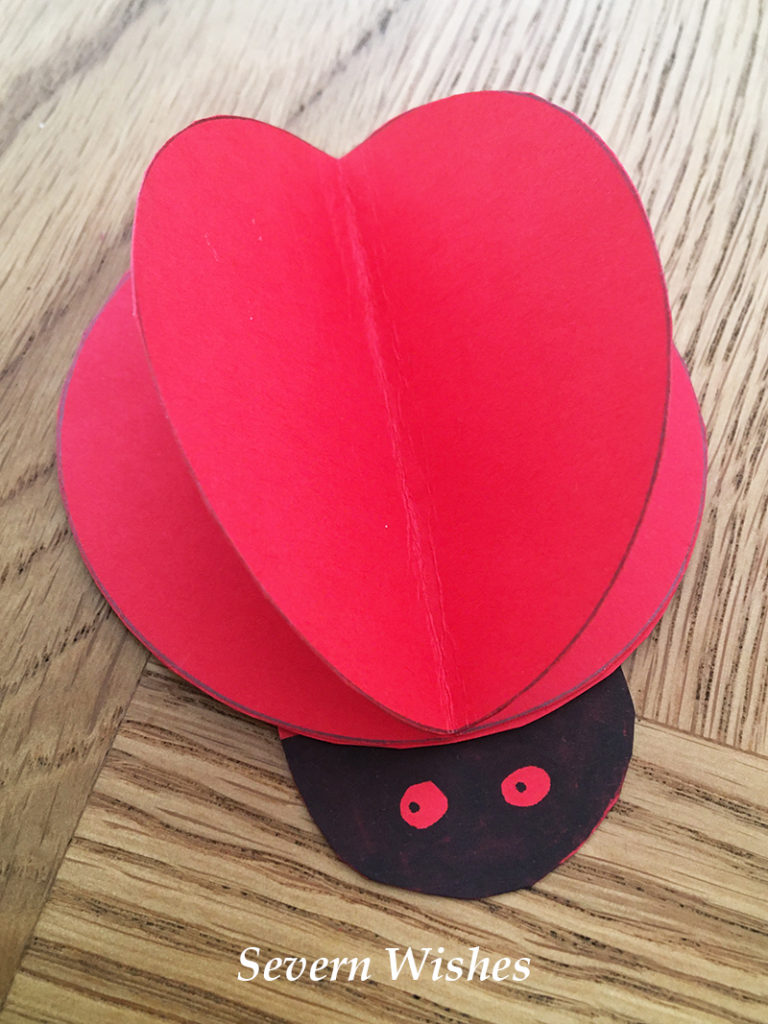
Step 7. Push down all the flat surfaces of the Ladybird and leave for an hour or two for the glue to dry. Then using a Pen or Marker, draw on however many Spots you would like.
Step 8. Repeat steps for making other colours or other sizes if you have Card or Paper left over. If you need a base for your Ladybird to sit on, why not make him a cardboard leaf! (You need leaves for another of my crafts anyway!) 😉
CRAFT FINISHED
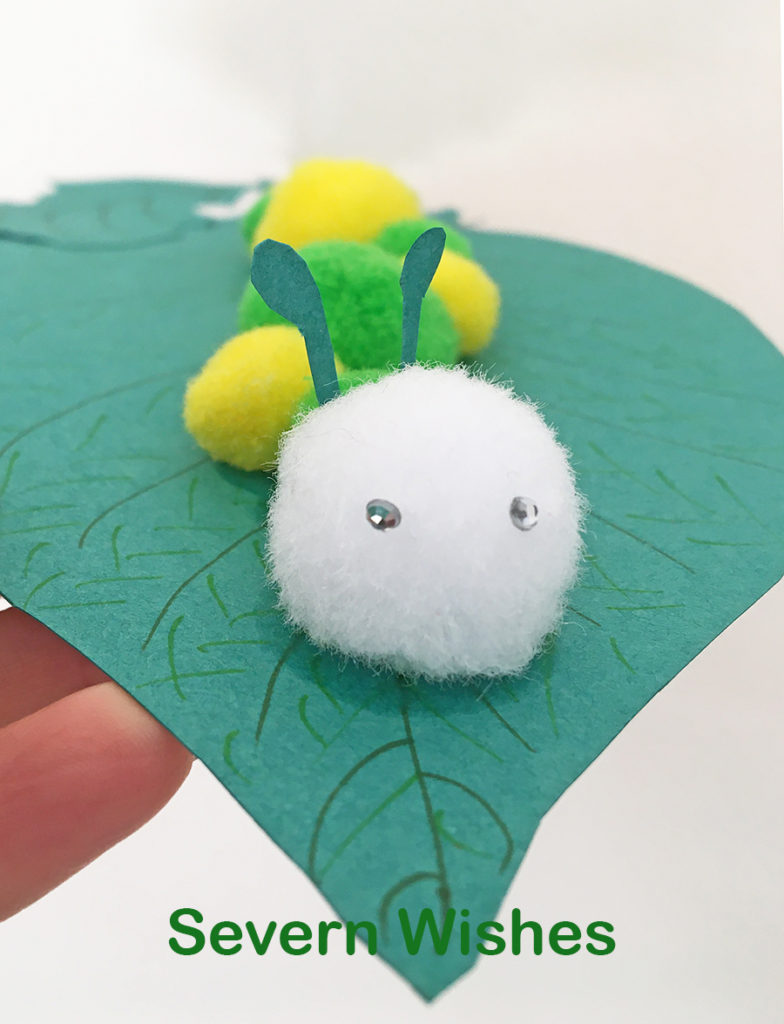
2. Wiggly Caterpillar (munching on a leaf)
You Will Need Pritt Stick and PVA Glue Green Paper or Card (Card is better) A Mixture of Green and Black Pens Poms Poms! All Colours Welcome! Googly Eyes or Stick on Sequins Scissors A Pencil A Piece of Cardboard (Cereal box is good!)
This is a fun craft to do with young children. They can make their Caterpillar whatever colour they want. All you need is some Pom Poms! You can follow my Steps or watch my video below!
Step 1. Draw and Cut Out a Leaf Shape (this is your main leaf) from your Cardboard. Then draw around this cut out piece of cardboard on to your green paper or card and Pritt Stick together.
Step 2. Draw your Leaf design on with Green pens. Set to one side.
Step 3. Decide what Pom Poms you want to use and arrange them!
Step 4. Make some antenna and extra leaves and stick your eyes on to a Pom Pom ready to assemble your bug!
Step 5. Using PVA glue stick your Caterpillar together, don’t forget the extra leaves, arrange however you wish, then leave to dry in a warm flat place.
Step 6. Add any additional things to your bug once it has dried.
3. 3D Paper Flower (Can be Framed or Made into an Easter Card)
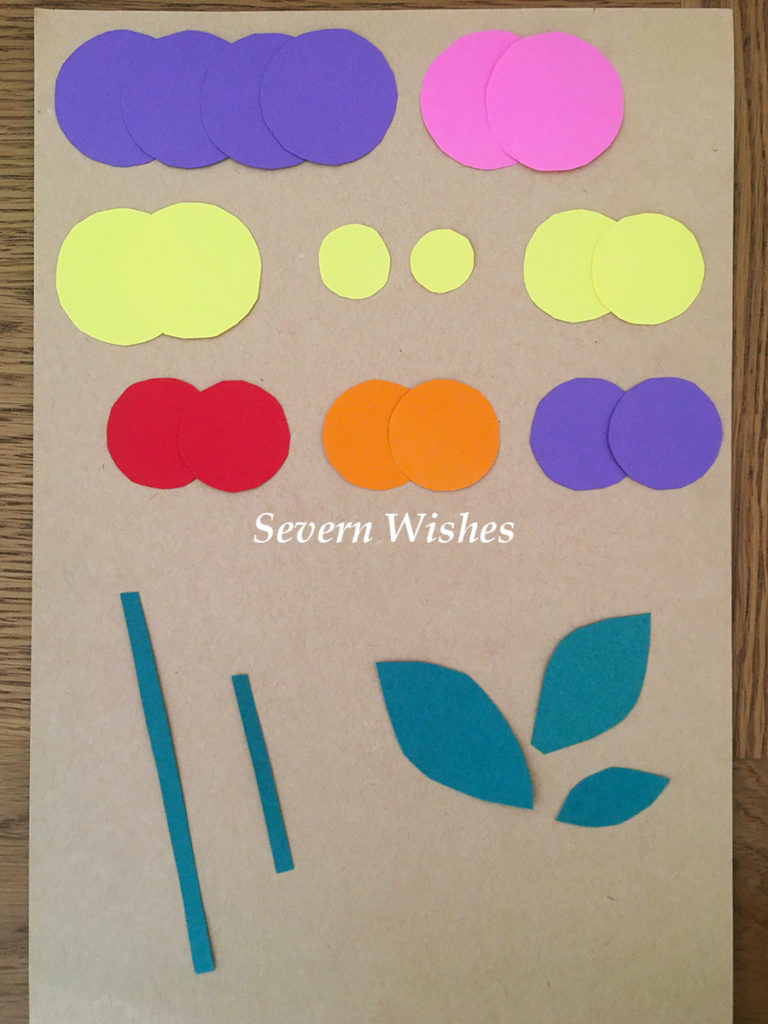
You Will Need Pritt Stick or Glue Different Coloured Cards or Papers A Piece of Card for Sticking to Scissors Pencil A Circular Object to Draw Around (it’s diameter will be half the width of the flower so choose wisely)
This idea is simple but looks so pretty when complete. It makes a great card.
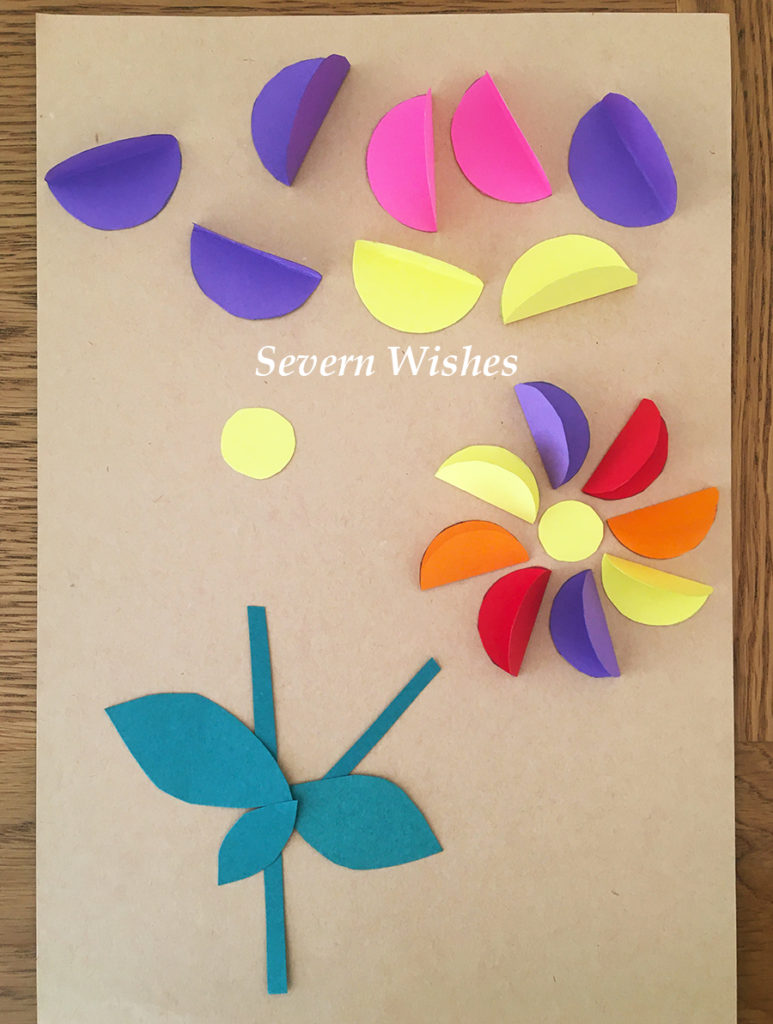
Step 1. Take a piece of plain card, this will be your base. Draw a Stem or Cut Green Card or Paper and create one. Make sure you leave plenty of room to stick the flower part. Cut out leaves and small circles of yellow paper to create the centre of the flowers. Be as creative as you like.
Step 2. Making the petals next, you need to cut circles of different colours, you will end up with 8 Petals in total per flower. I did two different sized circles to end up with two sized flowers.
Step 3. Fold all of the petals in half so you end up with 16 halves with flat sides that stick up. This is how the petals will look 3D.
Step 4. Using Pritt Stick, stick the sides of the petals down so that they rotate around the centre of the flowers. You want them all to face the same way when you stick them around the yellow centre.
Step 5. Turn the flowers into a card if you like, or make other smaller flowers too using smaller circles, and make a pretty Easter meadow scene picture. Draw or Stick Easter Eggs and Rabbits and other Easter items along the edge like an Easter scene.
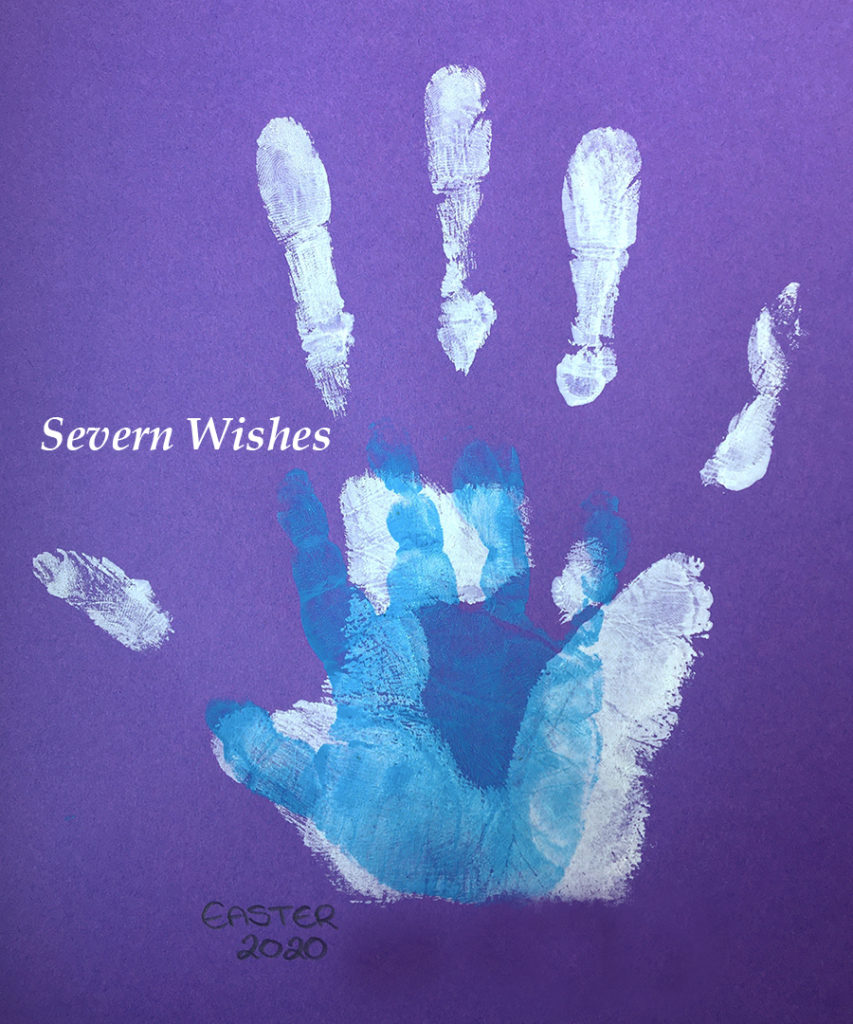
4. Hand Print Easter Bunny Rabbit
You Will Need Paper or Card Pencil Hands!!! Pens for the Details Scissors Paint
Paint works well for this one so you don’t have to colour in, unless you prefer to colour of course. It depends how much you’re painting, if you plan to do my hand prints picture (below) then you could do extra on different paper and make them into cute Rabbits!
Step 1. Draw around your hand and / or children’s hands. Or you can do a Hand Print on to Paper using Paint! MAKE SURE YOU LEAVE OUT THE THUMB! You want the shape to resemble a Rabbit head with two of each fingers being the ears! Keep two fingers together!
Step 2. Once dry you can cut the Rabbit shape out.
Step 3. Draw on Nose, Mouth and Eyes!
Step 4. Add any extras like whiskers, inner ears and freckles! Cut it out and hang it up or stick to a handmade card if you like.
FINISHED
Not the best hand print but you get the idea! My son was a bit reluctant to help out yesterday, ha ha!
5. Other Craft Ideas If you want to just Print some Easter Egg patterns and do some Colouring in with younger children then here are a few that I really like that you can save and print 🙂
Alternatively you could do some Painting of Hands and do some Prints!
Layer the Prints of your Hands to make a nice picture.
Thanks so much for joining me for this blog post. I hope that you’ve had fun, maybe even a laugh at my crafty items. If you made something please share it with me on social media, tag me or my page! I would love to see them! What was your favourite? Would you like to see more Art and Craft? Leave me a comment. Have a wonderful fun and safe Easter!
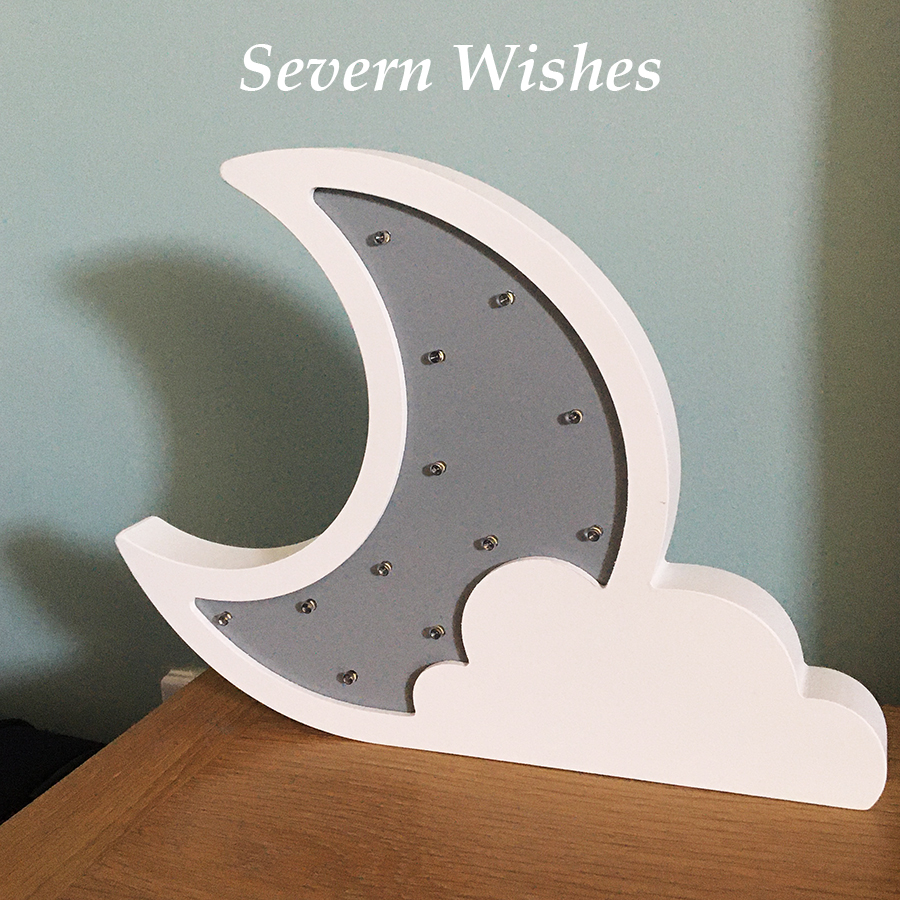
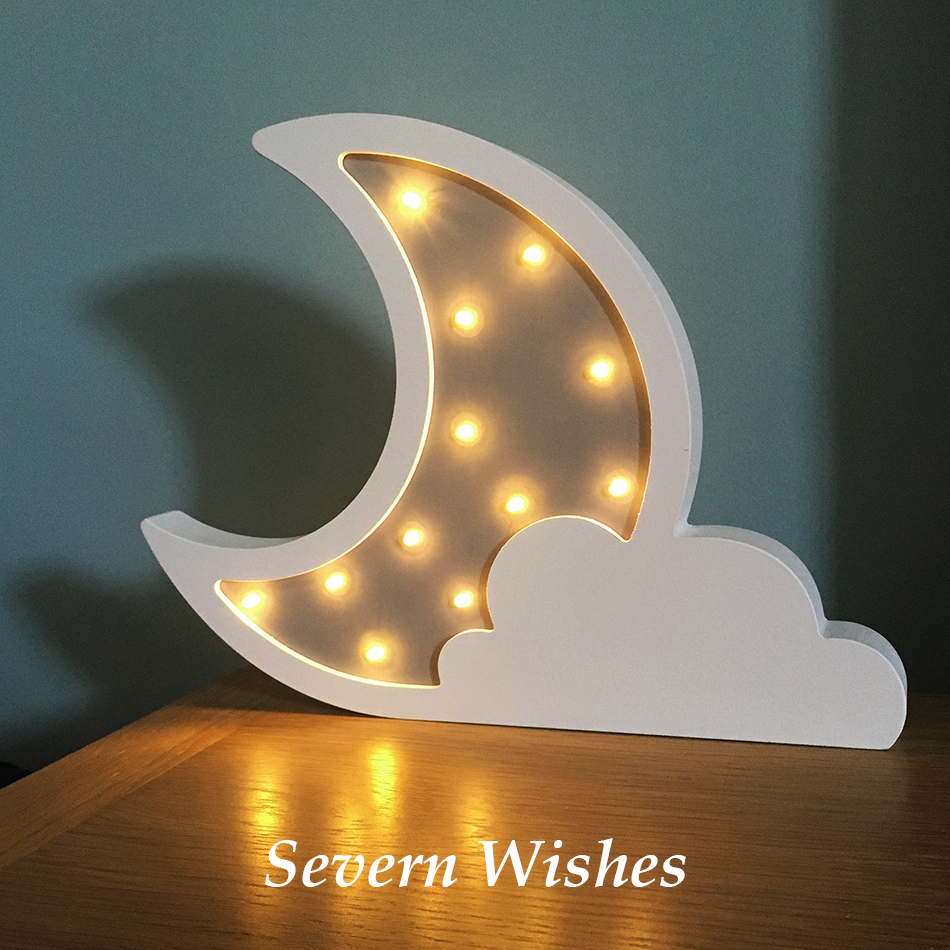
Today I am reviewing a product that I purchased for my sons bedroom. I really liked a number of lights available on the Lights 4 Fun website, but I wanted something fairly small and battery operated, which narrowed down my search parameters.
I initially wanted a night light so that I didn’t disturb him by clicking a switch. This battery powered night light features an on and off switch on the back, plus a very handy timer. The timer allows the light to stay on for 6 hours, and this was what swayed me into purchasing it, purely its convenience.
I really like the design and the painted finish look, it was neat and tidy and well made for the price. I chose to leave it on a table near his cot, the light pointed towards the wall to illuminate the corner of the bedroom. It was very bright for the first couple of uses, the first 36 hours it was almost so bright that I turned it away from him. But after that time and for the following three weeks we have had it, the light emanating from the Moon has been exactly the right strength and brightness. The battery is beginning to go now as the light is dim but still bright enough that I can see my son in the night.
I would highly recommend the company Lights 4 Fun, for both the quantity and range of their stock, there are some great choices to suit every kind of person. They are good quality and well made. What I bought was delivered well packaged and in a good time with regular delivery updates too. I would use them again in the future.
Product Name: Cloud & Moon Children’s Night Light Product Information: Battery Powered, Timer of 6 hours, 12 Warm White LED Lights, made from Wood, the Design is Grey and White painted in colour. This can be Wall Mounted or Stood on a Flat Surface. Ideal for Children’s Bedroom as a Night Light due to its timed feature, it is for indoor use and has an illumination time of approximately 100 hours. Product Dimensions: (H) 23 cm x (W) 30 cm x (D) 2.5 cm Batteries Required: AAA x 2 (not included) Product Price: £12.99 Link to the Product:Lights 4 Fun Website
My Review Scores
Quality of Product 5/5 Product Design 5/5 Product Features 5/5 Ease of Use 5/5
Thank you for reading this review today, if you’d like to know anymore about the item or see more images of it in use then please check out my social media such as Instagram. Alternatively click the product link I provided above to go to the Lights 4 Fun website.
If you’ve been following my blog for a while then you’ll know that food is a huge passion of mine. Coming up with new recipes and experimenting is a hobby of mine. But today, with all this talk about panic buying amidst this deadly virus, I couldn’t help but think, what can I do now to help others…
My epiphany was this! My Ideas On How To Make Your Food Go Further!
There are certain things that most of us keep in our kitchen during week to week shops or our larger monthly stock ups, so I wanted to focus on those to begin with. The issue right now is that due to bulk panic buying some of our staples are very hard to get a hold of. Take a look at the meals below to see if any of them would appeal to you or your family. Then see how you can make them go further with my recipe adjustments.
All of these recipes are my own, so if you wish to recreate one please credit me and notify me on where you have used it, thank you.
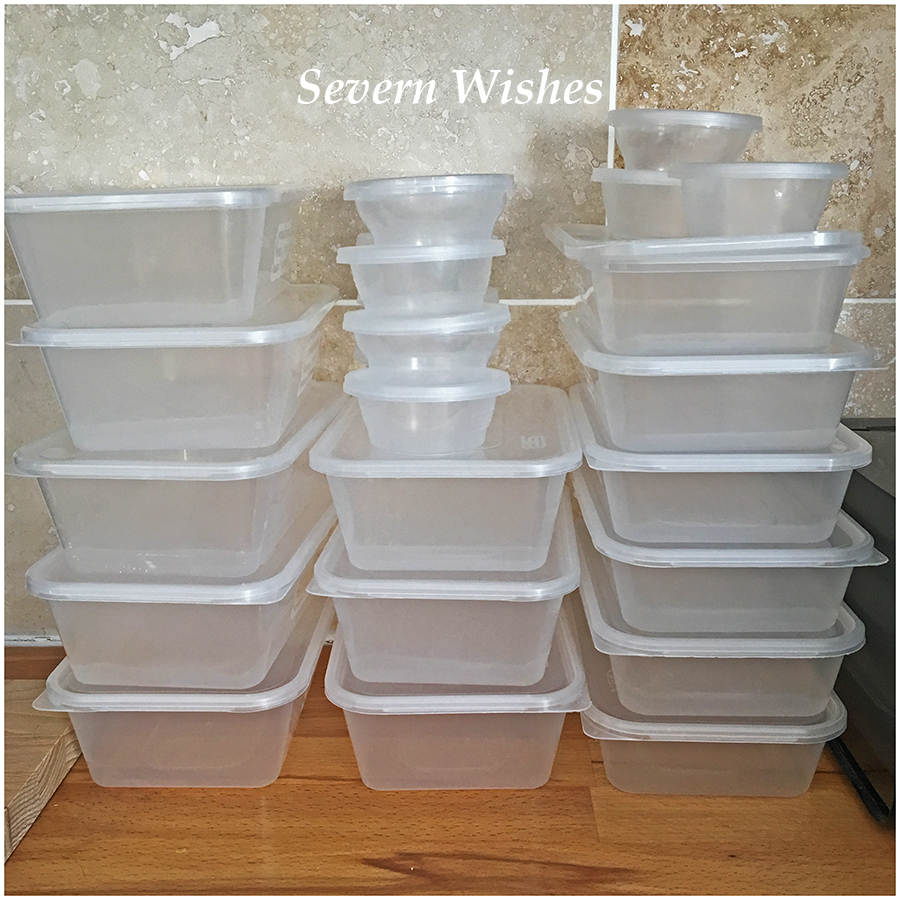
Keep those handy takeaway boxes ready to freeze any leftover freshly cooked meals, extra vegetables or leftover homemade sauces.
Author: Severn Sabrina Prep Time: 45 Minutes Cook Time: 40 Minutes Serves: 4 to 6 people Allergens: Wheat Flour, Barley and Soya in the Gravy Granules
COTTAGE PIE Serves 4 to 6 people (sometimes with leftovers if its children’s portions) Ingredients 1 or 2 Large White Onion – Diced 3 or 4 Large Carrots – Diced 500g Mince Beef – Cooked & put through a processor to make smaller pieces 1kg Potatoes – Cooked and Mashed Gravy Granules – I use the Bisto Onion Gravy Granules Additional foods to add to make it go further… Baked Beans x 1 Tin Mixed Dice Vegetables x 1 Cup ~~~ Most people will have a bag of frozen veg or veg that needs to be used up. Dicing it up small and adding it to your cottage pie gravy is a great way to get extra veg into children as well as help an adult get their 5 or more a day! Same with the tin of beans! Pour off a little sauce if there is lots in the tin, but the tomato sauce actually helps you to get a lovely gravy. The beans bulk out the cottage pie filling while adding your veg in take. You can even add all of this into a large casserole dish, and cook it in the oven for an hour, even the veg if cut small enough will cook in the gravy, locking in all the vitamins…
My Cottage Pie is a family favourite! If you cannot get fresh meat then using a tin of Minced Beef and Onion would work just as well!
Author: Severn Sabrina Prep Time: 30 Minutes Cook Time: 30 Minutes Serves: 4 to 6 people Allergens: Dairy will be present in Naan Bread if you choose it as a side
CHICKEN CURRY (You can use one of my Recipes already on my blog for the method) Serves 4 to 6 people (sometimes with leftovers if its children’s portions) Ingredients 2 Large White Onion – Diced and Chopped into two sizes 50g Tomato Puree (this is for your homemade sauce) 2 Tin of Chopped Tomatoes (for your sauce) 500g of Chicken cut into bite size pieces 100g of Yoghurt, I use Dairy Free Coconut Yoghurt Serve with Rice and / or Naan Bread Sauce – I prefer to make my own to my taste but you can use a jar of sauce, but if you do use a jar you only need 1 Tin of the Chopped Tomatoes. You then add curry spices like Cumin, Paprika, Garam Masala and Chilli. As well as Garlic and Coriander usually! (See my Recipes for more on making sauce and a method for the curry too). Additional foods to add to make it go further… New Potatoes x 1 Tin (They’ll cook in the sauce on a low heat for 20 mins) 1 or 2 Peppers Sliced thinly (fry these a little with your onion then add) Cauliflower Diced up x 1 Cup (Chopped small it will cook in the sauce)
Here is one of my recent Curry dishes, this one was with extra Peppers and Potatoes
Author: Severn Sabrina Prep Time: 25 Minutes Cook Time: 40 Minutes Serves: 4 to 6 people Allergens: Check Jar if you purchase a sauce, otherwise none.
CHILLI CON CARNE Serves 4 to 6 people (sometimes with leftovers if its children’s portions) Ingredients 2 Large White Onion – Diced 4 Large Carrots – Diced 1 Tin of Plum Tomatoes (they are sweeter but you need to chop them) 1 Tin of Chopped Tomatoes (you could use 2 of these and no plum if easier) 500g Mince Beef or Pork or both – Cooked & then put through a processor to make the pieces of meat smaller – or use Quorn or Soya Mince 1 Tin of Red Kidney Beans Serve with Rice Sauce – I use a packet or a jar for convenience but you can make a sauce, you have done the basics with the tomatoes already. So add the tomatoes to a bowl, then add Cumin, Garlic and Chilli to your own taste. Additional foods to add to make it go further… Baked Beans x 1 Tin (some people don’t like Red Beans so you could use Baked Beans (Haricot Beans) instead. Peppers – as many or as little as you like, if one needs using up do it! Mixed Dice Vegetables x 1 Cup (You can add other basic veg if you don’t have enough or you want to do a vegetarian style chilli).
✩ ✩ ✩
Author: Severn Sabrina Prep Time: 25 Minutes Cook Time: 30 Minutes Serves: 4 to 6 people Allergens: Check the Jar of Sauce if you buy one.
SWEET AND SOUR CHICKEN Serves 4 to 6 people Ingredients 500g Chicken Breast (Diced) or a Vegetarian Alternative Tin of Pineapple – Cut into Small Chunks – 1 Ring per person Peppers – 1 Yellow and 1 Red Cut into Small Long Pieces 1 Large Onion – Diced into Small Long Pieces 2 Carrots – I Peel and Slice them with the Peeler into long thin shards! Serve with Rice Sauce – I always buy a cheap jar of sauce, the cheaper the better! Alternatives This dish is so easy to make and these flavours are quite specific, if you aren’t keen on that much pineapple then do one ring total or leave it out but then you should add more of the other ingredients.
✩✩✩
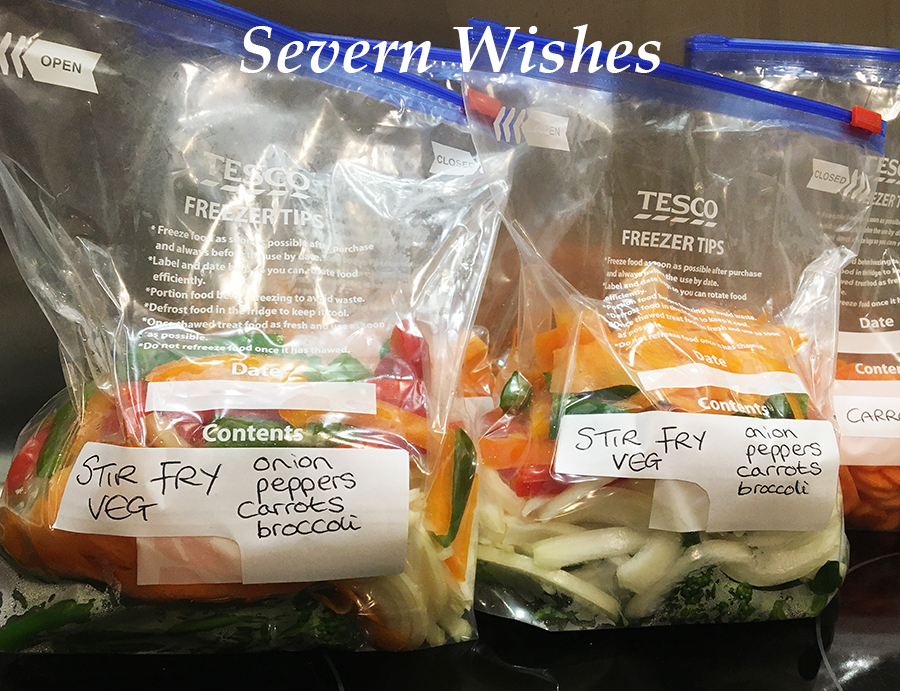
Fresh meat, fresh fruit and fresh vegetables are hard to get hold of in my area right now. When I did a home delivery order most of what I asked for was either out of stock or I was given a substituted alternative closest to what I wanted. This was very inconvenient and I have ended up spending 4 hours in total, chopping, peeling and bulk freezing some of the fresh veg before it went bad. I created mixed veg bags including a stir fry mix!
TOP TIP: Only make a freezer portion size for what you or your family members would eat at a meal time! Then there is no waste when you defrost it to use!
Washed, Chopped and Sliced, Ready to Freeze. MY TOP TIP always squeeze the air out of the freezer bags before popping them into the freezer to save space!
You can make 6 portions of Vegetable Stir Fry using the following raw vegetables, washed, chopped and ready to cook or freeze: 3 Coloured Peppers – 1/2 a sliced pepper per portion 1 Broccoli Head – cut into thin stems 1kg Carrots – I use a peeler to slice mine into strips 1 White Onion for every 2 Portions – Diced into small chunks ~ Add any of the following to make it go further and become 8 portions~ Water Chestnuts – I use Tinned x 1 Bamboo Shoots – I use Tinned x 1
Adding Noodles OR Rice on the Day you make the Stir Fry for extra bulking out of your food. Either use 1 Packet of Stir Fry Noodles once your veg is cooked, or a packet of Microwave Noodles or a Microwave Rice (all down to your preference) and one of these makes this meal double in amount.
Using a bought Sauce or Making a Sauce?
Adding a bought sauce to this stir fry is great, but if you’re feeding more than 4 people then 1 jar is only just enough. TOP TIP: Make sure you add 2 cm of warm or hot water to the bottom of the jar, replace the lid and give it a good shake, add this to your stir fry, no sauce left in the jar and wasted!
Don’t be scared of not using all the sauce, you can you half, replace the lid and use the rest within 2 or 3 days usually (always check the label).
Alternatives for Sauce… Make your own! You will need… Garlic fresh or paste, Ginger fresh or paste, Sweet Chilli Sauce or Chilli Sauce (if you like it hot!) Salt, Pepper and Chinese Five Spice! I prefer the pastes as it makes things so easy!
In a small bowl mix up a tablespoon of everything above! Less of the hot chilli though unless you like it spicy! Add more or less and experiment with the taste until it’s to your preference. Add this to your stir fry when you add the noodles. One of each paste does me around 7 or 8 stir fry’s or Chinese orientated meals. Chinese Five Spice goes a long way too!
A Pasta Bake is also a great way to use up Vegetables about to go stale and any leftover sandwich meats or leftover sausages for example. This is a firm fave of mine, bacon chunks, peppers and tomato!
I really hope I have given you some inspiration on some family favourites and ideas on how you can make them go a lot further during this difficult time. You can of course substitute the meats for vegetarian alternatives or swap out the vegetables you don’t like for others too.
Experiment with what you’ve got to use up and so long as you’re making healthy meals with vegetables in you’re already winning for the day! If you liked any of my meals after making them please leave me a comment, I would love to know how you got on.
Is there anything you would like to cook but need some help with? I’m an experienced cook and perhaps have experience of the dish, please comment and ask me 🙂 I’m happy to help!
Stay In and Stay Safe Friends. I might go do some baking now I’m done with my savoury cooking! If you’re after sweet treats check out those recipes that are on my blog already too!
In coordination with Endometriosis Awareness month this March 2020 I am going to be telling my diagnosis story. I know I have talked about my Endo in many of my posts, but this is the real true and honest story of mine. I will also be sharing statistics, symptoms and other information, as well as giving links to the websites you might find useful to find more out about Endometriosis if you wish to.
Not only is this going to be emotional post, it is raw, and it could also be disturbing for others. I am choosing to share some pictures post surgery too. I will therefore by putting a Trigger Warning on this post, because I am showing pictures but also talking about things that may upset others.
Please don’t let this put you off reading it, I think people need to see what effect this horrible condition can have upon the body. The female body already endures so much, so to have to deal with this condition too, it is exhausting. I should know.
There was light at the end of the tunnel for me, so this post does end on a positive, but I do believe more people need to realise the repercussions of having this debilitating and incurable condition.
Please continue reading now as I tell my story of pain, loss and eventual diagnosis.
Endo and Me
I have a love hate relationship with my body. Sometimes I love that I have a fast metabolism, it keeps me slim and I’m generally quite fit and strong despite my thin frame and small bones… however the Endo side of me causes unimaginable pain at times. It’s a chronic and incurable illness that doesn’t just affect your period like so many ignorant and uneducated people might believe. It is so much more than that because a number of things that happen to you can have a real negative affect on your life as well as your body. Let’s start at the beginning for me. I first had issues with my body when I was around fifteen years of age. I began getting unusual pain that I had to take medication for. All you could get at that age was paracetamol and ibuprofen tablets which were 200mg a piece and trust me; they barely touched the sides of my pain. As I got older I began having more symptoms, I didn’t know back then they were to do with Endometriosis. Except that whenever I sat in front of a doctor they tried to tell me it was anything and everything but that, it was never even mentioned. When I was seventeen I lost weight suddenly and quickly, I was tested for Thyroid issues and even Cancer! All tests came back negative and I tried to just deal with my awful periods and pains. Doctors were reluctant to explore further, so I let it go. At 19 I was fed up with the ridiculously heavy flow I had every month and the fact that I had no regular cycle, it was so exhausting and an anxious time. So after some persuasion on my part, I went on to a contraceptive pill. Regulating my cycle was a bonus of the tablets, and for the first time in my life I could be social with confidence. By knowing when things would be occurring allowed me to be at home with my hot water bottle and tablets when I needed to be.
When I was 25 I came off all medication in the hope of starting a family. Little did I know that all the pill had done for years was masking other symptoms of my Endo. When I had been off it for just six months I had such pain that it began affecting my everyday life. I cancelled social time with friends and family, I ended up avoiding things that I usually enjoyed because I was worried about being unwell in front of people. This caused me to suffer with anxiety, and that never went away, it just got worse as years went by… and so did my pain.
When I failed to conceive for years I went to my doctor and had various tests, blood tests for Thyroid, Hormones and Vitamin Deficiency amongst them. Then when everything came back with no issues and my pains were so bad that they affected me daily, I began seeking more answers. Endometriosis or Polycystic Ovary Syndrome was just two conditions that female members of my blood line suffer with. I must have told this to over a dozen doctors over the years. There are correlations between female genes that are often ignored. It wasn’t until I finally conceived after three years of trying, and then I tragically miscarried, that I ended up in Accident and Emergency every four weeks when I got my period, and I began getting sussed on this…
When I lost my baby I blamed myself and it made me depressed. I was so unwell physically I just didn’t know to what extent just yet.
So to help my state of mind I kept a diary, what I ate, what I did daily, what my pains were and where, I kept track of my cycle down to the hour and tried to make sense of it all. I looked for answers online and anything that told me what it could possibly be. Going in and out of hospital with no answers was exhausting, and it was wasting so much time too.
One afternoon I had written out all of my symptoms and matched them to the condition Endometriosis. All I wanted was someone to take me seriously and try and attempt to diagnose me. Instead I was in hospital nine times over the course of eighteen months. I had one MRI, seven ultrasounds, I went on a drip three times due to dehydration, I was given antibiotics twice, I had examinations with five internal swabs checking for infections… Nothing came back with anything concrete. On an ultrasound they told me that I had had a cyst that had burst. That time I ended up almost passing out in the bathroom at home from the pains, I was vomiting and couldn’t keep anything down. A&E was the only option when I had so much blood loss and was so sick from pain that I became dehydrated and needed a drip.
When I was admitted during the period that came after I lost my first child it was clear that I was incredibly ill and needed help. I had doctors who wanted to take me to surgery to check my appendix and my bowel, but I kept telling them it was Gynaecological. After I had a complete meltdown and shouting because I was kept nil by mouth for three whole days while two doctors argued over what to do with me, a lovely doctor who was a cancer specialist offered to do a basic laparoscopy on me that evening, to simply look inside me and take some pictures, so I could be passed on to whichever department I needed to be. This was the turning point for me; it was the start of my actual diagnosis. Over thirteen years since my first unexplained pains had begun…
It was severe. I was diagnosed with Stage 4 Endometriosis, with a mass the size of a Tennis Ball attaching my Left Ovary, Bladder, Bowel and Womb to each other. My organs were all pulled off to the left side of my body, which was contributing to other symptoms that I was having, including bloating, bowel pain and problems, pain when I had a full bladder and pain during intercourse. The pictures that were taken inside my body showed extensive Endometriosis, like a mesh of tissue, thick cobwebs and various sized pockets of blood. At this time I had been ill for a long time, and I had lost weight, I was a size 6 and I didn’t feel like me anymore. The pain was all I knew some days. Having a diagnosis was like a light bulb had been turned on in my darkened room…
I was lucky because there was an Endo Gynaecologist Specialist at my local hospital. After speaking with him he agreed to operate, to try and save my left ovary. I wanted to be a mother so badly and he understood this. We also agreed to check for reasons why I couldn’t carry a baby thus far, four years of trying and a miscarriage was an indication things weren’t right. And he wanted to find out if it was all down to this Endo and the position of my organs. He would also do the dye test on my Fallopian tubes while I was under to see if they were clear of Endo too.
So I was popped onto his waiting list for surgery twelve weeks later. Every day was hard during that time, it was a blur of medication and hot water bottles and I had to give up work and go off sick after trying and failing to do my shifts and ending up just collapsing. After dealing with the chronic pains during that time, having hardly any sleep because I couldn’t get comfortable and my constant anxiety and nausea… I finally went in for my surgery…
The day afterwards I felt like a new woman, this man and his team had literally given me my life back. It was bad, but they had fixed me for now… I had had the Endo mass and tissue removed, then my organs gently coaxed back into place, my tubes flushed, my bowel that was damaged had a resection, and my left ovary was carefully saved. I could feel that constant pressure was gone; there was no more dull pain in that area. In fact recovering from the surgical incisions wasn’t anywhere near as bad as the pain I had lived with every day for years. I stopped taking pain medications three days after I got home from my surgery, because I felt like I could deal with the pains I was getting, which were less than ten per cent than what I was used to. How mad is that?
The worst thing about the surgery for me was the gas, it fills every part of your body as it absorbs and fills the spaces between your organs, it can be very painful until it’s gone. I had to drink so much peppermint tea to help with the bloating! Below is my abdomen after surgery, you can see I’m swollen and bruised and you can see the three incision sites.
Days After Surgery…
The worse thing about having Endo is that it has stolen friendships away from me, and it put strains on other relationships too. People don’t understand how you can look so “well” on the outside but feel incredibly ill on the inside. Pain is something your body gets used to but it is the fatigue that most people struggle to deal with. Sometimes I would visit family and I would be talking one minute and falling asleep the next. Even after my surgery, although I didn’t have the same pain levels as before, I was still keeping up with the feelings of being tired, and my periods were exactly the same.
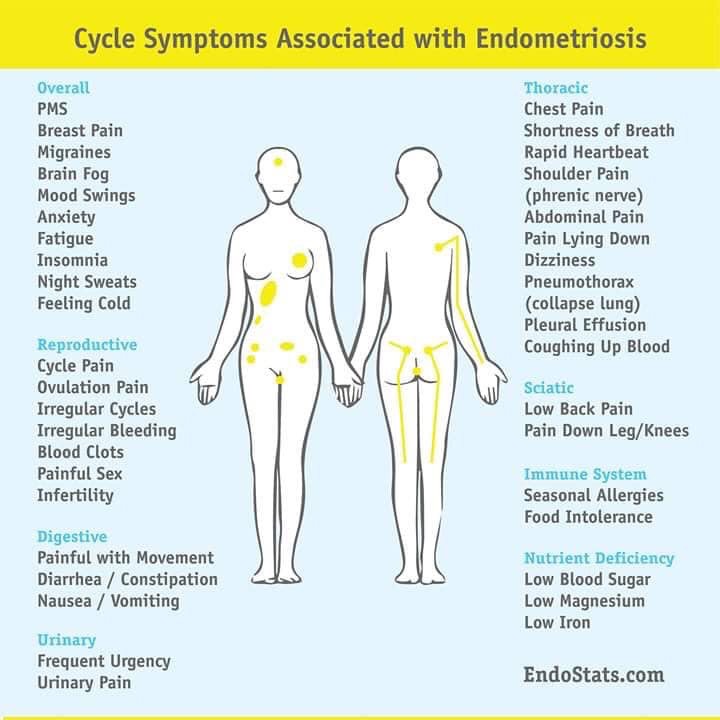
Did you know that Endometriosis also causes a whole range of other issues? I had over half of these when I eventually got diagnosed. Most women get told they have painful periods and IBS. Most of us only have these things because we have Endo. Here is a great diagram that was shared on the social media Endo pages earlier this month outlining most of what women like me have to deal with, sometimes these are daily symptoms, some are infrequent but they still occur, often brought on by hormone changes and cycles.
I experience a great deal of these symptoms. Some are daily and some are infrequent.
Endo Warrior is a term I use often to describe myself, because some days it feels like a battle just to get through the day. I am extremely lucky because I got the time to recover from my surgery, both body and soul searching too. Then when I was ready I had to do IVF in order to have my son. He is my entire world and I would be lost without him. I look back at all that I’ve been through and I am proud that I never gave up, despite everything.
If you want something in life and you have to work harder to get it then it makes it all the more worthwhile. I overcame a needle phobia and dealt with my Endo pain during my IVF treatment. But I would do all of it again if I had to. Being a mother is one of the most incredible and rewarding things I have ever done.
I realise some women have too bad a diagnosis and never get the chance to be mothers because of this condition, and that makes me sad. I class myself as one of the lucky ones.
To anyone out there who is suffering, make your voice heard. I once said to a friend that “Living a life in pain is like letting pain decide your life for you” and I got to a point where I just couldn’t live like that anymore. If your pain is ruling your life, then perhaps it is time to do something about it. Find a Doctor willing to listen and willing to take you seriously. Keep a diary, show that to a specialist if you’re lucky enough to get referred quickly.
Endometriosis has cost me so much in my life already, and because there is no cure I deal with those uncertainties for my future every single day. I still class myself as one of the lucky ones, I still have all my organs at the moment, and I was able to carry and have my son. I love being a mum. I try not to let my pain get in the way of that. As my son gets older I will be able to explain why mummy cannot bend and play today, and I will come up with other things for us to do together on those, my bad days. But I know it won’t stop me from being the mother he deserves. Of that I will make sure.
Thank you for visiting Severn Wishes today. If you would like to leave a comment please do so, I hope that my words help even just one person to stand up for themselves, to explain to a doctor that you want answers, that you deserve to live a life without pain.Stay strong.
Welcome to Sweet Treats Week on Severn Wishes. This half term I wanted to share my top 5 baking treats with you all, hopefully you’ve got some time this week to make them with me! I cannot believe this is Day 5 already! I hope you’ve had as much fun baking these as I have!
Check out my Instagram and Facebook page for more food pictures, videos and future recipe ideas too!
Day 5 is Sabrina’s Customisable Cookies!
And the great thing with these is that you can literally add anything into them… I like mine to have chocolate chips. But you could put tiny marshmallows in them or different kinds of chocolate confectionery. Just follow my basic recipe and then add in whatever you feel like! This is a great one to get the children involved in too and perhaps they could each make two or three cookies just for them!
My recipe will make between 12 and 16 cookies with a prep time of 20 minutes and a fridge time of 3 hours. When you bake they take as little as 15 minutes and only a five minute cool time, so before you know it you could have cookies to enjoy as a mid afternoon snack today!
What You Will Need
A Flat Oven Tray or two Baking Paper or Parchment A Large Mixing Bowl for the main mixture Small Mixing Bowls if your children are doing their own A Wooden Spoon A Tablespoon or Ice Cream Scoop A Sieve A Cooling Rack Something To Store The Cookies In After They Are Cooled
You can use other colourful confectionery like Smarties, M&Ms, Chocolate Chips of different sorts or even chop up your favourite chocolate bars and use those. (Get an adult to do this chopping up). You can use as much or as little as you want.
Step 1. Mixing Sugar and Butter and Salt
Method Steps
1. In a Large Bowl start by mixing the melted butter with the sugar and salt. You should have a thick brown liquid when it’s mixed enough.
2. Next you need to add the egg and once again mix thoroughly.
3. Make sure you sieve the flour and baking powder into the mixture and stir gently to combine as you do so. Once it’s all mixed in you can add your chocolate chips. If you’re doing different cookies you can now transfer some of the mix into smaller bowls and add the various confectionery. If your mixture is looking dry add one tablespoon of water at a time until it becomes more like cookie dough.
4. Place cling film over each bowl you have and let them cool in the refrigerator for up to 3 hours. TOP TIP While you wait you could play a game!
5. Then coming up to the end of the 3rd hour you can preheat your oven to 180’c and place some baking parchment onto a flat tray ready for your cookies.
6. In order to make your cookies the same size either use a tablespoon or an ice cream scoop to get a measurement out of the bowl. You want to make heaped almost ball shape but press them lightly to the baking paper. TOP TIP Leave at least 4 cm between each cookie! You may need 2 trays!
7. Bake the cookies but stay close by and keep an eye on them! I always have to rotate my tray half way! They will take between 12 and 15 minutes in a fan assisted oven, and you need to let them cool on a rack before you tuck in!
Step 6. Ready to Bake
TOP COOKIE TIPS
Don’t over handle your cookie dough! Mix in your chosen confectionery into the dough but don’t over mix it. When laying the cookies on the tray leave them heaped, they will flatten on their own. Bake your cookies straight from the fridge for best results. Keep an eye on them so they don’t over bake, it’s a fine line!
Cookies Freshly Baked and Cooling Down on the Rack
Thank you for joining me for Sweet Treats Week! I do hope you have enjoyed it and if you do make any of my bakes then please let me know how they turn out!
If you make any of my recipes be sure to tag me on social media, leave me a comment here on my blog. Any questions about a recipe please don’t hesitate to ask them! If you recreate this recipe somewhere else please credit me for it and name me and my blog, or even better link back to this original post too! Thanks everyone!
Welcome to Sweet Treats Week on Severn Wishes. This half term I wanted to share my top 5 baking treats with you all, hopefully you’ve got some time this week to make them with me! Check out my Instagram for more food pictures, videos and recipe ideas too!
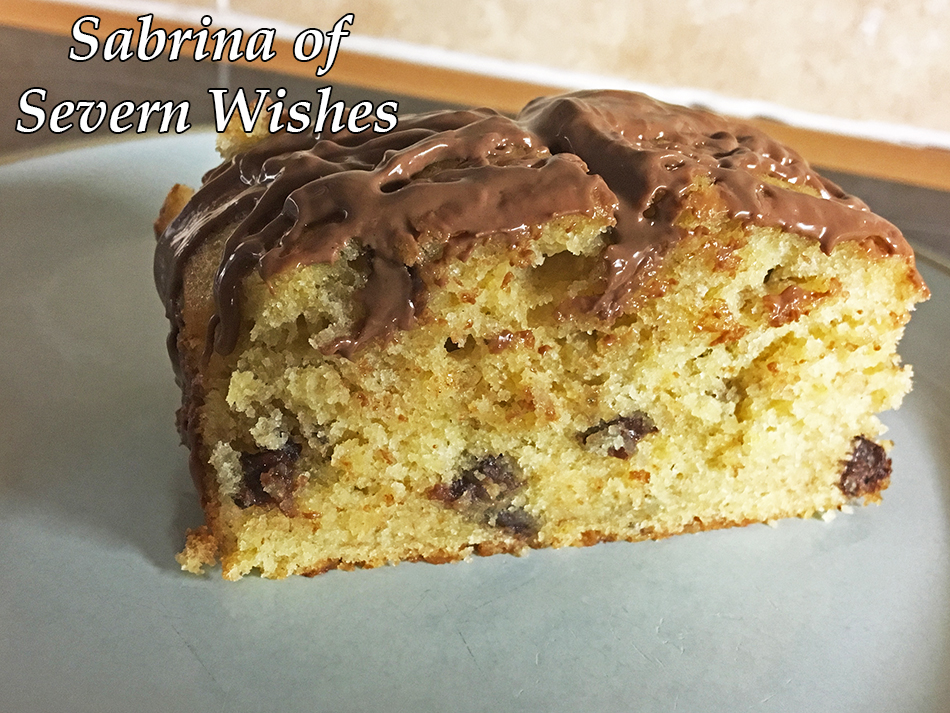
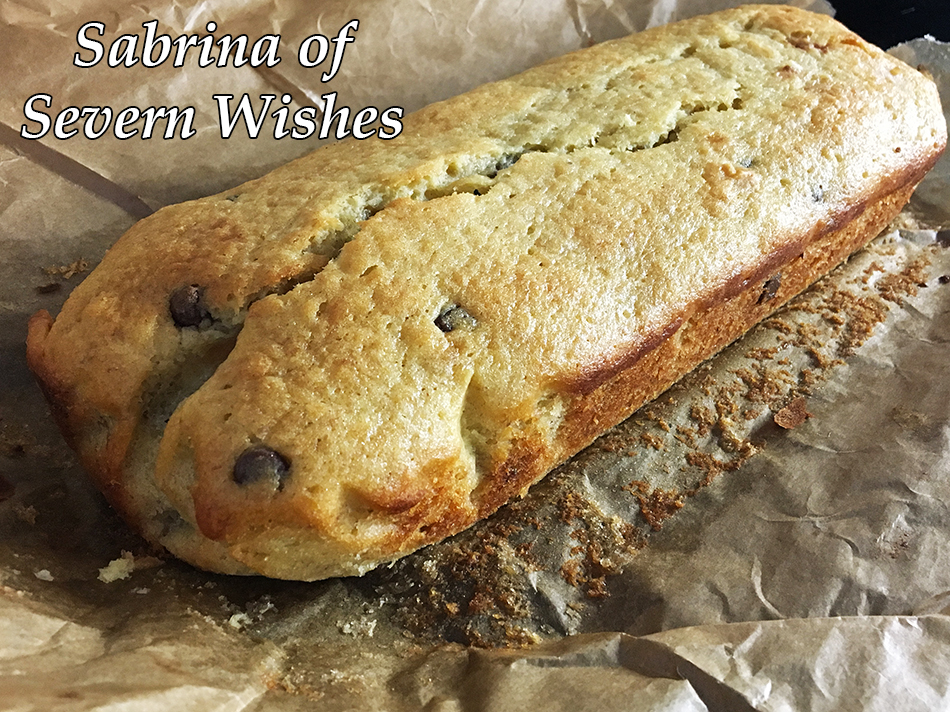
Chocolate and Banana Loaf Cake
Day 4 is Sabrina’s Loaf Tin Cake
I know some people aren’t fond of eating loads of chocolate things so I figured I’d have to put my next favourite baking combination out there, which is Loaf Tin Cake! This can be my favourite cake which is a Lemon Drizzle cake! Or we can do a Banana and Chocolate Chip flavour!
I make this delightful and refreshing cake in a loaf tin because it’s easier to cook it, easier to cut it and easier to store it too! You have lots of options to customise your own cake too! I will be giving you two versions, Lemon or Banana and Chocolate, you can choose which to try or even do both!
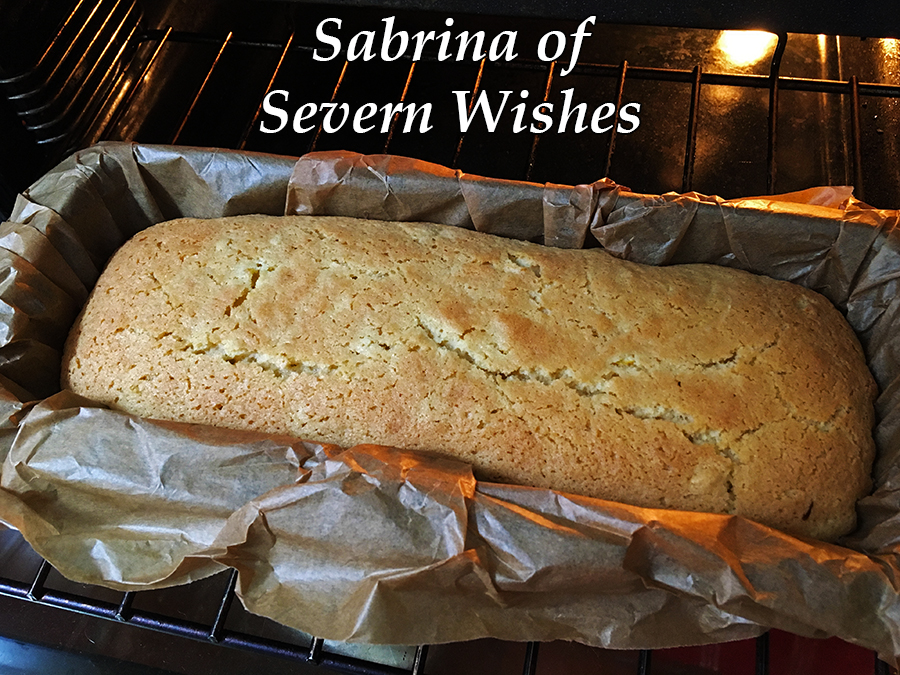
When baking you’re looking for a gorgeous golden colour on top!
A loaf tin cake is much easier to judge than a round cake, I think!
It’s also easier to store, cut it into slices and it’s ready whenever you want a piece! One tin gives you around 8 slices! This cake keeps best for up to 3 days, but because there aren’t many slices it’s usually enjoyed during a day or two when it is at it’s best. TOP TIP Store this cake in a cake tin with a piece of kitchen roll underneath the baking parchment to help absorb any moisture.
Fresh Out Of The Oven
What You Will Need
A Loaf Tin Baking Paper or Parchment A Large Mixing Bowl A Small Mixing Bowl A Wooden Spoon A Tablespoon A Sieve A Knife A Whisk (Manual or Mechanical) Something To Store The Slices In After They Are Cooled
Lemon Drizzle Cake
Banana and Chocolate Chip Cake
Author: Severn Sabrina Prep Time: 20 Minutes Cook Time: 25 Minutes Serves: 6 people per loaf made Allergens: Wheat Flour, Dairy, Egg and Soya (unless you use my alternatives listed below)
Ingredients To Make Any of Sabrina’s Loaf Cake Recipes
1 Free Range Egg (Fresh is best for baking) 125g Butter (or Dairy Free Spread) Melt in the Microwave 100g White Caster Sugar 50g Golden Caster Sugar 190g Self Raising Flour 1 Tablespoon of Vanilla Essence 1 Tablespoons of Milk or a Milk Alternative
Additionals to Flavour the Cake
Lemon Drizzle Cake For the Cake: 30ml of Lemon Juice For the Drizzle: 30g Icing Sugar, Lemon Juice, Lemon Rind (Optional) In a small bowl Mix Lemon Juice one Spoonful at a time to Icing Sugar, how much you want to make depends on your personal preference. Pour this over your cake when it’s baked. Add the Lemon Juice at Step Number 2. Add the Drizzle only when the Cake has cooled but still on its parchment.
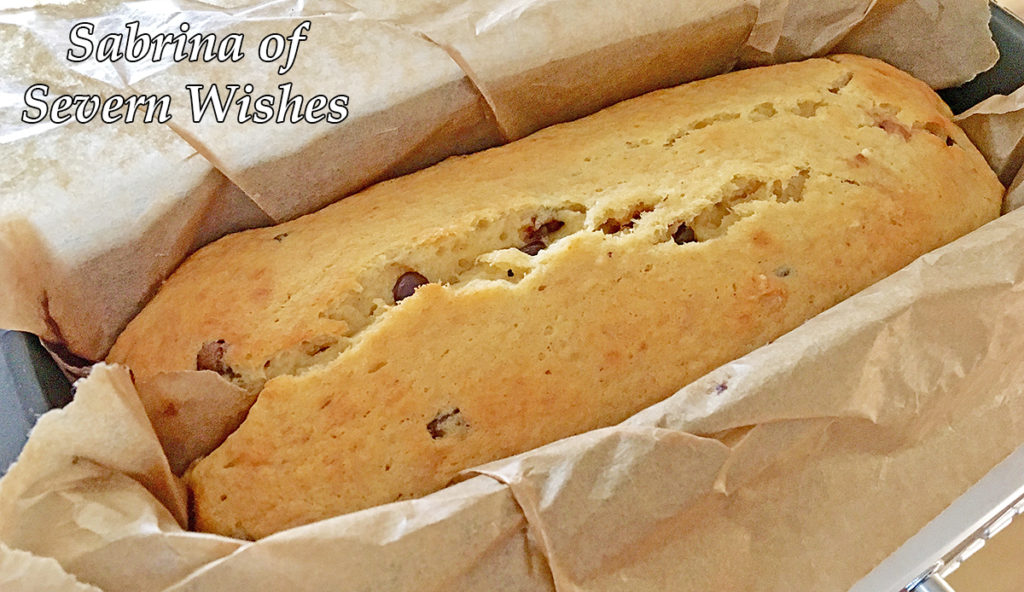
Banana and Chocolate Chip Cake For the Cake: 1 Banana – The Softer the Better! Mushed Up! 50g Chocolate Chips (I use Dark and Dairy Free) 25g Chocolate to Melt and Pour on Top of the Cooled Cake (Optional) Add the Mushed Up Banana and Chocolate Chips at Step Number 2.
Method Steps
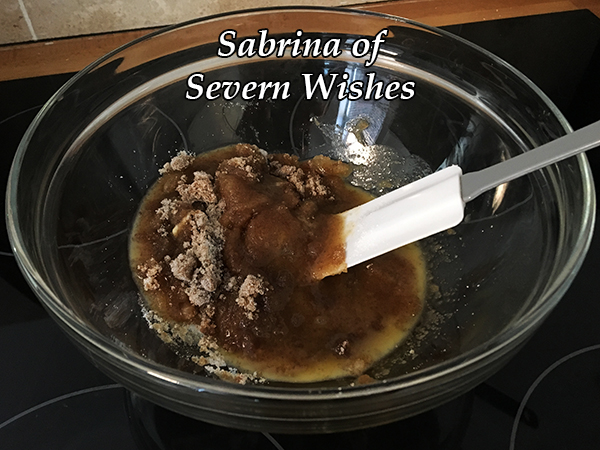
1. In a Large Bowl mix the egg and sugars together with a wooden spoon until smooth. Then add the milk and vanilla. Add the melted butter which has cooled and combine all these ingredients together using a whisk.
2. Now is the time to add your additional filling, use your small bowl to measure out anything you want, then transfer it to the large bowl and mix in.
3. Next you need to sieve the self raising flour into the bowl, do this a little at a time, stirring it together constantly mixing until the mixture is smooth.
4. Make sure you cut a piece of parchment to the correct size for your tin, it needs to stick out above the sides to allow the cake to rise and not spill over.
5. Bake this Cake at 160’c or 150’c (Fan) for 30 – 35 minutes. Check the cake at 25 minutes with a knife or skewer and then check it again at 30 minutes. The knife should come out clean and the top of the cake should be golden like my image below.
6. Once baked remove the cake from the tin by lifting it out using the parchment, and leave it to stand on a flat surface to cool down. Once cooled you can either add the additional options as outlined above or cut it and serve.
Chocolate Chip Loaf Cake
Thank you very much for joining me for Sweet Treats Week! I hope to see you again tomorrow for our final baking day!
If you make any of my recipes be sure to tag me on social media, leave me a comment here on my blog. Any questions don’t hesitate to ask them! If you recreate this recipe somewhere else please credit me for it and name me and my blog or even better link back to this original post! Thanks everyone!
Welcome to Sweet Treats Week on Severn Wishes. This half term I wanted to share my top 5 baking treats with you all, hopefully you’ve got some time this week to make them with me! Check out my Instagram for more food pictures and recipe ideas too!
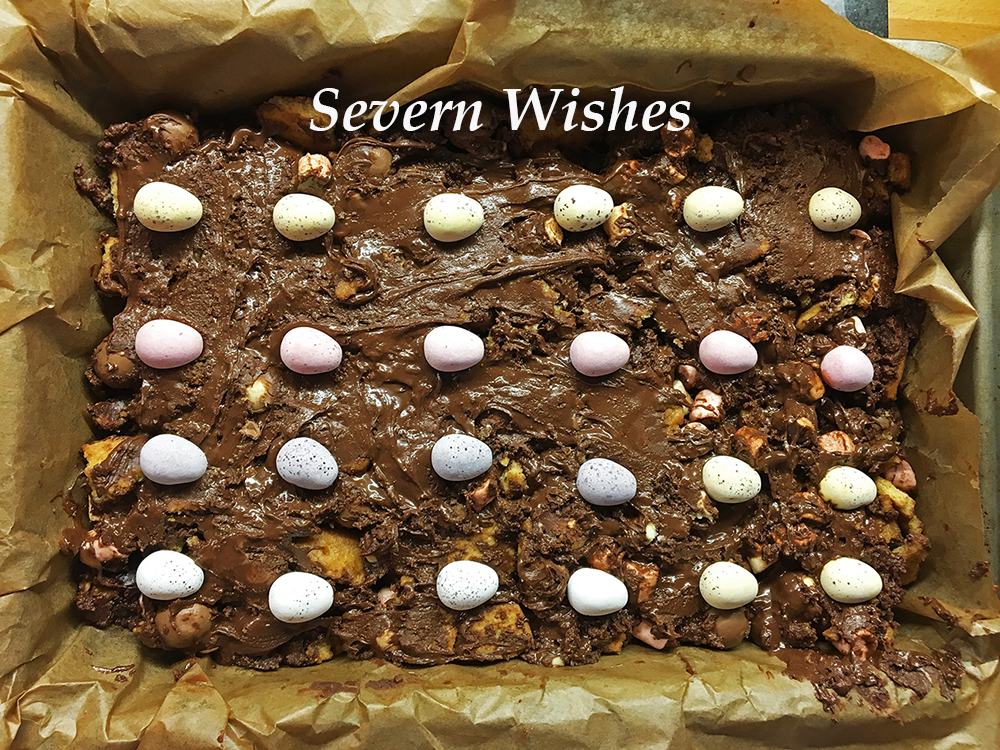
Day 3 is Sabrina’s No Bake Needed Rocky Road
Definitely one that the kids can get involved in, and this tray bake requires zero baking! You just need an adult to do some melting and chopping! This recipe will make 24 delicious squares of Rocky Road and you can do a custom set of ingredients to suit your family too!
Start by gathering all of your favourite things and a giant bowl to mix them! You’ll need chocolate for melting which will be the glue to hold all of the other ingredients together! You also need a deep tray to squash it all down into before you refrigerate it too!
The best thing about Rocky Road is that it’s totally customisable to your family and you can’t really get it wrong! Plus it’s fun for everyone! There’s only one danger with Rocky Road! Just don’t go eating all the singular ingredients while you’re making it!
I love to put things in mine you don’t usually find in a supermarket style tray bake, sometimes you find Nuts and I don’t put any of those in, some also contain fruit, which is a personal preference to whether or not you add this in. I will outline all the measurements below, and you can make your selection of your favourites.
Step 6.
What You Will Need
A Large Mixing Bowl – the bigger the better! A Wooden Spoon or Two A Saucepan (to do the melting part) A Spatula A Sharp Knife Tea Towel and Rolling Pin (Or something to smash the biscuits with) Baking Parchment to line your tray A Large Tray that will still fit in your Fridge minimum of 1.5 inches deep
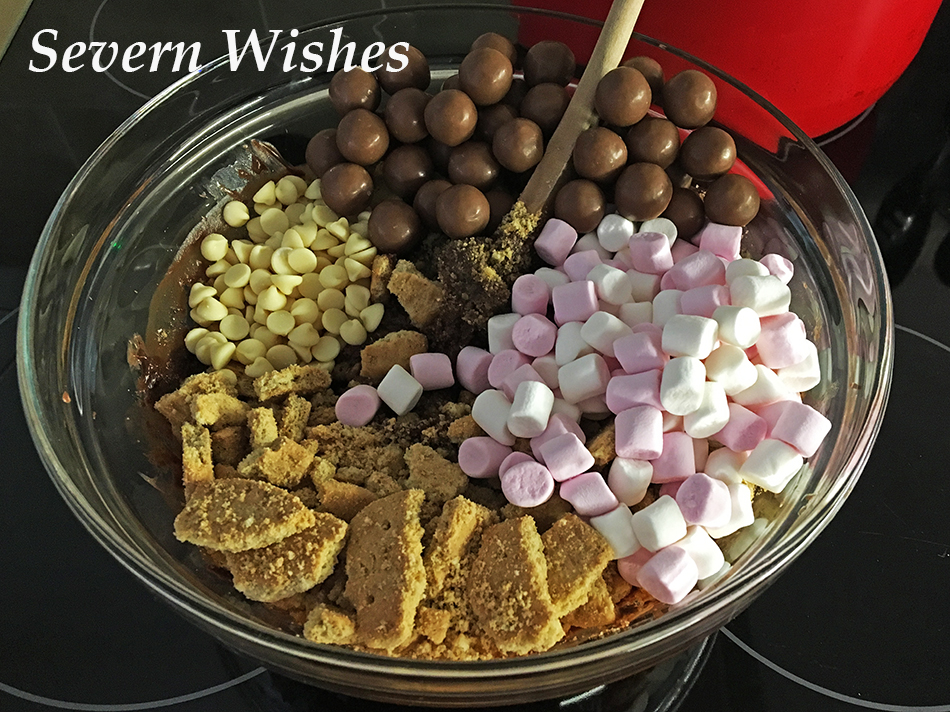
Ingredients
Mini Marshmallows 50g to 60g Maltesers or Honeycomb Shards 50g to 60g White Chocolate Chips 30g to 40g Biscuits 150-200 grams (You can use a mixture of biscuits like I do, Digestive, Shortbread and Ginger are my faves, Ginger give a nice taste!) ☆ Milk Chocolate (for the melting) 250 grams Dark Chocolate (for the melting) 120 grams Butter (for the melting) 140 grams Golden Syrup (for the melting) 4 tablespoons
Additional Ingredients to Personalise your version of Rocky Road
Your “Special Ingredient” can be anything, between January and April I tend to use Mini Eggs or other Easter related Mini Chocolate Eggs etc. I just cut some of them up for going inside the bake. Other things that go well and add colour are Smarties, Aero Bubbles anything that sort of size etc.
Use around 70g to 100g of your chosen ingredient and remember to save around 30g of it for the topping!
You can also add any of the following things that all go brilliantly with this type of non-bake recipe – Cherries / Cranberries / Nuts / Raisins etc…
You will need 50 grams of your chosen one/s and make sure you then increase the depth of your tray by half an inch / 2 cm if you decide to include more than one of these ingredients. You could also choose to remove say, the white chocolate from my main list, and add in Raisins instead, just keep the ratio the same…
The customization is all down to you and your family! Go crazy! Have fun!
Method
1. Measure out and then Crush the Biscuits into mixed bite size pieces and add them to a large bowl.
2. Next, gather all your additional ingredients as outlined above, measured correctly and add these to your large bowl. The aim is to then mix all these dry ingredients together so they are evenly distributed.
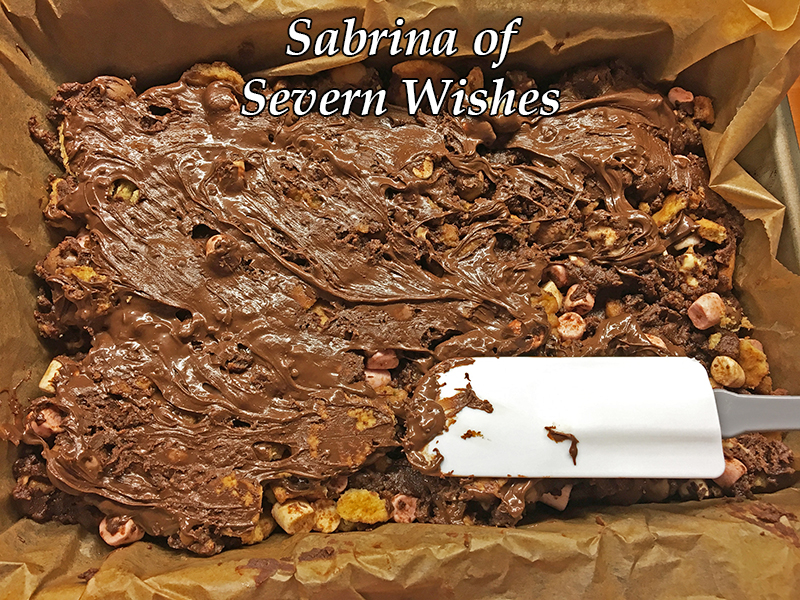
3. Melt the Milk and Dark Choc with the Syrup and Butter until Smooth. Set 150ml of this melted chocolate mixture to one side in a jug to cool a little (you need this for the top of the mixture).
4. Add your melted mixture from the saucepan to your large bowl, coating all of the dry ingredients, keep mixing it quickly but carefully. You need to cover all of them in a light chocolate covering before it cools down too much.
Step 5.
5. Transfer from the bowl to the tray making sure the parchment is already lined inside it and smooth the rocky road out as flat as possible, push it down gently using a wooden spoon. Then pour the remaining melted chocolate (from the jug) over the mixture and smooth that all over the top with a spoon or a spatula, you need to try and coat most of the mix if not all of it, TOP TIP don’t forget to coat up to the corners!
6. Finally add your chosen Chocolate Decorations like Mini Eggs. Push them down a little so that they stick to the melted chocolate. Score the pieces of size you want to cut once it’s solid, using a knife (adult part only). Then put the whole tray in the fridge to set for a couple of hours.
7. To serve it, gently remove the paper from the baking tray, lay flat and cut the Rocky Road where you scored into it earlier, do this using a knife that has been run under hot water (another adult only part). Remember to put the pieces into a seal-able tin or tub afterwards to make sure it stays fresh. Once set and cut you just store it at room temperature, for the best results eat it within 3 days.
Step 2.
Thanks very much for joining me for this recipe on Sweet Treats Week! I do hope to see you here again tomorrow! See my social media for some videos while I am baking these as well! Including versions and what I use to make my bakes dairy free too!
If you make any of my recipes be sure to tag me on social media, leave me a comment here on my blog. Any questions about a recipe please don’t hesitate to ask them! If you recreate this recipe somewhere else please credit me for it and name me and my blog, or even better link back to this original post too! Thanks everyone!
✩ Sabrina ✩
By continuing to use the site, you agree to the use of cookies. more information
The cookie settings on this website are set to "allow cookies" to give you the best browsing experience possible. If you continue to use this website without changing your cookie settings or you click "Accept" below then you are consenting to this.